AI-102 Study Guide

Plan and manage an Azure AI solution (15–20%)
Select the appropriate Azure AI service
Selecting the Appropriate Service for a Computer Vision Solution
When choosing the right service for a computer vision solution, it is essential to understand the capabilities and limitations of the available services. Azure AI offers a suite of computer vision services, each designed for specific types of tasks. Below is a detailed explanation of the services to help you select the most appropriate one for your needs.
Azure Computer Vision Service
Text Extraction: Use the Computer Vision service to extract printed and handwritten text from images and PDFs. This is ideal for scenarios where you need to convert images containing text into an editable and searchable data format https://learn.microsoft.com/en-us/credentials/certifications/resources/study-guides/ai-102 .
Form Recognizer: For more structured data extraction, such as forms or receipts, Azure Form Recognizer is the service of choice. It uses prebuilt models to understand and extract key-value pairs and tables from documents. Additionally, you can build and optimize custom models tailored to your specific data https://learn.microsoft.com/en-us/credentials/certifications/resources/study-guides/ai-102 .
Azure AI Vision - Face
- Face Detection and Analysis: If your solution requires identifying and analyzing human faces, Azure AI Vision - Face service provides features like face detection, verification, and recognition. It also offers insights into facial attributes such as emotion, age, and gender. However, it is crucial to consider the transparency note, characteristics, limitations, and responsible use guidelines provided by Microsoft 46_Overview.pdf .
Azure AI Vision - Spatial Analysis
- Spatial Understanding: For scenarios that require the analysis of the presence, movement, and demographics of people within a physical space, Azure AI Vision - Spatial Analysis is the appropriate service. It can help with understanding spatial relationships in the context of a camera’s field of view. As with all AI services, it is important to review the transparency note, use cases, and responsible use documentation 46_Overview.pdf .
Azure AI Vision - OCR
- Optical Character Recognition (OCR): When the task at hand is to convert different types of documents, such as scanned papers, into editable and searchable text, Azure AI Vision - OCR service is the go-to option. It supports multiple languages and fonts and can recognize the text structure, including paragraphs and tables. Be sure to review the transparency note and guidelines for integration and responsible use 46_Overview.pdf .
Azure AI Vision - Image Analysis
- Image Analysis: For analyzing visual content in images, Azure AI Vision - Image Analysis provides capabilities such as identifying objects, brands, and landmarks, detecting adult content, and extracting color schemes. It is important to understand the service’s characteristics, limitations, and how to integrate it responsibly into your applications 46_Overview.pdf .
When selecting a service, always consider the specific requirements of your computer vision task, the nature of the data you will be working with, and the ethical implications of deploying AI in your context. Additionally, ensure that you adhere to data privacy and security best practices.
For more detailed information on each service, including use cases, limitations, and guidelines for responsible use, please refer to the following URLs:
- Azure Form Recognizer documentation
- Azure AI Vision - Face documentation
- Azure AI Vision - Spatial Analysis documentation
- Azure AI Vision - OCR documentation
- Azure AI Vision - Image Analysis documentation
By carefully considering the information provided, you can make an informed decision on which Azure AI Vision service best fits your computer vision solution.
Plan and manage an Azure AI solution (15–20%)
Select the appropriate Azure AI service
Selecting the Appropriate Service for a Natural Language Processing Solution
When designing a natural language processing (NLP) solution, it is crucial to select the appropriate Azure AI service that aligns with the goals and requirements of the project. Azure offers a variety of services that cater to different aspects of NLP, including language understanding, speech processing, and question answering. Below is a guide to help you choose the right service for your NLP needs.
Language Understanding with Azure AI Language
Azure AI Language, previously known as Language Understanding (LUIS), is a cloud-based service that applies custom machine-learning intelligence to a user’s conversational, natural language text to predict overall meaning and pull out relevant, detailed information. It is ideal for building models for conversational language understanding, which can be integrated into bots and other AI applications https://learn.microsoft.com/en-us/training/modules/build-language-understanding-model/2-understand-resources-for-building .
For more focused modules on custom text classification and named entity recognition, you can explore the learning path for developing language solutions with Azure AI https://learn.microsoft.com/en-us/training/modules/build-language-understanding-model/2-understand-resources-for-building .
Speech Processing with Azure AI Speech
Azure AI Speech service provides the capability to convert spoken language into text (speech-to-text) and vice versa (text-to-speech), as well as speech translation. This service is suitable for applications that require speech-enabled features, such as voice commands, dictation, or spoken language understanding https://learn.microsoft.com/en-us/credentials/certifications/resources/study-guides/ai-102 .
Question Answering Solutions
The question answering feature of Azure Cognitive Service for Language allows the creation of a conversational layer over your data, enabling your application to find the most appropriate answer for any given input from your custom knowledge base. This feature is particularly useful for developing bots that can interact naturally with users and provide instant responses to their queries https://learn.microsoft.com/en-us/azure/bot-service/bot-builder-howto-answer-questions .
Decision Support Solutions
New to the Azure AI suite are decision support solutions, which include creating systems for data monitoring, anomaly detection, and content delivery. These solutions can be implemented to assist in making informed decisions based on the analysis of text and speech data https://learn.microsoft.com/en-us/credentials/certifications/resources/study-guides/ai-102 .
Generative AI Solutions
Azure also offers generative AI solutions, including the Azure OpenAI Service, which can be used to generate content. This service is part of the new offerings in Azure AI and is suitable for applications that require the generation of human-like text, such as chatbots or content creation tools https://learn.microsoft.com/en-us/credentials/certifications/resources/study-guides/ai-102 .
Additional Resources
- For best practices and design guidelines when creating bots, including those with NLP capabilities, refer to the Azure bot design guidelines https://learn.microsoft.com/en-us/azure/bot-service/index-bf-sdk .
- To learn more about developing natural language solutions with Azure AI, visit the learning path for developing language solutions https://learn.microsoft.com/en-us/training/modules/build-language-understanding-model/2-understand-resources-for-building .
- For detailed information on implementing question answering in your bot, consult the Azure Cognitive Service for Language documentation https://learn.microsoft.com/en-us/azure/bot-service/bot-builder-howto-answer-questions .
By carefully considering the specific needs of your NLP solution and the capabilities of each Azure AI service, you can select the most appropriate service to build an effective and efficient NLP application.
Plan and manage an Azure AI solution (15–20%)
Select the appropriate Azure AI service
Selecting the Appropriate Service for a Decision Support Solution
When designing decision support solutions, it is crucial to select the appropriate Azure AI services that align with the specific needs of the application. Decision support systems aid in making informed decisions by analyzing large volumes of data and presenting it in a way that is easy to understand. Azure offers several services that can be leveraged for these purposes:
Anomaly Detector
The Anomaly Detector service is part of Azure Cognitive Services and provides capabilities to detect irregularities in your data that could indicate issues such as fraud, network intrusion, or system failures. It uses machine learning to identify anomalies in time-series data with minimal configuration 7_Create a new resource using Bicep.pdf .
Content Moderator
Content Moderator is another service within Azure Cognitive Services. It is designed to help moderate and review text, images, and videos to ensure they comply with content standards. This service can be used in decision support systems to filter out inappropriate content or to flag content that requires further review 7_Create a new resource using Bicep.pdf .
Azure Cognitive Search
Azure Cognitive Search is a cloud search service with built-in AI capabilities that enrich all types of information to easily identify and explore relevant content at scale. It uses AI to extract insights from the content of images, blobs, and other unstructured data sources, making it easier to find the information you need https://learn.microsoft.com/en-us/credentials/certifications/resources/study-guides/ai-102 .
Azure AI Vision
Azure AI Vision is a part of Azure Cognitive Services that provides pre-built and custom computer vision capabilities. It includes services like Custom Vision, which allows you to build, deploy, and improve your own image classifiers. An image classifier is an AI service that applies labels (which represent classes) to images, according to their visual characteristics. It can be used in decision support systems to categorize images into predefined categories https://learn.microsoft.com/en-us/credentials/certifications/resources/study-guides/ai-102 .
Azure AI Language
Azure AI Language services include text analytics, language understanding (LUIS), and translator text, among others. These services can analyze text to understand sentiment, extract key phrases, recognize entities, and more. They can be used in decision support systems to analyze customer feedback, social media conversations, or any text data that can provide insights into business decisions https://learn.microsoft.com/en-us/credentials/certifications/resources/study-guides/ai-102 .
Azure AI Speech
Azure AI Speech service provides capabilities for speech-to-text, text-to-speech, and speech translation. This can be particularly useful in decision support systems that need to process spoken language, such as call center recordings or voice commands https://learn.microsoft.com/en-us/credentials/certifications/resources/study-guides/ai-102 .
Azure OpenAI Service
Azure OpenAI Service offers access to powerful generative AI models, including GPT-3, which can generate human-like text. This service can be used in decision support systems to automate content creation, summarize documents, or generate responses to customer inquiries https://learn.microsoft.com/en-us/credentials/certifications/resources/study-guides/ai-102 .
Each of these services can be used individually or in combination to create a comprehensive decision support solution that meets the specific needs of your application. When selecting the appropriate service, consider the type of data you will be working with (e.g., text, images, speech), the specific tasks you need to perform (e.g., anomaly detection, content moderation), and the level of customization required.
For more detailed information on these services, you can visit the following URLs: - Anomaly Detector: Azure Anomaly Detector - Content Moderator: Azure Content Moderator - Azure Cognitive Search: Azure Cognitive Search - Azure AI Vision: Azure AI Vision - Azure AI Language: Azure AI Language - Azure AI Speech: Azure AI Speech - Azure OpenAI Service: Azure OpenAI Service
Please note that the URLs provided are for additional information and are not meant to be included in the study guide.
Plan and manage an Azure AI solution (15–20%)
Select the appropriate Azure AI service
Selecting the Appropriate Service for a Speech Solution
When choosing the right service for a speech solution, it is essential to consider the specific features and capabilities that each service offers. Microsoft provides a variety of services under Azure Cognitive Services that cater to different aspects of speech processing. Below is a detailed explanation of the services that can be utilized for speech solutions:
Speech to Text
Speech to Text service converts spoken audio into text. It is ideal for applications that require transcription of spoken words into written form. This service can be used for real-time captioning, voice commands, or converting audio files to text https://learn.microsoft.com/en-us/training/modules/investigate-container-for-use-with-ai-services/3-use-ai-services-container .
Custom Speech to Text
Custom Speech to Text allows you to customize the speech recognition models to understand domain-specific terminology and accents. This service is particularly useful when dealing with jargon, technical language, or when the speech input comes from users with diverse accents https://learn.microsoft.com/en-us/training/modules/investigate-container-for-use-with-ai-services/3-use-ai-services-container .
Neural Text to Speech
Neural Text to Speech converts text into lifelike speech using deep neural networks. This service is suitable for creating interactive voice responses, audiobooks, or any application that requires high-quality speech synthesis https://learn.microsoft.com/en-us/training/modules/investigate-container-for-use-with-ai-services/3-use-ai-services-container .
Speech Language Detection
Speech Language Detection automatically identifies the language spoken in an audio file or real-time speech. This feature is crucial for multilingual applications and services that operate in an international context https://learn.microsoft.com/en-us/training/modules/investigate-container-for-use-with-ai-services/3-use-ai-services-container .
Speaker Recognition
Speaker Recognition service can identify and verify individual speakers based on their voice characteristics. This service is useful for personalized user experiences or security purposes where voice is used as a biometric identifier 46_Overview.pdf .
Pronunciation Assessment
Pronunciation Assessment evaluates the pronunciation of spoken language and provides feedback. This service is particularly beneficial for language learning applications or tools that aim to improve speech clarity and pronunciation 46_Overview.pdf .
When selecting the appropriate service for your speech solution, consider the following:
- The type of speech content (e.g., conversational, technical, multilingual)
- The need for customization to recognize specific vocabulary or accents
- The requirement for real-time processing or batch processing of audio files
- The necessity for speaker identification or verification
- The importance of assessing pronunciation quality
For additional information on each service, including use cases and limitations, you can refer to the following URLs:
- Speech to Text: About Speech to Text
- Custom Speech to Text: About Custom Speech to Text
- Neural Text to Speech: About Neural Text to Speech
- Speech Language Detection: About Language Detection
- Speaker Recognition: About Speaker Recognition
- Pronunciation Assessment: About Pronunciation Assessment
By carefully evaluating the features and capabilities of each service, you can select the most appropriate service for your speech solution that meets the specific needs of your application.
Plan and manage an Azure AI solution (15–20%)
Select the appropriate Azure AI service
Selecting the Appropriate Service for a Generative AI Solution
When selecting the appropriate service for a generative AI solution, it is essential to consider the specific needs of the application you are developing. Generative AI encompasses a range of technologies that can generate new content, from text to images and beyond. Azure AI provides several services that can be leveraged for generative AI tasks.
Azure OpenAI Service
Azure OpenAI Service is a comprehensive solution for generative AI applications. It allows developers to integrate OpenAI’s powerful language models, such as GPT-3, into their applications. This service is ideal for generating human-like text, answering questions, summarizing documents, and more. It is particularly useful when you need to generate content that requires a deep understanding of language and context.
- Learn more about Azure OpenAI Service and how to build generative AI applications with it here azure-ai-services-openai.pdf .
Azure Cognitive Services
Azure Cognitive Services provides a suite of AI services and cognitive APIs to help you build intelligent apps. While not exclusively for generative AI, certain services within this suite can be used for generative tasks. For example, the Custom Vision service can be used to generate new images based on existing ones, and the Language service can be used for text completion and generation tasks.
- Explore Azure Cognitive Services for various AI solutions here 11_Azure AI services and the ecosystem.pdf .
Azure AI Studio
Azure AI Studio is a new environment that supports the building, deployment, and management of AI solutions on Azure. It provides tools and resources that can be used to create generative AI models and applications. AI Studio simplifies the process of training and deploying models, making it a valuable tool for developers working on generative AI.
- Discover how to build generative AI applications in Azure AI Studio here 11_Azure AI services and the ecosystem.pdf .
Considerations for Service Selection
When selecting a service for your generative AI solution, consider the following:
- Task Requirements: Understand the specific generative tasks your application needs to perform, such as text generation, image creation, or data synthesis.
- Model Capabilities: Evaluate the capabilities of the AI models provided by the service to ensure they align with your application’s requirements.
- Scalability: Ensure the service can scale to meet the demands of your application, especially if you expect high volumes of requests or large amounts of data to be processed.
- Security and Compliance: Consider the security features of the service and ensure it complies with the necessary regulations and standards for your application.
- Cost: Review the pricing model of the service to ensure it fits within your budget, especially if you anticipate extensive usage.
By carefully evaluating these factors, you can select the most appropriate Azure AI service for your generative AI solution, ensuring that it meets the needs of your application and provides the desired functionality.
For additional information and resources, you can refer to the following URLs:
- Azure OpenAI Service: Build a chat app with Azure OpenAI azure-ai-services-openai.pdf .
- Azure Cognitive Services updates: Service updates 11_Azure AI services and the ecosystem.pdf .
- Azure AI Studio: What is AI Studio? 11_Azure AI services and the ecosystem.pdf .
This information should provide a solid foundation for understanding how to select the appropriate service for a generative AI solution within the Azure AI ecosystem.
Plan and manage an Azure AI solution (15–20%)
Select the appropriate Azure AI service
When selecting the appropriate service for a document intelligence solution, it is essential to consider the specific needs of the project and the capabilities of the available services. Azure offers a range of document intelligence services that can be tailored to various use cases. Here’s a detailed explanation of how to select the right service:
Azure Document Intelligence Services
Azure Document Intelligence services provide tools for extracting, analyzing, and processing information from documents. These services can be accessed through multiple interfaces, including REST API, client library SDKs, and the Azure Document Intelligence Studio.
Azure Document Intelligence Studio
The Azure Document Intelligence Studio is a user-friendly online tool that allows for visual exploration, understanding, and integration of features from Azure Document Intelligence services. It supports various projects, including analyzing form layouts, extracting data with prebuilt models, and training custom models https://learn.microsoft.com/en-us/training/modules/work-form-recognizer/9-form-recognizer-studio https://learn.microsoft.com/en-us/credentials/certifications/resources/study-guides/ai-102 .
Prebuilt Models
For standard document types, such as invoices, receipts, or business cards, Azure provides prebuilt models that can be used to extract data without the need for custom training. These models are readily available and can be implemented quickly https://learn.microsoft.com/en-us/credentials/certifications/resources/study-guides/ai-102 .
Custom Models
When dealing with unique or specialized document types, custom models can be created using Azure Document Intelligence Studio. The process involves:
- Creating an Azure Document Intelligence or Azure AI Services resource.
- Collecting sample forms and uploading them to a storage account container.
- Configuring CORS for Azure Document Intelligence Studio to access the storage container.
- Creating a custom model project and linking it to the storage and Azure resources.
- Labeling text using the Studio’s interface.
- Training the model to receive a Model ID and Average Accuracy for tags.
- Testing the model with new forms not used in training https://learn.microsoft.com/en-us/training/modules/work-form-recognizer/9-form-recognizer-studio .
Composed Models
For complex scenarios that require combining multiple custom models or prebuilt models, Azure allows the creation of composed models. This approach enables the extraction of data from documents that may not conform to a single model type https://learn.microsoft.com/en-us/credentials/certifications/resources/study-guides/ai-102 .
SDKs and REST API
Azure Document Intelligence services can also be accessed programmatically using SDKs for languages like Python and .NET, or through the REST API. This allows for integration into workflows or applications where a visual interface is not required https://learn.microsoft.com/en-us/training/modules/work-form-recognizer/2-what-form-recognizer .
Additional Resources
For more information on how to get started with the SDKs and REST API, refer to the Azure Document Intelligence services documentation https://learn.microsoft.com/en-us/training/modules/work-form-recognizer/2-what-form-recognizer .
In summary, the selection of the appropriate document intelligence service depends on the document types, the need for custom model training, and the preferred method of integration. Azure Document Intelligence Studio offers a comprehensive solution for both prebuilt and custom models, while SDKs and REST API provide programmatic access for application integration.
Plan and manage an Azure AI solution (15–20%)
Select the appropriate Azure AI service
When selecting the appropriate service for a knowledge mining solution, it is essential to understand the capabilities and features of Azure services that facilitate knowledge mining. Knowledge mining is the process of deriving actionable insights from vast amounts of unstructured data, such as documents, images, and other media. Azure provides several services that can be leveraged for knowledge mining, and the choice of service depends on the specific requirements of the solution.
Azure Cognitive Search
Azure Cognitive Search is a cloud search service that provides powerful indexing capabilities, allowing you to quickly perform text search and retrieval across large datasets. It is an ideal choice for knowledge mining as it can ingest, enrich, and explore structured and unstructured data. The service integrates with Azure Cognitive Services to add AI enrichment to the indexing pipeline, enhancing the search capabilities with skills such as entity recognition, key phrase extraction, and language detection.
Azure Cognitive Services
Azure Cognitive Services is a collection of AI services and cognitive APIs that help you build intelligent apps. Within this suite, there are several services relevant to knowledge mining:
- Text Analytics API: This service provides natural language processing over raw text for sentiment analysis, key phrase extraction, and language detection.
- Form Recognizer: This service extracts key-value pairs, tables, and text from documents and images, which can be useful for processing forms and extracting information for indexing.
- Computer Vision API: It analyzes visual content in different ways depending on the specific requirements, such as extracting printed and handwritten text from images and documents.
Decision Making
When selecting the appropriate service for a knowledge mining solution, consider the following factors:
- Data Types: Determine the types of data you need to process (text, images, forms, etc.) and choose services that offer the relevant processing capabilities.
- Scale: Consider the volume of data to be processed and select a service that can scale to meet your demands.
- Integration: Ensure that the service integrates well with other Azure services and your existing infrastructure.
- Enrichment Needs: If your solution requires the enrichment of data (e.g., entity recognition, sentiment analysis), choose services that provide these AI capabilities.
For additional information on Azure services for knowledge mining, you can refer to the official documentation for Azure Cognitive Search and Azure Cognitive Services.
Please note that the URLs provided are for reference purposes to supplement the study guide and should be accessed for more detailed information on each service.
Plan and manage an Azure AI solution (15–20%)
Plan, create and deploy an Azure AI service
Plan for a Solution that Meets Responsible AI Principles
When planning for a solution that adheres to Responsible AI principles, it is essential to integrate ethical considerations throughout the AI system’s lifecycle. This includes the design, development, deployment, and monitoring stages. Here are the key steps to ensure that your AI solution aligns with Responsible AI principles:
Understand Microsoft’s AI Principles: Familiarize yourself with Microsoft’s AI principles, which provide a foundation for responsible AI practices. These principles include fairness, reliability and safety, privacy and security, inclusiveness, transparency, and accountability azure-ai-services-openai.pdf .
Assess AI Impact: Evaluate the potential impact of the AI solution on various stakeholders, including users, employees, and broader society. Consider the implications for privacy, employment, and the environment.
Fairness: Ensure that your AI models do not perpetuate or amplify biases. This involves using diverse datasets for training and testing, as well as implementing fairness checks and balances during model validation.
Reliability and Safety: Design AI systems that are reliable and safe under a wide range of conditions. Implement robust testing and validation procedures to minimize the risk of failures or unintended consequences.
Privacy and Security: Protect the privacy and security of data used by AI systems. This includes adhering to data protection regulations, securing data storage and transmission, and implementing access controls.
Inclusiveness: Strive to create AI solutions that empower everyone, including people with disabilities and those from diverse backgrounds. This means considering accessibility and cultural relevance in design and user experience.
Transparency: Maintain transparency in AI processes and decisions. This can be achieved by providing clear explanations of how AI systems work and the rationale behind their decisions.
Accountability: Establish clear lines of accountability for AI systems’ outcomes. This includes having mechanisms in place to monitor, audit, and rectify issues as they arise.
Continuous Monitoring and Improvement: Once deployed, continuously monitor the AI solution to ensure it adheres to Responsible AI principles. Be prepared to make iterative improvements based on feedback and new insights.
Education and Training: Provide education and training on Responsible AI principles to all team members involved in the AI solution’s lifecycle. This ensures that everyone is aware of their responsibilities and the importance of ethical AI practices.
For additional information and resources on Responsible AI, you can refer to the following URLs:
- Microsoft AI principles: Microsoft AI principles
- Microsoft responsible AI resources: Microsoft responsible AI resources
- Microsoft Azure Learning courses on responsible AI: Microsoft Azure Learning courses on responsible AI
By integrating these steps into your planning process, you can ensure that your AI solution not only meets technical requirements but also aligns with ethical standards and societal values azure-ai-services-openai.pdf https://learn.microsoft.com/en-us/credentials/certifications/resources/study-guides/ai-102 https://learn.microsoft.com/en-us/credentials/certifications/resources/study-guides/ai-102 .
Plan and manage an Azure AI solution (15–20%)
Plan, create and deploy an Azure AI service
Create an Azure AI Resource
Creating an Azure AI resource is a fundamental step in utilizing Azure’s AI services for your projects. Here’s a step-by-step guide to help you understand the process:
Sign in to Azure Portal: Begin by signing into the Azure Portal at https://portal.azure.com/.
Navigate to AI Services: In the Azure Portal, search for the specific AI service you wish to create a resource for, such as Azure Cognitive Services, Azure Machine Learning, or Azure Bot Services.
Create a New Resource: Click on “Create a resource” to start the process. You will be prompted to fill in details such as the name of the resource, the subscription you want to use, the resource group, and the location where you want your resource to be hosted.
Configure Resource Settings: Depending on the AI service you are creating, you may need to configure specific settings. This could include choosing pricing tiers, specifying API types (for Cognitive Services), or configuring related services.
Review and Create: Once you have configured the settings, review all the information to ensure it’s correct. Then, click “Create” to deploy your new Azure AI resource.
Resource Deployment: Azure will then begin the deployment of your resource. This process may take a few minutes. Once completed, you will receive a notification, and the resource will be available in your resource group.
Access Keys and Endpoints: After the resource is created, you can access the necessary keys and endpoints from the resource management page. These are essential for authenticating and interacting with your AI services programmatically.
Manage Access Control: Set up role-based access control (RBAC) to manage who has access to your Azure AI resource. Assign roles and permissions as needed to ensure secure access to the resource.
Encryption and Compliance: Ensure that your data is secure by configuring encryption settings. Azure AI resources support encryption with Microsoft-managed keys by default, and you have the option to use customer-managed keys if required 39_Configure customer-managed keys.pdf 39_Configure customer-managed keys.pdf .
Monitoring and Management: Finally, configure monitoring and diagnostics settings to keep track of the resource’s performance and usage. This can help you manage costs and maintain the health of your AI applications https://learn.microsoft.com/en-us/credentials/certifications/resources/study-guides/ai-102 .
Remember, once you create an Azure AI resource, you should familiarize yourself with its limitations, such as the inability to switch between Microsoft-managed and customer-managed keys after deployment, and the restrictions on modifying certain Microsoft-managed resources 39_Configure customer-managed keys.pdf .
For additional information on creating and managing Azure AI resources, you can refer to the following resources: - Azure AI Services Documentation - Azure Cognitive Services Documentation - Azure Machine Learning Documentation - Azure Bot Services Documentation
By following these steps and utilizing the provided resources, you can successfully create and manage an Azure AI resource tailored to your project’s needs.
Plan and manage an Azure AI solution (15–20%)
Plan, create and deploy an Azure AI service
Determine a Default Endpoint for a Service
When configuring Azure AI services, it is essential to determine a default endpoint for the service. An endpoint is a URL that represents the entry point for a web service or web API. It is where the service can be accessed by client applications to perform operations.
Steps to Determine a Default Endpoint:
Create a Resource: Begin by creating a resource using the Azure portal. This resource will be associated with the service you are configuring.
Access Resource Management: Navigate to the Azure AI services resource you have created. Within the Azure portal, select ‘Resource Management’ to expand the section, and then select ‘Networking’.
Configure Network Access Rules: Under ‘Firewalls and virtual networks’, you can choose ‘Selected Networks and Private Endpoints’ to deny access by default. This means that unless you configure specific virtual networks or address ranges, all access is denied. Alternatively, you can select ‘All networks’ to allow traffic from any network.
Save Changes: After setting up your network access rules, select ‘Save’ to apply the changes.
Endpoint URL: The default endpoint URL will typically be provided after the resource is created. This URL is used by client applications to interact with the Azure AI service.
Container Deployment: If you deploy an Azure AI services container, the client application will consume the containerized endpoint instead of the default Azure endpoint. In this case, you need to configure the client application with the appropriate endpoint URL for your container.
Additional Considerations:
Authentication: When using a containerized service, you do not need to provide a subscription key for authentication. You can implement your own authentication solution and apply network security restrictions as needed.
Integration into CI/CD Pipelines: You can integrate Azure AI services into a continuous integration/continuous deployment (CI/CD) pipeline to automate the deployment and management of your services.
Responsible AI Principles: Plan your solution to align with Responsible AI principles, ensuring ethical, transparent, and accountable use of AI technologies.
Resources:
For more information on creating a bot and determining the default endpoint, refer to the Create a bot quickstart guide.
To learn about integrating Azure AI services into CI/CD pipelines, explore the Azure documentation on continuous integration and continuous delivery.
By following these steps and considerations, you can effectively determine and configure a default endpoint for your Azure AI service, ensuring secure and efficient access for client applications 40_Use virtual networks.pdf https://learn.microsoft.com/en-us/training/modules/investigate-container-for-use-with-ai-services/3-use-ai-services-container https://learn.microsoft.com/en-us/credentials/certifications/resources/study-guides/ai-102 https://learn.microsoft.com/en-us/credentials/certifications/resources/study-guides/ai-102 https://learn.microsoft.com/en-us/azure/bot-service/index-bf-sdk .
Plan and manage an Azure AI solution (15–20%)
Plan, create and deploy an Azure AI service
Integrate Azure AI services into a CI/CD Pipeline
Integrating Azure AI services into a Continuous Integration/Continuous Delivery (CI/CD) pipeline involves several steps that ensure the seamless deployment and management of AI models and resources as part of an automated workflow. Here’s a detailed explanation of the process:
Create Azure AI Resources: Before integrating into the CI/CD pipeline, you need to create the necessary Azure AI resources, such as Cognitive Services, Machine Learning workspaces, or Bot Services, depending on the AI capabilities required for your application https://learn.microsoft.com/en-us/credentials/certifications/resources/study-guides/ai-102 .
Configure Service Endpoints: Determine and configure the default endpoints for the Azure AI services. These endpoints are the URLs through which your application will communicate with the deployed AI services https://learn.microsoft.com/en-us/credentials/certifications/resources/study-guides/ai-102 https://learn.microsoft.com/en-us/credentials/certifications/resources/study-guides/ai-102 .
Automate Resource Provisioning: Use infrastructure as code (IaC) tools like Azure Resource Manager templates or Terraform scripts to automate the provisioning of Azure AI resources. This ensures that your AI services can be consistently deployed across different environments https://learn.microsoft.com/en-us/credentials/certifications/resources/study-guides/ai-102 https://learn.microsoft.com/en-us/credentials/certifications/resources/study-guides/ai-102 .
Set Up CI/CD Pipeline: Utilize Azure DevOps or GitHub Actions to set up the CI/CD pipeline. This pipeline will automate the process of building, testing, and deploying your AI application. Include steps in your pipeline to train and validate AI models, if applicable https://learn.microsoft.com/en-us/credentials/certifications/resources/study-guides/ai-102 https://learn.microsoft.com/en-us/credentials/certifications/resources/study-guides/ai-102 .
Integrate AI Services into the Pipeline: Use the Azure CLI or SDKs to integrate Azure AI services into the pipeline. This can include deploying prebuilt containers for AI services or using APIs to interact with the services https://learn.microsoft.com/en-us/credentials/certifications/resources/study-guides/ai-102 https://learn.microsoft.com/en-us/credentials/certifications/resources/study-guides/ai-102 .
Leverage Service Connectors: For services like Azure Logic Apps, use service-specific connectors available in Power Automate to integrate with Azure AI services. These connectors act as a proxy or wrapper around the APIs, simplifying the integration process 11_Azure AI services and the ecosystem.pdf .
Implement Testing: Include automated tests in your pipeline to validate the integration and functionality of the AI services. This can involve unit tests, integration tests, and performance tests.
Monitor Deployments: After deployment, monitor the performance and usage of the AI services. Use Azure Monitor and Application Insights to track metrics and logs, ensuring that the services are running as expected.
Follow Responsible AI Principles: Ensure that the solution adheres to Responsible AI principles, which include fairness, reliability, privacy, inclusiveness, transparency, and accountability https://learn.microsoft.com/en-us/credentials/certifications/resources/study-guides/ai-102 46_Overview.pdf .
Documentation and SDKs: Refer to the official Azure documentation for quick start guides on SDKs and REST API usage for various Azure AI services. This will help in integrating these services into your application or workflow https://learn.microsoft.com/en-us/training/modules/work-form-recognizer/2-what-form-recognizer .
For additional information on integrating Azure AI services into a CI/CD pipeline, you can explore the following resources: - Azure Logic Apps Documentation: [https://learn.microsoft.com/en-us/azure/logic-apps/] 11_Azure AI services and the ecosystem.pdf - Azure Document Intelligence Services Quickstarts: [https://learn.microsoft.com/en-us/azure/ai-services/document-intelligence/quickstarts/get-started-sdks-rest-api] https://learn.microsoft.com/en-us/training/modules/work-form-recognizer/2-what-form-recognizer - Responsible AI with Personalizer: [https://learn.microsoft.com/en-us/azure/ai-services/personalizer/responsible-use-cases] 46_Overview.pdf
By following these steps and utilizing the provided resources, you can effectively integrate Azure AI services into your CI/CD pipeline, enhancing the automation and reliability of your AI application deployments.
Plan and manage an Azure AI solution (15–20%)
Plan, create and deploy an Azure AI service
Plan and Implement a Container Deployment
When planning and implementing a container deployment, it is essential to consider several key steps to ensure a successful deployment. Containers allow for the encapsulation of an application’s code, configurations, and dependencies into a single object that can run consistently on any infrastructure.
- Determine the Application Requirements:
- Assess the application’s resource needs, such as CPU, memory, and storage.
- Identify dependencies and any specific configuration required by the application.
- Select a Containerization Platform:
- Choose a platform for containerization, such as Docker, which is widely used for creating container images.
- Create a Container Image:
- Package the application and its dependencies into a container image.
- Use a Dockerfile to define the steps to create the image.
- Test the container image locally to ensure it runs as expected.
- Choose a Container Registry:
- Select a container registry to store and manage your container images, such as Azure Container Registry.
- Plan the Deployment Environment:
- Decide on the hosting environment for the containers, such as Azure Container Instances, which allows for running containers without managing servers.
- Continuous Integration and Continuous Deployment
(CI/CD):
- Integrate the container deployment process into a CI/CD pipeline for automation and consistency.
- Set up automated builds, tests, and deployments using tools like Azure DevOps.
- Implement the Deployment:
- Deploy the container image to the chosen environment.
- Configure networking, storage, and other services as required.
- Monitor the deployment to ensure it meets performance and reliability standards.
- Maintain and Update:
- Plan for ongoing maintenance of the containerized application.
- Implement strategies for updating the containers with minimal downtime.
For additional information on container deployment in Azure, you can refer to the following resources:
- Azure Container Instances Documentation: Learn how to deploy Docker containers onto Azure infrastructure without provisioning any virtual machines or adopting a higher-level service 30_Azure Container Instances.pdf .
- Azure Container Registry Documentation: Understand how to manage private Docker container images and related artifacts.
- Continuous Integration/Continuous Deployment (CI/CD) with Azure AI: Integrate Azure AI services into your CI/CD pipeline for automated workflows https://learn.microsoft.com/en-us/credentials/certifications/resources/study-guides/ai-102 https://learn.microsoft.com/en-us/credentials/certifications/resources/study-guides/ai-102 .
By following these steps and utilizing the provided resources, you can plan and implement a robust container deployment strategy that aligns with best practices and leverages Azure’s cloud capabilities.
Plan and manage an Azure AI solution (15–20%)
Manage, monitor and secure an Azure AI service
Configure Diagnostic Logging
When configuring diagnostic logging for Azure AI Services, it is essential to understand the process and the options available to capture and store log data effectively. Here’s a detailed explanation of how to configure diagnostic logging:
Log Destinations: Before capturing diagnostic logs, determine where the log data will be sent. Common destinations include:
- Azure Log Analytics: A service within Azure that allows you to query and visualize log data directly from the Azure portal https://learn.microsoft.com/en-us/training/modules/monitor-cognitive-services/5-manage-diagnostic-logging .
- Azure Storage: A cloud-based storage solution for archiving log data, which can be exported for analysis in external tools https://learn.microsoft.com/en-us/training/modules/monitor-cognitive-services/5-manage-diagnostic-logging .
Creating Diagnostic Settings: Diagnostic settings are defined on the Diagnostic settings page of your Azure AI Services resource in the Azure portal. When adding diagnostic settings, you need to specify:
- A unique name for the diagnostic settings.
- The categories of log events to capture.
- The destinations for storing the log data https://learn.microsoft.com/en-us/training/modules/monitor-cognitive-services/5-manage-diagnostic-logging .
Categories of Logs: When creating a diagnostic setting, you choose which categories of logs to collect. For example, the Azure AI Bot Service has specific categories listed in its monitoring data reference https://learn.microsoft.com/en-us/azure/bot-service/monitor-bot-service .
Resource Logs: Unlike platform metrics and the Activity log, which are automatically collected, Resource Logs are not collected until you create a diagnostic setting and route them to one or more locations https://learn.microsoft.com/en-us/azure/bot-service/monitor-bot-service .
Viewing Diagnostic Data: After the diagnostic data starts flowing to the chosen destinations, which can take an hour or more, you can view and analyze the data in Azure Log Analytics by running queries https://learn.microsoft.com/en-us/training/modules/monitor-cognitive-services/5-manage-diagnostic-logging .
For a detailed process on creating a diagnostic setting using the Azure portal, CLI, or PowerShell, you can refer to the official Microsoft documentation: Create diagnostic setting to collect platform logs and metrics in Azure https://learn.microsoft.com/en-us/azure/bot-service/monitor-bot-service .
By following these steps, you can effectively configure diagnostic logging for your Azure AI Services to monitor performance, track resource usage, and troubleshoot issues.
Plan and manage an Azure AI solution (15–20%)
Manage, monitor and secure an Azure AI service
Monitoring an Azure AI Resource
Monitoring Azure AI resources is crucial for maintaining the health, availability, and performance of applications and business processes that rely on these resources. Azure AI Bot Service, as an example of an Azure AI resource, integrates with Azure Monitor to provide comprehensive monitoring capabilities.
Key Aspects of Monitoring Azure AI Resources:
Data Collection: Azure AI Bot Service collects monitoring data similar to other Azure resources. This includes metrics and logs that are essential for understanding the resource’s performance and health https://learn.microsoft.com/en-us/azure/bot-service/monitor-bot-service .
Diagnostic Logging: Configuring diagnostic logging is an important step in monitoring. It allows you to collect detailed information about the operations of your Azure AI resource, which can be used for debugging and performance analysis https://learn.microsoft.com/en-us/credentials/certifications/resources/study-guides/ai-102 .
Metrics and Logs: Azure Monitor Logs store data in tables with unique properties. All resource logs have common fields, followed by service-specific fields. The common schema and service-specific details for Azure AI Bot Service can be found in the Azure Monitor resource log schema https://learn.microsoft.com/en-us/azure/bot-service/monitor-bot-service .
Activity Log: The Activity log is a platform log that provides insights into subscription-level events. It can be viewed independently or routed to Azure Monitor Logs for more complex analysis using Log Analytics https://learn.microsoft.com/en-us/azure/bot-service/monitor-bot-service .
Azure Monitor Integration: Azure AI Bot Service uses Azure Monitor, which offers a range of features for monitoring Azure resources. This includes the ability to set up alerts, visualize metrics, and analyze logs https://learn.microsoft.com/en-us/azure/bot-service/monitor-bot-service .
Cost Management: Monitoring also involves managing costs associated with Azure AI services. Keeping track of the usage and associated costs ensures that the services remain within budget https://learn.microsoft.com/en-us/credentials/certifications/resources/study-guides/ai-102 .
Additional Resources:
- For detailed information on the metrics and logs created by Azure AI Bot Service, refer to the Monitoring Azure AI Bot Service data reference.
- To understand the general features of Azure Monitor and how to monitor Azure resources, read Monitoring Azure resources with Azure Monitor.
- For the Azure Monitor resource log schema, including the common fields and how to query them, visit Azure Monitor resource log schema.
- To explore the Activity log and its capabilities, check out the Activity log documentation.
By utilizing these monitoring tools and resources, you can ensure that your Azure AI resources are performing optimally and that you are alerted to any issues that may arise, allowing for timely intervention and resolution.
Plan and manage an Azure AI solution (15–20%)
Manage, monitor and secure an Azure AI service
Manage Costs for Azure AI Services
Managing costs for Azure AI services is an essential aspect of using Azure resources efficiently. Here’s a detailed explanation of how to manage these costs:
Monitor Costs
Monitoring costs is the first step in managing your Azure AI services expenses. Azure provides a cost analysis tool that allows you to view your costs in graphs and tables for different time intervals, such as by day, month, or year. This tool helps you identify spending trends and potential overspending. If you have set budgets, you can easily track when they are exceeded 14_Plan and manage costs.pdf .
To monitor costs: 1. Sign in to the Azure portal. 2. Navigate to the scope (e.g., Subscriptions) and select ‘Cost analysis’ from the menu. 3. By default, the cost for services is shown in a donut chart. Select ‘Azure AI services’ to view specific costs. 4. To narrow down costs for a single service, use the ‘Add filter’ option and select ‘Service name’, then choose ‘Azure AI services’ 14_Plan and manage costs.pdf .
For more information on monitoring costs, visit the Azure cost analysis page.
Estimate Costs
Before deploying Azure AI services, it’s crucial to estimate potential costs. The Azure Pricing Calculator is a tool that allows you to create an estimate based on the specific Azure AI service API, region, pricing tier, expected usage metrics, and support options https://learn.microsoft.com/en-us/training/modules/monitor-cognitive-services/2-monitor-cost .
To estimate costs using the Azure Pricing Calculator: 1. Go to the Azure Pricing Calculator. 2. Create a new estimate and select ‘Azure AI Services’ under the ‘AI + Machine Learning’ category. 3. Choose the specific Azure AI service API, region, pricing tier, and fill in the expected usage metrics https://learn.microsoft.com/en-us/training/modules/monitor-cognitive-services/2-monitor-cost .
Create Budgets and Alerts
Creating budgets and setting up alerts are proactive measures to manage costs effectively. Budgets help you plan for expected spending, while alerts can notify stakeholders of spending anomalies or when spending exceeds the budget 14_Plan and manage costs.pdf .
To create budgets and alerts: 1. Use the Azure portal to set up budgets based on your expected spending. 2. Configure alerts to notify you when spending reaches a certain threshold or when there are unusual spending patterns 14_Plan and manage costs.pdf .
For more information on creating budgets and alerts, visit the budgets page and the alerts page.
Plan to Manage Costs for Specific Services
For services like Azure OpenAI, it’s important to plan and manage costs from the outset. Use the Azure pricing calculator to estimate costs before deployment, and once the service is in use, leverage Cost Management features to keep track of expenses azure-ai-services-openai.pdf .
For more information on managing costs for Azure OpenAI Service, refer to the Azure OpenAI cost management guide.
Understand Accrued Costs
When using Azure AI services, be aware that creating resources for one service may also create resources for other Azure services, which can accrue additional costs 14_Plan and manage costs.pdf .
For a comprehensive understanding of service pricing, refer to the Azure AI pricing page.
By following these steps and utilizing the available tools, you can effectively manage costs for Azure AI services and ensure that your spending aligns with your budget and project requirements.
Plan and manage an Azure AI solution (15–20%)
Manage, monitor and secure an Azure AI service
Manage Account Keys in Azure Cognitive Services
Managing account keys is a crucial aspect of Azure Cognitive Services account administration. Account keys are used to authenticate applications to Azure Cognitive Services and to ensure that only authorized users and services can access your Cognitive Services resources.
Key Management Operations
Listing Account Keys: You can list the existing account keys for your Azure Cognitive Services accounts to retrieve them for use in your applications or services. This is typically done using the Azure CLI command
az cognitiveservices account keys list55_Azure CLI.pdf .Regenerating Account Keys: It is a security best practice to periodically regenerate your account keys. This can help prevent unauthorized access if a key is compromised. To regenerate an account key, you can use the Azure CLI command
az cognitiveservices account keys regenerate55_Azure CLI.pdf . When you regenerate a key, ensure that you update the key in all applications that use it to avoid service interruptions.Key Management in the Azure Portal: In addition to using the Azure CLI, you can manage your account keys through the Azure portal. This includes viewing, copying, and regenerating keys. The portal provides a user-friendly interface for these operations.
Security Considerations
- Data Encryption with Customer-Managed Keys: For enhanced security, Azure Cognitive Services supports data encryption with customer-managed keys. This means you can use your own keys, managed in Azure Key Vault, to encrypt data stored in Cognitive Services. This is particularly important for meeting regulatory compliance standards and for organizations that require greater control over their encryption keys 57_Azure Policy built-ins.pdf .
Additional Resources
- For a comprehensive guide on managing Azure Cognitive Services accounts, refer to the Azure CLI documentation for Cognitive Services account and subscription management azure-ai-services-openai.pdf .
- To learn more about customer-managed keys and how to implement them, visit the Microsoft documentation on data encryption with customer-managed keys 57_Azure Policy built-ins.pdf .
By effectively managing your account keys and understanding the security implications, you can ensure that your Azure Cognitive Services resources remain secure and compliant with your organization’s policies.
Plan and manage an Azure AI solution (15–20%)
Manage, monitor and secure an Azure AI service
Protect Account Keys by Using Azure Key Vault
Azure Key Vault is a cloud service that provides a secure storage for secrets, such as keys, passwords, certificates, and other sensitive data. When it comes to protecting account keys, Azure Key Vault plays a crucial role by offering several features and best practices:
Integration with Azure Services: Azure Key Vault can be integrated with various Azure services to manage and control the encryption keys used by these services. This integration ensures that the keys are securely stored and managed within the Key Vault https://learn.microsoft.com/security/benchmark/azure/baselines/bot-service-security-baseline .
Key Management: Azure Key Vault allows you to create and control the life cycle of your encryption keys. This includes key generation, distribution, and storage. By managing the keys within Azure Key Vault, you can ensure that they are protected and accessible only to authorized users and services 43_Security baseline.pdf .
Key Rotation and Revocation: It is essential to rotate and revoke your keys periodically or in the event of key retirement or compromise. Azure Key Vault supports key rotation and revocation, allowing you to update your keys according to a defined schedule or in response to specific events 43_Security baseline.pdf .
Customer-Managed Keys (CMK): For scenarios that require the use of customer-managed keys at the workload, service, or application level, Azure Key Vault supports the use of a key hierarchy. This involves generating a separate data encryption key (DEK) with your key encryption key (KEK) within the Key Vault. This practice enhances the security of your keys by separating the management of keys from the data they protect https://learn.microsoft.com/security/benchmark/azure/baselines/bot-service-security-baseline 43_Security baseline.pdf .
Bring Your Own Key (BYOK): If you need to import keys that are protected by hardware security modules (HSMs) from on-premises environments into Azure Key Vault, you can do so by following the BYOK guidelines. This allows you to maintain control over the initial key generation and transfer process 43_Security baseline.pdf .
Specifying a Key from Key Vault: To specify a key from Azure Key Vault for use with an Azure AI service, you must first ensure that you have a key vault with the desired key. Then, within your Azure AI service resource, navigate to the Encryption settings and select the key from the Key Vault. This process ensures that the encryption key is correctly associated with your service azure-ai-services-openai.pdf .
For additional information on managing resource groups, Azure Key Vault recovery, and configuring customer-managed keys with Azure Key Vault, you can refer to the following resources:
- Manage resource groups: Manage resource groups 18_Recover or purge deleted resources.pdf .
- Azure Key Vault recovery management: Azure Key Vault recovery management 18_Recover or purge deleted resources.pdf .
- Configure customer-managed keys with Azure Key Vault for Cognitive Services: Configure customer-managed keys with Azure Key Vault for Cognitive Services 43_Security baseline.pdf .
- Learn more about Azure Key Vault: About Azure Key Vault https://learn.microsoft.com/en-us/azure/bot-service/bot-service-encryption .
By following these guidelines and utilizing Azure Key Vault, you can ensure that your account keys are well-protected, which is essential for maintaining the security and integrity of your Azure services.
Plan and manage an Azure AI solution (15–20%)
Manage, monitor and secure an Azure AI service
Manage Authentication for an Azure AI Service Resource
Managing authentication for an Azure AI Service resource involves setting up and configuring the appropriate authentication mechanisms to ensure that only authorized users and services can access the AI resources. Here are the key steps and considerations for managing authentication:
- Service Principals and Managed Identities:
- Azure AI Services support Microsoft Entra authentication, which allows you to grant access to service principals or managed identities. Service principals are Azure Active Directory (Azure AD) applications that provide a secure identity to run automated tasks or access resources. Managed identities are an Azure feature that provides Azure services with an automatically managed identity in Azure AD https://learn.microsoft.com/en-us/training/modules/secure-cognitive-services/2-authentication .
- For Azure AI Search, you can assign a system-assigned managed identity directly in the Azure portal to allow other services to recognize the Azure AI Search using Azure AD authentication azure-ai-services-openai.pdf .
- Account Keys Management:
- Account keys are used to authenticate applications or services that require access to Azure AI resources. It is crucial to manage these keys securely and rotate them periodically to maintain security https://learn.microsoft.com/en-us/credentials/certifications/resources/study-guides/ai-102 https://learn.microsoft.com/en-us/credentials/certifications/resources/study-guides/ai-102 .
- OAuth for Bots:
- When a bot needs to access secured online resources on behalf of a user, OAuth is used to authenticate the user and authorize the bot. This ensures that the bot can perform actions without compromising the user’s credentials https://learn.microsoft.com/en-us/azure/bot-service/index-bf-sdk .
- Azure Key Vault:
- Protecting account keys is essential for security. Azure Key Vault can be used to securely store and manage sensitive information such as keys, secrets, and certificates. By using Key Vault, you can control access to AI service keys and reduce the risk of key exposure https://learn.microsoft.com/en-us/credentials/certifications/resources/study-guides/ai-102 .
- Azure Virtual Networks:
- To secure services further, you can use Azure Virtual Networks to isolate your Azure AI resources from the public internet, allowing access only from authorized networks or services https://learn.microsoft.com/en-us/credentials/certifications/resources/study-guides/ai-102 .
- Responsible AI Principles:
- When managing authentication, it is also important to plan for solutions that adhere to Responsible AI principles, ensuring that AI systems are secure, private, and reliable https://learn.microsoft.com/en-us/credentials/certifications/resources/study-guides/ai-102 .
For additional information on authentication options for Azure AI Services, you can refer to the Azure AI Services documentation: - Azure AI Services authentication
For more details on OAuth and user authentication in bots, the following resources are available: - Bot Service authentication concepts - Supported OAuth URLs - Add authentication to a bot
By following these guidelines and utilizing the provided resources, you can effectively manage authentication for Azure AI Service resources, ensuring secure and controlled access.
Plan and manage an Azure AI solution (15–20%)
Manage, monitor and secure an Azure AI service
Manage Private Communications
When managing private communications for Azure AI services, it is essential to ensure that data is securely accessed and transferred within a virtual network, without exposure to the public internet. This can be achieved through the use of private endpoints.
Private Endpoints
Private endpoints are a key feature that allows clients on a virtual network to securely access Azure AI services resources. They utilize Azure Private Link, which provides a secure connection by using an IP address from the virtual network’s address space for the Azure AI services resource. The network traffic between the clients on the virtual network and the resource is routed through the virtual network and a private link on the Microsoft Azure backbone network 40_Use virtual networks.pdf .
Benefits of Private Endpoints:
Enhanced Security: By configuring the firewall to block all connections on the public endpoint for the Azure AI service, private endpoints secure your Azure AI services resource 40_Use virtual networks.pdf .
Data Exfiltration Protection: Private endpoints increase the security of the virtual network by enabling the blocking of data exfiltration 40_Use virtual networks.pdf .
Secure On-premises Connection: They allow secure connections to Azure AI services resources from on-premises networks that connect to the virtual network via Azure VPN Gateway or ExpressRoutes with private-peering 40_Use virtual networks.pdf .
Implementation
To implement private communications management:
Configure Diagnostic Logging: Keep track of operations and changes within your Azure AI services by enabling diagnostic logging https://learn.microsoft.com/en-us/credentials/certifications/resources/study-guides/ai-102 .
Monitor Azure AI Resources: Regularly monitor the performance and health of your Azure AI resources to ensure they are functioning correctly and securely https://learn.microsoft.com/en-us/credentials/certifications/resources/study-guides/ai-102 .
Manage Costs: Keep an eye on the costs associated with Azure AI services to avoid unexpected charges https://learn.microsoft.com/en-us/credentials/certifications/resources/study-guides/ai-102 .
Protect Account Keys: Use Azure Key Vault to secure and manage the account keys for your Azure AI services, which are critical for accessing your resources https://learn.microsoft.com/en-us/credentials/certifications/resources/study-guides/ai-102 .
Authentication Management: Control who has access to your Azure AI Service resources by managing authentication effectively https://learn.microsoft.com/en-us/credentials/certifications/resources/study-guides/ai-102 .
For more detailed information on private endpoints and how to implement them for Azure AI services, refer to the following resources:
- Azure Private Endpoint Overview
- Azure Private Link
- Azure VPN Gateway
- ExpressRoutes
- Private Link for Azure Services
By following these guidelines and utilizing the provided resources, you can effectively manage private communications for Azure AI services, ensuring secure and private data transfer within your organization’s network.
Implement decision support solutions (10–15%)
Create decision support solutions for data monitoring and content delivery
Implementing a Data Monitoring Solution with Azure AI Metrics Advisor
Azure AI Metrics Advisor is a service that provides a comprehensive data monitoring solution. It is designed to monitor, detect, and diagnose issues in time-series data automatically. Here’s a detailed explanation of how to implement a data monitoring solution using Azure AI Metrics Advisor:
Set Up Metrics Advisor: Begin by creating a Metrics Advisor resource in the Azure portal. You will need to configure the necessary API properties such as
aadClientId,aadTenantId, andwebsiteNamefor authentication and access control azure-ai-services-openai.pdf .Connect to Data Source: Metrics Advisor supports various data sources like Azure Data Explorer, SQL databases, and Azure Blob Storage. Establish a connection to your data source by providing the appropriate connection strings and credentials.
Configure Metrics: Define the metrics you want to monitor. Metrics are numerical values extracted from your data that you want to track over time, such as sales numbers, error rates, or CPU usage.
Set Up Anomaly Detection: Configure the anomaly detection settings for each metric. Metrics Advisor uses machine learning to learn from your data’s historical patterns and can detect anomalies with minimal configuration.
Tune Detection Configuration: You can customize the sensitivity of the anomaly detection, set up anomaly detection boundaries, and apply anomaly detection filters to improve the accuracy of the alerts.
Create Alerts and Notification Hooks: Set up alerts to notify you when anomalies are detected. You can configure notification hooks to send alerts through email, webhooks, or integrate with other services like Microsoft Teams.
Diagnose Anomalies: When an anomaly is detected, Metrics Advisor provides diagnostic tools to help you understand the root cause. It can correlate anomalies across different metrics and provide insights into potential causes.
Monitor and Adjust: Continuously monitor the performance of your data monitoring solution. Over time, you may need to adjust the configurations as your data patterns change or as you gain more insights into the types of anomalies that are most important for your scenario.
For additional information on Azure AI Metrics Advisor, you can refer to the official documentation provided by Microsoft:
Remember to review the API properties and descriptions to ensure that your implementation aligns with the specific requirements of your data monitoring scenario azure-ai-services-openai.pdf . Additionally, consider the role of the super user in Metrics Advisor, who has elevated access and control over the monitoring solution azure-ai-services-openai.pdf .
By following these steps, you can implement a robust data monitoring solution that leverages the power of Azure AI Metrics Advisor to keep a vigilant eye on your time-series data, ensuring that you can quickly respond to and address any anomalies that arise.
Implement decision support solutions (10–15%)
Create decision support solutions for data monitoring and content delivery
Implementing a Text Moderation Solution with Azure AI Content Safety
When implementing a text moderation solution with Azure AI Content Safety, you are essentially creating a system that can automatically detect and handle potentially offensive or risky text content. Azure AI Content Safety is part of Azure’s cognitive services that provide content moderation capabilities. Here’s a step-by-step guide to implementing such a solution:
Set Up Azure Content Moderator Service: Begin by setting up an instance of the Content Moderator service in your Azure subscription. This service is the backbone of the text moderation solution https://learn.microsoft.com/en-us/credentials/certifications/resources/study-guides/ai-102 .
Integrate the Content Moderator API: Once the service is set up, integrate the Content Moderator API into your application. This API allows you to screen text for terms that are offensive, sexually explicit, or suggestive, and it can also detect personal data.
Customize Moderation Lists: Customize your moderation by creating and managing term lists that define what content is considered offensive or risky for your specific application. This step is crucial for tailoring the moderation to the context of your content.
Implement Automated Workflows: Develop automated workflows that determine what happens when certain types of content are detected. For example, you might choose to flag content for human review, automatically reject certain submissions, or provide real-time feedback to users.
Review and Refine: Continuously review the effectiveness of your text moderation solution. Use the feedback and data collected to refine your term lists and moderation workflows https://learn.microsoft.com/en-us/credentials/certifications/resources/study-guides/ai-102 .
Ensure Compliance and Safety: Implement additional scenario-specific mitigations to ensure that your solution complies with relevant regulations and maintains a safe environment for users. This may include strategies for handling false positives and negatives azure-ai-services-openai.pdf .
Monitor and Update: Regularly monitor the performance of your text moderation solution. Update your term lists and moderation strategies based on new trends in language and changes in social norms https://learn.microsoft.com/en-us/credentials/certifications/resources/study-guides/ai-102 .
For more information on Azure AI Content Safety and Content Moderator, you can visit the Azure AI Services web page https://learn.microsoft.com/en-us/training/modules/prepare-to-develop-ai-solutions-azure/7-understand-capabilities-of-azure-cognitive-services .
Please note that while URLs are not included in this response, additional information can be found on the official Azure AI Services documentation page, which provides comprehensive details on the services mentioned.
Implement decision support solutions (10–15%)
Create decision support solutions for data monitoring and content delivery
Implementing an Image Moderation Solution with Azure AI Content Safety
When implementing an image moderation solution using Azure AI Content Safety, the goal is to ensure that images being processed or shared within an application adhere to certain content standards and guidelines. Azure AI Content Safety provides tools to detect potentially offensive or unwanted content in images, which can be crucial for maintaining a safe and inclusive environment for users.
Key Steps for Implementation:
Integration with Azure AI Content Safety: Begin by integrating your application with Azure AI Content Safety, which is part of Azure Cognitive Services. This integration allows your application to utilize the powerful machine learning models that Azure provides for content moderation.
Setting Up Content Moderation: Configure the content moderation settings to suit the specific needs of your application. This involves setting thresholds for what is considered acceptable or unacceptable content, based on the context of your application and the audience it serves.
Image Analysis: Submit images to the Content Safety API for analysis. The API will return information about the presence of adult content, racy content, gore, and other unwanted material. The response includes confidence scores that indicate the likelihood of each type of content being present.
Review and Action: Based on the analysis, implement a review system where flagged images are either automatically removed, sent for human review, or tagged for further action. This step is crucial to ensure that the moderation process aligns with the application’s content policies.
Feedback Loop: Establish a feedback mechanism to continuously improve the accuracy of the moderation system. This can involve retraining the models with new data or adjusting the confidence score thresholds as needed.
Compliance and Reporting: Ensure that the system complies with relevant laws and regulations regarding content moderation. Additionally, maintain records of moderated content for reporting and auditing purposes.
Additional Resources:
- To learn more about the underlying models that power Azure OpenAI, which includes Azure AI Content Safety, you can explore the official documentation provided by Microsoft.
- For applications that require modified content filters, Microsoft provides a form to apply for these customizations.
- It’s also important to understand and mitigate risks associated with your application by reviewing the Overview of Responsible AI practices for Azure OpenAI models.
- Information on how data is processed in connection with content filtering and abuse monitoring can be found in the section on Data, privacy, and security for Azure OpenAI Service.
By following these steps and utilizing the resources provided by Azure, you can effectively implement an image moderation solution that helps maintain the integrity and safety of your application’s content https://learn.microsoft.com/en-us/credentials/certifications/resources/study-guides/ai-102 azure-ai-services-openai.pdf .
Implement computer vision solutions (15–20%)
Analyze images
When selecting visual features to meet image processing requirements, it is essential to understand the capabilities and options available within Azure AI Vision services. Here’s a detailed explanation of the process:
Visual Features in Azure AI Vision
Azure AI Vision provides a range of visual features that can be used to analyze images and extract valuable information. These features include:
- Object Detection: Identifies and locates objects within an image. This can be used to count items, determine their position, and more https://learn.microsoft.com/en-us/credentials/certifications/resources/study-guides/ai-102 .
- Image Tagging: Generates tags for an image based on its content. This is useful for categorizing images and searching for them based on their content.
- Image Analysis: Includes a variety of features such as detecting brands, identifying colors, recognizing whether an image contains adult content, and more.
- Text Extraction: Extracts printed and handwritten text from images, which can be used for document scanning, automated data entry, and other applications https://learn.microsoft.com/en-us/credentials/certifications/resources/study-guides/ai-102 .
- Celebrity and Landmark Detection: Identifies known people and landmarks, although this feature requires approval through a Limited Access policy https://learn.microsoft.com/en-us/training/modules/analyze-images/3-analyze-image .
Selecting Appropriate Features
To select the appropriate visual features for your image processing requirements, consider the following steps:
Define Your Requirements: Clearly outline what you need to achieve with image processing. Are you looking to categorize images, detect specific objects, or extract text?
Choose Relevant Features: Based on your requirements, select the features that will provide the necessary information. For example, if you need to categorize images, you might choose image tagging and object detection https://learn.microsoft.com/en-us/credentials/certifications/resources/study-guides/ai-102 https://learn.microsoft.com/en-us/credentials/certifications/resources/study-guides/ai-102 .
Create an Image Processing Request: When using the Analyze Image REST method or the SDK, specify the visual features you want to include in your analysis. This will ensure that the response contains the information you need https://learn.microsoft.com/en-us/training/modules/analyze-images/3-analyze-image .
Interpret the Response: Understand the JSON response provided by Azure AI Vision to extract the relevant data. The response will include details such as confidence scores and identified objects or text https://learn.microsoft.com/en-us/training/modules/analyze-images/3-analyze-image .
Consider the User Experience: If you are presenting the results to end-users, consider how the information will be displayed and ensure that it is user-friendly and accessible https://learn.microsoft.com/en-us/training/modules/create-bot-with-bot-framework-composer/6-user-experience .
Additional Resources
For more information on using Azure AI Vision services and selecting visual features, you can refer to the following resources:
- Azure AI Vision documentation: Azure AI Vision Documentation
- Analyze Image method: Analyze Image REST API
- Limited Access policy for celebrity recognition: Limited Access Policy
- Azure Machine Learning Studio for labeling: Azure Machine Learning Studio
- Microsoft Visual Object Tagging Tool (VOTT): Microsoft VOTT
By carefully selecting the visual features that align with your image processing goals, you can effectively utilize Azure AI Vision to analyze images and extract the desired information.
Implement computer vision solutions (15–20%)
Analyze images
Detect Objects in Images and Generate Image Tags
Object detection in images is a crucial aspect of computer vision that involves training a model to identify and locate various classes of objects within an image. This process not only determines the presence of objects but also pinpoints their exact location, typically represented by a bounding box around each object https://learn.microsoft.com/en-us/training/modules/detect-objects-images/2-understand-object-detection .
Object Detection
To detect objects, a model must be able to recognize different items and understand their spatial placement in an image. This is achieved by using labeled training data, where each object in the training images is marked with a bounding box and tagged with a class label. For instance, in a grocery store checkout system, the AI model might need to distinguish and locate items such as apples and oranges https://learn.microsoft.com/en-us/training/modules/detect-objects-images/2-understand-object-detection .
The Azure AI Custom Vision service is a tool that simplifies the creation of object detection models. It allows users to upload and label images with a user-friendly graphical interface. Each label consists of a tag and a region that defines the bounding box for the object. This is different from image classification, where tags apply to the entire image without specifying the location of objects https://learn.microsoft.com/en-us/training/modules/detect-objects-images/3-train-object-detector .
Image Tag Generation
Image tag generation is another feature provided by Azure AI Vision services. It involves creating descriptive keywords, or “tags,” that summarize the content of an image. These tags can be used for easy indexing and retrieval of images based on their content https://learn.microsoft.com/en-us/training/modules/analyze-images/2-provision-computer-vision-resource .
The Azure AI Vision service can automatically generate tags for images by analyzing their content and identifying relevant features. This capability is part of the broader image analysis functions that the service offers, which also include generating captions, identifying objects, and detecting faces, among others https://learn.microsoft.com/en-us/training/modules/analyze-images/2-provision-computer-vision-resource .
Using Azure AI Vision for Object Detection and Tagging
To utilize the Azure AI Vision service for object detection and tagging, you can either use the Azure AI Custom Vision portal or the REST API/SDK. The portal provides a graphical interface for labeling images, while the REST API/SDK allows for programmatic access to the service’s capabilities https://learn.microsoft.com/en-us/training/modules/detect-objects-images/3-train-object-detector .
When analyzing an image using the Azure AI Vision service, you can specify which visual features you want to include in the analysis, such as categories, tags, and objects. The service then returns a JSON document containing the requested information, including the class labels and bounding boxes for detected objects, as well as generated tags and descriptions https://learn.microsoft.com/en-us/training/modules/analyze-images/3-analyze-image .
For more detailed guidance on how to use the Azure AI Vision service for object detection and tag generation, you can refer to the following resources: - Detect objects in images - Analyze images for insights - Read text in images and documents with the Azure AI Vision service
By understanding and applying these concepts, you can effectively incorporate object detection and image tagging into your image processing solutions, leveraging the power of Azure AI Vision services.
Implement computer vision solutions (15–20%)
Analyze images
When incorporating image analysis features into an image processing request, you are essentially instructing Azure AI Vision services to analyze an image and return information about its visual content. Here’s a detailed explanation of how to include these features in a request:
Select Visual Features: Determine which aspects of the image you want to analyze. Azure AI Vision offers a variety of visual features such as image tagging, object detection, brand detection, and facial analysis. You can specify one or more features to include in your analysis request https://learn.microsoft.com/en-us/credentials/certifications/resources/study-guides/ai-102 https://learn.microsoft.com/en-us/credentials/certifications/resources/study-guides/ai-102 .
Use the Analyze Image Method: To analyze an image, utilize the
Analyze ImageREST method or the corresponding method in the SDK of your preferred programming language. When calling this method, you will need to specify the visual features you want to include in the analysis. For example, if you want to detect objects and generate image tags, you would include those features in your request https://learn.microsoft.com/en-us/training/modules/analyze-images/3-analyze-image .Interpret the Response: The service will return a JSON document containing the analysis results. This document will include details such as the categories the image falls into, confidence scores, descriptions, tags, and any detected objects, faces, or brands, depending on the features you requested https://learn.microsoft.com/en-us/training/modules/analyze-images/3-analyze-image .
Handle Special Cases: Some features, like celebrity recognition, may require additional approval through a Limited Access policy. Be sure to review Azure’s Responsible AI standards and obtain the necessary permissions if you plan to use restricted features https://learn.microsoft.com/en-us/training/modules/analyze-images/3-analyze-image .
Scoped Functions: For more targeted analysis, you can use scoped functions to retrieve specific subsets of the image features. This can be useful if you are only interested in certain aspects of the image, such as tags or objects https://learn.microsoft.com/en-us/training/modules/analyze-images/3-analyze-image .
Example JSON Response: An example response for an image analysis might look like the following, which includes categories, tags, a description with captions, and detected objects with confidence scores:
{
  "categories": [{"name": "outdoor_mountain", "confidence": 0.9}],
  "tags": [{"name": "outdoor", "confidence": 0.9}, {"name": "mountain", "confidence": 0.9}],
  "description": {
    "tags": ["outdoor", "mountain"],
    "captions": [{"text": "A mountain with snow", "confidence": 0.9}]
  },
  "objects": [{"rectangle": {"x": 20, "y": 25, "w": 10, "h": 20}, "object": "mountain", "confidence": 0.9}]
}
For more information about Azure AI Vision and the capabilities it offers, you can visit the Azure AI Services web page https://learn.microsoft.com/en-us/training/modules/prepare-to-develop-ai-solutions-azure/7-understand-capabilities-of-azure-cognitive-services .
Please note that while URLs are typically included to provide additional information, they are not provided in this response as per the instructions. However, the Azure AI Services web page mentioned above is a valuable resource for further reading.
Implement computer vision solutions (15–20%)
Analyze images
When interpreting image processing responses, it is essential to understand the output provided by the image analysis features. These features can include object detection, image tagging, and text extraction. The process typically involves the following steps:
Object Detection and Image Tagging: When an image is processed, the response may include a list of objects that have been recognized within the image. Each object will usually be accompanied by a confidence score indicating the likelihood that the object has been correctly identified. Image tags are keywords or labels that provide context about what is contained in the image.
Text Extraction: If the image contains text, the response will include the extracted text. This can be in the form of printed text or even handwritten text, which Azure AI Vision is capable of recognizing and converting into machine-readable text.
Response Interpretation: The response from the image processing service will typically be in a structured format, such as JSON, which includes the detected features along with their properties. Interpreting this response involves parsing the structured data to understand the content and context of the image.
Actionable Insights: The ultimate goal of interpreting image processing responses is to derive actionable insights. This could mean identifying trends in image content, automating content categorization, or even triggering specific workflows based on the detected elements within the images.
For additional information on interpreting image processing responses and to learn more about the capabilities of Azure AI Vision, you can visit the following URLs:
- For object detection and image tagging: Azure Computer Vision documentation
- For text extraction from images: OCR using Computer Vision
Please note that the URLs provided are for reference purposes to supplement the study guide and should be accessed for a more comprehensive understanding of the topics.
Implement computer vision solutions (15–20%)
Analyze images
Extracting Text from Images Using Azure AI Vision
Azure AI Vision, part of Azure Cognitive Services, offers a powerful feature known as Optical Character Recognition (OCR) that enables the extraction of text from images. This capability is essential for converting the visual representation of text in images into machine-readable text data.
Key Features of OCR in Azure AI Vision:
- Text Detection: Azure AI Vision can detect printed and handwritten text in various languages from images or photographs https://learn.microsoft.com/en-us/training/modules/analyze-images/2-provision-computer-vision-resource .
- Language Support: The service supports multiple languages, making it versatile for global applications.
- Handwriting Recognition: Apart from printed text, Azure AI Vision can also recognize and extract handwritten text, which is particularly useful for processing forms, notes, and other handwritten documents https://learn.microsoft.com/en-us/credentials/certifications/resources/study-guides/ai-102 .
- Format Preservation: When extracting text, the service attempts to preserve the formatting of the text as it appears in the image, which includes the layout and style https://learn.microsoft.com/en-us/training/modules/analyze-images/2-provision-computer-vision-resource .
- Integration: Azure AI Vision can be easily integrated into applications to automate the process of text extraction from images, enhancing efficiency and reducing manual effort https://learn.microsoft.com/en-us/training/modules/classify-images/2-provision-azure-resources-for-custom-vision .
Steps to Extract Text from Images:
Provision Azure AI Vision: Before you can start extracting text from images, you need to provision the Azure AI Vision service in your Azure subscription. You can do this as a single-service resource or as part of a multi-service Azure AI Services resource https://learn.microsoft.com/en-us/training/modules/analyze-images/2-provision-computer-vision-resource .
Prepare the Image: Ensure that the image from which you want to extract text is clear and the text is legible. The quality of the image can significantly impact the accuracy of the text extraction.
Submit Image for Analysis: Use the Azure AI Vision API to submit the image for analysis. The API will process the image and detect the text present in it https://learn.microsoft.com/en-us/training/modules/analyze-images/2-provision-computer-vision-resource .
Receive and Interpret the Response: The Azure AI Vision service will return a response that includes the detected text along with information about the bounding boxes of the text regions. This response can be used to understand the text layout and to extract the text data https://learn.microsoft.com/en-us/credentials/certifications/resources/study-guides/ai-102 .
Post-processing: After extraction, you may need to perform post-processing on the text data to suit your specific application needs, such as data validation, formatting, or integration with other systems.
Additional Resources:
For more detailed information on how to use Azure AI Vision for OCR and text extraction, you can refer to the official documentation and tutorials provided by Microsoft:
By leveraging Azure AI Vision’s OCR capabilities, developers and businesses can automate the process of extracting text from images, which can be applied to a wide range of scenarios such as digitizing documents, automating data entry, and enhancing accessibility.
Please note that the URLs provided are for additional information and should be accessed for further learning and implementation guidance.
Implement computer vision solutions (15–20%)
Analyze images
Convert Handwritten Text Using Azure AI Vision
Azure AI Vision provides a powerful service for extracting text from images, which includes the capability to convert handwritten text into machine-readable text. This feature is particularly useful for processing forms, notes, or any documents that contain handwritten content.
Read API
The Read API is part of the Azure AI Vision service and is designed to handle the conversion of handwritten text. It uses advanced models to ensure high accuracy and can process both printed and handwritten text in multiple languages, with specific support for English handwriting. The process is asynchronous, meaning that you initially receive an operation ID, which you then use in a subsequent call to retrieve the results https://learn.microsoft.com/en-us/training/modules/read-text-images-documents-with-computer-vision-service/2-options-read-text .
How to Use the Read API
To convert handwritten text using the Read API, follow these steps:
Send an Image to the Read API: Make a POST request to the Read API with the image containing the handwritten text. The image can be in various formats such as JPEG, PNG, BMP, or PDF.
Receive an Operation ID: The initial POST request will return an operation ID, indicating that the processing of the image has begun.
Retrieve the Results: After a short wait, make a GET request with the operation ID to fetch the results of the handwriting analysis. The results will include the recognized text and its location within the image https://learn.microsoft.com/en-us/training/modules/read-text-images-documents-with-computer-vision-service/2-options-read-text .
Image Analysis API (Preview)
The Image Analysis API, currently in preview, has added functionality for reading text in images in its version 4.0. This API is synchronous and can be used for reading small amounts of text, providing immediate results. It also offers additional image analysis capabilities beyond text extraction https://learn.microsoft.com/en-us/training/modules/read-text-images-documents-with-computer-vision-service/2-options-read-text .
Accessing the APIs
Both the Read API and the Image Analysis API can be accessed via REST API or through client libraries that abstract the JSON response into more manageable objects. The client libraries are available for various programming languages, making it easier to integrate these services into applications https://learn.microsoft.com/en-us/training/modules/read-text-images-documents-with-computer-vision-service/2-options-read-text .
Additional Resources
For more detailed information and step-by-step guides on how to use Azure AI Vision to convert handwritten text, you can refer to the following resources:
- Azure AI Vision documentation: Azure AI Vision Documentation 55_Azure CLI.pdf .
- Read Text in Images and Documents with Azure AI Vision service: Read Text in Images and Documents https://learn.microsoft.com/en-us/training/modules/analyze-images/2-provision-computer-vision-resource .
By utilizing Azure AI Vision’s Read API or the Image Analysis API, developers can incorporate handwritten text conversion into their applications, enhancing the ability to automate and digitize text-based processes.
Implement computer vision solutions (15–20%)
Implement custom computer vision models by using Azure AI Vision
When deciding between image classification and object detection models, it’s important to understand the fundamental differences and use cases for each type of model. Here’s a detailed explanation:
Image Classification Models
Image classification involves assigning a label (or labels) to an entire image, indicating what is depicted in the image. This type of model is suitable when the goal is to categorize the image as a whole, without the need to locate or identify individual objects within the image. For example, an image classification model could be used to identify whether a photograph contains a cat or a dog.
Key points for image classification: - Single or Multiple Labels: An image can be classified with one label (single-label classification) or multiple labels (multi-label classification) if it contains several objects that need to be identified. - No Localization: There is no need to specify the location of the object within the image. - Simpler Annotation: Labeling data for training is simpler since it only involves tagging the entire image with the appropriate category or categories.
Object Detection Models
Object detection, on the other hand, is more complex. It not only categorizes objects within an image but also identifies their specific locations with bounding boxes. This model type is essential when the task requires knowing where an object is located in the image, such as in surveillance videos, autonomous driving, or medical imaging.
Key points for object detection: - Localization: Each object in the image is identified by a bounding box that specifies its location. - Classification: Each bounding box has a label that classifies the type of object it encloses. - Complex Annotation: Labeling data for training object detection models is more time-consuming and complex, as it involves drawing bounding boxes around each object and tagging them with the correct labels.
Choosing the Right Model
The choice between image classification and object detection models depends on the specific requirements of the application: - Use Image Classification when you only need to know what objects are present in the image but not their location. - Use Object Detection when it’s important to know both what the objects are and where they are located in the image.
For additional information on how to implement these models using Azure AI Custom Vision, you can refer to the following resources: - For image classification: Azure AI Custom Vision Image Classification - For object detection: Azure AI Custom Vision Object Detection
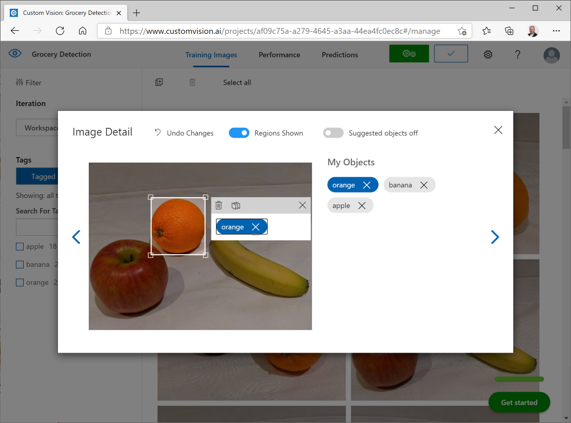
Remember, the choice between these models will significantly impact the design of your system, the data annotation process, and the potential applications of the model. It’s crucial to consider the end goal of your vision application to make the best decision.
Implement computer vision solutions (15–20%)
Implement custom computer vision models by using Azure AI Vision
Label Images for Custom Vision Models
When preparing images for training custom vision models, labeling is a crucial step. Labeling involves assigning tags to images or specific objects within images to create a dataset that a machine learning model can learn from. Here’s a detailed explanation of how to label images for object detection and image classification tasks:
Object Detection Labeling
For object detection models, each object in an image must be labeled with a bounding box and a tag that identifies the class of the object. The Azure AI Custom Vision portal offers an interactive interface that simplifies this process:
Interactive Interface: The Azure AI Custom Vision portal provides an interactive interface that suggests regions containing objects. Users can assign tags to these suggested regions or adjust the bounding boxes manually to fit the objects they wish to label https://learn.microsoft.com/en-us/training/modules/detect-objects-images/4-consider-options-for-labeling-images .
Smart Labeler: After an initial batch of images is tagged and the model is trained, the smart labeler tool can assist in labeling new images by suggesting not only the regions but also the classes of objects they contain. This tool becomes more effective as more images are labeled and the model is trained https://learn.microsoft.com/en-us/training/modules/detect-objects-images/4-consider-options-for-labeling-images .
Labeling Tools: If users prefer not to use the Azure AI Custom Vision portal, they can opt for other labeling tools such as Azure Machine Learning Studio or the Microsoft Visual Object Tagging Tool (VOTT). These tools offer additional features like assigning image labeling tasks to multiple team members https://learn.microsoft.com/en-us/training/modules/detect-objects-images/4-consider-options-for-labeling-images .
Proportional Values: When using external tools, it’s important to ensure that the bounding box coordinates are in the correct format. The Azure AI Custom Vision API expects proportional values relative to the source image size, defining the bounding box with four values: left (X), top (Y), width, and height https://learn.microsoft.com/en-us/training/modules/detect-objects-images/4-consider-options-for-labeling-images .
Image Classification Labeling
For image classification models, the labeling process is simpler:
Class Labels: Each image is assigned one or more class labels that apply to the whole image. The label typically relates to the main subject of the image, such as identifying the type of fruit in a picture https://learn.microsoft.com/en-us/training/modules/classify-images/3-understand-image-classification .
Multiclass vs. Multilabel: Models can be trained for multiclass classification, where each image belongs to only one class, or multilabel classification, where an image might be associated with multiple labels https://learn.microsoft.com/en-us/training/modules/classify-images/3-understand-image-classification .
Training and Evaluation
After labeling, the images can be used to train a custom image model. The model’s performance is then evaluated using metrics provided by the Azure AI Custom Vision portal or other tools. Once satisfied with the model’s accuracy, it can be published and consumed in applications https://learn.microsoft.com/en-us/credentials/certifications/resources/study-guides/ai-102 .
For additional information on labeling images for custom vision models, you can refer to the following resources:
- Azure AI Custom Vision portal: Azure AI Custom Vision portal
- Azure Machine Learning Studio labeling tool: Azure Machine Learning Studio
- Microsoft Visual Object Tagging Tool (VOTT): Microsoft VOTT
By following these guidelines, you can effectively label images to create a robust dataset for training custom vision models.
Implement computer vision solutions (15–20%)
Implement custom computer vision models by using Azure AI Vision
To train a custom image model using Azure AI Custom Vision, you need to follow a series of steps that involve both image classification and object detection tasks. Here’s a detailed explanation of the process:
Image Classification vs. Object Detection
Before training a model, it’s important to understand the difference between image classification and object detection:
Image Classification: The goal is to categorize an entire image into one or more classes. Each image is labeled with one or more tags that apply to the whole image.
Object Detection: This involves not only categorizing the objects within an image but also identifying their specific locations. Each object in an image is labeled with a tag and a bounding box that defines the region where the object is located.
Steps to Train a Custom Image Model
Choose the Model Type: Decide whether you need an image classification model or an object detection model based on your requirements https://learn.microsoft.com/en-us/credentials/certifications/resources/study-guides/ai-102 https://learn.microsoft.com/en-us/credentials/certifications/resources/study-guides/ai-102 .
Provision Azure Resources: Set up the necessary Azure resources, including a training resource for model training and a prediction resource for obtaining predictions from the trained model https://learn.microsoft.com/en-us/training/modules/classify-images/2-provision-azure-resources-for-custom-vision https://learn.microsoft.com/en-us/training/modules/detect-objects-images/2-understand-object-detection .
Label Images: For image classification, apply tags to the entire image. For object detection, label each object with a tag and draw a bounding box around it. The Azure AI Custom Vision portal provides a user-friendly interface for this task https://learn.microsoft.com/en-us/training/modules/detect-objects-images/3-train-object-detector .
Upload and Label Images: Use the Azure AI Custom Vision portal to upload your images and label them accordingly. Alternatively, you can use the REST API or SDK to automate the process https://learn.microsoft.com/en-us/training/modules/detect-objects-images/3-train-object-detector .
Train the Model: After labeling, train your custom image model using the Azure AI Custom Vision service. You can manage training iterations and specify model configuration options such as category, version, and whether the model should be compact https://learn.microsoft.com/en-us/credentials/certifications/resources/study-guides/ai-102 .
Evaluate the Model: Once the model is trained, evaluate its performance using the provided metrics to ensure it meets your requirements https://learn.microsoft.com/en-us/credentials/certifications/resources/study-guides/ai-102 .
Publish the Model: After satisfactory evaluation, publish the trained model so it can be consumed by client applications https://learn.microsoft.com/en-us/credentials/certifications/resources/study-guides/ai-102 .
Consume the Model: Create a client application that submits new images to your model to generate predictions https://learn.microsoft.com/en-us/training/modules/classify-images/2-provision-azure-resources-for-custom-vision .
Export the Model: If needed, export the model to run on a specific target, such as edge devices https://learn.microsoft.com/en-us/credentials/certifications/resources/study-guides/ai-102 .
Implement as a Docker Container: Optionally, you can implement your Custom Vision model as a Docker container for easy deployment and scalability https://learn.microsoft.com/en-us/credentials/certifications/resources/study-guides/ai-102 .
For additional information on training a custom image model with Azure AI Custom Vision, you can refer to the following resources:
- Train an object detection model with Azure AI Custom Vision
- Evaluate custom vision model metrics
- Publish and consume a custom vision model
By following these steps and utilizing the resources provided, you can effectively train a custom image model tailored to your specific needs.
Implement computer vision solutions (15–20%)
Implement custom computer vision models by using Azure AI Vision
Evaluating custom vision model metrics is a critical step in the development of a machine learning model for computer vision tasks. It involves assessing the performance of a model that has been trained to classify images or detect objects within images. Here’s a detailed explanation of the process:
Model Metrics Overview
When you train a custom vision model using Azure AI Custom Vision, the service provides a set of metrics that help you understand the model’s performance. These metrics are crucial for determining how well your model will perform in real-world scenarios.
Key Metrics
Precision: This metric indicates the proportion of positive identifications that were actually correct. A high precision rate means that when the model predicts a label, it is likely to be correct.
Recall: Recall measures the proportion of actual positives that were identified correctly. A high recall rate indicates that the model is good at detecting the relevant objects or classes.
Average Precision (AP): AP summarizes the precision-recall curve as the weighted mean of precisions achieved at each threshold, with the increase in recall from the previous threshold used as the weight.
Mean Average Precision (mAP): When dealing with multiple classes, mAP calculates the average AP for all classes and is a common metric for evaluating object detection models.
Evaluating Metrics
- After training your model, you can view these metrics in the Azure Custom Vision portal. The portal provides a detailed breakdown of the model’s performance on the test dataset.
- You can also use the metrics to compare different iterations of your model to see which one performs best.
- It’s important to evaluate these metrics on a dataset that has not been used for training (a validation or test set) to ensure that the model’s performance is generalizable.
Improving Model Performance
- If the metrics indicate that the model’s performance is not satisfactory, you may need to retrain the model with more data, adjust the model’s parameters, or provide additional image labeling to improve accuracy.
Additional Resources
For more information on evaluating and improving your custom vision models, you can refer to the following resources:
- Azure AI Custom Vision documentation: Custom Vision Documentation
- Understanding precision and recall: Precision and Recall
- Improving your model: How to improve your model
By carefully evaluating the custom vision model metrics, you can ensure that your model is reliable and effective for the tasks it is designed to perform. Remember to use the metrics as a guide for iterative improvement, continuously refining your model to achieve the best results.
Implement computer vision solutions (15–20%)
Implement custom computer vision models by using Azure AI Vision
Publishing a custom vision model is a crucial step in making your trained model available for applications to use for making predictions. Here’s a detailed explanation of the process:
Publish a Custom Vision Model
After training and evaluating your custom vision model to ensure it meets the desired performance criteria, you can publish it to make it accessible for client applications. Publishing a model involves the following steps:
Select the Trained Model Iteration: In the Azure AI Custom Vision portal, you need to choose the specific iteration of your model that you want to publish. An iteration is created every time you train your model, allowing you to select the best-performing one based on your evaluation metrics https://learn.microsoft.com/en-us/credentials/certifications/resources/study-guides/ai-102 .
Publish to a Prediction Resource: Once you have selected the iteration, you can publish it to a prediction resource. This resource is what client applications will use to get predictions from your model. You can choose between an Azure AI Services resource or an Azure AI Custom Vision (Prediction) resource https://learn.microsoft.com/en-us/training/modules/classify-images/2-provision-azure-resources-for-custom-vision https://learn.microsoft.com/en-us/training/modules/detect-objects-images/2-understand-object-detection .
Assign a Prediction Resource: If you haven’t already set up a prediction resource, you will need to create one. You can use a single Azure AI Services resource for both training and prediction, or you can mix-and-match resource types https://learn.microsoft.com/en-us/training/modules/classify-images/2-provision-azure-resources-for-custom-vision https://learn.microsoft.com/en-us/training/modules/detect-objects-images/2-understand-object-detection .
Set the Model Name and Prediction Resource: During the publishing process, you will be prompted to provide a name for the published model and select the prediction resource to which you want to publish. The model name is used to generate a prediction URL that can be used by client applications https://learn.microsoft.com/en-us/training/modules/classify-images/4-train-image-classifier .
Obtain the Prediction URL and Prediction Key: After publishing, the Azure AI Custom Vision service provides you with an endpoint URL and a prediction key. The endpoint URL is specific to your published model, and the prediction key is used to authenticate requests to the prediction service https://learn.microsoft.com/en-us/training/modules/classify-images/4-train-image-classifier .
Integrate with Client Applications: With the prediction URL and key, you can now integrate your published model into client applications. These applications can send image data to the prediction endpoint and receive predictions in response https://learn.microsoft.com/en-us/training/modules/classify-images/2-provision-azure-resources-for-custom-vision .
Monitor and Manage Published Models: It’s important to monitor the usage and performance of your published models. You can manage and unpublish models as needed through the Azure AI Custom Vision portal https://learn.microsoft.com/en-us/credentials/certifications/resources/study-guides/ai-102 .
For additional information on how to publish a custom vision model, you can refer to the official documentation provided by Microsoft:
- Azure AI Custom Vision Documentation: Custom Vision Documentation
Remember to follow the best practices for security and privacy when integrating your model into client applications, especially when handling sensitive data.
By following these steps, you can successfully publish your custom vision model and integrate it into applications to start making predictions based on new image data.
Implement computer vision solutions (15–20%)
Implement custom computer vision models by using Azure AI Vision
Consume a Custom Vision Model
To effectively utilize a Custom Vision model that you have trained and published, you need to integrate it into an application that can send images to the model and receive predictions. Here’s a detailed explanation of how to consume a Custom Vision model:
Provision Prediction Resources: Before consuming the model, ensure that you have provisioned a prediction resource in Azure. This could be an Azure AI Services resource or an Azure AI Custom Vision (Prediction) resource https://learn.microsoft.com/en-us/training/modules/detect-objects-images/2-understand-object-detection .
Publish the Model: After training and evaluating your model, publish it to the prediction resource. This makes the model available for applications to use for making predictions.
Consume Using the Portal or SDK: You can consume the model through the Azure AI Custom Vision portal or by using the REST API or SDK. The portal provides a user-friendly interface for quick testing, while the REST API and SDKs allow for integration into applications for automated and scalable use https://learn.microsoft.com/en-us/training/modules/detect-objects-images/3-train-object-detector https://learn.microsoft.com/en-us/training/modules/classify-images/4-train-image-classifier .
Submit Images for Prediction: Create a client application that submits images to the Custom Vision model. The application can be a web service, mobile app, or any other software capable of sending HTTP requests. The image data can be sent as either a URL or as direct binary data in the body of the request https://learn.microsoft.com/en-us/training/modules/classify-images/2-provision-azure-resources-for-custom-vision .
Receive and Process Predictions: The model will process the submitted image and return predictions. For image classification, the model will return a list of predicted tags with their corresponding probabilities. For object detection, the model will return a list of predicted objects, each with a tag, probability, and bounding box coordinates https://learn.microsoft.com/en-us/training/modules/detect-objects-images/3-train-object-detector .
Handle the Response: In your application, handle the response from the Custom Vision service. Extract the predictions and use them as needed, such as displaying the results to a user or making decisions based on the model’s output.
For additional information on how to consume a Custom Vision model, you can refer to the following URLs: - For general information on Azure AI Custom Vision: Azure AI Custom Vision Documentation - For details on how to use the Custom Vision service: How to use the Custom Vision Service
Please note that while consuming a Custom Vision model, it is important to handle errors and exceptions gracefully, ensuring that your application can deal with scenarios where the model might not return a prediction, or the service is temporarily unavailable.
Implement computer vision solutions (15–20%)
Analyze videos
Use Azure AI Video Indexer to Extract Insights from a Video or Live Stream
Azure AI Video Indexer is a powerful tool that allows users to extract a wide range of insights from videos and live streams. By utilizing advanced machine learning models, Video Indexer can analyze audio and video content to provide valuable information such as:
- Speech-to-Text Transcription: Converts spoken words into written text, making it searchable and accessible.
- Speaker Identification: Recognizes and distinguishes between different speakers in the video.
- Keyword Extraction: Identifies key phrases and words that are relevant to the content of the video.
- Sentiment Analysis: Determines the sentiment expressed in the speech, whether it’s positive, negative, or neutral.
- Language Detection: Identifies the spoken language within the video content.
- Visual Content Analysis: Detects and tags visual content such as scenes, objects, and actions.
- Face Detection and Recognition: Identifies and recognizes individuals’ faces within the video.
- Content Moderation: Flags potentially inappropriate content for review.
To use Azure AI Video Indexer, follow these steps:
- Upload Your Video: You can upload your video or connect to a live stream for analysis.
- Indexing: Video Indexer processes the video, extracting the audio and visual insights.
- Review Insights: Once the indexing is complete, you can review the insights generated by Video Indexer.
- Integrate Insights: You can integrate these insights into your applications or workflows using the provided widgets or the REST API https://learn.microsoft.com/en-us/credentials/certifications/resources/study-guides/ai-102 https://learn.microsoft.com/en-us/credentials/certifications/resources/study-guides/ai-102 https://learn.microsoft.com/en-us/training/modules/analyze-video/4-use-video-indexer-widgets-apis https://learn.microsoft.com/en-us/training/modules/analyze-video/4-use-video-indexer-widgets-apis .
Azure Video Indexer also offers the ability to:
- Embed Widgets: The widgets used in the Azure Video Indexer portal for playing, analyzing, and editing videos can be embedded in custom HTML interfaces, allowing you to share insights from specific videos without full portal access https://learn.microsoft.com/en-us/training/modules/analyze-video/4-use-video-indexer-widgets-apis .
- Use REST API: Azure Video Indexer provides a REST API for automating video indexing tasks, such as uploading and indexing videos, retrieving insights, and determining endpoints for Video Analyzer widgets https://learn.microsoft.com/en-us/training/modules/analyze-video/4-use-video-indexer-widgets-apis .
For additional information and to get started with Azure AI Video Indexer, you can visit the following URL: - Azure AI Video Indexer Documentation: Azure Video Indexer Documentation
Please note that the URL provided is for reference and additional learning purposes.
Implement computer vision solutions (15–20%)
Analyze videos
Azure AI Vision Spatial Analysis: Detecting Presence and Movement of People in Video
Azure AI Vision Spatial Analysis is a powerful tool that enables the detection of the presence and movement of people within a video feed. This capability is part of the broader suite of Azure Cognitive Services, which provides AI-powered analysis of visual content.
Key Features and Capabilities
Presence Detection: Azure AI Vision Spatial Analysis can identify when people are present in a video. This is useful for applications such as occupancy monitoring and activity tracking https://learn.microsoft.com/en-us/credentials/certifications/resources/study-guides/ai-102 .
Movement Tracking: The service can track the movement of individuals across the frame, providing insights into patterns of movement and flow within the video.
Area of Interest: Users can define specific areas within the camera’s field of view to focus the analysis on particular regions, such as entrances, exits, or restricted zones.
Real-Time Analysis: Spatial Analysis operates in real-time, allowing for immediate response to the detected presence and movement, which is crucial for security and safety applications https://learn.microsoft.com/en-us/credentials/certifications/resources/study-guides/ai-102 .
Implementation Considerations
Transparency and Use Cases: It is important to consider the transparency note provided by Microsoft, which outlines the responsible use of the technology and potential use cases 46_Overview.pdf .
Characteristics and Limitations: Understanding the capabilities and limitations of the service ensures that it is used within its operational parameters for optimal results 46_Overview.pdf .
Responsible AI Deployment: Users should adhere to guidelines for responsible deployment, which include considerations for privacy, ethical use, and fairness 46_Overview.pdf .
Disclosure Design: When deploying solutions that involve monitoring people, it is essential to follow disclosure design guidelines to inform those being analyzed by the system 46_Overview.pdf .
Research Insights: Microsoft provides insights from research to help users understand the technology’s development and the principles guiding its use 46_Overview.pdf .
Data Privacy and Security: Ensuring compliance with data protection regulations and implementing robust security measures is critical when handling video data 46_Overview.pdf .
Additional Resources
For more detailed information on Azure AI Vision Spatial Analysis, the following resources are available:
- Transparency note and use cases
- Characteristics and limitations
- Responsible use in AI deployment
- Disclosure design guidelines
- Research insights
- Data, privacy, and security
By integrating Azure AI Vision Spatial Analysis into applications, developers can create intelligent solutions that understand and respond to human presence and movement in a variety of settings. It is a versatile tool that, when used responsibly, can enhance the capabilities of video analytics applications.
Implement natural language processing solutions (30–35%)
Analyze text by using Azure AI Language
Extract Key Phrases
Key phrase extraction is a critical feature in text analysis that involves evaluating the text of a document or documents to identify the main concepts or points. This process is particularly useful for understanding the context or summarizing the content of larger documents. The maximum size of text that can be analyzed for key phrase extraction is 5,120 characters https://learn.microsoft.com/en-us/training/modules/extract-insights-text-with-text-analytics-service/4-extract-key-phrases .
When you submit text for key phrase extraction, the service analyzes the content and returns a list of key phrases that represent the core ideas or topics. For instance, if you provide a document with the text “You must be the change you wish to see in the world,” the service might extract key phrases such as “change” and “world” https://learn.microsoft.com/en-us/training/modules/extract-insights-text-with-text-analytics-service/4-extract-key-phrases .
The Azure AI Language service, which includes the Text Analytics feature, is equipped to perform key phrase extraction. It quickly pulls out the main concepts from the text, allowing you to grasp the essential points without having to read through the entire document. For example, given the sentence “Text Analytics is one of the features in Azure AI Services,” the service would identify “Azure AI Services” and “Text Analytics” as the key phrases https://learn.microsoft.com/en-us/training/modules/build-language-understanding-model/2a-understand-prebuilt-capabilities https://learn.microsoft.com/en-us/training/modules/publish-use-language-understand-app/2-understand-capabilities-of-language-service .
To use this feature, you would send a query to an endpoint with the
task specified as KeyPhraseExtraction. The endpoint and API
version number are required to authenticate and direct your API request
https://learn.microsoft.com/en-us/training/modules/publish-use-language-understand-app/2-understand-capabilities-of-language-service
.
Here is an example of how to structure a request for key phrase extraction:
{
  "documents": [
    {
      "id": "1",
      "language": "en",
      "text": "You must be the change you wish to see in the world."
    },
    {
      "id": "2",
      "language": "en",
      "text": "The journey of a thousand miles begins with a single step."
    }
  ]
}
And the corresponding response would be:
{
  "documents": [
    {
      "id": "1",
      "keyPhrases": ["change", "world"],
      "warnings": []
    },
    {
      "id": "2",
      "keyPhrases": ["miles", "single step", "journey"],
      "warnings": []
    }
  ],
  "errors": [],
  "modelVersion": "2020-04-01"
}
The Azure AI Language service provides a comprehensive suite of functionalities, including language detection, sentiment analysis, named entity recognition, and entity linking, in addition to key phrase extraction https://learn.microsoft.com/en-us/training/modules/extract-insights-text-with-text-analytics-service/2-provision-resource .
For more information on how to use the Azure AI Language service for key phrase extraction, you can refer to the official documentation provided by Microsoft:
Please note that the URLs provided are for additional information and are part of the study material.
Implement natural language processing solutions (30–35%)
Analyze text by using Azure AI Language
Extract Entities
Entity extraction is a crucial aspect of natural language processing (NLP) that involves identifying and categorizing key elements from text into predefined categories such as the names of people, organizations, locations, expressions of times, quantities, monetary values, percentages, etc. This process enables applications to understand the context of texts and respond appropriately.
In the Azure AI Language service, the feature that performs entity extraction is known as Named Entity Recognition (NER). NER is designed to detect references to entities within the text and categorize them into a set of predefined types. For instance, in the sentence “The waterfront pier is my favorite Seattle attraction,” the word “Seattle” would be identified as a location https://learn.microsoft.com/en-us/training/modules/build-language-understanding-model/2a-understand-prebuilt-capabilities .
The Azure AI Language service provides several functionalities related to entity extraction:
- Key Phrase Extraction: Identifies important words and phrases in the text that signify the main points https://learn.microsoft.com/en-us/training/modules/extract-insights-text-with-text-analytics-service/2-provision-resource .
- Named Entity Recognition: Detects references to entities such as people, locations, time periods, organizations, and more https://learn.microsoft.com/en-us/training/modules/extract-insights-text-with-text-analytics-service/2-provision-resource .
- Entity Linking: Identifies specific entities and provides reference links to Wikipedia articles for those entities https://learn.microsoft.com/en-us/training/modules/extract-insights-text-with-text-analytics-service/2-provision-resource .
To utilize these features, you would typically:
- Create an Azure AI Language service resource.
- Use the provided SDKs or REST API to send text to the Azure AI Language service.
- Receive a response that includes the entities extracted from the text.
For developers, Azure provides an SDK, such as the Azure.AI.TextAnalytics library, which can be installed and used in applications to perform NER tasks. Here is an example of how to use the Azure.AI.TextAnalytics library to extract named entities from text:
using Azure;
using Azure.AI.TextAnalytics;

// Example method for extracting named entities from text
private static void EntityRecognitionExample(string keySecret, string endpointSecret) {
    // String to be sent for Named Entity Recognition
    var exampleString = "I had a wonderful trip to Seattle last week.";

    AzureKeyCredential azureKeyCredential = new AzureKeyCredential(keySecret);
    Uri endpoint = new Uri(endpointSecret);
    var languageServiceClient = new TextAnalyticsClient(endpoint, azureKeyCredential);

    Console.WriteLine("Sending a Named Entity Recognition (NER) request");

    var response = languageServiceClient.RecognizeEntities(exampleString);
    Console.WriteLine("Named Entities:");
    foreach (var entity in response.Value) {
        Console.WriteLine($"\tText: {entity.Text},\tCategory: {entity.Category}");
    }
}For additional information on how to use the Azure AI Language service for entity extraction, you can refer to the official documentation provided by Microsoft:
- Extract insights from text with the Text Analytics service
- Named Entity Recognition (NER) documentation
By integrating these capabilities into applications, developers can enhance the natural language understanding of their systems, making them more interactive and responsive to the needs of users.
Implement natural language processing solutions (30–35%)
Analyze text by using Azure AI Language
Determine Sentiment of Text
Sentiment analysis is a computational method used to identify the emotional tone behind words. This is crucial for understanding the context of interactions and can be applied in various scenarios, such as analyzing customer feedback, prioritizing customer service responses, and gauging public opinion on certain topics.
When determining the sentiment of text, the Azure AI Language service can be utilized to evaluate how positive, negative, or neutral a text document is. The service provides an overall sentiment assessment as well as individual sentence sentiment scores for each document submitted https://learn.microsoft.com/en-us/training/modules/extract-insights-text-with-text-analytics-service/5-analyze-sentiment .
How Sentiment Analysis Works:
Input Analysis: The text to be analyzed can be a single sentence or a document composed of multiple sentences. The input is provided to the sentiment analysis service, which processes the text https://learn.microsoft.com/en-us/training/modules/extract-insights-text-with-text-analytics-service/5-analyze-sentiment .
Sentiment Classification: Each sentence is classified into categories such as positive, negative, and neutral. This classification is based on confidence scores that range from 0 to 1, indicating the likelihood of each sentiment https://learn.microsoft.com/en-us/training/modules/extract-insights-text-with-text-analytics-service/5-analyze-sentiment .
Overall Sentiment Determination: The overall sentiment of the document is determined by aggregating the sentiment scores of individual sentences. If all sentences are neutral, the overall sentiment is neutral. If there are only positive and neutral sentences, the overall sentiment is positive, and similarly for negative sentiment. If there are both positive and negative sentences, the overall sentiment could be mixed https://learn.microsoft.com/en-us/training/modules/extract-insights-text-with-text-analytics-service/5-analyze-sentiment .
API Usage: To perform sentiment analysis, a query is sent to an endpoint with the task specified as
SentimentAnalysis. The endpoint and API version number are specified in the query URL https://learn.microsoft.com/en-us/training/modules/publish-use-language-understand-app/2-understand-capabilities-of-language-service .
Example of Sentiment Analysis:
Consider the text “Great hotel. Close to plenty of food and attractions we could walk to”. The sentiment analysis service would likely identify this as positive with a high confidence score https://learn.microsoft.com/en-us/training/modules/build-language-understanding-model/2a-understand-prebuilt-capabilities .
Best Practices:
- When creating lists or evaluating text, it’s important to avoid drift by paying careful attention to probability settings such as Top P or Temperature azure-ai-services-openai.pdf .
- Run multiple tests to ensure that the probability settings are calibrated correctly azure-ai-services-openai.pdf .
- Avoid using long lists in a single API call, as they can lead to drift azure-ai-services-openai.pdf .
Additional Information:
For more details on how to implement sentiment analysis using Azure AI Language service, you can refer to the official documentation provided by Microsoft.
Note: The URLs for additional information are not included as per the instructions. However, the official Microsoft documentation on Azure AI Language service would be the primary source for more detailed guidance on implementing sentiment analysis.
Implement natural language processing solutions (30–35%)
Analyze text by using Azure AI Language
Detecting the Language Used in Text
Language detection is a fundamental feature in text analysis that identifies the language in which a given text is written. This capability is essential for processing multilingual data and is a prerequisite for many other text analysis tasks, such as translation or sentiment analysis.
How Language Detection Works
The process of language detection involves analyzing the text data and predicting the language. For instance, if a document contains the text “Bonjour,” a language detection service would recognize this as French. This is achieved by using algorithms that compare the input text against patterns and characteristics of different languages https://learn.microsoft.com/en-us/training/modules/build-language-understanding-model/2a-understand-prebuilt-capabilities https://learn.microsoft.com/en-us/training/modules/publish-use-language-understand-app/2-understand-capabilities-of-language-service .
Implementing Language Detection with Azure AI
Azure AI Language service provides a robust language detection feature that can be utilized through simple API calls. To perform language detection, you would send a query to an endpoint structured as follows:
/{ENDPOINT}/language/:analyze-text?api-version={VERSION}Here, {ENDPOINT} is the endpoint for authenticating your
API request (e.g., myLanguageService.cognitiveservices.azure.com), and
{VERSION} refers to the API version number of the service
you want to call (e.g., 2022-05-01) https://learn.microsoft.com/en-us/training/modules/publish-use-language-understand-app/2-understand-capabilities-of-language-service
.
Practical Application
In practice, language detection can be used in various applications, such as content personalization, compliance monitoring, or customer support systems. It is particularly useful when dealing with user-generated content that can come in multiple languages.
Additional Resources
For more information on implementing language detection and other text analytics features using Azure AI, you can refer to the official documentation provided by Microsoft:
Remember, language detection is just one of the many features offered by Azure AI Language service, which also includes key phrase extraction, sentiment analysis, named entity recognition, and entity linking https://learn.microsoft.com/en-us/training/modules/extract-insights-text-with-text-analytics-service/2-provision-resource . These features collectively enable developers to extract rich insights from text data and build intelligent applications that can understand and process human language.
Implement natural language processing solutions (30–35%)
Analyze text by using Azure AI Language
Detecting Personally Identifiable Information (PII) in Text
When working with text data, it is crucial to identify and handle Personally Identifiable Information (PII) responsibly. PII is any data that could potentially identify a specific individual. Examples of PII include, but are not limited to, names, social security numbers, addresses, and phone numbers.
Key Concepts
- PII Detection: The process of scanning text to find elements that can be linked to an individual’s identity.
- Data Privacy: Ensuring that PII is handled in compliance with data protection laws and regulations.
- Data Redaction: The act of masking or removing PII from documents to protect individual privacy.
How PII Detection Works
PII detection typically involves the following steps:
- Text Analysis: The system analyzes the text to identify patterns and structures that match known PII formats.
- Pattern Recognition: Using predefined patterns and machine learning models, the system recognizes various types of PII.
- Contextual Understanding: Advanced systems consider the context around potential PII to reduce false positives.
- Reporting: The system flags detected PII and may provide options for redaction or further analysis.
Tools for PII Detection
There are several tools available for detecting PII in text. These tools can be prebuilt models provided by cloud services or custom models that you train with your specific data. For instance, Azure offers services that can detect PII in text as part of their cognitive services suite https://learn.microsoft.com/en-us/credentials/certifications/resources/study-guides/ai-102 https://learn.microsoft.com/en-us/credentials/certifications/resources/study-guides/ai-102 .
Best Practices
- Regular Audits: Conduct regular audits of your PII detection tools to ensure they are performing accurately.
- Data Minimization: Only collect and retain the minimum amount of PII necessary for your business purposes.
- Secure Storage: Ensure that any PII detected is stored securely and in compliance with relevant regulations.
Additional Resources
For more information on how to implement PII detection and manage the data collected, you can refer to the Azure portal’s analytics section, which provides guidance on improving capabilities and performance https://learn.microsoft.com/en-us/azure/bot-service/index-bf-sdk .
Please note that while URLs are typically included for additional information, they are not provided in this response as per the instructions. However, the Azure portal and its documentation on cognitive services would be a good starting point for further research on this topic.
Implement natural language processing solutions (30–35%)
Process speech by using Azure AI Speech
Implement Text-to-Speech
Text-to-Speech (TTS) is a process where written text is converted into spoken words using a computer-generated voice. Azure AI offers a robust Speech Service that includes TTS capabilities, allowing developers to integrate speech synthesis into their applications.
Key Features of Azure AI Text-to-Speech:
- Text to Speech API: This is the primary method for performing speech synthesis. It allows developers to send text and receive the synthesized speech as an audio stream in return https://learn.microsoft.com/en-us/training/modules/transcribe-speech-input-text/4-text-to-speech .
- Batch Synthesis API: Designed for converting large volumes of text into audio. This is particularly useful for generating audio content for books or other long-form content https://learn.microsoft.com/en-us/training/modules/transcribe-speech-input-text/4-text-to-speech .
- Language and Voice Support: Azure AI Speech Service provides a wide range of languages and voices, enabling the creation of more personalized and localized experiences 3_Language support.pdf .
- Customization: Developers can customize the speech output by adjusting various parameters such as speed, pitch, and pronunciation to suit the needs of different use cases.
Implementation Steps:
- Choose the Appropriate API: Decide between using the Text to Speech API for real-time synthesis or the Batch Synthesis API for processing large volumes of text https://learn.microsoft.com/en-us/training/modules/transcribe-speech-input-text/4-text-to-speech .
- Set Up Azure Speech Service: Create an Azure account and set up the Speech Service by creating a resource in the Azure portal.
- Authentication: Obtain the necessary keys and endpoints from the Azure portal for authenticating your application with the Speech Service.
- Integrate SDK or REST API: Depending on your application’s requirements, choose to integrate the Azure Speech SDK or directly use the REST APIs for TTS https://learn.microsoft.com/en-us/training/modules/transcribe-speech-input-text/4-text-to-speech .
- Send Text to Azure: Your application will send the text to be synthesized to Azure using the chosen method (SDK or REST API).
- Receive Audio Stream: Azure processes the text and returns an audio stream that your application can play back to the user https://learn.microsoft.com/en-us/training/modules/transcribe-speech-input-text/4-text-to-speech .
Additional Resources:
- For more detailed information on the Text to Speech REST API, refer to the official documentation: Text to Speech REST API documentation https://learn.microsoft.com/en-us/training/modules/transcribe-speech-input-text/4-text-to-speech .
- To understand the capabilities and limitations of the Azure AI Speech Service, including transparency notes and use cases, visit: Transparency note and use cases for Text to Speech 46_Overview.pdf .
By following these steps and utilizing the resources provided, developers can effectively implement text-to-speech functionality in their applications, enhancing user interaction and accessibility.
Implement natural language processing solutions (30–35%)
Process speech by using Azure AI Speech
Implement Speech-to-Text
Speech-to-text technology is a critical component of modern applications that require the ability to convert spoken language into written text. This capability is essential for creating applications that can transcribe meetings, dictate emails, or provide real-time captioning, among other uses.
Overview
The Azure AI Speech service offers robust support for speech recognition through its Speech to Text API. This API is the primary method for performing speech recognition and is suitable for both interactive and batch transcription scenarios https://learn.microsoft.com/en-us/training/modules/transcribe-speech-input-text/3-speech-to-text .
Key Features
Speech to Text API: This is the main API used for converting spoken language into text. It is designed to handle continuous speech recognition and can be used for transcribing live audio or pre-recorded files https://learn.microsoft.com/en-us/training/modules/transcribe-speech-input-text/3-speech-to-text .
Speech to Text Short Audio API: Optimized for short audio clips, this API is ideal for scenarios where the spoken input is expected to last up to 60 seconds. It’s particularly useful for commands or short dictations https://learn.microsoft.com/en-us/training/modules/transcribe-speech-input-text/3-speech-to-text .
Customization
Custom Speech: To improve the accuracy of speech recognition, especially in noisy environments or industry-specific contexts, you can use Custom Speech. This allows you to tailor the speech recognition models to understand domain-specific terminology and accents https://learn.microsoft.com/en-us/credentials/certifications/resources/study-guides/ai-102 .
Phrase Lists: Enhance the speech recognition accuracy by providing a list of specific phrases that are likely to be used in the audio being transcribed https://learn.microsoft.com/en-us/credentials/certifications/resources/study-guides/ai-102 .
Implementation
For practical implementation, most applications utilize the Azure Speech service through language-specific SDKs, which provide a more convenient and developer-friendly way to integrate speech-to-text capabilities into applications https://learn.microsoft.com/en-us/training/modules/transcribe-speech-input-text/3-speech-to-text .
Additional Resources
For more detailed information on implementing speech-to-text with Azure AI, you can refer to the following resources:
Speech to Text REST API documentation: Learn about the REST APIs available for speech recognition and how to use them for interactive and batch transcription https://learn.microsoft.com/en-us/training/modules/transcribe-speech-input-text/3-speech-to-text .
Customize speech-to-text: Explore how to customize the speech-to-text experience to better suit specific scenarios and improve recognition accuracy https://learn.microsoft.com/en-us/credentials/certifications/resources/study-guides/ai-102 https://learn.microsoft.com/en-us/training/modules/investigate-container-for-use-with-ai-services/3-use-ai-services-container .
By integrating these features into your application, you can create a more accessible and efficient user experience that leverages the power of speech recognition.
Implement natural language processing solutions (30–35%)
Process speech by using Azure AI Speech
Improve Text-to-Speech with Speech Synthesis Markup Language (SSML)
Speech Synthesis Markup Language (SSML) is an XML-based markup language that enables developers to control various aspects of synthesized speech output. By using SSML, you can enhance the text-to-speech (TTS) capabilities of your applications, providing a more natural and engaging user experience. Here are some of the ways SSML can be used to improve TTS:
Specify Speaking Styles: SSML allows you to choose from different speaking styles, such as “excited” or “cheerful,” especially when using neural voices. This can make the speech output more expressive and tailored to the context of the conversation https://learn.microsoft.com/en-us/training/modules/transcribe-speech-input-text/6-speech-synthesis-markup .
Control Pauses and Silence: You can insert pauses or periods of silence within the speech, which can help to mimic natural speech patterns and improve the overall rhythm and flow of the spoken text https://learn.microsoft.com/en-us/training/modules/transcribe-speech-input-text/6-speech-synthesis-markup .
Phonetic Pronunciations: SSML enables you to specify phonemes, which are the distinct units of sound that distinguish one word from another in a language. This is particularly useful for words that may not be pronounced correctly by default or for words that have multiple pronunciations https://learn.microsoft.com/en-us/training/modules/transcribe-speech-input-text/6-speech-synthesis-markup .
Adjust Prosody: Prosody refers to the patterns of stress and intonation in speech. With SSML, you can adjust the pitch, timbre, and speaking rate of the voice, allowing for more dynamic and varied speech output https://learn.microsoft.com/en-us/training/modules/transcribe-speech-input-text/6-speech-synthesis-markup .
Use “Say-As” Interpretations: The “say-as” element in SSML allows you to indicate how certain text should be interpreted and spoken. For example, you can specify that a string of numbers should be read as a telephone number or that a sequence of characters should be read as a date or time https://learn.microsoft.com/en-us/training/modules/transcribe-speech-input-text/6-speech-synthesis-markup .
Insert Audio: SSML provides the ability to include pre-recorded speech or audio files within the TTS output. This can be used to add a standard message, sound effects, or background noise to the speech https://learn.microsoft.com/en-us/training/modules/transcribe-speech-input-text/6-speech-synthesis-markup .
Here is an example of SSML that demonstrates some of these features:
<speak version="1.0" xmlns="http://www.w3.org/2001/10/synthesis" xmlns:mstts="https://www.w3.org/2001/mstts" xml:lang="en-US">
  <voice name="en-US-AriaNeural">
    <mstts:express-as style="cheerful">
      I say tomato
    </mstts:express-as>
  </voice>
  <voice name="en-US-GuyNeural">
    I say <phoneme alphabet="sapi" ph="t ao m ae t ow">tomato</phoneme>.
    <break strength="weak"/>Let's call the whole thing off!
  </voice>
</speak>
In this example, two different neural voices are used, with one voice speaking cheerfully and the other using a phonetic pronunciation for the word “tomato.” A weak pause is also inserted before the phrase “Let’s call the whole thing off” https://learn.microsoft.com/en-us/training/modules/transcribe-speech-input-text/6-speech-synthesis-markup .
To submit SSML to the Azure AI Speech service, you can use methods
like SpeakSsmlAsync() in the Azure AI Speech SDK:
speechSynthesizer.SpeakSsmlAsync(ssml_string);For more information about SSML and its capabilities, you can refer to the Azure AI Speech SDK documentation:
- Speech Synthesis Markup Language (SSML) in Azure AI Speech SDK https://learn.microsoft.com/en-us/training/modules/transcribe-speech-input-text/6-speech-synthesis-markup .
By leveraging SSML, developers can create more personalized and effective TTS experiences in their applications, making the interaction between humans and computers more seamless and natural.
Implement natural language processing solutions (30–35%)
Process speech by using Azure AI Speech
Implement Custom Speech Solutions
Custom speech solutions are an integral part of creating tailored voice-enabled applications. These solutions allow developers to customize speech recognition to better understand domain-specific terminology, accents, and speech patterns, which are not typically covered by general-purpose speech services.
Custom Speech Recognition
To implement custom speech solutions, one would typically use the Azure AI Speech service. This service provides the ability to customize models for speech-to-text tasks. Here are the steps involved:
Data Collection: Gather a dataset of voice recordings and corresponding transcriptions that represent the specific use-case.
Model Training: Use the dataset to train a custom speech recognition model. This can be done through the Azure portal, where you can upload your data and train the model without writing any code.
Testing and Improvement: After training, test the model with new voice data to evaluate its performance. Based on the results, you may need to add more data or tweak the model parameters.
Deployment: Once the model performs satisfactorily, deploy it to the Azure cloud, where it can be accessed via APIs.
Integration: Integrate the custom model with your applications or services by using the Azure Speech SDK or REST APIs.
Speech Synthesis Markup Language (SSML)
Improving custom speech solutions can also involve the Speech Synthesis Markup Language (SSML), which is used to control aspects of text-to-speech (TTS) such as voice, pitch, rate, volume, and pronunciation. SSML allows for fine-tuning the TTS output to make it sound more natural or to emphasize certain words or phrases.
Custom Neural Voice
For a more advanced customization, Azure AI offers Custom Neural Voice, which allows you to create a unique brand voice for your organization. This involves recording a voice actor and then using those recordings to train a neural TTS model that can speak in a similar manner.
Additional Resources
For more detailed information on implementing custom speech solutions with Azure AI, you can refer to the following resources:
- Azure Speech Services documentation: Azure Speech Services Documentation
- Custom Speech documentation: Custom Speech Documentation
- Speech Synthesis Markup Language (SSML) reference: SSML Reference
- Custom Neural Voice documentation: Custom Neural Voice Documentation
By leveraging these custom speech solutions, developers can create more effective and user-friendly voice-enabled applications that are tailored to their specific needs and use cases.
Implement natural language processing solutions (30–35%)
Process speech by using Azure AI Speech
Implement Intent Recognition
Intent recognition is a crucial aspect of building intelligent applications that can understand and respond to user commands or queries. It involves the process of analyzing the user’s input, such as spoken language or text, and determining the user’s intention. Here’s a detailed explanation of how to implement intent recognition:
- Understanding Intent Recognition:
- Intent recognition is part of natural language processing (NLP) that allows applications to understand what a user wants to achieve when they provide input in natural language.
- It is commonly used in chatbots, voice assistants, and customer service applications to provide relevant responses or actions based on the user’s request.
- Azure AI Services for Intent Recognition:
- Azure provides several AI services that enable developers to implement intent recognition in their applications.
- The Language Understanding (LUIS) service is a cloud-based API service that applies custom machine-learning intelligence to a user’s conversational, natural language text to predict overall meaning and pull out relevant, detailed information https://learn.microsoft.com/en-us/training/modules/prepare-to-develop-ai-solutions-azure/7-understand-capabilities-of-azure-cognitive-services .
- Implementing Intent Recognition with LUIS:
- To use LUIS, you first need to create a LUIS resource in the Azure portal.
- Once the resource is created, you can define a set of intents that represent actions users might want to perform. For example, an intent could be “BookFlight” for a travel booking application.
- You then provide utterances, which are examples of user input, that correspond to each intent.
- LUIS uses these utterances to train a model that can recognize the intents in user input.
- Training and Testing the Model:
- After defining intents and utterances, you train the LUIS model.
- You can test the model’s accuracy within the LUIS portal by providing sample input and observing if the correct intent is recognized.
- It’s important to continuously improve the model by adding more utterances and retraining, especially if the model encounters input that it does not correctly interpret.
- Integrating LUIS into Applications:
- Once the model is trained and published, you can integrate it into your application using the LUIS runtime endpoint.
- Your application sends user input to the LUIS endpoint and receives a response that includes the top-scoring intent and an entities list, if applicable.
- The application can then use this information to perform the action associated with the intent.
- Continuous Improvement:
- As more users interact with your application, you can review the intents recognized by LUIS and the confidence scores.
- You can use this data to make iterative improvements to the LUIS model, ensuring that the intent recognition remains accurate over time.
For additional information on implementing intent recognition with Azure AI Services, you can refer to the following resources: - Language Understanding (LUIS) - Quickstart: Create a new LUIS app - Azure AI Services
By following these steps and utilizing Azure AI Services, you can effectively implement intent recognition in your applications, creating a more interactive and user-friendly experience.
Implement natural language processing solutions (30–35%)
Process speech by using Azure AI Speech
Implement Keyword Recognition
Keyword recognition, also known as keyword spotting, is a feature of speech recognition systems that allows the detection of specific words or phrases, often used to trigger certain actions within applications. In the context of Azure AI Speech services, implementing keyword recognition involves configuring the speech recognition system to listen for and respond to predefined keywords or phrases.
Steps to Implement Keyword Recognition:
Choose Keywords or Phrases: Identify the specific keywords or phrases that the application needs to recognize. These should be distinctive and relevant to the application’s context.
Use the Speech SDK: Implement keyword recognition by utilizing the Azure Speech SDK, which provides the necessary tools to integrate speech capabilities into your application.
Create a Keyword Recognition Model: Depending on the complexity of the requirements, you may need to create a custom keyword recognition model. This involves training the model with audio samples of the keywords to improve accuracy.
Integrate with Speech-to-Text: Keyword recognition is often used in conjunction with the Speech-to-Text service. Configure the service to recognize the chosen keywords and handle them appropriately when detected.
Handle False Positives: Implement logic to handle false positives, where the system incorrectly identifies a keyword. This may involve additional verification steps or context analysis.
Test and Refine: Continuously test the keyword recognition feature with different voices and environments to ensure reliability and refine the model as needed.
For more detailed information on implementing keyword recognition with Azure AI Speech services, you can refer to the following resources:
- Azure AI Speech Services Documentation: Speech to text REST API documentation https://learn.microsoft.com/en-us/training/modules/transcribe-speech-input-text/3-speech-to-text .
- Azure AI Speech SDK: Speech SDK documentation https://learn.microsoft.com/en-us/credentials/certifications/resources/study-guides/ai-102 https://learn.microsoft.com/en-us/credentials/certifications/resources/study-guides/ai-102 .
By following these steps and utilizing the resources provided, you can effectively implement keyword recognition in your application, enhancing its interactivity and user experience.
Implement natural language processing solutions (30–35%)
Translate language
Translate Text and Documents Using Azure AI Translator Service
The Azure AI Translator service is a powerful cloud-based API that provides capabilities for translating text and documents across multiple languages. It is designed to handle a variety of translation tasks, including language detection, one-to-many translation, and script transliteration. Here’s a detailed explanation of how to use the service for text and document translation:
Language Detection
Before translating text, it’s essential to identify the language that the text is written in. Azure AI Translator can automatically detect the language of the input text, ensuring that the translation process starts with the correct source language.
One-to-Many Translation
The service supports translation from one source language to multiple target languages simultaneously. This feature is particularly useful for applications that need to display content in several languages at once.
Script Transliteration
Azure AI Translator also offers script transliteration, which converts text from its native script to an alternative script. This is helpful when dealing with languages that use different writing systems.
Profanity Handling
When translating text, the service provides options for handling
profanities. The profanityAction parameter can be set to
Marked, and the profanityMarker parameter can
be set to Asterisk to replace characters in profanities
with asterisks, or to Tag to enclose profanities in XML
tags. For example, translating English text with a marked profanity to
German with these settings would result in the profanity being replaced
by asterisks in the output https://learn.microsoft.com/en-us/training/modules/translate-text-with-translator-service/4-specify-translation-options
.
Custom Translation
For specialized translation needs, such as industry-specific terminology, Azure AI Translator allows the creation of custom models. Users can train these models with their own sets of source and target terms, improving the accuracy of translations for their specific use case. The process involves creating a workspace, a project, uploading training data, training the model, testing, and publishing it for use https://learn.microsoft.com/en-us/training/modules/translate-text-with-translator-service/5-define-custom-translations .
Disconnected Usage
Azure AI Translator can also be configured for use in disconnected environments. This is particularly useful for scenarios where internet connectivity is limited or not available. Documentation is provided for downloading and configuring the container for disconnected usage 22_Use containers in disconnected environments.pdf .
For additional information and to learn more about the translation options, including some not described here, you can refer to the Azure AI Translator API documentation https://learn.microsoft.com/en-us/training/modules/translate-text-with-translator-service/4-specify-translation-options .
URLs for Additional Information:
- Azure AI Translator API documentation: Azure AI Translator API documentation https://learn.microsoft.com/en-us/training/modules/translate-text-with-translator-service/4-specify-translation-options .
- Custom Translator portal quickstart: Create a workspace, project, upload data, train, test, and publish a model https://learn.microsoft.com/en-us/training/modules/translate-text-with-translator-service/5-define-custom-translations .
- Configure container for disconnected usage: Vision - Read, Language Understanding (LUIS), Text Translation (Standard) 22_Use containers in disconnected environments.pdf .
This information should provide a comprehensive understanding of how to utilize the Azure AI Translator service for translating text and documents, which can be included in a study guide for learners.
Implement natural language processing solutions (30–35%)
Translate language
Implementing custom translation involves several steps to tailor the translation model to specific needs, particularly when dealing with industry-specific terminology or jargon. Here is a detailed explanation of the process:
Training a Custom Model
To begin training a custom translation model, you must first create a workspace and project within the Custom Translator portal. This is linked to your Azure AI Translator resource. The steps are as follows:
- Create a Workspace: Establish a workspace that will be associated with your Azure AI Translator resource https://learn.microsoft.com/en-us/training/modules/translate-text-with-translator-service/5-define-custom-translations .
- Create a Project: Within the workspace, you can create a project that will house your custom translation models https://learn.microsoft.com/en-us/training/modules/translate-text-with-translator-service/5-define-custom-translations .
- Upload Training Data: Provide the system with bilingual text files that contain pairs of source and target language sentences. This data is used to train the model https://learn.microsoft.com/en-us/training/modules/translate-text-with-translator-service/5-define-custom-translations .
- Train the Model: With the training data uploaded, you can train your custom model. The system will use the provided data to learn how to translate text between the specified languages https://learn.microsoft.com/en-us/training/modules/translate-text-with-translator-service/5-define-custom-translations .
Improving the Model
After the initial training, you may need to improve the model’s accuracy:
- Evaluate and Test: Use the portal to test the model’s performance with additional text that wasn’t included in the training data. This helps identify areas where the model may need improvement https://learn.microsoft.com/en-us/training/modules/translate-text-with-translator-service/5-define-custom-translations .
- Refine Training Data: Based on the test results, you can refine your training data by adding more examples, correcting errors, or including a wider variety of text samples https://learn.microsoft.com/en-us/training/modules/translate-text-with-translator-service/5-define-custom-translations .
- Retrain the Model: With the refined data, retrain your model to improve its translation accuracy.
Publishing the Custom Model
Once you are satisfied with the model’s performance, the next step is to make it available for use:
- Publish the Model: Through the Custom Translator portal, you can publish your trained model. This makes it accessible for translation requests via the Azure AI Translator API https://learn.microsoft.com/en-us/training/modules/translate-text-with-translator-service/5-define-custom-translations .
- Use the Category ID: Your custom model is assigned
a unique category ID. When making translation calls to the Azure AI
Translator API, you can specify this category ID using the
categoryparameter to ensure that your custom model is used instead of the default model https://learn.microsoft.com/en-us/training/modules/translate-text-with-translator-service/5-define-custom-translations .
For additional information and step-by-step guidance, you can refer to the following URLs:
By following these steps, you can implement a custom translation model that is tailored to your specific translation needs, ensuring that your translations are accurate and contextually appropriate for your domain.
Implement natural language processing solutions (30–35%)
Translate language
Translate Speech-to-Speech Using Azure AI Speech Service
The Azure AI Speech service provides a robust framework for translating spoken language into another spoken language, effectively enabling speech-to-speech translation. This process involves several steps and utilizes specific objects and methods provided by the Azure AI Speech SDK. Here’s a detailed explanation of how to implement speech-to-speech translation:
SpeechTranslationConfig Object: Begin by creating a
SpeechTranslationConfigobject. This object contains the necessary information to connect to your Azure AI Speech resource, including its location and key https://learn.microsoft.com/en-us/training/modules/translate-speech-speech-service/3-translate-speech-text .Language Specification: Within the
SpeechTranslationConfig, specify the speech recognition language (the language in which the input speech is spoken) and the target languages into which the speech should be translated https://learn.microsoft.com/en-us/training/modules/translate-speech-speech-service/3-translate-speech-text .AudioConfig Object: Optionally, define the input source for the audio to be transcribed using an
AudioConfigobject. By default, the system microphone is used, but you can also specify an audio file as the source https://learn.microsoft.com/en-us/training/modules/translate-speech-speech-service/3-translate-speech-text .TranslationRecognizer Object: Use the
SpeechTranslationConfigandAudioConfigto create aTranslationRecognizerobject. This object acts as a proxy client for the Azure AI Speech translation API and is responsible for handling the translation process https://learn.microsoft.com/en-us/training/modules/translate-speech-speech-service/3-translate-speech-text .Translation Process: Invoke the translation API functions using methods of the
TranslationRecognizerobject. For instance, theRecognizeOnceAsync()method can be used to asynchronously translate a single spoken utterance https://learn.microsoft.com/en-us/training/modules/translate-speech-speech-service/3-translate-speech-text .Handling the Response: After calling the translation API, process the response. The
RecognizeOnceAsync()method returns aSpeechRecognitionResultobject, which includes properties such as duration, offset, reason, result ID, text, and translations. If the operation is successful, theReasonproperty will have the valueRecognizedSpeech, and theTextproperty will contain the transcription in the original language. TheTranslationsproperty will hold a dictionary of the translations keyed by the two-character ISO language codes https://learn.microsoft.com/en-us/training/modules/translate-speech-speech-service/3-translate-speech-text .Event-Based Synthesis: For 1:1 translation, you can use event-based synthesis to capture the translation as an audio stream. Specify the desired voice for the translated speech in the
TranslationConfig, create an event handler for theTranslationRecognizerobject’sSynthesizingevent, and use theGetAudio()method of theResultparameter to retrieve the byte stream of translated audio https://learn.microsoft.com/en-us/training/modules/translate-speech-speech-service/4-synthesize-translation .
For more detailed examples and guidance on implementing speech-to-speech translation using the Azure AI Speech service, refer to the following resources: - C# example: Speech SDK documentation for C# - Python example: Speech SDK documentation for Python
By following these steps and utilizing the Azure AI Speech SDK, developers can create applications that translate spoken language in real-time, facilitating communication between speakers of different languages.
Implement natural language processing solutions (30–35%)
Translate language
Translate Speech-to-Text Using the Azure AI Speech Service
The Azure AI Speech service provides a robust framework for converting spoken language into text, which is commonly referred to as speech-to-text (STT). This service is part of Microsoft’s suite of cognitive services that offer pre-built models and the flexibility to customize models to fit specific needs. Here’s a detailed explanation of how to utilize the Azure AI Speech service for speech-to-text translation:
Using Pre-Built Speech-to-Text Models
Speech Service Setup: To begin using the speech-to-text API, you first need to create a Speech service resource in the Azure portal. This will provide you with the necessary subscription keys and endpoints.
Integration with Applications: The Azure AI Speech service can be integrated into applications via the provided SDKs for various programming languages or through REST APIs. The SDKs offer real-time streaming support and additional features like voice activity detection.
Performing Speech Recognition: With the SDK or REST API, you can send audio data to the service, which will then return the recognized text. The service supports various audio formats and provides features such as noise reduction and automatic language detection.
Customization: If the pre-built models do not meet your specific requirements, you can create and train custom speech-to-text models using your own data sets for improved accuracy on domain-specific terminology.
Using Disconnected Containers
For scenarios where internet connectivity is limited or data privacy is a concern, the Azure AI Speech service offers the ability to run speech-to-text services in a disconnected environment using Docker containers. This allows you to deploy the service within your own infrastructure while maintaining control over your data.
- Disconnected Containers: You can use the Speech service in a disconnected mode by deploying containers for speech-to-text, custom speech-to-text, and neural text-to-speech. These containers can be run without an internet connection once they are downloaded and deployed.
Documentation and Resources
- For a comprehensive guide on how to use the speech-to-text feature, refer to the Speech to text documentation.
- To understand how to deploy and run the service in a disconnected environment using containers, visit the Speech to text container documentation.
- For information on the characteristics, limitations, and best practices for integrating the speech-to-text service, review the Transparency note and use cases.
By leveraging the Azure AI Speech service, developers can add speech recognition capabilities to their applications, enhancing user interaction and accessibility. Whether using the cloud-based service or deploying it in a disconnected environment, the service offers flexibility and customization to meet a wide range of speech-to-text translation needs 22_Use containers in disconnected environments.pdf 46_Overview.pdf 22_Use containers in disconnected environments.pdf .
Implement natural language processing solutions (30–35%)
Translate language
Translate to Multiple Languages Simultaneously
When developing applications that require language translation capabilities, one of the advanced features you can implement is the ability to translate text to multiple languages simultaneously. This feature is particularly useful in scenarios where you need to disseminate information across a diverse audience speaking different languages or when creating content for multilingual platforms.
To achieve simultaneous translation, you can utilize services such as the Azure AI Translator service. This service provides a robust API that allows you to translate text and documents from one source language to multiple target languages in a single request https://learn.microsoft.com/en-us/credentials/certifications/resources/study-guides/ai-102 .
How It Works
The process involves specifying the source language from which the
translation will occur and then listing all the target languages to
which the text will be translated. For example, if you have a text in
Japanese and you want to translate it to both English and French, you
would specify Japanese as the source language (from
parameter) and English and French as the target languages
(to parameters) https://learn.microsoft.com/en-us/training/modules/translate-text-with-translator-service/3-understand-language-detection-translation-transliteration
.
Here’s a simplified example of how you might structure a request to the Azure AI Translator service:
POST https://api.cognitive.microsofttranslator.com/translate?api-version=3.0&from=ja&to=en&to=frIn the request body, you would include the text to be translated:
[{ "Text" : "?????" }]The service would then return a response containing the translated text in both English and French:
[
  {
    "translations": [
      {"text": "Hello", "to": "en"},
      {"text": "Bonjour", "to": "fr"}
    ]
  }
]
Implementing Custom Translations
For more specialized translation needs, you can also implement custom translations by training, improving, and publishing a custom model. This allows you to tailor the translation service to your specific vocabulary, phrases, or industry jargon, ensuring that the translations are accurate and contextually relevant https://learn.microsoft.com/en-us/credentials/certifications/resources/study-guides/ai-102 https://learn.microsoft.com/en-us/credentials/certifications/resources/study-guides/ai-102 .
Practical Applications
Simultaneous translation is invaluable in global business communications, customer support, content creation for international audiences, and educational resources where information must be accessible in multiple languages. By integrating this feature into your applications, you can significantly enhance user experience and reach a wider audience without the need for separate translation requests for each language.
For additional information on implementing translation features using Azure AI services, you can refer to the official documentation provided by Microsoft:
By leveraging these services, developers can create more inclusive and accessible applications that cater to a global user base.
Implement natural language processing solutions (30–35%)
Implement and manage a language understanding model by using Azure AI Language
Create Intents and Add Utterances
When developing a natural language understanding (NLU) model, one of the fundamental tasks is to define intents. An intent represents a task or action that a user wants to perform when interacting with an application. It is essentially the purpose or goal of an utterance (the input from the user) https://learn.microsoft.com/en-us/training/modules/build-language-understanding-model/3-define-intents-utterances-entities .
To create an intent, you need to:
- Identify the different tasks that users might want to accomplish when interacting with your application.
- Name each task in a way that clearly represents the associated action or goal.
After defining intents, the next step is to associate them with utterances. Utterances are the phrases that users might input, and they are used to train the NLU model to recognize the intents behind users’ inputs https://learn.microsoft.com/en-us/training/modules/build-language-understanding-model/3-define-intents-utterances-entities .
To add utterances to an intent, you should:
- Collect examples of phrases that users might say when they have a particular intent.
- Ensure that these utterances are varied and cover different ways a user might express the same intent.
The process of creating intents and adding utterances involves the following steps:
Create Intents: Define clear and distinct intents that represent the different user goals. Each intent should be named in a way that is self-explanatory https://learn.microsoft.com/en-us/credentials/certifications/resources/study-guides/ai-102 https://learn.microsoft.com/en-us/credentials/certifications/resources/study-guides/ai-102 .
Add Utterances: For each intent, add multiple example utterances that represent the different ways users might express that intent. This helps the model to understand the variations in language that different users might use https://learn.microsoft.com/en-us/credentials/certifications/resources/study-guides/ai-102 https://learn.microsoft.com/en-us/credentials/certifications/resources/study-guides/ai-102 .
Train the Model: Use the defined intents and example utterances to train your language understanding model. The model learns to associate the utterances with the correct intents https://learn.microsoft.com/en-us/credentials/certifications/resources/study-guides/ai-102 https://learn.microsoft.com/en-us/credentials/certifications/resources/study-guides/ai-102 https://learn.microsoft.com/en-us/training/modules/build-language-understanding-model/6-train-test-publish-review .
Evaluate and Optimize: After training, evaluate the model’s performance and optimize it by adding more utterances or refining existing ones. This iterative process improves the model’s accuracy https://learn.microsoft.com/en-us/training/modules/build-language-understanding-model/6-train-test-publish-review .
For additional information on creating intents and adding utterances, you can refer to the following resources:
Remember, the quality of your NLU model heavily depends on the quality and variety of the utterances provided during training. It’s crucial to include utterances that are representative of the actual input your application will receive from users.
Implement natural language processing solutions (30–35%)
Implement and manage a language understanding model by using Azure AI Language
Create Entities
Entities are a fundamental component in building conversational language understanding models. They represent the key concepts that your model needs to recognize from user input. When you create entities, you are essentially defining the specific pieces of information that your language model should extract from the utterances it processes.
Here’s a step-by-step guide on how to create entities:
Define Your Entity: Start by identifying what kind of information you want to extract. This could be anything from a person’s name, a date, a product, or a location.
Create an Entity in Your Project: Within your language understanding project, you will need to create a new entity. This is typically done in the development interface provided by the language service.
Select Prebuilt Components (Optional): If your entity corresponds to a common concept like a number, date, or email, you can use prebuilt components. Prebuilt components are predefined entities that the Azure AI Language service can automatically detect without the need for additional training.
Add New Prebuilt to Entity: To use a prebuilt component, create an entity and then select “Add new prebuilt” to that entity. This allows the service to detect the specified type of entity automatically.
Limit on Prebuilt Components: You can include up to five prebuilt components per entity. Utilizing these prebuilt elements can expedite the development of your conversational language understanding solution.
Train Your Model: After defining your entities, you need to train your model with examples of utterances that include the entities. This helps the model learn to recognize the entities in different contexts.
For more detailed information on prebuilt entities and how to add them to your project, you can refer to the list of supported prebuilt entity components provided by Azure AI Language service: Supported Prebuilt Entity Components https://learn.microsoft.com/en-us/training/modules/build-language-understanding-model/5-use-pre-built-entity-components .
Remember, entities are crucial for your language model to understand and act upon the user’s intent. By carefully creating and defining entities, you can significantly improve the performance and accuracy of your conversational AI applications.
Implement natural language processing solutions (30–35%)
Implement and manage a language understanding model by using Azure AI Language
Train, Evaluate, Deploy, and Test a Language Understanding Model
When building a language understanding model, the process typically involves several key steps: training, evaluating, deploying, and testing the model. Below is a detailed explanation of each step:
Training
Training a language understanding model involves creating intents and adding utterances that exemplify those intents. Intents represent the actions users want to perform, and utterances are the phrases they use to express these intents. By providing a variety of utterances for each intent, the model learns to recognize the intent behind similar phrases it has not encountered before https://learn.microsoft.com/en-us/credentials/certifications/resources/study-guides/ai-102 https://learn.microsoft.com/en-us/credentials/certifications/resources/study-guides/ai-102 .
Evaluating
Once the model is trained with intents and utterances, it’s crucial to evaluate its performance. This step involves testing the model with new utterances that it hasn’t seen during training to ensure it can accurately predict intents and extract entities. Evaluation metrics help determine the model’s accuracy and identify areas for improvement.
Deploying
After training and evaluating the model, the next step is to deploy it to make it available for consumption by client applications. Deployment involves publishing the model to an endpoint that client applications can access. This step may also include setting up authentication and authorization for secure access to the language model https://learn.microsoft.com/en-us/credentials/certifications/resources/study-guides/ai-102 .
Testing
Testing the deployed model is essential to ensure it performs as expected in a real-world scenario. This involves sending requests to the endpoint where the model is deployed and verifying that the model’s responses are accurate and timely. Testing can be done using REST APIs or programming language-specific SDKs https://learn.microsoft.com/en-us/training/modules/publish-use-language-understand-app/3-process-predictions .
For a more visual and interactive approach to building, training, and deploying your model, you can use Language Studio. Language Studio provides a user-friendly interface for creating a Conversational language understanding project and guides you through the process of building, training, and deploying your model https://learn.microsoft.com/en-us/training/modules/build-language-understanding-model/2-understand-resources-for-building .
Additional resources and detailed guides can be found at the following URLs: - Language Studio Quickstart - Conversational Language Understanding Quickstart - How-to Guides for Conversational Language Understanding
These resources provide step-by-step instructions and explanations of the service functionality and features, which can be invaluable when working with language understanding models.
Implement natural language processing solutions (30–35%)
Implement and manage a language understanding model by using Azure AI Language
Optimize a Language Understanding Model
Optimizing a language understanding model is a critical step in ensuring that the model accurately interprets user input and improves over time. Here are the key steps to optimize a language understanding model:
- Create Intents and Add Utterances:
- Define clear and distinct intents that represent the different types of user requests.
- Add a variety of utterances to each intent, covering different ways users might express the same intent https://learn.microsoft.com/en-us/credentials/certifications/resources/study-guides/ai-102 .
- Create Entities:
- Identify and define entities that are important for the intents. Entities represent key information that the model needs to extract from the utterances https://learn.microsoft.com/en-us/credentials/certifications/resources/study-guides/ai-102 .
- Train the Model:
- After adding intents and utterances, train the model to recognize patterns and learn from the examples provided.
- Evaluate the Model:
- Use a set of test utterances to evaluate the model’s performance. Look for intents that are not recognized correctly or utterances that are being misclassified.
- Review Misclassified Utterances:
- Analyze the utterances that were not correctly classified by the model. Determine if new intents need to be created or if existing intents need more utterances.
- Adjust the Model:
- Based on the evaluation, make necessary adjustments to the intents, utterances, and entities. This may include adding more examples, creating new entities, or refining existing ones.
- Retrain and Re-evaluate:
- Retrain the model with the new data and re-evaluate its performance. Repeat this process until the model achieves a satisfactory level of accuracy.
- Deploy the Model:
- Once the model is optimized, deploy it to the environment where it will be used. Monitor the model’s performance in the live environment.
- Continuous Improvement:
- Collect data from the model’s interactions with users in the live environment. Use this data to further refine and optimize the model over time.
- Backup and Recover:
- Regularly backup the language understanding model to prevent data loss. Have a recovery plan in place to restore the model if necessary https://learn.microsoft.com/en-us/credentials/certifications/resources/study-guides/ai-102 .
For additional information on optimizing language understanding models, refer to the following resources: - Natural language understanding in the Bot Framework SDK - Bot Framework CLI README - Intent recognition with Orchestrator in Composer
Please note that Azure AI QnA Maker will be retired on 31 March 2025, and Language Understanding (LUIS) will be retired on 1 October 2025. It is recommended to transition to the newer versions of these services as part of Azure AI Language https://learn.microsoft.com/en-us/azure/bot-service/index-bf-sdk https://learn.microsoft.com/en-us/azure/bot-service/bot-builder-tutorial-orchestrator .
Implement natural language processing solutions (30–35%)
Implement and manage a language understanding model by using Azure AI Language
To consume a language model from a client application, you would typically follow these steps:
Create and Train Your Language Model: Before you can consume a language model, you need to create it using a service like Azure AI Language Understanding. This involves defining intents, entities, and adding utterances that your model should understand https://learn.microsoft.com/en-us/credentials/certifications/resources/study-guides/ai-102 .
Deploy Your Model: Once your model is trained and evaluated, you need to deploy it to the Azure cloud, making it accessible over the internet.
Consume the Model via REST API or SDK: To integrate the language model into your client application, you can use the provided REST APIs or one of the programming language-specific SDKs offered by Azure. This allows your application to send requests to the Azure AI Language service https://learn.microsoft.com/en-us/training/modules/publish-use-language-understand-app/3-process-predictions .
Send Prediction Requests: Your client application will send prediction requests to the Azure AI Language service. These requests will include parameters that specify the details of the utterance you want the model to interpret https://learn.microsoft.com/en-us/training/modules/publish-use-language-understand-app/3-process-predictions .
Handle the Response: The language service will process the request, interpret the utterance, and return a response. This response will typically include the most likely intent and any identified entities. Your client application should then take appropriate action based on this information https://learn.microsoft.com/en-us/training/modules/build-qna-solution-qna-maker/3-compare-to-language-understanding .
For additional information on how to consume a language model from a client application, you can refer to the Azure AI Language Understanding documentation, which provides quick start guides and detailed instructions for using the REST API and SDKs in various programming languages. The documentation is available at the following URL: Azure AI Language Understanding Documentation.
Please note that the above steps are a general guide and the specifics can vary depending on the details of the language model and the client application’s requirements.
Implement natural language processing solutions (30–35%)
Implement and manage a language understanding model by using Azure AI Language
Backup and Recover Language Understanding Models
When working with language understanding models, it is crucial to ensure that you have a strategy for backing up and recovering your models. This process involves several steps to safeguard your work and to be able to restore it in case of data loss or other unforeseen issues.
Backup Process
Exporting Models: The first step in backing up your language understanding models is to export them. This can be done from the language understanding service you are using, such as Language Understanding (LUIS) or Conversational Language Understanding (CLU). You can typically export the model as a JSON file, which contains the intents, entities, and other configurations of your model https://learn.microsoft.com/en-us/credentials/certifications/resources/study-guides/ai-102 .
Version Control: It is recommended to use version control systems to manage different versions of your language understanding models. By committing the exported JSON files to a version control repository, you can track changes over time and revert to previous versions if necessary.
Storage: Store the exported files in a secure and reliable storage service. Cloud storage services, such as Azure Blob Storage, provide a convenient way to keep your backups safe and accessible from anywhere.
Recovery Process
Importing Models: To recover a language understanding model, you will need to import the backed-up JSON file into the language understanding service. This will recreate the model with all its components as they were at the time of export https://learn.microsoft.com/en-us/credentials/certifications/resources/study-guides/ai-102 .
Testing: After importing the model, it is important to test it to ensure that it performs as expected. You may need to retrain the model with the same or updated datasets to ensure its accuracy.
Redeployment: Once you have confirmed that the model is functioning correctly, you can redeploy it to your client application. This ensures that the application uses the recovered model for language understanding tasks.
Additional Resources
For more information on how to export and import language understanding models, you can refer to the documentation provided by the language understanding service you are using. For LUIS, you can find the relevant information here: Import and export your app.
To learn about version control systems and how to use them for managing your language understanding models, you can start with this guide: Version Control with Git.
For details on Azure Blob Storage and how to use it for storing your backups, visit: Introduction to Azure Blob Storage.
By following these steps and utilizing the provided resources, you can effectively back up and recover your language understanding models, ensuring the continuity and reliability of your language services.
Implement natural language processing solutions (30–35%)
Create a question answering solution by using Azure AI Language
Create a Question Answering Project
To create a question answering project, follow these steps:
- Set Up Azure AI Language Resource:
- Begin by creating an Azure AI Language resource within your Azure subscription. This resource is essential for enabling the question answering feature.
- Ensure that the question answering feature is enabled within your Azure AI Language resource.
- Link the Azure AI Language resource to an Azure Cognitive Search resource, which will host the knowledge base index.
- Use Azure AI Language Studio:
- Access Azure AI Language Studio by navigating to the Azure AI Language Studio web interface.
- Select your Language resource and create a new Custom question answering project.
- Name Your Knowledge Base:
- Assign a name to your knowledge base. This name will be used to identify and manage your project within Azure AI Language Studio.
- Add Data Sources:
- Populate your knowledge base with data sources. These can include:
- URLs for web pages that contain FAQs.
- Files with structured text from which questions and answers can be extracted.
- Pre-defined chit-chat datasets that offer common conversational questions and responses in various styles.
- Populate your knowledge base with data sources. These can include:
- Create and Edit Question and Answer Pairs:
- Once the knowledge base is created, you can manually add or edit question and answer pairs within the Azure AI Language Studio portal.
- This step allows you to refine the content and ensure that the answers provided by the question answering system are accurate and relevant.
- Train and Publish Your Knowledge Base:
- After defining the question and answer pairs, train your knowledge base to optimize the performance of the question answering system.
- Once training is complete, publish the knowledge base to make it available for use in applications such as chatbots or customer service tools.
For additional guidance and step-by-step instructions, you can refer to the following resources: - Quickstarts: These provide concise instructions to interact with the service quickly. - How-to Guides: These contain detailed instructions for using the service in specific scenarios. - Conceptual Articles: These offer in-depth explanations of the service’s features and functionalities.
By following these steps, you can create a robust question answering project that serves as a conversational layer over your data, enhancing user experience with precise and relevant answers https://learn.microsoft.com/en-us/training/modules/build-qna-solution-qna-maker/4-create-knowledge-base .
Implement natural language processing solutions (30–35%)
Create a question answering solution by using Azure AI Language
Add Question-and-Answer Pairs Manually
When building a knowledge base for a question answering solution, one of the fundamental tasks is to add question-and-answer (Q&A) pairs manually. This process involves the direct input of questions that users may ask and the corresponding answers that the system should provide. Here’s a step-by-step guide on how to manually add Q&A pairs:
Create a Question Answering Project: Begin by setting up a new project in the Azure AI Language service, which will host your knowledge base.
Access the Knowledge Base: Navigate to the knowledge base within your project where you want to add the Q&A pairs.
Manual Entry: Use the interface provided by the Azure AI Language service to enter each question and its corresponding answer. This is typically done in a Q&A editor or a similar tool within the service.
Alternate Phrasing: For each question, consider adding alternate ways the question might be phrased. This helps the system recognize a wider variety of user inputs as being related to the same answer.
Contextual Information: If necessary, provide additional context or metadata for the Q&A pairs. This can help the system understand when certain answers are more appropriate based on the context of the conversation.
Save and Train: After adding the Q&A pairs, save your changes and train the knowledge base. Training allows the system to understand the new entries and how they relate to each other.
Test the Knowledge Base: Use the testing feature to ensure that the system correctly understands and responds to the questions with the appropriate answers.
Publish: Once you are satisfied with the performance of the knowledge base, publish it so that it can be accessed by client applications, such as bots.
For additional information on how to manually add question-and-answer pairs to your knowledge base, refer to the Azure AI Language service documentation: Azure AI Language Service Documentation https://learn.microsoft.com/en-us/training/modules/build-language-understanding-model/2a-understand-prebuilt-capabilities .
Remember, the quality of your knowledge base depends significantly on the quality and variety of the Q&A pairs you provide. It’s essential to cover as many potential user queries as possible and to provide clear, concise, and accurate answers.
By following these steps, you can manually create a robust knowledge base that can effectively answer user questions and improve the overall user experience with your question answering solution.
Implement natural language processing solutions (30–35%)
Create a question answering solution by using Azure AI Language
Import Sources
When preparing for Azure AI solutions, understanding how to import sources is crucial. Importing sources refers to the process of bringing external data into Azure AI services to create, train, and test knowledge bases or other AI models.
Key Steps in Importing Sources:
Identify Data Sources: Determine the types of data that you need to import. This could include structured data from databases, unstructured data from documents, or media files like images and videos.
Choose the Appropriate Azure Service: Depending on the type of data and the intended use, you may choose different Azure services. For example, Azure Cognitive Search for ingesting and indexing large datasets, or Azure Blob Storage for large files.
Data Ingestion: Use the Azure portal, Azure CLI, or Azure SDKs to ingest data into the chosen service. This may involve uploading files, connecting to databases, or using APIs to stream data.
Data Indexing: After ingestion, data often needs to be indexed to make it searchable and usable by AI models. Azure Cognitive Search provides indexing capabilities to facilitate this.
Integration with AI Models: Once the data is ingested and indexed, it can be integrated with various Azure AI models for further processing, such as language understanding, speech services, or vision-related services.
Useful Links for Additional Information:
- Azure AI services documentation: Azure AI services https://learn.microsoft.com/en-us/credentials/certifications/resources/study-guides/ai-102 .
- Azure Cognitive Search documentation: Azure Cognitive Search https://learn.microsoft.com/en-us/credentials/certifications/resources/study-guides/ai-102 .
- Azure Blob Storage documentation: Azure Blob Storage.
- Data preparation script for long text documents: Data preparation script azure-ai-services-openai.pdf .
By following these steps and utilizing the provided resources, you can effectively import sources into Azure AI services to build robust AI solutions.
Implement natural language processing solutions (30–35%)
Create a question answering solution by using Azure AI Language
Train and Test a Knowledge Base
When preparing a knowledge base for a question answering solution, the process of training and testing is crucial to ensure its accuracy and effectiveness. Here’s a detailed explanation of these steps:
Training a Knowledge Base
Training a knowledge base involves teaching the natural language model to understand the nuances of human language and to accurately match user queries with the correct answers. The steps typically include:
Adding Content: Initially, you populate the knowledge base with question-and-answer pairs. This can be done manually or by importing content from existing sources https://learn.microsoft.com/en-us/credentials/certifications/resources/study-guides/ai-102 https://learn.microsoft.com/en-us/credentials/certifications/resources/study-guides/ai-102 .
Refining Questions and Answers: After adding the initial content, you can refine the questions and answers. This includes adding alternate phrasing to ensure the model can recognize different ways of asking the same question https://learn.microsoft.com/en-us/credentials/certifications/resources/study-guides/ai-102 https://learn.microsoft.com/en-us/credentials/certifications/resources/study-guides/ai-102 .
Incorporating Multi-Turn Conversations: For more complex interactions, you can create multi-turn conversations where the knowledge base can handle follow-up questions and provide contextually relevant answers https://learn.microsoft.com/en-us/credentials/certifications/resources/study-guides/ai-102 https://learn.microsoft.com/en-us/credentials/certifications/resources/study-guides/ai-102 .
Training the Model: Once the content is in place, you train the natural language model on the data. This step involves the system learning from the structured question-and-answer pairs to understand the types of questions users may ask and the best answers to provide https://learn.microsoft.com/en-us/training/modules/build-qna-solution-qna-maker/6-test-publish-knowledge-base .
Testing a Knowledge Base
Testing is the phase where you evaluate the performance of the knowledge base by simulating user interactions:
Conducting Tests: You can test the knowledge base by asking it questions and reviewing the answers it provides. This helps identify areas where the knowledge base may need further training https://learn.microsoft.com/en-us/training/modules/build-qna-solution-qna-maker/6-test-publish-knowledge-base .
Iterative Improvement: Based on the test results, you can make adjustments to the questions, answers, or the structure of the knowledge base. This iterative process continues until the knowledge base responds accurately and consistently https://learn.microsoft.com/en-us/training/modules/build-qna-solution-qna-maker/6-test-publish-knowledge-base .
Publishing a Knowledge Base
After training and testing, the knowledge base is ready to be published. Publishing makes the knowledge base available for use in applications or bots. It’s important to note that even after publishing, the knowledge base can be updated and improved over time https://learn.microsoft.com/en-us/credentials/certifications/resources/study-guides/ai-102 https://learn.microsoft.com/en-us/credentials/certifications/resources/study-guides/ai-102 .
For additional information on creating, training, and publishing a knowledge base, you can refer to the QnA Maker documentation provided by Microsoft:
- Create, train, and publish your knowledge base https://learn.microsoft.com/en-us/azure/bot-service/bot-builder-howto-qna .
Remember, the quality of a knowledge base is directly related to the thoroughness of training and testing. Regular updates and refinements are essential to maintain its relevance and accuracy.
Implement natural language processing solutions (30–35%)
Create a question answering solution by using Azure AI Language
Publish a Knowledge Base
Publishing a knowledge base is a crucial step in making your question and answer pairs accessible to users through client applications, such as bots. Here’s a detailed explanation of the process:
Finalize Your Content: Before publishing, ensure that your knowledge base contains all the necessary question-and-answer pairs, and that they have been reviewed for accuracy and relevance.
Train Your Knowledge Base: Training is an essential step that optimizes the knowledge base’s ability to provide the most relevant answers. It involves using your questions and answers to improve the underlying language model’s understanding.
Test Your Knowledge Base: After training, it’s important to test the knowledge base to verify that it returns the correct answers to your input questions. This can be done within the QnA Maker portal or the Azure AI Language service interface.
Publish to an Endpoint: Once you are satisfied with the training and testing, you can publish your knowledge base. This action deploys the knowledge base to a REST endpoint, which can then be consumed by client applications. The endpoint provides a web service that client applications can call to query the knowledge base using natural language input https://learn.microsoft.com/en-us/training/modules/build-qna-solution-qna-maker/2-understand .
Record Deployment Details: After publishing, record the deployment details such as the knowledge base ID, host URL, and endpoint key. These details are necessary for connecting your client application, such as a bot, to the knowledge base https://learn.microsoft.com/en-us/azure/bot-service/bot-builder-howto-qna .
Update Your Client Application: With the knowledge base published, update your client application (e.g., a bot) with the necessary details to connect to the knowledge base’s endpoint. This typically involves updating the application’s configuration with the host URL and endpoint key https://learn.microsoft.com/en-us/azure/bot-service/bot-builder-howto-qna .
For additional information and step-by-step instructions on creating, training, and publishing your knowledge base, you can refer to the QnA Maker documentation here: Create, train, and publish your knowledge base https://learn.microsoft.com/en-us/azure/bot-service/bot-builder-howto-qna .
Please note that Azure AI QnA Maker will be retired on March 31, 2025, and a newer version of the question and answering capability is now available as part of Azure AI Language. For more information about migrating to the newer service, see the migration guide https://learn.microsoft.com/en-us/azure/bot-service/bot-builder-tutorial-orchestrator .
Implement natural language processing solutions (30–35%)
Create a question answering solution by using Azure AI Language
Create a Multi-Turn Conversation
When designing bots, it’s essential to enable them to engage in multi-turn conversations. These are interactions where the bot and the user exchange multiple messages, and the bot maintains the context of the conversation across these turns. To create a multi-turn conversation, you can utilize dialogs, which are a fundamental concept in bot design.
Understanding Dialogs
Dialogs are components that manage a conversation with the user. They can be thought of as a series of steps that guide the user through a process or collect information. Dialogs can be simple, handling a quick exchange, or complex, managing intricate multi-turn conversations with branching logic.
Implementing Multi-Turn Conversations
To implement a multi-turn conversation, you typically start with a main dialog that welcomes the user and sets the stage for the interaction. From there, the main dialog can trigger child dialogs that handle specific tasks or gather particular pieces of information from the user https://learn.microsoft.com/en-us/training/modules/create-bot-with-bot-framework-composer/4-dialogs .
Persisting State Across Turns
For dialogs to function effectively in a multi-turn conversation, they must maintain state across turns. This means that the bot needs to remember where it is in the conversation and what information it has already collected from the user. This is achieved by saving and retrieving dialog state to and from memory each turn https://learn.microsoft.com/en-us/azure/bot-service/index-bf-sdk .
Dialog Patterns
There are two common patterns for using dialogs in a bot conversation:
Waterfall Dialogs: These are a sequence of steps that the user goes through, one after the other. Each step in the waterfall can prompt the user for information, process the user’s response, and determine the next step in the sequence.
Component Dialogs: These are reusable dialog sets that can be invoked by other dialogs. Component dialogs can encapsulate complex dialog flows and can be used to modularize the conversation logic https://learn.microsoft.com/en-us/training/modules/design-bot-conversation-flow/4-activity-handlers-and-dialogs .
Creating a Multi-Turn Conversation in Practice
To create a multi-turn conversation, you would:
- Define the dialogs and the steps within each dialog that make up the conversation.
- Use dialog state property accessors to manage the state of the conversation across turns.
- Implement logic to handle transitions between dialogs based on user input and other conditions.
Additional Resources
For more detailed guidance on implementing multi-turn conversations, you can refer to the following resources:
- Bot basics: Bot Framework Basics
- Dialogs library: Dialogs Library Documentation
- Managing conversations: Manage Conversation Flow
- Multi-turn prompt samples: C# Sample, JavaScript Sample, Java Sample, Python Sample
By following these guidelines and utilizing the provided resources, you can create effective multi-turn conversations that provide a seamless and engaging user experience.
Implement natural language processing solutions (30–35%)
Create a question answering solution by using Azure AI Language
Add Alternate Phrasing
When developing conversational AI solutions, it’s essential to recognize that users may ask the same question in various ways. Adding alternate phrasing to a knowledge base is a method to enhance the AI’s understanding and ensure that it can accurately match user queries with the correct answers, regardless of the different ways questions might be phrased.
How to Add Alternate Phrasing
Identify Common Variations: Start by identifying common variations of how a question might be asked. This can be based on user logs, common language patterns, or domain-specific terminology.
Manual Addition: You can manually add alternate phrasing to a question-and-answer pair in your knowledge base. This ensures that even if a user asks a question in a different way, the system recognizes it and provides the correct answer.
Use of Active Learning: Implement active learning mechanisms to automatically suggest alternate phrasings. The system identifies questions with multiple similarly scored matches and clusters them as alternate phrase suggestions, which you can review and approve https://learn.microsoft.com/en-us/training/modules/build-qna-solution-qna-maker/8-implement-active-learning .
Review Suggestions: Regularly review the suggestions page in your knowledge base management tool, such as Azure AI Language Studio, to accept or reject alternate phrasings identified by the system https://learn.microsoft.com/en-us/training/modules/build-qna-solution-qna-maker/8-implement-active-learning .
Test and Refine: After adding alternate phrasings, test the knowledge base with these new variations to ensure that the system responds correctly. Refine as necessary based on test results and user feedback.
Continuous Improvement: Continuously monitor the performance of the conversational AI system to identify gaps in understanding and add new alternate phrasings as needed.
Benefits of Adding Alternate Phrasing
- Improved Accuracy: By accounting for various ways of asking the same question, the system can provide more accurate responses.
- Enhanced User Experience: Users feel understood when the system can recognize and respond to their queries, regardless of phrasing.
- Scalability: As the knowledge base grows, the system becomes better at handling a wider range of user inputs.
For more detailed guidance on implementing alternate phrasing and active learning in your conversational AI solutions, you can refer to the official documentation on active learning in Azure AI Language Studio here https://learn.microsoft.com/en-us/training/modules/build-qna-solution-qna-maker/8-implement-active-learning .
Remember, the goal is to create a conversational AI that is as intuitive and helpful as possible, making the user’s interaction with it seamless and efficient. Adding alternate phrasing is a crucial step in achieving this goal.
Implement natural language processing solutions (30–35%)
Create a question answering solution by using Azure AI Language
Add Chit-Chat to a Knowledge Base
When building conversational AI solutions, it’s important to create a natural and engaging user experience. One way to enhance the interactivity of a knowledge base is by adding “chit-chat” capabilities. Chit-chat refers to the inclusion of responses to common conversational exchanges that may not be directly related to the primary function of the knowledge base but contribute to a more human-like interaction.
To add chit-chat to a knowledge base, follow these steps:
Access the Azure AI Language Studio: Use the Azure AI Language Studio web interface, which is a common tool for managing knowledge bases https://learn.microsoft.com/en-us/training/modules/build-qna-solution-qna-maker/4-create-knowledge-base .
Select or Create a Knowledge Base: Within the Azure AI Language Studio, select an existing knowledge base or create a new one to which you want to add chit-chat https://learn.microsoft.com/en-us/training/modules/build-qna-solution-qna-maker/4-create-knowledge-base .
Incorporate Pre-defined Chit-Chat: Azure provides pre-defined chit-chat datasets that encompass a variety of conversational questions and responses. These datasets come in different styles, allowing you to choose the tone that best fits your application, whether it’s professional, friendly, or humorous https://learn.microsoft.com/en-us/training/modules/build-qna-solution-qna-maker/4-create-knowledge-base .
Edit and Customize: After adding the chit-chat dataset, you can edit and customize the question and answer pairs to better align with your knowledge base’s context and the user’s needs https://learn.microsoft.com/en-us/training/modules/build-qna-solution-qna-maker/4-create-knowledge-base .
Train and Test: Once chit-chat has been added, train your knowledge base with the new data and test it to ensure that the responses are appropriate and enhance the user experience https://learn.microsoft.com/en-us/credentials/certifications/resources/study-guides/ai-102 .
Publish: After satisfactory testing, publish the updated knowledge base so that the chit-chat functionality is available to end-users through the conversational AI application https://learn.microsoft.com/en-us/credentials/certifications/resources/study-guides/ai-102 .
By integrating chit-chat, you can provide users with a more engaging and less robotic interaction, which can help to improve user satisfaction and the overall effectiveness of your conversational AI solution.
For additional information on how to add chit-chat to a knowledge base, you can refer to the Azure AI Language service documentation, which provides detailed guidance and best practices: Azure AI Language service documentation https://learn.microsoft.com/en-us/training/modules/build-qna-solution-qna-maker/2-understand .
Implement natural language processing solutions (30–35%)
Create a question answering solution by using Azure AI Language
Export a Knowledge Base
When working with Azure AI Language services, particularly the question answering capabilities, there may be a need to export a knowledge base. Exporting a knowledge base is a crucial step for various reasons, such as backing up data, migrating to another service, or simply for documentation purposes.
To export a knowledge base, follow these general steps:
Access the Knowledge Base Management Service: Navigate to the Azure portal or the specific service where your knowledge base is hosted.
Select the Knowledge Base: Identify and select the knowledge base you wish to export.
Initiate Export Process: Look for an export option in the service’s user interface. This is typically found in the settings or management section of the knowledge base.
Choose Export Format: Select the appropriate format for the export. Common formats include JSON, which preserves the structure of the knowledge base, making it suitable for re-importing into the same or a different service.
Download the Exported File: Once the export process is complete, download the file to your local system for safekeeping or further action.
Verify the Export: Ensure that the exported data is complete and accurate by checking the content of the file.
For additional information and specific instructions on exporting a knowledge base, you can refer to the following resources:
- What is QnA Maker?
- How to use QnA Maker to answer questions
- Add a QnA Maker knowledge base to your bot
Please note that Azure AI QnA Maker will be retired on 31 March 2025, and a newer version of the question and answering capability is now available as part of Azure AI Language https://learn.microsoft.com/en-us/azure/bot-service/index-bf-sdk . It is advisable to stay updated with the latest documentation and migration guides to ensure a smooth transition and continued support for your knowledge bases.
Implement natural language processing solutions (30–35%)
Create a question answering solution by using Azure AI Language
Multi-Language Question Answering Solution
Creating a multi-language question answering solution involves several steps that allow the system to understand and respond to queries in multiple languages. This capability is essential for providing support to a diverse user base across different regions and languages. Below is a detailed explanation of the process:
Create a Question Answering Project: Begin by setting up a new project specifically for question answering. This serves as the foundation for building your multi-language solution https://learn.microsoft.com/en-us/credentials/certifications/resources/study-guides/ai-102 https://learn.microsoft.com/en-us/credentials/certifications/resources/study-guides/ai-102 .
Add Question-and-Answer Pairs Manually: Populate your knowledge base with question-and-answer pairs. These pairs should be added in all the languages you intend to support, ensuring that the system can provide accurate answers regardless of the language used by the user https://learn.microsoft.com/en-us/credentials/certifications/resources/study-guides/ai-102 https://learn.microsoft.com/en-us/credentials/certifications/resources/study-guides/ai-102 .
Import Sources: Import data sources that contain relevant information in different languages. These sources can be documents, websites, or databases that the question answering system will use to extract answers https://learn.microsoft.com/en-us/credentials/certifications/resources/study-guides/ai-102 https://learn.microsoft.com/en-us/credentials/certifications/resources/study-guides/ai-102 .
Train and Test a Knowledge Base: After importing the sources, train your knowledge base to understand the context and nuances of each language. Testing is crucial to ensure that the system accurately understands and responds to queries in all supported languages https://learn.microsoft.com/en-us/credentials/certifications/resources/study-guides/ai-102 https://learn.microsoft.com/en-us/credentials/certifications/resources/study-guides/ai-102 .
Publish a Knowledge Base: Once the knowledge base is trained and tested, publish it so that it can be accessed by users. The published knowledge base should be able to handle queries in multiple languages and provide appropriate responses https://learn.microsoft.com/en-us/credentials/certifications/resources/study-guides/ai-102 https://learn.microsoft.com/en-us/credentials/certifications/resources/study-guides/ai-102 .
Create a Multi-Language Question Answering Solution: Extend the capabilities of your question answering solution to support multiple languages. This may involve integrating language detection and translation services to ensure that the system can identify the language of the query and provide answers in the same language https://learn.microsoft.com/en-us/credentials/certifications/resources/study-guides/ai-102 .
Use Metadata for Question-and-Answer Pairs: Utilize metadata to tag question-and-answer pairs with language-specific information. This helps the system to filter and match queries with the correct language set of answers https://learn.microsoft.com/en-us/credentials/certifications/resources/study-guides/ai-102 .
By following these steps, you can create a robust multi-language question answering solution that serves users in their preferred languages, enhancing the overall user experience.
For additional information on creating a multi-language question answering solution, you can refer to the following resources: - Azure Cognitive Services Documentation - QnA Maker Documentation
Please note that while URLs are provided for further reading, they should be accessed and reviewed to ensure they contain the most up-to-date and relevant information for your study guide.
Implement knowledge mining and document intelligence solutions (10–15%)
Implement an Azure Cognitive Search solution
Provisioning an Azure Cognitive Search Resource
To provision an Azure Cognitive Search resource, follow these steps:
Navigate to the Azure Portal: Begin by logging into your Azure Portal account.
Create a New Resource: Click on “Create a resource” to initiate the process of setting up a new service.
Search for Azure Cognitive Search: In the “New” window, search for “Azure Cognitive Search” and select it from the results.
Create Azure Cognitive Search: Click on the “Create” button to start configuring your Azure Cognitive Search resource.
Resource Configuration:
- Subscription: Choose the Azure subscription in which you want to create the resource.
- Resource Group: Select an existing resource group or create a new one.
- Resource Name: Enter a unique name for your Azure Cognitive Search resource.
- Location: Choose the region that is closest to your users to minimize latency.
- Pricing Tier: Select a pricing tier that fits your performance and scale requirements.
Review and Create: Once you have configured the settings, review the details, and click “Create” to deploy the Azure Cognitive Search resource.
Resource Deployment: Azure will now deploy your Cognitive Search resource. This process may take a few minutes.
Access and Manage: After deployment, you can access the Azure Cognitive Search resource from your Azure Portal dashboard. Here, you can manage indexes, import data, and integrate with other Azure services.
For additional information on provisioning and managing Azure Cognitive Search resources, you can refer to the following URLs:
Remember, the resource provider name for Azure Cognitive Search is
Microsoft.Search 40_Use virtual networks.pdf .
Optional settings for field mapping when using Azure Cognitive Search
can be controlled through FieldMappingOptions azure-ai-services-openai.pdf .
To add a new data source to Azure OpenAI, specific Azure RBAC roles are
required, such as Cognitive Services OpenAI Contributor and Search
Service Contributor azure-ai-services-openai.pdf
.
Please note that if you encounter issues such as the search indices not loading when selecting an existing Azure Cognitive Search resource, you should check the setup in Azure OpenAI Studio and ensure that the correct data source is being added azure-ai-services-openai.pdf .
By following these steps and utilizing the provided resources, you can successfully provision and manage an Azure Cognitive Search resource to enhance your applications with powerful search capabilities.
Implement knowledge mining and document intelligence solutions (10–15%)
Implement an Azure Cognitive Search solution
Create Data Sources
When setting up a search solution, the initial step involves establishing a data source. A data source is essentially the repository of data that you wish to make searchable. Azure Cognitive Search is versatile in its support for various types of data sources, which include:
Unstructured Files: These are typically stored in Azure Blob Storage containers. Unstructured data refers to information that does not have a pre-defined data model, such as text or multimedia content.
Structured Data: This can be found in Azure SQL Database tables, where the data is organized into rows and columns.
Semi-Structured Documents: Documents stored in Cosmos DB, which is a globally distributed, multi-model database service, can also serve as data sources.
Azure Cognitive Search can index data from these sources, making it searchable. Indexing is the process of extracting information from the data source and organizing it in a way that makes it easily retrievable.
Alternatively, instead of pulling data from an existing data store, applications can push data directly into an Azure Cognitive Search index in the form of JSON documents. This method is particularly useful when dealing with data that is already in a format suitable for indexing or when real-time indexing is required.
For more information on Azure Cognitive Search and data sources, you can refer to the following URL: Azure Cognitive Search Documentation.
Updating Your Index
To keep your search index up-to-date, you have a couple of options:
Automatic Index Refresh: You can configure your Azure Cognitive Search to automatically refresh the index at regular intervals.
Manual Update: If you have new data in your Azure Blob Container, you can create a new index that includes all the existing and new data. This is done by using the updated Blob Container as the data source for the new index.
For guidance on updating your index, visit: How to Update an Azure Cognitive Search Index.
Role of Search Service Contributor
The role of a Search Service Contributor is crucial in the context of data ingestion and indexing. This role is responsible for creating and managing the index, data sources, skillset, and indexer. It also involves querying the indexer status to ensure that the data ingestion process is functioning correctly.
For a detailed description of the Search Service Contributor role, you can explore the following URL: Azure Cognitive Search - Search Service Contributor Role.
By understanding these components and their roles, you can effectively create and manage data sources for Azure Cognitive Search, ensuring that your search solution is efficient, scalable, and up-to-date.
Implement knowledge mining and document intelligence solutions (10–15%)
Implement an Azure Cognitive Search solution
Create an Index in Azure Cognitive Search
Creating an index in Azure Cognitive Search involves defining the structure of the index and the data that will be stored within it. An index is composed of fields that represent the searchable data types and structures. Here’s a step-by-step guide to creating an index:
Define the Index Schema: Start by defining the schema of your index, which includes specifying the fields that will make up the index. Each field can be configured with various attributes such as the field name, data type (e.g., string, integer, boolean), and whether the field is searchable, filterable, sortable, or facetable.
Create the Index: Once the schema is defined, you can create the index in Azure Cognitive Search. This can be done through the Azure portal, using Azure CLI, or programmatically via the Azure Cognitive Search REST API or SDKs.
Configure Indexing Behavior: Determine how each field should be processed during indexing. For example, you can set analyzers for text fields to control how text is tokenized and indexed.
Populate the Index: After creating the index, you need to populate it with data. This is typically done using an indexer that connects to your data source, such as an Azure Blob Storage container or a database, and automatically extracts, transforms, and loads the data into the index.
Use AI Enrichment: Optionally, you can enhance your index with AI enrichment by creating a skillset. A skillset is a collection of AI skills that process your content to extract additional information such as key phrases, language detection, sentiment analysis, and image analysis. The output from these skills can be added to the index to create more complex and rich search experiences https://learn.microsoft.com/en-us/training/modules/create-azure-cognitive-search-solution/3-search-components .
Manage the Index: After the index is created and populated, you can manage it by updating the schema, adding or deleting documents, or refreshing the index to reflect changes in the data source.
For additional information and guidance on creating an index in Azure Cognitive Search, you can refer to the following resources:
- Azure Cognitive Search documentation: Create an Azure Cognitive Search index
- GitHub script for index creation: Azure AI Search index creation script azure-ai-services-openai.pdf .
Remember to review the Azure Cognitive Search documentation for the latest features and best practices when creating and managing your search indexes.
Implement knowledge mining and document intelligence solutions (10–15%)
Implement an Azure Cognitive Search solution
Define a Skillset
In Azure Cognitive Search, a skillset is a collection of artificial intelligence (AI) skills that are applied during the indexing process to enrich the source data with additional information. This enrichment process enhances the data with insights obtained by specific AI skills, which can then be mapped to index fields. The skillset effectively defines an enrichment pipeline, where each step in the pipeline applies a particular AI skill to the source data.
Here are the key points to understand about defining a skillset:
AI Skills: These are the individual components within a skillset that perform specific tasks, such as extracting key phrases, detecting language, or generating sentiment scores. AI skills can also include custom skills developed to meet unique requirements.
Enrichment Pipeline: The skillset represents a sequence of AI skills that process the data in a step-by-step manner. Each skill adds new information or transformations to the data, which can be used to improve search capabilities.
Mapping to Index Fields: After the AI skills have processed the data, the enriched information is mapped to fields within an index. This mapping allows the enriched data to be searchable and retrievable in the context of Azure Cognitive Search.
Examples of AI Skills:
- Language detection to determine the language a document is written in.
- Key phrase extraction to identify the main themes or topics in a document.
- Sentiment analysis to quantify the positivity or negativity of the content.
- Entity recognition to identify and categorize entities like locations, people, and organizations.
- Optical character recognition (OCR) to extract text from images.
- Custom skills for specialized data processing requirements.
Custom Skills: In addition to the pre-built AI skills provided by Azure Cognitive Search, you can create and integrate custom skills into your skillset to perform specialized processing tailored to your specific use case.
For more detailed information on defining a skillset in Azure Cognitive Search, you can refer to the official documentation provided by Microsoft:
Remember, a well-defined skillset is crucial for creating a rich search experience, as it allows you to extract and search on a wide range of data points that might not be readily available in the original data source https://learn.microsoft.com/en-us/training/modules/create-azure-cognitive-search-solution/3-search-components .
Implement knowledge mining and document intelligence solutions (10–15%)
Implement an Azure Cognitive Search solution
Implement Custom Skills and Include Them in a Skillset
When working with Azure Cognitive Search, custom skills can be implemented to extend the capabilities of the built-in cognitive skills provided by Azure. These custom skills can perform specialized processing or transformation tasks that are not covered by the pre-built skills. Once implemented, these custom skills need to be included in a skillset, which is a collection of skills that process your data in the Azure Cognitive Search indexing pipeline.
Steps to Implement Custom Skills:
Define the Custom Skill Interface: A custom skill is essentially a Web API that accepts inputs and returns outputs in a specific format that Azure Cognitive Search can understand https://learn.microsoft.com/en-us/training/modules/build-form-recognizer-custom-skill-for-azure-cognitive-search/3-build-custom-skill .
Input and Output Formats: The custom skill must accept a JSON body with a collection named
values, where each item represents a document to process. Each item must have arecordIdto correlate inputs with outputs. The output must also be a JSON body with avaluescollection, includingrecordIdand the processed data https://learn.microsoft.com/en-us/training/modules/build-form-recognizer-custom-skill-for-azure-cognitive-search/3-build-custom-skill .Error Handling: Your custom skill code should handle errors and warnings appropriately. If an error occurs during processing, it should be indicated in an
errorscollection in the output JSON. Similarly, non-critical issues should be reported in awarningscollection https://learn.microsoft.com/en-us/training/modules/build-form-recognizer-custom-skill-for-azure-cognitive-search/3-build-custom-skill .Integration with Azure AI Document Intelligence: If your custom skill involves analyzing forms or documents, you may need to integrate with Azure AI Document Intelligence. This requires handling specific connection information such as the endpoint and API key https://learn.microsoft.com/en-us/training/modules/build-form-recognizer-custom-skill-for-azure-cognitive-search/3-build-custom-skill .
Steps to Include Custom Skills in a Skillset:
Create a Skillset: A skillset is a collection of skills that defines the enrichment pipeline. You can include built-in skills as well as custom skills in a skillset https://learn.microsoft.com/en-us/credentials/certifications/resources/study-guides/ai-102 https://learn.microsoft.com/en-us/credentials/certifications/resources/study-guides/ai-102 .
Attach a Cognitive Services Account: To use cognitive skills, including custom skills that call Cognitive Services, you must attach a Cognitive Services account to your skillset https://learn.microsoft.com/en-us/credentials/certifications/resources/study-guides/ai-102 .
Incorporate Custom Skills: Include your custom skill in the skillset by specifying the skill in the skillset definition. This involves setting the URI of the custom skill Web API and mapping the inputs and outputs https://learn.microsoft.com/en-us/credentials/certifications/resources/study-guides/ai-102 https://learn.microsoft.com/en-us/credentials/certifications/resources/study-guides/ai-102 .
Implement Incremental Enrichment: For ongoing indexing tasks, you may want to implement incremental enrichment, which allows the skillset to process only new or updated documents since the last run, rather than reprocessing all documents https://learn.microsoft.com/en-us/credentials/certifications/resources/study-guides/ai-102 .
Additional Resources:
- For more information on creating and running an indexer, which is necessary to use your skillset, please refer to the Azure documentation on indexers https://learn.microsoft.com/en-us/training/modules/create-azure-cognitive-search-solution/3-search-components .
- To learn about managing Knowledge Store projections, which can be used in conjunction with skillsets to store enriched documents, visit the Azure documentation on Knowledge Store https://learn.microsoft.com/en-us/credentials/certifications/resources/study-guides/ai-102 .
- For a comprehensive guide on data ingestion architecture, including how custom skills fit into the process, you can explore the Azure OpenAI documentation azure-ai-services-openai.pdf .
By following these steps and utilizing the resources provided, you can effectively implement custom skills and include them in a skillset to enhance the capabilities of Azure Cognitive Search.
Implement knowledge mining and document intelligence solutions (10–15%)
Implement an Azure Cognitive Search solution
Create and Run an Indexer
An indexer in Azure Cognitive Search is a crucial component that automates the process of extracting data from a specified data source, transforming it if necessary, and loading it into an index. Here’s a detailed explanation of how to create and run an indexer:
Provisioning the Data Source: Before creating an indexer, you must have a data source to pull data from. This could be Azure Blob Storage, Azure Table Storage, or a variety of other supported data sources azure-ai-services-openai.pdf .
Defining the Index: An index is where the searchable data will reside. You need to define the schema of the index, which includes fields like strings, numbers, dates, and complex types such as collections and objects.
Creating the Indexer: Once the data source and index are defined, you can create an indexer. The indexer is the engine that drives the indexing process. It uses the outputs extracted by the skills in the skillset, along with the data and metadata values extracted from the original data source, and maps them to fields in the index https://learn.microsoft.com/en-us/training/modules/create-azure-cognitive-search-solution/3-search-components .
Running the Indexer: After creation, the indexer is automatically run. It can also be scheduled to run at regular intervals or run on demand to add more documents to the index. If there are changes such as new fields in an index or new skills in a skillset, you may need to reset the index before re-running the indexer https://learn.microsoft.com/en-us/training/modules/create-azure-cognitive-search-solution/3-search-components .
Scheduling Indexer Runs: For data sources like Azure Blob storage, you can schedule automatic index refreshes. This ensures that the index is kept up-to-date with the latest data without manual intervention. You can set the refresh cadence according to your requirements azure-ai-services-openai.pdf .
Monitoring and Management: After the indexer is set up, you can monitor its status and manage it through the Azure portal or programmatically via the Azure Cognitive Search APIs. This includes checking for any errors during indexing and ensuring that the data is being indexed as expected.
For additional information on creating and running an indexer, you can refer to the following resources:
Remember to review the official documentation for the most up-to-date and detailed instructions, as the process may evolve over time.
Implement knowledge mining and document intelligence solutions (10–15%)
Implement an Azure Cognitive Search solution
Querying an Index in Azure Cognitive Search
When querying an index in Azure Cognitive Search, several key concepts and functionalities are essential to understand: syntax, sorting, filtering, and the use of wildcards. These components allow users to retrieve and manipulate search results effectively.
Syntax
Azure Cognitive Search uses the Lucene query syntax, which is a powerful and flexible language for constructing search queries. It enables the parsing of text-based document contents to locate specific query terms. The syntax supports a variety of query operations, such as searching for exact phrases, boosting the importance of terms, and performing fuzzy searches https://learn.microsoft.com/en-us/training/modules/create-azure-cognitive-search-solution/5-search-index .
Sorting
Sorting is a common requirement in search solutions, allowing users to order query results based on field values. Azure Cognitive Search facilitates this through the search query API, where you can specify the sort order for the results. For instance, you might sort results by a ‘date_published’ field in descending order to get the most recent documents first https://learn.microsoft.com/en-us/training/modules/create-azure-cognitive-search-solution/6-apply-filtering-sorting .
Filtering
Filtering is another crucial feature that refines query results. In Azure Cognitive Search, you can filter based on field values to include only the documents that meet certain criteria. For example, you might filter results to only include documents where the ‘status’ field is ‘active’ https://learn.microsoft.com/en-us/training/modules/create-azure-cognitive-search-solution/6-apply-filtering-sorting .
Wildcards
Wildcards are special characters that allow you to perform searches
with flexible matching. In Azure Cognitive Search, the two main wildcard
characters are * (asterisk) for zero or more characters and
? (question mark) for exactly one character. Wildcards can
be used to find documents that match a pattern, such as all words
starting with ‘netw’ (e.g., ‘network’, ‘networking’, etc.) https://learn.microsoft.com/en-us/credentials/certifications/resources/study-guides/ai-102
https://learn.microsoft.com/en-us/credentials/certifications/resources/study-guides/ai-102
.
Extended Syntax
Azure Cognitive Search also offers an extended syntax that supports more complex queries. This includes advanced filtering capabilities, regular expressions, and other sophisticated query types. The extended syntax allows for more nuanced and precise search operations https://learn.microsoft.com/en-us/training/modules/create-azure-cognitive-search-solution/5-search-index .
Query Parameters
When submitting queries, client applications can include various parameters that determine how the search expression is evaluated and the results returned. Common parameters include the search text, filter expressions, sort order, and the fields to include in the results https://learn.microsoft.com/en-us/training/modules/create-azure-cognitive-search-solution/5-search-index .
For additional information on querying an index in Azure Cognitive Search, you can refer to the official Microsoft documentation: - Azure Cognitive Search - Query your index - Lucene query syntax in Azure Cognitive Search
This information is crucial for understanding how to interact with Azure Cognitive Search and can be used to enhance the search experience in your applications.
Implement knowledge mining and document intelligence solutions (10–15%)
Implement an Azure Cognitive Search solution
Manage Knowledge Store Projections
Managing Knowledge Store projections involves storing the enriched data from the Azure Cognitive Search indexing process into a Knowledge Store. The Knowledge Store can create projections in the form of files, objects, and tables, which are based on the document structures generated by the enrichment pipeline. Here’s a detailed explanation of each type of projection:
File Projections
File projections allow you to store the output of the enrichment
process as files in Azure Blob Storage. This is useful for binary data
or when you want to maintain the original format of the data, such as
images or documents. To manage file projections, you define a
files array within the knowledgeStore object
in your skillset, specifying the storage container and the source data
from the enrichment pipeline https://learn.microsoft.com/en-us/training/modules/create-knowledge-store-azure-cognitive-search/3-define-knowledge-store
.
Object Projections
Object projections are used to store JSON objects in Azure Blob
Storage. These objects are typically well-structured JSON documents that
represent a view of the data suitable for consumption by other
applications or services. To manage object projections, you define an
objects array within the knowledgeStore
object, indicating the storage container and the source from the
enriched document https://learn.microsoft.com/en-us/training/modules/create-knowledge-store-azure-cognitive-search/3-define-knowledge-store
.
Table Projections
Table projections allow you to store data in Azure Table Storage,
which is useful for structured data that can be represented in tabular
form. Each table projection creates an Azure Storage table with fields
mapped from the enriched document and a unique key field specified by
the generatedKeyName property. This is particularly helpful
for analysis and reporting, as the key fields can be used to define
relational joins between tables https://learn.microsoft.com/en-us/training/modules/create-knowledge-store-azure-cognitive-search/3-define-knowledge-store
.
To simplify the creation of projections, the Shaper
skill is often used to transform complex document structures into a
simpler format that can be easily mapped to projections. The Shaper
skill defines a new field, typically named projection,
which contains a structured representation of the fields you want to map
to your Knowledge Store projections https://learn.microsoft.com/en-us/training/modules/create-knowledge-store-azure-cognitive-search/2-define-projection-json
.
For example, a Shaper skill might create a projection
field that includes a file name, URL, sentiment score, and key phrases
extracted from the document. This structured data is then easier to map
to file, object, or table projections in the Knowledge Store https://learn.microsoft.com/en-us/training/modules/create-knowledge-store-azure-cognitive-search/2-define-projection-json
.
When defining Knowledge Store projections, it’s important to note
that projection types are mutually exclusive within a single projection
definition. Therefore, if you want to create file, object, and table
projections, you must define a separate projection for each type within
the knowledgeStore object https://learn.microsoft.com/en-us/training/modules/create-knowledge-store-azure-cognitive-search/3-define-knowledge-store
.
For additional information on managing Knowledge Store projections, you can refer to the following resources: - Provision a Cognitive Search resource - Create and run an indexer - Query an index
Remember to always refer to the official Microsoft documentation for the most up-to-date and detailed guidance on implementing and managing Knowledge Store projections.
Implement knowledge mining and document intelligence solutions (10–15%)
Implement an Azure AI Document Intelligence solution
Provisioning a Document Intelligence Resource
To provision a Document Intelligence resource, you will need to follow these steps:
Access the Azure Portal: Begin by signing into the Azure Portal. If you do not have an account, you will need to create one.
Create a New Resource: Once logged in, navigate to the “Create a resource” section. Here, you can search for “Document Intelligence” or find it under the AI + Machine Learning category.
Select the Appropriate Service: You have the option to choose between an Azure AI Service resource, which is a multi-service subscription key used across multiple Azure AI Services, or an Azure Document Intelligence resource, which is a single-service subscription key used only with a specific Azure AI Service https://learn.microsoft.com/en-us/training/modules/work-form-recognizer/3-get-started .
Configure the Service: After selecting the service, you will need to configure it by specifying details such as the name, subscription, resource group, and the location where you want to host your service.
Review and Create: Review all the details you have entered. Once you are satisfied that everything is correct, proceed to create the resource. Azure will then deploy your new Document Intelligence resource.
Authentication: For authentication purposes, especially if you intend to use Microsoft Entra authentication, you will need a single-service resource https://learn.microsoft.com/en-us/training/modules/work-form-recognizer/3-get-started .
Access Keys and Endpoint: After the resource is deployed, you can go to the resource page to find your key and endpoint. These are essential for accessing the service programmatically.
Subscription to the Service: You can subscribe to the service either through the Azure portal or with the Azure Command Line Interface (CLI). The CLI commands for managing Cognitive Services accounts can be found in the Azure documentation https://learn.microsoft.com/en-us/training/modules/work-form-recognizer/3-get-started .
For additional information on provisioning and using Azure Document Intelligence resources, you can refer to the Azure CLI documentation for Cognitive Services accounts: Azure CLI Cognitive Services Account Commands.
Remember, provisioning a Document Intelligence resource is the foundational step in utilizing Azure’s AI capabilities to extract data and insights from documents. Whether you are using prebuilt models or implementing custom models, having this resource is crucial https://learn.microsoft.com/en-us/credentials/certifications/resources/study-guides/ai-102 https://learn.microsoft.com/en-us/training/modules/work-form-recognizer/9-form-recognizer-studio https://learn.microsoft.com/en-us/training/modules/work-form-recognizer/9-form-recognizer-studio https://learn.microsoft.com/en-us/training/modules/work-form-recognizer/9-form-recognizer-studio .
Implement knowledge mining and document intelligence solutions (10–15%)
Implement an Azure AI Document Intelligence solution
Use Prebuilt Models to Extract Data from Documents
Azure Document Intelligence provides a suite of prebuilt models designed to extract data from various types of documents efficiently. These models leverage advanced machine learning algorithms to detect and extract information, returning the data in a structured JSON format. The process of using these prebuilt models involves several steps:
- Provisioning a Resource:
- Begin by creating an Azure Document Intelligence or Azure AI Services resource. This is a prerequisite for accessing the prebuilt models and their functionalities https://learn.microsoft.com/en-us/training/modules/work-form-recognizer/9-form-recognizer-studio .
- Selecting a Prebuilt Model:
- Azure Document Intelligence offers a range of prebuilt models
tailored for specific document types. These include:
- W-2 forms
- Invoices
- Receipts
- ID documents
- Health insurance cards
- Vaccination records
- Business cards
- Choose the model that best fits the type of document you need to analyze https://learn.microsoft.com/en-us/training/modules/work-form-recognizer/9-form-recognizer-studio https://learn.microsoft.com/en-us/training/modules/work-form-recognizer/2-what-form-recognizer .
- Azure Document Intelligence offers a range of prebuilt models
tailored for specific document types. These include:
- Analyzing Documents:
- With the appropriate model selected, you can analyze your document. This requires the Azure Document Intelligence or Azure AI service endpoint and key. The service accepts input files in JPEG, PNG, PDF, and TIFF formats https://learn.microsoft.com/en-us/training/modules/work-form-recognizer/2-what-form-recognizer .
- Receiving Extracted Data:
- The prebuilt model processes the document and returns a JSON file. This file contains the extracted data, including the location of text in bounding boxes, text content, tables, selection marks (checkboxes or radio buttons), and document structure https://learn.microsoft.com/en-us/training/modules/work-form-recognizer/2-what-form-recognizer .
- Integration and Usage:
- The extracted data can be integrated into various applications or workflows. It can be used for automating data entry, archiving, compliance checks, or any other process that requires information from physical or digital documents.
For visual exploration and understanding of how these prebuilt models work, you can use the Azure Document Intelligence Studio (preview). This online tool allows users to analyze form layouts and extract data using a user-friendly interface https://learn.microsoft.com/en-us/training/modules/work-form-recognizer/9-form-recognizer-studio .
For additional information and up-to-date details on Azure Document Intelligence and its prebuilt models, refer to the official documentation page: Azure Document Intelligence Overview https://learn.microsoft.com/en-us/training/modules/work-form-recognizer/2-what-form-recognizer .
Please note that some features of Azure Document Intelligence may be in preview and subject to change. Always consult the official page for the latest information https://learn.microsoft.com/en-us/training/modules/work-form-recognizer/2-what-form-recognizer .
Implement knowledge mining and document intelligence solutions (10–15%)
Implement an Azure AI Document Intelligence solution
Implementing a Custom Document Intelligence Model
Implementing a custom document intelligence model involves several steps that allow you to tailor the extraction of data from documents to your specific needs. Here’s a detailed explanation of the process:
Provisioning a Resource: Begin by provisioning an Azure Document Intelligence or Azure AI Services resource. This resource will be used to create and manage your custom models https://learn.microsoft.com/en-us/credentials/certifications/resources/study-guides/ai-102 .
Data Collection: Collect a set of sample forms (at least 5-6) that represent the type of documents you want to process. These forms will be used to train your custom model. Upload them to your Azure storage account container https://learn.microsoft.com/en-us/training/modules/work-form-recognizer/9-form-recognizer-studio .
Configuring CORS: Configure Cross-Origin Resource Sharing (CORS) for your storage account. CORS is necessary to allow Azure Document Intelligence Studio to access and store labeled files in your storage container https://learn.microsoft.com/en-us/training/modules/work-form-recognizer/9-form-recognizer-studio .
Creating a Custom Model Project: In Azure Document Intelligence Studio, create a new custom model project. You will need to link your storage container and the Azure Document Intelligence or Azure AI Service resource to the project through configurations https://learn.microsoft.com/en-us/training/modules/work-form-recognizer/9-form-recognizer-studio .
Labeling Data: Use Azure Document Intelligence Studio to label the text in your sample forms. This involves identifying and tagging the specific data you want the model to extract, such as names, dates, amounts, etc https://learn.microsoft.com/en-us/training/modules/work-form-recognizer/9-form-recognizer-studio .
Training the Model: Train your custom model using the labeled data. Azure Document Intelligence Studio will automatically generate the necessary
ocr.json,labels.json, andfields.jsonfiles for training. Once the training is complete, you will receive a Model ID and an Average Accuracy for the tags https://learn.microsoft.com/en-us/training/modules/work-form-recognizer/9-form-recognizer-studio .Testing the Model: After training, test your model’s performance by analyzing new forms that were not included in the training set. This helps to evaluate the model’s accuracy and generalization capabilities https://learn.microsoft.com/en-us/training/modules/work-form-recognizer/9-form-recognizer-studio .
Integration into Azure Cognitive Search: If you wish to integrate your custom document intelligence model into the Cognitive Search indexing process, you will need to write a web service that conforms to the custom skill interface. This allows you to send documents to Azure AI Document Intelligence for data extraction and store the extracted values in your search index https://learn.microsoft.com/en-us/training/modules/build-form-recognizer-custom-skill-for-azure-cognitive-search/3-build-custom-skill .
Using Azure Document Intelligence Studio: Azure Document Intelligence Studio provides a user interface for visually exploring, understanding, and integrating features from the Azure Document Intelligence service. It can be used for analyzing form layouts, extracting data with prebuilt models, and training custom models https://learn.microsoft.com/en-us/training/modules/work-form-recognizer/9-form-recognizer-studio .
Supervised Machine Learning: Azure Document Intelligence service supports supervised machine learning, allowing you to train custom models and create composite models. You can choose between custom template models for structured documents and custom neural models for semi-structured or unstructured documents https://learn.microsoft.com/en-us/training/modules/work-form-recognizer/6-train-custom-models .
For additional information and guidance, you can refer to the Azure Document Intelligence Studio documentation and the Azure AI Document Intelligence service documentation.
Please note that the URLs for additional information are not included as per the instructions. However, these resources can be found on the official Microsoft documentation website.
Implement knowledge mining and document intelligence solutions (10–15%)
Implement an Azure AI Document Intelligence solution
To train, test, and publish a custom document intelligence model using Azure Document Intelligence services, you can follow these steps:
Train a Custom Model
- Provision Azure Resources: Begin by creating an Azure Document Intelligence or Azure AI Services resource.
- Prepare Training Data: Collect a set of sample forms (at least 5-6) that are representative of the documents you want to process. Upload these to your Azure storage account container.
- Set Up CORS: Configure Cross-Origin Resource Sharing (CORS) to allow Azure Document Intelligence Studio to access your storage container.
- Create a Project: In Azure Document Intelligence Studio, create a new custom model project. Link your storage container and Azure resource to the project.
- Label Data: Use the studio to label text in your
sample forms, creating
ocr.json,labels.json, andfields.jsonfiles that are necessary for training. - Train the Model: With the labeled data, train your custom model. Upon completion, you will receive a Model ID and information about the average accuracy of the tags https://learn.microsoft.com/en-us/training/modules/work-form-recognizer/9-form-recognizer-studio .
Test the Custom Model
- Analyze New Forms: Test the model by analyzing new forms that were not included in the training set. This helps to evaluate the model’s performance on unseen data.
- Review Results: Check the accuracy of the extracted data and make any necessary adjustments to the model or the labeling of the training data https://learn.microsoft.com/en-us/training/modules/work-form-recognizer/9-form-recognizer-studio https://learn.microsoft.com/en-us/training/modules/work-form-recognizer/6-train-custom-models .
Publish the Custom Model
- Finalize the Model: Once you are satisfied with the model’s performance, finalize the configurations.
- Publish the Model: Use the Azure portal or the REST API to publish the model, making it available for document analysis in production environments https://learn.microsoft.com/en-us/training/modules/work-form-recognizer/6-train-custom-models .
For additional information and detailed instructions, you can refer to the following resources: - Azure Document Intelligence Studio: Azure Document Intelligence Studio - Official Azure Document Intelligence Overview: Azure AI Services Document Intelligence Overview https://learn.microsoft.com/en-us/training/modules/work-form-recognizer/2-what-form-recognizer .
Please note that some features of Azure Document Intelligence may be in preview and subject to change. Always refer to the official documentation for the most up-to-date information https://learn.microsoft.com/en-us/training/modules/work-form-recognizer/2-what-form-recognizer .
Implement knowledge mining and document intelligence solutions (10–15%)
Implement an Azure AI Document Intelligence solution
Create a Composed Document Intelligence Model
When working with Azure Document Intelligence, a composed document intelligence model allows you to combine multiple trained models into a single model that can analyze a variety of document types. This is particularly useful when you have different forms or documents that require processing by different models, but you want to streamline the analysis into a single step.
Here’s a step-by-step explanation of how to create a composed document intelligence model:
Provision Azure Resources: Before you begin, ensure that you have an Azure Document Intelligence or Azure AI Services resource provisioned. This resource is necessary to access the Azure Document Intelligence capabilities.
Train Individual Models: You need to have trained individual custom models for each type of document you want to process. Use Azure Document Intelligence Studio to train these models, ensuring that you have labeled your sample forms and that the models have been tested for accuracy.
Create a Composed Model: Once you have your individual models ready, you can create a composed model. In Azure Document Intelligence Studio, you can select the option to create a composed model and then choose the individual models you want to include in the composition.
Test the Composed Model: After creating the composed model, it’s important to test it with documents that represent the variety of types it’s expected to handle. This ensures that the composed model is correctly utilizing the individual models for accurate data extraction.
Publish the Composed Model: Once you are satisfied with the performance of the composed model, you can publish it. This makes the model available for use in your applications or workflows.
Implement the Model: Finally, you can implement the composed model as a custom skill in Azure Cognitive Search or integrate it into your applications using the Azure Document Intelligence SDK or REST API.
For additional information on creating and using composed document intelligence models, you can refer to the Azure Document Intelligence Studio documentation and the official Azure AI Services documentation:
- Azure Document Intelligence Studio: Azure Document Intelligence Studio
- Azure AI Services Documentation: Azure AI Services
Remember that some features of Azure Document Intelligence may be in preview and subject to change, so always refer to the official documentation for the most up-to-date information https://learn.microsoft.com/en-us/training/modules/work-form-recognizer/2-what-form-recognizer .
Implement knowledge mining and document intelligence solutions (10–15%)
Implement an Azure AI Document Intelligence solution
Implementing a Document Intelligence Model as a Custom Azure Cognitive Search Skill
To implement a document intelligence model as a custom Azure Cognitive Search skill, you need to integrate Azure AI Document Intelligence into the Cognitive Search indexing process. This involves creating a web service that acts as a custom skill within the Cognitive Search pipeline. The custom skill will call Azure AI Document Intelligence to extract specific fields from documents, such as customer names or voter IDs, which can then be included in the search index for easy retrieval.
Steps to Implement the Custom Skill:
- Create and Deploy a Web Service:
- Develop a web service that can act as a custom skill.
- The web service should call Azure AI Document Intelligence to extract the required fields from documents https://learn.microsoft.com/en-us/training/modules/build-form-recognizer-custom-skill-for-azure-cognitive-search/4-exercise-build-deploy .
- Integrate with Cognitive Search:
- Write the web service to conform to the custom skill interface required by Azure Cognitive Search.
- Ensure that the web service can accept input data and return output data in the formats compatible with the rest of the Cognitive Search indexing pipeline https://learn.microsoft.com/en-us/training/modules/build-form-recognizer-custom-skill-for-azure-cognitive-search/3-build-custom-skill https://learn.microsoft.com/en-us/training/modules/build-form-recognizer-custom-skill-for-azure-cognitive-search/3-build-custom-skill .
- Handle Input and Output Data:
- The web service must handle input values in the JSON body of the
REST request, which includes a collection named
values. Each item in this collection represents a document to analyze. - The service should return a JSON response with a
valuescollection, where each item corresponds to the submitted documents and includes the extracted fields https://learn.microsoft.com/en-us/training/modules/build-form-recognizer-custom-skill-for-azure-cognitive-search/3-build-custom-skill .
- The web service must handle input values in the JSON body of the
REST request, which includes a collection named
- Set Up Azure Resources:
- Use a script to create the necessary Azure resources, including the Azure Forms Recognizer and Cognitive Search resources.
- Clone the necessary code repository and execute the setup script to configure these resources https://learn.microsoft.com/en-us/training/modules/build-form-recognizer-custom-skill-for-azure-cognitive-search/4-exercise-build-deploy .
- Configure Cognitive Search to Call the Custom
Skill:
- Once the custom skill is completed, tested, and hosted, configure Cognitive Search with the definition JSON code for the custom skill.
- Define the
urifor the web service, theinputsfor the data sent to the skill, and theoutputsfor the data returned from the skill https://learn.microsoft.com/en-us/training/modules/build-form-recognizer-custom-skill-for-azure-cognitive-search/3-build-custom-skill .
Additional Information:
- Azure AI Document Intelligence is a feature of Azure Cognitive Services that enables the extraction of information from documents.
- Cognitive Search is an AI-powered cloud search service for mobile and web app development.
- Custom skills in Azure Cognitive Search allow you to extend the capabilities of the indexing pipeline with your own code.
By following these steps, you can successfully implement a document intelligence model as a custom skill in Azure Cognitive Search, enhancing the search capabilities with the power of AI to extract and index valuable information from documents.
References:
- For more details on implementing custom skills in Azure Cognitive Search, you can refer to the Azure documentation on creating and deploying a web service for a custom skill https://learn.microsoft.com/en-us/training/modules/build-form-recognizer-custom-skill-for-azure-cognitive-search/4-exercise-build-deploy https://learn.microsoft.com/en-us/training/modules/build-form-recognizer-custom-skill-for-azure-cognitive-search/3-build-custom-skill https://learn.microsoft.com/en-us/training/modules/build-form-recognizer-custom-skill-for-azure-cognitive-search/3-build-custom-skill .
- To set up the necessary Azure resources for your custom skill, follow the instructions provided in the setup script https://learn.microsoft.com/en-us/training/modules/build-form-recognizer-custom-skill-for-azure-cognitive-search/4-exercise-build-deploy .
- For configuring Cognitive Search to call your custom skill, refer to the sample definition JSON code provided in the documentation https://learn.microsoft.com/en-us/training/modules/build-form-recognizer-custom-skill-for-azure-cognitive-search/3-build-custom-skill .
Implement generative AI solutions (10–15%)
Use Azure OpenAI Service to generate content
Provisioning an Azure OpenAI Service Resource
To provision an Azure OpenAI Service resource, follow these steps:
Create a Resource in Azure: Begin by navigating to the Azure portal. You will need to log in with your Microsoft account credentials. Once logged in, search for “OpenAI Service” in the marketplace.
Resource Deployment: Select “Create” to initiate the deployment process. You will be prompted to fill in details such as the subscription you want to use, the resource group (you can create a new one or use an existing one), the region where you want to deploy the service, and the resource name azure-ai-services-openai.pdf .
Review and Create: After filling in all the necessary details, review your configuration to ensure everything is correct. Then, click “Create” to deploy your Azure OpenAI Service resource.
Configuration: Once the resource is deployed, you may need to configure certain settings such as access keys and endpoints. These are essential for authenticating and interacting with the OpenAI API azure-ai-services-openai.pdf .
Access Control: Ensure that your sign-in credential has the Cognitive Services OpenAI Contributor role on your Azure OpenAI resource. This role is necessary to perform actions like deploying models and managing the resource azure-ai-services-openai.pdf .
IP Allowlisting: If you plan to call the Azure OpenAI API from your development machine, make sure that your IP is allowlisted in the IP rules of the Azure OpenAI Service resource azure-ai-services-openai.pdf .
Clean Up: If the resource was created for temporary or testing purposes, remember to clean up by deleting the deployed models and the resource or the associated resource group to avoid incurring unnecessary costs azure-ai-services-openai.pdf .
For additional information and detailed steps, you can refer to the following URLs: - Create and deploy an Azure OpenAI Service resource - Clean up resources
It is also important to review the pricing information before proceeding to ensure you are aware of the costs associated with using the Azure OpenAI Service.
Implement generative AI solutions (10–15%)
Use Azure OpenAI Service to generate content
Select and Deploy an Azure OpenAI Model
When preparing to work with Azure OpenAI models, it is essential to understand the process of selecting and deploying a model. This process involves several steps that ensure you can generate text or inference with the chosen model. Below is a detailed explanation of how to select and deploy an Azure OpenAI model:
Sign in to Azure OpenAI Studio: Begin by signing into Azure OpenAI Studio. This is the platform where you can manage your Azure OpenAI resources and deployments.
Choose Subscription and Resource: After signing in, select the appropriate subscription and the Azure OpenAI resource you wish to work with. Then, proceed by selecting ‘Use resource’.
Navigate to Deployments: Within the Azure OpenAI Studio, find the ‘Management’ section and click on ‘Deployments’. This is where you can manage all your model deployments.
Create a New Deployment: To deploy a new model, click on ‘Create new deployment’. You will need to configure several fields to specify the details of your deployment. These fields typically include the model name, version, and any other relevant parameters that define how the model should be deployed.
Deployment Considerations: It is important to note that if a deployment remains inactive for more than fifteen days, it may be automatically deleted azure-ai-services-openai.pdf . However, this does not affect the underlying customized model, which can be redeployed at any time.
Deploy from Azure OpenAI Studio: If you are satisfied with the model’s performance in the studio, you can deploy it directly from there. You have the option to deploy the model as a standalone web application or integrate it with Power Virtual Agents if you are using your own data azure-ai-services-openai.pdf .
Web App Deployment: For web app deployment, you can either create a new web app or update an existing one. You will need to provide a name for the app, select your subscription, resource group, location, and pricing plan. The name you choose will be part of the app’s URL azure-ai-services-openai.pdf .
Important Considerations: When deploying a web app, consider the implications for usage and costs. Each deployed model incurs an hourly hosting cost, and it is advisable to plan and manage these costs effectively azure-ai-services-openai.pdf .
For additional information on creating and deploying an Azure OpenAI Service resource, you can refer to the following URL: Create and deploy an Azure OpenAI Service resource azure-ai-services-openai.pdf .
By following these steps, you can successfully select and deploy an Azure OpenAI model to meet your application’s requirements. Remember to monitor your deployments to optimize costs and ensure that your models remain active and available for use.
Implement generative AI solutions (10–15%)
Use Azure OpenAI Service to generate content
Submit Prompts to Generate Natural Language
When creating AI solutions that involve natural language generation (NLG), one of the capabilities you can leverage is the submission of prompts to an AI model to generate human-like text. This process involves providing a model with a prompt, which is a piece of text that instructs or guides the model on what kind of text it should produce.
How It Works:
Provision an Azure OpenAI Service Resource: Before you can submit prompts, you need to set up an Azure OpenAI Service resource within your Azure subscription https://learn.microsoft.com/en-us/credentials/certifications/resources/study-guides/ai-102 .
Select and Deploy an Azure OpenAI Model: Choose an appropriate model for your NLG needs. Azure OpenAI offers a variety of models that specialize in different types of language tasks https://learn.microsoft.com/en-us/credentials/certifications/resources/study-guides/ai-102 .
Submit Prompts: Once the model is deployed, you can submit prompts through the Azure OpenAI APIs. The prompt should be carefully crafted to guide the model in generating the desired output. For example, if you want the model to write an article about health, your prompt might be “Write a short article about the benefits of a balanced diet.” https://learn.microsoft.com/en-us/credentials/certifications/resources/study-guides/ai-102 .
Receive Responses: After submitting the prompt, the model will generate text based on the input it received. The quality and relevance of the generated text will depend on how well the prompt was constructed https://learn.microsoft.com/en-us/credentials/certifications/resources/study-guides/ai-102 .
Considerations:
Prompt Design: The design of the prompt is crucial. It should be clear and specific to guide the model effectively. You can refer to the bot design guidelines for best practices in crafting prompts https://learn.microsoft.com/en-us/azure/bot-service/index-bf-sdk .
Ethical Use: Be aware of the ethical implications of NLG. Models can sometimes over- or under-represent certain groups or introduce biases in the generated text. It’s important to review and filter the output to ensure it is fair and unbiased.
Continuous Improvement: The process of generating natural language is iterative. You may need to refine your prompts and the model’s parameters based on the responses you receive to improve the quality of the output.
Additional Resources:
For more information on designing prompts and understanding best practices, you can visit the Azure bot design guidelines: Bot Design Guidelines https://learn.microsoft.com/en-us/azure/bot-service/index-bf-sdk .
To learn about the question answering feature of Azure Cognitive Service for Language, which can be used in conjunction with NLG, check out this article: Question Answering in Azure Cognitive Service for Language https://learn.microsoft.com/en-us/azure/bot-service/bot-builder-howto-answer-questions .
By following these steps and considerations, you can effectively use Azure OpenAI to generate natural language that is coherent, contextually relevant, and ethically responsible. This capability can be integrated into various applications, such as chatbots, content creation tools, and more, to enhance the user experience with AI-driven interactions.
Implement generative AI solutions (10–15%)
Use Azure OpenAI Service to generate content
Submit Prompts to Generate Code
When working with Azure OpenAI Service, one of the capabilities you can leverage is the submission of prompts to generate code. This process involves providing a text-based prompt that describes the code you want to generate, and the service will return the corresponding code snippet.
How to Submit Prompts for Code Generation
Provision Azure OpenAI Service Resource: Before you can submit prompts, you need to have an Azure OpenAI Service resource provisioned in your Azure account https://learn.microsoft.com/en-us/credentials/certifications/resources/study-guides/ai-102 .
Select and Deploy a Model: Choose an appropriate model for code generation from the Azure OpenAI models available and deploy it. This model will process your input prompts https://learn.microsoft.com/en-us/credentials/certifications/resources/study-guides/ai-102 .
Craft Your Prompt: Write a clear and concise prompt that describes the functionality you want your code to have. The more specific your prompt, the more accurate the generated code will be.
Use the Playground or API: You can either use the GPT-3 Playground for a no-code approach or the REST API for programmatic access. In the playground, simply enter your prompt into the text box and select “Generate” azure-ai-services-openai.pdf . If using the API, you will need to send a POST request with your prompt to the completions endpoint.
Experiment with Configuration Settings: Adjust settings such as temperature to fine-tune the creativity and determinism of the code generation. You can find more details about each parameter in the REST API documentation azure-ai-services-openai.pdf .
Receive and Review the Generated Code: Once you submit your prompt, the model will process it and return a code snippet. Review the generated code to ensure it meets your requirements.
Iterate if Necessary: If the generated code does not exactly match your needs, you can refine your prompt and resubmit it, or tweak the generated code manually.
Additional Information
Content Moderation: Azure OpenAI also performs content moderation on the prompt inputs and generated outputs to ensure that harmful content is not produced azure-ai-services-openai.pdf azure-ai-services-openai.pdf .
Stateless Models: The models are stateless, meaning they do not store any prompts or generations. This ensures privacy and security as your code prompts are not used to train or improve the models azure-ai-services-openai.pdf .
View Code Samples: In the GPT-3 playground, you can view Python and curl code samples pre-filled according to your selected settings, which can help you write an application to complete the same task azure-ai-services-openai.pdf .
For more information on using Azure OpenAI to generate code, you can refer to the Azure OpenAI documentation and the REST API guide.
Please note that while this capability is powerful, it is essential to review and test the generated code thoroughly before using it in a production environment to ensure it functions as intended and adheres to best practices.
Implement generative AI solutions (10–15%)
Use Azure OpenAI Service to generate content
Use the DALL-E Model to Generate Images
The DALL-E model is an advanced AI system capable of generating images from textual descriptions provided by users. This technology can create a wide range of visuals, from simple objects to complex scenes, with impressive detail and creativity. Here’s how to utilize the DALL-E model for image generation:
Accessing DALL-E 3: To start using DALL-E 3, you need to access it through OpenAI Studio or the REST API. Ensure that your OpenAI resource is located in the SwedenCentral Azure region for optimal performance azure-ai-services-openai.pdf .
Prompt Crafting: When you provide a text prompt to DALL-E, the model uses its built-in prompt rewriting capabilities to enhance the image quality, reduce potential biases, and increase the natural variation in the generated images azure-ai-services-openai.pdf .
Content Credentials: Azure OpenAI Service includes a feature called Content Credentials, which provides a manifest with each image generated by DALL-E. This manifest is cryptographically signed and includes information such as the description of the image as “AI Generated Image,” the software agent “Azure OpenAI DALL-E,” and the timestamp of creation. This helps users understand the AI-generated nature of the content azure-ai-services-openai.pdf .
Using Azure OpenAI Studio: To generate images with DALL-E 3, navigate to Azure OpenAI Studio and sign in with your credentials. From the landing page, select the DALL-E playground (Preview) to access the image generation APIs azure-ai-services-openai.pdf .
Making API Calls: To request a generated image, you’ll need to make a POST request to the Azure OpenAI Service with your resource name, deployment ID, and API version. The request body must include the text prompt and can specify the number of images, size, quality, response format, and style of the generated images azure-ai-services-openai.pdf .
Image Generation Parameters: The parameters for generating images include the text prompt (required), the number of images (optional, with only n=1 supported for DALL-E 3), image size (optional, with specific dimensions available), image quality (optional, with ‘hd’ or ‘standard’ as choices), response format (optional, with ‘url’ or ‘b64_json’), and style (optional, with ‘natural’ or ‘vivid’ as choices) azure-ai-services-openai.pdf .
For additional information on how to responsibly build solutions with Azure OpenAI service image-generation models, you can visit the Azure OpenAI transparency note azure-ai-services-openai.pdf .
Please note that the above steps are based on the current capabilities and features of the DALL-E model as described in the provided documents. The actual process may evolve over time as the technology advances.
Implement generative AI solutions (10–15%)
Use Azure OpenAI Service to generate content
Using Azure OpenAI APIs to Submit Prompts and Receive Responses
When working with Azure OpenAI, one of the core functionalities is the ability to submit prompts to the service and receive generated natural language or code responses. This process is facilitated through the Azure OpenAI APIs, which provide a programmable interface to interact with the various models available within the Azure OpenAI Service.
Step 1: Provision an Azure OpenAI Service Resource
Before you can start submitting prompts, you need to provision an Azure OpenAI Service resource in your Azure account. This involves creating a new resource, selecting the appropriate subscription and resource group, and configuring the service according to your needs.
Step 2: Authenticate with Azure OpenAI
To use the Azure OpenAI APIs, you must authenticate your requests.
This is typically done using an API key, which you can obtain from the
Azure portal after creating your OpenAI resource. The
OpenAIKeyCredential class represents an OpenAI API key and
is used to authenticate into an OpenAI client for an OpenAI endpoint azure-ai-services-openai.pdf
.
Step 3: Install Azure OpenAI and Set Up Environment Variables
You will need to install the Azure OpenAI package for your programming language of choice. For example, in a Node.js environment, you can use npm to install the package. Additionally, you should set up environment variables for your resource endpoint and API key to keep your credentials secure azure-ai-services-openai.pdf .
Step 4: Create an Instance of OpenAIClient
With the Azure OpenAI package installed and your environment
variables set, you can create an instance of the
OpenAIClient class. This client will be used to send
requests to the Azure OpenAI service azure-ai-services-openai.pdf
.
Step 5: Submit Prompts
To submit a prompt, you will use the OpenAIClient
instance to send a request to the appropriate model endpoint. The
request should include the prompt text and any parameters that control
the behavior of the model, such as the maximum number of tokens to
generate.
Step 6: Receive Responses
After submitting the prompt, the Azure OpenAI service will process the request and return a response. This response will contain the generated text or code based on the prompt you provided. You can then use this response in your application or for further processing.
Step 7: Secure Your Data
When using Azure OpenAI, it’s important to ensure that your data is secure. Azure provides mechanisms such as virtual networks and private endpoints to help protect your data while using the service azure-ai-services-openai.pdf .
Additional Resources
For more detailed information on using Azure OpenAI APIs, you can refer to the following resources: - Azure OpenAI documentation: Azure OpenAI Documentation - Management APIs reference: Management APIs Reference Documentation
By following these steps, you can effectively use Azure OpenAI APIs to submit prompts and receive responses, enabling you to integrate advanced AI capabilities into your applications.
Implement generative AI solutions (10–15%)
Optimize generative AI
Configure Parameters to Control Generative Behavior
When working with generative AI models, such as those provided by Azure OpenAI, it is crucial to understand how to configure parameters to control the behavior of the model’s output. This involves adjusting settings that influence the generation of text, ensuring that the responses align with the desired outcome. Below are key parameters that can be configured:
Temperature: This parameter controls the randomness of the output. A lower temperature results in more predictable text, while a higher temperature encourages creativity and diversity in the responses.
Top-k Sampling: By setting a ‘k’ value, you limit the model to only consider the top ‘k’ most likely next words at each step of the generation process. This can help focus the model’s output and prevent it from generating irrelevant content.
Top-p Sampling (Nucleus Sampling): Similar to top-k, top-p sampling chooses from the smallest set of words whose cumulative probability exceeds the threshold ‘p’. This allows for dynamic adjustment of the word pool size.
Maximum Length: This parameter sets the maximum number of tokens to generate. It is useful for controlling the verbosity of the model’s responses.
Stop Sequences: You can specify certain sequences of text where the model should stop generating further content. This is helpful for defining the end of a response.
Prompt Engineering: The way a prompt is structured can significantly influence the model’s output. Careful design of prompts can improve the relevance and quality of the generated text.
Fine-tuning: For more specific control, you can fine-tune a model on your own dataset to tailor its behavior to your particular use case.
For additional information on configuring these parameters and best practices for interacting with generative AI models, you can refer to the following resources:
- Azure OpenAI documentation: Use your own data with an Azure OpenAI model
- Microsoft’s Responsible AI Standard: Microsoft Responsible AI Standard
- Azure OpenAI Transparency Note: Transparency Note
By understanding and properly configuring these parameters, developers and data scientists can harness the power of generative AI while maintaining control over the model’s output to ensure it meets the requirements of their application https://learn.microsoft.com/en-us/credentials/certifications/resources/study-guides/ai-102 azure-ai-services-openai.pdf .
Implement generative AI solutions (10–15%)
Optimize generative AI
Apply Prompt Engineering Techniques to Improve Responses
Prompt engineering is a critical skill when working with Large Language Models (LLMs) like Azure OpenAI. It involves crafting inputs that guide the AI to generate the desired outputs. Here are some techniques to improve the quality of responses from an LLM:
Define Clear Objectives: Start by clearly defining what you want the model to achieve with its response. This helps in constructing prompts that are direct and unambiguous azure-ai-services-openai.pdf .
Use Example Demonstrations: Provide examples within your prompt to illustrate the type of response you’re looking for. This can serve as a model for the AI to follow.
Control Generative Behavior: Adjust parameters such as temperature and max tokens to control the creativity and length of the AI’s responses. Lower temperatures result in more predictable outputs, while higher temperatures allow for more varied responses https://learn.microsoft.com/en-us/credentials/certifications/resources/study-guides/ai-102 .
Optimize Function Calls: When using functions within your prompts, ensure that the syntax is precise and that the function definitions are clear to the model. This helps the AI understand when and how to execute these functions azure-ai-services-openai.pdf .
Format Input Data Appropriately: Depending on the API you’re using (Chat Completion or Completion API), format your input data correctly. For chat-like interactions, use an array of dictionaries; for more flexible interactions, a simple string of text will suffice azure-ai-services-openai.pdf .
Apply Behavioral Guardrails: Include additional instructions in your prompt to prevent undesired behavior and to keep the AI’s responses within the scope of the task azure-ai-services-openai.pdf .
Validate Model Responses: Always validate the AI’s responses to ensure they meet your requirements. Even well-crafted prompts may not always produce the desired outcome across different scenarios.
For more in-depth guidance on prompt engineering techniques, you can refer to the following resources:
- Introduction to prompt engineering: Introduction to Prompt Engineering
- Advanced prompt engineering techniques: Advanced Prompt Engineering Techniques
- Using the Chat Completion API: Guide on Using Chat Completion API
By incorporating these techniques into your prompt engineering practice, you can significantly enhance the performance of Azure OpenAI models and achieve more accurate and grounded responses.
Implement generative AI solutions (10–15%)
Optimize generative AI
Use Your Own Data with an Azure OpenAI Model
When working with Azure OpenAI models, you have the capability to utilize your own data to fine-tune models for specific use cases. This process enhances the model’s performance by adapting it to the nuances and context of your data. Below is a detailed explanation of how to use your own data with an Azure OpenAI model:
- Data Preparation:
- Begin by preparing your training and validation datasets. These datasets should be representative of the type of content you want the model to generate or understand.
- Ensure that your data is formatted correctly and is of high quality, as this will directly impact the effectiveness of the fine-tuned model azure-ai-services-openai.pdf .
- Creating a Custom Model:
- Access Azure OpenAI Studio and use the ‘Create custom model’ wizard to start the training process.
- Select the base model that best fits your needs. Azure OpenAI provides a variety of pre-trained models that serve as starting points for fine-tuning azure-ai-services-openai.pdf .
- Upload your training data and, if available, your validation data to the platform.
- You may configure advanced options for fine-tuning if necessary, such as hyperparameters or training duration azure-ai-services-openai.pdf .
- Review your configurations and initiate the training to create your new custom model.
- Model Training and Validation:
- Monitor the status of your fine-tuning job within Azure OpenAI Studio. This will provide insights into the training progress and any potential issues azure-ai-services-openai.pdf .
- Once the model is trained, evaluate its performance using the validation data. This step is crucial to ensure that the model has learned the patterns in your data effectively.
- Deployment and Usage:
- After the fine-tuning process is complete and the model’s performance is satisfactory, deploy the custom model for use.
- Integrate the model into your applications or services to leverage its capabilities in your specific context azure-ai-services-openai.pdf .
- Optionally, continue to analyze the model’s performance and fit over time to ensure it remains effective as your data or requirements evolve.
- Data Privacy and Security:
- It is important to note that your data remains private throughout this process. Azure OpenAI ensures that your prompts, completions, embeddings, and training data are not available to other customers, OpenAI, or used to improve other models or services azure-ai-services-openai.pdf .
- The Azure OpenAI Service is fully controlled by Microsoft, and the service does not interact with any services operated by OpenAI azure-ai-services-openai.pdf .
For additional information on using your own data with Azure OpenAI models, you can refer to the following resources: - Data, privacy, and security for Azure OpenAI Service - Microsoft Products and Services Data Protection Addendum - Quickstart: Chat with Azure OpenAI models using your own data
By following these steps and utilizing the resources provided, you can effectively use your own data to create custom models with Azure OpenAI, tailored to your specific needs and use cases.
Implement generative AI solutions (10–15%)
Optimize generative AI
Fine-tuning an Azure OpenAI Model
Fine-tuning is a process that allows you to tailor a pre-trained AI model to better suit your specific data and use case. When it comes to Azure OpenAI models, fine-tuning can significantly enhance the model’s performance by adjusting it to the nuances of your dataset.
Prerequisites for Fine-tuning
Before you begin fine-tuning an Azure OpenAI model, there are several prerequisites that must be met:
Azure Subscription: You need to have an active Azure subscription. If you do not have one, you can create a free subscription here.
Access to Azure OpenAI: Ensure that you have been granted access to Azure OpenAI within your Azure subscription. Currently, access to Azure OpenAI Service is application-based, and you must complete a form to apply for access.
Azure OpenAI Resource: You must have an Azure OpenAI resource in a region that supports fine-tuning. You can check the model summary table and region availability for this information.
Permissions: You will need the Cognitive Services OpenAI Contributor role to view quota, deploy models, and access fine-tuning capabilities in Azure OpenAI Studio.
Fine-tuning Process
The fine-tuning process involves the following steps:
Prepare Your Data: Gather and prepare your training and validation datasets. Your training file should include examples of the input data and the desired output.
Start Fine-tuning: Use the Azure OpenAI Studio or the OpenAI Python SDK to start a fine-tuning job. You will need to specify the base model (e.g.,
gpt-3.5-turbo-0613) and provide the training and validation files.Monitor the Job: Fine-tuning can take some time, often more than an hour. You can monitor the status of the job through Azure OpenAI Studio or by using the OpenAI Python SDK to retrieve the job status.
Evaluate the Results: Once the fine-tuning job has completed, you can evaluate the performance of the fine-tuned model by testing it with new data.
Deploy the Model: If you are satisfied with the fine-tuned model’s performance, you can deploy it for inference within the Azure AI service.
Costs and Considerations
It is important to review the pricing information for fine-tuning before starting. Costs are incurred for training hours, fine-tuning inference, and hourly hosting of the deployed fine-tuned model. To avoid ongoing costs, delete the fine-tuned model deployment if it is no longer needed.
Next Steps
After fine-tuning your model, you can explore additional capabilities and regional availability of fine-tuning models to further enhance your application’s performance.
For a more detailed tutorial on fine-tuning with Azure OpenAI, you can refer to the Azure OpenAI fine-tuning tutorial provided in the documentation.
By following these steps and considerations, you can effectively fine-tune an Azure OpenAI model to meet the specific needs of your application, leading to improved accuracy and functionality.
Implement generative AI solutions (10–15%)
Optimize generative AI
Fine-tuning an Azure OpenAI Model
Fine-tuning is a process that allows you to customize a pre-trained AI model to better suit your specific data and use case. When it comes to Azure OpenAI models, fine-tuning can significantly enhance the model’s performance on tasks that are closely aligned with your unique requirements.
Steps to Fine-tune an Azure OpenAI Model:
Prepare Your Data: Before you begin fine-tuning, you need to prepare your training and validation datasets. These datasets should be representative of the type of content you want the model to generate or understand.
Set Up Your Azure OpenAI Resource: Ensure you have an Azure OpenAI resource in a region where fine-tuning is available. If you don’t have a resource, you can follow the resource deployment guide provided by Azure azure-ai-services-openai.pdf .
Check Permissions: You will need the Cognitive Services OpenAI Contributor role to access fine-tuning capabilities. If you don’t have the necessary permissions to view quota and deploy models in Azure OpenAI Studio, you’ll need to acquire them azure-ai-services-openai.pdf azure-ai-services-openai.pdf .
Review Costs: It’s important to review the pricing information for fine-tuning to understand the associated costs. This includes the cost of training, fine-tuning inference, and the hourly hosting costs of having a fine-tuned model deployed azure-ai-services-openai.pdf .
Fine-tune the Model: Use the Azure OpenAI fine-tuning capabilities to train your model with your prepared datasets. This involves setting hyperparameters such as the number of epochs and monitoring the training process until completion azure-ai-services-openai.pdf .
Deploy the Fine-tuned Model: Once fine-tuning is complete, you can deploy the model for inferencing within the applicable Azure AI service. Remember that the fine-tuned model is limited to internal users and can only be used for the permitted use cases azure-ai-services-openai.pdf .
Monitor and Manage Your Model: After deployment, it’s crucial to monitor the model’s performance and manage its hosting to avoid incurring unnecessary costs. You should delete your fine-tuned model deployment if it’s no longer needed azure-ai-services-openai.pdf .
Additional Resources:
- To get started with fine-tuning, you can explore the Azure OpenAI fine-tuning tutorial azure-ai-services-openai.pdf .
- For a comprehensive understanding of when to use Azure OpenAI fine-tuning, read the guide provided by Azure azure-ai-services-openai.pdf .
- To review the regional availability of fine-tuning models, check the Model summary table and region availability azure-ai-services-openai.pdf .
By following these steps and utilizing the resources provided, you can effectively fine-tune an Azure OpenAI model to meet the specific needs of your application or service.