SC-300 Study Guide

Implement and manage user identities (20–25%)
Configure and manage a Microsoft Entra tenant
Configure and Manage Built-in and Custom Microsoft Entra Roles
When configuring and managing Microsoft Entra roles, it is essential to understand the role-based access control (RBAC) system that Microsoft Entra employs. RBAC is a method of regulating access to resources based on the roles of individual users within an organization. Here’s a detailed explanation of how to configure and manage both built-in and custom roles within Microsoft Entra:
Built-in Roles
Azure provides a set of predefined built-in roles that can be assigned to users or groups to grant access to App Configuration data using Microsoft Entra ID https://learn.microsoft.com/en-us/azure/azure-app-configuration/concept-enable-rbac . These roles are designed to cover common sets of permissions that users typically need.
Custom Roles
In addition to built-in roles, you can create custom roles to meet the specific needs of your organization. Custom roles allow you to define a unique set of permissions that are not covered by the built-in roles.
Steps to Create Custom Roles in Microsoft Defender Portal
- Sign in to the Microsoft Defender portal using an account with Security Administrator or Global Administrator role https://learn.microsoft.com/en-us/training/modules/deploy-microsoft-defender-for-endpoints-environment/6-create-manage-roles-for-role-based-access-control .
- Navigate to Settings > Endpoints. Under Permissions, select Roles https://learn.microsoft.com/en-us/training/modules/deploy-microsoft-defender-for-endpoints-environment/6-create-manage-roles-for-role-based-access-control .
- Click on the Turn on roles button to enable custom roles https://learn.microsoft.com/en-us/training/modules/deploy-microsoft-defender-for-endpoints-environment/6-create-manage-roles-for-role-based-access-control .
- Select + Add item to create a new role https://learn.microsoft.com/en-us/training/modules/deploy-microsoft-defender-for-endpoints-environment/6-create-manage-roles-for-role-based-access-control .
- Provide a name and description for the role and select the permissions you wish to assign https://learn.microsoft.com/en-us/training/modules/deploy-microsoft-defender-for-endpoints-environment/6-create-manage-roles-for-role-based-access-control .
- Click Next to assign the role to a Microsoft Entra Security group https://learn.microsoft.com/en-us/training/modules/deploy-microsoft-defender-for-endpoints-environment/6-create-manage-roles-for-role-based-access-control .
- Use the filter to select the Microsoft Entra group to which you want to add the role https://learn.microsoft.com/en-us/training/modules/deploy-microsoft-defender-for-endpoints-environment/6-create-manage-roles-for-role-based-access-control .
- Click Save to create the role.
Role-Based Access Control (RBAC) and Device Groups
RBAC in Defender for Endpoint allows you to create roles and groups within your security operations team to grant appropriate access to the portal https://learn.microsoft.com/en-us/training/modules/deploy-microsoft-defender-for-endpoints-environment/5-manage-access . You can control who can take specific actions and who can see information on a specific device group or groups https://learn.microsoft.com/en-us/training/modules/deploy-microsoft-defender-for-endpoints-environment/5-manage-access . To implement RBAC, you need to define admin roles, assign corresponding permissions, and assign Microsoft Entra user groups to the roles https://learn.microsoft.com/en-us/training/modules/deploy-microsoft-defender-for-endpoints-environment/5-manage-access .
Understanding Roles and Permissions
Before using RBAC, it is crucial to understand the roles that can grant permissions and the consequences of enabling RBAC https://learn.microsoft.com/en-us/training/modules/deploy-microsoft-defender-for-endpoints-environment/5-manage-access . Full access rights are typically granted to users with Security Administrator or Global Administrator roles, while read-only access is granted to users with a Security Reader role https://learn.microsoft.com/en-us/training/modules/deploy-microsoft-defender-for-endpoints-environment/5-manage-access .
Authorization with Microsoft Entra
When using Microsoft Entra authentication, authorization is managed by RBAC, which requires users to be assigned to roles to access resources https://learn.microsoft.com/en-us/azure/azure-app-configuration/rest-api-authorization-azure-ad . Each role contains a set of actions that users assigned to the role can perform https://learn.microsoft.com/en-us/azure/azure-app-configuration/rest-api-authorization-azure-ad .
Additional Information on Roles and Role Assignments
For further details on roles and role assignments, you can refer to the following resources: - Understanding different roles: Understanding different roles https://learn.microsoft.com/en-us/azure/azure-app-configuration/concept-enable-rbac .
By following these guidelines, you can effectively configure and manage both built-in and custom Microsoft Entra roles to ensure that users have the appropriate level of access to resources within your organization.
Implement and manage user identities (20–25%)
Configure and manage a Microsoft Entra tenant
Explanation of Administrative Units Usage
Administrative units in Microsoft 365 are organizational structures that provide a way to delegate administrative tasks across different subsets of users. They are particularly useful in large organizations or educational institutions where there is a need to delegate administrative permissions more granularly than at the entire organization level.
Here are some scenarios where using administrative units is recommended:
Geographical Distribution: For organizations with a presence in multiple geographical locations, administrative units can be used to delegate control to regional IT administrators, allowing them to manage users, groups, and devices specific to their region.
Departmental Delegation: In large organizations with distinct departments, administrative units enable departmental admins to manage their own set of users and resources without impacting other departments.
Educational Institutions: Schools and universities can use administrative units to delegate permissions to IT staff responsible for specific faculties or student groups, thus maintaining a clear separation of administrative control.
Compliance Requirements: Organizations with strict compliance or regulatory requirements can use administrative units to ensure that only certain administrators have access to specific sets of user data.
Role-Based Access Control: Administrative units support role-based access control (RBAC) by allowing roles to be scoped to the administrative unit. This ensures that administrators only have the permissions necessary for their role within the specific subset of the organization.
Simplified Management: For any organization that wants to simplify the management of users and resources by breaking down the administrative responsibility into smaller, more manageable units.
For more information on administrative units and how to implement them, you can refer to the following resources:
- Overview of administrative units in Microsoft 365
- Manage administrative units in Microsoft 365
- Assign roles to administrative units in Microsoft 365
Please note that the URLs provided are for additional information and should be used to gain a deeper understanding of administrative units and their application within Microsoft 365 environments.
Implement and manage user identities (20–25%)
Configure and manage a Microsoft Entra tenant
Configure and Manage Administrative Units
Administrative units in Microsoft 365 are designed to provide scoped administrative roles that allow for finer control over the management of users and resources. They are particularly useful in large organizations or educational institutions where there is a need to delegate administrative tasks to different departments or regions without granting full administrative rights across the entire organization.
Key Concepts:
Scope of Management: Administrative units limit the scope of administrative privileges to specific subsets of users. For example, an administrative unit can be created for a particular department, and a department administrator can be assigned to manage only users within that unit.
Role Assignment: Roles can be assigned to administrators at the administrative unit level. This means that an administrator with a user management role can only manage users within their assigned administrative unit.
Delegated Administration: Administrative units help organizations delegate administration tasks securely. This is particularly important for organizations that need to comply with certain regulations or want to implement a principle of least privilege.
Steps to Configure and Manage Administrative Units:
- Create an Administrative Unit:
- Navigate to the Microsoft 365 admin center.
- Under the “Users” or “Groups” section, select “Administrative units.”
- Click “Add” to create a new administrative unit.
- Provide a name and description for the administrative unit.
- Add Members to the Administrative Unit:
- Within the administrative unit, select “Members.”
- Click “Add members” to include users or groups into the unit.
- Search and select the users or groups to be added.
- Assign Roles to Administrators:
- Select “Roles” within the administrative unit.
- Click “Assign roles” to add administrators to the unit.
- Choose the roles that will be assigned to the administrators, such as User Management or Helpdesk Administrator.
- Select the administrators to whom the roles will be assigned.
- Manage Administrative Unit Properties:
- You can edit the properties of an administrative unit by selecting it and clicking “Edit.”
- Update the name, description, or membership of the administrative unit as needed.
Additional Resources:
For more detailed guidance on configuring and managing administrative units, you can refer to the following resources:
By following these steps and utilizing the provided resources, you can effectively configure and manage administrative units within your Microsoft 365 environment, ensuring that administrative tasks are delegated appropriately while maintaining security and compliance.
Implement and manage user identities (20–25%)
Configure and manage a Microsoft Entra tenant
Evaluate Effective Permissions for Microsoft Entra Roles
When evaluating effective permissions for Microsoft Entra roles, it is essential to understand the role-based access control (RBAC) mechanisms that Microsoft employs to manage permissions within its services. Here’s a detailed explanation of how to evaluate these permissions:
- Understand the Role Definitions:
- Begin by familiarizing yourself with the specific permissions that each Microsoft Entra role encompasses. Roles define a set of permissions, such as the ability to read, write, or delete resources.
- Identify Assigned Roles:
- Check which roles have been assigned to a user or a security principal. This can be done through the Microsoft Defender portal or other Microsoft services where roles are managed.
- Examine Role Assignments:
- Look at the scope of the role assignments. Roles can be assigned at different levels, such as the subscription, resource group, or resource level. The scope of the assignment can affect the effective permissions.
- Check Group Memberships:
- Users may inherit permissions through group memberships. Verify which Microsoft Entra user groups the user belongs to and the roles assigned to these groups.
- Review Conditional Access Policies:
- Conditional Access policies can impact effective permissions by adding requirements or restrictions based on certain conditions, such as user location or device compliance.
- Consider Overlapping Permissions:
- If a user has multiple roles assigned, or roles are assigned at different scopes, there may be overlapping permissions. Evaluate the cumulative permissions to understand the effective rights.
- Use the Principle of Least Privilege:
- Ensure that users have the minimum level of access necessary to perform their tasks. This reduces the risk of unauthorized access to resources.
- Monitor and Audit Permissions:
- Regularly review and audit permissions to ensure they are still appropriate for the user’s role within the organization. Use tools provided by Microsoft to monitor and report on effective permissions.
For additional information on managing roles and permissions, you can refer to the following resources:
- To learn about creating roles in the Microsoft Defender portal and assigning them to Microsoft Entra Security groups, visit Create and manage roles in Microsoft Defender.
- For guidance on authenticating and authorizing access to App Configuration resources using Microsoft Entra ID, see Authenticate access to Azure App Configuration resources with Microsoft Entra ID and managed identities for Azure Resources.
- To understand role-based access control (RBAC) in Microsoft Defender for Endpoint and how to create device groups and assign roles, review the information on Role-Based Access Control (RBAC) and Device Groups.
- For best practices on managing access with Azure RBAC and the principle of least privilege, refer to Best practices for Azure RBAC.
By following these steps and utilizing the provided resources, you can effectively evaluate and manage the permissions associated with Microsoft Entra roles.
Implement and manage user identities (20–25%)
Configure and manage a Microsoft Entra tenant
Configure and Manage Custom Domains
When configuring and managing custom domains in Azure Front Door, there are several key steps to follow:
- Adding a Certificate to Azure Front Door:
- Access your Azure Front Door Standard/Premium in the Azure portal.
- Under Settings, go to Secrets and select + Add certificate.
- Choose the certificate you wish to add and select the certificate version. Opting for Latest will allow Azure Front Door to automatically update the certificate upon rotation https://learn.microsoft.com/en-us/azure/frontdoor/standard-premium/how-to-configure-https-custom-domain .
- Adding a New Custom Domain:
- Navigate to Domains under Settings and select + Add.
- On the Add a domain page, select “Bring Your Own Certificate (BYOC)” for HTTPS configuration.
- Choose the certificate you previously added from the drop-down list under Secret.
- Ensure the common name (CN) of the certificate matches the custom domain you are adding https://learn.microsoft.com/en-us/azure/frontdoor/standard-premium/how-to-configure-https-custom-domain .
- Enabling HTTPS for Custom Domains:
- Select the custom domain you’ve added and change the Custom domain HTTPS status to Enabled.
- Choose ‘Use my own certificate’ for the Certificate management type.
- Set up the correct permissions for Azure Front Door to access your Azure Key Vault.
- Select the appropriate Key Vault account, Secret, and Secret version that corresponds to your certificate https://learn.microsoft.com/en-us/azure/frontdoor/front-door-how-to-onboard-apex-domain?pivots=front-door-standard-premium .
- Using Pre-Validated Domains:
- If your domain is pre-validated with another Azure service, select Domains under settings for your Azure Front Door profile and then + Add.
- Choose “Azure pre-validated domain” and select your custom domain name from the list.
- For HTTPS, select “Azure managed (Recommended)”.
- Validate and associate the custom domain to an endpoint as per the instructions provided https://learn.microsoft.com/en-us/azure/frontdoor/standard-premium/how-to-configure-https-custom-domain .
- Next Steps:
- After configuring the custom domain and enabling HTTPS, ensure that you have created appropriate routing rules for your domain or added the domain to existing routing rules https://learn.microsoft.com/en-us/azure/frontdoor/front-door-how-to-onboard-apex-domain?pivots=front-door-standard-premium .
- Monitor the progress of certificate provisioning by refreshing the page and re-selecting the custom domain after a few minutes https://learn.microsoft.com/en-us/azure/frontdoor/front-door-how-to-onboard-apex-domain?pivots=front-door-standard-premium .
For additional information and step-by-step guides, you can refer to the following resources: - Create an Azure Front Door profile https://learn.microsoft.com/en-us/azure/frontdoor/front-door-wildcard-domain?pivots=front-door-standard-premium . - Add a custom domain to your Azure Front Door https://learn.microsoft.com/en-us/azure/frontdoor/front-door-wildcard-domain?pivots=front-door-standard-premium . - Enable HTTPS on a custom domain https://learn.microsoft.com/en-us/azure/frontdoor/front-door-wildcard-domain?pivots=front-door-standard-premium .
By following these steps and utilizing the provided resources, you can successfully configure and manage custom domains in Azure Front Door, ensuring secure and reliable access to your applications.
Implement and manage user identities (20–25%)
Configure and manage a Microsoft Entra tenant
Configure Company Branding Settings
When configuring company branding settings, the goal is to create a consistent and recognizable experience for users that aligns with the organization’s branding guidelines. This involves customizing the appearance of the sign-in and sign-up pages that users interact with when accessing organizational resources.
Here are the steps and considerations for configuring company branding settings:
Access Microsoft Entra ID Management: Navigate to the Microsoft Entra ID portal to manage your organization’s identities. This is where you can set up multi-factor authentication, track user sign-ins, and edit company branding https://learn.microsoft.com/en-us/training/modules/mitigate-incidents-microsoft-365-defender/2-use-microsoft-security-center-portal .
Customize Sign-in Page: Customize the sign-in page with your organization’s logo, color schemes, and images. This helps users to immediately recognize the organization’s brand during the sign-in process.
Edit Sign-up Experience: Similarly, customize the sign-up experience to match your organization’s branding. This can include custom text, images, and terms of service links.
Set Up Home Realm Discovery: If your organization uses multiple identity providers, you can configure home realm discovery so that users are redirected to the correct sign-in page based on their email domain.
Provide Sign-in Page Text: You can provide custom text for the sign-in page that might include instructions, greetings, or support information relevant to the user’s sign-in experience.
Error Page Branding: In the event of sign-in errors, you can configure custom error pages that maintain your company branding, providing a more professional and supportive experience for users who encounter issues.
Maintain Consistency Across Platforms: Ensure that the branding is consistent across all platforms and services where users might need to authenticate, including mobile and desktop applications.
Review and Update Regularly: Branding elements may change over time, so it’s important to review and update the company branding settings regularly to ensure they remain current and effective.
For additional information and guidance on configuring company branding settings, you can refer to the following resources:
- Microsoft Entra ID portal: Manage your organization’s identities and company branding settings https://learn.microsoft.com/en-us/training/modules/mitigate-incidents-microsoft-365-defender/2-use-microsoft-security-center-portal .
- Configure a custom domain with Azure Front Door: If you’re using Azure Front Door for content delivery, you can add a custom domain for branding purposes https://learn.microsoft.com/en-us/azure/frontdoor/integrate-storage-account .
By following these steps and utilizing the provided resources, you can effectively configure company branding settings to create a secure and branded user experience for your organization.
Implement and manage user identities (20–25%)
Configure and manage a Microsoft Entra tenant
Configure Tenant Properties, User Settings, Group Settings, and Device Settings
When configuring settings within a Microsoft Azure environment, it is essential to understand the different levels at which these settings can be applied: tenant, user, group, and device. Below is a detailed explanation of each:
Tenant Properties
Tenant properties refer to the global settings that affect the entire Azure Active Directory (Azure AD) environment. These settings include configurations such as custom domain names, company branding, and security defaults. Tenant-level settings are typically managed by global administrators who have the necessary permissions to make changes that impact all users and services within the Azure AD tenant.
- Custom Domain Names: Add and verify custom domain names to personalize your Azure AD tenant.
- Company Branding: Customize the sign-in and sign-up pages with your company logo, colors, and custom user help text.
- Security Defaults: Enable pre-configured security settings for a secure and compliant environment.
For more information on configuring tenant properties, refer to the [Microsoft Entra authorization model] https://learn.microsoft.com/en-us/azure/azure-app-configuration/rest-api-authorization-index .
User Settings
User settings are specific to individual user accounts within the Azure AD tenant. These settings include user profiles, authentication methods, and assigned roles and licenses. User settings are crucial for ensuring that each user has the appropriate access and authentication methods required for their role.
- User Profiles: Manage user attributes, contact information, and organizational relationships.
- Authentication Methods: Configure multi-factor authentication (MFA) settings, password reset policies, and other user sign-in options.
- Assigned Roles and Licenses: Assign Azure AD roles for access control and allocate licenses for Microsoft services.
Azure AD authentication overview can be found [here] https://learn.microsoft.com/security/benchmark/azure/baselines/azure-front-door-security-baseline .
Group Settings
Group settings apply to Azure AD groups, which are collections of users. These settings can define how groups are created, managed, and used within the tenant. Group settings help streamline access management and ensure consistent policy application across users within the same group.
- Group Creation: Define who can create groups and the types of groups that can be created (e.g., security groups, distribution lists).
- Group Management: Set up rules for group membership, naming policies, and expiration policies.
- Group Usage: Control how groups are utilized for access to resources and group-based licensing.
Device Settings
Device settings pertain to the devices that are registered or joined to Azure AD. These settings include device compliance policies, conditional access policies, and device management options. Device settings are critical for securing and managing devices that access corporate resources.
- Device Compliance Policies: Establish criteria that devices must meet to be considered compliant with corporate standards.
- Conditional Access Policies: Define access rules based on device compliance, location, and risk level.
- Device Management: Enroll devices in mobile device management (MDM) solutions like Microsoft Intune for configuration, monitoring, and remote actions.
For additional guidance on configuring device settings, see the [How to configure an origin for Azure Front Door] https://learn.microsoft.com/en-us/azure/frontdoor/../api-management/front-door-api-management?toc=/azure/frontdoor/toc.json and [Azure AD B2C identity provider configuration] https://learn.microsoft.com/en-us/azure/frontdoor/../api-management/front-door-api-management?toc=/azure/frontdoor/toc.json .
- By understanding and properly configuring tenant properties, user settings, group settings, and device settings, organizations can create a secure and efficient environment that aligns with their operational needs and security policies.
-
https://learn.microsoft.com/en-us/azure/azure-app-configuration/rest-api-authorization-azure-ad https://learn.microsoft.com/security/benchmark/azure/baselines/azure-front-door-security-baseline : https://learn.microsoft.com/en-us/azure/active-directory/authentication/overview-authentication https://learn.microsoft.com/en-us/azure/frontdoor/../api-management/front-door-api-management?toc=/azure/frontdoor/toc.json : https://learn.microsoft.com/en-us/azure/api-management/api-management-howto-aad-b2c
Implement and manage user identities (20–25%)
Create, configure, and manage Microsoft Entra identities
Create, Configure, and Manage Users
When managing users within an Azure environment, it is essential to understand the process of creating, configuring, and managing user accounts. This includes not only the initial setup but also ongoing management tasks such as assigning roles, managing credentials, and configuring user settings.
Creating Users
To create a new user in Azure Active Directory (Azure AD), you can follow these general steps:
- Sign in to the Azure portal.
- Navigate to Azure Active Directory > Users.
- Select “New user” and enter the required information, such as name, username, and profile settings.
- Assign a role to the user if necessary.
- Set the initial password and configure password reset options.
For more detailed instructions, refer to the official documentation on creating a new user in Azure AD: Create a new Azure AD user.
Configuring Users
Once a user is created, you can configure various settings to tailor the user’s experience and access within the Azure environment:
- Profile Information: Update personal information, job title, department, and contact information.
- Directory Role: Assign roles to grant specific permissions within Azure AD.
- Groups: Add the user to groups for easier access management.
- Licenses: Assign licenses to provide access to Azure services and applications.
- Authentication Methods: Set up multi-factor authentication (MFA) and other verification methods for enhanced security.
For more information on configuring user settings, visit: Configure user account properties.
Managing Users
Managing users involves monitoring and maintaining user accounts to ensure they have the appropriate access and that their information is up to date:
- Reset Passwords: Assist users with password recovery and enforce password policies.
- Review Sign-In Activity: Monitor sign-in logs to track user activity and identify any unusual access patterns.
- Update User Roles: Regularly review and adjust user roles to adhere to the principle of least privilege.
- Manage User Devices: Oversee the devices that users have registered and ensure compliance with organizational policies.
For guidance on managing user accounts, you can refer to: Manage user accounts in Azure AD.
By following these guidelines, you can effectively create, configure, and manage user accounts in Azure AD, ensuring that users have the access they need while maintaining security and compliance within your organization.
Implement and manage user identities (20–25%)
Create, configure, and manage Microsoft Entra identities
Create, Configure, and Manage Groups
When managing Microsoft 365 services, a fundamental aspect is the ability to create, configure, and manage groups. Groups in Microsoft 365 are used to organize users and control access to resources. Here’s a detailed explanation of how to handle groups within Microsoft 365:
Creating Groups
Groups can be created in the Microsoft 365 admin center or by using PowerShell commands. There are different types of groups, each serving specific purposes:
- Office 365 Groups: These are used across Microsoft 365 apps and services. They provide a shared workspace for email, conversations, files, and calendar events where group members can collaborate.
- Security Groups: These are used for granting access to resources such as SharePoint sites and assigning user rights.
- Distribution Groups: Primarily used for sending notifications to a group of people.
- Mail-enabled Security Groups: These combine the features of security groups and distribution groups.
Configuring Groups
Once a group is created, it can be configured with specific settings:
- Ownership: Assign group owners who can manage membership and settings.
- Membership: Add or remove members and configure membership approval settings.
- Group Email: Set up an email address for the group to allow communication among members.
- Privacy: Determine whether the group is public (anyone can see its content) or private (only members can see its content).
- Permissions: Define what members can do within the group, such as sharing files or scheduling meetings.
Managing Groups
Managing groups involves regular maintenance and monitoring:
- Viewing Group Properties: Check the details of a group, including its members, owners, and settings.
- Editing Group Properties: Update group details as necessary, such as changing the group name or description.
- Deleting Groups: Remove groups that are no longer needed to keep the environment clean and organized.
- Monitoring Group Activity: Keep an eye on how groups are being used and ensure they comply with company policies.
For additional information on creating, configuring, and managing groups in Microsoft 365, you can refer to the following resources:
By understanding and effectively managing groups, you can ensure that your organization’s resources are properly secured and that collaboration is facilitated among team members.
Implement and manage user identities (20–25%)
Create, configure, and manage Microsoft Entra identities
Manage Custom Security Attributes
Custom security attributes in Azure Active Directory (Azure AD) are a feature that allows organizations to define their own attributes that can be associated with Azure AD objects like users and groups. These attributes can be used for various purposes, such as enforcing Conditional Access policies, providing access control, and driving governance decisions.
Here’s a detailed explanation of how to manage custom security attributes:
- Define Custom Security Attributes:
- Navigate to the Azure AD portal and access the ‘Identity Governance’ section.
- Under ‘Entitlement Management’, you can define custom security attributes. These attributes are essentially key-value pairs that you can assign to users or groups within your organization.
- Assign Attributes to Users or Groups:
- Once the custom attributes are defined, they can be assigned to users or groups manually through the Azure AD portal or programmatically via PowerShell or Graph API.
- These attributes can then be used in access reviews, where reviewers can make decisions based on the values of these attributes.
- Use in Conditional Access Policies:
- Custom security attributes can be used in Conditional Access policies to make decisions about whether to grant access to a resource.
- For example, you can create a policy that requires a user to have a specific attribute value to access a particular application.
- Integration with Other Services:
- These attributes can be integrated with other Azure services like Microsoft Intune for device compliance policies or with Azure Information Protection for classifying and protecting documents.
- Governance and Compliance:
- Custom security attributes can help with governance and compliance by ensuring that only users with certain attributes can access sensitive information or systems.
- Audit and Reporting:
- Changes to custom security attributes are logged, and reports can be generated to audit the use and assignment of these attributes.
For additional information on managing custom security attributes, you can refer to the following resources:
By leveraging custom security attributes, organizations can enhance their security posture and ensure that their identity and access management practices align with their specific business requirements and regulatory standards.
Plan and implement identity governance (20–25%)
Monitor identity activity by using logs, workbooks, and reports
Configure Diagnostic Settings for Azure Resources
Diagnostic settings in Azure are crucial for monitoring the performance and health of your resources. They allow you to collect platform metrics and activity logs, which can be routed to various destinations for analysis and storage. Here’s how you can configure diagnostic settings for Azure resources:
- Accessing Diagnostic Settings:
- Navigate to the Azure resource for which you want to enable diagnostic settings.
- In the Monitoring section of the resource, select Diagnostic settings.
- Click on + Add diagnostic setting to create a new setting https://learn.microsoft.com/en-us/azure/azure-app-configuration/monitor-app-configuration .
- Selecting Logs and Metrics:
- Once in the diagnostic settings page, you will need to specify a name for your setting.
- Choose the log categories you wish to collect, such as HttpRequest for App Configuration or Access log, Performance log, and Firewall log for Application Gateway https://learn.microsoft.com/en-us/azure/azure-app-configuration/monitor-app-configuration https://learn.microsoft.com/en-us/azure/application-gateway/application-gateway-diagnostics .
- Choosing Destinations:
- You have several options for where to send your logs and metrics:
- Log Analytics workspace: Ideal for real-time monitoring and analysis. Select Send to Log Analytics workspace, then choose your subscription and workspace https://learn.microsoft.com/en-us/azure/azure-app-configuration/monitor-app-configuration .
- Storage account: Suitable for long-term storage and archival. Choose to Archive to a storage account and select the appropriate subscription and storage account https://learn.microsoft.com/en-us/azure/frontdoor/standard-premium/how-to-logs .
- Event hubs: Best for integration with SIEM tools or external data stores. Select Stream to an event hub and provide the necessary details like subscription, event hub namespace, and policy name https://learn.microsoft.com/en-us/azure/frontdoor/standard-premium/how-to-logs .
- You have several options for where to send your logs and metrics:
- Configuring via Azure Portal:
- After selecting the logs and choosing the destination, enter the necessary details such as subscription, workspace, or storage account.
- Confirm your settings and click Save to apply the diagnostic setting https://learn.microsoft.com/en-us/azure/azure-app-configuration/monitor-app-configuration https://learn.microsoft.com/en-us/azure/application-gateway/application-gateway-diagnostics https://learn.microsoft.com/en-us/azure/frontdoor/standard-premium/how-to-logs .
- Configuring via Azure CLI:
- Open Azure Cloud Shell or a command console with Azure CLI installed.
- Use the
az monitor diagnostic-settings createcommand with the appropriate parameters to create a diagnostic setting https://learn.microsoft.com/en-us/azure/azure-app-configuration/monitor-app-configuration .
- Configuring via PowerShell:
- Open a PowerShell command window and sign in to your Azure subscription.
- Use the
Set-AzDiagnosticSettingcmdlet to enable logging for a Log Analytics Workspace https://learn.microsoft.com/en-us/azure/azure-app-configuration/monitor-app-configuration .
- Verification:
- After saving the diagnostic setting, verify that it is listed and that the log categories are enabled https://learn.microsoft.com/en-us/azure/azure-app-configuration/monitor-app-configuration .
- Additional Considerations:
- For Azure Firewall, note that the diagnostic settings for metrics must be configured separately from logs. Metrics should always use Azure Diagnostics https://learn.microsoft.com/en-us/azure/firewall/metrics .
For more detailed instructions and additional information, you can refer to the following resources: - Create a Log Analytics Workspace - Azure CLI - Diagnostic Settings Create Command - Set-AzDiagnosticSetting PowerShell Cmdlet - Create a Diagnostic Setting to Collect Platform Logs and Metrics in Azure - App Configuration Monitoring Data Reference
By following these steps, you can effectively configure diagnostic settings for your Azure resources, ensuring that you have the necessary data for monitoring and troubleshooting.
Plan and implement identity governance (20–25%)
Monitor identity activity by using logs, workbooks, and reports
Monitoring Microsoft Entra with KQL Queries in Log Analytics
Monitoring Microsoft Entra involves analyzing sign-in and identity management events to ensure security and compliance within an organization. Kusto Query Language (KQL) is a powerful tool used in Log Analytics to create complex queries for analyzing large datasets. Here’s a detailed explanation of how to monitor Microsoft Entra using KQL queries in Log Analytics:
Understanding KQL Basics
KQL is similar to SQL but is designed for querying structured, semi-structured, and unstructured data in Log Analytics. It uses a combination of schema entities such as databases, tables, and columns to process and return data without modifying it https://learn.microsoft.com/en-us/training/modules/query-data-sentinel/4-query-data .
Query Structure
A KQL query starts with a table name or a search command, followed by a series of commands separated by the pipe (|) character. Each command transforms the data, with the output of one command becoming the input for the next https://learn.microsoft.com/en-us/training/modules/query-data-sentinel/4-query-data .
Example Query
To retrieve all records from the Event table, you would
use:
EventTo further search for the term error in any property of
the Event table:
Event | search errorTime Range
By default, queries are limited to the past 24 hours. To specify a
different time range, use the TimeGenerated filter or the
Time range control. For instance, to return data from the
last hour:
AzureActivity | where TimeGenerated > ago(1h)Common Operators
count: Counts the number of rows.take: Retrieves a specified number of rows.project: Selects specific columns.sort: Orders rows by one or more columns.top: Returns the top N records based on specified columns.extend: Creates derived columns.summarize: Aggregates groups of rows.render: Visualizes results graphically https://learn.microsoft.com/en-us/training/modules/query-data-sentinel/4-query-data .
Joining and Unioning Tables
To combine records from two tables, use the join
operator. To combine multiple tables into one, use the
union operator https://learn.microsoft.com/en-us/training/modules/query-data-sentinel/4-query-data
.
Monitoring Sign-in Events
For sign-in investigations, including conditional access policies,
you can query tables like AADSignInEventsBeta in Microsoft
365 Defender Threat Hunting or SigninLogs in Microsoft
Entra ID Log Analytics https://learn.microsoft.com/en-us/training/modules/mitigate-incidents-microsoft-365-defender/9-investigate-azure-ad-sign-in-logs
.
Accessing Sign-in Logs
To access the Sign-in Logs blade in the Azure portal, select Microsoft Entra ID, then Sign-in Logs in the Monitoring Group. The output will include columns like Date, User, Application, Status, and Conditional Access https://learn.microsoft.com/en-us/training/modules/mitigate-incidents-microsoft-365-defender/9-investigate-azure-ad-sign-in-logs .
Analytics Rules
Analytics rules in Microsoft Sentinel can be created using built-in templates or custom KQL queries against Log Analytics workspaces. These rules detect important security events and generate alerts https://learn.microsoft.com/en-us/training/modules/incident-management-sentinel/3-describe-incident-management .
Visualization
KQL queries can return results in a pandas DataFrame, which can be used for visualization, such as plotting a bar graph of unique IP addresses https://learn.microsoft.com/en-us/training/modules/perform-threat-hunting-sentinel-with-notebooks/5-explore-notebook-code .
Learning Resources
For more information on constructing and running KQL queries, refer to the following tutorials: - Log Analytics Tutorial - Azure Data Explorer Tutorial
Note that not all KQL syntax used in Azure Data Explorer is supported in Microsoft Sentinel Log Analytics https://learn.microsoft.com/en-us/training/modules/query-data-sentinel/4-query-data .
By mastering KQL and understanding how to apply it within Log Analytics, you can effectively monitor Microsoft Entra and gain insights into the security posture of your organization.
Plan and implement identity governance (20–25%)
Monitor identity activity by using logs, workbooks, and reports
Analyze Microsoft Entra by Using Workbooks and Reporting
Microsoft Entra, formerly known as Azure Active Directory (Azure AD), provides a range of security and identity services. To effectively analyze and monitor the activities within Microsoft Entra, workbooks and reporting tools are essential. Workbooks are interactive reports that combine text, tables, charts, and tiles to visualize important data, making it easier to understand and act upon.
Workbooks in Microsoft Entra
Workbooks in Microsoft Entra allow administrators to create custom reports and dashboards to analyze various aspects of identity and access management. These can include sign-in activities, user risk levels, and the status of conditional access policies. By leveraging these workbooks, administrators can gain insights into patterns and potential security issues within their environment.
For instance, the Microsoft Entra sign-in logs workbook can provide valuable information on user sign-ins, including whether multifactor authentication (MFA) was required and used. This helps in identifying and investigating authentication requests that may not have been authorized by the user, which is crucial for protecting against identity-based risks https://learn.microsoft.com/en-us/training/modules/query-data-sentinel/5-workbooks .
Reporting Features
The reporting features in Microsoft Entra include a range of pre-built and customizable reports that help in identifying, investigating, and remediating identity-based risks. Reports can be configured to analyze user risk, sign-in risk, and authentication risk, providing a comprehensive view of the security posture related to identity and access management https://learn.microsoft.com/en-us/training/modules/protect-identities-with-aad-idp/2-azure-ad-idp-overview .
Utilizing Microsoft Entra ID Protection
Microsoft Entra ID Protection is a feature that helps protect against identity-based risks. It allows administrators to configure policies, investigate incidents through reports, and take remedial actions. By setting up an investigation policy, administrators can automatically trigger investigations based on specific events or conditions, streamlining the process of identifying and responding to potential threats https://learn.microsoft.com/en-us/training/modules/protect-identities-with-aad-idp/2-azure-ad-idp-overview .
Additional Resources
For more detailed guidance on how to use workbooks and reporting in Microsoft Entra, the following resources can be helpful:
- To learn how to create and use Microsoft Sentinel Workbooks, which can be applied to Microsoft Entra data, visit Microsoft Sentinel Workbooks documentation.
- For information on Azure Monitor logs, which can be integrated with Microsoft Entra events, see Azure Monitor logs for Azure Firewall.
- To understand how to monitor logs using Azure Firewall Workbook, which can be adapted for Microsoft Entra, refer to Monitor logs using Azure Firewall Workbook.
By utilizing these workbooks and reporting tools, administrators can effectively analyze and respond to security incidents, ensuring that their organization’s identities and access controls are secure and compliant.
Plan and implement identity governance (20–25%)
Monitor identity activity by using logs, workbooks, and reports
Monitoring and Improving Security Posture with Identity Secure Score
The Identity Secure Score is a critical metric that reflects an organization’s security posture, specifically focusing on identity-related security. It is a quantifiable measure that indicates the extent to which an organization has implemented security best practices and controls for protecting identities within Microsoft 365 environments. A higher score signifies that more improvement actions have been taken, enhancing the organization’s defense against potential threats https://learn.microsoft.com/en-us/training/modules/mitigate-incidents-microsoft-365-defender/10-understand-microsoft-secure-score .
Accessing Identity Secure Score
To monitor and improve your security posture using Identity Secure Score, you can access the centralized dashboard in the Microsoft 365 Defender portal. This dashboard provides a comprehensive view of the security of Microsoft 365 identities, applications, and devices https://learn.microsoft.com/en-us/training/modules/mitigate-incidents-microsoft-365-defender/10-understand-microsoft-secure-score .
Features of Identity Secure Score
- Visualizations and Trends: The dashboard offers robust visualizations that help you understand the current security status and observe trends over time https://learn.microsoft.com/en-us/training/modules/mitigate-incidents-microsoft-365-defender/10-understand-microsoft-secure-score .
- Integration with Microsoft Products: It integrates with other Microsoft security solutions, providing a unified view of security measures across different products https://learn.microsoft.com/en-us/training/modules/mitigate-incidents-microsoft-365-defender/10-understand-microsoft-secure-score .
- Benchmarking: You can compare your score with those of similar organizations to gauge your relative security posture https://learn.microsoft.com/en-us/training/modules/mitigate-incidents-microsoft-365-defender/10-understand-microsoft-secure-score .
- Third-party Solutions Recognition: The score reflects not only the security actions recommended by Microsoft but also those addressed by third-party solutions https://learn.microsoft.com/en-us/training/modules/mitigate-incidents-microsoft-365-defender/10-understand-microsoft-secure-score .
Improving Your Identity Secure Score
To improve your Identity Secure Score, it is essential to review and implement the security recommendations provided by Microsoft. These recommendations are designed to protect against various threats and are grouped into security controls, which represent logical groups of related security recommendations https://learn.microsoft.com/en-us/training/modules/manage-cloud-security-posture-management/2-explore-secure-score .
- Review Recommendations: Navigate to the recommendations page in Defender for Cloud to see the applicable suggestions for your environment https://learn.microsoft.com/en-us/training/modules/manage-cloud-security-posture-management/3-explore-recommendations .
- Implement Remediations: For each recommendation, follow the remediation instructions to address the identified issues https://learn.microsoft.com/en-us/training/modules/manage-cloud-security-posture-management/2-explore-secure-score .
- Focus on Security Controls: Your score improves when all recommendations for a single resource within a control are remediated. This approach ensures that each vulnerable attack surface is secured https://learn.microsoft.com/en-us/training/modules/manage-cloud-security-posture-management/2-explore-secure-score .
Additional Resources
For more information on how to access and improve your Identity Secure Score, you can refer to the following URLs:
- Microsoft Defender for Cloud Recommendations: View Recommendations
- Microsoft 365 Defender portal: Microsoft 365 Defender
- Defender for Cloud’s Overview page: Defender for Cloud Overview
By regularly monitoring and taking action to improve the Identity Secure Score, organizations can significantly enhance their security posture and reduce the risk of identity-related security breaches.
Plan and implement identity governance (20–25%)
Plan and implement Microsoft Entra Permissions Management
Onboarding Azure Subscriptions to Permissions Management
When onboarding Azure subscriptions to Permissions Management, it is essential to understand the process and the necessary steps to ensure proper configuration and security. Here is a detailed explanation of the key steps involved:
Verify Permissions and Access Control: Before onboarding, ensure that the correct permissions are in place. This involves checking that all users and service principals have the appropriate permissions assigned to them. It is crucial to fix any permission issues before proceeding with the onboarding process.
Use Azure Feature Exposure Control (AFEC): As an interim solution, Azure provides the Azure Feature Exposure Control (AFEC) which can be used temporarily while permissions are being fixed. AFEC allows you to register for a feature that disables certain permission checks, such as the Application Gateway Subnet Permission Check https://learn.microsoft.com/en-us/azure/application-gateway/configuration-infrastructure .
Register for AFEC: To register for AFEC, follow the steps outlined for preview feature registration in your Azure subscription. The specific feature to register for is
Microsoft.Network/DisableApplicationGatewaySubnetPermissionCheck. This feature is set toAutoApprovefor enrollment https://learn.microsoft.com/en-us/azure/application-gateway/configuration-infrastructure .Prioritize Permission Fixes: While AFEC provides a temporary workaround, it is not a permanent solution. It is recommended to prioritize fixing permissions for all users and service principals. Once the correct permissions are in place, unregister the AFEC flag to re-enable permission verification on the virtual network resource https://learn.microsoft.com/en-us/azure/application-gateway/configuration-infrastructure .
Unregister AFEC: After fixing the permissions, it is important to unregister the AFEC flag to ensure that the system returns to its standard permission verification process. Relying on AFEC permanently is not recommended as the feature will be removed in the future https://learn.microsoft.com/en-us/azure/application-gateway/configuration-infrastructure .
For additional information on Azure Feature Exposure Control (AFEC) and preview feature registration, you can refer to the following URL: Azure Resource Manager preview features.
By following these steps, you can successfully onboard Azure subscriptions to Permissions Management, ensuring that your Azure environment is secure and properly managed. Remember to always maintain up-to-date permissions and to use temporary solutions like AFEC only as a short-term fix.
Plan and implement identity governance (20–25%)
Plan and implement Microsoft Entra Permissions Management
Evaluate and Remediate Risks Relating to Azure Identities, Resources, and Tasks
When managing Azure identities, resources, and tasks, it is crucial to evaluate and remediate risks to maintain a secure environment. Here’s a detailed explanation of how to approach this:
Evaluating Risks
Risk Detection with Identity Protection: Utilize Microsoft Entra Identity Protection to detect identity-based risks. This service uses advanced detection methods to identify potential threats to your Azure identities and applications https://learn.microsoft.com/en-us/training/modules/protect-identities-with-aad-idp/1-introduction .
User Behavior Analysis: Identity Protection learns normal user behavioral patterns and uses this knowledge to assess the risk of identity compromise. Anomalies in behavior can trigger alerts https://learn.microsoft.com/en-us/training/modules/protect-identities-with-aad-idp/3-detect-risks-with-policies .
Risk Policies: Configure risk policies in the Azure portal to target specific users or conditions. These policies help in identifying and responding to potential risks https://learn.microsoft.com/en-us/training/modules/protect-identities-with-aad-idp/3-detect-risks-with-policies .
Vulnerability Management: Microsoft Defender Vulnerability Management should be used to discover devices, assess vulnerabilities, and prioritize risks based on their potential impact on the environment https://learn.microsoft.com/en-us/training/modules/use-threat-vulnerability-management-microsoft-defender-for-endpoint/3-explore-vulnerabilities-devices .
Remediating Risks
Automated Responses: Set up risk policies that automatically respond to detected threats. For example, you can configure a policy to enforce multifactor authentication or prompt a user for a self-service password reset when a risk is detected https://learn.microsoft.com/en-us/training/modules/protect-identities-with-aad-idp/2-azure-ad-idp-overview .
Admin-Driven Remediation: Allow administrators to decide on the remediation actions for detected risks. Admins can review detailed reports and take appropriate actions, such as accepting a risk if a sign-in is deemed safe.
User Risk Policies: Implement user risk policies that require users to take specific actions to remediate identified risks. This could include changing passwords or providing additional verification https://learn.microsoft.com/en-us/training/modules/protect-identities-with-aad-idp/3-detect-risks-with-policies .
Continuous Monitoring: Keep track of remediation efforts and continuously monitor the environment to ensure that risks are being effectively addressed and that new risks are detected promptly https://learn.microsoft.com/en-us/training/modules/use-threat-vulnerability-management-microsoft-defender-for-endpoint/3-explore-vulnerabilities-devices .
Additional Resources
- For more information on configuring and using Microsoft Entra Identity Protection, you can visit the following URL: Microsoft Entra Identity Protection
- To learn about Microsoft Defender Vulnerability Management and its capabilities, refer to this resource: Microsoft Defender Vulnerability Management
By following these steps and utilizing the available tools, you can effectively evaluate and remediate risks associated with Azure identities, resources, and tasks, ensuring a secure and resilient Azure environment.
Plan and implement identity governance (20–25%)
Plan and implement Microsoft Entra Permissions Management
Evaluate and Remediate Risks Relating to Azure Highly Privileged Roles
When managing Azure highly privileged roles, it is crucial to evaluate and remediate any risks associated with these roles to ensure the security and compliance of your organization’s IT environment.
Evaluation of Risks
Role Assignments: Regularly review and audit role assignments to ensure that only necessary personnel have privileged access. Limit the number of users with high-level privileges to reduce the risk of unauthorized access or breaches.
Role Activities: Monitor the activities of privileged roles to detect any unusual or unauthorized actions that could indicate a security risk. Use tools like Azure AD sign-in logs and audit logs for this purpose.
Alert Policies: Implement alert policies to get notified about risky activities. For example, if a user assigned to a highly privileged role performs an action that is not part of their usual behavior, an alert should be triggered.
Risk Assessment Tools: Utilize Azure AD’s risk detection capabilities which can identify potential vulnerabilities or active risks associated with user accounts.
Remediation of Risks
Least Privilege Principle: Apply the principle of least privilege by ensuring that users have only the access necessary to perform their job functions. Regularly review and adjust permissions as roles or job functions change.
Privileged Identity Management (PIM): Use Azure AD Privileged Identity Management to manage, control, and monitor access within Azure AD, Azure, and other Microsoft Online Services. PIM allows just-in-time privileged access, enforces multi-factor authentication to activate any role, and provides access review features.
Access Reviews: Conduct periodic access reviews to validate whether the current highly privileged roles are still required for the users. Remove any unnecessary privileges to minimize the potential attack surface.
Training and Awareness: Ensure that users with highly privileged roles are aware of the security risks and best practices for managing their access. Provide regular security training to these users.
Incident Response Plan: Develop and maintain an incident response plan that includes procedures for responding to risks associated with highly privileged roles. This plan should outline steps to investigate, contain, and remediate any incidents that occur.
For additional information on managing and securing privileged access, you can refer to the following resources:
- Azure AD Privileged Identity Management
- Insider Risk Management Content Explorer
- Permissions in the Microsoft Purview compliance portal
By following these guidelines and utilizing the available tools and resources, you can effectively evaluate and remediate risks associated with Azure highly privileged roles, thereby enhancing the security posture of your organization.
Plan and implement identity governance (20–25%)
Plan and implement Microsoft Entra Permissions Management
Evaluate and Remediate Risks Relating to Permissions Creep Index (PCI) in Azure
Permissions Creep Index (PCI) refers to the gradual accumulation of access rights by users beyond what is necessary for their job functions. This can lead to increased security risks as it may provide opportunities for malicious activities or data breaches. In Azure, it is essential to regularly evaluate and remediate these risks to maintain a secure environment.
Evaluation of PCI
Review IAM Permissions: Regularly review Identity and Access Management (IAM) permissions for all user accounts within your Azure subscription. Ensure that only necessary permissions are granted and that any excessive rights are revoked to minimize the risk of permissions creep https://learn.microsoft.com/en-us/training/modules/remediate-azure-defender-security-alerts/6-respond-alerts-from-azure-resources .
Use Azure Activity Logs: Azure Activity Logs provide a record of all operations performed within your Azure environment. By reviewing these logs, you can identify any unusual or unauthorized activities that may indicate permissions creep. This can help in tracing back to the accounts that may have overextended permissions https://learn.microsoft.com/en-us/training/modules/remediate-azure-defender-security-alerts/6-respond-alerts-from-azure-resources .
Monitor Security Alerts: Utilize Azure Defender for Cloud to monitor security alerts. Investigate any alerts related to unusual access patterns or potential breaches that could be a result of permissions creep https://learn.microsoft.com/en-us/training/modules/what-is-azure-defender/3-understand-azure-secure-center .
Remediation of PCI
Remove Unnecessary Permissions: After evaluating the permissions, promptly remove any that are not required for a user’s role. This can be done through the Azure portal by adjusting the IAM settings for each resource or user account https://learn.microsoft.com/en-us/training/modules/remediate-azure-defender-security-alerts/6-respond-alerts-from-azure-resources .
Implement Role-Based Access Control (RBAC): Define roles that encapsulate specific permissions and assign users to these roles rather than granting direct permissions. This helps in maintaining a clear structure of access rights and prevents the accumulation of unnecessary permissions https://learn.microsoft.com/en-us/azure/confidential-ledger/quickstart-cli .
Regular Audits and Reviews: Schedule periodic audits of user roles and permissions. This ensures that any permissions creep is identified and addressed promptly. Use tools like Azure Policy to enforce and validate compliance with your organization’s access policies.
Educate Users: Train users on the importance of security and the risks associated with permissions creep. Encourage them to report any unnecessary access rights they may have so that these can be reviewed and revoked if necessary.
Automate Permissions Management: Consider using automation tools to manage permissions more effectively. Automation can help in regularly reviewing and adjusting permissions based on predefined policies and user activities.
For additional information on managing permissions and access in Azure, you can refer to the following resources:
- Azure Cloud Shell Overview: Azure Cloud Shell
- Quickstart for Bash in Azure Cloud Shell: Quickstart for Bash
- Azure CLI Installation: Install Azure CLI
- Sign in with Azure CLI: Sign in with the Azure CLI
- Use Extensions with Azure CLI: Use extensions with the Azure CLI
- Check Access with Role-Based Access Control: Confirm that you have the appropriate access
By following these steps and utilizing the provided resources, you can effectively evaluate and remediate risks associated with Permissions Creep Index in Azure, ensuring a secure and compliant environment.
Plan and implement identity governance (20–25%)
Plan and implement Microsoft Entra Permissions Management
Configure Activity Alerts and Triggers for Azure Subscriptions
When managing Azure subscriptions, it is crucial to set up activity alerts and triggers to monitor and respond to various events and potential security threats. Here’s a detailed explanation of how to configure these alerts and triggers:
Outbound and Inbound Traffic Alerts
- Outbound Traffic Alerts: These alerts are critical
as they may indicate that the environment has been compromised. Azure
provides a test FQDN
(
testmaliciousdomain.eastus.cloudapp.azure.com) to verify that outbound traffic alerts are functioning correctly https://learn.microsoft.com/en-us/azure/firewall-manager/threat-intelligence-settings . - Inbound Traffic Alerts: Alerts on incoming traffic are expected if DNAT (Destination Network Address Translation) rules are configured on the firewall. Azure Firewall will trigger alerts for scanners engaged in malicious activities, not just any known port scanners https://learn.microsoft.com/en-us/azure/firewall-manager/threat-intelligence-settings .
Anomaly Detection and Alert Suppression
- Anomaly Detections: These detections are designed to trigger alerts for activities that deviate from the norm. However, they can sometimes generate false positives, which can lead to alert fatigue. To mitigate this, anomaly detection policies can be fine-tuned to include different levels of suppression https://learn.microsoft.com/en-us/training/modules/microsoft-cloud-app-security/detect-threats .
- Suppression Types: There are three suppression
types to consider when fine-tuning the detection logic:
- System Suppression: Built-in detections that are always suppressed.
- Tenant Suppression: Suppresses common activities based on historical activity within the tenant.
- User Suppression: Suppresses common activities based on the specific user’s historical activity https://learn.microsoft.com/en-us/training/modules/microsoft-cloud-app-security/detect-threats .
- Sensitivity Levels: The sensitivity level of a
policy determines how strict the detection logic is and affects the
suppression types:
- Low Sensitivity: Affects System, Tenant, and User suppression types.
- Medium Sensitivity: Affects System and User suppression types.
- High Sensitivity: Affects System suppression type only https://learn.microsoft.com/en-us/training/modules/microsoft-cloud-app-security/detect-threats .
Microsoft Defender for Storage
- Security Alerts: Microsoft Defender for Storage provides security intelligence that detects unusual and potentially harmful access attempts to storage accounts. It uses AI and Microsoft Threat Intelligence to generate contextual security alerts and recommendations https://learn.microsoft.com/en-us/training/modules/understand-azure-defender-cloud-workload-protection/4-understand-azure-defender-for-storage .
- Integration with Defender for Cloud: The security alerts are integrated with Defender for Cloud and are sent to subscription administrators via email with details on suspicious activity and how to investigate and remediate threats https://learn.microsoft.com/en-us/training/modules/understand-azure-defender-cloud-workload-protection/4-understand-azure-defender-for-storage .
Insider Risk Management Templates
- Some insider risk management templates require configuration for policy indicators to generate relevant activity alerts. Depending on the policy being configured, this step may be optional https://learn.microsoft.com/en-us/training/modules/m365-compliance-insider-manage-insider-risk/policies .
Azure App Configuration Event Subscriptions
- Event Subscriptions: Azure App Configuration allows users to subscribe to events that occur when key-values are modified. These events can trigger various handlers such as web hooks, Azure Functions, or Azure Storage Queues https://learn.microsoft.com/en-us/azure/azure-app-configuration/howto-app-configuration-event .
- Event Processing: Events are typically sent to an endpoint that processes the event data and takes action. For example, a web app could collect and display these messages as part of the event handling process https://learn.microsoft.com/en-us/azure/azure-app-configuration/howto-app-configuration-event .
For additional information on configuring activity alerts and triggers for Azure subscriptions, you can refer to the following resources:
- Azure Firewall documentation
- Microsoft Defender for Cloud documentation
- Azure App Configuration documentation
Please note that the URLs provided are for reference purposes and are part of the study material to enhance understanding of the topic.
Plan and implement identity governance (20–25%)
Plan and implement Microsoft Entra Permissions Management
Configure Activity Alerts and Triggers for Azure Subscriptions
When managing Azure subscriptions, it is crucial to set up activity alerts and triggers to monitor and respond to various events and changes within the environment. These mechanisms help in identifying potential security issues, ensuring compliance, and maintaining operational integrity.
Activity Alerts
Activity alerts in Azure are notifications that are triggered by specific actions or events occurring within your Azure subscription. These alerts can be configured to monitor for a wide range of activities, such as changes to resources, security violations, or service health issues.
Microsoft Defender for Storage: This service provides an additional layer of security intelligence, detecting unusual and potentially harmful attempts to access or exploit storage accounts. It uses advanced security AI and Microsoft Threat Intelligence to generate contextual security alerts. When anomalies in activity are detected, security alerts are integrated with Defender for Cloud and sent to subscription administrators via email with details and remediation recommendations https://learn.microsoft.com/en-us/training/modules/understand-azure-defender-cloud-workload-protection/4-understand-azure-defender-for-storage .
Insider Risk Management: Certain insider risk management templates require configuration for policy indicators to generate relevant activity alerts. These alerts help in identifying activities within the organization that may pose a risk https://learn.microsoft.com/en-us/training/modules/m365-compliance-insider-manage-insider-risk/policies .
Triggers
Triggers are mechanisms that automatically initiate a response when a specific event occurs. In Azure, triggers can be set up to automate responses to events such as modifications to resources or configurations.
Azure App Configuration Event Subscriptions: Users can subscribe to events emitted whenever key-values are modified in Azure App Configuration. These events can trigger webhooks, Azure Functions, Azure Storage Queues, or other event handlers supported by Azure Event Grid. The events can be sent to an endpoint that processes the event data and takes action https://learn.microsoft.com/en-us/azure/azure-app-configuration/howto-app-configuration-event .
Microsoft Sentinel Analytics Rule: As part of security monitoring, an analytics rule can be created in Microsoft Sentinel to detect specific activities, such as the deletion of virtual machines (VMs). When the rule is triggered, it creates an incident that can be investigated and resolved by the security team https://learn.microsoft.com/en-us/training/modules/incident-management-sentinel/6-exercise-investigate-incident .
Implementation Steps
Define Alert Criteria: Determine the types of activities or events that need monitoring. This could include access to resources, changes in configurations, or security threats.
Configure Alert Settings: Use Azure services like Microsoft Defender for Storage or Microsoft Sentinel to set up the alert parameters. Specify the conditions that will trigger the alert and the actions to be taken when an alert is fired.
Set Up Notification Channels: Decide how the alerts will be delivered to the responsible parties. Options include email notifications, integration with incident response platforms, or forwarding to a SIEM system.
Create Triggers for Automated Responses: Utilize Azure Event Grid and other automation services to set up triggers that automatically respond to specific events. This could involve invoking Azure Functions, sending messages to queues, or triggering webhooks.
Test and Validate: After configuration, perform tests to ensure that alerts and triggers are functioning as expected. This may involve simulating events or using test domains provided by Azure for outbound traffic alerts https://learn.microsoft.com/en-us/azure/firewall-manager/threat-intelligence-settings .
Monitor and Adjust: Continuously monitor the effectiveness of the alerts and triggers. Make adjustments as necessary to refine the criteria and responses based on the evolving needs of the Azure subscription.
For additional information on configuring activity alerts and triggers in Azure, you can refer to the following resources:
- Microsoft Defender for Storage
- Insider Risk Management in Microsoft 365
- Azure App Configuration
- Microsoft Sentinel Analytics Rules
By following these steps and utilizing the provided resources, you can effectively configure activity alerts and triggers for your Azure subscriptions to maintain a secure and well-managed cloud environment.
Implement and manage user identities (20–25%)
Create, configure, and manage Microsoft Entra identities
PowerShell is a powerful scripting language that administrators can use to automate the management of users and groups in Azure Active Directory (Azure AD). By leveraging PowerShell, you can perform a variety of tasks such as creating, updating, and deleting users and groups, as well as managing their properties and memberships. Below is a detailed explanation of how to automate these management tasks using PowerShell:
Creating Users
To create a new user in Azure AD, you can use the
New-AzureADUser cmdlet. You will need to provide necessary
details such as the user’s display name, user principal name (UPN), and
password.
New-AzureADUser -DisplayName "John Doe" -UserPrincipalName "johndoe@domain.com" -PasswordProfile $PasswordProfile -AccountEnabled $trueUpdating Users
To update an existing user’s information, the
Set-AzureADUser cmdlet comes into play. You can modify
properties like the user’s job title, department, or other
attributes.
Set-AzureADUser -ObjectId "user_id" -Department "Sales" -JobTitle "Sales Manager"Deleting Users
To remove a user from Azure AD, use the
Remove-AzureADUser cmdlet. You will need to specify the
ObjectId of the user you wish to delete.
Remove-AzureADUser -ObjectId "user_id"Creating Groups
You can create a new group in Azure AD with the
New-AzureADGroup cmdlet. You can specify the group’s
display name, description, and whether it is a security or an Office 365
group.
New-AzureADGroup -DisplayName "Project Team" -Description "Group for Project Team Members" -MailEnabled $false -SecurityEnabled $trueManaging Group Membership
To add a user to a group, you can use the
Add-AzureADGroupMember cmdlet. Conversely, to remove a user
from a group, you would use the Remove-AzureADGroupMember
cmdlet.
# Add a user to a group
Add-AzureADGroupMember -ObjectId "group_id" -RefObjectId "user_id"

# Remove a user from a group
Remove-AzureADGroupMember -ObjectId "group_id" -MemberId "user_id"
Bulk Operations
For bulk operations, such as adding multiple users or updating users in bulk, you can use PowerShell scripts to iterate over a list of users and perform the desired action for each one.
# Example of bulk adding users to a group
$userIds = @("user_id1", "user_id2", "user_id3")
foreach ($userId in $userIds) {
    Add-AzureADGroupMember -ObjectId "group_id" -RefObjectId $userId
}
Additional Resources
For more detailed information and examples on how to manage users and groups with PowerShell, you can refer to the following resources:
Remember to install the AzureAD PowerShell module and authenticate to your Azure AD tenant before running these commands. The above examples are meant to serve as a starting point for automating user and group management tasks in Azure AD using PowerShell.
Implement and manage user identities (20–25%)
Create, configure, and manage Microsoft Entra identities
Assign, Modify, and Report on Licenses
When managing Microsoft 365 services, it is crucial to understand how to assign, modify, and report on licenses to ensure that users have the necessary permissions and services to perform their roles effectively.
Assigning Licenses
To assign a license to a user in Microsoft 365:
- Navigate to the Microsoft 365 admin center at Microsoft 365 admin center portal.
- Select Users from the navigation pane, then choose Active users.
- Choose the user to whom you want to assign a license.
- On the user properties page, click on the Licenses and apps tab.
- In the Licenses section, select the appropriate license to assign to the user.
- Click Save changes to apply the license to the user’s account https://learn.microsoft.com/en-us/training/modules/investigate-threats-using-audit-in-microsoft-365-defender-microsoft-purview-premium/3-implement-microsoft-purview-audit-premium .
Modifying Licenses
To modify a user’s license or the apps available to them:
- Follow steps 1-4 from the assigning licenses process to navigate to the user’s Licenses and apps tab.
- To change the license, select a different license from the Licenses section.
- To modify the apps available to the user, expand the Apps section and select or clear the checkboxes for the apps you want to assign or remove.
- Click Save changes to update the user’s license and app assignments https://learn.microsoft.com/en-us/training/modules/investigate-threats-using-audit-in-microsoft-365-defender-microsoft-purview-premium/3-implement-microsoft-purview-audit-premium .
Reporting on Licenses
Reporting on licenses involves understanding the current license assignments and usage within the organization. This can be done through the admin center or by using PowerShell cmdlets for more detailed reports.
- In the Microsoft 365 admin center, you can view license assignments on the Billing > Licenses page.
- For detailed reporting, you can use PowerShell cmdlets such as
Get-MsolAccountSkuto retrieve information about license usage andGet-MsolUserto see license assignments for individual users.
Additional Information
- For a list of licenses that support Audit (Premium) and their requirements, refer to Audit (Premium) licensing requirements https://learn.microsoft.com/en-us/training/modules/investigate-threats-using-audit-in-microsoft-365-defender-microsoft-purview-premium/3-implement-microsoft-purview-audit-premium .
- To understand the requirements for creating audit log retention policies, including license requirements, see the documentation on audit log retention policies https://learn.microsoft.com/en-us/training/modules/investigate-threats-using-audit-in-microsoft-365-defender-microsoft-purview-premium/4-manage-audit-log-retention-policies .
- For general information on auditing solutions and licensing in Microsoft 365, you can refer to Auditing solutions in Microsoft 365 https://learn.microsoft.com/en-us/training/modules/investigate-threats-using-audit-in-microsoft-365-defender-microsoft-purview-standard/3-implement-microsoft-purview-audit .
By following these steps and utilizing the provided resources, you can effectively manage license assignments, modifications, and reporting within your Microsoft 365 environment.
Implement and manage user identities (20–25%)
Implement and manage identities for external users and tenants
Manage External Collaboration Settings in Microsoft Entra ID
External collaboration settings in Microsoft Entra ID (formerly known as Azure Active Directory) are crucial for managing how users from outside your organization can access your resources. Here’s a detailed explanation of how to manage these settings:
Understanding External Collaboration: External collaboration allows users from other organizations to access your Microsoft 365 tenant resources, such as SharePoint sites or OneDrive locations. This is facilitated through a feature known as pass-through authentication https://learn.microsoft.com/en-us/training/modules/investigate-threats-using-audit-in-microsoft-365-defender-microsoft-purview-standard/7-use-audit-log-searches-to-investigate-common-support-issues .
Audit Logs: Administrators can review audit logs to monitor external user activities. For instance, an audit record might show that a user from another organization has successfully signed into your Microsoft 365 tenant. It’s important to note that a successful sign-in only indicates that the user was authenticated and does not necessarily mean they accessed any resources https://learn.microsoft.com/en-us/training/modules/investigate-threats-using-audit-in-microsoft-365-defender-microsoft-purview-standard/7-use-audit-log-searches-to-investigate-common-support-issues .
Pass-Through Authentication: When an external user attempts to sign in, they are prompted to enter their credentials. Microsoft Entra ID uses these credentials to authenticate the user. However, for the external user to access resources like SharePoint or OneDrive, an internal user must explicitly share access with them https://learn.microsoft.com/en-us/training/modules/investigate-threats-using-audit-in-microsoft-365-defender-microsoft-purview-standard/7-use-audit-log-searches-to-investigate-common-support-issues .
First-Party Applications: Microsoft Entra ID allows pass-through authentication only for first-party applications such as SharePoint Online and OneDrive for Business. It is not permitted for third-party applications https://learn.microsoft.com/en-us/training/modules/investigate-threats-using-audit-in-microsoft-365-defender-microsoft-purview-standard/7-use-audit-log-searches-to-investigate-common-support-issues .
Sharing Invitations: To enable access to resources, internal users can send sharing invitations or anonymous sharing links to external users. This is a controlled way to grant access to your organization’s resources https://learn.microsoft.com/en-us/training/modules/investigate-threats-using-audit-in-microsoft-365-defender-microsoft-purview-standard/7-use-audit-log-searches-to-investigate-common-support-issues .
Conditional Access: In some scenarios, such as when a device is compromised, Microsoft Entra ID Conditional Access can restrict access to enterprise resources. Once the device is remediated, access can be restored https://learn.microsoft.com/en-us/training/modules/introduction-microsoft-365-threat-protection/2-explore-extended-detection-response-use-cases .
Service Principal Creation: For certain applications, like the Azure Kubernetes Metric Adapter, you may need to create a Microsoft Entra service principal and assign it appropriate access, such as
Monitoring Reader, over the resource group https://learn.microsoft.com/en-us/azure/application-gateway/ingress-controller-autoscale-pods .Azure Portal Access: To access certain features like the ledger explorer, users need to be logged in with an Entra ID user account that has the necessary roles assigned, such as Reader, Contributor, or Administrator https://learn.microsoft.com/en-us/azure/confidential-ledger/quickstart-ledger-explorer .
Registering Service Principals: For services like Azure Front Door, you must register the service principal as an app in your Microsoft Entra ID. This requires Application Administrator role permissions and is a one-time action per Microsoft Entra tenant https://learn.microsoft.com/en-us/azure/frontdoor/front-door-custom-domain-https .
For additional information on managing external collaboration settings in Microsoft Entra ID, you can refer to the following resources:
- Investigate threats using audit in Microsoft 365 Defender https://learn.microsoft.com/en-us/training/modules/investigate-threats-using-audit-in-microsoft-365-defender-microsoft-purview-standard/7-use-audit-log-searches-to-investigate-common-support-issues .
- Manage Microsoft Entra token-based users in Azure confidential ledger https://learn.microsoft.com/en-us/azure/confidential-ledger/quickstart-ledger-explorer .
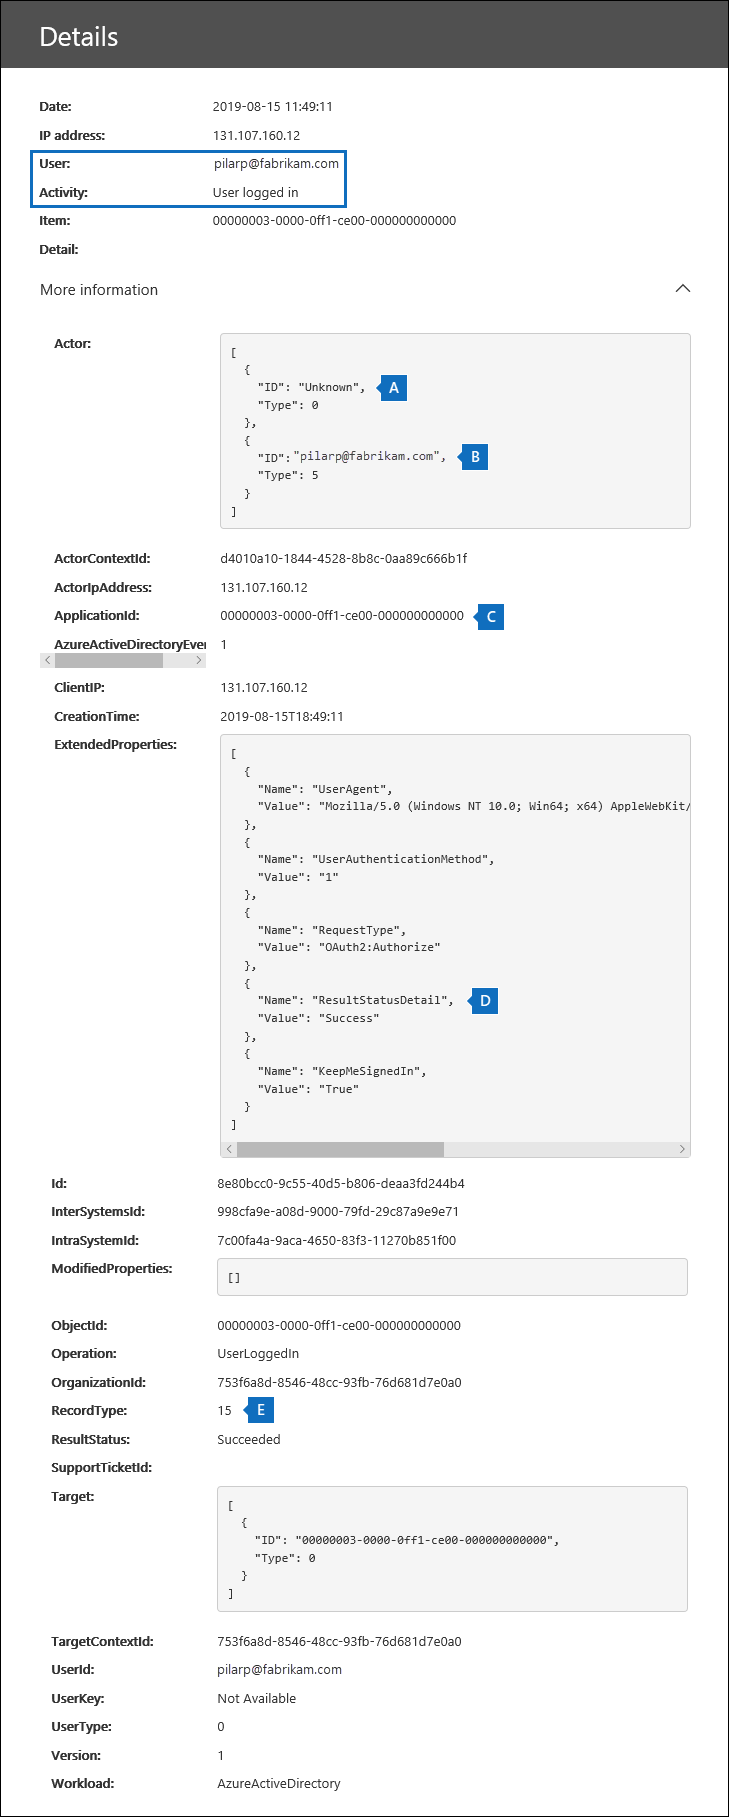
Please note that while managing external collaboration settings, it is essential to adhere to your organization’s security policies and compliance requirements to ensure that external access is granted securely and appropriately.
Implement and manage user identities (20–25%)
Implement and manage identities for external users and tenants
Inviting External Users to Azure Active Directory
When managing access to resources within an organization, it’s often necessary to invite external users, such as partners or contractors, to collaborate. Azure Active Directory (Azure AD) provides the capability to invite these users individually or in bulk. Here’s a detailed explanation of how to perform both methods:
Inviting Individual External Users
Access Azure Portal: Log in to the Azure Portal with an account that has the necessary permissions, such as a Global Administrator, User Administrator, or a custom role with the appropriate privileges.
Navigate to Azure AD: Go to the Azure Active Directory service from the portal’s dashboard.
Select Users: In the Azure AD menu, click on “Users” to open the user management page.
Invite User: Click on “New guest user” to start the invitation process.
Provide Details: Fill in the required information for the guest user, such as name and email address. You can also include a personal message in the invitation.
Assign Roles (Optional): If needed, assign roles to the user to grant specific permissions within your directory.
Send Invitation: Once all details are confirmed, send the invitation. The external user will receive an email with instructions on how to accept the invitation and access the resources shared with them.
For more information on inviting individual users, refer to the official documentation: Add Azure AD B2B collaboration users in the Azure portal.
Inviting External Users in Bulk
Prepare CSV File: Create a CSV file containing the list of external users to invite. The file should include columns for the user’s name, email, and other relevant details.
Access Azure Portal: Log in to the Azure Portal with an account that has the necessary permissions.
Navigate to Azure AD: Go to the Azure Active Directory service from the portal’s dashboard.
Bulk Operations: In the Azure AD menu, select “Bulk operations” and then choose “Bulk invite”.
Upload CSV File: Upload the prepared CSV file and review the details to ensure accuracy.
Send Invitations: Confirm and send the bulk invitations. Each user listed in the CSV file will receive an email with instructions on how to accept the invitation.
For more information on bulk invitations, refer to the official documentation: Bulk invite B2B collaboration users.
Additional Considerations
Audit Log: It’s important to monitor the activities of external users. Azure AD provides audit logs to track sign-ins and other activities. For more information, see Investigate threats using audit in Microsoft 365 Defender https://learn.microsoft.com/en-us/training/modules/investigate-threats-using-audit-in-microsoft-365-defender-microsoft-purview-standard/7-use-audit-log-searches-to-investigate-common-support-issues .
Sharing Policies: Ensure that your organization’s sharing policies are configured to control how resources are shared with external users. For SharePoint sharing activities, see Use sharing auditing in the audit log https://learn.microsoft.com/en-us/training/modules/investigate-threats-using-audit-in-microsoft-365-defender-microsoft-purview-standard/7-use-audit-log-searches-to-investigate-common-support-issues .
User Roles: When inviting users, consider the roles they will need. Azure AD supports roles like Reader, Contributor, and Administrator, which can be assigned during the invitation process or updated later https://learn.microsoft.com/en-us/azure/confidential-ledger/manage-azure-ad-token-based-users .
By following these steps and considerations, you can effectively manage external user access within your organization, ensuring secure collaboration and compliance with your organization’s policies.
Implement and manage user identities (20–25%)
Implement and manage identities for external users and tenants
Manage External User Accounts in Microsoft Entra ID
When managing external user accounts in Microsoft Entra ID, it is essential to understand the concept of pass-through authentication and how it applies to users from external organizations or those with Microsoft Accounts (MSA) such as Outlook.com or Live.com. Pass-through authentication allows external users to sign in to a Microsoft 365 tenant, such as accessing a SharePoint site or a OneDrive location, using their own credentials. Microsoft Entra ID is responsible for verifying the identity of these users https://learn.microsoft.com/en-us/training/modules/investigate-threats-using-audit-in-microsoft-365-defender-microsoft-purview-standard/7-use-audit-log-searches-to-investigate-common-support-issues .
Audit Records and Sign-In Events
Administrators may encounter audit records indicating that an external user has successfully signed into their Microsoft 365 tenant. It is important to note that a successful sign-in audit record only signifies that Microsoft Entra ID has authenticated the user’s identity. It does not necessarily mean the user has accessed any resources or completed any actions within the organization. For an external user to access SharePoint or OneDrive resources, an internal user must explicitly share a resource with them through a sharing invitation or anonymous sharing link https://learn.microsoft.com/en-us/training/modules/investigate-threats-using-audit-in-microsoft-365-defender-microsoft-purview-standard/7-use-audit-log-searches-to-investigate-common-support-issues .
First-Party Applications
Microsoft Entra ID allows pass-through authentication exclusively for first-party applications, such as SharePoint Online and OneDrive for Business. This feature is not available for third-party applications https://learn.microsoft.com/en-us/training/modules/investigate-threats-using-audit-in-microsoft-365-defender-microsoft-purview-standard/7-use-audit-log-searches-to-investigate-common-support-issues .
Managing External Access
To manage external access, administrators should be familiar with the various levels of scope within Azure, including management groups, subscriptions, resource groups, and resources. Settings applied at a higher level of scope will be inherited by the lower levels. For instance, applying a policy to a subscription will affect all resource groups and resources within that subscription https://learn.microsoft.com/en-us/azure/firewall/../azure-resource-manager/management/overview .
Monitoring Sign-In Activity
Security administrators can monitor sign-in activity using the Microsoft Entra sign-in logs workbook. This tool provides charts, graphs, and tables that offer insights into user sign-ins, locations, email addresses, and IP addresses. It also allows administrators to review failed activities and the associated errors. By filtering the data, administrators can identify specific sign-in activities, such as failed attempts, and take appropriate actions https://learn.microsoft.com/en-us/training/modules/query-data-sentinel/5-workbooks .
Managed Identities
For Azure App Configuration and other Microsoft Entra protected resources, managed identities can be utilized. These identities are managed by the Azure platform and do not require manual provisioning or rotation of secrets. There are two types of managed identities: system-assigned and user-assigned. A system-assigned identity is tied to a specific resource and is deleted if the resource is deleted. A user-assigned identity is a standalone resource that can be assigned to multiple resources https://learn.microsoft.com/en-us/azure/azure-app-configuration/overview-managed-identity .
Risk Policies
Risk policies are crucial for responding to identity risks in a controlled and cost-effective manner. They enable organizations to detect and respond to threats without compromising security. Administrators should investigate how identity risks are detected in Microsoft Entra ID Protection and understand how to configure and enable risk policies https://learn.microsoft.com/en-us/training/modules/protect-identities-with-aad-idp/3-detect-risks-with-policies .
For additional information on managing external user accounts and related topics, you can refer to the following resources: - Pass-through authentication in Microsoft Entra ID - Azure scope levels - Microsoft Entra sign-in logs workbook - Managed identities for Azure resources - Risk policies in Microsoft Entra ID Protection
Please note that the URLs provided are for additional reading and should not be included in the exam preparation materials as per the instructions.
Implement and manage user identities (20–25%)
Implement and manage identities for external users and tenants
Implement Cross-tenant access settings
Cross-tenant access settings are a crucial aspect of managing and securing collaboration between different Microsoft 365 organizations. These settings allow administrators to control how users in their organization can access resources in other tenants and how users from other tenants can access resources in their organization.
Overview of Cross-tenant Access Settings
Cross-tenant access settings provide granular control over:
- External collaboration settings: Define how users can share information and collaborate with external users.
- Authentication: Determine the authentication methods required for external users.
- Conditional Access policies: Apply specific conditions that must be met for access to be granted.
- Security groups and role assignments: Control which users or groups from external tenants can access resources.
Steps to Implement Cross-tenant Access Settings
Access the Microsoft 365 Admin Center: You must be a global administrator or security administrator to configure these settings.
Navigate to External Collaboration Settings:
- In the Microsoft 365 Admin Center, go to the ‘Organizational relationships’ settings.
- Select ‘External collaboration settings’ to configure how users can collaborate with external partners.
Configure Authentication Methods:
- Set up multi-factor authentication (MFA) requirements for external users.
- Define trusted devices or locations if necessary.
Apply Conditional Access Policies:
- Create policies that define conditions for access, such as requiring MFA or blocking access from certain locations.
- Apply these policies to specific users, groups, or roles.
Manage Security Groups and Role Assignments:
- Assign roles to external users to control their level of access.
- Use security groups to manage access for a set of users from an external tenant.
Monitor and Review Access:
- Regularly review the configurations and access patterns.
- Adjust settings as necessary to maintain security and compliance.
Additional Resources
For more detailed information on configuring cross-tenant access settings, you can refer to the following resources:
- External collaboration settings in the Microsoft 365 admin center
- Conditional Access in Azure Active Directory
- Manage external access (federation) in Microsoft Teams
By implementing cross-tenant access settings, organizations can ensure secure collaboration with external entities while maintaining control over their data and resources. It is essential to regularly review and update these settings to adapt to changing collaboration needs and security requirements.
Implement and manage user identities (20–25%)
Implement and manage identities for external users and tenants
Implement and Manage Cross-Tenant Synchronization
Cross-tenant synchronization is a critical aspect of managing distributed systems, especially when dealing with multiple Azure tenants. It involves ensuring that data and resources are consistent and up-to-date across different tenants. Here’s a detailed explanation of how to implement and manage cross-tenant synchronization:
Understanding Synchronization Tokens
In distributed systems, achieving real-time consistency across requests can be challenging. To address this, synchronization tokens can be used. These tokens are optional protocol support elements that help maintain consistency between requests https://learn.microsoft.com/en-us/azure/azure-app-configuration/rest-api-consistency . When a server responds to a request, it may include multiple synchronization tokens. The client is then responsible for returning all received tokens in subsequent requests to maintain consistency. The tokens should be comma-separated in the header of the request as follows:
Sync-Token: <token1-id>=<value>,<token2-id>=<value>This ensures that the state of the system is consistent across different tenants and that any changes are synchronized in real-time https://learn.microsoft.com/en-us/azure/azure-app-configuration/rest-api-consistency .
Utilizing Azure Lighthouse for Cross-Tenant Management
Azure Lighthouse is a service that allows for the management of resources across multiple Azure tenants. By implementing Azure Lighthouse, you can gain access to and manage tenant resources more efficiently. Once onboarded, you can use the directory and subscription selector in the Azure portal to manage all the subscriptions and workspaces across different tenants https://learn.microsoft.com/en-us/training/modules/create-manage-azure-sentinel-workspaces/4-manage-workspaces-across-tenants-using-azure-lighthouse .
Azure Lighthouse provides the flexibility to manage resources for multiple customers from a single service provider’s tenant. This is particularly useful for service providers who manage resources for customers with varying responsibilities and access levels. It simplifies the process of signing in and switching between different accounts and tenants https://learn.microsoft.com/en-us/training/modules/create-manage-azure-sentinel-workspaces/4-manage-workspaces-across-tenants-using-azure-lighthouse .
Pros and Cons of Different Workspace Configurations
When implementing cross-tenant synchronization, it’s important to consider the workspace configuration. There are two main configurations to consider:
- Single-Tenant with Regional Microsoft Sentinel
Workspaces:
- Pros: No cross-region bandwidth costs, may meet data governance requirements, granular data access control, granular retention settings, and split billing.
- Cons: No central pane of glass, analytics and workbooks must be deployed multiple times.
- To query data across these workspaces, use the
workspace()function before the table name in your queries https://learn.microsoft.com/en-us/training/modules/create-manage-azure-sentinel-workspaces/2-plan-for-azure-sentinel-workspace .
- Single-Tenant with a Single Microsoft Sentinel
Workspace:
- Pros: Central pane of glass, consolidates all security logs and information, easier to query all information, and uses Azure Log Analytics RBAC and Microsoft Sentinel RBAC for data access control.
- Cons: May not meet data governance requirements and can incur bandwidth costs for cross-region data transfer https://learn.microsoft.com/en-us/training/modules/create-manage-azure-sentinel-workspaces/2-plan-for-azure-sentinel-workspace .
By understanding the pros and cons of each configuration, you can choose the one that best fits your organization’s needs and ensures efficient cross-tenant synchronization.
For additional information on Azure Lighthouse and managing Azure Sentinel workspaces, you can refer to the following URLs: - Azure Lighthouse documentation: Azure Lighthouse Documentation - Managing Azure Sentinel workspaces: Manage Azure Sentinel Workspaces
Please note that the URLs provided are for reference purposes to supplement the study guide material.
Implement and manage user identities (20–25%)
Implement and manage identities for external users and tenants
Configure Identity Providers for SAML and WS-Fed
When configuring identity providers for authentication in Azure Active Directory (Azure AD), it’s important to understand the protocols that these providers use. Two common authentication protocols are Security Assertion Markup Language (SAML) and Windows Federation (WS-Fed).
SAML Identity Providers
SAML is an XML-based standard for exchanging authentication and authorization data between an identity provider and a service provider. To configure a SAML identity provider in Azure AD:
Register the Application: Begin by registering the application in Azure AD that will use SAML. This can be done in the Azure portal under Azure Active Directory > Enterprise applications > New application.
Configure SAML Settings: In the application’s settings, navigate to the Single sign-on section and select SAML. Here, you will configure the SAML-based sign-on settings, including the Identifier (Entity ID), Reply URL (Assertion Consumer Service URL), and Sign-on URL.
Set up Certificates: Azure AD uses a certificate to sign the SAML response sent to the service provider. You can use the default certificate provided by Azure or upload your own.
User Attributes & Claims: Customize the user attributes and claims that will be sent in the SAML token to the service provider. This step is crucial for ensuring that the correct user information is transmitted for authentication.
Configure Service Provider: The service provider must be configured with the Azure AD SAML metadata to establish a trust relationship. This metadata is available in the Azure portal and includes the Azure AD Single Sign-On Service URL and the Azure AD Sign-Out URL.
Test Configuration: After configuration, test the SAML single sign-on with the application to ensure that the authentication process works correctly.
WS-Fed Identity Providers
WS-Fed is another protocol used for federated identity that allows users to access services across different domains. To configure a WS-Fed identity provider in Azure AD:
Register the Application: Similar to SAML, start by registering the application in Azure AD.
Configure WS-Fed Settings: In the application’s settings, navigate to the Single sign-on section and select WS-Fed. Configure the WS-Federation settings, including the Federation Metadata URL and the Passive Requestor Endpoint.
User Attributes & Claims: Define the user attributes and claims to be sent in the token to the service provider.
Configure Service Provider: The service provider must be configured to trust tokens from Azure AD. This involves importing the federation metadata from Azure AD into the service provider.
Test Configuration: Ensure that the WS-Fed single sign-on is functioning correctly by testing it with the application.
For more detailed guidance and step-by-step instructions, you can refer to the following URLs:
By following these steps, you can set up identity providers using SAML and WS-Fed protocols in Azure AD, allowing for secure and seamless authentication across different services.
Implement and manage user identities (20–25%)
Implement and manage identities for external users and tenants
Create and Manage a Microsoft Entra B2C Tenant (Microsoft Entra External ID)
When creating and managing a Microsoft Entra B2C tenant, also known as Microsoft Entra External ID, it is essential to understand the foundational concepts and steps involved in the process. Below is a detailed explanation of how to create and manage a Microsoft Entra B2C tenant:
Understanding Microsoft Entra B2C Tenant
A Microsoft Entra B2C tenant is a specific type of directory within Microsoft Entra ID that allows for the management of consumer identities. This tenant is separate from your organization’s employee directory and is designed to provide a scalable and secure identity management solution for your applications’ users.
Creating a Microsoft Entra B2C Tenant
- Prerequisites:
- An Azure account with an active subscription and permission to manage applications in Microsoft Entra ID is required https://learn.microsoft.com/en-us/azure/confidential-ledger/register-application .
- If you do not have an account, you can create one for free https://learn.microsoft.com/en-us/azure/confidential-ledger/register-application .
- Set Up a Tenant:
- Learn how to set up a new Microsoft Entra tenant by following the guide provided https://learn.microsoft.com/en-us/azure/confidential-ledger/register-application .
- Navigate to the Azure portal and search for “Azure AD B2C” to begin the process of creating a new B2C tenant.
- Configuration:
- Once the tenant is created, configure the identity providers, custom policies, and user attributes according to your application’s requirements.
- Ensure that the Microsoft Entra tenant is associated with the subscription to which the configuration store belongs https://learn.microsoft.com/en-us/azure/azure-app-configuration/rest-api-authentication-azure-ad .
Managing a Microsoft Entra B2C Tenant
- User Accounts and Groups:
- Manage user accounts, sign-up and sign-in policies, and user attributes within the B2C tenant.
- Organize users into groups for easier management and to apply policies at scale.
- Applications:
- Register applications that will use the B2C tenant for authentication.
- Configure the applications with the correct redirect URLs and permissions.
- Policies:
- Define custom sign-in and sign-up experiences using user flows or custom policies.
- Set up password reset policies, multi-factor authentication, and conditional access policies.
- Monitoring and Auditing:
- Use the monitoring tools available in the Azure portal to track the activities within your B2C tenant.
- Set up auditing to keep a record of changes and sign-in events for security and compliance purposes.
Additional Resources
- For more information on configuring an origin for Azure Front Door, which may be necessary if you are using Azure Front Door with your B2C tenant, see How to configure an origin for Azure Front Door https://learn.microsoft.com/en-us/azure/frontdoor/../api-management/front-door-api-management?toc=/azure/frontdoor/toc.json .
- If you’ve configured a Microsoft Entra ID or Azure AD B2C identity provider for the developer portal, remember to update the app registration with an additional redirect URL to Front Door https://learn.microsoft.com/en-us/azure/frontdoor/../api-management/front-door-api-management?toc=/azure/frontdoor/toc.json .
By following these guidelines, you can create and manage a Microsoft Entra B2C tenant effectively, ensuring a secure and seamless authentication experience for your users.
Implement and manage user identities (20–25%)
Implement and manage hybrid identity
Implement and Manage Microsoft Entra Connect
Microsoft Entra Connect, formerly known as Azure AD B2C (Business to Consumer), is a customer identity access management solution that enables your applications to authenticate users with customizable experiences. Implementing and managing Microsoft Entra Connect involves several key steps and considerations:
1. Setting Up Microsoft Entra Connect
To begin with Microsoft Entra Connect, you need to create a tenant where you can manage your user identities and configurations. This involves: - Creating an Azure account with an active subscription. - Setting up a Microsoft Entra tenant, which will serve as the directory for your users https://learn.microsoft.com/en-us/azure/confidential-ledger/register-application .
2. Configuring Identity Providers
Microsoft Entra Connect allows integration with various identity providers. You can configure it to allow users to sign in with their social accounts (like Facebook, Google, etc.) or enterprise accounts (like Azure AD, AD FS, etc.). This step involves: - Registering your application with the identity providers. - Configuring the identity providers in your Microsoft Entra Connect tenant.
3. Customizing User Flows
User flows are pre-built, configurable policies in Microsoft Entra Connect that define how users interact with your applications. They can be customized to create a seamless user experience for sign-up, sign-in, profile editing, and password reset processes.
4. Integrating Applications
To use Microsoft Entra Connect, you need to integrate it with your applications. This involves: - Registering your application in the Microsoft Entra tenant. - Configuring authentication parameters and redirect URLs. - Utilizing libraries or SDKs to facilitate the authentication process.
5. Monitoring and Logging
Gaining insights into user activities and authentication events is crucial for security and compliance. Microsoft Entra Connect can be connected to Microsoft Sentinel for monitoring purposes. This allows you to: - Stream Audit and Sign-in logs to Microsoft Sentinel. - Analyze app usage, conditional access policies, and legacy authentication details https://learn.microsoft.com/en-us/training/modules/connect-microsoft-services-to-azure-sentinel/4-connect-azure-active-directory-connector .
6. Managing Access and Roles
Access to the ledger explorer and other resources in Microsoft Entra Connect is controlled through roles such as Reader, Contributor, or Administrator. Managing users and their roles is essential for maintaining security and proper access control https://learn.microsoft.com/en-us/azure/confidential-ledger/quickstart-ledger-explorer .
7. Connecting to Microsoft Sentinel
For enhanced security monitoring, you can connect Microsoft Entra Connect to Microsoft Sentinel. This allows you to: - View at-risk users, risk events, and vulnerabilities. - Remediate risks immediately and set policies for future autoremediation. - Optionally, enable the creation of incidents based on Microsoft Entra ID Protection alerts https://learn.microsoft.com/en-us/training/modules/connect-microsoft-services-to-azure-sentinel/5-connect-azure-active-directory-identity-protection-connector .
Additional Resources:
- Microsoft Entra ID Protection
- Microsoft Entra Connect Audit and Sign-in logs
- Setting up a Microsoft Entra tenant
- Microsoft Entra authentication and authorization
- Manage Microsoft Entra token-based users in Azure confidential ledger
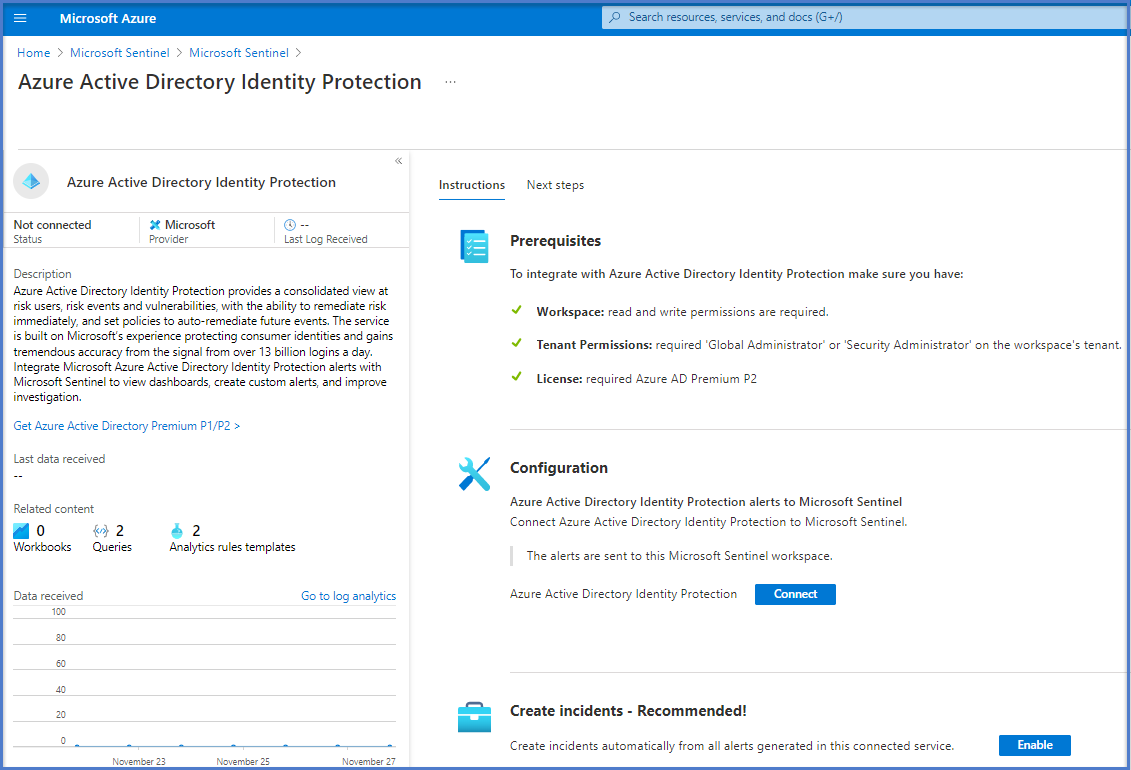
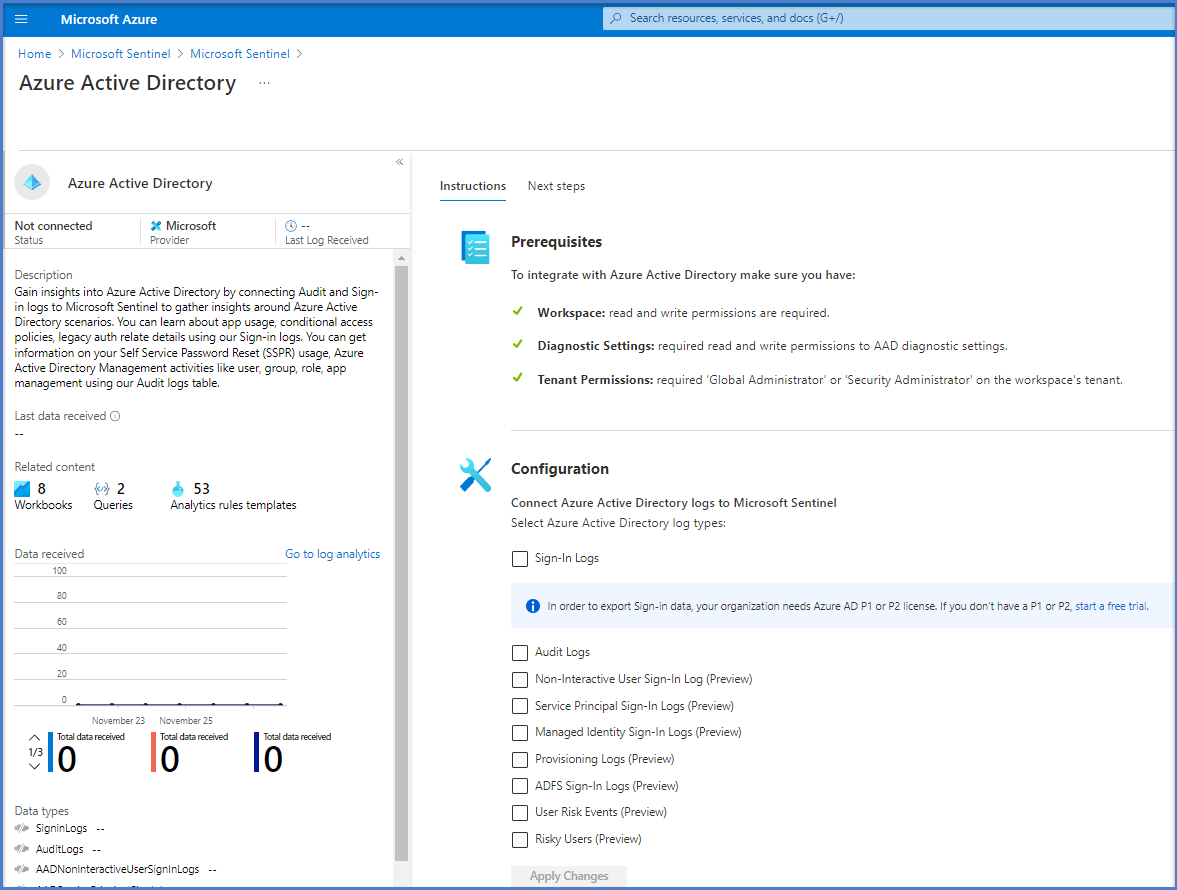
By following these steps and utilizing the provided resources, you can effectively implement and manage Microsoft Entra Connect to provide a secure and customized user experience for your applications.
Implement and manage user identities (20–25%)
Implement and manage hybrid identity
Implement and Manage Microsoft Entra Connect Cloud Sync
Microsoft Entra Connect, formerly known as Azure AD Connect, is a tool that integrates your on-premises directories with Azure Active Directory (Azure AD). This allows you to provide a common identity for your users for Office 365, Azure, and SaaS applications integrated with Azure AD.
When implementing and managing Microsoft Entra Connect cloud sync, the following steps and considerations are essential:
- Installation and Configuration:
- Begin by downloading and installing the Microsoft Entra Connect tool on a server within your on-premises environment.
- During the installation process, you will configure the tool to sync with your specific Azure AD instance. This involves specifying your Azure AD credentials and selecting the on-premises directories you wish to synchronize.
- Directory and User Synchronization:
- Choose the types of objects (e.g., users, groups, contacts) and the attributes of those objects that you want to synchronize to Azure AD.
- Configure directory synchronization options, including filtering to control which objects are synchronized.
- Password Hash Synchronization (PHS) or Pass-Through
Authentication (PTA):
- Decide on the authentication method for your synchronized accounts. PHS synchronizes hash versions of user passwords from on-premises Active Directory to Azure AD, while PTA allows users to authenticate directly against your on-premises Active Directory.
- Synchronization Rules:
- Set up synchronization rules to govern how data is transformed and synchronized between your on-premises directories and Azure AD. This includes de-duplication rules to handle conflicts.
- Monitoring and Managing Synchronization:
- Regularly monitor the health and activities of your Microsoft Entra Connect synchronization. This can be done through the Synchronization Service Manager console.
- Manage synchronization by initiating manual sync cycles, resolving sync errors, and making adjustments to the configuration as needed.
- Security and Compliance:
- Ensure that your synchronization process complies with your organization’s security policies and any relevant regulations.
- Regularly review and update your synchronization settings to maintain security and compliance standards.
For additional information on Microsoft Entra Connect cloud sync, you can refer to the following resources:
By following these guidelines, you can effectively implement and manage Microsoft Entra Connect cloud sync, ensuring that your on-premises and cloud directories are properly integrated and that your users have seamless access to the resources they need.
Implement and manage user identities (20–25%)
Implement and manage hybrid identity
Implementing and managing password hash synchronization is a critical aspect of maintaining security and consistency across an organization’s IT environment. Password hash synchronization is a feature used in hybrid identity scenarios where user identities are managed both on-premises and in the cloud, such as with Azure Active Directory (Azure AD).
Password Hash Synchronization Overview
Password hash synchronization involves the process of synchronizing the hash of a user’s on-premises Active Directory (AD) password with Azure AD. This allows users to use the same credentials to access both on-premises and cloud-based resources. The actual password is never sent to Azure AD, only the hash of the password.
How It Works
- Hash Generation: When a user’s password is changed or reset in the on-premises AD, the system generates a hash of the password.
- Hash Synchronization: This hash is then synchronized to Azure AD through the Azure AD Connect tool.
- Authentication: When a user attempts to access a resource that relies on Azure AD for authentication, Azure AD uses the synchronized hash to authenticate the user.
Implementation Steps
- Install Azure AD Connect: To begin, you must have Azure AD Connect installed on a server that can communicate with your on-premises AD.
- Configure Directory Sync: Within Azure AD Connect, configure directory synchronization and enable password hash synchronization.
- Initial Sync: Perform an initial synchronization of your on-premises AD objects to Azure AD.
- Ongoing Sync: Azure AD Connect will continue to synchronize password hashes on a regular basis, ensuring that changes in the on-premises AD are reflected in Azure AD.
Management Considerations
- Security: Ensure that the Azure AD Connect server is secure and that only authorized personnel have access to it.
- Monitoring: Regularly monitor the synchronization process for any errors or inconsistencies.
- Compliance: Verify that password hash synchronization aligns with your organization’s compliance requirements.
Additional Resources
For more detailed information on implementing and managing password hash synchronization, you can refer to the following resources:
- Azure AD Connect sync: Understand and customize synchronization: Understanding and customizing synchronization
- Integrate your on-premises directories with Azure Active Directory: Integrating directories
- Azure AD Connect and Azure AD Connect Health installation roadmap: Installation roadmap
Please note that the URLs provided are for additional information and are not to be included in the study guide.
Implement and manage user identities (20–25%)
Implement and manage hybrid identity
Implement and Manage Pass-Through Authentication
Pass-through authentication (PTA) is a method that allows users to authenticate using their on-premises Active Directory credentials without storing passwords in the cloud. This is particularly useful for organizations that want to use Azure Active Directory (Azure AD) to manage cloud-based applications but maintain their password policies and security enforcement on-premises.
Understanding Pass-Through Authentication
When implementing PTA, it’s important to understand that it is a sign-in method that allows a user to be authenticated by Azure AD without Azure AD needing to store their password. Instead, the authentication is passed through to the on-premises Active Directory, which verifies the user’s credentials.
Configuration Steps
- Prerequisites: Ensure that you have an Azure AD tenant and an on-premises Active Directory.
- Azure AD Connect: Install and configure Azure AD Connect on an on-premises server to enable synchronization between your on-premises Active Directory and Azure AD.
- Enable PTA: During the Azure AD Connect setup, select the ‘Pass-through authentication’ option as your preferred sign-in method.
- User Sign-In: After enabling PTA, when users sign in to an application that uses Azure AD, they will enter their on-premises AD credentials. Azure AD Connect will then validate these credentials with the on-premises Active Directory.
Management and Monitoring
- Audit Logs: Review audit records in the audit log to monitor sign-in attempts and activities. Look for the “User logged In” event, which indicates that a user was authenticated by Microsoft Entra ID (formerly known as Azure AD) https://learn.microsoft.com/en-us/training/modules/investigate-threats-using-audit-in-microsoft-365-defender-microsoft-purview-standard/7-use-audit-log-searches-to-investigate-common-support-issues .
- Investigate Activities: If you see successful sign-ins from external users, investigate further by searching the audit log for activities performed by these users. This can help you understand if and how they accessed resources https://learn.microsoft.com/en-us/training/modules/investigate-threats-using-audit-in-microsoft-365-defender-microsoft-purview-standard/7-use-audit-log-searches-to-investigate-common-support-issues .
- Sharing Activities: Check for SharePoint sharing activities to see if files were shared with the external user who signed in. This can be done using sharing auditing in the audit log https://learn.microsoft.com/en-us/training/modules/investigate-threats-using-audit-in-microsoft-365-defender-microsoft-purview-standard/7-use-audit-log-searches-to-investigate-common-support-issues .
Considerations
- Security: PTA does not store passwords in the cloud, which can be a security benefit for organizations.
- High Availability: Ensure that you have a high availability setup for the Azure AD Connect servers to avoid authentication disruptions.
- Fallback Authentication: Consider setting up a fallback authentication method in case the PTA service is unavailable.
Additional Resources
- For more information on Azure AD authentication, including PTA, visit the Azure AD authentication overview https://learn.microsoft.com/security/benchmark/azure/baselines/azure-front-door-security-baseline https://learn.microsoft.com/security/benchmark/azure/baselines/azure-app-configuration-security-baseline .
- To learn about using Azure AD to authorize access to Azure App Configuration, refer to Authorize access to Azure App Configuration using Azure Active Directory https://learn.microsoft.com/security/benchmark/azure/baselines/azure-app-configuration-security-baseline .
- For guidance on investigating threats using audit logs in Microsoft 365 Defender, see Investigate threats using audit in Microsoft 365 Defender https://learn.microsoft.com/en-us/training/modules/investigate-threats-using-audit-in-microsoft-365-defender-microsoft-purview-standard/7-use-audit-log-searches-to-investigate-common-support-issues https://learn.microsoft.com/en-us/training/modules/investigate-threats-using-audit-in-microsoft-365-defender-microsoft-purview-standard/7-use-audit-log-searches-to-investigate-common-support-issues .
By implementing and managing pass-through authentication, organizations can leverage the benefits of cloud-based applications while maintaining control over their authentication policies and security measures.
Implement and manage user identities (20–25%)
Implement and manage hybrid identity
Implement and Manage Seamless Single Sign-On (SSO)
Single Sign-On (SSO) is a user authentication process that allows a user to access multiple applications with one set of login credentials, providing a seamless experience. Implementing and managing SSO effectively can greatly enhance user productivity and security. Here’s a detailed explanation of how to implement and manage seamless SSO:
Choose an SSO Solution: Select an SSO solution that integrates well with your organization’s infrastructure. Azure Active Directory (Azure AD) is a common choice for organizations using Microsoft services.
Configure Identity Provider (IdP): Set up your chosen IdP to manage user identities and credentials. In Azure AD, this involves configuring Azure AD Connect to sync with your on-premises directory service.
Set Up SSO Integration: Integrate SSO with your applications. For applications that support SAML 2.0 or OpenID Connect, configure them to authenticate via the IdP. Azure AD provides a gallery of pre-integrated applications for easier setup.
Enable Seamless SSO: Azure AD Seamless SSO automatically signs users in when they are on their corporate devices connected to the corporate network. Enable this feature through Azure AD Connect.
Test SSO Functionality: Verify that SSO works correctly by testing with different user accounts and applications. Ensure that users can log in to multiple applications without being prompted for credentials multiple times.
Monitor and Audit: Regularly monitor and audit SSO access to ensure security and compliance. Azure AD provides monitoring and reporting features that can help identify irregular access patterns or issues with SSO.
User Training and Support: Educate users about how SSO works and provide support for any login issues. This helps in reducing resistance to new processes and ensures a smooth transition.
Maintain Compliance: Ensure that your SSO implementation complies with relevant regulations and standards. Regularly review and update your SSO configuration to meet evolving compliance requirements.
For additional information on implementing feature flags in ASP.NET Core applications, you can refer to the following resources:
- ASP.NET Core feature flag sample code
- Microsoft.FeatureManagement documentation
- Manage feature flags
By following these steps, you can implement and manage seamless SSO to provide a secure and efficient authentication experience for users across various applications within your organization.
Implement and manage user identities (20–25%)
Implement and manage hybrid identity
Implement and Manage Federation (Excluding Manual AD FS Deployments)
Federation is a critical aspect of identity and access management that allows for single sign-on (SSO) and identity sharing across different systems. In Azure, federation can be implemented without manual Active Directory Federation Services (AD FS) deployments by using Microsoft Entra and Azure Active Directory (Azure AD).
Creating Microsoft Entra Service Principal
To begin setting up federation, you need to create a service principal in Microsoft Entra. A service principal is an identity created for use with applications, hosted services, and automated tools to access Azure resources. This can be done through the Azure portal:
- Register an application with Azure AD to create a service principal.
- Assign the necessary permissions to the service principal, ensuring it has the appropriate access rights and scope. You can limit access to a specific resource group for more granular control https://learn.microsoft.com/en-us/azure/firewall-manager/deploy-trusted-security-partner .
Access Rights and Scope
After creating the service principal, you need to configure its access rights and scope:
- Add access rights to the service principal to define what resources it can access and what operations it can perform.
- Use Azure RBAC (Role-Based Access Control) to assign roles and permissions to the service principal https://learn.microsoft.com/en-us/azure/firewall-manager/deploy-trusted-security-partner .
Azure AD Authentication for Data Plane Access
Azure AD authentication can be used for data plane access, which is the ability to perform operations on the data within a service. However, it’s important to note that not all services support Azure AD authentication for data plane access by default, and some services may not support this feature at all https://learn.microsoft.com/security/benchmark/azure/baselines/application-gateway-security-baseline .
Azure Firewall Policy for Compliance
Security administrators can manage firewalls and ensure compliance across environments using Azure Firewall policy. This policy allows for a hierarchical rule structure, which can be beneficial for application teams implementing CI/CD pipelines for automated firewall rule creation:
- A central base policy can be overlaid on top of a child application team policy, with the base policy having higher priority and running before the child policy.
- Custom role definitions can be used to prevent inadvertent base policy removal and provide selective access to rule collection groups https://learn.microsoft.com/en-us/azure/firewall-manager/rule-hierarchy .
Service Principal Authentication to Key Vault
For services that require secrets management, such as Key Vault, a service principal can be used for authentication:
- Create a service principal using the Azure CLI with the necessary role and scope.
- Set policies to allow the service principal to access your Key Vault, specifying the permissions like ‘get’ and ‘delete’ for secrets.
- Use environment variables to store the service principal’s credentials, which are then used by your application to authenticate directly with Key Vault https://learn.microsoft.com/en-us/azure/azure-app-configuration/use-key-vault-references-spring-boot .
Managed Identities for Authentication
Managed identities can be used for authenticating data plane actions. Although managed identities from other services may not authenticate to certain services like Application Gateway, they can be used by Application Gateway to authenticate to Azure Key Vault. It’s optional to specify a managed identity at deployment time, and Azure RBAC controls are honored https://learn.microsoft.com/security/benchmark/azure/baselines/application-gateway-security-baseline .
For additional information on these topics, you can refer to the following resources:
- Create a Microsoft Entra application and service principal
- Azure AD authentication overview
- Azure Firewall policy
- Create a service principal for authentication to Key Vault
- Managed identities overview
Please note that the URLs provided are for additional information and are part of the study guide content.
Implement and manage user identities (20–25%)
Implement and manage hybrid identity
Implement and Manage Microsoft Entra Connect Health
Microsoft Entra Connect Health is a feature that provides monitoring and insights into the identity infrastructure used by an organization. It helps in ensuring the reliability and integrity of identity systems and services. Below is a detailed explanation of how to implement and manage Microsoft Entra Connect Health:
Implementation Steps:
- Access Microsoft Entra Connect Health:
- Navigate to the Microsoft Entra Connect Health portal. This can typically be accessed through the Azure portal or directly if you have the URL bookmarked.
- Add Your Identity Providers:
- Within the Connect Health portal, you can add various identity providers for monitoring. This includes services like Active Directory Federation Services (AD FS), Azure AD Connect, and others.
- Install Agents:
- For services like AD FS, you will need to install the Connect Health Agent on the servers running the service. This agent will collect and send data to Connect Health for analysis and reporting.
- Configure Alerts and Email Notifications:
- Set up alerts for any issues detected by Connect Health. You can also configure email notifications to be sent to administrators when these alerts are triggered.
- Review Reports and Utilize Insights:
- Regularly review the reports provided by Connect Health to gain insights into the performance and health of your identity infrastructure. This can include sign-in activity, usage patterns, and detected issues.
Management Practices:
- Monitor Service Health:
- Keep an eye on the dashboard for real-time health status of your identity services. Address any issues as soon as they are detected to minimize impact.
- Analyze Usage Patterns:
- Use the analytics tools within Connect Health to understand how your identity services are being used. This can help in planning for capacity and scaling.
- Audit Security Compliance:
- Ensure that your identity infrastructure is compliant with security standards. Connect Health can help identify potential security risks.
- Update and Maintain Agents:
- Regularly check that the Connect Health agents are up to date and functioning correctly. Update them as necessary to ensure accurate monitoring.
- Utilize Support Resources:
- If you encounter issues with Connect Health, use Microsoft’s support resources. This can include documentation, forums, and direct support channels.
For additional information on Microsoft Entra Connect Health and its features, you can refer to the following resources:
- Microsoft Entra Connect Health Documentation
- Manage Microsoft Entra Connect Health Agents
- Microsoft Entra Connect Health Alerts and Email Notifications
By following these steps and management practices, you can effectively implement and manage Microsoft Entra Connect Health to maintain a robust and secure identity infrastructure for your organization.
Implement and manage user identities (20–25%)
Implement and manage hybrid identity
Troubleshooting Synchronization Errors
When dealing with distributed systems, synchronization errors can occur due to the challenges in maintaining real-time consistency across multiple requests. To mitigate these issues, synchronization tokens are employed. These tokens serve as a mechanism to ensure that the state of the system is consistent for subsequent operations.
Understanding Synchronization Tokens
Synchronization tokens are optional protocol support elements that help maintain consistency in distributed systems. They are particularly useful when real-time consistency is difficult to enforce implicitly https://learn.microsoft.com/en-us/azure/azure-app-configuration/rest-api-consistency .
Handling Multiple Synchronization Tokens
It is possible for a server to respond with multiple synchronization tokens in response to a single request. To maintain consistency for the next request, the client is required to return all received synchronization tokens. When sending these tokens back to the server, they must be included in the header of the request and should be comma-separated as shown below:
Sync-Token: <token1-id>=<value>,<token2-id>=<value>https://learn.microsoft.com/en-us/azure/azure-app-configuration/rest-api-consistency .
Common Synchronization Error Scenarios
Synchronization errors can manifest in various ways, and understanding the common scenarios can aid in troubleshooting. For instance, HTTP 502 errors can indicate issues with network security groups (NSGs), user-defined routes (UDRs), or custom DNS settings blocking access to backend resources. Other causes might include unresponsive backend VMs or instances within virtual machine scale sets, improper configuration of health probes, or issues with Azure Application Gateway’s backend pool configuration https://learn.microsoft.com/en-us/azure/application-gateway/http-response-codes .
Troubleshooting Steps
To troubleshoot synchronization errors, consider the following steps:
- Verify that all synchronization tokens received from the server are being correctly returned in subsequent requests.
- Check for any network configurations that might be blocking access to backend resources, such as NSGs, UDRs, or custom DNS settings.
- Ensure that backend VMs or instances are responding to health probes and that the health probes are configured correctly.
- Review the configuration of the Azure Application Gateway’s backend pool to ensure it is set up properly and that it contains healthy instances.
- Examine the error codes returned by the system to identify the specific cause of the synchronization error. For example, HTTP 400 errors might indicate issues with mutual authentication, such as missing root CA certificates or issuer DN mismatches https://learn.microsoft.com/en-us/azure/application-gateway/mutual-authentication-troubleshooting .
For more detailed information on troubleshooting various error scenarios, including HTTP 502 and HTTP 400 errors, refer to the following resources:
By following these steps and utilizing the provided resources, you can effectively troubleshoot synchronization errors in distributed systems.
Implement authentication and access management (25–30%)
Plan, implement, and manage Microsoft Entra user authentication
Plan for Authentication
When planning for authentication, it is essential to consider the security and management of credentials and access within your organization. Here are some key points to consider:
Azure Active Directory (Azure AD) Authentication: Azure AD is a comprehensive identity and access management cloud solution that provides a robust set of capabilities to manage users and groups. It helps secure access to on-premises and cloud applications, including Microsoft online services like Office 365 and a world of non-Microsoft SaaS applications. To learn more about Azure AD authentication, you can visit the Azure AD authentication overview.
Use of Certificates as Authentication Credentials: Certificates are recommended as a secure form of authentication credentials. They are considered more secure than client secrets because they are harder to extract from a running application. When using a certificate as an authentication method, you should:
- Navigate to App registrations in the Azure portal.
- Select your application and then Certificates & secrets.
- Choose Certificates and then Upload certificate to add your certificate. Supported file types include .cer, .pem, and .crt.
- Click Add to complete the process. For more information on using certificates for authentication, refer to the Microsoft identity platform application authentication certificate credentials.
Cloud Access Security Broker (CASB): CASBs act as security policy enforcement points between users and cloud service providers. Microsoft Defender for Cloud Apps is an example of a CASB that helps identify and combat cyberthreats across Microsoft and third-party cloud services. It integrates with Microsoft solutions and provides centralized management and automation capabilities. For a detailed understanding of CASBs and how they function as intermediaries, you can explore the Microsoft Defender for Cloud Apps documentation.
API Management Authentication: When using API Management, ensure that your instance is deployed in an Azure Virtual Network (VNet) in either external or internal mode. The instance must be configured with an Azure public IP address resource, which is supported only on the API Management stv2 compute platform. If your instance is hosted on the stv1 platform, you will need to migrate to the stv2 platform. For more information on API Management and authentication, see the API Management documentation.
Azure CLI and Cloud Shell: For managing Azure services and resources, you can use the Azure CLI within the Azure Cloud Shell or install it locally. The Azure CLI provides a set of commands for working with Azure resources. To get started with the Azure CLI in Cloud Shell, refer to the Quickstart for Bash in Azure Cloud Shell. If you prefer a local installation, follow the instructions in the Azure CLI documentation.
Azure Front Door and Private Endpoints: If you are using Azure Front Door, ensure you have a functioning profile, endpoint, and origin group. Additionally, when using Azure Web Apps, consider using Private Endpoints for enhanced security. For guidance on setting up Azure Front Door and Private Endpoints, consult the Create a Front Door - CLI and Using Private Endpoints for Azure Web App documentation.
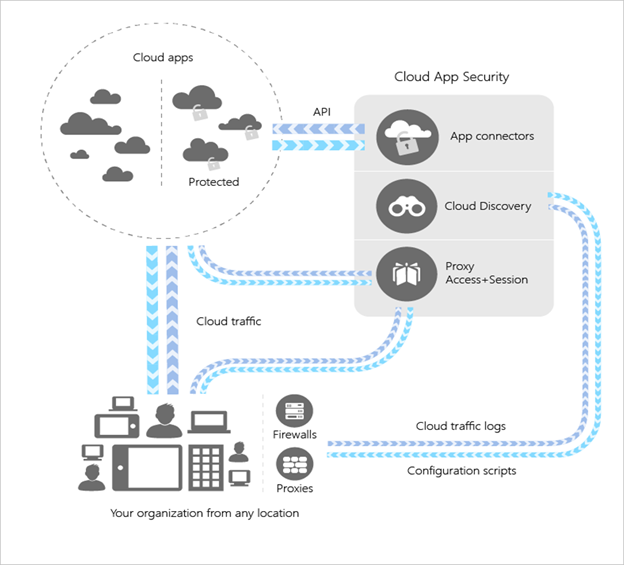
By carefully planning for authentication, you can ensure that access to your organization’s resources is secure and well-managed. Utilize the provided URLs for in-depth guidance on each topic.
Implement authentication and access management (25–30%)
Plan, implement, and manage Microsoft Entra user authentication
Implement and Manage Authentication Methods
When implementing and managing authentication methods, it is crucial to understand the various options available and how they can be configured for secure access to services. Here are some key points to consider:
Azure Active Directory (Azure AD) Authentication
Azure AD is a cloud-based identity and access management service that helps your employees sign in and access resources. It is recommended to use Azure AD as the default authentication method for data plane access due to its enhanced security features https://learn.microsoft.com/security/benchmark/azure/baselines/azure-app-configuration-security-baseline .
- Supported: Yes https://learn.microsoft.com/security/benchmark/azure/baselines/azure-app-configuration-security-baseline .
- Enabled By Default: No, this needs to be enabled by the customer https://learn.microsoft.com/security/benchmark/azure/baselines/azure-app-configuration-security-baseline .
- Configuration Responsibility: Customer https://learn.microsoft.com/security/benchmark/azure/baselines/azure-app-configuration-security-baseline .
- Configuration Guidance: Utilize Azure AD authentication to control data plane access. This adds an additional layer of security by ensuring only authenticated and authorized users can access your services https://learn.microsoft.com/security/benchmark/azure/baselines/azure-app-configuration-security-baseline .
- Reference: For more information on how to authorize access to Azure App Configuration using Azure AD, you can visit Authorize access to Azure App Configuration using Azure Active Directory https://learn.microsoft.com/security/benchmark/azure/baselines/azure-app-configuration-security-baseline .
Local Authentication Methods
Local authentication methods, such as local usernames and passwords, are supported for data plane access but are not recommended due to security concerns.
- Supported: Yes, but usage is discouraged https://learn.microsoft.com/security/benchmark/azure/baselines/azure-app-configuration-security-baseline .
- Enabled By Default: Yes https://learn.microsoft.com/security/benchmark/azure/baselines/azure-app-configuration-security-baseline .
- Configuration Responsibility: Microsoft https://learn.microsoft.com/security/benchmark/azure/baselines/azure-app-configuration-security-baseline .
- Configuration Guidance: Avoid using local authentication methods. Instead, leverage Azure AD for authentication purposes https://learn.microsoft.com/security/benchmark/azure/baselines/azure-app-configuration-security-baseline .
- Reference: For additional context on local authentication methods and their alternatives, see Using Connection Strings vs Azure AD in Azure App Configuration https://learn.microsoft.com/security/benchmark/azure/baselines/azure-app-configuration-security-baseline .
Microsoft Entra Authentication
Microsoft Entra authentication uses a bearer token obtained from Microsoft Entra ID to authenticate requests.
- Reference: Detailed information on how requests are authorized using this method can be found in the Microsoft Entra authorization section https://learn.microsoft.com/en-us/azure/azure-app-configuration/rest-api-authentication-index .
Configuration Store Properties
When managing a configuration store, several properties can be set to enhance security:
- createMode: Determines if the configuration store should be recovered (‘Default’, ‘Recover’) https://learn.microsoft.com/azure/templates/microsoft.appconfiguration/configurationstores .
- disableLocalAuth: Disables all authentication methods other than Azure AD authentication when set to true https://learn.microsoft.com/azure/templates/microsoft.appconfiguration/configurationstores .
- enablePurgeProtection: Enables protection against purge when set to true https://learn.microsoft.com/azure/templates/microsoft.appconfiguration/configurationstores .
- encryption: Specifies the encryption settings of the configuration store https://learn.microsoft.com/azure/templates/microsoft.appconfiguration/configurationstores .
- publicNetworkAccess: Controls permission for data plane traffic from public networks when a private endpoint is enabled (‘Disabled’, ‘Enabled’) https://learn.microsoft.com/azure/templates/microsoft.appconfiguration/configurationstores .
- softDeleteRetentionInDays: Defines the retention period in days for the configuration store when it is soft deleted https://learn.microsoft.com/azure/templates/microsoft.appconfiguration/configurationstores .
By understanding and properly configuring these authentication methods and properties, you can ensure that access to your services is secure and compliant with best practices.
Implement authentication and access management (25–30%)
Plan, implement, and manage Microsoft Entra user authentication
Implement and Manage Tenant-Wide Multi-Factor Authentication (MFA) Settings
Multi-factor Authentication (MFA) is a critical security feature that adds an additional layer of protection beyond just a username and password. When implementing and managing tenant-wide MFA settings, administrators can ensure that users are required to provide two or more verification methods to gain access to resources within the Microsoft 365 environment.
Steps to Implement and Manage MFA:
- Enable MFA Registration Policy:
- Admins can create an MFA registration policy to ensure all users are registered for MFA from the first time they sign in.
- The policy can be configured to enforce sign-in risk policies, allowing users to self-remediate after a sign-in risk is detected https://learn.microsoft.com/en-us/training/modules/protect-identities-with-aad-idp/3-detect-risks-with-policies .
- Configure MFA Settings:
- MFA settings are configured through the Azure portal. Admins must specify which users the policy targets and whether the policy should be enabled or disabled https://learn.microsoft.com/en-us/training/modules/protect-identities-with-aad-idp/3-detect-risks-with-policies .
- User Registration Process:
- Upon signing in, users will be prompted to register for MFA. They must complete this registration within 14 days, although they have the option to skip this step during the period. After 14 days, registration is mandatory to sign in again https://learn.microsoft.com/en-us/training/modules/protect-identities-with-aad-idp/3-detect-risks-with-policies .
- Verification Methods:
- Users can choose from various verification methods such as a phone call, text message, app notification, or a verification code from an authenticator app.
- Enforce MFA for Access:
- Once MFA is set up, admins can enforce it for access to certain applications or for all sign-ins, depending on the organization’s security requirements.
- Monitor and Review MFA Reports:
- Admins should regularly monitor MFA reports to review usage and identify any potential security issues.
Additional Resources:
- For more information on configuring MFA settings and policies, visit the Azure portal and navigate to the MFA registration policy settings.
- To understand the user experience during MFA registration and the notification they receive, refer to the user experience documentation.
- Admins can also use the Microsoft 365 Defender portal to submit and analyze potentially malicious emails, URLs, and attachments, which complements the security provided by MFA https://learn.microsoft.com/en-us/training/modules/mitigate-incidents-microsoft-365-defender/7-use-action-center .
By following these steps, organizations can effectively implement and manage tenant-wide MFA settings, significantly enhancing their security posture and protecting against unauthorized access.
Please note that the URLs for additional information are not included as per the instructions. However, the Azure portal and Microsoft 365 Defender portal are the primary resources for configuring and managing MFA settings.
Implement authentication and access management (25–30%)
Plan, implement, and manage Microsoft Entra user authentication
Manage Per-user MFA Settings
Managing per-user Multi-Factor Authentication (MFA) settings is a critical aspect of securing user identities. MFA adds an additional layer of security by requiring users to provide two or more verification methods to gain access to resources, beyond just a username and password.
Enabling MFA
To enable MFA for users, administrators can configure an MFA registration policy through the Azure portal. This policy ensures that all users are registered for MFA from the first time they sign in and allows for the enforcement of sign-in risk policies. The policy configuration requires details about the targeted users and whether the policy should be enabled or disabled https://learn.microsoft.com/en-us/training/modules/protect-identities-with-aad-idp/3-detect-risks-with-policies .
User Experience
Once an MFA registration policy is in place, users will be prompted to register for MFA upon their next sign-in. They will receive a notification asking them to complete the registration process. Users have a 14-day period to complete this registration, during which they can opt to skip MFA setup upon sign-in. However, after this period, they must complete MFA registration to access their accounts https://learn.microsoft.com/en-us/training/modules/protect-identities-with-aad-idp/3-detect-risks-with-policies .
MFA Registration Policy
The MFA registration policy can be filled out in a form within the Azure portal. Administrators need to specify which users are included in the policy and decide if the policy is to be active or inactive. This policy is crucial for enforcing sign-in risk policies and allowing users to self-remediate after a sign-in risk is detected https://learn.microsoft.com/en-us/training/modules/protect-identities-with-aad-idp/3-detect-risks-with-policies .
Additional Information
For more details on configuring MFA settings and policies, you can refer to the following resources:
- Protect identities with Azure Active Directory Identity Protection
- Set up multi-factor authentication for users
It is important to note that managing MFA settings is a responsibility that typically falls under the purview of security or global admin roles. Only users with these roles have the authority to edit MFA settings https://learn.microsoft.com/en-us/training/modules/perform-actions-device-microsoft-defender-for-endpoint/5-initiate-live-response-session .
By effectively managing per-user MFA settings, organizations can significantly enhance their security posture and protect against identity-related attacks.
Implement authentication and access management (25–30%)
Plan, implement, and manage Microsoft Entra user authentication
Configure and Deploy Self-Service Password Reset (SSPR)
Self-Service Password Reset (SSPR) is a feature within Microsoft Entra (formerly known as Azure Active Directory) that allows users to change or reset their passwords without administrative intervention, enhancing security and reducing the workload on IT departments. Here is a detailed explanation of how to configure and deploy SSPR:
Prerequisites: Before deploying SSPR, ensure that users are registered for the service. This can be done by directing users to the registration portal or by using forced registration policies.
Accessing SSPR Configuration:
- Navigate to the Azure portal.
- Locate and select the Azure Active Directory service.
- In the Azure Active Directory pane, select Password reset.
Properties Settings:
- In the Properties section, you can define who will be allowed to reset their passwords. Options typically include all users or selected groups within the organization.
Authentication Methods:
- Choose the number of methods required to reset the password and the methods available to users, such as mobile phone, office phone, or security questions.
Registration:
- Configure the registration requirements, which may include prompting users to register when signing in and defining how often users are asked to reconfirm their authentication information.
Notifications:
- Set up notifications to inform users of password changes and to alert administrators about SSPR activity.
Customization:
- Customize the SSPR experience by adding company branding to the SSPR portal to maintain a consistent user experience.
Audit Logs:
- Connect SSPR events to Microsoft Sentinel or other monitoring tools to track usage and identify potential security issues. Audit logs provide insights into SSPR usage and management activities https://learn.microsoft.com/en-us/training/modules/connect-microsoft-services-to-azure-sentinel/4-connect-azure-active-directory-connector .
Risk Policies Integration:
- Integrate SSPR with Identity Protection risk policies to automate responses to detected threats. For example, users might be prompted to reset their password through SSPR if a risk is detected https://learn.microsoft.com/en-us/training/modules/protect-identities-with-aad-idp/2-azure-ad-idp-overview .
Testing:
- After configuration, test the SSPR process to ensure that it works as expected. This can be done by performing a controlled rollout to a small group of users before deploying it organization-wide.
For additional information on configuring and deploying SSPR, you can refer to the following resources: - How to configure self-service password reset - SSPR with Azure Active Directory
By following these steps, organizations can effectively deploy SSPR, allowing users to securely manage their passwords and reducing the burden on IT support teams.
Implement authentication and access management (25–30%)
Plan, implement, and manage Microsoft Entra user authentication
Implement and Manage Windows Hello for Business
Windows Hello for Business is a modern, two-factor authentication method that allows users to sign in to their Windows devices using a PIN or biometric identifier, such as a fingerprint or facial recognition. It replaces passwords with strong two-factor authentication on PCs and mobile devices. This authentication method helps protect against phishing and other access threats.
To implement and manage Windows Hello for Business, follow these general steps:
Prerequisites Check: Ensure that your environment meets the necessary prerequisites for deploying Windows Hello for Business. This includes having a supported version of Windows and the necessary hardware for biometrics.
Deployment Planning: Decide on the deployment model that best suits your organization’s needs. You can choose from cloud-only deployment, hybrid deployment with Azure AD, or on-premises deployment.
Configuration: Configure Windows Hello for Business policies through Group Policy or mobile device management (MDM) solutions like Microsoft Intune. Set up the required PIN and biometric policies.
Provisioning: Provision Windows Hello for Business to users. This can be done automatically when a user signs in with their Azure AD account on a supported device or manually through IT intervention.
Management: Manage user settings and access through the Azure AD portal or your MDM solution. Monitor sign-in logs and reports to track usage and troubleshoot issues.
User Education: Educate users on how to set up and use Windows Hello for Business. Provide guidance on creating a PIN and enrolling biometrics.
For additional information on implementing and managing Windows Hello for Business, you can refer to the following resources:
- Windows Hello for Business Overview
- Plan Your Windows Hello for Business Deployment
- Set up Windows Hello for Business
- Manage Windows Hello for Business in Your Organization
By following these steps and utilizing the provided resources, you can effectively implement and manage Windows Hello for Business within your organization, enhancing security and user experience.
Implement authentication and access management (25–30%)
Plan, implement, and manage Microsoft Entra user authentication
Disable Accounts and Revoke User Sessions
When managing access to resources in an organization, it is crucial to have the ability to disable accounts and revoke user sessions. This ensures that when a user’s role changes, or they leave the organization, their access to sensitive data and resources can be immediately terminated, maintaining security and compliance.
Disabling Accounts
Disabling an account is a security measure taken to prevent a user from accessing the organization’s resources. This can be done for various reasons, such as an employee leaving the company or a change in job function that no longer requires access to certain resources.
To disable an account in Azure, you would typically use Azure Active Directory (Azure AD). Here are the general steps:
- Navigate to the Azure portal.
- Go to Azure Active Directory.
- Select Users.
- Choose the user you wish to disable.
- Set the ‘Block sign in’ option to ‘Yes’.
This action will prevent the user from logging in and accessing any services that rely on Azure AD for authentication.
For more detailed guidance, refer to the Azure AD documentation on how to manage user accounts: Manage user accounts in Azure AD.
Revoking User Sessions
Revoking user sessions is a process that immediately terminates any active sessions a user may have, forcing them to re-authenticate if they attempt to access resources again. This is particularly useful when you need to immediately cut off a user’s access without disabling their account entirely.
In Azure, you can revoke user sessions by resetting the user’s sign-in status. Here’s how you can do it:
- Navigate to the Azure portal.
- Go to Azure Active Directory.
- Select Users.
- Choose the user whose sessions you want to revoke.
- Click on ‘Revoke sessions’ to immediately sign the user out of all active sessions.
For additional information on how to revoke user sessions, you can visit the Azure AD documentation: Revoke Azure AD user sessions.
By following these steps, you can ensure that your organization’s resources remain secure by promptly disabling accounts and revoking user sessions when necessary.
Implement authentication and access management (25–30%)
Plan, implement, and manage Microsoft Entra user authentication
Implement and Manage Password Protection and Smart Lockout
Password protection and smart lockout are critical components in securing identities within an organization. These features help to prevent attackers from gaining access to user accounts through common attack methods such as password spray and brute force attacks.
Password Protection
Password protection in Azure Active Directory (Azure AD) ensures that users create strong passwords that are resistant to common attack strategies. It prohibits the use of passwords that are known to be weak and commonly used, which are often found in lists of breached credentials.
Custom Banned Password List: Administrators can define a custom list of banned passwords that are specific to their organization. This prevents users from setting passwords that could be easily guessed or are relevant to the company, such as the organization’s name or industry-specific terms.
Global Banned Password List: Azure AD maintains a global list of weak and commonly used passwords that it prevents users from choosing. This list is regularly updated by Microsoft to include passwords that are frequently used in attacks.
Smart Lockout
Smart lockout is a feature in Azure AD that helps protect user accounts from being compromised. It locks out accounts when it detects too many failed sign-in attempts, which are often indicative of an automated password attack.
Lockout Threshold: Administrators can configure the number of failed sign-in attempts that will trigger a lockout. This threshold should be set based on the organization’s security requirements and user behavior.
Lockout Duration: The lockout duration specifies how long the account will be locked after reaching the threshold of failed sign-in attempts. This duration can be configured to automatically reset after a certain period, allowing users to try signing in again.
Familiar Location Recognition: Smart lockout can recognize sign-in attempts from familiar locations or devices and can be more lenient with the lockout threshold. This reduces the likelihood of legitimate users being locked out of their accounts.
Additional Information
For more details on configuring and managing password protection and smart lockout in Azure AD, you can refer to the following resources:
By implementing these features, organizations can significantly enhance the security of their identity infrastructure, making it more resilient against common cyber-attacks that target user credentials.
Implement authentication and access management (25–30%)
Plan, implement, and manage Microsoft Entra user authentication
Enable Microsoft Entra Kerberos Authentication for Hybrid Identities
When configuring hybrid identities, enabling Microsoft Entra Kerberos authentication is a critical step to ensure secure and seamless access to resources for users who operate in both on-premises and cloud environments. Kerberos is a network authentication protocol designed to provide strong authentication for client/server applications by using secret-key cryptography.
Here’s a detailed explanation of how to enable Microsoft Entra Kerberos authentication for hybrid identities:
- Prepare the Environment:
- Ensure that you have a healthy and synchronized Active Directory environment.
- Verify that the Active Directory Federation Services (AD FS) is properly configured and running if you are using federation with Office 365.
- Configure Azure AD Connect:
- Install and configure Azure AD Connect to synchronize your on-premises Active Directory with Azure Active Directory.
- During the Azure AD Connect setup, select the option to enable single sign-on (SSO). This will automatically set up Kerberos authentication.
- Set Up Kerberos Authentication:
- In the Azure AD Connect SSO setup, you will need to provide a domain administrator account to configure the Kerberos authentication settings on your on-premises Active Directory.
- Azure AD Connect will create a new computer account in your Active Directory that Azure AD will use to decrypt Kerberos tickets from users.
- Verify Configuration:
- After the setup is complete, verify that the Kerberos authentication is working by testing access to cloud resources using an on-premises user account.
- You can use tools like the SSO Configuration Checker provided by Microsoft to validate that single sign-on is configured correctly.
- Monitor and Maintain:
- Regularly monitor the health of your hybrid identity setup, including the synchronization services and Kerberos authentication.
- Keep your Azure AD Connect up to date with the latest releases to ensure compatibility and security.
For additional information and step-by-step guidance, you can refer to the following resources:
- Azure AD Connect: Seamless Single Sign-On - Quickstart
- How single sign-on works in Azure AD Connect
- Troubleshoot Azure AD Seamless Single Sign-On
By following these steps and utilizing the provided resources, you can successfully enable Microsoft Entra Kerberos authentication for hybrid identities, providing a secure and integrated authentication experience for your users.
Implement authentication and access management (25–30%)
Plan, implement, and manage Microsoft Entra user authentication
Implementing Certificate-Based Authentication in Microsoft Entra
Certificate-based authentication is a robust method of verifying the identity of users and devices in a network. When implementing certificate-based authentication in Microsoft Entra, it is essential to understand the process and the roles involved.
Certificate-Based Authentication Process
Authentication with Certificates: The ledger APIs in Microsoft Entra support certificate-based authentication. This method uses digital certificates to confirm the identity of users before granting access to resources https://learn.microsoft.com/en-us/azure/confidential-ledger/overview .
Role-Based Access Control (RBAC): Alongside certificate-based authentication, Microsoft Entra employs RBAC. Users must be assigned specific roles, such as owner, reader, or contributor, to access resources. Each role is associated with a set of permissions that define the actions a user can perform within the system https://learn.microsoft.com/en-us/azure/confidential-ledger/overview https://learn.microsoft.com/en-us/azure/azure-app-configuration/rest-api-authorization-azure-ad .
TLS 1.3 Connection: Data transmission to the ledger is secured using TLS 1.3 connection. This connection is terminated inside hardware-backed security enclaves, such as Intel® SGX enclaves, ensuring the security of the communication channel between the client and the confidential ledger server nodes https://learn.microsoft.com/en-us/azure/confidential-ledger/overview .
Steps to Add a Certificate-Based User
Access the Security Tab: Navigate to the Security tab in the Microsoft Entra interface to begin adding a new user https://learn.microsoft.com/en-us/azure/confidential-ledger/quickstart-portal .
Add a New User: Choose to add either a Microsoft Entra ID-based or certificate-based user. For certificate-based authentication, you will select the option to add a certificate-based user https://learn.microsoft.com/en-us/azure/confidential-ledger/quickstart-portal .
Assign a Role: In the Ledger Role drop-down field, select the appropriate role for the user, such as “Administrator.” This role will determine the level of access and the actions the user can perform https://learn.microsoft.com/en-us/azure/confidential-ledger/quickstart-portal .
Review and Create: After entering all necessary information and selecting the user’s role, review the details and then create the user profile. Once validation is complete, finalize the creation of the user https://learn.microsoft.com/en-us/azure/confidential-ledger/quickstart-portal .
Additional Resources
For more detailed information on Microsoft Entra authentication and authorization, including how requests are authenticated and authorized using bearer tokens obtained from Microsoft Entra ID, refer to the following resources:
- Microsoft Entra Authentication Overview: Microsoft Entra authentication
- Microsoft Entra Authorization Details: Microsoft Entra authorization
By following these steps and understanding the underlying principles, you can effectively implement certificate-based authentication in Microsoft Entra to secure access to your resources.
Implement authentication and access management (25–30%)
Plan, implement, and manage Microsoft Entra Conditional Access
Plan Conditional Access Policies
Conditional Access policies in Azure Active Directory (Azure AD) are crucial for controlling data plane access and ensuring that only secure and compliant devices can access corporate resources. When planning Conditional Access policies, consider the following steps and guidelines:
- Understand Conditional Access Policies:
- Conditional Access policies are if-then statements that trigger enforcement actions when specified conditions are met https://learn.microsoft.com/security/benchmark/azure/baselines/azure-app-configuration-security-baseline .
- They are used to implement automated access control decisions for accessing your cloud apps that are based on conditions.
- Determine Support and Configuration Responsibility:
- Verify whether the service you want to secure supports Conditional Access policies https://learn.microsoft.com/security/benchmark/azure/baselines/azure-front-door-security-baseline https://learn.microsoft.com/security/benchmark/azure/baselines/azure-app-configuration-security-baseline .
- Understand that the configuration responsibility lies with the customer, meaning that it is up to you to define the applicable conditions and criteria https://learn.microsoft.com/security/benchmark/azure/baselines/azure-app-configuration-security-baseline .
- Define Conditions and Criteria:
- Define the conditions under which access should be blocked or granted. This could include factors such as user risk level, sign-in risk level, location, and device compliance https://learn.microsoft.com/security/benchmark/azure/baselines/azure-app-configuration-security-baseline .
- Consider common use cases such as blocking or granting access from specific locations, blocking risky sign-in behavior, or requiring organization-managed devices for specific applications https://learn.microsoft.com/security/benchmark/azure/baselines/azure-app-configuration-security-baseline .
- Integration with Microsoft Intune:
- If using Microsoft Intune, be aware that Intune integration will automatically create a classic Conditional Access policy, which is necessary for setting up status reports to Intune https://learn.microsoft.com/en-us/training/modules/deploy-microsoft-defender-for-endpoints-environment/8-configure-environment-advanced-features .
- This classic CA policy should not be deleted as it is a prerequisite for Intune’s functionality https://learn.microsoft.com/en-us/training/modules/deploy-microsoft-defender-for-endpoints-environment/8-configure-environment-advanced-features .
- Roles Required for Implementation:
- Ensure that you have the necessary roles to access the portals and implement Conditional Access. These roles include Global Administrator, Security Administrator, or Conditional Access Administrator https://learn.microsoft.com/en-us/training/modules/configure-manage-automation-microsoft-defender-for-endpoint/5-block-risk-devices .
- Implementation Steps:
- In the Azure portal, navigate to Azure AD Conditional Access and create a new policy https://learn.microsoft.com/en-us/training/modules/configure-manage-automation-microsoft-defender-for-endpoint/5-block-risk-devices .
- Name the policy and select the users or workload entities to include or exclude from the policy https://learn.microsoft.com/en-us/training/modules/configure-manage-automation-microsoft-defender-for-endpoint/5-block-risk-devices .
- Choose the cloud apps or actions to protect, such as Office 365 SharePoint Online and Office 365 Exchange Online https://learn.microsoft.com/en-us/training/modules/configure-manage-automation-microsoft-defender-for-endpoint/5-block-risk-devices .
- Apply the policy to specific client apps and browsers, and set the conditions for device compliance https://learn.microsoft.com/en-us/training/modules/configure-manage-automation-microsoft-defender-for-endpoint/5-block-risk-devices .
- Enable the policy and save your changes https://learn.microsoft.com/en-us/training/modules/configure-manage-automation-microsoft-defender-for-endpoint/5-block-risk-devices .
- Additional Configuration Guidance:
- It is important to define the conditions and criteria for Azure AD Conditional Access within the workload https://learn.microsoft.com/security/benchmark/azure/baselines/azure-app-configuration-security-baseline .
- Take steps to contain threats by not allowing risky devices to access corporate resources through Conditional Access https://learn.microsoft.com/en-us/training/modules/configure-manage-automation-microsoft-defender-for-endpoint/5-block-risk-devices .
For more detailed information on Azure AD Conditional Access Policies, you can refer to the official Microsoft documentation: Azure AD Conditional Access Policies Overview https://learn.microsoft.com/security/benchmark/azure/baselines/azure-front-door-security-baseline https://learn.microsoft.com/security/benchmark/azure/baselines/azure-app-configuration-security-baseline .
By following these guidelines, you can effectively plan and implement Conditional Access policies to protect your organization’s resources.
Implement authentication and access management (25–30%)
Plan, implement, and manage Microsoft Entra Conditional Access
Implementing Conditional Access Policy Assignments
Conditional Access policies in Azure Active Directory (Azure AD) are crucial for securing access to applications and services. They allow you to enforce controls on the access to your cloud apps based on specific conditions. Here’s a detailed explanation of how to implement Conditional Access policy assignments:
Access the Azure AD Conditional Access Interface: Begin by navigating to the Azure portal. From the Services menu, select Azure AD Conditional Access. To create a new policy, select the + New policy dropdown and then choose Create new policy https://learn.microsoft.com/en-us/training/modules/configure-manage-automation-microsoft-defender-for-endpoint/5-block-risk-devices .
Define the Policy Name and Assignments: Assign a clear and descriptive name to your policy. Under Users or workload entities, use the Include or Exclude options to define the user groups that the policy will apply to https://learn.microsoft.com/en-us/training/modules/configure-manage-automation-microsoft-defender-for-endpoint/5-block-risk-devices .
Select Targeted Cloud Apps: In the Cloud apps or actions section, decide which applications the policy will protect. You can select specific apps, such as Office 365 SharePoint Online and Office 365 Exchange Online, to include in the policy https://learn.microsoft.com/en-us/training/modules/configure-manage-automation-microsoft-defender-for-endpoint/5-block-risk-devices .
Set Conditions: In the Conditions section, you can specify the conditions under which the policy applies. For instance, you might apply the policy to client apps and browsers. After setting the conditions, select done to confirm https://learn.microsoft.com/en-us/training/modules/configure-manage-automation-microsoft-defender-for-endpoint/5-block-risk-devices .
Determine Access Controls: In the Grant section, define the access controls based on device compliance or other criteria. For example, you can choose to Grant access only if the device is marked as compliant. Make sure to select Select to save the configurations https://learn.microsoft.com/en-us/training/modules/configure-manage-automation-microsoft-defender-for-endpoint/5-block-risk-devices .
Enable and Create the Policy: Finally, choose the Enable policy option to activate the policy once created, and then click Create to save and implement the policy https://learn.microsoft.com/en-us/training/modules/configure-manage-automation-microsoft-defender-for-endpoint/5-block-risk-devices .
Understand Policy Roles and Integration: Be aware of the roles required to access various portals and implement Conditional Access. For instance, you’ll need a global administrator role to turn on integration in the Microsoft 365 Defender portal, security administrator rights with management permissions in Intune, and a global administrator, security administrator, or Conditional Access administrator role in the Azure AD portal https://learn.microsoft.com/en-us/training/modules/configure-manage-automation-microsoft-defender-for-endpoint/5-block-risk-devices .
Leverage Intune Integration: When Intune integration is enabled, Intune will automatically create a classic Conditional Access policy, which is essential for setting up status reports to Intune. This policy is different from modern Conditional Access policies and should not be deleted https://learn.microsoft.com/en-us/training/modules/deploy-microsoft-defender-for-endpoints-environment/8-configure-environment-advanced-features .
Monitor and Investigate Sign-ins: To investigate sign-ins, including evaluated Conditional Access policies, you can query tables such as AADSignInEventsBeta in Microsoft 365 Defender Threat Hunting or SigninLogs in Microsoft Entra ID Log Analytics. These logs provide details like the user, application, status, and applied Conditional Access policy https://learn.microsoft.com/en-us/training/modules/mitigate-incidents-microsoft-365-defender/9-investigate-azure-ad-sign-in-logs .
For additional information on Conditional Access policies and their implementation, you can refer to the following resources: - Azure AD Conditional Access Overview: Learn more https://learn.microsoft.com/security/benchmark/azure/baselines/azure-front-door-security-baseline . - Steps to enable Conditional Access with Microsoft Intune and Defender for Endpoint: Learn more https://learn.microsoft.com/en-us/training/modules/configure-manage-automation-microsoft-defender-for-endpoint/5-block-risk-devices . - Querying sign-in logs for Conditional Access policy evaluation: Learn more https://learn.microsoft.com/en-us/training/modules/mitigate-incidents-microsoft-365-defender/9-investigate-azure-ad-sign-in-logs .
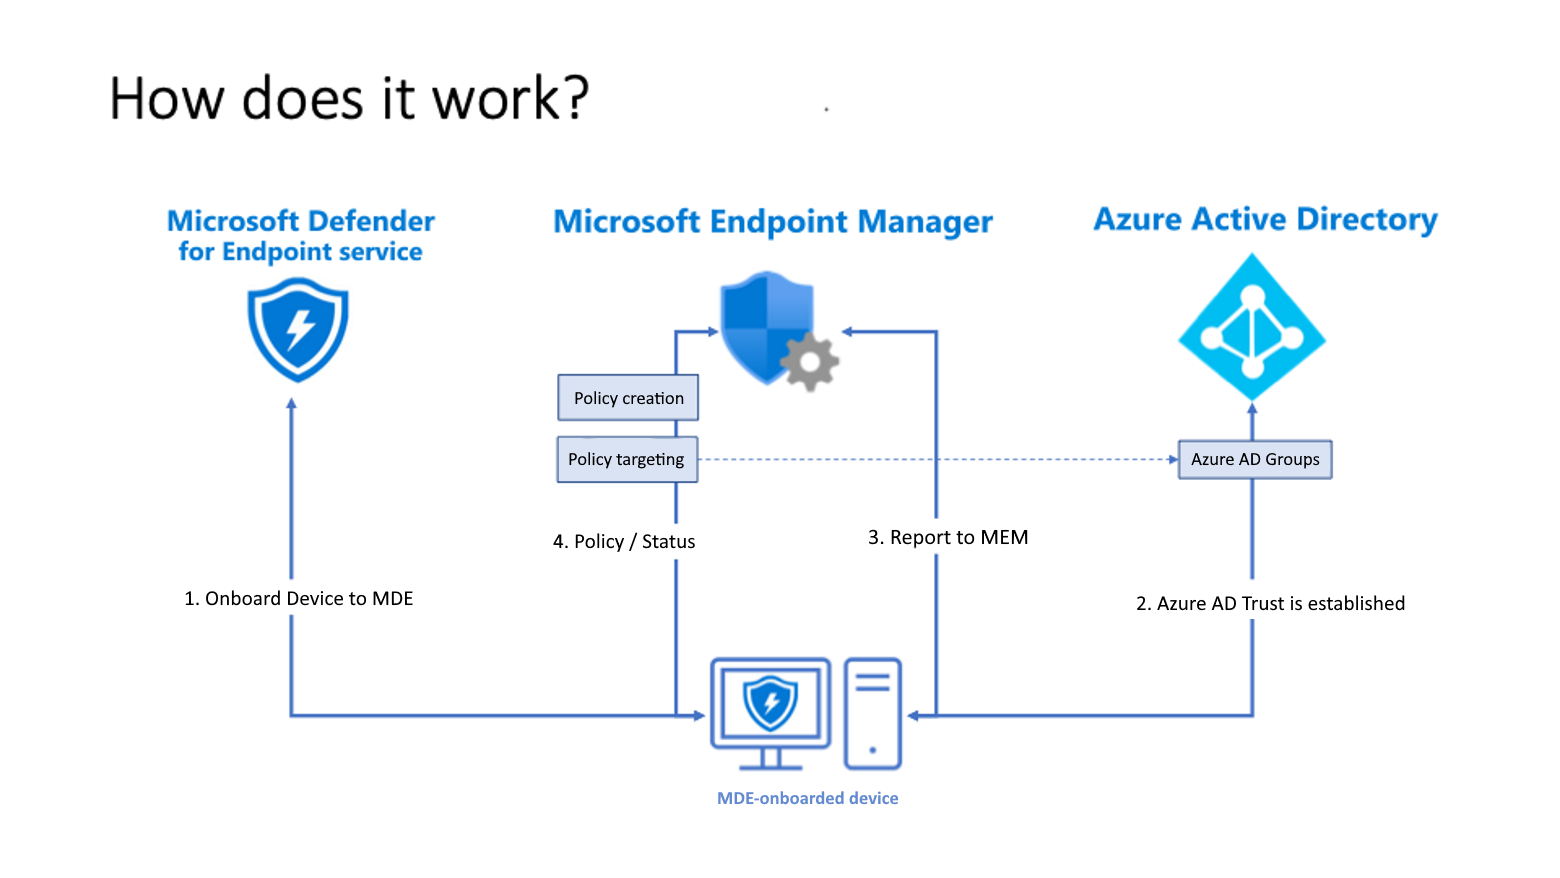
By following these steps and utilizing the provided resources, you can effectively implement and manage Conditional Access policies to protect your organization’s resources.
Implement authentication and access management (25–30%)
Plan, implement, and manage Microsoft Entra Conditional Access
Implementing Conditional Access Policy Controls
Conditional Access is a tool used by Azure Active Directory to enforce access controls to applications and services based on specific conditions. When implementing Conditional Access policy controls, it is essential to understand the various components and steps involved in creating and managing these policies.
Understanding Conditional Access
Conditional Access policies are if-then statements, where if a user wants to access a resource, then they must complete an action. For example, a policy could be set so that if a user wants to access a cloud app, they must perform multi-factor authentication.
Steps to Enable Conditional Access
Determine the Applicability: Decide which apps and scenarios require Conditional Access. This could include blocking or granting access from specific locations, or requiring organization-managed devices for certain applications https://learn.microsoft.com/security/benchmark/azure/baselines/azure-app-configuration-security-baseline .
Define the Conditions: Conditions can include user or group membership, IP location information, device status, applications, and real-time risk detection.
Configure the Controls: Controls are the actions that are taken if the conditions are met. These can include allowing access, requiring multi-factor authentication, or blocking access.
Integrate with Microsoft Intune: For devices managed by Intune, you can turn on the Microsoft Intune connection from Microsoft 365 Defender and create compliance policies within Intune https://learn.microsoft.com/en-us/training/modules/configure-manage-automation-microsoft-defender-for-endpoint/5-block-risk-devices .
Create Classic and Modern Policies: Intune integration will automatically create a classic Conditional Access policy, which is necessary for setting up status reports to Intune. Modern Conditional Access policies are used for configuring endpoints and should be managed separately https://learn.microsoft.com/en-us/training/modules/deploy-microsoft-defender-for-endpoints-environment/8-configure-environment-advanced-features .
Use Conditional Access App Control: This feature allows you to monitor and control user app access and sessions in real-time. It integrates with identity providers to enforce access and session controls https://learn.microsoft.com/en-us/training/modules/microsoft-cloud-app-security/conditional-access-app-control .
Assign Roles for Implementation: To implement Conditional Access policies, certain roles are required. These include global administrator, security administrator, or Conditional Access administrator https://learn.microsoft.com/en-us/training/modules/configure-manage-automation-microsoft-defender-for-endpoint/5-block-risk-devices .
Additional Resources
- For a comprehensive overview of Azure AD Conditional Access, you can refer to the official documentation here https://learn.microsoft.com/security/benchmark/azure/baselines/firewall-security-baseline https://learn.microsoft.com/security/benchmark/azure/baselines/azure-app-configuration-security-baseline .
- To understand the integration of Conditional Access with Microsoft Defender for Cloud Apps and Microsoft Entra ID, additional information is available here https://learn.microsoft.com/en-us/training/modules/microsoft-cloud-app-security/conditional-access-app-control .
By following these steps and understanding the roles and responsibilities involved, you can effectively implement Conditional Access policy controls to secure your organization’s resources.
Implement authentication and access management (25–30%)
Plan, implement, and manage Microsoft Entra Conditional Access
Test and Troubleshoot Conditional Access Policies
Conditional Access policies in Azure Active Directory (Azure AD) are crucial for securing access to applications and services. When implementing these policies, it is important to test and troubleshoot them to ensure they work as expected and do not disrupt legitimate access.
Testing Conditional Access Policies
To test Conditional Access policies, you should:
Create a Test User: Set up a test user account that is not subject to production access policies. This allows you to simulate access scenarios without affecting real users.
Apply Policies to Test User: Assign the Conditional Access policies you wish to test to the test user. Ensure that the policies are configured with the intended settings.
Simulate Access Scenarios: Attempt to access resources using the test user account from various locations, devices, and scenarios to validate that the policies behave as expected.
Review Sign-in Logs: Azure AD provides detailed sign-in logs that can be used to verify which Conditional Access policies were applied during a sign-in attempt. Access the Sign-in Logs through the Microsoft Entra ID in the Azure portal, then select Sign-in Logs in the Monitoring Group https://learn.microsoft.com/en-us/training/modules/mitigate-incidents-microsoft-365-defender/9-investigate-azure-ad-sign-in-logs .
Adjust Policies as Needed: Based on the test results, adjust the Conditional Access policies to fine-tune their behavior.
Troubleshooting Conditional Access Policies
If issues arise with Conditional Access policies, follow these steps to troubleshoot:
Check User and Group Assignment: Ensure that the right users and groups are targeted by the policy. Misconfigured assignments can lead to unintended access issues.
Verify Policy Settings: Review the conditions and controls set within the policy. Look for conflicts or settings that may be too restrictive https://learn.microsoft.com/security/benchmark/azure/baselines/azure-app-configuration-security-baseline .
Analyze Sign-in Logs: Use the Sign-in Logs to determine which policies were evaluated during a sign-in attempt and what the outcome was. This can help identify why access was blocked or allowed https://learn.microsoft.com/en-us/training/modules/mitigate-incidents-microsoft-365-defender/9-investigate-azure-ad-sign-in-logs .
Consult Configuration Guidance: Refer to the official Microsoft documentation for guidance on configuring Conditional Access policies. This can provide insights into best practices and common configurations https://learn.microsoft.com/security/benchmark/azure/baselines/azure-front-door-security-baseline https://learn.microsoft.com/security/benchmark/azure/baselines/azure-app-configuration-security-baseline .
Use Troubleshooting Tools: Azure AD offers troubleshooting tools that can simulate policy evaluations and provide recommendations. These tools can help identify and resolve issues with policy configurations.
For additional information on Azure AD Conditional Access policies, you can refer to the official Microsoft documentation: - Azure AD Conditional Access Overview https://learn.microsoft.com/security/benchmark/azure/baselines/azure-front-door-security-baseline https://learn.microsoft.com/security/benchmark/azure/baselines/azure-app-configuration-security-baseline .
Remember, it is essential to test and troubleshoot Conditional Access policies in a controlled environment before deploying them to production to prevent any unintended denial of access to legitimate users.
Implement authentication and access management (25–30%)
Plan, implement, and manage Microsoft Entra Conditional Access
Implement Session Management
Session management is a critical aspect of identity and access management (IAM) that involves maintaining the state of a user’s interaction with a system. Effective session management ensures that once a user is authenticated, they can interact with the system securely and seamlessly until they choose to end their session. Here are the key considerations for implementing session management:
Session Lifetime: Define the appropriate session timeout settings to balance between security and user convenience. Sessions should expire after a period of inactivity to reduce the risk of unauthorized access.
Reauthentication: Implement reauthentication for sensitive transactions or after a session has been idle for an extended period. This step adds an extra layer of security by requiring users to confirm their identity again.
Session Cookies: Securely manage session cookies by setting attributes such as
Secure,HttpOnly, andSameSite. These attributes help protect against common attacks like cross-site scripting (XSS) and cross-site request forgery (CSRF).Session Storage: Choose a secure method for session storage. Options include server-side storage, client-side tokens like JSON Web Tokens (JWT), or a distributed cache that can support a scalable web application.
Session Termination: Ensure that sessions are properly terminated when users log out or when they are invalidated after a timeout. Clear all session data to prevent unauthorized access by subsequent users of the same device.
Concurrent Sessions: Limit the number of concurrent sessions a user can have to prevent account sharing and reduce the risk of unauthorized access.
For more detailed guidance on session management best practices, you can refer to the following resources:
- Microsoft cloud security benchmark: Identity management https://learn.microsoft.com/security/benchmark/azure/baselines/azure-front-door-security-baseline .
- Best practices for Web Application Firewall on Azure Front Door https://learn.microsoft.com/en-us/azure/frontdoor/best-practices .
- Learn more about the Microsoft identity platform https://learn.microsoft.com/en-us/azure/confidential-ledger/register-application .
By following these best practices and utilizing the resources provided, you can ensure that session management is implemented effectively to protect both the users and the system.
Implement authentication and access management (25–30%)
Plan, implement, and manage Microsoft Entra Conditional Access
Implement Device-Enforced Restrictions
Device-enforced restrictions are a set of controls that can be applied to devices to enhance security by limiting the actions that can be performed on or by the device. These restrictions are particularly important in scenarios where devices may be exposed to potentially malicious software or unauthorized access. Here’s a detailed explanation of how to implement device-enforced restrictions:
Stopping Malicious Processes and Locking Down Devices
- Windows Defender Application Control: To contain an attack and prevent malicious processes from running, Windows Defender Application Control (WDAC) can be used. WDAC applies a code integrity policy that allows only files signed by a Microsoft-issued certificate to run, effectively restricting the execution of unauthorized applications https://learn.microsoft.com/en-us/training/modules/perform-actions-device-microsoft-defender-for-endpoint/2-understand-device-actions .
- Device Lockdown: In addition to stopping malicious processes, devices can be locked down to prevent subsequent attempts of potentially malicious programs from running. This is particularly useful for devices running Windows 10, version 1709 or later, and is available if the organization uses Microsoft Defender Antivirus https://learn.microsoft.com/en-us/training/modules/perform-actions-device-microsoft-defender-for-endpoint/2-understand-device-actions .
- Reversibility: The restrictions applied to prevent applications from running can be reversed at any time. The device page will provide an option to “Remove app restrictions,” allowing administrators to lift the restrictions when necessary https://learn.microsoft.com/en-us/training/modules/perform-actions-device-microsoft-defender-for-endpoint/2-understand-device-actions .
- Action Center and Notifications: The Action center in Microsoft Defender provides information on actions taken, such as app restrictions, and the device timeline will record these events. When an app is restricted, users will receive a notification informing them of the restriction https://learn.microsoft.com/en-us/training/modules/perform-evidence-entities-investigations-microsoft-defender-for-endpoint/2-investigate-file .
Additional Information
For more details on implementing device-enforced restrictions, you can refer to the following resources:
- Windows Defender Application Control (WDAC) documentation
- Microsoft Defender Antivirus documentation
- Action Center in Microsoft Defender
By implementing these device-enforced restrictions, organizations can significantly reduce the risk of malicious activities on their devices, ensuring a more secure environment for their operations.
Implement authentication and access management (25–30%)
Plan, implement, and manage Microsoft Entra Conditional Access
Implementing Continuous Access Evaluation
Continuous Access Evaluation (CAE) is a security feature that enhances the control over access to corporate resources. It allows for real-time decisions on whether to grant or deny access based on certain risk factors or changes in user status. Here’s a detailed explanation of how CAE works and how it can be implemented:
Risk Assessment Integration: CAE is closely integrated with device risk assessment tools such as Microsoft Defender for Endpoint (MDE). MDE continuously monitors devices for potential threats and reports the risk status to Intune https://learn.microsoft.com/en-us/training/modules/introduction-microsoft-365-threat-protection/2-explore-extended-detection-response-use-cases .
Compliance Status Update: Once Intune receives a notification about a device’s risk status from MDE, it updates the compliance status of the device in Microsoft Entra Identity and Access Management (IAM) solutions, formerly known as Azure Active Directory (Azure AD) https://learn.microsoft.com/en-us/training/modules/introduction-microsoft-365-threat-protection/2-explore-extended-detection-response-use-cases .
Access Restriction: If a device is found to be at risk, CAE restricts the user’s access to corporate resources. This restriction is not only applied to new resource requests but also revokes any current sessions that support CAE, ensuring that compromised devices cannot access sensitive data https://learn.microsoft.com/en-us/training/modules/introduction-microsoft-365-threat-protection/2-explore-extended-detection-response-use-cases .
Continuous Evaluation: CAE continuously evaluates access permissions. If a user’s risk level changes or if they move to a non-compliant device, CAE can immediately enforce access policies to prevent unauthorized access https://learn.microsoft.com/en-us/training/modules/introduction-microsoft-365-threat-protection/2-explore-extended-detection-response-use-cases .
Non-Corporate Access: While CAE restricts access to corporate resources, users can still perform general internet activities that do not require corporate authentication. This ensures that productivity is not entirely halted due to compliance issues https://learn.microsoft.com/en-us/training/modules/introduction-microsoft-365-threat-protection/2-explore-extended-detection-response-use-cases .
Support for CAE: It’s important to note that not all resources may support CAE. Organizations should ensure that the resources they use are compatible with CAE to leverage its full potential.
For additional information on implementing continuous access evaluation and its integration with other Azure services, you can explore the following resources:
- Microsoft Defender for Endpoint (MDE) Documentation
- Microsoft Intune Documentation
- Microsoft Entra Documentation
Implementing CAE is a proactive step towards securing corporate resources and ensuring that access is granted based on the most current assessment of user and device risk. By integrating CAE with other security tools and services, organizations can create a robust security posture that adapts to emerging threats and maintains compliance with security policies.
Implement authentication and access management (25–30%)
Plan, implement, and manage Microsoft Entra Conditional Access
Create a Conditional Access Policy from a Template
Conditional Access policies in Azure Active Directory (Azure AD) are an essential tool for securing access to applications and services. They allow you to enforce controls on the access to your cloud apps based on specific conditions. To streamline the process of creating these policies, templates can be used as a starting point. Here’s how you can create a Conditional Access policy from a template:
Access Microsoft Defender for Cloud Apps: Begin by accessing Microsoft Defender for Cloud Apps. This is where you can manage and create session policies for applications like Microsoft Teams or Slack.
Select a Policy Template: Choose a predefined policy template that suits your scenario. For instance, if you want to block Instant Messaging (IM) messages containing sensitive content in Microsoft Teams, you would select the Block sending of messages based on real-time content inspection policy template https://learn.microsoft.com/en-us/training/modules/microsoft-cloud-app-security/conditional-access-app-control .
Configure the Session Policy:
- Under Activity source, select the application you want to apply the policy to, such as Send Teams message for Microsoft Teams.
- Enable Content Inspection and define what constitutes sensitive information. This could be a predefined expression, a custom expression, or a regular expression.
- Set the action to Block to prevent the message from being sent if it contains sensitive content. Additionally, configure alerts to notify administrators when such an incident occurs https://learn.microsoft.com/en-us/training/modules/microsoft-cloud-app-security/conditional-access-app-control .
Enable the Policy: Once the policy is configured, enable it to start protecting your environment. Users will receive a notification if they attempt to send a message that violates the policy.
For additional guidance on creating and managing Conditional Access policies, you can refer to the Azure AD Conditional Access documentation: Learn more about Azure AD Conditional Access https://learn.microsoft.com/security/benchmark/azure/baselines/azure-front-door-security-baseline .
Remember, the specific steps and configurations may vary depending on the template you choose and the unique requirements of your organization. Always review and test your Conditional Access policies to ensure they work as intended and provide the necessary level of security without hindering user productivity.
Implement authentication and access management (25–30%)
Manage risk by using Microsoft Entra ID Protection
Implement and Manage User Risk Policies
User risk policies are a critical component of Identity Protection in Azure Active Directory (Azure AD). They enable administrators to define how the system should respond when a user’s identity appears to be at risk of being compromised. Here’s a detailed explanation of how to implement and manage these policies:
Configuration of User Risk Policies
Access the Azure Portal: To configure user risk policies, you need to access the Azure portal and navigate to the Identity Protection section.
Define Policy Settings: Within the Identity Protection area, you can create a new user risk policy. You’ll need to specify:
- The users or group of users the policy will target.
- The conditions that trigger the policy, such as sign-in from an unfamiliar location or sign-in on a new device.
- The level of risk you want to address (e.g., low, medium, or high).
Determine the Response: Decide on the response that the policy should enforce when a risk is detected. Options include:
- Blocking access until an administrator unblocks the account.
- Allowing access only after the user has completed multi-factor authentication.
- Requiring the user to change their password through self-service password reset.
Policy Application: Apply the policy to the targeted users. Ensure that users are registered for self-service password reset before the policy is enforced https://learn.microsoft.com/en-us/training/modules/protect-identities-with-aad-idp/4-investigate-detected-risks https://learn.microsoft.com/en-us/training/modules/protect-identities-with-aad-idp/3-detect-risks-with-policies https://learn.microsoft.com/en-us/training/modules/protect-identities-with-aad-idp/3-detect-risks-with-policies .
Management of User Risk Policies
Monitor Policy Triggers: Regularly review the risk detections to understand the types of risks encountered and how the policies are responding.
Adjust Policy Thresholds: Based on the organization’s needs and the frequency of false positives, adjust the risk levels that trigger the policies. For example, setting the user risk policy threshold to ‘high’ may affect fewer users but could miss some risks https://learn.microsoft.com/en-us/training/modules/protect-identities-with-aad-idp/4-investigate-detected-risks .
Remediation Methods: Choose from different remediation methods such as self-remediation, manual password resets by admins, dismissing user risk detections, or closing individual detections to lower the overall risk score of a user’s account https://learn.microsoft.com/en-us/training/modules/protect-identities-with-aad-idp/4-investigate-detected-risks .
Policy Review and Update: Periodically review the policies to ensure they align with the current security posture of the organization. Update the policies as necessary to adapt to new threats or changes in user behavior.
For additional information on implementing and managing user risk policies, you can refer to the following resources:
- Identity Protection in Azure AD
- Configure User Risk Policies
- Azure AD Identity Protection Documentation
By following these steps and utilizing the resources provided, you can effectively implement and manage user risk policies to protect your organization’s identities.
Implement authentication and access management (25–30%)
Manage risk by using Microsoft Entra ID Protection
Implement and Manage Sign-In Risk Policies
Implementing and managing sign-in risk policies is a crucial aspect of safeguarding an organization’s identities against potential threats. Microsoft Entra Identity Protection provides a mechanism to assess the risk level of sign-in attempts and apply appropriate controls to mitigate these risks.
Sign-In Risk Policy Configuration
A sign-in risk policy evaluates each sign-in attempt and assigns a risk score, which reflects the likelihood that the sign-in is not being performed by the legitimate user. To configure a sign-in risk policy, you would typically follow these steps:
- Determine Acceptable Risk Levels: Decide on the threshold for risk levels (low, medium, or high) that your organization is willing to accept https://learn.microsoft.com/en-us/training/modules/protect-identities-with-aad-idp/3-detect-risks-with-policies .
- Set Up Policy Responses: Based on the chosen risk level, determine whether to allow access, require additional authentication, or block access. For instance, you might require multifactor authentication for medium-level risks or block sign-ins for high-level risks https://learn.microsoft.com/en-us/training/modules/protect-identities-with-aad-idp/3-detect-risks-with-policies .
- Configure Policy Settings: In the Azure portal, use a form to specify which users the policy targets, the conditions that trigger the policy, and the desired response to a detected risk https://learn.microsoft.com/en-us/training/modules/protect-identities-with-aad-idp/3-detect-risks-with-policies .
Risk Remediation Actions
Once a sign-in risk is identified, the user is prompted to take action to remediate the risk. They are informed about what triggered the risk and what is required to resolve the issue. For example, they might be asked to go through multifactor authentication https://learn.microsoft.com/en-us/training/modules/protect-identities-with-aad-idp/3-detect-risks-with-policies .
Policy Application
It is important to ensure that users are registered for Microsoft Entra multifactor authentication before applying a sign-in risk policy. This ensures that they can complete the necessary steps to remediate any detected risks https://learn.microsoft.com/en-us/training/modules/protect-identities-with-aad-idp/3-detect-risks-with-policies .
Additional Considerations
- User Notification: After a sign-in risk is detected, users should be notified and guided on how to address the risk https://learn.microsoft.com/en-us/training/modules/protect-identities-with-aad-idp/3-detect-risks-with-policies .
- Policy Monitoring: Regularly review the effectiveness of your sign-in risk policies and adjust them as needed to align with your organization’s evolving security posture https://learn.microsoft.com/en-us/training/modules/protect-identities-with-aad-idp/3-detect-risks-with-policies .
For more detailed information on configuring and managing sign-in risk policies, you can refer to the following resources:
By carefully implementing and managing sign-in risk policies, organizations can significantly enhance their security measures and protect against identity-based risks.
Implement authentication and access management (25–30%)
Manage risk by using Microsoft Entra ID Protection
Implement and Manage MFA Registration Policies
Multifactor Authentication (MFA) is a critical security measure that adds an additional layer of protection beyond just a username and password. When implementing MFA registration policies, it is essential to ensure that users are registered for MFA from the first time they use their account. This not only enhances security but also allows for the enforcement of sign-in risk policies, enabling users to self-remediate after a sign-in risk is detected https://learn.microsoft.com/en-us/training/modules/protect-identities-with-aad-idp/3-detect-risks-with-policies .
Configuration Steps:
Access the Azure Portal: Begin by signing into the Azure portal to configure an MFA registration policy.
Navigate to MFA Registration Policy: Locate the form to configure an MFA registration policy. This is typically found within the security or identity sections of the portal.
Specify Policy Details: Provide details about the policy, including which users it targets and whether the policy should be enabled or disabled.
Policy Enforcement: After configuration, the policy will prompt users to register for MFA upon their next sign-in. Users will see a notification asking them to complete the registration process.
Registration Period: Users must complete the MFA registration within 14 days. They have the option to skip this process during the sign-in for this period. However, after 14 days, completing the MFA registration is mandatory before they are allowed to sign in again https://learn.microsoft.com/en-us/training/modules/protect-identities-with-aad-idp/3-detect-risks-with-policies .
Additional Considerations:
User Experience: It is important to consider the user experience during the MFA registration process. Clear communication about the necessity of MFA and instructions on how to register can help ensure compliance and reduce user frustration.
Policy Updates: If there are changes in the organization’s security requirements or user base, the MFA registration policy may need to be updated. Regularly review and adjust the policy as needed.
Sign-In Risk Policies: Integrating MFA registration with sign-in risk policies can provide a more robust security posture. This integration allows for conditional access based on the risk level of a sign-in attempt.
For more detailed information and guidance on configuring MFA registration policies, please refer to the following resources:
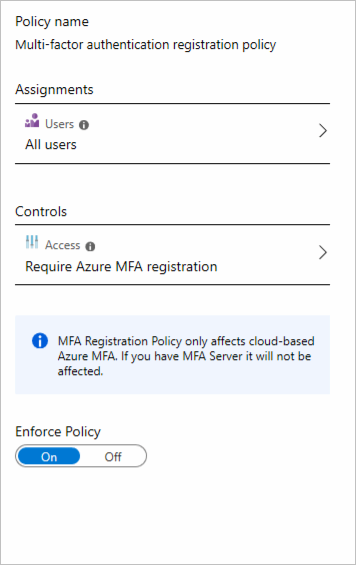
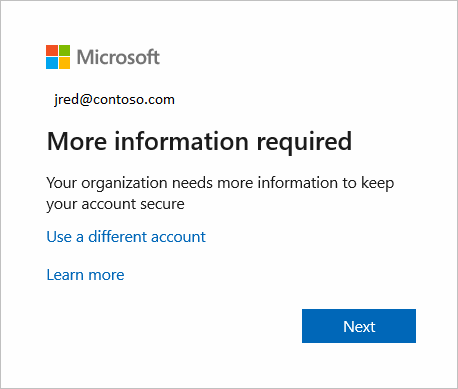
By following these steps and considerations, you can effectively implement and manage MFA registration policies to protect your organization’s identities and resources.
Implement authentication and access management (25–30%)
Manage risk by using Microsoft Entra ID Protection
Monitor, Investigate, and Remediate Risky Users
Monitoring, investigating, and remediating risky users are critical components of maintaining a secure and compliant IT environment. Here’s a detailed explanation of each step:
Monitoring Risky Users
Monitoring involves keeping a vigilant eye on user activities, especially when they sign in to applications. It’s important to log their actions within the session to identify any unusual or risky behavior. By doing so, you can gather data to understand the context of user actions and determine where to apply session policies effectively in the future https://learn.microsoft.com/en-us/training/modules/microsoft-cloud-app-security/conditional-access-app-control .
Investigating Risky Users
Investigation is the next step, where you delve into the reports provided by Identity Protection to understand the nature of the risks detected. These reports can include:
Risky Sign-ins Report: This report includes location details, device details, and information on sign-ins that have been confirmed as safe or have had their risks dismissed or remediated. It covers the last 30 days and allows admins to confirm the safety of sign-ins or recognize them as compromised https://learn.microsoft.com/en-us/training/modules/protect-identities-with-aad-idp/4-investigate-detected-risks .
Risky Users Report: This report lists users who are at risk and those with dismissed or remediated risks. It also provides a history of risky sign-ins for each user. There is no specific period covered for this report https://learn.microsoft.com/en-us/training/modules/protect-identities-with-aad-idp/4-investigate-detected-risks .
Risk Detection Type Reports: These reports combine information about risky user detections and sign-in detections, helping you see how different risk types are related and take appropriate action https://learn.microsoft.com/en-us/training/modules/protect-identities-with-aad-idp/4-investigate-detected-risks .
You can view and download all these reports from the Azure portal.
Remediating Risky Users
Remediation involves taking action to address the risks identified during the monitoring and investigation phases. Actions can include:
- Resetting user passwords to ensure account security.
- Dismissing user risk if the activity identified as risky is found to be a false positive.
- Blocking user sign-ins if the risk is confirmed and poses a threat to the organization.
- Confirming user accounts as compromised if there is sufficient evidence of malicious activity https://learn.microsoft.com/en-us/training/modules/protect-identities-with-aad-idp/4-investigate-detected-risks https://learn.microsoft.com/en-us/training/modules/protect-identities-with-aad-idp/4-investigate-detected-risks .
In some cases, if a user account is blocked due to risky behavior, the admin can unblock the account by resetting the password or dismissing the risky activity. If a policy is causing widespread issues, it may be necessary to disable the policy altogether https://learn.microsoft.com/en-us/training/modules/protect-identities-with-aad-idp/4-investigate-detected-risks .
For additional information on monitoring and diagnostics best practices, refer to the monitoring and diagnostics best practices. To monitor your live web application and automatically detect performance anomalies, consider using Azure Application Insights, an extensible application performance management service https://learn.microsoft.com/en-us/azure/ddos-protection/ddos-response-strategy .
By following these steps to monitor, investigate, and remediate risky users, you can enhance your organization’s security posture and protect against identity-based threats.
Implement authentication and access management (25–30%)
Manage risk by using Microsoft Entra ID Protection
Monitor, Investigate, and Remediate Risky Workload Identities
When managing workload identities, it is crucial to have a robust system in place to monitor, investigate, and remediate any risky identities to ensure the security of your services and resources. Here’s a detailed explanation of how to approach this:
Monitoring Risky Workload Identities
Monitoring involves the continuous observation of workload identities to detect any unusual or risky behavior. Microsoft Entra Workload Identity in Azure Kubernetes Service (AKS) allows you to assign identities to software workloads, which can then be used to authenticate and access other Azure services and resources https://learn.microsoft.com/en-us/azure/application-gateway/ingress-controller-install-existing .
To monitor these identities effectively:
Enable Identity Protection Reports: Utilize Identity Protection reports to keep track of identity-based risks detected within your organization. These reports provide details on risky sign-ins and users, including location and device details, and can cover the last 30 days of activity https://learn.microsoft.com/en-us/training/modules/protect-identities-with-aad-idp/4-investigate-detected-risks .
Use Risk Detection Type Reports: These reports combine information about risky user detections and sign-in detections, helping you understand the relationship between different risk types and take appropriate action https://learn.microsoft.com/en-us/training/modules/protect-identities-with-aad-idp/4-investigate-detected-risks .
Access Reports from Azure Portal: All reports can be viewed and downloaded from the Azure portal for further analysis https://learn.microsoft.com/en-us/training/modules/protect-identities-with-aad-idp/4-investigate-detected-risks .
Investigating Risky Workload Identities
Investigation is the process of examining the detected risks to understand their nature and potential impact. When a risky workload identity is detected:
Review Risky Sign-ins and Users: Check the reports for any sign-ins or users that have been flagged as risky. Look into their history of risky sign-ins and the actions that have been taken so far https://learn.microsoft.com/en-us/training/modules/protect-identities-with-aad-idp/4-investigate-detected-risks .
Analyze User Behavior: Monitor user sessions to investigate and analyze behavior, which can inform future session policies https://learn.microsoft.com/en-us/training/modules/microsoft-cloud-app-security/conditional-access-app-control .
Remediating Risky Workload Identities
Remediation involves taking action to resolve the risks associated with workload identities. Depending on the findings from your investigation, you may need to:
Reset Passwords: If a user account is compromised, reset the user’s password to prevent further unauthorized access https://learn.microsoft.com/en-us/training/modules/protect-identities-with-aad-idp/4-investigate-detected-risks .
Dismiss or Confirm Risks: For risks that have been investigated and found to be false positives, dismiss them. If the risks are confirmed, take appropriate action such as blocking user sign-ins or confirming that accounts are compromised https://learn.microsoft.com/en-us/training/modules/protect-identities-with-aad-idp/4-investigate-detected-risks .
Adjust Risk Policies: Based on the investigation, adjust your risk policies to better detect and prevent similar risks in the future https://learn.microsoft.com/en-us/training/modules/protect-identities-with-aad-idp/1-introduction .
Use Azure CLI for Role Assignments: Ensure that the workload identities have the correct permissions and that any unnecessary permissions are revoked to minimize the risk of exploitation. Use Azure CLI commands to manage role assignments for workload identities https://learn.microsoft.com/en-us/azure/application-gateway/ingress-controller-install-existing https://learn.microsoft.com/en-us/azure/azure-app-configuration/reference-kubernetes-provider .
For additional information and guidance on managing workload identities and implementing security measures, you can refer to the following resources:
- Identity Protection and Risky Sign-ins Report: Identity Protection Reports
- Microsoft Entra Workload Identity Overview: Workload Identity in AKS
- Azure CLI Documentation for Identity and Access Management: Azure CLI - Identity
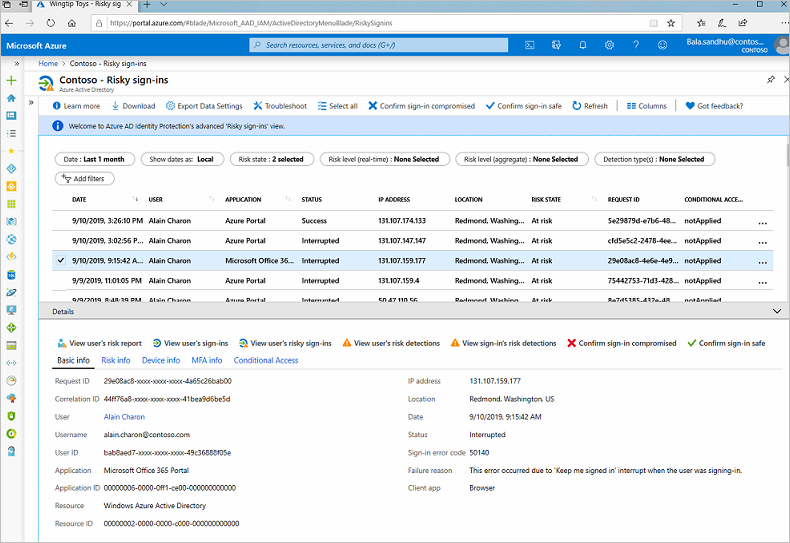
By following these steps and utilizing the provided resources, you can ensure that your workload identities are monitored, investigated, and remediated effectively, maintaining a secure environment for your Azure resources.
Implement authentication and access management (25–30%)
Implement access management for Azure resources by using Azure roles
Custom Azure Roles: Control Plane and Data Plane Permissions
Azure Role-Based Access Control (Azure RBAC) is a system that provides fine-grained access management for Azure resources. It allows you to create custom roles with specific permissions tailored to your organization’s needs, encompassing both control plane and data plane actions.
Control Plane Permissions
Control plane actions refer to operations that affect the Azure resource itself, such as creating, configuring, or deleting resources. These actions are typically managed through the Azure portal, Azure CLI, or Azure PowerShell.
To create custom roles for control plane permissions:
Identify the Actions: Determine the specific Azure resource actions that the role needs to perform. Actions are typically in the format of
Microsoft.ServiceName/resourceType/action.Define the Role: Create a JSON file that defines the role, including the role’s name, description, and the actions it allows. The JSON structure also includes
NotActionsfor explicitly denying certain actions andDataActionsfor data plane permissions.Create the Role: Use Azure PowerShell, Azure CLI, or the Azure portal to create the role in Azure AD from the JSON definition.
Data Plane Permissions
Data plane actions involve operations that are performed within the service itself, such as reading from a database or sending messages to a queue. These actions are service-specific and are not managed at the Azure resource level.
To include data plane permissions in a custom role:
Identify the Data Actions: Similar to control plane actions, you need to specify the data actions that the role should permit. These are specified in the
DataActionssection of the role definition.Update the Role Definition: Add the identified
DataActionsto the custom role JSON file. Ensure that the actions align with the service’s data plane operations you wish to manage.Deploy the Role: Use the same method as for control plane permissions to create the role with data plane permissions included.
Example Role Definition
Below is an example snippet of a custom role definition JSON that includes both control plane and data plane permissions:
{
  "Name": "Custom Role Example",
  "Id": "00000000-0000-0000-0000-000000000000",
  "IsCustom": true,
  "Description": "Allows for specific control and data plane operations.",
  "Actions": [
    "Microsoft.Compute/virtualMachines/start/action",
    "Microsoft.Compute/virtualMachines/restart/action"
  ],
  "NotActions": [],
  "DataActions": [
    "Microsoft.Storage/storageAccounts/blobServices/containers/blobs/read",
    "Microsoft.Storage/storageAccounts/blobServices/containers/blobs/write"
  ],
  "NotDataActions": [],
  "AssignableScopes": ["/subscriptions/00000000-0000-0000-0000-000000000000"]
}
Additional Resources
For more information on Azure RBAC and creating custom roles, you can refer to the following resources:
- Azure RBAC Overview: [Learn more] https://learn.microsoft.com/security/benchmark/azure/baselines/azure-front-door-security-baseline .
- Built-in Roles and Permissions: [Network Contributor] https://learn.microsoft.com/en-us/azure/ddos-protection/manage-ddos-ip-protection-portal , Custom Roles https://learn.microsoft.com/en-us/azure/ddos-protection/manage-ddos-protection .
- Managing Permissions for DDoS Protection Plans: [Permissions] https://learn.microsoft.com/en-us/azure/ddos-protection/manage-permissions .
- Azure RBAC Roles - CDN: [CDN Endpoint Contributor] https://learn.microsoft.com/security/benchmark/azure/baselines/content-delivery-network-security-baseline .
By understanding and utilizing Azure RBAC, you can create custom roles that precisely match the security and access requirements of your organization, ensuring that users have only the permissions they need to perform their tasks.
https://learn.microsoft.com/security/benchmark/azure/baselines/azure-front-door-security-baseline : https://learn.microsoft.com/en-us/azure/role-based-access-control/overview https://learn.microsoft.com/en-us/azure/ddos-protection/manage-ddos-ip-protection-portal : https://learn.microsoft.com/en-us/azure/role-based-access-control/built-in-roles?toc=/azure/virtual-network/toc.json#network-contributor https://learn.microsoft.com/en-us/azure/ddos-protection/manage-ddos-protection : https://learn.microsoft.com/en-us/azure/role-based-access-control/custom-roles?toc=/azure/virtual-network/toc.json https://learn.microsoft.com/en-us/azure/ddos-protection/manage-permissions : https://learn.microsoft.com/en-us/azure/ddos-protection/manage-permissions https://learn.microsoft.com/security/benchmark/azure/baselines/content-delivery-network-security-baseline : https://learn.microsoft.com/en-us/azure/role-based-access-control/built-in-roles#cdn-endpoint-contributor
Implement authentication and access management (25–30%)
Implement access management for Azure resources by using Azure roles
Assign Built-in and Custom Azure Roles
Azure Role-Based Access Control (Azure RBAC) is a system that provides fine-grained access management for Azure resources. It allows you to define who has access to Azure resources, what they can do with those resources, and what areas they have access to.
Built-in Azure Roles
Azure provides a set of built-in roles that can be assigned to users, groups, service principals, and managed identities. These roles are designed to cover most common scenarios and are available across all Azure services. For example, Microsoft Sentinel uses Azure RBAC to provide built-in roles that can be assigned within the security operations team to grant appropriate access to Microsoft Sentinel resources https://learn.microsoft.com/en-us/training/modules/create-manage-azure-sentinel-workspaces/5-understand-azure-sentinel-permissions-roles .
Built-in roles can be assigned at various scopes, including the management group, subscription, resource group, and individual resource levels. This allows for flexibility in granting users the minimum level of access they need to perform their tasks.
Custom Azure Roles
In cases where the built-in roles do not meet the specific needs of your organization, Azure allows you to create custom roles https://learn.microsoft.com/en-us/training/modules/create-manage-azure-sentinel-workspaces/5-understand-azure-sentinel-permissions-roles . Custom roles can include any combination of permissions that are tailored to the unique requirements of your organization. These roles can then be assigned at the same scopes as built-in roles.
Assigning Roles
To assign a role, you can follow these general steps, which are exemplified by assigning the App Configuration Data Reader role to an App Service https://learn.microsoft.com/en-us/azure/azure-app-configuration/howto-integrate-azure-managed-service-identity :
- Navigate to the Azure portal and select the resource you wish to assign the role to.
- Access the Access control (IAM) section of the resource.
- Click on Add > Add role assignment.
- Choose the role you wish to assign, such as the App Configuration Data Reader role.
- On the Members tab, select the type of member (e.g., user, group, service principal) and then select the specific members to assign the role to.
- Review the assignment and confirm by selecting Review + assign.
It is important to note that if you do not have permission to assign roles, the Add role assignment option will be disabled.
Configuration Guidance
When configuring Azure RBAC, it is recommended to use built-in role assignments to manage access to Azure resources. If necessary, you can create custom roles to provide more specific access control tailored to your organization’s needs https://learn.microsoft.com/security/benchmark/azure/baselines/content-delivery-network-security-baseline .
Additional Resources
For more detailed guidance on assigning Azure roles using the Azure portal, you can refer to the official documentation: Assign Azure roles using the Azure portal https://learn.microsoft.com/en-us/azure/azure-app-configuration/howto-integrate-azure-managed-service-identity .
To understand the permissions required for managing Azure resources, you can review the how-to guide on Permissions https://learn.microsoft.com/en-us/azure/ddos-protection/manage-ddos-ip-protection-portal .
For a comprehensive list of Azure built-in roles and their descriptions, visit Azure built-in roles https://learn.microsoft.com/security/benchmark/azure/baselines/content-delivery-network-security-baseline .
To learn about creating and managing custom roles in Azure, refer to Custom roles in Azure RBAC https://learn.microsoft.com/en-us/training/modules/create-manage-azure-sentinel-workspaces/5-understand-azure-sentinel-permissions-roles .
By understanding and utilizing Azure RBAC, you can ensure that individuals and services have the appropriate level of access to Azure resources, enhancing the security and management of your Azure environment.
Implement authentication and access management (25–30%)
Implement access management for Azure resources by using Azure roles
Evaluating Effective Permissions for a Set of Azure Roles
When evaluating effective permissions for a set of Azure roles, it is essential to understand the concept of Azure Role-Based Access Control (RBAC). Azure RBAC is a system that provides fine-grained access management for Azure resources, allowing users to have access only to the resources they need to work with, following the principle of least privilege.
To evaluate effective permissions:
Identify the Azure Roles: Determine which Azure roles are relevant to the resources you are working with. Common built-in roles include Owner, Contributor, and Reader, each providing different levels of access https://learn.microsoft.com/en-us/azure/azure-app-configuration/howto-disable-access-key-authentication .
Check Role Assignments: Role assignments define what resources a user, group, or service principal can access and what they can do with those resources. You can list role assignments using the Azure portal or Azure CLI https://learn.microsoft.com/en-us/azure/application-gateway/configuration-infrastructure .
Understand Role Definitions: Each role has a set of permissions defined in a role definition. These permissions are specified as actions (allowed operations) or notActions (excluded operations). Review the role definition to understand the effective permissions.
Evaluate Role Scope: The scope of a role assignment can be a subscription, a resource group, or a single resource. Permissions are inherited from higher scopes. For example, a Contributor role assigned at the subscription level applies to all resource groups and resources within that subscription https://learn.microsoft.com/en-us/azure/azure-app-configuration/howto-disable-access-key-authentication .
Consider Multiple Role Assignments: A user can have multiple role assignments that may overlap. Azure RBAC evaluates role assignments to calculate effective permissions, considering all assigned roles.
Check Access for Specific Actions: Some roles include permissions to perform specific actions, such as
Microsoft.Network/virtualNetworks/subnets/join/action, which is necessary for managing Application Gateways within a virtual network https://learn.microsoft.com/en-us/azure/application-gateway/configuration-infrastructure .Use Access Control (IAM) Tools: The Azure portal provides Access Control (IAM) tools where you can add role assignments, view the roles assigned to a user, and check access to resources https://techcommunity.microsoft.com/t5/azure-network-security-blog/backup-azure-firewall-and-azure-firewall-policy-with-logic-apps/ba-p/3613928 .
Verify Permissions: Use the Azure portal’s “Check Access” feature to verify the effective permissions of a user or service principal for a particular Azure resource https://learn.microsoft.com/en-us/azure/confidential-ledger/quickstart-portal .
Refresh Permissions: After making role assignment changes, allow time for the Azure Resource Manager cache to refresh to ensure that the changes are detected and effective https://learn.microsoft.com/en-us/azure/application-gateway/configuration-infrastructure .
For additional information on managing access with Azure RBAC, you can refer to the following resources:
- Azure RBAC documentation
- Understand role definitions in Azure RBAC
- List role assignments using the Azure portal
- Best practices for Azure RBAC
- Check access to Azure resources
By following these steps and utilizing the provided resources, you can effectively evaluate the permissions for a set of Azure roles and ensure that users have the appropriate access to perform their tasks securely and efficiently.
Implement authentication and access management (25–30%)
Implement access management for Azure resources by using Azure roles
Assigning Azure Roles for Microsoft Entra ID Login to Azure Virtual Machines
To enable Microsoft Entra ID login to Azure virtual machines, it is essential to understand the role-based access control (RBAC) provided by Azure. RBAC is a method that provides fine-grained access management for Azure resources, including virtual machines. Here’s a step-by-step guide on how to assign Azure roles for this purpose:
- Authenticate the Security Principal:
- The first step is to authenticate the identity of the security principal, which could be a user, a managed identity, or an application service principal https://learn.microsoft.com/en-us/azure/azure-app-configuration/concept-enable-rbac .
- Authentication is done by obtaining an OAuth 2.0 token from
https://login.microsoftonline.com/{tenantID}, where{tenantID}is the Microsoft Entra tenant ID to which the service principal belongs https://learn.microsoft.com/en-us/azure/azure-app-configuration/concept-enable-rbac .
- Authorize Access to the Virtual Machine:
- Once authenticated, the token is used to authorize access to the Azure virtual machine https://learn.microsoft.com/en-us/azure/azure-app-configuration/concept-enable-rbac .
- Authorization is based on the Azure roles assigned to the security principal https://learn.microsoft.com/en-us/azure/azure-app-configuration/concept-enable-rbac .
- Assign Azure Roles:
- Azure roles can be assigned to a Microsoft Entra security principal to grant access to Azure resources, scoped to the App Configuration resource https://learn.microsoft.com/en-us/azure/azure-app-configuration/concept-enable-rbac .
- These roles determine the permissions that the security principal has over the Azure virtual machine https://learn.microsoft.com/en-us/azure/azure-app-configuration/concept-enable-rbac .
- Manage Azure Roles:
- To manage roles and role assignments, you can refer to the documentation on Understanding different roles https://learn.microsoft.com/en-us/azure/azure-app-configuration/concept-enable-rbac .
- Azure provides built-in roles for App Configuration resources, and these roles can be assigned to security principals to define their permissions https://learn.microsoft.com/en-us/azure/azure-app-configuration/concept-enable-rbac .
- Use Managed Identities:
- If an application is running within an Azure entity, such as an Azure Functions app, an Azure Web App, or an Azure VM, it can use a managed identity to access resources https://learn.microsoft.com/en-us/azure/azure-app-configuration/concept-enable-rbac .
- To authenticate requests made by a managed identity to Azure App Configuration, see Authenticate access to Azure App Configuration resources with Microsoft Entra ID and managed identities for Azure Resources https://learn.microsoft.com/en-us/azure/azure-app-configuration/concept-enable-rbac .
By following these steps, you can assign the appropriate Azure roles to enable Microsoft Entra ID login to Azure virtual machines, ensuring that only authorized security principals can access and manage these resources. This process is crucial for maintaining security and compliance within your Azure environment.
Implement authentication and access management (25–30%)
Implement access management for Azure resources by using Azure roles
Configure Azure Key Vault Role-Based Access Control (RBAC) and Access Policies
Azure Key Vault is a secure and convenient way to store and manage sensitive information such as secrets, keys, and certificates. When setting up access control for Azure Key Vault, you have two primary methods to manage permissions: Role-Based Access Control (RBAC) and Access Policies.
Role-Based Access Control (RBAC)
RBAC is a method of restricting system access to authorized users. It is one of the main methods for advanced access control to Azure resources, including Azure Key Vault. RBAC allows you to grant access at different scopes, such as the management group, subscription, resource group, or individual resource level.
To configure RBAC for Azure Key Vault:
- Navigate to the Azure portal and select the Key Vault you wish to configure.
- Open the Access Control (IAM) blade to manage permissions.
- Click on Add role assignment to open the role assignment settings.
- Select the role you wish to assign, such as Key Vault Secrets User.
- Assign access to the role by selecting Managed identity.
- Choose the managed identity associated with the service that needs access to the Key Vault.
- Review and confirm the assignment by clicking Review + assign https://learn.microsoft.com/en-us/azure/application-gateway/application-gateway-key-vault-common-errors .
For more detailed guidance on RBAC in Key Vault, refer to the Azure role-based access control in Key Vault documentation.
Access Policies
Access policies are the legacy way to manage permissions in Azure Key Vault. They provide fine-grained access control over the vault’s secrets, keys, and certificates.
To configure access policies for Azure Key Vault:
- In the Azure portal, go to your Key Vault.
- Select the Access Policies blade.
- Click on + Add Access Policy.
- Choose the permissions you want to grant, such as Get for secret permissions.
- Select the principal (user, group, or application) that will receive the permissions.
- Save the changes to apply the access policy https://learn.microsoft.com/en-us/azure/application-gateway/key-vault-certs .
It’s important to note that Azure RBAC does not currently support authorization for certain actions, and you may need to use the access policy model instead. For example, adding a new key vault-based certificate is not supported through the portal when using Azure RBAC, and you would need to use an ARM template, CLI, or PowerShell https://learn.microsoft.com/en-us/azure/application-gateway/application-gateway-key-vault-common-errors .
For a comparison of Azure RBAC and access policies, you can visit Azure role-based access control (Azure RBAC) vs. access policy.
Additional Considerations
- When integrating services like Azure Front Door or Azure Firewall Premium with Key Vault, you may need to configure additional settings such as network firewall rules or managed identities https://learn.microsoft.com/en-us/azure/frontdoor/managed-identity https://learn.microsoft.com/en-us/azure/firewall/premium-certificates https://learn.microsoft.com/en-us/azure/frontdoor/domain .
- Ensure that any certificates imported into Key Vault are trusted by your Azure workload and that you configure alerts for certificate expiration dates https://learn.microsoft.com/en-us/azure/firewall/premium-certificates .
- If your Key Vault has network restrictions, configure it to allow trusted Microsoft services to bypass the firewall https://learn.microsoft.com/en-us/azure/frontdoor/domain .
By carefully configuring RBAC and access policies, you can ensure that only authorized users and services have access to your Azure Key Vault, thereby maintaining the security and integrity of your sensitive data.
Plan and implement workload identities (20–25%)
Plan and implement identities for applications and Azure workloads
When selecting appropriate identities for applications and Azure workloads, it is crucial to understand the different types of identities available and their use cases. Here is a detailed explanation of the various identities:
Managed Identities
Managed identities provide an identity for applications to use when connecting to resources that support Azure Active Directory (Azure AD) authentication. They eliminate the need for developers to manage credentials. Managed identities are automatically managed by Azure and are best used with Azure services like Azure App Service, Azure Functions, Azure Kubernetes Service (AKS), Azure Virtual Machines, and more https://learn.microsoft.com/en-us/azure/azure-app-configuration/howto-integrate-azure-managed-service-identity .
Advantages: - No credentials are placed in the code or configuration files. - Credentials are automatically rotated by Azure. - Managed identities can be used without additional cost.
Use Cases: - Accessing Azure services that support Azure AD authentication without managing credentials. - Simplifying secret management for cloud applications.
Service Principals
A service principal is an identity created for use with applications, hosted services, and automated tools to access Azure resources. This allows Azure services to authenticate with Azure AD to gain access to resources.
Advantages: - Provides an identity for applications to use when interacting with Azure resources. - Allows for fine-grained access control using Azure role-based access control (RBAC).
Use Cases: - When an application needs to access or modify resources in Azure. - For automating deployment and management tasks in Azure.
User Accounts
User accounts represent an individual in Azure AD and are used for human users. They can be used for interactive sign-in by a person.
Advantages: - Tied to an individual, which can be useful for auditing and tracking activities. - Can be assigned permissions directly or through group membership.
Use Cases: - Interactive sign-in for users to access Azure services and applications. - Personalized access to resources based on user identity.
Managed Service Accounts
Managed service accounts are domain accounts created in Active Directory that provide automatic password management and simplified service principal name (SPN) management.
Advantages: - Automatic password management handled by the Windows operating system. - No need to manually administer SPNs for services.
Use Cases: - Running Windows services with a domain identity without the need for manual password management.
When selecting identities for applications and Azure workloads, consider the following: - The level of access required by the application or service. - Whether the identity is for a human user or an application/service. - The need for automated credential rotation and management. - The environment in which the application or service is running (e.g., Azure, on-premises).
For additional information on managed identities and how to implement them, you can refer to the following URLs: - [Managed identities for Azure resources overview] https://learn.microsoft.com/en-us/azure/azure-app-configuration/howto-integrate-azure-managed-service-identity - [Use a managed identity to access Azure App Configuration] https://learn.microsoft.com/en-us/azure/azure-app-configuration/howto-integrate-azure-managed-service-identity - [What are managed identities for Azure resources?] https://learn.microsoft.com/en-us/azure/frontdoor/migrate-tier
For more details on service principals and how to create and manage them, you can visit: - [Create a user-assigned identity] https://learn.microsoft.com/en-us/azure/frontdoor/migrate-tier
For information on assigning roles such as
Storage Blob Data Owner for managed applications, refer to:
- [Azure role assignment create] https://learn.microsoft.com/en-us/azure/confidential-ledger/create-blob-managed-app
For understanding how to register applications with Microsoft identity platform, you can check: - [Register an application with the Microsoft identity platform] https://learn.microsoft.com/en-us/azure/confidential-ledger/register-application
Please note that managed identity cannot be used to authenticate locally running applications; it is intended for applications deployed to Azure services https://learn.microsoft.com/en-us/azure/azure-app-configuration/howto-integrate-azure-managed-service-identity .
https://learn.microsoft.com/en-us/azure/azure-app-configuration/howto-integrate-azure-managed-service-identity
:
https://learn.microsoft.com/en-us/azure/active-directory/managed-identities-azure-resources/overview
https://learn.microsoft.com/en-us/azure/frontdoor/migrate-tier
:
 https://learn.microsoft.com/en-us/azure/confidential-ledger/create-blob-managed-app
:
https://learn.microsoft.com/en-us/azure/confidential-ledger/create-blob-managed-app
:
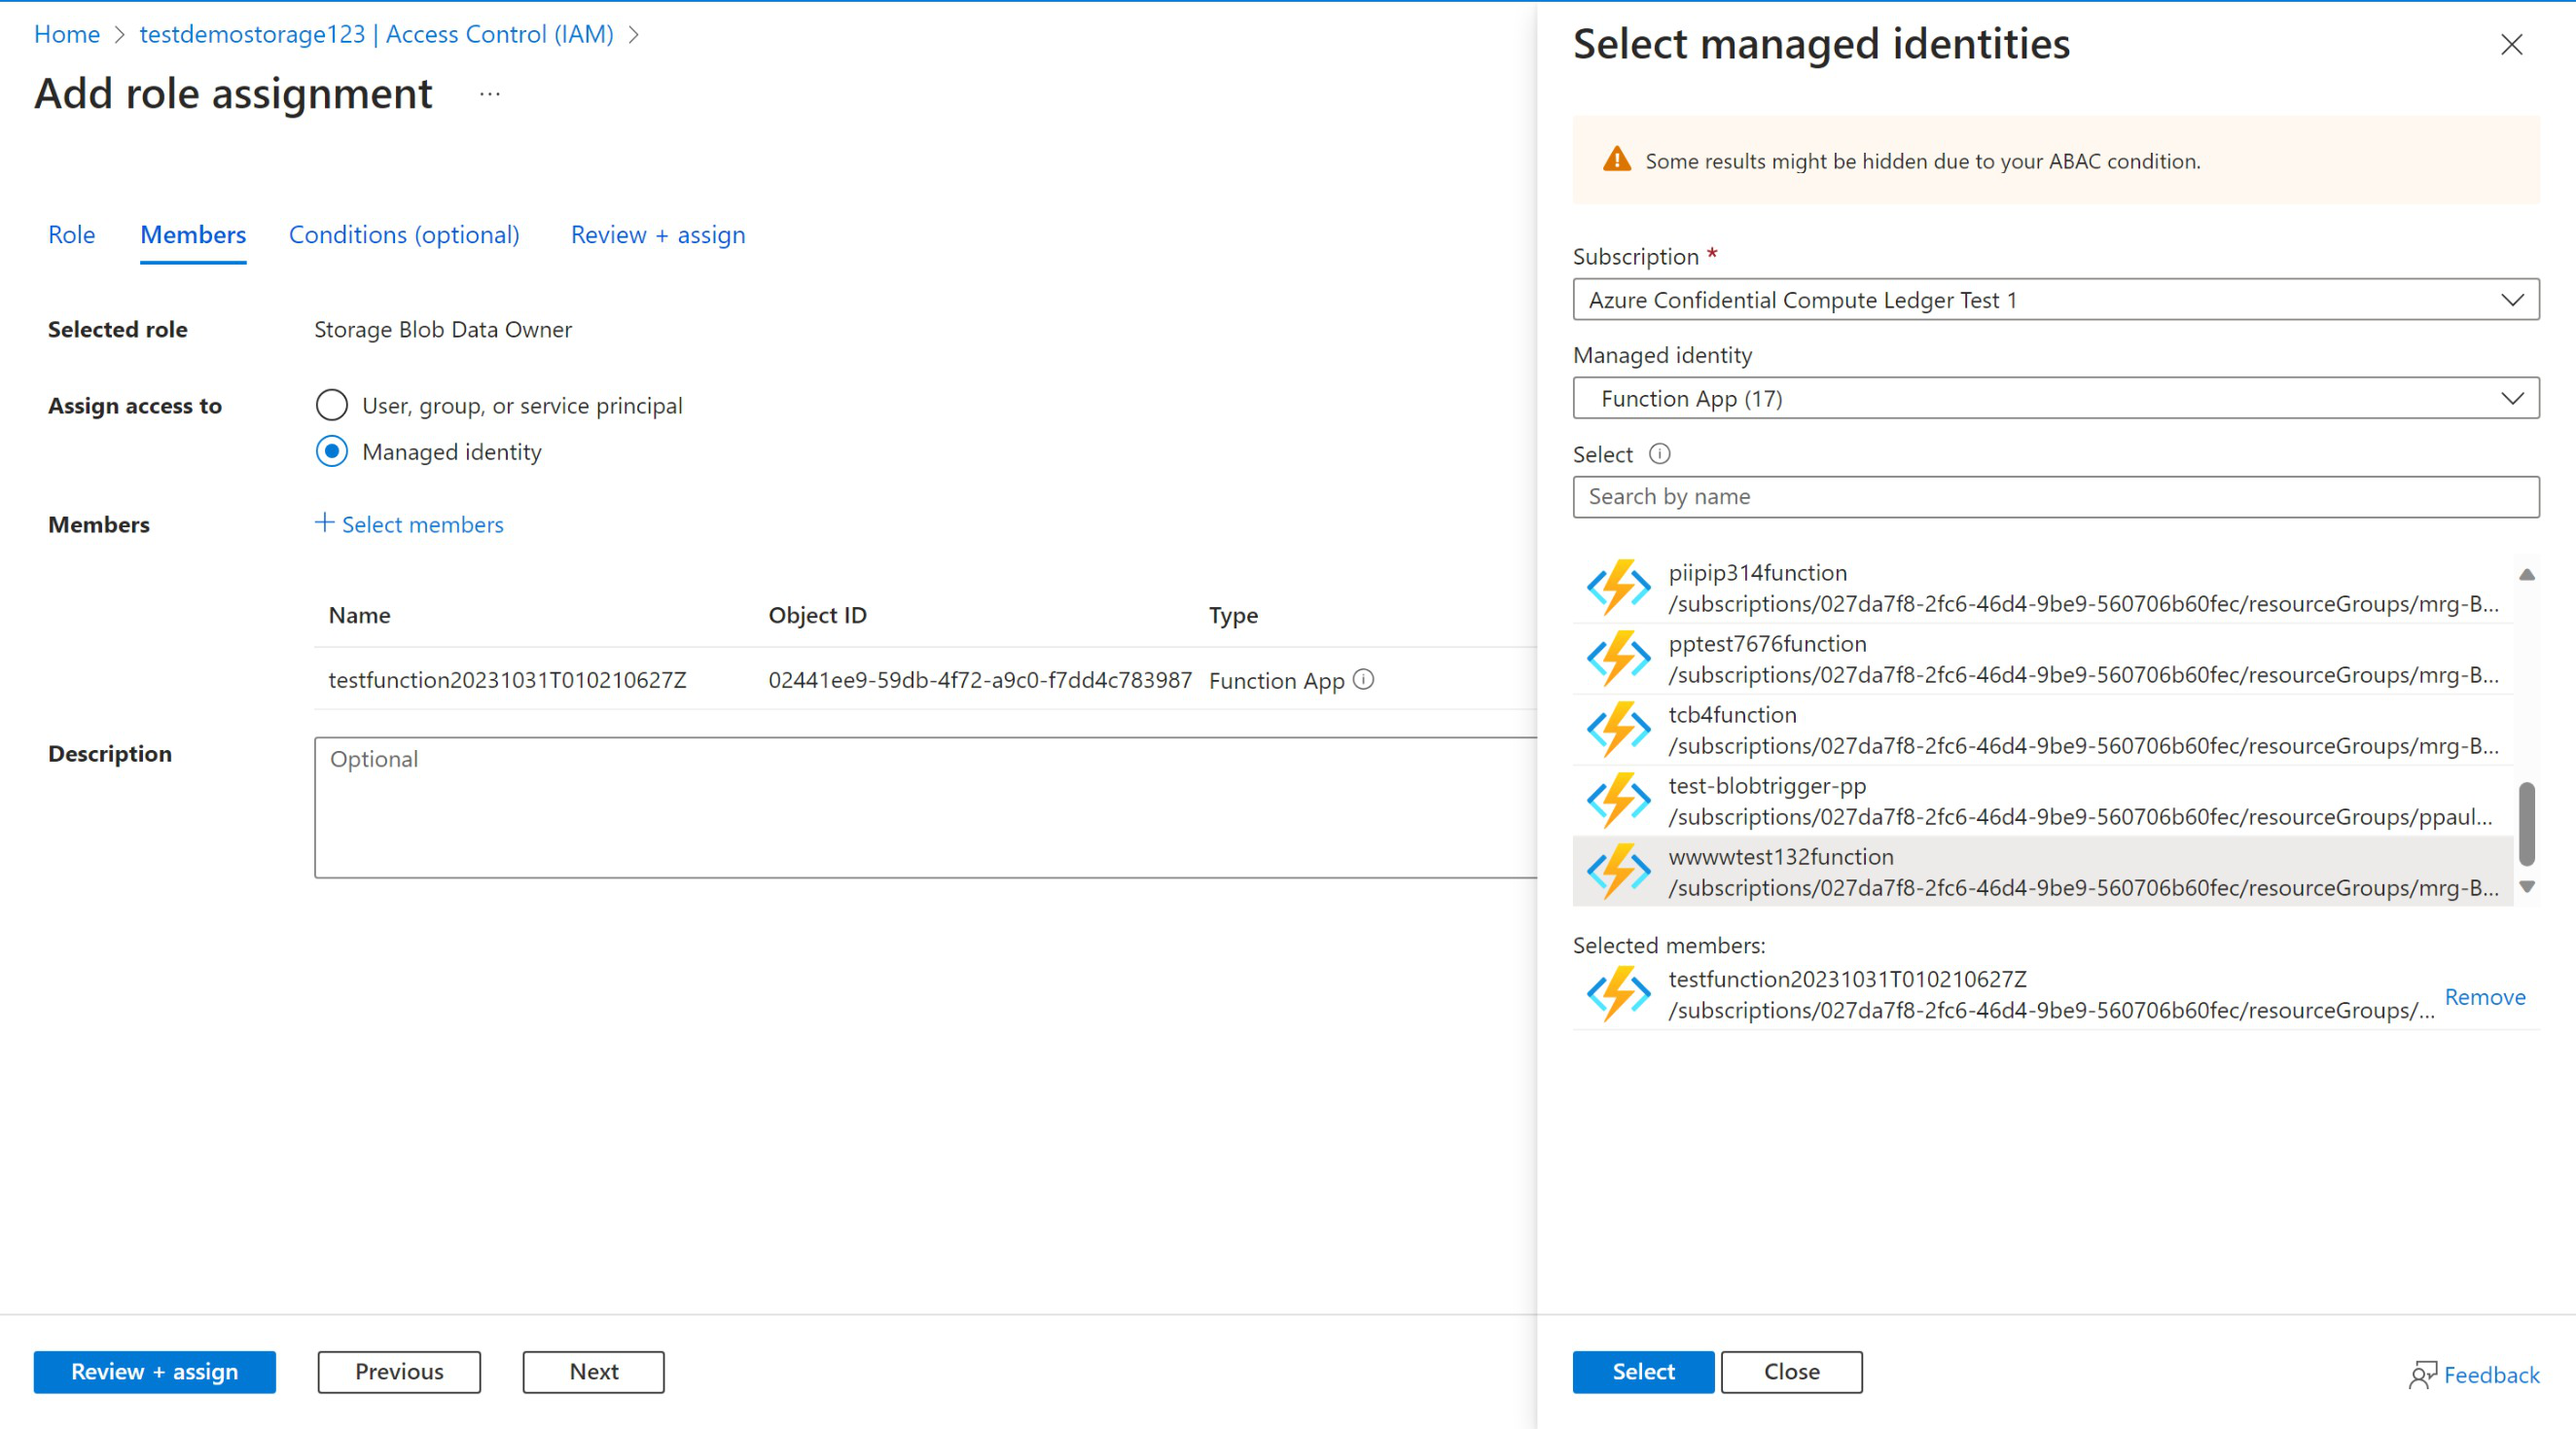 https://learn.microsoft.com/en-us/azure/confidential-ledger/register-application
:
https://learn.microsoft.com/en-us/azure/confidential-ledger/register-application
:
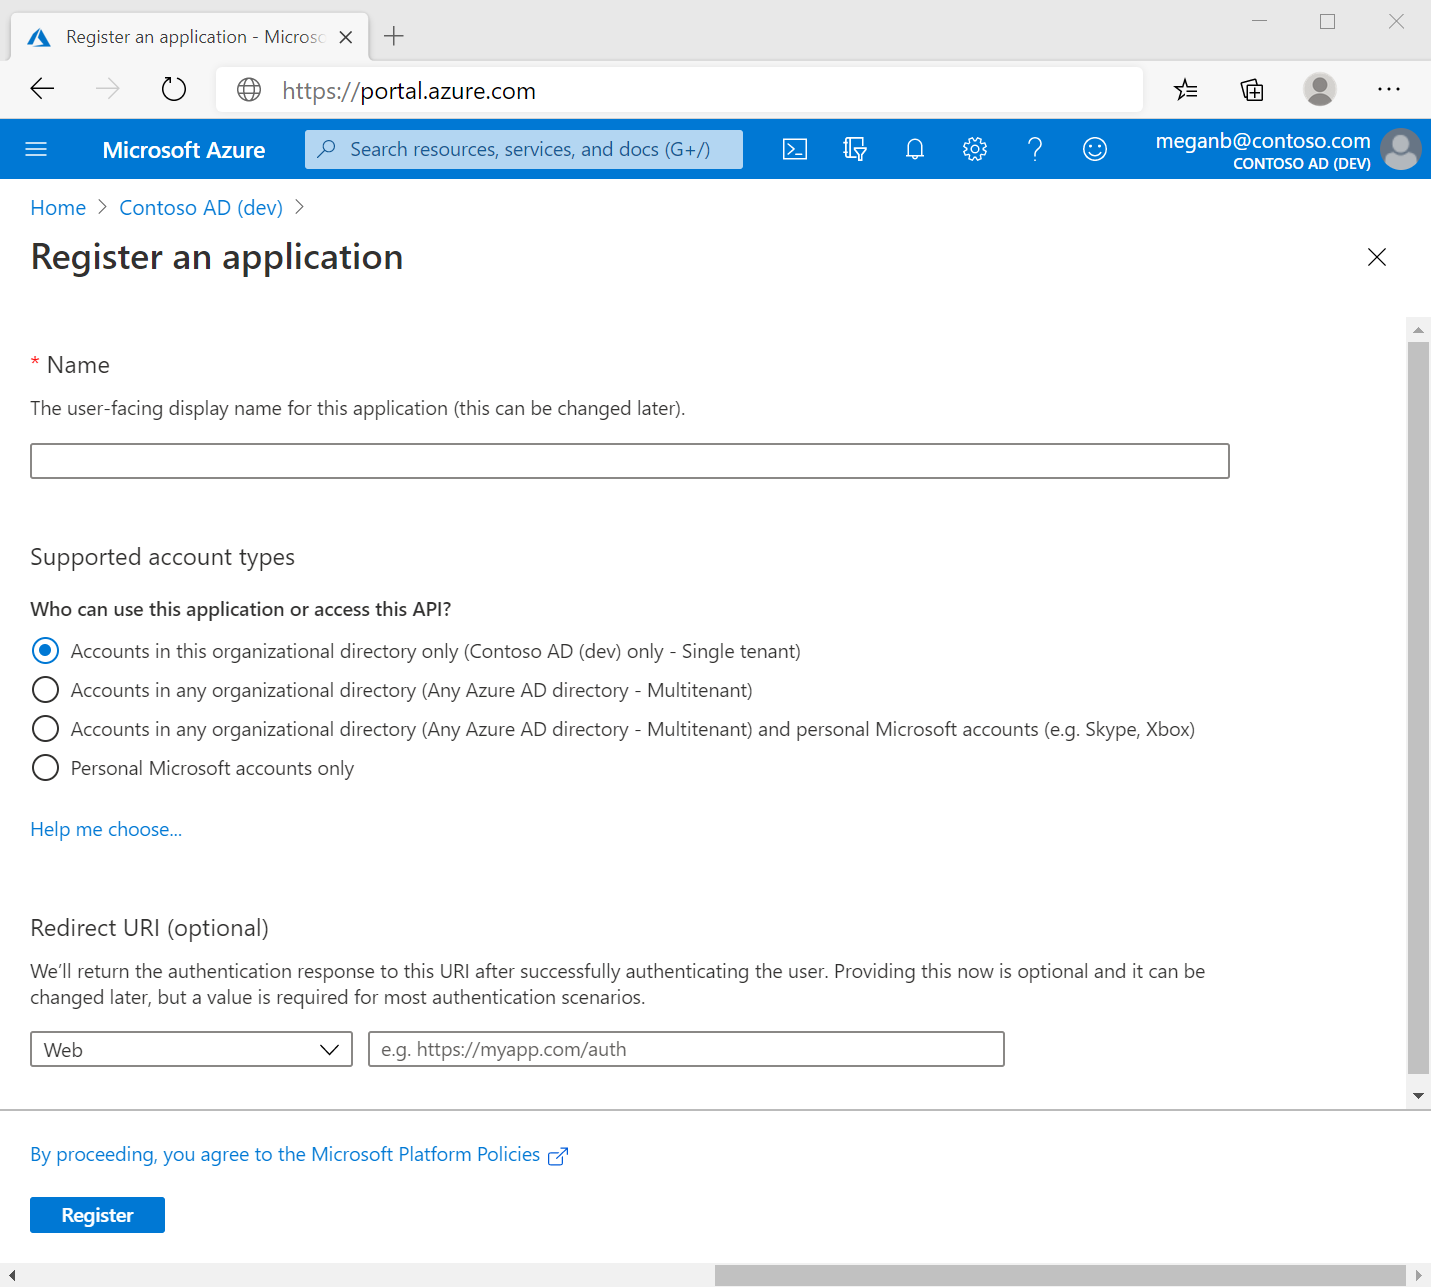
Plan and implement workload identities (20–25%)
Plan and implement identities for applications and Azure workloads
Create Managed Identities
Managed identities in Azure are a feature of Microsoft Entra that allow Azure services to authenticate to other Azure services that support Azure Active Directory (AAD) authentication. Managed identities eliminate the need for developers to manage credentials. Instead, Azure takes care of the identity management for the services.
Types of Managed Identities
There are two types of managed identities that can be used with Azure services:
System-Assigned Managed Identity: This is an identity that is created by Azure and tied to a specific Azure service instance, such as an Azure App Configuration store. When the service instance is deleted, the identity is also deleted. Each service instance can only have one system-assigned identity https://learn.microsoft.com/en-us/azure/azure-app-configuration/overview-managed-identity .
User-Assigned Managed Identity: This is a standalone Azure resource that can be created and managed separately from the service instances. It can be assigned to one or more service instances, and a service instance can have multiple user-assigned identities. This type of identity is not tied to the lifecycle of a service instance and must be managed and deleted separately https://learn.microsoft.com/en-us/azure/azure-app-configuration/overview-managed-identity .
Creating a Managed Identity
To create a managed identity for Azure App Configuration or other services, follow these steps:
Create a user-assigned managed identity through the Azure portal or Azure CLI. Note down the client ID of the managed identity after creation https://learn.microsoft.com/en-us/azure/azure-app-configuration/reference-kubernetes-provider https://learn.microsoft.com/en-us/azure/application-gateway/key-vault-certs https://learn.microsoft.com/en-us/azure/frontdoor/managed-identity .
If the managed identity is to be used with an Azure Kubernetes Service (AKS) cluster, assign it to the virtual machine scale set used by the AKS cluster https://learn.microsoft.com/en-us/azure/azure-app-configuration/reference-kubernetes-provider .
Grant the managed identity the appropriate role, such as the App Configuration Data Reader role, in Azure App Configuration https://learn.microsoft.com/en-us/azure/azure-app-configuration/reference-kubernetes-provider .
Configure the service that will use the managed identity by setting the relevant properties, such as
spec.auth.managedIdentityClientIdfor an AKS cluster, to the client ID of the managed identity https://learn.microsoft.com/en-us/azure/azure-app-configuration/reference-kubernetes-provider .
Using Managed Identities with Azure Services
Managed identities can be used with various Azure services. For example, Azure Application Gateway can use a managed identity to retrieve certificates from Azure Key Vault on behalf of the service https://learn.microsoft.com/en-us/azure/application-gateway/key-vault-certs .
Troubleshooting
If a user-assigned managed identity is accidentally deleted, it can be recreated with the same name and under the same resource group. After re-creation, update the access policies of the Azure service, such as a key vault, to grant the new managed identity the required permissions https://learn.microsoft.com/en-us/azure/application-gateway/application-gateway-key-vault-common-errors .
For more information on managed identities and step-by-step instructions on how to create and manage them, refer to the following resources:
- Managed identities for Azure resources overview https://learn.microsoft.com/en-us/azure/azure-app-configuration/overview-managed-identity .
- How to create a user-assigned managed identity https://learn.microsoft.com/en-us/azure/frontdoor/managed-identity .
- How to assign a user-assigned managed identity to a virtual machine scale set https://learn.microsoft.com/en-us/azure/azure-app-configuration/reference-kubernetes-provider .
By using managed identities, Azure services can securely access other Azure services without the need to manage credentials, simplifying the security model and reducing the risk of credential leaks.
Plan and implement workload identities (20–25%)
Plan and implement identities for applications and Azure workloads
Managed identities in Azure are a feature of Microsoft Entra that provide Azure services with an automatically managed identity in Azure Active Directory (Azure AD). This identity can be used to authenticate to any service that supports Azure AD authentication, without the need for credentials to be stored in code. Managed identities can be used to securely access other Azure resources that are Entra protected.
There are two types of managed identities:
System-assigned managed identity: This is an identity that is created by Azure and tied to a single Azure resource, such as an Azure App Service or Azure Virtual Machine. When the resource is deleted, Azure automatically cleans up the credentials and the identity in Azure AD. A resource can only have one system-assigned identity.
User-assigned managed identity: This is a standalone Azure resource that can be created and managed separately from your Azure services. You can assign a user-assigned managed identity to one or more Azure resources. This type of identity is not tied to the lifecycle of any particular resource and must be managed and deleted separately.
Assigning a Managed Identity to an Azure Resource
To assign a managed identity to an Azure resource, you can follow these general steps:
- Create a user-assigned managed identity (if using
user-assigned):
- Navigate to the Azure portal and create a new user-assigned managed identity. Take note of the client ID after creation https://learn.microsoft.com/en-us/azure/azure-app-configuration/reference-kubernetes-provider .
- Assign the managed identity to your Azure resource:
- For a user-assigned managed identity, you would assign it to the resource, such as a virtual machine scale set or an Azure Kubernetes Service (AKS) cluster https://learn.microsoft.com/en-us/azure/azure-app-configuration/reference-kubernetes-provider https://learn.microsoft.com/en-us/azure/azure-app-configuration/reference-kubernetes-provider .
- For a system-assigned managed identity, you would enable it directly on the resource, such as enabling it on a virtual machine scale set https://learn.microsoft.com/en-us/azure/azure-app-configuration/reference-kubernetes-provider .
- Grant appropriate roles to the managed identity:
- Assign roles to the managed identity that will allow it to access other Azure resources. For example, you can grant the “App Configuration Data Reader” role to a managed identity to allow it to read data from Azure App Configuration https://learn.microsoft.com/en-us/azure/azure-app-configuration/reference-kubernetes-provider https://learn.microsoft.com/en-us/azure/azure-app-configuration/reference-kubernetes-provider https://learn.microsoft.com/en-us/azure/azure-app-configuration/reference-kubernetes-provider .
- Configure your Azure resource to use the managed
identity:
- Update the configuration of your Azure resource to use the managed identity for authentication. This might involve setting properties in a configuration file or through Azure Resource Manager templates.
- Deploy the configuration to your Azure resource:
- Deploy the updated configuration to your Azure resource. For AKS,
this might involve deploying an
AzureAppConfigurationProviderresource to the cluster with the managed identity client ID specified https://learn.microsoft.com/en-us/azure/azure-app-configuration/reference-kubernetes-provider https://learn.microsoft.com/en-us/azure/azure-app-configuration/reference-kubernetes-provider https://learn.microsoft.com/en-us/azure/azure-app-configuration/reference-kubernetes-provider .
- Deploy the updated configuration to your Azure resource. For AKS,
this might involve deploying an
By following these steps, you can assign a managed identity to an Azure resource, which will allow it to securely access other Azure services that support Azure AD authentication without the need to manage credentials.
For additional information on managed identities and their usage in Azure, you can refer to the following URLs: - What are managed identities for Azure resources? - How to manage user-assigned managed identities - How to configure a virtual machine scale set with a managed identity
Please note that the URLs provided are for additional context and should be used to supplement the explanation provided.
Plan and implement workload identities (20–25%)
Plan and implement identities for applications and Azure workloads
Use of Managed Identity for Azure Resource Access
Managed identities in Azure provide a robust solution for secure, automated access to Azure resources. They eliminate the need for developers to manage credentials, as the identity is directly managed by the Azure platform. Managed identities can be either system-assigned or user-assigned:
System-Assigned Identity: This identity is tied to a specific Azure resource, such as an Azure App Service or Azure Virtual Machine. It is created automatically when the resource is created and is deleted when the resource is deleted. Each resource can have only one system-assigned identity https://learn.microsoft.com/en-us/azure/azure-app-configuration/overview-managed-identity .
User-Assigned Identity: This is a standalone Azure resource that can be created and managed separately. It can be assigned to multiple Azure resources, and multiple user-assigned identities can be assigned to a single resource. This provides greater flexibility and control over access to Azure services https://learn.microsoft.com/en-us/azure/azure-app-configuration/overview-managed-identity .
Accessing Azure Resources with Managed Identities
When an Azure resource is granted a managed identity, it can authenticate to any Azure service that supports Azure Active Directory (Azure AD) without the need for credentials stored in code or configuration files. This is particularly useful for services like Azure App Configuration, which can store and manage application settings and feature flags https://learn.microsoft.com/en-us/azure/azure-app-configuration/howto-integrate-azure-managed-service-identity .
Here are the steps to use a managed identity to access Azure App Configuration:
Create a Managed Identity: Depending on the requirement, create either a system-assigned or user-assigned managed identity for the Azure resource https://learn.microsoft.com/en-us/azure/azure-app-configuration/reference-kubernetes-provider .
Assign Roles: Grant the appropriate role to the managed identity. For example, assign the “App Configuration Data Reader” role to allow read-only access to Azure App Configuration https://learn.microsoft.com/en-us/azure/azure-app-configuration/reference-kubernetes-provider .
Configure the Azure Resource: Set up the Azure resource (e.g., Azure App Service, Azure Kubernetes Service) to use the managed identity for authentication. This typically involves setting the managed identity client ID in the resource’s configuration https://learn.microsoft.com/en-us/azure/azure-app-configuration/reference-kubernetes-provider .
Access Other Azure Resources: The Azure resource can now use its managed identity to access other Azure services, such as reading configuration settings from Azure App Configuration without managing secrets https://learn.microsoft.com/en-us/azure/azure-app-configuration/howto-integrate-azure-managed-service-identity .
Additional Resources
For more information on managed identities and how to implement them, refer to the following resources:
- Managed identities for Azure resources overview https://learn.microsoft.com/en-us/azure/azure-app-configuration/overview-managed-identity .
- How to integrate Azure Managed Service Identity with Azure App Configuration https://learn.microsoft.com/en-us/azure/azure-app-configuration/quickstart-container-apps .
- How to use managed identities for Azure App Configuration https://learn.microsoft.com/security/benchmark/azure/baselines/azure-app-configuration-security-baseline .
By leveraging managed identities, developers can significantly enhance the security and manageability of their cloud applications, ensuring that access to Azure resources is both secure and efficient.
Plan and implement workload identities (20–25%)
Plan, implement, and monitor the integration of enterprise applications
Configure and Manage User and Admin Consent
When configuring and managing user and admin consent in Microsoft Entra (formerly known as Azure Active Directory), it is important to understand the consent framework that allows applications to access user data securely and efficiently. Consent is a critical aspect of identity and access management, ensuring that users are aware of what data applications are accessing and that administrators have control over what applications can be accessed within their organization.
User Consent
User consent is the process where users are prompted to grant permissions to an application to access their user data or perform operations on their behalf. This process is typically encountered when a user signs into an application for the first time. The consent prompt will detail the permissions the application is requesting, and the user can choose to accept or deny these permissions.
Admin Consent
Admin consent is required when applications request access to data or permissions that are beyond the scope of what a regular user can grant. This typically involves permissions that affect the entire tenant, such as reading all users’ profiles or accessing data across multiple users. An administrator can grant consent for these permissions on behalf of all users within the organization, which means individual users will not be prompted for consent when accessing the application.
Managing Consent
To manage consent within Microsoft Entra, administrators can:
Set user consent settings: Administrators can configure settings to allow or restrict user consent to applications. They can specify which permissions users can consent to and which require admin consent.
Review and grant admin consent: Administrators can review the permissions requested by applications and grant admin consent for those that require it. This is done through the Enterprise Applications section of the Microsoft Entra portal.
Audit consent grants: It is important to regularly audit consent grants to ensure that only authorized applications have access to organizational data. Administrators can use the audit logs in Microsoft Entra to review consent grants.
Manage consent requests: In some cases, users can request admin consent for certain applications. Administrators can manage these requests and either approve or deny them based on organizational policies.
Additional Resources
For more detailed information on managing identities and access, including user and admin consent, refer to the following resources:
- Microsoft Entra ID Overview
- Manage consent to applications using Microsoft Entra
- Enterprise Applications in Microsoft Entra
By understanding and effectively managing user and admin consent, organizations can ensure that their data remains secure while still enabling productivity through the use of third-party applications. It is a balance between security and usability that requires careful consideration and ongoing management.
Plan and implement workload identities (20–25%)
Plan, implement, and monitor the integration of enterprise applications
Discovering Apps with AD FS Application Activity Reports
Active Directory Federation Services (AD FS) application activity reports are a crucial tool for monitoring and understanding the usage of federated applications within an organization. These reports provide insights into how applications are being accessed, which can help in identifying usage patterns, potential security issues, and ensuring compliance with organizational policies.
To effectively utilize AD FS application activity reports, follow these steps:
Access the AD FS Management Console: Begin by opening the AD FS Management console on your server. This is where you can manage your federation service settings and access reports.
Navigate to the Reports Section: Within the console, locate the section for reports. This is typically found under the AD FS folder in the console tree.
Select the Activity Reports: Look for reports that detail application activity. These reports can include information on logins, token requests, and other relevant data that pertain to the usage of federated applications.
Generate and View Reports: Generate the reports for a specified time frame to get the most recent data. Once the report is generated, you can view various details such as user activity, application usage frequency, and any irregular access patterns that may indicate a security risk.
Analyze the Data: Carefully analyze the data provided in the reports. Look for trends in application usage, peak access times, and any anomalies that could suggest issues like unauthorized access or potential breaches.
Take Action Based on Insights: Use the insights gained from the reports to make informed decisions. This could involve adjusting security policies, providing additional training to users, or making changes to the federation services configuration to enhance security or performance.
Regular Review: Make it a practice to regularly review AD FS application activity reports. Continuous monitoring helps maintain a secure and efficient federated environment.
For additional information on generating and interpreting AD FS application activity reports, you can refer to the official Microsoft documentation. This will provide you with more detailed instructions and best practices for using these reports effectively within your organization.
Please note that while this guide provides a general overview of discovering apps using AD FS application activity reports, the specific steps and details may vary based on the version of AD FS and the configuration of your environment. Always refer to the most current documentation for guidance tailored to your particular setup.
Plan and implement workload identities (20–25%)
Plan, implement, and monitor the integration of enterprise applications
Plan and Implement Settings for Enterprise Applications
When planning and implementing settings for enterprise applications, it is essential to consider both application-level and tenant-level settings to ensure proper governance, security, and functionality across the organization.
Application-Level Settings
Application-level settings are configurations that apply to individual applications within your Azure environment. These settings can include:
Authentication and Authorization Configurations: Define how users authenticate to the application and what permissions they have. This can involve setting up single sign-on (SSO), conditional access policies, and role-based access controls (RBAC).
Custom Branding: Customize the application’s appearance to align with corporate branding guidelines, including logos, color schemes, and sign-in page text.
API Permissions: Specify which APIs the application can access and the level of access, ensuring that the application has only the permissions it needs to function correctly.
Certificates and Secrets: Manage the certificates, secrets, and keys used by the application for secure communications and data protection.
User and Group Assignment: Control which users and groups have access to the application, often used in conjunction with RBAC.
Tenant-Level Settings
Tenant-level settings are broader configurations that affect all applications and services within your Azure Active Directory (Azure AD) tenant. These settings include:
Directory-wide Policies: Implement policies that affect all users and applications in the tenant, such as password complexity requirements, multi-factor authentication (MFA) requirements, and user sign-in risk policies.
Conditional Access Policies: Define security requirements that users must meet to access any application in the tenant, such as requiring MFA from untrusted locations or blocking sign-ins from specific regions.
External Collaboration Settings: Set up policies for sharing resources with external users, including guest user permissions and restrictions.
Audit Logs and Monitoring: Enable and configure audit logging to track user and administrator activity across all applications, which is crucial for security and compliance.
Enterprise Application Registration: Register new applications to the tenant, providing them with an Application (client) ID and configuring the necessary permissions.
Additional Resources
For more detailed information on these settings, you can refer to the following resources:
- Azure Active Directory documentation
- Manage application access with Azure AD
- Configure Azure AD SSO
- Conditional Access in Azure AD
- Manage certificates for federated single sign-on in Azure AD
By carefully planning and implementing these settings, organizations can ensure that their enterprise applications are secure, compliant, and aligned with business requirements.
Plan and implement workload identities (20–25%)
Plan, implement, and monitor the integration of enterprise applications
Assigning Microsoft Entra Roles to Manage Enterprise Applications
When managing enterprise applications, it is crucial to assign the correct Microsoft Entra roles to users to ensure they have the appropriate access levels. Microsoft Entra, formerly known as Azure Active Directory, uses Role-Based Access Control (RBAC) to manage access to resources within an organization. Here’s a detailed explanation of how to assign these roles:
Understand Role-Based Access Control (RBAC): RBAC is a method of restricting system access to authorized users. In Microsoft Entra, RBAC allows you to create roles with specific permissions and assign them to users, groups, or service principals within your organization https://learn.microsoft.com/en-us/training/modules/deploy-microsoft-defender-for-endpoints-environment/5-manage-access https://learn.microsoft.com/en-us/azure/azure-app-configuration/rest-api-authorization-azure-ad .
Identify the Roles: Before assigning roles, identify the roles available in Microsoft Entra that are relevant to managing enterprise applications. Each role contains a set of permissions that define what actions the role can perform https://learn.microsoft.com/en-us/azure/azure-app-configuration/rest-api-authorization-azure-ad .
Create Custom Roles (if necessary): If the predefined roles do not meet your specific needs, you can create custom roles. This involves defining a new role, setting the permissions, and then assigning it to users or groups https://learn.microsoft.com/en-us/training/modules/deploy-microsoft-defender-for-endpoints-environment/5-manage-access .
Assign Roles to Users: To grant a user access to manage enterprise applications, you must assign them to one or more roles. This is done by selecting the user and then assigning the appropriate role that grants the necessary permissions.
Use Microsoft Entra User Groups: For efficient management, it is recommended to use Microsoft Entra user groups. Assign roles to these groups rather than individual users to manage permissions more effectively https://learn.microsoft.com/en-us/training/modules/deploy-microsoft-defender-for-endpoints-environment/5-manage-access https://learn.microsoft.com/en-us/training/modules/deploy-microsoft-defender-for-endpoints-environment/7-configure-device-groups .
Manage Device Groups: In some cases, you may need to manage access to applications based on the devices being used. You can create device groups and assign roles to these groups to control access to enterprise applications https://learn.microsoft.com/en-us/training/modules/deploy-microsoft-defender-for-endpoints-environment/7-configure-device-groups .
Implementing Access Control: After roles are assigned, users will have access to manage enterprise applications based on the permissions defined in their roles. It is important to regularly review and update these assignments to maintain security and compliance https://learn.microsoft.com/en-us/training/modules/deploy-microsoft-defender-for-endpoints-environment/5-manage-access .
Monitor and Audit: Continuously monitor and audit role assignments to ensure that they are still appropriate for the users’ job functions and that no unauthorized access is granted.
For additional information on Microsoft Entra and RBAC, you can refer to the following resources:
- Azure role-based access control (Azure RBAC) Overview
- Managed Identities for Azure Resources Overview
By following these steps and utilizing the resources provided, you can effectively assign Microsoft Entra roles to manage enterprise applications within your organization. Remember to adhere to the principle of least privilege, ensuring users have only the access they need to perform their job functions.
Plan and implement workload identities (20–25%)
Plan, implement, and monitor the integration of enterprise applications
Monitor and Audit Activity in Enterprise Applications
Monitoring and auditing activities within enterprise applications are critical for maintaining security, compliance, and operational integrity. Here are the key points to consider when addressing this topic:
Understanding Audit Logs
Audit logs are records of events based on the activities within enterprise applications. They provide a trail that can be used to understand the sequence of events that have taken place, which is essential for:
- Security Analysis: Identifying potential security breaches or unauthorized access.
- Compliance: Ensuring that the organization meets regulatory requirements.
- Operational Oversight: Monitoring user activities and application performance.
Microsoft Purview Audit (Standard)
Microsoft Purview Audit (Standard) is a solution that allows administrators to run searches on audit logs across various services. It is important to note that there may be instances where an IP address is not displayed in the audit records. This could be due to:
- Administrator activities for Microsoft Entra ID-related events https://learn.microsoft.com/en-us/training/modules/investigate-threats-using-audit-in-microsoft-365-defender-microsoft-purview-standard/5-search-audit-log .
- Activities performed by external users https://learn.microsoft.com/en-us/training/modules/investigate-threats-using-audit-in-microsoft-365-defender-microsoft-purview-standard/5-search-audit-log .
- Activities performed by a trusted application on behalf of a user https://learn.microsoft.com/en-us/training/modules/investigate-threats-using-audit-in-microsoft-365-defender-microsoft-purview-standard/5-search-audit-log .
Visualizing Audit Data
To effectively monitor and audit activity, it is beneficial to visualize the data. This can be achieved through:
- Azure Monitor logs: These logs can be used to visualize counter and event logs, providing insights into the network and application performance https://learn.microsoft.com/en-us/azure/application-gateway/application-gateway-diagnostics .
- Power BI: Azure activity logs can be visualized using Power BI, which offers a more interactive and graphical representation of the data. This can help in identifying trends and anomalies https://learn.microsoft.com/en-us/azure/application-gateway/application-gateway-diagnostics .
For additional information on visualizing logs and activity data, you can refer to the following resources: - Azure Monitor logs: Visualize counter and event logs - Power BI blog post: Visualize your Azure activity log with Power BI - Azure blog post: View and analyze Azure activity logs in Power BI and more
Mailbox Audit Events
In some cases, mailbox audit events may not appear in audit log searches. This could be due to:
- The events being related to administrator activity for Microsoft Entra ID https://learn.microsoft.com/en-us/training/modules/investigate-threats-using-audit-in-microsoft-365-defender-microsoft-purview-standard/7-use-audit-log-searches-to-investigate-common-support-issues .
- The requirement of E5 licenses for users to have their mailbox audit events returned in searches when using the Microsoft Purview compliance portal or the Office 365 Management Activity API https://learn.microsoft.com/en-us/training/modules/investigate-threats-using-audit-in-microsoft-365-defender-microsoft-purview-standard/7-use-audit-log-searches-to-investigate-common-support-issues .
Attack Surface Reduction Rules
To prevent potential security issues, organizations can use attack surface reduction (ASR) rules. It is recommended to:
- Use audit mode to evaluate the impact of ASR rules before enabling them https://learn.microsoft.com/en-us/training/modules/implement-windows-10-security-enhancements-with-microsoft-defender-for-endpoint/3-enable-attack-surface-reduction-rules .
- Monitor audit data and add exclusions for necessary applications to avoid impacting productivity https://learn.microsoft.com/en-us/training/modules/implement-windows-10-security-enhancements-with-microsoft-defender-for-endpoint/3-enable-attack-surface-reduction-rules .
Network Intrusion Detection and Prevention System (IDPS)
An IDPS is a tool that helps monitor network activities for malicious activity. It logs information about this activity, reports it, and optionally attempts to block it https://learn.microsoft.com/en-us/azure/firewall/premium-features . This is an essential component of monitoring and auditing enterprise applications.
By understanding and implementing these monitoring and auditing strategies, organizations can enhance their security posture, ensure compliance with regulations, and maintain operational efficiency.
Plan and implement workload identities (20–25%)
Plan, implement, and monitor the integration of enterprise applications
Design and Implement Integration for On-Premises Apps Using Microsoft Entra Application Proxy
Microsoft Entra Application Proxy is a feature of Azure AD that enables users to access on-premises applications from a remote location. When designing and implementing integration for on-premises apps using Microsoft Entra Application Proxy, consider the following steps:
Assess Requirements: Determine the on-premises applications that need to be accessed remotely. Evaluate the authentication and authorization requirements for these applications.
Install Application Proxy Connectors: Deploy connectors on servers within the on-premises network. These connectors will facilitate secure communication between Azure AD and the on-premises applications.
Register Applications: In the Azure portal, register the on-premises applications with Azure AD. Specify the internal URLs and pre-authentication methods.
Configure Application Proxy: Set up the Application Proxy by defining the external URL that users will access. This URL will be the endpoint that Azure AD publishes to the internet.
Assign Users: Assign users or groups in Azure AD who are authorized to access the on-premises applications through the Application Proxy.
Test Access: Verify that the applications can be accessed externally through the Application Proxy without compromising security or performance.
Monitor and Maintain: Regularly monitor the health of the Application Proxy connectors and review access logs to ensure secure and efficient operation.
For additional information on Microsoft Entra Application Proxy and its configuration, you can refer to the following resources:
- Azure AD Application Proxy documentation
- Tutorial: Add an on-premises application for remote access through Application Proxy in Azure AD
By following these steps and utilizing the resources provided, you can effectively design and implement integration for on-premises applications, allowing for secure and seamless remote access through Microsoft Entra Application Proxy.
Plan and implement workload identities (20–25%)
Plan, implement, and monitor the integration of enterprise applications
Design and Implement Integration for Software as a Service (SaaS) Apps
When designing and implementing integration for SaaS applications, it is essential to consider several key aspects to ensure that the integration is secure, efficient, and scalable. Below are the steps and best practices to follow:
1. Assess Application Requirements
- Understand the SaaS application’s architecture: Determine how the SaaS app will interact with your existing infrastructure, including data flow, authentication, and authorization mechanisms.
- Identify integration points: Look for APIs, webhooks, or other endpoints provided by the SaaS application for integration.
2. Security and Compliance
- Implement a multi-layered security approach: Ensure that network, application, and data protection measures are in place to safeguard the integration https://learn.microsoft.com/en-us/azure/ddos-protection/ddos-protection-overview .
- Use secure authentication methods: Leverage Azure Active Directory for secure sign-on and identity management.
- Compliance checks: Verify that the SaaS application meets relevant compliance standards for your industry.
3. Automation and Orchestration
- Utilize Azure Logic Apps: Create workflows in Azure Logic Apps to automate tasks and orchestrate the integration between the SaaS app and other systems https://learn.microsoft.com/en-us/training/modules/automation-microsoft-sentinel/2-understand-automation-options .
- Playbooks for incident response: Develop playbooks in Microsoft Sentinel to automate threat response related to the SaaS application https://learn.microsoft.com/en-us/training/modules/automation-microsoft-sentinel/2-understand-automation-options .
4. Network Design
- Optimize internet traffic: Ensure that the network design accommodates traffic to and from the SaaS application efficiently, including considerations for Microsoft 365 and Azure public PaaS services https://learn.microsoft.com/en-us/azure/firewall-manager/trusted-security-partners .
5. Data Protection and Encryption
- Azure Key Vault: Use Azure Key Vault for managing encryption keys and secrets that the SaaS application might use https://learn.microsoft.com/en-us/azure/dedicated-hsm/faq .
- Azure Dedicated HSM: For applications requiring hardware security modules (HSMs), consider Azure Dedicated HSM for cryptographic operations https://learn.microsoft.com/en-us/azure/dedicated-hsm/faq .
6. High Availability and Disaster Recovery
- Redundancy: Design the integration with redundancy in mind to ensure high availability.
- Incident response plan: Prepare for potential disruptions by having an incident response plan in place https://learn.microsoft.com/en-us/azure/ddos-protection/ddos-protection-overview .
7. Monitoring and Support
- Implement monitoring: Use Azure monitoring tools to keep track of the health and performance of the integration.
- Leverage support resources: Utilize the Thales customer support portal for configuration activities and application integration scenarios https://learn.microsoft.com/en-us/azure/dedicated-hsm/deployment-architecture .
8. Documentation and Best Practices
- Follow best practices: Consult the Fundamental best practices for DDoS protection and mitigation as a reference for network security https://learn.microsoft.com/en-us/azure/ddos-protection/ddos-protection-overview .
- Integration guides: Refer to the Microsoft partner site for a variety of integration guides https://learn.microsoft.com/en-us/azure/dedicated-hsm/deployment-architecture .
Additional Resources
- For more information on Azure Logic Apps and how to use them for automation and orchestration, visit Azure Logic Apps documentation.
- To understand high availability concepts for Azure Dedicated HSM, refer to High Availability for Azure Dedicated HSM.
- For physical security considerations, see Physical Security for Azure Dedicated HSM.
- To learn about networking best practices, consult Networking for Azure Dedicated HSM.
- For supportability and monitoring details, check Supportability for Azure Dedicated HSM and Monitoring for Azure Dedicated HSM.
By following these guidelines, you can design and implement a robust integration for SaaS applications that aligns with best practices and leverages Azure’s powerful cloud services.
Plan and implement workload identities (20–25%)
Plan, implement, and monitor the integration of enterprise applications
Assign, Classify, and Manage Users, Groups, and App Roles for Enterprise Applications
When managing access to enterprise applications within an Azure environment, it is crucial to understand how to assign, classify, and manage users, groups, and app roles effectively. This ensures that the right individuals have the appropriate level of access to the resources they need to perform their job functions, while also maintaining security and compliance within the organization.
Assigning Users and Groups
Azure Role-Based Access Control (Azure RBAC) is a system that provides fine-grained access management for Azure resources. It allows you to assign roles to users, groups, service principals, and managed identities. These roles define the permissions that the assignee has over Azure resources. For example, you can assign a user to the role of “Reader” to allow them to view resources without making changes https://learn.microsoft.com/security/benchmark/azure/baselines/azure-app-configuration-security-baseline .
Classifying Users and Groups
Classifying users and groups involves organizing them in a way that reflects their role within the organization and their access needs. This can be done by creating groups that represent different departments, job functions, or access levels. For instance, you might have a group for “Security Administrators” who need broad access to manage security settings and another group for “Developers” who need access to deploy and manage applications https://learn.microsoft.com/security/benchmark/azure/baselines/azure-app-configuration-security-baseline .
Managing App Roles
App roles are a feature of Azure Active Directory (Azure AD) that enable you to define roles within your applications and assign users or groups to these roles. Each app role has a set of permissions associated with it, which determines what the user assigned to that role can do within the application. For example, you might have an app role called “Order Manager” in a sales application that allows users to process orders.
Configuration Guidance
- Use Azure RBAC to manage access to Azure resources through built-in role assignments https://learn.microsoft.com/security/benchmark/azure/baselines/azure-app-configuration-security-baseline .
- Create custom roles if the built-in roles do not meet the specific needs of your organization https://learn.microsoft.com/en-us/azure/firewall-manager/rule-hierarchy .
- Assign roles to users and groups at the appropriate scope, which could be a subscription, resource group, or a single resource.
- Use the principle of least privilege, ensuring that users have only the permissions they need to perform their tasks https://learn.microsoft.com/en-us/azure/azure-app-configuration/howto-disable-access-key-authentication .
- Consider using managed identities for Azure resources to simplify the management of credentials https://learn.microsoft.com/en-us/azure/azure-app-configuration/reference-kubernetes-provider .
Additional Resources
For more information on managing access with Azure RBAC, you can refer to the following resources:
- Azure RBAC Overview https://learn.microsoft.com/security/benchmark/azure/baselines/azure-app-configuration-security-baseline
- Authorize Access to Azure App Configuration Using Azure Active Directory https://learn.microsoft.com/security/benchmark/azure/baselines/azure-app-configuration-security-baseline
- Understand Scope for Azure RBAC https://learn.microsoft.com/en-us/azure/azure-app-configuration/howto-disable-access-key-authentication
- Best Practices for Azure RBAC https://learn.microsoft.com/en-us/azure/azure-app-configuration/howto-disable-access-key-authentication
- Create a User-Assigned Managed Identity https://learn.microsoft.com/en-us/azure/azure-app-configuration/reference-kubernetes-provider
By following these guidelines and utilizing the provided resources, you can effectively assign, classify, and manage users, groups, and app roles for enterprise applications within your Azure environment. This will help maintain a secure and efficient access management system.
Plan and implement workload identities (20–25%)
Plan, implement, and monitor the integration of enterprise applications
Create and Manage Application Collections
Application collections are a way to organize and manage applications within Microsoft Entra, which is a suite of identity and access capabilities. When creating and managing application collections, you typically perform the following tasks:
Register Applications with Microsoft Entra: To integrate any application with Microsoft Entra, you must first register it with the Microsoft identity platform. This establishes a trust relationship between your application and the identity provider. Registration involves creating an application entry in Microsoft Entra, which provides you with an Application (client) ID and Directory (tenant) ID that are used to configure your application to use Microsoft Entra for authentication https://learn.microsoft.com/en-us/azure/confidential-ledger/register-application .
Create Service Principals: A service principal is an identity created for use with applications, hosted services, and automated tools to access and manage Microsoft Entra resources. You can create a service principal in the Azure portal. This service principal grants your application the necessary permissions to access and manage resources https://learn.microsoft.com/en-us/azure/firewall-manager/deploy-trusted-security-partner .
Assign Managed Identities: Managed identities simplify secrets management by eliminating the need for credentials in code. There are two types of managed identities:
- System-assigned identity: This identity is tied to a specific Azure resource (like an Azure App Configuration store) and is deleted when the resource is deleted. Each resource can have only one system-assigned identity https://learn.microsoft.com/en-us/azure/azure-app-configuration/overview-managed-identity .
- User-assigned identity: This is a standalone Azure resource that can be assigned to multiple resources. A single resource can have multiple user-assigned identities https://learn.microsoft.com/en-us/azure/azure-app-configuration/overview-managed-identity .
Grant Access to Resources: After creating a service principal or managed identity, you need to grant it access to the necessary resources. This is done by assigning roles and permissions that define what actions the identity can perform on a given resource. You can limit access to specific resources or resource groups for more granular control https://learn.microsoft.com/en-us/azure/firewall-manager/deploy-trusted-security-partner .
Configure Applications to Use Managed Identities: Once you have granted a managed identity access to App Configuration, you can configure your application to use this identity. This allows your application to access the App Configuration store using only the service endpoint, without the need for an access token containing secrets https://learn.microsoft.com/en-us/azure/azure-app-configuration/howto-integrate-azure-managed-service-identity .
Manage Application Lifecycle: As part of managing application collections, you need to monitor and maintain the lifecycle of the registered applications and their corresponding service principals or managed identities. This includes updating, rotating secrets if necessary, and deleting identities when they are no longer needed.
For additional information on these topics, you can refer to the following resources: - Managed identities for Azure resources overview https://learn.microsoft.com/en-us/azure/azure-app-configuration/howto-integrate-azure-managed-service-identity https://learn.microsoft.com/en-us/azure/azure-app-configuration/overview-managed-identity - How to: Use the portal to create a Microsoft Entra application and service principal that can access resources https://learn.microsoft.com/en-us/azure/firewall-manager/deploy-trusted-security-partner - Integrate Azure confidential ledger with Microsoft Entra ID https://learn.microsoft.com/en-us/azure/confidential-ledger/register-application
By following these steps, you can effectively create and manage application collections within Microsoft Entra, ensuring that your applications have the appropriate access and permissions to operate securely and efficiently.
Plan and implement workload identities (20–25%)
Plan and implement app registrations
Plan for App Registrations
When planning for app registrations in Azure, it is essential to understand the process and the options available to ensure that your application is securely integrated with the Microsoft identity platform. Here’s a detailed explanation of the steps and considerations involved in planning for app registrations:
- App Registration Creation:
- Begin by signing into the Azure portal.
- Navigate to Microsoft Entra ID and select App registrations > New registration.
- Provide a display Name for your application. This name can be seen by users during sign-in and can be changed later if necessary.
- The Application (client) ID is generated automatically and uniquely identifies your app within the identity platform https://learn.microsoft.com/en-us/azure/confidential-ledger/register-application .
- Supported Account Types:
- Decide who can use the application, also known as the sign-in audience.
- Options include:
- Accounts in this organizational directory only (Single-tenant)
- Accounts in any organizational directory (Multi-tenant)
- Accounts in any organizational directory and personal Microsoft accounts
- Personal Microsoft accounts only https://learn.microsoft.com/en-us/azure/confidential-ledger/register-application .
- Redirect URI Configuration:
- Initially, you may leave the Redirect URI field blank. This will be configured in subsequent steps.
- The redirect URI is crucial for the security of your application as it is where the authentication responses are sent https://learn.microsoft.com/en-us/azure/confidential-ledger/register-application .
- Visibility to Users:
- By default, new app registrations are not visible to users.
- To make the app visible on the users’ My Apps page, navigate to Microsoft Entra ID > Enterprise applications, select the app, and toggle Visible to users? to Yes https://learn.microsoft.com/en-us/azure/confidential-ledger/register-application .
- Authentication Method:
- Consider using a certificate as the authentication method for your application, as they are more secure than client secrets.
- Certificates can be uploaded in the Certificates & secrets section of your app registration in the Azure portal https://learn.microsoft.com/en-us/azure/confidential-ledger/register-application .
- Additional Configuration for Specific Scenarios:
- If you are using Azure Front Door or have configured an identity provider like Microsoft Entra ID or Azure AD B2C for the developer portal, you may need to update the app registration with additional redirect URLs https://learn.microsoft.com/en-us/azure/frontdoor/../api-management/front-door-api-management?toc=/azure/frontdoor/toc.json .
- App Service Plans:
- If your application is hosted on Azure Web Apps, ensure you have the necessary app service plans created in the appropriate regions https://learn.microsoft.com/en-us/azure/frontdoor/create-front-door-cli .
- Documentation and Resources:
- For a comprehensive understanding of app registrations, refer to the official Microsoft documentation on app registration in Azure https://learn.microsoft.com/en-us/azure/confidential-ledger/register-application .
- Learn more about using certificates for authentication in the Microsoft identity platform application authentication certificate credentials https://learn.microsoft.com/en-us/azure/confidential-ledger/register-application .
- For details on configuring origins for Azure Front Door, see How to configure an origin for Azure Front Door https://learn.microsoft.com/en-us/azure/frontdoor/../api-management/front-door-api-management?toc=/azure/frontdoor/toc.json .
- To create app service plans via Azure CLI, refer to the az appservice plan create documentation https://learn.microsoft.com/en-us/azure/frontdoor/create-front-door-cli .
By following these steps and considerations, you can plan for app registrations that align with your application’s requirements and the security standards of the Microsoft identity platform.
Plan and implement workload identities (20–25%)
Plan and implement app registrations
Create App Registrations
App registrations in Azure are a fundamental part of setting up an application to use Microsoft identity platform for authentication and authorization. When you register an application, you establish a trust relationship with the Microsoft identity platform. Here’s a detailed explanation of how to create app registrations:
Sign in to Azure Portal: Begin by signing into the Azure portal at https://portal.azure.com/.
Navigate to App Registrations: Once signed in, search for and select “Microsoft Entra ID”. Under the “Manage” section, choose “App registrations” and then select “New registration”.
Enter Application Details: Provide a display name for your application. This name can be seen by users during sign-in and can be changed later. It’s important to note that the Application (client) ID, which is automatically generated, uniquely identifies your app within the identity platform, not the display name.
Specify the Sign-in Audience: Choose who can use the application by selecting the appropriate supported account type. The options range from single-tenant applications only available to users within your organization to multi-tenant applications that can support users from any Microsoft Entra tenant and personal Microsoft accounts.
Redirect URI: Leave the “Redirect URI (optional)” field blank for now, as you will configure a redirect URI in a subsequent step.
Complete the Registration: Click on “Register” to complete the initial app registration process. Once the registration is complete, the Azure portal will display the “Overview” pane with your application’s client ID.
Configure Certificates & Secrets: After registration, you can add credentials to your application such as certificates. In the Azure portal, under “App registrations”, select your application, then navigate to “Certificates & secrets” > “Certificates” > “Upload certificate”. Choose the certificate file to upload, which must be one of the following types: .cer, .pem, .crt. Click “Add” to upload the certificate.
Visibility to Users: By default, new app registrations are hidden from users. To make the app visible on users’ “My Apps” page, navigate to “Microsoft Entra ID” > “Enterprise applications”, select the app, and on the “Properties” page toggle “Visible to users?” to Yes.
Update Redirect URIs: If you have configured an identity provider like Microsoft Entra ID or Azure AD B2C for the developer portal, remember to update the app registration with an additional redirect URL to Front Door.
Authorization Model: Understand the authorization model associated with Microsoft Entra authentication, which uses Azure Role-Based Access Control (RBAC) to control permissions.
By following these steps, you can successfully create an app registration in Azure, which is a crucial step in enabling your application to authenticate and authorize users via the Microsoft identity platform.
For more information and additional guidance, please refer to the following resources: - [Microsoft identity platform application authentication certificate credentials] https://learn.microsoft.com/en-us/azure/confidential-ledger/register-application - [How to configure an origin for Azure Front Door] https://learn.microsoft.com/en-us/azure/frontdoor/../api-management/front-door-api-management?toc=/azure/frontdoor/toc.json - [Microsoft Entra authorization] https://learn.microsoft.com/en-us/azure/azure-app-configuration/rest-api-authorization-index - [Local authentication methods in Azure App Service] https://learn.microsoft.com/security/benchmark/azure/baselines/azure-app-configuration-security-baseline
Remember to review these resources thoroughly to ensure a comprehensive understanding of app registrations and their configurations.
Plan and implement workload identities (20–25%)
Plan and implement app registrations
Configure App Authentication
When configuring app authentication, it’s essential to understand the role of Azure Active Directory (Azure AD) in managing and securing access to your application’s data plane. Azure AD is a cloud-based identity and access management service that helps your employees sign in and access resources.
Azure AD Authentication for Data Plane Access
Azure AD can be used as the default authentication method to control data plane access, which adds an extra layer of security. The data plane typically involves operations that read, write, and modify data. Securing this access is crucial for protecting sensitive information.
Configuration Steps:
- Register Your Application with Azure AD:
- Begin by registering your application with Azure AD to establish an identity for your app. This process involves creating an application registration within the Azure portal.
- Set Up Redirect URIs:
- A redirect URI is where the Microsoft identity platform sends security tokens after authentication. You need to specify the URI where your app expects to receive the tokens.
- For production, use a public endpoint where your app is running,
such as
https://contoso.com/auth-response. - During development, you can also use local endpoints like
https://127.0.0.1/auth-responseorhttp://localhost/auth-responsehttps://learn.microsoft.com/en-us/azure/confidential-ledger/register-application .
- Configure Platform Settings:
- Modify the platform settings for your registered application to include the redirect URIs and other necessary configurations.
- Implement Authentication in Your App:
- Use the Azure AD authentication libraries, such as MSAL (Microsoft Authentication Library), to implement the sign-in functionality in your application.
- Assign Roles and Permissions:
- Define roles and permissions within Azure AD to control what authenticated users can do within your application.
- Enable and Configure Authentication:
- If the service supports Azure AD authentication for data plane access, enable it and configure the necessary settings. Note that this feature might not be supported by all services, and the responsibility to configure it lies with the customer https://learn.microsoft.com/security/benchmark/azure/baselines/azure-app-configuration-security-baseline .
- Test Authentication Flow:
- Test the authentication flow to ensure that users can sign in successfully and that the correct tokens are being issued and validated by your application.
Additional Resources:
- For a general overview of Azure AD authentication, you can refer to the Azure AD authentication documentation https://learn.microsoft.com/security/benchmark/azure/baselines/azure-front-door-security-baseline .
- To learn more about configuring Azure AD authentication for specific services, such as Azure App Configuration, you can consult the Azure documentation on authorizing access using Azure AD https://learn.microsoft.com/security/benchmark/azure/baselines/azure-app-configuration-security-baseline .
By following these steps and utilizing the resources provided, you can effectively configure app authentication for your application, leveraging Azure AD to enhance security and manage access to your data plane.
Plan and implement workload identities (20–25%)
Plan and implement app registrations
Configure API Permissions
When configuring API permissions, it is essential to understand the role of Azure Role-Based Access Control (RBAC) in managing access to resources. API permissions are crucial for applications that need to interact with Azure services. Here are the steps and considerations for configuring API permissions:
Identify the API: Determine which Azure service API your application needs to access. This could be Microsoft Graph, Azure Storage, or any other Azure service that offers an API.
Register an Application in Azure AD: Before setting permissions, you must register your application with Azure Active Directory (Azure AD). This provides an identity for your application and a framework to authenticate against Azure services.
Configure Permissions in Azure AD:
- Navigate to the Azure portal and select Azure Active Directory.
- Go to the ‘App registrations’ section and select your application.
- In the application’s registration page, find the ‘API permissions’ section.
- Click on ‘Add a permission’ to open the request API permissions panel.
- Choose the API you want to access (e.g., Microsoft Graph).
- Select the type of permissions your application requires: Delegated permissions for user-signed-in scenarios or Application permissions for background services.
- Add the necessary permissions from the list provided.
Grant Admin Consent (if required):
- Some permissions require administrator consent.
- If admin consent is needed, a button labeled ‘Grant admin consent for [Your Organization]’ will appear in the API permissions section.
- An Azure AD administrator must click this button to grant consent for all users within the organization.
Verify Permissions:
- After adding permissions and granting consent, verify that the status of the permissions is set to ‘Granted’.
- This ensures that your application has the necessary permissions to access the API.
Use the Permissions in Your Application:
- When making API calls, include an access token that your application has acquired from Azure AD.
- The access token should reflect the permissions that have been granted.
Monitor and Update Permissions:
- Regularly review the permissions for any changes in your application’s requirements or updates to the Azure services.
- Update the permissions as necessary through the Azure portal.
For additional information on configuring API permissions, you can refer to the following resources:
- Microsoft identity platform (v2.0) overview
- Register an application with the Microsoft identity platform
- Permissions and consent in the Microsoft identity platform
Remember to follow best practices for security and least privilege, only granting the minimum permissions necessary for your application to function.
Plan and implement workload identities (20–25%)
Plan and implement app registrations
Create App Roles
App roles are a feature in Azure Active Directory (Azure AD) that allows you to define roles within your applications and assign these roles to users, groups, or service principals. Creating app roles is an essential step in managing access control to your applications. Here’s a detailed explanation of how to create app roles:
- Define App Roles in Your Application Manifest:
- Navigate to the Azure portal and select the Azure Active Directory service.
- Choose the application where you want to define app roles.
- Click on “App registrations” and select the application.
- In the application’s registration page, find the “Manifest” section.
- Edit the manifest by locating the
appRolesblock. This is where you define your app roles, specifying theallowedMemberTypes,displayName,id(a unique GUID for the role), andvalue(the role name used in code).
- Assign App Roles to Users or Groups:
- Still within the Azure AD service, go to “Enterprise applications” and select the relevant application.
- Click on “Users and groups”.
- Click on “Add user/group” to assign a role to a user or group.
- Select the user or group and then assign the appropriate role defined in the app manifest.
- Assign App Roles to Service Principals (for
service-to-service access):
- In the Azure portal, navigate to “App registrations” and select the service principal.
- Under “Manage”, click on “App roles”.
- Assign the desired role to the service principal.
- Use App Roles in Your Application Code:
- After assigning app roles, your application can check the roles of a
signed-in user or service principal by inspecting the
rolesclaim in the security token. - Implement authorization checks in your application’s code to grant or deny access based on the app roles assigned to the user or service principal.
- After assigning app roles, your application can check the roles of a
signed-in user or service principal by inspecting the
- Best Practices:
- Use the principle of least privilege when assigning roles.
- Regularly review and audit role assignments.
- Consider using groups to manage role assignments more efficiently.
For additional information on creating and managing app roles, you can refer to the following URLs: - How to: Add app roles in your application and receive them in the token - Understand the application manifest
Please note that the URLs provided are for reference and additional information. They should be used to supplement the explanation provided in the study guide.
Plan and implement workload identities (20–25%)
Manage and monitor app access by using Microsoft Defender for Cloud Apps
Configure and Analyze Cloud Discovery Results Using Defender for Cloud Apps
Defender for Cloud Apps is a critical component in understanding and securing your cloud environment. To configure and analyze cloud discovery results, follow these steps:
- Setting Up Cloud Discovery:
- Navigate to the Defender for Cloud Apps portal.
- Set up Cloud Discovery by analyzing your traffic logs against a comprehensive catalog of over 16,000 cloud apps.
- The system assesses each app and assigns a risk score based on more than 80 risk factors, providing insights into cloud usage, potential Shadow IT, and associated risks https://learn.microsoft.com/en-us/training/modules/microsoft-cloud-app-security/cloud-discovery .
- Using the Cloud Discovery Dashboard:
- The dashboard offers a summary view of the cloud apps in use, active alerts, and the risk levels of these apps within your organization.
- It displays top users of the apps and the geographical origins of each app on an App Headquarters map.
- Filters can be applied to the Cloud Discovery data to create tailored views that focus on specific areas of interest https://learn.microsoft.com/en-us/training/modules/microsoft-cloud-app-security/cloud-discovery .
- Integrating with Identity Providers:
- Defender for Cloud Apps can integrate with identity providers (IdPs) to offer real-time protection against breaches and leaks.
- If using Microsoft Entra ID as your IdP, the integration with Defender for Cloud Apps is direct, allowing for seamless Conditional Access App Control https://learn.microsoft.com/en-us/training/modules/microsoft-cloud-app-security/conditional-access-app-control .
- Configuring Conditional Access App Control:
- Define conditions for access based on user or group, cloud apps, and location or network.
- Route users through Defender for Cloud Apps to apply access and session controls.
- In Microsoft Entra ID, configure the conditions of a Conditional Access policy, then under Access controls, select Session and click Use Conditional Access App Control.
- For custom controls, define them within the Defender for Cloud Apps portal https://learn.microsoft.com/en-us/training/modules/microsoft-cloud-app-security/conditional-access-app-control .
- Access and Session Policies:
- Use the Defender for Cloud Apps portal to create access and session policies that refine filters and set actions for user activities.
- These policies can enforce specific behaviors or restrictions during user sessions within cloud applications https://learn.microsoft.com/en-us/training/modules/microsoft-cloud-app-security/conditional-access-app-control .
For additional information on configuring and analyzing cloud discovery results with Defender for Cloud Apps, you can refer to the following resources:
- Defender for Cloud Apps documentation
- Setting up Cloud Discovery
- Using Conditional Access App Control
By following these steps and utilizing the provided resources, you can effectively configure and analyze cloud discovery results to enhance the security and compliance of your cloud environment.
Plan and implement workload identities (20–25%)
Manage and monitor app access by using Microsoft Defender for Cloud Apps
Configure Connected Apps
When configuring connected apps, it is essential to understand the integration and authentication mechanisms that allow these apps to communicate securely with other services and resources. Here are the key points to consider:
Managed Identities: Utilize managed identities in Azure to simplify the management of credentials when your application needs to access other Azure services. Managed identities eliminate the need for storing credentials in your code, configuration files, or Azure Key Vault. Instead, they allow an Azure service to authenticate to other services that support Azure AD authentication without any credentials in your code https://learn.microsoft.com/en-us/azure/azure-app-configuration/howto-integrate-azure-managed-service-identity .
App Configuration: Azure App Configuration is a service that helps manage application settings and feature flags. It supports managed identity authentication, allowing your application to retrieve configuration settings securely. This is particularly useful for ASP.NET Core and Java Spring applications that can leverage Azure App Configuration libraries to access the configuration store https://learn.microsoft.com/en-us/azure/azure-app-configuration/howto-integrate-azure-managed-service-identity .
Container Apps: When working with Azure Container Apps, you can build and deploy containerized applications that integrate with Azure App Configuration. Managed identities can be used to streamline access from Container Apps to other Azure resources, such as Azure Container Registry, without maintaining secrets https://learn.microsoft.com/en-us/azure/azure-app-configuration/quickstart-container-apps .
Azure Active Directory (Azure AD): For added security, use Azure AD as the default authentication method to control data plane access to your services. This ensures that only authenticated and authorized users and services can access your app configuration data https://learn.microsoft.com/security/benchmark/azure/baselines/azure-app-configuration-security-baseline .
Security and Compliance: Ensure that your connected apps comply with security standards and best practices. This includes configuring alerts for any suspicious activities or high-risk threats, as well as integrating with security solutions like Microsoft Sentinel for comprehensive monitoring and incident response https://learn.microsoft.com/en-us/training/modules/analyze-data-in-sentinel/4-analytics-rules .
For additional information and guidance on these topics, you can refer to the following resources:
- Managed identities overview
- Access App Configuration using managed identity
- Authorize access to Azure App Configuration using Azure Active Directory
- Access Container Registry using managed identity
By following these guidelines and utilizing the provided resources, you can ensure that your connected apps are configured securely and efficiently, leveraging Azure’s robust identity and access management features.
Plan and implement workload identities (20–25%)
Manage and monitor app access by using Microsoft Defender for Cloud Apps
Implementing Application-Enforced Restrictions
When securing applications, it’s crucial to implement restrictions that are enforced at the application level. This involves setting up controls that dictate how the application behaves in response to various requests and interactions. Here are some strategies to consider:
Use Access Restriction Rules
Access restriction rules can be configured to lock down inbound access to an application, ensuring that only traffic from trusted sources, such as an Application Gateway, is allowed. This can be achieved by using service endpoints or IP restrictions to create a list of allowed addresses with access to the web app https://learn.microsoft.com/en-us/azure/application-gateway/configure-web-app .
Integrate with Azure Services
Leveraging Azure services like Azure Application Gateway, Azure Front Door, and Azure DDoS Protection can provide additional layers of security. These services offer capabilities such as web application firewall (WAF), load balancing, routing, request filtering, and rate limiting, which help secure your apps from various threats https://learn.microsoft.com/azure/architecture/web-apps/spring-apps/guides/spring-cloud-reverse-proxy .
Enforce Access Restrictions in Azure Spring Apps
For applications hosted in Azure Spring Apps, access restrictions can be enforced to ensure that they are only accessible through a reverse proxy service. This helps prevent direct access to the apps, bypassing security measures like WAF or throttling limits. Depending on the deployment scenario, different approaches may be used, such as network security groups (NSGs) or custom WAF rules https://learn.microsoft.com/azure/architecture/web-apps/spring-apps/guides/spring-cloud-reverse-proxy https://learn.microsoft.com/azure/architecture/web-apps/spring-apps/guides/spring-cloud-reverse-proxy .
Optimize Application Gateway Configuration
Optimizing the configuration of Application Gateway for security involves setting up a TLS policy, using Application Gateway for TLS termination, storing TLS certificates in Azure Key Vault, and complying with NSG restrictions. These recommendations help enhance the security posture of the application by ensuring secure communication and managing access control effectively https://learn.microsoft.com/azure/architecture/framework/services/networking/azure-application-gateway .
Apply Cross-Cutting Restrictions with Spring Cloud Gateway
Spring Cloud Gateway can be used to apply cross-cutting access restrictions for applications within Azure Spring Apps. By deploying Spring Cloud Gateway and configuring route predicates, you can control which requests are routed to the backend applications based on attributes like client IP address, request method, or HTTP headers https://learn.microsoft.com/azure/architecture/web-apps/spring-apps/guides/spring-cloud-reverse-proxy .
For more detailed information on implementing these strategies, refer to the following resources: - Access restriction rules based on service endpoints - Azure App Service static IP restrictions - Azure Spring Apps - Azure Application Gateway - Azure Front Door - Azure DDoS Protection - Spring Cloud Gateway
By implementing these application-enforced restrictions, you can ensure that your applications are secure and only accessible through designated pathways, thereby reducing the risk of unauthorized access and potential security breaches.
Plan and implement workload identities (20–25%)
Manage and monitor app access by using Microsoft Defender for Cloud Apps
Configure Conditional Access App Control
Conditional Access App Control is a feature integrated with Microsoft Defender for Cloud Apps that allows organizations to monitor and control user app access and sessions in real time. This feature is particularly useful for enforcing security policies and preventing data breaches or leaks by applying granular access and session controls based on specific conditions.
Understanding Conditional Access App Control
Conditional Access App Control works by integrating with identity providers (IdPs) to protect data and devices. When using Microsoft Entra ID as your IdP, these controls are seamlessly integrated into Defender for Cloud Apps https://learn.microsoft.com/en-us/training/modules/microsoft-cloud-app-security/conditional-access-app-control .
Setting Up Conditional Access App Control
To configure Conditional Access App Control, follow these steps:
Connect Apps: Ensure that your apps are connected to Microsoft Defender for Cloud Apps. This can be done using an app connector or through Conditional Access App Control https://learn.microsoft.com/en-us/training/modules/microsoft-cloud-app-security/classify-protect-sensitive-information .
Define Conditions: Use Microsoft Entra Conditional Access to define conditions for your policies. Conditions can specify who (user or group), what (cloud apps), and where (locations and networks) the policies apply https://learn.microsoft.com/en-us/training/modules/microsoft-cloud-app-security/conditional-access-app-control .
Configure Policies: In Microsoft Entra ID, configure the conditions of a Conditional Access policy. Under “Access controls,” select “Session” and then “Use Conditional Access App Control.” If you opt for custom controls, you will define them in the Defender for Cloud Apps portal https://learn.microsoft.com/en-us/training/modules/microsoft-cloud-app-security/conditional-access-app-control .
Access and Session Policies: Refine your security measures by using access and session policies in the Defender for Cloud Apps portal. These policies allow you to set filters and actions to be taken on a user’s session https://learn.microsoft.com/en-us/training/modules/microsoft-cloud-app-security/conditional-access-app-control .
Real-Time Control and Protection
Conditional Access App Control enables real-time control over sensitive actions within cloud applications. For instance, you can create a session policy in Microsoft Teams to block instant messages containing sensitive content:
- Start by creating a new session policy in Microsoft Defender for Cloud Apps using a template such as “Block sending of messages based on real-time content inspection.”
- Under “Activity source,” select the application, e.g., “Send Teams message.”
- Enable “Content Inspection” and define the sensitive information using expressions.
- Set the action to “Block” to prevent the message from being sent and configure alerts to notify administrators https://learn.microsoft.com/en-us/training/modules/microsoft-cloud-app-security/conditional-access-app-control .
Additional Resources
For more information on configuring Conditional Access App Control, you can refer to the following resources:
- Overview of Azure AD Conditional Access Policies: Learn more https://learn.microsoft.com/security/benchmark/azure/baselines/firewall-security-baseline .
- Detailed guidance on implementing Cloud Discovery and Conditional Access App Control can be found in the Defender for Cloud Apps portal documentation https://learn.microsoft.com/en-us/training/modules/microsoft-cloud-app-security/walkthrough .
By following these steps and utilizing the available resources, you can effectively configure Conditional Access App Control to enhance your organization’s cloud security posture.
Plan and implement workload identities (20–25%)
Manage and monitor app access by using Microsoft Defender for Cloud Apps
Creating access and session policies in Microsoft Defender for Cloud Apps is a crucial step in managing and securing your organization’s cloud environment. These policies allow you to monitor and control user app access and sessions in real time, ensuring that your data and devices are protected from unauthorized access and potential breaches.
Access Policies
Access policies in Defender for Cloud Apps enable you to enforce conditions on user access to cloud applications. You can define conditions based on user identity, group membership, application type, and network location. Here’s how you can create access policies:
- Navigate to the Defender for Cloud Apps portal.
- Go to Control and select Policies.
- Click on Create policy and choose Access policy.
- Define the policy by specifying the users or groups it applies to, the target applications, and the conditions under which the policy will trigger.
- Set the actions to be taken when the policy conditions are met, such as block access or require multi-factor authentication (MFA).
- Save the policy to activate it.
Session Policies
Session policies provide granular control over user sessions within cloud applications. They allow you to monitor user activities and apply real-time controls, such as blocking downloads or restricting data sharing. To create session policies:
- Access the Defender for Cloud Apps portal.
- Select Control and then Policies.
- Click on Create policy and select Session policy.
- Configure the policy by defining the session control type, such as monitoring only or block downloads.
- Choose the conditions that will trigger the session control, like user risk level or sign-in risk.
- Determine the actions to be applied during the session, for example, protect data with encryption or apply a watermark.
- Activate the policy by saving it.
For additional information on creating and managing access and session policies in Microsoft Defender for Cloud Apps, you can refer to the following resources:
- [Conditional Access App Control in Microsoft Defender for Cloud Apps] https://learn.microsoft.com/en-us/training/modules/microsoft-cloud-app-security/conditional-access-app-control
- [Access and session controls in Microsoft Defender for Cloud Apps] https://learn.microsoft.com/en-us/training/modules/microsoft-cloud-app-security/conditional-access-app-control
- [Microsoft Defender for Cloud Apps documentation] https://learn.microsoft.com/en-us/training/modules/microsoft-cloud-app-security/cloud-app-security-framework
By implementing these policies, you can ensure that your organization’s cloud applications are accessed securely and in compliance with your security policies. Remember to review and update your policies regularly to adapt to the evolving security landscape and organizational needs.
Plan and implement workload identities (20–25%)
Manage and monitor app access by using Microsoft Defender for Cloud Apps
Implement and Manage Policies for OAuth Apps
When implementing and managing policies for OAuth apps, it is essential to understand the authorization process and how to control access to resources within your environment. OAuth is an open standard for access delegation, commonly used to grant websites or applications access to information on other websites without giving them the passwords.
Authorization Process
Authentication of Security Principal: The first step in the OAuth process is to authenticate the identity of the security principal (user, service, or application). This is done by obtaining an OAuth 2.0 token from an authorization server. The token endpoint typically looks like
https://login.microsoftonline.com/{tenantID}, where{tenantID}is the unique identifier for the Microsoft Entra tenant https://learn.microsoft.com/en-us/azure/azure-app-configuration/concept-enable-rbac .Authorization Token Request: Once authenticated, the security principal requests an authorization token, which will be used to access the desired resource. This token is included in the header of the HTTP requests made to the resource server https://learn.microsoft.com/en-us/azure/azure-app-configuration/concept-enable-rbac .
Access to Resource: With the token, the security principal can now access the resource if they have the necessary permissions. The permissions are determined by the roles assigned to the security principal https://learn.microsoft.com/en-us/azure/azure-app-configuration/concept-enable-rbac .
Managing Access and Policies
Managed Identities: For applications running within Azure services, such as Azure Functions or Azure Web Apps, managed identities can be used to authenticate requests to resources like Azure App Configuration. This simplifies the management of credentials and improves security https://learn.microsoft.com/en-us/azure/azure-app-configuration/concept-enable-rbac .
Role Assignments: To authorize access, Azure roles must be assigned to the security principal. These roles define the permissions that the principal has over App Configuration resources. Understanding and managing these roles is crucial for controlling access to resources https://learn.microsoft.com/en-us/azure/azure-app-configuration/concept-enable-rbac .
Policy Configuration: In Microsoft Cloud App Security, policies can be configured to monitor and control OAuth app usage. For example, a discovery anomaly detection policy can be set up to monitor for unusual increases in cloud application usage, which may indicate unauthorized OAuth app activities. Filters and sensitivity settings can be adjusted to tailor the monitoring and alerting to your specific needs https://learn.microsoft.com/en-us/training/modules/microsoft-cloud-app-security/detect-threats .
Compliance and Firewall Policies: Security administrators should also manage firewalls and compliance policies to ensure that OAuth apps adhere to organizational and regulatory standards. Azure Firewall policy, for example, allows for the creation of a rule hierarchy to enforce compliance and manage access https://learn.microsoft.com/en-us/azure/firewall-manager/rule-hierarchy .
Additional Resources
For more detailed information on these topics, you can refer to the following resources:
- Authenticate access to Azure App Configuration resources with Microsoft Entra ID and managed identities for Azure Resources https://learn.microsoft.com/en-us/azure/azure-app-configuration/concept-enable-rbac .
- Azure built-in roles for Azure App Configuration https://learn.microsoft.com/en-us/azure/azure-app-configuration/concept-enable-rbac .
- Microsoft Cloud App Security https://learn.microsoft.com/en-us/training/modules/microsoft-cloud-app-security/detect-threats .
- Azure Firewall policy documentation https://learn.microsoft.com/en-us/azure/firewall-manager/rule-hierarchy .
By understanding and implementing these policies and controls, organizations can effectively manage OAuth apps and ensure that only authorized applications and users have access to sensitive resources.
Plan and implement workload identities (20–25%)
Manage and monitor app access by using Microsoft Defender for Cloud Apps
Manage the Cloud App Catalog
When managing the Cloud app catalog, it is essential to understand that it involves overseeing the applications that are being used within an organization’s network. This includes both sanctioned apps that are approved for use and unsanctioned apps that may not comply with the organization’s security and compliance policies. Here’s a detailed explanation of the key activities involved in managing the Cloud app catalog:
Visibility into Cloud Use and Shadow IT
Cloud Discovery is a tool that provides insights into the cloud applications running in your network. It analyzes traffic logs against a vast catalog of over 16,000 cloud apps. By doing so, it helps identify not only the expected applications but also any unsanctioned apps, which are often referred to as Shadow IT https://learn.microsoft.com/en-us/training/modules/microsoft-cloud-app-security/cloud-discovery .
Risk Assessment and App Scoring
Each app is ranked and scored based on more than 80 risk factors. This scoring system is designed to give administrators a clear understanding of the potential risks associated with each app. The risk factors can include security vulnerabilities, compliance issues, or other concerns that may affect the organization’s data and resources https://learn.microsoft.com/en-us/training/modules/microsoft-cloud-app-security/cloud-discovery .
Cloud Discovery Dashboard
The Cloud Discovery dashboard offers a comprehensive overview of app usage within the organization. It displays the types of apps being used, any open alerts, and the risk levels associated with the apps. This dashboard is a crucial tool for administrators to quickly assess and manage the use of cloud applications https://learn.microsoft.com/en-us/training/modules/microsoft-cloud-app-security/cloud-discovery .
User and App Monitoring
Administrators can see who the top app users are and the origins of each app, which can be visualized on an App Headquarters map. This information is valuable for identifying potential insider threats or pinpointing areas where additional user training may be necessary https://learn.microsoft.com/en-us/training/modules/microsoft-cloud-app-security/cloud-discovery .
Filtering and Custom Views
The data collected by Cloud Discovery can be filtered to generate specific views that cater to the interests of the administrators. This feature allows for a more targeted approach when analyzing app usage and risks https://learn.microsoft.com/en-us/training/modules/microsoft-cloud-app-security/cloud-discovery .
Integration with Microsoft Defender for Cloud Apps
Microsoft Defender for Cloud Apps is a tool that can be used to discover and manage applications. It plays a significant role in identifying, investigating, and remediating security risks associated with cloud app usage. By integrating with Defender for Cloud Apps, administrators can enhance their ability to monitor and control the applications in their environment https://learn.microsoft.com/en-us/credentials/certifications/resources/study-guides/sc-200 .
For additional information on managing the Cloud app catalog and utilizing tools like Cloud Discovery and Microsoft Defender for Cloud Apps, you can refer to the following resources:
By effectively managing the Cloud app catalog, organizations can ensure that their cloud environment remains secure, compliant, and aligned with their business objectives.
Plan and implement identity governance (20–25%)
Plan and implement entitlement management in Microsoft Entra
Plan Entitlements
When planning entitlements, it is essential to understand the concept of granting access to resources within an organization. Entitlements refer to the rights or privileges assigned to users or groups, allowing them to perform specific actions on resources or services. Proper planning of entitlements is crucial for maintaining security and ensuring that users have the necessary access to fulfill their roles without overprovisioning permissions.
Key Considerations for Planning Entitlements:
Identify Resources: Determine which resources or services users need access to. This could include files, applications, databases, or network resources.
Define Roles and Responsibilities: Establish clear roles within the organization and outline the responsibilities associated with each role. This helps in mapping out the access rights each role requires.
Least Privilege Principle: Apply the least privilege principle by granting users only the access rights they need to perform their job functions. This minimizes the risk of unauthorized access or data breaches.
Access Reviews: Conduct regular access reviews to ensure that entitlements are still appropriate for users’ roles and that there are no orphaned accounts or excessive permissions.
Segregation of Duties: Ensure that duties are segregated to prevent conflicts of interest and reduce the risk of fraud. This involves splitting responsibilities and access rights among multiple users or groups.
Automate Provisioning and Deprovisioning: Implement automated processes for provisioning and deprovisioning user access. This helps in managing entitlements efficiently and reduces the risk of human error.
Audit and Compliance: Maintain an audit trail of entitlements and access patterns. This is important for compliance with regulatory requirements and for investigating security incidents.
Entitlement Management Tools: Utilize entitlement management tools to streamline the process of managing user access. These tools can help in defining, enforcing, and reviewing entitlements across the organization.
For additional information on planning entitlements and managing access within an organization, you can refer to the following resources:
- Azure Active Directory documentation
- Identity and access management in Azure
- Best practices for Azure role-based access control (RBAC)
By following these guidelines and utilizing the available resources, organizations can effectively plan entitlements and ensure that users have the appropriate access to perform their duties securely and efficiently.
Plan and implement identity governance (20–25%)
Plan and implement entitlement management in Microsoft Entra
Create and Configure Catalogs
When creating and configuring catalogs, it is essential to understand that a catalog serves as a centralized repository where information about digital or physical resources is stored and managed. In the context of Microsoft technologies, catalogs often refer to directories or listings of services, applications, or resources that are available for use within an organization.
To create and configure catalogs effectively, follow these general steps:
Identify the Scope and Purpose: Determine what the catalog will be used for and what resources it will contain. This could be a list of applications available to users, services provided by the IT department, or a directory of assets.
Design the Catalog Structure: Decide on the structure of the catalog. This includes defining categories, subcategories, and the metadata that should be associated with each item in the catalog.
Implement Access Control: Set up access control to ensure that only authorized users can view or modify the catalog. This might involve integrating with identity providers and setting up roles and permissions.
Populate the Catalog: Add items to the catalog. This can be done manually or by importing data from other systems. Ensure that each item has the necessary metadata and is categorized correctly.
Maintain the Catalog: Regularly update the catalog to add new resources, remove outdated items, and modify entries as needed. This maintenance ensures that the catalog remains a reliable source of information.
Integrate with Other Services: If applicable, integrate the catalog with other services such as service desks, portals, or provisioning systems to streamline the user experience and automate resource management.
For additional information on creating and configuring catalogs within Microsoft technologies, you can refer to the following resources:
- Azure Active Directory documentation
- Microsoft Entra documentation
- Azure App Configuration documentation
- Microsoft Identity Manager documentation
Remember to review the specific documentation related to the service or application you are using to ensure that you follow the best practices and guidelines provided by Microsoft.
Plan and implement identity governance (20–25%)
Plan and implement entitlement management in Microsoft Entra
Create and Configure Access Packages
Access packages are a part of Azure Active Directory’s (Azure AD) entitlement management and are used to group together resources that users need access to. They simplify the process of managing and controlling access to resources within an organization or across organizations. Here is a detailed explanation of how to create and configure access packages:
Define the Catalog: Before creating an access package, you need to define a catalog in Azure AD entitlement management. A catalog is a container for the resources that you want to manage access to. It can include applications, Azure AD groups, and SharePoint Online sites.
Create the Access Package: Once the catalog is set up, you can create an access package. Navigate to the Azure AD entitlement management in the Azure portal and select ‘Access packages’. Here, you can create a new package by providing a name, description, and selecting the catalog you created earlier.
Add Resources: After creating the access package, add resources to it. You can select from the resources you’ve included in your catalog. For each resource, you can define specific roles that determine the level of access users will receive.
Define Policies: Policies control who can request access and the conditions under which they can do so. You can create policies for:
- Requests: Define who can request access to the package, such as all users or specific groups.
- Approval: Determine if approvals are required. If so, specify approvers and set up multi-stage approvals if necessary.
- Access Reviews: Set up periodic reviews to ensure that access is still needed and revoke it if not.
Configure Request and Approval Workflow: Customize the request process by adding questions for users to answer when they request access. Configure the approval workflow to include one or more approvers and set up notifications.
Set Lifecycle: Define the duration for which the access will be granted. You can set an expiration date for the access package or make it indefinite. You can also configure automatic renewal or access reviews to manage ongoing access.
Publish the Access Package: Once the access package is configured, publish it so that it becomes available for users to request access.
Monitor and Manage Access: After users start requesting access, monitor the access package for any issues and manage access as needed. Use the reporting features to track who has access and review access assignments periodically.
For additional information on creating and configuring access packages, you can refer to the following resources:
- What is entitlement management?
- Create a new access package
- Configure policies for an access package
- Manage access package lifecycle
By following these steps, you can effectively create and configure access packages to manage and secure access to resources within your organization.
Plan and implement identity governance (20–25%)
Plan and implement entitlement management in Microsoft Entra
Manage Access Requests
When managing access requests within an Azure environment, it is essential to understand the process of authorizing and authenticating security principals to access resources. This process typically involves two key steps: authentication and authorization.
Authentication
Authentication is the first step, where the security principal’s
identity is verified. In Microsoft Entra, this is done through OAuth 2.0
tokens. When a security principal requests access to an App
Configuration resource, they must authenticate their identity and obtain
an OAuth 2.0 token. The token request is made to the resource URL
https://login.microsoftonline.com/{tenantID}, where
{tenantID} is the Microsoft Entra tenant ID to which the
service principal belongs https://learn.microsoft.com/en-us/azure/azure-app-configuration/concept-enable-rbac
.
For applications running within Azure entities, such as Azure Functions, Azure Web Apps, or Azure VMs, managed identities can be used to access resources. Managed identities provide a way for applications to access Azure services securely without needing to manage credentials. To authenticate requests made by a managed identity to Azure App Configuration, refer to the guide on Authenticating access to Azure App Configuration resources with Microsoft Entra ID and managed identities for Azure Resources https://learn.microsoft.com/en-us/azure/azure-app-configuration/concept-enable-rbac .
Authorization
The second step is authorization, which involves assigning one or more Azure roles to the security principal. These roles define the permissions that the principal has over App Configuration resources. Azure App Configuration offers built-in roles that include specific sets of permissions. The roles assigned to a security principal determine the level of access they have https://learn.microsoft.com/en-us/azure/azure-app-configuration/concept-enable-rbac .
For example, when using a user-assigned managed identity with Azure Key Vault, access policies need to be defined. This can be done through the Azure portal by selecting the Key Vault, adding an access policy, and assigning the appropriate permissions and principal. If using Azure role-based access control, the user-assigned managed identity should be assigned the “Key Vault Secrets User” role to access the Azure Key Vault https://learn.microsoft.com/en-us/azure/application-gateway/key-vault-certs .
Additional Resources
For further information on managing access and permissions within Azure services, the following resources may be helpful:
- To understand how to assign a managed identity access to a resource, you can follow the guide on Assigning a managed identity access to a resource https://learn.microsoft.com/en-us/azure/application-gateway/key-vault-certs .
- For a comprehensive understanding of Azure App Configuration and how to use it effectively, continue to the Azure CLI samples provided in the tutorial CLI samples https://learn.microsoft.com/en-us/azure/azure-app-configuration/howto-integrate-azure-managed-service-identity .
By following these guidelines and utilizing the provided resources, you can effectively manage access requests and ensure that security principals have the appropriate level of access to Azure resources.
Plan and implement identity governance (20–25%)
Plan and implement entitlement management in Microsoft Entra
Implement and Manage Terms of Use (ToU)
When implementing and managing Terms of Use (ToU) in an Azure environment, it is essential to understand that ToU policies are a part of Azure Active Directory (Azure AD) Conditional Access. These policies help ensure that users review and accept your organization’s terms before gaining access to corporate resources.
Steps to Implement ToU Policies:
- Create the ToU Document:
- Draft the terms that users must accept. This document can include guidelines, privacy policies, or user behavior policies.
- Configure ToU Policy in Azure AD:
- Navigate to the Azure portal and select Azure Active Directory.
- Go to the “Security” section, then “Conditional Access,” and choose “Terms of use.”
- Click on “New terms” to create a new ToU policy.
- Upload the ToU document and configure the policy settings, such as name, display name, and language.
- Set the conditions under which the ToU must be accepted, such as on every sign-in or only once.
- Enforce ToU with Conditional Access Policies:
- Still within the Conditional Access section, create a new policy.
- Define the users and groups this ToU policy will apply to.
- Under “Access controls,” select “Grant,” then choose “Require terms of use.”
- Enable the policy and set the applicable conditions, such as sign-in risk level or location-based restrictions https://learn.microsoft.com/security/benchmark/azure/baselines/azure-app-configuration-security-baseline .
- Monitor and Report Compliance:
- Use Azure AD’s reporting features to monitor who has accepted the ToU.
- Regularly review and update the ToU policy to reflect any changes in regulations or company policies.
Additional Information:
Azure AD Conditional Access Policies: These policies are crucial for controlling data plane access and can be tailored to specific organizational needs. They are not enabled by default and require customer configuration https://learn.microsoft.com/security/benchmark/azure/baselines/azure-app-configuration-security-baseline .
Azure CLI Commands: To manage ToU policies, you may need to obtain certain IDs using Azure CLI commands such as
az ad signed-in-user show --query objectIdto get your principal ID https://learn.microsoft.com/en-us/azure/confidential-ledger/quickstart-cli oraz ad sp list --show-mine -o tableto list service principals and their ObjectIds https://learn.microsoft.com/en-us/azure/confidential-ledger/quickstart-template .
For more detailed guidance on implementing and managing Terms of Use in Azure AD, you can refer to the official documentation provided by Microsoft:
- Azure Active Directory Conditional Access Policies Overview https://learn.microsoft.com/security/benchmark/azure/baselines/azure-app-configuration-security-baseline .
- Manage Terms of Use in Azure Active Directory.
By following these steps and utilizing the resources provided, you can effectively implement and manage Terms of Use within your organization to enhance security and compliance.
Plan and implement identity governance (20–25%)
Plan and implement entitlement management in Microsoft Entra
Manage the Lifecycle of External Users
Managing the lifecycle of external users involves several key steps to ensure secure access to resources and compliance with organizational policies. Here’s a detailed explanation of the process:
1. Onboarding External Users
When onboarding external users, it’s important to establish their identity and assign appropriate roles. Access to the Azure Portal’s ledger explorer, for instance, requires users to have a Reader, Contributor, or Administrator role. To manage these users, refer to the guide on managing Microsoft Entra token-based users in Azure confidential ledger https://learn.microsoft.com/en-us/azure/confidential-ledger/quickstart-ledger-explorer .
2. Assigning and Obtaining Principal ID
For certain operations, such as creating a confidential ledger,
you’ll need the Microsoft Entra principal ID of the external user. This
ID can be obtained using the Azure CLI with the
az ad signed-in-user show --query objectId command https://learn.microsoft.com/en-us/azure/confidential-ledger/quickstart-cli
.
3. Monitoring Sign-In Activities
It’s crucial to monitor successful sign-in attempts by external users, especially when using pass-through authentication. Organizations should search the audit log for activities performed by the external user and investigate any sharing activities in SharePoint that involve the external user. For a detailed investigation, exporting the audit log search results is recommended https://learn.microsoft.com/en-us/training/modules/investigate-threats-using-audit-in-microsoft-365-defender-microsoft-purview-standard/7-use-audit-log-searches-to-investigate-common-support-issues .
4. Implementing Conditional Access
To contain threats and control access to corporate resources, implement Conditional Access policies. This requires roles such as Global Administrator, Security Administrator, or Conditional Access Administrator in Azure AD, and security administrator rights in Intune https://learn.microsoft.com/en-us/training/modules/configure-manage-automation-microsoft-defender-for-endpoint/5-block-risk-devices .
5. Auditing and Reporting
Regularly audit and report on the activities of external users. This includes reviewing sign-in logs, access to shared resources, and modifications to documents. The User Principal Name (UPN) of the external user is a key identifier in audit records https://learn.microsoft.com/en-us/training/modules/investigate-threats-using-audit-in-microsoft-365-defender-microsoft-purview-standard/7-use-audit-log-searches-to-investigate-common-support-issues .
6. Offboarding External Users
When an external user’s collaboration ends, it’s important to revoke their access to prevent unauthorized entry. This involves removing their roles and permissions across all systems and ensuring that any shared resources are no longer accessible to them.
Additional Resources
- For managing Microsoft Entra token-based users in Azure confidential ledger, visit [Manage Microsoft Entra token-based users in Azure confidential ledger] https://learn.microsoft.com/en-us/azure/confidential-ledger/quickstart-ledger-explorer .
- To obtain your Microsoft Entra principal ID, use the Azure CLI command as detailed [here] https://learn.microsoft.com/en-us/azure/confidential-ledger/quickstart-cli .
- For investigating sign-in attempts and sharing activities, refer to [Use sharing auditing in the audit log] https://learn.microsoft.com/en-us/training/modules/investigate-threats-using-audit-in-microsoft-365-defender-microsoft-purview-standard/7-use-audit-log-searches-to-investigate-common-support-issues .
- To learn about the roles required for Conditional Access and the steps to enable it, check out the guide [here] https://learn.microsoft.com/en-us/training/modules/configure-manage-automation-microsoft-defender-for-endpoint/5-block-risk-devices .
By following these steps, organizations can effectively manage the lifecycle of external users, ensuring secure and compliant access to their resources.
Plan and implement identity governance (20–25%)
Plan and implement entitlement management in Microsoft Entra
Configure and Manage Connected Organizations
When configuring and managing connected organizations, it is essential to understand the integration of various services and tools that facilitate collaboration and security across different entities. This involves setting up trust relationships, managing shared services, and ensuring compliance with governance policies.
Trust Relationships and Federation
Establishing trust relationships between organizations allows for secure collaboration. Federation services, such as Microsoft Entra ID, enable organizations to trust identities provided by external partners. By setting up federation, users from connected organizations can authenticate and access resources without needing separate accounts.
Compliance and Information Governance
Compliance is a critical aspect of managing connected organizations. Tools like the Microsoft Purview compliance portal help manage compliance needs across Microsoft 365 services. This includes solutions for information governance, classification, case management, and more, ensuring that data shared between organizations adheres to regulatory standards.
Identity and Access Management
Managing identities is crucial for security and operational efficiency. Microsoft Entra ID Protection detects potential vulnerabilities affecting an organization’s identities and investigates suspicious incidents. It also sets up automated responses to resolve identity-related issues, ensuring that only authorized users from connected organizations have access to resources.
Information Protection
Protecting sensitive information shared between organizations is paramount. Azure Information Protection allows you to configure and manage the classification and protection of your organization’s email and documents. It also provides reports to monitor label usage and identify sensitive information that should be protected.
Security Solutions Integration
Integrating third-party security solutions with Microsoft’s security tools can enhance the overall security posture. Microsoft Defender for Cloud offers advanced threat protection for Azure and non-Azure workloads, both in the cloud and on-premises. It ensures that data centers are protected and helps secure Azure services quickly with autoprovisioned, native protection.
For more information on configuring and managing connected organizations, you can refer to the following resources: - Microsoft Purview compliance portal - Microsoft Entra ID - Microsoft Entra ID Protection - Azure Information Protection - Microsoft Defender for Cloud
By leveraging these tools and services, organizations can effectively manage their connected environments, ensuring secure collaboration, compliance with governance policies, and protection of sensitive information https://learn.microsoft.com/en-us/training/modules/mitigate-incidents-microsoft-365-defender/2-use-microsoft-security-center-portal .
Plan and implement identity governance (20–25%)
Plan, implement, and manage access reviews in Microsoft Entra
Plan for Access Reviews
Access reviews are a critical component of identity governance in Azure Active Directory (Azure AD). They enable organizations to efficiently manage group memberships, access to enterprise applications, and role assignments. Regular access reviews help ensure that users have appropriate access to resources and comply with corporate policies.
Key Considerations for Planning Access Reviews
Determine the Scope: Identify which resources, applications, and groups require access reviews. This could include Azure AD groups, enterprise applications, and Azure AD roles.
Define Reviewers: Assign individuals or groups responsible for performing the reviews. Reviewers can be the resource owners, group owners, or other designated personnel.
Set Review Frequency: Decide how often access reviews should occur. This could be monthly, quarterly, or annually, depending on the sensitivity of the resource and organizational requirements.
Establish Policies: Create policies that dictate what happens when a review is completed. For example, users with unnecessary access might be removed automatically or upon manual approval.
Automate Reviews: Utilize Azure AD’s capabilities to automate the access review process. Automation can help reduce the administrative burden and ensure reviews are conducted consistently.
Review Results: After each review cycle, examine the results to understand access patterns and make adjustments to access policies as needed.
Record-Keeping: Ensure that records of access reviews are maintained for compliance purposes. This includes who was reviewed, who performed the review, and any actions taken as a result.
Notifications: Set up notifications to alert reviewers when access reviews are pending, in progress, or completed.
Integration with Other Systems: Consider how access reviews will integrate with other identity governance systems, such as privileged identity management and entitlement management.
Training and Communication: Provide training for reviewers to ensure they understand the process and the importance of access reviews. Communicate the purpose and outcomes of access reviews to the broader organization.
Additional Resources
For more detailed guidance on planning and implementing access reviews in Azure AD, refer to the following resources:
- Azure AD Access Reviews Documentation: Learn more
- Best Practices for Access Reviews: Learn more
- How to Configure Access Reviews: Learn more
By following these steps and utilizing the provided resources, organizations can establish a robust access review process that enhances security and compliance within their Azure AD environment.
Plan and implement identity governance (20–25%)
Plan, implement, and manage access reviews in Microsoft Entra
Create and Configure Access Reviews
Access reviews are a critical feature in Microsoft Entra (formerly known as Azure Active Directory) that enable organizations to manage and review access rights within their environment. This process helps ensure that users have appropriate access to resources and comply with company policies and regulations.
Steps to Create and Configure Access Reviews:
Initiate Access Review Creation: Navigate to the Microsoft Entra portal and select the “Identity Governance” section. Here, you will find the option to create a new access review.
Define the Scope: Determine which users or groups’ access you want to review. You can select groups, applications, or roles to be reviewed.
Configure Review Settings: Set up the frequency of the review (one-time, recurring, etc.), the duration of the review period, and the start date. Decide if reviewers should be the users themselves, group owners, or selected individuals.
Define Review Parameters: Specify what should happen upon approval or denial of access. You can choose to remove access automatically or require manual intervention.
Advanced Settings: Configure additional settings such as reminders, decision helpers (like recommendations based on user activity), and auto-review of access.
Review and Create: Before finalizing, review all settings to ensure they align with your organization’s policies. Once confirmed, create the access review.
Additional Information:
Access Review Documentation: For more detailed guidance on creating and configuring access reviews, refer to the official Microsoft documentation: Azure AD access reviews.
Best Practices: Familiarize yourself with best practices for access reviews to enhance security and compliance in your organization. This includes regular reviews, clear communication with reviewers, and proper documentation of decisions and actions taken.
Automation: Consider automating the access review process where possible to maintain consistent review cycles and reduce administrative overhead.
By following these steps and utilizing the resources provided, you can effectively create and configure access reviews to maintain a secure and compliant access environment within your organization.
Plan and implement identity governance (20–25%)
Plan, implement, and manage access reviews in Microsoft Entra
Monitor Access Review Activity
Monitoring access review activity is a critical component of managing identities and ensuring that the right individuals have the appropriate access to resources within an organization. Access reviews are a feature in Azure Active Directory (Azure AD) that allows organizations to efficiently manage group memberships, access to enterprise applications, and role assignments.
Key Steps for Monitoring Access Review Activity:
Initiate Access Reviews: Set up access reviews for groups, applications, and roles in Azure AD to determine whether users should maintain their current permissions.
Review and Analyze Reports: After an access review is completed, analyze the reports to understand the actions taken by the reviewers. Look for any approvals or denials of access and the reasons provided.
Use Azure Activity Logs: Azure Activity Logs provide a record of operations that are submitted to your Azure subscription. These logs can be used to monitor the access review process and identify any suspicious activities https://learn.microsoft.com/en-us/training/modules/remediate-azure-defender-security-alerts/6-respond-alerts-from-azure-resources .
Investigate Alerts: If there are any alerts related to access review activities, such as unexpected changes in permissions or unauthorized access attempts, investigate these using the Alerts dashboard. The Forensic evidence tab can provide detailed information about the activities that triggered the alerts https://learn.microsoft.com/en-us/training/modules/m365-compliance-insider-manage-insider-risk/forensic-evidence .
Review Forensic Evidence: For alerts with forensic evidence, review the captured clips and transcripts to understand the context of the user’s actions during the activity. This can help in identifying any malicious intent or policy violations.
Regular Audits: Conduct regular audits of access review activities to ensure compliance with organizational policies and regulatory requirements. This includes reviewing the history of access reviews and the decisions made.
Update Access Review Policies: Based on the findings from monitoring and audits, update the access review policies as necessary to address any gaps or to adapt to changes in the organization’s environment.
Additional Resources:
For more information on Azure Activity Logs and how to use them for monitoring, visit the Azure documentation on Activity Logs: Azure Activity Logs.
To understand how to set up and manage access reviews in Azure AD, refer to the official guide on access reviews: Azure AD Access Reviews.
By following these steps and utilizing the available resources, organizations can effectively monitor access review activities and maintain a secure and compliant environment.
Plan and implement identity governance (20–25%)
Plan, implement, and manage access reviews in Microsoft Entra
Manually Respond to Access Review Activity
Access reviews in Azure Active Directory (Azure AD) are a critical feature that allows organizations to manage and control access to their resources efficiently. When conducting an access review, it is essential to understand how to manually respond to the activity to ensure that only the right individuals have the necessary access.
Steps to Manually Respond to Access Review Activity:
Initiate the Access Review: An access review must be initiated to determine if users should maintain their access rights. This can be done by an administrator or a designated reviewer.
Review the Access: The reviewer will receive a notification to start the review process. They will need to sign in to the Azure AD portal and navigate to the ‘Identity Governance’ section, where they can find the access review.
Evaluate User Access: The reviewer will evaluate the list of users and their access rights. They will need to decide whether to approve, deny, or revoke access for each user based on whether their access is still necessary.
Provide Justification: If access is denied or revoked, the reviewer should provide a justification for their decision. This helps maintain an audit trail and transparency in the access review process.
Complete the Review: Once all users have been reviewed, and decisions have been made, the reviewer must submit their responses to complete the access review process.
Apply the Decisions: After the review is completed, the system will automatically apply the decisions made by the reviewer. Users who were approved will retain their access, while those denied will have their access removed.
Document the Review: It is good practice to document the outcomes of the access review for compliance and auditing purposes.
Additional Information:
For more detailed guidance on how to conduct an access review, including setting up, configuring, and managing access reviews, you can refer to the following resources:
- Azure AD Access Reviews Documentation: Learn more
- How to Configure Access Reviews: Learn more
- Managing Access Reviews: Learn more
By following these steps and utilizing the provided resources, you can effectively respond to access review activities and maintain secure and compliant access to your organization’s resources.
Plan and implement identity governance (20–25%)
Plan and implement privileged access
Plan and Manage Azure Roles in Microsoft Entra Privileged Identity Management (PIM)
When planning and managing Azure roles in Microsoft Entra Privileged Identity Management (PIM), it is essential to understand the scope and hierarchy of role assignments, as well as the settings and processes involved in managing these roles effectively.
Understanding Scope and Hierarchy
Azure provides four levels of scope: management groups, subscriptions, resource groups, and resources. Settings applied at a higher level are inherited by the lower levels. For instance, applying a policy to a subscription means all resource groups and resources within that subscription inherit the policy https://learn.microsoft.com/en-us/azure/firewall/../azure-resource-manager/management/overview .
Role Assignments in PIM
Microsoft Entra PIM allows for the assignment of Azure roles to users, groups, and service principals on a just-in-time basis, enhancing security by limiting the time span during which permissions are available. To manage role assignments in PIM:
Identify the roles needed for users and groups within your organization. Azure has built-in roles that can be assigned to security principals, which determine the permissions they possess https://learn.microsoft.com/en-us/azure/azure-app-configuration/concept-enable-rbac .
Configure role settings in PIM to control how and when the roles can be activated. Settings include the duration of the role activation, approval requirements to activate the role, and notification settings upon role activation or request.
Assign roles to eligible users, groups, or service principals. This can be done through the Azure portal, where you can select the role and assign it to the appropriate security principal.
Monitor role activations and assignments to ensure compliance and to review for any unauthorized access or changes. PIM provides audit logs and alerts for tracking these activities.
Managing Identities and Access
For managing identities and access, refer to Microsoft Entra ID, which provides comprehensive information on identity and access management within Azure https://learn.microsoft.com/en-us/azure/firewall/../azure-resource-manager/management/overview .
Additional Resources
- For more information on management groups and scope levels, visit Management Groups Overview.
- To understand policies and how they are applied, see Azure Policy Overview.
- Learn about managing identities and access through Microsoft Entra ID at Microsoft Entra ID.
- For details on how to authenticate and authorize access to Azure App Configuration, refer to Authenticate access to Azure App Configuration resources with Microsoft Entra ID and managed identities for Azure Resources.
By following these guidelines, you can effectively plan and manage Azure roles within Microsoft Entra PIM, ensuring that your organization’s resources are accessed securely and in compliance with your governance policies.
Plan and implement identity governance (20–25%)
Plan and implement privileged access
Plan and Manage Azure Resources in PIM (Privileged Identity Management)
When planning and managing Azure resources using Azure AD Privileged Identity Management (PIM), it is essential to understand the scope and settings that can be applied to manage access and assignments effectively.
Scope of Azure Resources
Azure resources can be organized and managed at different levels of scope: management groups, subscriptions, resource groups, and individual resources. Settings applied at a higher level of scope, such as a management group, will be inherited by the lower levels, such as subscriptions and resource groups within that management group https://learn.microsoft.com/en-us/azure/firewall/../azure-resource-manager/management/overview .
Privileged Identity Management Settings
PIM provides the ability to control and manage privileged access within your Azure environment. Key settings include:
- Role Assignments: Assigning users to Azure roles for a specified duration with just-in-time (JIT) privileged access to reduce the risk of excessive, unnecessary, or misused access permissions.
- Role Activation: Users who are assigned to a privileged role may be required to perform a multi-factor authentication (MFA) challenge or provide a business justification when activating their role.
- Access Reviews: Regularly reviewing and certifying the assignments of privileged roles to ensure that only the necessary individuals have access.
- Alerts and Notifications: Configuring alerts for certain activities within PIM, such as when a privileged role is activated.
Managing Assignments in PIM
Assignments in PIM are crucial for ensuring that only authorized users have access to perform certain actions within Azure. To manage these assignments, you should:
- Identify the roles needed for managing Azure resources and determine which users require these roles.
- Configure role settings to enforce policies such as MFA on role activation, assignment duration, and approval to activate roles.
- Assign eligible roles to users, which allows them to activate the role when needed, rather than having permanent access.
- Monitor role activations and access patterns to ensure compliance with organizational policies.
For additional information on managing Azure resources with PIM, including detailed instructions and best practices, refer to the following resources:
- Azure AD Privileged Identity Management documentation
- How to manage the lifecycle of a role assignment in PIM
- How to configure PIM settings
By following these guidelines and utilizing the resources provided, you can effectively plan and manage Azure resources within PIM, ensuring that privileged access is granted securely and in compliance with your organization’s policies.
Plan and implement identity governance (20–25%)
Plan and implement privileged access
Plan and Configure Privileged Access Groups
Privileged Access Groups are designed to manage and secure privileged access within an organization. Planning and configuring these groups involves several key steps to ensure that access is controlled and monitored effectively.
Understanding Privileged Access
Privileged access refers to the ability to perform administrative and management tasks that are not available to regular users. These tasks can include modifying system configurations, managing user accounts, and accessing sensitive data. Due to the elevated permissions, it is crucial to have a robust system in place to manage who has privileged access, when they have it, and what they can do with it.
Planning Privileged Access Groups
When planning privileged access groups, consider the following:
Identify Roles and Responsibilities: Determine which roles within your organization require privileged access. Assign specific responsibilities to these roles to minimize the scope of access.
Principle of Least Privilege: Ensure that users are granted only the access necessary to perform their job functions. This reduces the risk of unauthorized access to sensitive information.
Access Reviews: Regularly review and validate privileged access rights. Remove access that is no longer required for a user’s role.
Segregation of Duties: Separate duties among different individuals to reduce the risk of a single point of failure or potential for abuse of privileged access.
Configuring Privileged Access Groups
To configure privileged access groups, follow these steps:
Create Privileged Access Groups: Establish groups that correspond to the different levels of privileged access required. For example, create separate groups for system administrators, network administrators, and database administrators.
Assign Users to Groups: Add users to the privileged access groups based on their roles and responsibilities. Ensure that users are only in groups that are necessary for their work.
Implement Access Controls: Use access controls to define what each group can do. This includes setting permissions for accessing resources, performing specific tasks, and defining conditions under which access is granted.
Monitor and Audit: Implement monitoring and auditing mechanisms to track the use of privileged access. This helps in detecting any unauthorized or suspicious activities.
Emergency Access: Plan for emergency access scenarios where additional privileges may be required temporarily. Ensure that there are controls and oversight for these situations.
For more information on privileged access and best practices, you can refer to the Microsoft cloud security benchmark documentation on Privileged Access Microsoft cloud security benchmark: Privileged access https://learn.microsoft.com/security/benchmark/azure/baselines/azure-app-configuration-security-baseline .
Additional Resources
- For a deeper understanding of scope levels in Azure and how they relate to managing access, visit Azure scope levels https://learn.microsoft.com/en-us/azure/firewall/../azure-resource-manager/management/overview .
- To learn about managing identities and access in Azure, see Microsoft Entra ID https://learn.microsoft.com/en-us/azure/firewall/../azure-resource-manager/management/overview .
- For guidance on creating service principals and assigning access rights, refer to How to: Use the portal to create a Microsoft Entra application and service principal that can access resources https://learn.microsoft.com/en-us/azure/firewall-manager/deploy-trusted-security-partner .
By following these guidelines and utilizing the provided resources, you can effectively plan and configure privileged access groups to secure your organization’s critical assets.
Plan and implement identity governance (20–25%)
Plan and implement privileged access
Manage the PIM Request and Approval Process
Privileged Identity Management (PIM) is a service in Azure that enables you to manage, control, and monitor access within your organization. This includes providing just-in-time privileged access to Azure AD and Azure resources, enforcing on-demand, approval-based activation, and requiring justification to activate privileged roles. Managing the PIM request and approval process involves several steps to ensure that users are granted the necessary permissions securely and efficiently.
Steps to Manage PIM Requests and Approvals:
Initiate a PIM Request: A user or an administrator initiates a request for privileged access. This request can be for Azure AD roles or Azure resource roles.
Justification for Role Activation: The user must provide a justification for why they need privileged access. This is a critical step to ensure that access is granted based on valid business reasons.
Approval Workflow: Depending on the organization’s policies, the request may go through an approval workflow. This workflow can be configured to require one or more approvers before access is granted.
Review and Approve Requests: Approvers, who are typically part of a designated role group, review the request and the provided justification. They can either approve or deny the request based on its merit and compliance with company policies.
Activation of Privileged Role: Once approved, the role is activated for the user. The activation can be immediate or scheduled for a future time, and it can have a predefined duration after which the privileges are automatically revoked.
Monitoring and Auditing: All PIM requests and activations are logged for auditing purposes. Administrators can review these logs to monitor compliance and ensure that privileged access is being used appropriately.
Revoking Access: If necessary, approval for specific users can be revoked, preventing them from future privileged access activations. However, revoking approval does not affect any existing privileged sessions or previously captured evidence of their activities.
For additional information on managing identity and access in Azure, you can refer to the following resources:
- Microsoft cloud security benchmark: Identity management https://learn.microsoft.com/security/benchmark/azure/baselines/azure-front-door-security-baseline .
- Microsoft cloud security benchmark: Privileged access https://learn.microsoft.com/security/benchmark/azure/baselines/azure-app-configuration-security-baseline .
By following these steps and utilizing the resources provided, you can effectively manage the PIM request and approval process within your organization, ensuring that privileged access is granted in a controlled and secure manner.
Plan and implement identity governance (20–25%)
Plan and implement privileged access
Analyze PIM Audit History and Reports
Privileged Identity Management (PIM) is a service in Azure that enables you to manage, control, and monitor access within your organization. This includes providing just-in-time privileged access to Azure AD and Azure resources, enforcing multi-factor authentication to activate any role, and using approval workflows to gain access to privileged roles.
Audit History
The audit history in PIM provides a record of all the activities related to role assignments and activations. By analyzing the audit history, you can:
- Track Changes: See when privileged roles are activated or deactivated, and by whom.
- Review Approvals and Denials: Understand who approved or denied requests for privileged access.
- Monitor Just-in-Time Activation: Ensure that just-in-time access is being used correctly and that privileged roles are not being activated without proper justification.
Reports
PIM also offers several reports that can help you analyze the security posture of your organization:
- Role Assignment Report: Lists all the users assigned to privileged roles, along with the assignment type (permanent or eligible).
- Role Activation Report: Shows instances when a privileged role was activated, including the duration and reason for activation.
- Access Review Report: Provides details on the outcomes of access reviews, which are periodic reviews of role assignments to ensure that users still require the privileges granted to them.
By regularly reviewing these reports, you can ensure that privileged access is being managed and utilized securely and in compliance with your organization’s policies.
For more information on how to analyze PIM audit history and reports, you can refer to the following resources:
- Microsoft Cloud Security Benchmark: Identity Management https://learn.microsoft.com/security/benchmark/azure/baselines/azure-front-door-security-baseline .
- Microsoft Cloud Security Benchmark: Privileged Access https://learn.microsoft.com/security/benchmark/azure/baselines/azure-app-configuration-security-baseline .
These resources provide guidance on best practices for identity and access management, including how to effectively use PIM to enhance your organization’s security posture.
Plan and implement identity governance (20–25%)
Plan and implement privileged access
Create and Manage Break-Glass Accounts
Break-glass accounts are a critical component of a robust security strategy. They are highly privileged emergency accounts that are used when normal administrative accounts are not accessible, for example, during an outage of the identity provider or if there is a compromise of the regular administrative accounts.
Creation of Break-Glass Accounts
To create break-glass accounts, follow these best practices:
- Separate Accounts: Ensure that break-glass accounts are separate from regular user accounts and are not associated with any individual employee.
- Strong Authentication: Use complex passwords that are changed regularly and ensure they are stored securely, such as in a password manager.
- Limited Usage: These accounts should only be used in emergency situations and not for everyday administrative tasks.
- Audit and Monitoring: Implement strict audit policies and monitoring to track when these accounts are used.
Management of Break-Glass Accounts
Managing break-glass accounts involves:
- Regular Validation: Periodically verify that the break-glass accounts are operational and that their credentials are up to date.
- Access Control: Limit the number of individuals who have access to break-glass account credentials.
- Review and Update: Regularly review the break-glass procedures and update them as necessary to adapt to new security challenges or changes in the organization’s infrastructure.
Additional Information
For more detailed guidance on implementing and managing break-glass accounts, refer to the following resources:
- Azure AD Authentication and Authorization Overview: Learn more.
- Using Connection Strings vs Azure AD in Azure App Configuration Best Practices: Learn more.
It is important to note that while the documents provided do not explicitly discuss break-glass accounts, the principles of strong authentication, access control, and regular review are applicable to the management of these accounts https://learn.microsoft.com/security/benchmark/azure/baselines/azure-app-configuration-security-baseline .
Plan and implement identity governance (20–25%)
Monitor identity activity by using logs, workbooks, and reports
Designing a Strategy for Monitoring Microsoft Entra
When designing a strategy for monitoring Microsoft Entra, it is essential to consider the various tools and tables available for sign-in investigations, including conditional access policies. Here are the steps and resources you can utilize to create an effective monitoring strategy:
- Utilize Microsoft 365 Defender for Threat Hunting:
- Leverage the
AADSignInEventsBetatable in Microsoft 365 Defender to track sign-in events and conditional access policy evaluations https://learn.microsoft.com/en-us/training/modules/mitigate-incidents-microsoft-365-defender/9-investigate-azure-ad-sign-in-logs . - This table provides insights into the default columns such as Date, User, Application, Status, and Conditional Access (policy applied) https://learn.microsoft.com/en-us/training/modules/mitigate-incidents-microsoft-365-defender/9-investigate-azure-ad-sign-in-logs .
- Leverage the
- Access Sign-in Logs through Microsoft Entra ID Log
Analytics:
- Use the
SigninLogstable in Microsoft Entra ID Log Analytics for a detailed view of sign-in activities https://learn.microsoft.com/en-us/training/modules/mitigate-incidents-microsoft-365-defender/9-investigate-azure-ad-sign-in-logs . - To access the Sign-in Logs blade, navigate to Microsoft Entra ID in the Azure portal and select Sign-in Logs in the Monitoring Group https://learn.microsoft.com/en-us/training/modules/mitigate-incidents-microsoft-365-defender/9-investigate-azure-ad-sign-in-logs .
- Use the
- Explore Microsoft Sentinel Workbooks:
- Microsoft Sentinel Workbooks offer interactive reports that combine text, tables, charts, and tiles to visualize security data https://learn.microsoft.com/en-us/training/modules/query-data-sentinel/1-introduction .
- Create and use Microsoft Sentinel Workbooks to generate reports and monitor security incidents effectively https://learn.microsoft.com/en-us/training/modules/query-data-sentinel/1-introduction .
- These workbooks can help visualize security data and use queries to generate reports, exploring the functionalities of a workbook https://learn.microsoft.com/en-us/training/modules/query-data-sentinel/1-introduction .
- Implement Alerts with Azure Monitor:
- Configure Azure Monitor alerts to proactively notify you of important conditions found in your monitoring data https://learn.microsoft.com/en-us/azure/azure-app-configuration/monitor-app-configuration .
- Set alerts on metrics, logs, and the activity log to identify and address system issues promptly https://learn.microsoft.com/en-us/azure/azure-app-configuration/monitor-app-configuration .
- Review common and recommended alert rules for App Configuration to optimize your monitoring strategy https://learn.microsoft.com/en-us/azure/azure-app-configuration/monitor-app-configuration .
- Best Practices for DDoS Protection and Mitigation:
- Ensure your applications and infrastructure are designed with redundancy and resilience https://learn.microsoft.com/en-us/azure/ddos-protection/ddos-protection-overview .
- Prepare an incident response plan for a coordinated response to DDoS attacks https://learn.microsoft.com/en-us/azure/ddos-protection/ddos-protection-overview .
- Follow the fundamental best practices for DDoS protection and mitigation as outlined in the Microsoft documentation https://learn.microsoft.com/en-us/azure/ddos-protection/ddos-protection-overview .
- Regular Risk Assessment:
- Periodically assess the risk of a DDoS attack on your Azure resources https://learn.microsoft.com/en-us/azure/ddos-protection/ddos-response-strategy .
- Evaluate whether DDoS Protection is enabled where necessary and if services are active/active with failover across multiple regions https://learn.microsoft.com/en-us/azure/ddos-protection/ddos-response-strategy .
- Monitor your business-critical applications and be prepared to act if they behave unexpectedly during an attack https://learn.microsoft.com/en-us/azure/ddos-protection/ddos-response-strategy .
- Use Azure Application Insights:
- Implement Azure Application Insights, an extensible APM service, to monitor your live web application https://learn.microsoft.com/en-us/azure/ddos-protection/ddos-response-strategy .
- It helps in automatically detecting performance anomalies and includes analytics tools for diagnosing issues and understanding user interactions https://learn.microsoft.com/en-us/azure/ddos-protection/ddos-response-strategy .
For additional information and best practices, refer to the following URLs: - Microsoft 365 Defender Threat Hunting - Microsoft Entra ID Log Analytics - Microsoft Sentinel Workbooks - Azure Monitor Alerts - DDoS Protection Best Practices - Monitoring and Diagnostics Best Practices - Azure Application Insights Overview
By following these steps and utilizing the provided resources, you can design a comprehensive strategy for monitoring Microsoft Entra to ensure the security and integrity of your organization’s identity and access management.
Plan and implement identity governance (20–25%)
Monitor identity activity by using logs, workbooks, and reports
Review and Analyze Sign-In, Audit, and Provisioning Logs Using the Microsoft Entra Admin Center
When managing identity and access within an organization, it is crucial to monitor and analyze various logs to ensure security and compliance. The Microsoft Entra admin center provides access to sign-in, audit, and provisioning logs, which are essential for tracking authentication events, administrative changes, and the provisioning of resources. Here’s a detailed explanation of how to review and analyze these logs:
Sign-In Logs
- Purpose: Sign-in logs provide information about the user authentication process, including successful and failed sign-in attempts.
- Analysis: By examining sign-in logs, you can identify patterns of access, such as sign-ins from unexpected locations or devices, which could indicate compromised credentials.
- Steps:
- Navigate to the Microsoft Entra admin center.
- Locate the sign-in logs section to view the authentication events.
- Use filters to narrow down the events based on criteria such as user, location, device, and time frame.
Audit Logs
- Purpose: Audit logs record various activities within the Microsoft Entra admin center, such as changes to user roles, group memberships, and application permissions.
- Analysis: These logs are vital for tracking administrative actions and ensuring that changes are authorized and compliant with organizational policies.
- Steps:
- Access the audit logs in the Microsoft Entra admin center.
- Search for specific events or browse through the logs to identify any unusual or unauthorized changes.
- Utilize the detailed information provided in the logs, such as the actor, target, and outcome of each event.
Provisioning Logs
- Purpose: Provisioning logs track the process of creating, updating, and deleting resources such as user accounts and groups.
- Analysis: Reviewing provisioning logs helps ensure that resources are provisioned according to policy and that there are no discrepancies in the provisioning process.
- Steps:
- Find the provisioning logs within the Microsoft Entra admin center.
- Investigate the logs to confirm that all provisioning actions are legitimate and correctly executed.
- Check for any errors or inconsistencies that may need to be addressed.
For additional information and guidance on how to review and analyze these logs, you can refer to the following resources:
- Investigate threats using audit in Microsoft 365 Defender
- Connect Microsoft services to Azure Sentinel
- Manage role groups in Exchange Online
- Audit (Premium) licensing requirements
- Enable mailbox auditing
By utilizing the Microsoft Entra admin center to review and analyze sign-in, audit, and provisioning logs, organizations can maintain a secure and compliant environment, detect potential security threats, and ensure the integrity of their identity and access management processes.