SC-5002 Study Guide

Secure Azure services and workloads with Microsoft Defender for Cloud regulatory compliance controls
Filter network traffic with a network security group using the Azure portal
Azure Resource Group
An Azure resource group is a fundamental organizational block within the Azure platform, which acts as a container for holding related resources for an Azure solution. The concept of a resource group is essential for effective Azure resource management, and understanding it is crucial for anyone working with Azure.
Definition and Purpose
- Resource Group: A resource group is a collection of resources such as virtual machines, storage accounts, web apps, databases, and virtual networks that are managed as a single entity by Azure Resource Manager https://learn.microsoft.com/en-us/azure/firewall-manager/../azure-resource-manager/management/overview .
- Management: Resource groups allow you to manage all the resources in your solution as a group. You can deploy, update, or delete all the resources in a resource group in a single, coordinated operation https://learn.microsoft.com/en-us/azure/firewall-manager/../azure-resource-manager/management/overview .
- Lifecycle: It is recommended that all resources in a resource group share the same lifecycle, meaning they are created, updated, and deleted together https://learn.microsoft.com/en-us/azure/firewall-manager/../azure-resource-manager/management/overview .
- Uniqueness: Each resource can only exist in one resource group at a time, but you can move resources between groups as needed https://learn.microsoft.com/en-us/azure/firewall-manager/../azure-resource-manager/management/overview .
Considerations
- Location: While the resources within a group can be from different regions, the resource group itself must have a location, which is where its metadata is stored. This is important for compliance and for ensuring that control plane operations are performed efficiently https://learn.microsoft.com/en-us/azure/firewall-manager/../azure-resource-manager/management/overview .
- Access Control: Resource groups can be used to scope access control for administrative actions. You can assign Azure Policies, Azure roles, or resource locks to manage a resource group https://learn.microsoft.com/en-us/azure/firewall-manager/../azure-resource-manager/management/overview .
- Tags: Tags can be applied to resource groups for organizational purposes, but these tags do not propagate to the resources within the group https://learn.microsoft.com/en-us/azure/firewall-manager/../azure-resource-manager/management/overview .
- Interconnectivity: Resources in one resource group can connect to resources in other resource groups, which is common when resources are related but do not share the same lifecycle https://learn.microsoft.com/en-us/azure/firewall-manager/../azure-resource-manager/management/overview .
- Deletion: Deleting a resource group will also delete all the resources contained within it. This action is irreversible, so caution should be exercised to avoid accidental deletions https://learn.microsoft.com/en-us/azure/azure-app-configuration/quickstart-javascript-provider .
Practical Usage
- Creation: To create a resource group, you can use
various tools such as the Azure portal, PowerShell, Azure CLI, or an ARM
template. For example, using Azure CLI, you would use the
az group createcommand with the desired name and location https://learn.microsoft.com/en-us/azure/dedicated-hsm/quickstart-hsm-azure-cli . - Deletion: To delete a resource group and all its resources, you can use the Azure portal. Navigate to “Resource groups”, find the group you wish to delete, and confirm the deletion https://learn.microsoft.com/en-us/azure/azure-app-configuration/quickstart-javascript-provider .
Additional Resources
For more information on Azure resource groups, you can refer to the following resources: - What is a resource group? - Resource providers and types - Move resources to new resource group or subscription - Designing reliable Azure applications - Azure Resource Manager resource group and resource deletion
Understanding Azure resource groups is a key part of managing Azure resources effectively and is a foundational concept for anyone working with Azure infrastructure.
Secure Azure services and workloads with Microsoft Defender for Cloud regulatory compliance controls
Filter network traffic with a network security group using the Azure portal
Azure Virtual Network Overview
Azure Virtual Network (VNet) is the fundamental building block for your private network in Azure. VNet enables many types of Azure resources, such as Azure Virtual Machines (VM), to securely communicate with each other, the internet, and on-premises networks. It is similar to a traditional network that you’d operate in your own data center but brings with it additional benefits of Azure’s infrastructure such as scale, availability, and isolation.
Key Features of Azure Virtual Network:
Isolation and Segmentation: VNets provide isolation and segmentation of your network environment. You can create multiple VNets within each Azure subscription and Azure region.
Internet Communication: Azure VNet provides your Azure resources with a secure and reliable internet communication channel. Each VNet has a default route to the internet, and resources within a VNet can have public IP addresses assigned to them.
Connectivity to On-premises Networks: You can connect VNets to your on-premises networks using various VPN technologies or Azure ExpressRoute, which provides a private connection to Azure.
Traffic Filtering and Routing: Network security groups (NSGs) and routing tables allow you to filter and route traffic between subnets and to and from the internet and on-premises networks.
Integration with Azure Services: VNets enable many Azure services to securely communicate with each other, the internet, and on-premises networks. For example, Azure services like Azure SQL Database and Azure Storage can be integrated into a VNet.
High Availability and Scalability: Azure VNet is a highly available and scalable service that supports the creation of hundreds of VMs or other resources within a single VNet.
Additional Information:
For a more detailed overview of Azure Virtual Network, you can refer to the following resources:
- Azure Virtual Network documentation: Virtual Network Documentation
- Quickstart for creating a Virtual Network: Create a Virtual Network
- Information on integrating Azure services into the virtual network: Virtual Network for Azure Services
Azure Firewall Integration:
Azure Firewall is a managed, cloud-based network security service that protects your Azure Virtual Network resources. It is a fully stateful firewall with built-in high availability and unrestricted cloud scalability. Azure Firewall can centrally create, enforce, and log application and network connectivity policies across subscriptions and virtual networks. It provides a static public IP address for your virtual network resources, allowing outside firewalls to identify traffic originating from your VNet. The service is fully integrated with Azure Monitor for logging and analytics https://learn.microsoft.com/rest/api/firewall .
DDoS Protection:
Azure provides DDoS Protection to monitor public IP addresses assigned to resources within a virtual network. It is essential to enable DDoS Protection on a virtual network or on a public IP address to safeguard your Azure resources against distributed denial of service attacks. For diagnostic logging and additional protection, you can create a Log Analytics workspace with diagnostic settings enabled https://learn.microsoft.com/en-us/azure/ddos-protection/alerts https://learn.microsoft.com/en-us/azure/ddos-protection/diagnostic-logging https://learn.microsoft.com/en-us/azure/ddos-protection/ddos-diagnostic-alert-templates .
Dedicated HSM Integration:
Dedicated Hardware Security Modules (HSMs) can be integrated into a Virtual Network and placed within the customer’s private network in Azure. This integration allows access to the HSM devices from virtual machines or compute resources within the VNet https://learn.microsoft.com/en-us/azure/dedicated-hsm/networking .
By understanding these components and features of Azure Virtual Network, you can design and implement a secure, scalable, and highly available network infrastructure in Azure.
Secure Azure services and workloads with Microsoft Defender for Cloud regulatory compliance controls
Filter network traffic with a network security group using the Azure portal
Network Security Groups (NSGs) and Traffic Filtering
Network Security Groups (NSGs) are a critical component in Azure for filtering network traffic to and from Azure resources within an Azure virtual network. An NSG contains a list of security rules that allow or deny network traffic based on several parameters, such as source and destination IP addresses, port, and protocol.
How NSGs Work
- Traffic Direction: NSGs filter traffic at the network layer for both inbound and outbound directions.
- Rule Evaluation: NSG rules are evaluated by priority using a 5-tuple hash (source, source port, destination, destination port, and protocol).
- Default Rules: By default, NSGs deny all inbound traffic and allow all outbound traffic within a virtual network and to Azure Load Balancers https://learn.microsoft.com/security/benchmark/azure/baselines/azure-app-configuration-security-baseline .
Configuration Guidance
- Rule Assignment: Assign NSG rules to subnets or individual network interfaces attached to VMs.
- Rule Creation: Create rules to restrict service’s open ports, such as blocking management ports from being accessed from untrusted networks https://learn.microsoft.com/security/benchmark/azure/baselines/azure-app-configuration-security-baseline .
- Defense-in-Depth: Use NSGs in conjunction with Azure Firewall for enhanced security. While NSGs provide distributed filtering, Azure Firewall offers centralized, stateful, and application-level protection https://learn.microsoft.com/en-us/azure/firewall/firewall-faq .
Adaptive Network Hardening
- Traffic Analysis: Adaptive Network Hardening (ANH) uses machine learning to analyze actual traffic and provide recommendations to harden NSG rules based on traffic patterns, trusted configurations, and threat intelligence https://learn.microsoft.com/en-us/training/modules/understand-azure-defender-cloud-workload-protection/2-understand-azure-defender-for-servers .
Example Scenario
- Inbound Rules: Allow traffic to specific ports, such as port 80 and 8080 for Application Gateway, while denying all other inbound traffic.
- Outbound Rules: Allow outbound traffic to specific targets, such as a backend in another virtual network or the Internet, and deny all other outbound traffic https://learn.microsoft.com/en-us/azure/application-gateway/application-gateway-private-deployment .
Monitoring and Compliance
- Microsoft Defender for Cloud: Monitor NSGs with Microsoft Defender for Cloud and use Azure Policy built-in definitions to ensure subnets are associated with NSGs for enhanced security https://learn.microsoft.com/security/benchmark/azure/baselines/application-gateway-security-baseline .
For additional information on NSGs and their configuration, you can refer to the following resources: - Understanding Network Security Groups https://learn.microsoft.com/security/benchmark/azure/baselines/azure-app-configuration-security-baseline - Azure Firewall and NSG comparison https://learn.microsoft.com/en-us/azure/firewall/firewall-faq - Adaptive Network Hardening in Azure Security Center https://learn.microsoft.com/en-us/training/modules/understand-azure-defender-cloud-workload-protection/2-understand-azure-defender-for-servers - Create an NSG using the Azure portal https://learn.microsoft.com/en-us/azure/application-gateway/application-gateway-private-deployment - Microsoft Defender for Cloud monitoring with NSGs https://learn.microsoft.com/security/benchmark/azure/baselines/application-gateway-security-baseline
By understanding and implementing NSGs effectively, you can significantly improve the security posture of your Azure environment.
Secure Azure services and workloads with Microsoft Defender for Cloud regulatory compliance controls
Filter network traffic with a network security group using the Azure portal
Application Security Groups (ASGs)
Application Security Groups (ASGs) are a feature in Azure that help manage network security as a natural extension of an application’s structure. ASGs enable fine-grained control over network security policies, allowing you to group virtual machines and define network security policies based on those groups. This approach simplifies the management of security rules, making it easier to apply consistent policies across multiple virtual machines that serve a similar role within your applications.
Key Benefits of Application Security Groups:
- Simplified Security Management: By grouping virtual machines that require similar network security policies, you can reduce the complexity of your network security rules.
- Improved Clarity: ASGs allow you to define network security policies based on the roles of the virtual machines, rather than individual IP addresses, which can change over time.
- Scalability: ASGs make it easier to scale your network security policies as you add or remove virtual machines from a group.
How to Use Application Security Groups:
- Create an ASG: In the Azure portal, you can create an ASG and assign a name and resource group to it.
- Assign Virtual Machines to ASGs: Once the ASG is created, you can assign virtual machines to the ASG based on their roles within your application.
- Configure Network Security Group (NSG) Rules: Use the ASGs as source or destination in your NSG security rules to apply the appropriate allow or deny actions on network traffic.
Considerations:
- ASGs are used within a virtual network and cannot span across different regions.
- You can associate multiple ASGs with a single network interface and a single ASG with multiple network interfaces.
- ASGs are fully integrated with the Azure platform and can be used in conjunction with other network security features such as NSGs and Azure Firewall.
For more detailed information on Application Security Groups, you can refer to the Azure documentation on NSGs and ASGs: Network security groups (NSGs).
By leveraging ASGs, you can create a robust network security posture that aligns with your application’s architecture and enhances your overall security strategy within Azure.
Please note that while ASGs provide a way to manage network security, it is important to consider a comprehensive security approach that includes other aspects such as data protection, identity management, and monitoring to ensure a full defense-in-depth strategy https://learn.microsoft.com/en-us/azure/ddos-protection/fundamental-best-practices .
Secure Azure services and workloads with Microsoft Defender for Cloud regulatory compliance controls
Filter network traffic with a network security group using the Azure portal
Create a Virtual Network Infrastructure
When creating a virtual network infrastructure in Azure, the process involves several key steps to ensure that the network is properly configured for security and functionality. Below is a detailed explanation of how to create a virtual network infrastructure:
- Define the Virtual Network (VNet):
- A Virtual Network is the fundamental building block for your private network in Azure. It enables Azure resources, such as virtual machines (VMs), to securely communicate with each other, the internet, and on-premises networks https://learn.microsoft.com/en-us/azure/dedicated-hsm/networking .
- You can create a VNet by specifying a range of IP addresses for the network, divided into subnets.
- Create a Resource Group:
- Resource groups are containers that hold related resources for an Azure solution. Begin by creating a resource group to organize the resources associated with your virtual network https://learn.microsoft.com/en-us/azure/ddos-protection/manage-ddos-protection-terraform .
- Deploy VNet using Terraform:
- Terraform is an infrastructure as code tool that allows you to define and create an entire Azure infrastructure with code. Use Terraform’s HCL syntax to define the VNet and related resources https://learn.microsoft.com/en-us/azure/ddos-protection/manage-ddos-protection-terraform .
- Create configuration files that specify the cloud provider (Azure) and the elements that make up your cloud infrastructure. Then, generate an execution plan to preview changes before applying them to deploy the infrastructure https://learn.microsoft.com/en-us/azure/ddos-protection/manage-ddos-protection-terraform .
- Configure DDoS Protection:
- Azure provides a DDoS protection service that defends your Azure resources from denial-of-service attacks. You can enable a DDoS protection plan for your VNet to safeguard your network infrastructure https://learn.microsoft.com/en-us/azure/ddos-protection/manage-ddos-protection-terraform https://learn.microsoft.com/en-us/azure/ddos-protection/alerts .
- Create Subnets:
- Within the VNet, create subnets to segment the network into one or more sub-networks. This allows you to allocate a portion of the VNet’s IP address range to each subnet and organize resources based on security, workload, or other criteria https://learn.microsoft.com/en-us/azure/firewall/../virtual-network/nat-gateway/tutorial-hub-spoke-nat-firewall?toc=/azure/firewall/toc.json .
- Set Up Network Security Groups (NSGs):
- NSGs are used to filter network traffic to and from Azure resources in an Azure VNet. An NSG contains security rules that allow or deny inbound network traffic to, or outbound network traffic from, several types of Azure resources https://learn.microsoft.com/en-us/azure/firewall/../virtual-network/nat-gateway/tutorial-hub-spoke-nat-firewall?toc=/azure/firewall/toc.json .
- Deploy Virtual Machines:
- To test the network infrastructure, deploy virtual machines within the VNet. These VMs can be used to test connectivity and the effectiveness of the network security rules https://learn.microsoft.com/en-us/azure/firewall/../virtual-network/nat-gateway/tutorial-hub-spoke-nat-firewall?toc=/azure/firewall/toc.json .
- Remove Public IP Addresses if Necessary:
- For enhanced security, you can remove public IP addresses from VMs if they are not needed. This can be done in virtual networks that use Azure Bastion, which provides secure and seamless RDP/SSH connectivity to your VMs directly in the Azure portal over SSL https://learn.microsoft.com/en-us/azure/firewall/../virtual-network/nat-gateway/tutorial-hub-spoke-nat-firewall?toc=/azure/firewall/toc.json .
For additional information and step-by-step guidance, you can refer to the following resources: - Azure Virtual Network documentation - Terraform Azure Provider documentation - Azure DDoS Protection documentation - Create a Windows virtual machine in Azure - Create a Linux virtual machine in Azure
By following these steps and utilizing the provided resources, you can create a robust virtual network infrastructure in Azure that is well-organized, secure, and ready to support your workloads.
Secure Azure services and workloads with Microsoft Defender for Cloud regulatory compliance controls
Create a Log Analytics workspace for Microsoft Defender for Cloud
Defender for Cloud Monitoring Components
Microsoft Defender for Cloud is a comprehensive security management and threat protection service that provides advanced threat detection and response capabilities across cloud workloads. It offers several monitoring components that are essential for maintaining the security posture of cloud environments. Below are the key components of Defender for Cloud monitoring:
1. Security Alerts
Defender for Cloud generates security alerts when it detects threats and anomalous activities in your cloud environment. These alerts provide detailed information about the detected issue, including the affected resources and recommended actions to investigate and mitigate the threat https://learn.microsoft.com/en-us/training/modules/respond-to-data-loss-prevention-alerts-microsoft-365/6-summary-resources .
2. Secure Score
The Secure Score in Defender for Cloud is a measurement of an organization’s security posture, with a higher number indicating more improvement actions taken. It provides a list of recommendations to enhance security across your cloud workloads, helping you prioritize and track your security improvement journey https://learn.microsoft.com/en-us/training/modules/query-data-sentinel/1-introduction .
3. Regulatory Compliance Dashboard
The Regulatory Compliance Dashboard in Defender for Cloud assesses your environment against specific compliance standards and benchmarks. It provides insights into your compliance status and identifies areas that require attention to meet regulatory requirements https://learn.microsoft.com/en-us/training/modules/query-data-sentinel/1-introduction .
4. Security Policies
Defender for Cloud allows you to manage and enforce security policies across your cloud workloads. These policies help ensure that your resources are configured according to security best practices and regulatory standards https://learn.microsoft.com/en-us/training/modules/query-data-sentinel/1-introduction .
5. Advanced Threat Protection (ATP)
Advanced Threat Protection in Defender for Cloud offers behavioral analytics and anomaly detection capabilities to identify and respond to potential threats. It leverages Microsoft’s global threat intelligence to provide rapid threat detection https://learn.microsoft.com/en-us/training/modules/connect-microsoft-defender-365-to-azure-sentinel/3-connect-microsoft-365-defender-connector .
6. Continuous Assessment and Security Recommendations
Defender for Cloud continuously assesses the security state of your resources and provides actionable security recommendations. These recommendations guide you in hardening your resources and reducing the attack surface https://learn.microsoft.com/en-us/training/modules/query-data-sentinel/1-introduction .
7. Microsoft Defender for Cloud Apps Integration
Defender for Cloud integrates with Microsoft Defender for Cloud Apps to provide visibility into your cloud applications and services. It helps you understand and control user activities and data travel, and it provides sophisticated analytics to identify and combat cyberthreats https://learn.microsoft.com/en-us/training/modules/respond-to-data-loss-prevention-alerts-microsoft-365/6-summary-resources https://learn.microsoft.com/en-us/training/modules/connect-microsoft-defender-365-to-azure-sentinel/3-connect-microsoft-365-defender-connector .
8. Azure Monitor Agent (AMA)
The Azure Monitor Agent collects data from your Azure and on-premises environments, which is then used by Defender for Cloud for monitoring and threat detection purposes https://learn.microsoft.com/en-us/training/modules/connect-windows-hosts-to-azure-sentinel/5-summary-resources .
Additional Resources
For more information on Microsoft Defender for Cloud and its monitoring components, you can visit the following URLs:
- Microsoft Defender for Cloud data collection with the Azure Monitor Agent (AMA)
- Microsoft Tech Community Security Webinars
- Become a Microsoft Sentinel Ninja
By understanding and utilizing these components, organizations can significantly enhance their security monitoring and threat protection capabilities within Microsoft’s cloud environments.
Secure Azure services and workloads with Microsoft Defender for Cloud regulatory compliance controls
Create a Log Analytics workspace for Microsoft Defender for Cloud
Create a Workspace
When setting up a workspace for monitoring and managing security data, it is essential to understand the process and options available. A workspace is a logical container that stores data collected from various sources and provides a centralized platform for analysis and insight.
Steps to Create a Workspace:
- Auto Provisioning with Defender for Cloud:
- Navigate to Environment settings in the Defender for Cloud’s menu.
- Select the subscription you want to configure.
- In the Auto provisioning page, toggle the status of auto provisioning for the Log Analytics agent to On.
- In the configuration options pane, you can define which workspace to use.
- Workspace Connection Options:
- Default Workspace: Defender for Cloud can create a
default workspace and resource group in the geolocation of the Azure
VMs. The naming convention typically follows:
- Workspace:
DefaultWorkspace-[subscription-ID]-[geo] - Resource Group:
DefaultResourceGroup-[geo]
- Workspace:
- Custom Workspace: You can select a different workspace from a dropdown list that includes all workspaces across your subscriptions. This is useful for collecting data from VMs in different subscriptions into a single workspace.
- Default Workspace: Defender for Cloud can create a
default workspace and resource group in the geolocation of the Azure
VMs. The naming convention typically follows:
- Using an Existing Workspace:
- If you have an existing Log Analytics workspace, you may choose to use it for security data collection. Ensure you have the necessary read and write permissions on the workspace.
- If the workspace already has a Security or Defender for Cloud Free solution enabled, the pricing will be set automatically. Otherwise, you will need to install a Defender for Cloud solution on the workspace.
Additional Considerations:
- Data Privacy Compliance: If your subscription contains VMs from multiple geolocations, multiple workspaces may be created to comply with data privacy requirements.
- Centralized Workspace: Using a centralized workspace for security data collection can be beneficial for organizations that want to streamline their security operations.
- Access Management: Managing access to log data and workspaces is crucial. You can learn more about this in the Azure Monitor documentation on managing access to log data and workspaces.
Additional Resources:
- For more information on managing access to log data and workspaces, refer to the Azure Monitor documentation.
- To understand how to install Defender for Cloud solutions on a workspace, consult the relevant Azure documentation.
By following these steps and considerations, you can create a workspace that effectively collects and manages security data for your organization. Remember to configure the workspace according to your organization’s specific needs and compliance requirements.
Secure Azure services and workloads with Microsoft Defender for Cloud regulatory compliance controls
Set up Microsoft Defender for Cloud
Implementing Microsoft Defender for Cloud
Microsoft Defender for Cloud is an advanced security management and threat protection service that enhances the security of cloud resources and workloads. It is designed to strengthen the security posture of your cloud resources and offers integrated Microsoft Defender plans to protect workloads across Azure, hybrid environments, and other cloud platforms.
Key Features of Microsoft Defender for Cloud:
Security Posture Management: Defender for Cloud provides continuous assessment tools to help you understand and improve your current security posture. It offers recommendations to harden your resources and helps in tracking the overall security status of your cloud environment https://learn.microsoft.com/en-us/training/modules/what-is-azure-defender/3-understand-azure-secure-center .
Threat Protection: With its threat protection capabilities, Defender for Cloud helps protect your workloads against cyber threats. It uses advanced analytics and global threat intelligence from Microsoft to detect and respond to potential threats https://learn.microsoft.com/en-us/training/modules/what-is-azure-defender/3-understand-azure-secure-center .
Security Management: Defender for Cloud streamlines security management by providing tools for setting security policies and integrating security solutions. It simplifies the deployment process with auto-provisioning features that secure your resources by default https://learn.microsoft.com/en-us/training/modules/what-is-azure-defender/3-understand-azure-secure-center .
Implementation Steps:
Enable Microsoft Defender for Cloud: To start using Defender for Cloud, you need to enable it in your Azure environment. This will activate the additional security features and protections offered by the service https://learn.microsoft.com/en-us/training/modules/understand-azure-defender-cloud-workload-protection/14-summary-resources .
Create a Log Analytics Workspace: If you are setting up Microsoft Sentinel, you must manually create a Log Analytics workspace as you cannot use the default Microsoft Defender for Cloud Log Analytics workspace. After creating the workspace, update the Microsoft Defender for Cloud tier to select the manually created workspace https://learn.microsoft.com/en-us/training/modules/create-manage-azure-sentinel-workspaces/3-create-azure-sentinel-workspace .
Configure Diagnostic Alerts: Learn to configure diagnostic alerts through the Azure portal. This will help you monitor the security of your resources and receive notifications for specific security events https://learn.microsoft.com/en-us/azure/ddos-protection/ddos-diagnostic-alert-templates .
Test Through Simulations: After setting up the necessary configurations, you can test DDoS Protection and other security features through simulations to ensure they are working correctly https://learn.microsoft.com/en-us/azure/ddos-protection/ddos-diagnostic-alert-templates https://learn.microsoft.com/en-us/azure/ddos-protection/alerts .
View Alerts in Microsoft Defender for Cloud: Monitor the alerts generated by Microsoft Defender for Cloud in the Azure portal. This will help you stay informed about any security incidents or potential vulnerabilities https://learn.microsoft.com/en-us/azure/ddos-protection/ddos-diagnostic-alert-templates https://learn.microsoft.com/en-us/azure/ddos-protection/alerts .
Additional Resources:
- For configuring diagnostic alerts and testing through simulations, refer to the following guides:
- To configure diagnostic logging, you can follow this tutorial:
By following these steps and utilizing the resources provided, you can effectively implement and manage Microsoft Defender for Cloud to enhance the security of your cloud resources and workloads.
Secure Azure services and workloads with Microsoft Defender for Cloud regulatory compliance controls
Set up Microsoft Defender for Cloud
Security Posture
Security posture refers to the overall security status of software, networks, services, and information. It encompasses the policies, controls, procedures, and technologies that protect the integrity, confidentiality, and availability of an organization’s assets. A robust security posture minimizes the risk of security breaches and is an essential aspect of managing and safeguarding information in cloud environments.
Understanding Security Posture
In the context of cloud security, maintaining a strong security posture involves continuous assessment and improvement of security measures. Tools like Microsoft Defender for Cloud play a crucial role in this process by providing:
Security Recommendations: These are actionable insights that guide you in hardening your resources against vulnerabilities. By following these recommendations, you can enhance your security measures and reduce potential attack surfaces https://learn.microsoft.com/en-us/training/modules/manage-cloud-security-posture-management/7-summary-resources .
Secure Score: This is a metric that quantifies your security posture. A higher secure score indicates a more robust security stance. It reflects the adoption of security controls and best practices. On the Security posture page, you can view the secure score for your entire subscription and each environment within it https://learn.microsoft.com/en-us/training/modules/manage-cloud-security-posture-management/2-explore-secure-score https://learn.microsoft.com/en-us/training/modules/manage-cloud-security-posture-management/7-summary-resources .
Regulatory Compliance: Defender for Cloud assesses your environment against industry standards and regulations, providing insights into your compliance status. This helps ensure that your security measures meet required benchmarks and can help you navigate the complex landscape of regulatory requirements https://learn.microsoft.com/en-us/training/modules/manage-cloud-security-posture-management/7-summary-resources .
Azure Security Benchmark: This is a set of guidelines for securing Azure resources. Following these benchmarks can help you maintain a strong security posture by aligning with best practices for cloud security https://learn.microsoft.com/en-us/training/modules/manage-cloud-security-posture-management/7-summary-resources .
Enhancing Security Posture
To enhance your security posture, you can implement various strategies, such as:
Applying Network Security Groups (NSG): NSGs are used to filter inbound and outbound network traffic to cloud resources. They are a fundamental element for maintaining a secure network environment https://learn.microsoft.com/en-us/training/modules/understand-azure-defender-cloud-workload-protection/2-understand-azure-defender-for-servers .
Adaptive Network Hardening (ANH): This is a feature that provides recommendations for hardening NSG rules based on actual traffic patterns and machine learning algorithms. ANH takes into account real traffic, trusted configurations, threat intelligence, and other indicators of compromise to suggest improvements to your network security https://learn.microsoft.com/en-us/training/modules/understand-azure-defender-cloud-workload-protection/2-understand-azure-defender-for-servers .
Analyzing Security Rules: By analyzing the effectiveness of individual security rules, you can refine access controls and enhance your overall security posture. This analysis helps in understanding the traffic that interacts with the rules and allows for optimization of the access they provide https://learn.microsoft.com/en-us/azure/firewall/policy-analytics .
Tools for Security Posture Management
- Microsoft Defender for Cloud: This tool is essential for security posture management and threat protection. It helps to harden resources, track security posture, protect against cyberattacks, and streamline security management. Defender for Cloud is natively integrated into the cloud platform, making it easy to deploy and automatically secure resources by default https://learn.microsoft.com/en-us/training/modules/what-is-azure-defender/3-understand-azure-secure-center .
For additional information on security posture and related tools, you can refer to the following resources:
By understanding and actively managing your security posture, you can ensure that your cloud resources are well-protected against potential threats and aligned with best practices and regulatory requirements.
Secure Azure services and workloads with Microsoft Defender for Cloud regulatory compliance controls
Set up Microsoft Defender for Cloud
Workload Protections
Workload protections are a critical aspect of cloud security, ensuring that the various types of resources within your subscriptions are safeguarded against threats. Microsoft Defender for Cloud offers a suite of advanced, intelligent protection features specifically designed to secure your workloads. Here’s a detailed explanation of workload protections provided by Microsoft Defender for Cloud:
Cloud Workload Protection (CWP)
Microsoft Threat Intelligence: Defender for Cloud utilizes the power of Microsoft Threat Intelligence to provide security alerts. This intelligence is the result of extensive research and analysis of the global threat landscape, ensuring that the alerts are timely and relevant.
Enhanced Security Features: Depending on the types of resources in your subscriptions, you can enable specific Microsoft Defender enhanced security features plans. These plans are tailored to provide the best possible protection for each type of resource.
Microsoft Defender for Storage: As an example, enabling Microsoft Defender for Storage will alert you to suspicious activities related to your Azure Storage accounts. This is just one of the many resource-specific protections available.
Visibility and Control: Defender for Cloud not only provides these protections but also gives you visibility into and control over the security features for your environment. This enables you to monitor the security status of your workloads actively and take necessary actions when alerted to potential threats.
For additional information on workload protections and how to enable Microsoft Defender for Cloud, you can refer to the following URLs:
It’s important to note that these protections are part of a broader strategy to manage and secure cloud workloads effectively. By leveraging Microsoft Defender for Cloud, organizations can benefit from a comprehensive set of tools designed to protect their cloud resources from evolving threats.
Secure Azure services and workloads with Microsoft Defender for Cloud regulatory compliance controls
Set up Microsoft Defender for Cloud
Deploy Microsoft Defender for Cloud
Microsoft Defender for Cloud is an essential tool designed to manage the security posture and provide threat protection for cloud resources. It is a comprehensive solution that helps to strengthen the security posture of your cloud resources, whether they are hosted in Azure, hybrid environments, or other cloud platforms. Here’s a detailed explanation of how to deploy Microsoft Defender for Cloud:
- Access Microsoft Defender for Cloud:
- Sign in to the Azure portal at Azure Portal.
- In the search box at the top of the portal, enter “Microsoft Defender for Cloud” and select it from the search results https://learn.microsoft.com/en-us/azure/ddos-protection/ddos-view-alerts-defender-for-cloud .
- Environment Settings:
- Navigate to ‘Environment settings’ and select the subscription you wish to protect with Microsoft Defender for Cloud https://learn.microsoft.com/en-us/training/modules/understand-azure-defender-cloud-workload-protection/2-understand-azure-defender-for-servers .
- Enable Defender for Servers:
- If Microsoft Defender for Servers is not already enabled, set it to ‘On’. By default, Plan 2 is selected, which includes all features of Plan 1 plus additional capabilities https://learn.microsoft.com/en-us/training/modules/understand-azure-defender-cloud-workload-protection/2-understand-azure-defender-for-servers .
- Selecting a Plan:
- Microsoft Defender for Cloud offers two plans for servers:
- Plan 1: Provides automatic deployment of Microsoft Defender for Endpoint to all cloud workloads, ensuring protection upon spin-up. It also offers cost-effective licensing charged per hour and integration with Microsoft Defender for Cloud for alerts and vulnerability data https://learn.microsoft.com/en-us/training/modules/understand-azure-defender-cloud-workload-protection/2-understand-azure-defender-for-servers .
- Plan 2: Includes all the benefits of Plan 1 and supports all other Microsoft Defender for Servers features https://learn.microsoft.com/en-us/training/modules/understand-azure-defender-cloud-workload-protection/2-understand-azure-defender-for-servers .
- To change the Defender for Servers plan, go to the ‘Plan/Pricing’ column, select ‘Change plan’, choose the desired plan, and confirm your selection https://learn.microsoft.com/en-us/training/modules/understand-azure-defender-cloud-workload-protection/2-understand-azure-defender-for-servers .
- Microsoft Defender for Cloud offers two plans for servers:
- Deployment and Auto-Provisioning:
- Microsoft Defender for Cloud is natively integrated, making its deployment straightforward. It provides simple auto-provisioning to secure your resources by default https://learn.microsoft.com/en-us/training/modules/what-is-azure-defender/3-understand-azure-secure-center .
- Security Posture Management:
- Defender for Cloud continuously assesses the security posture of your cloud resources, helping you understand and improve your current security status https://learn.microsoft.com/en-us/training/modules/what-is-azure-defender/3-understand-azure-secure-center .
- Threat Protection:
- With integrated Microsoft Defender plans, Defender for Cloud protects workloads against cyber attacks and streamlines security management https://learn.microsoft.com/en-us/training/modules/what-is-azure-defender/3-understand-azure-secure-center .
- Security Alerts:
- You can view and manage security alerts by selecting ‘Security alerts’ from the side menu in Microsoft Defender for Cloud. Alerts can be filtered by subscription or other relevant criteria https://learn.microsoft.com/en-us/azure/ddos-protection/ddos-view-alerts-defender-for-cloud .
By deploying Microsoft Defender for Cloud, organizations can ensure that their cloud resources are continuously assessed, hardened, and protected against threats. It simplifies the security management process and provides a robust defense mechanism for cloud workloads.
For additional information and guidance on deploying Microsoft Defender for Cloud, you can refer to the following resources: - Microsoft Defender for Cloud Overview - Setting up Microsoft Defender for Servers - Advanced Hunting with Microsoft 365 Defender
Secure Azure services and workloads with Microsoft Defender for Cloud regulatory compliance controls
Set up Microsoft Defender for Cloud
Enable Defender for Cloud on Your Azure Subscription
To enhance the security of your Azure subscription, enabling Microsoft Defender for Cloud is a crucial step. Defender for Cloud is a tool that provides advanced, intelligent protection for your Azure and hybrid resources and workloads. Here’s a detailed explanation of how to enable Defender for Cloud:
Access Defender for Cloud: Navigate to the Defender for Cloud section in the Azure portal. This is the central location where you can manage the security of your Azure and hybrid resources.
Select Environment Settings: From the main menu of Defender for Cloud, choose the Environment settings option. This allows you to configure the settings for your Azure subscription or workspace https://learn.microsoft.com/en-us/training/modules/what-is-azure-defender/5-enable-azure-defender .
Choose Subscription or Workspace: Select the specific subscription or workspace that you wish to protect with Defender for Cloud. It’s important to ensure that you are managing the correct environment before making changes https://learn.microsoft.com/en-us/training/modules/what-is-azure-defender/5-enable-azure-defender .
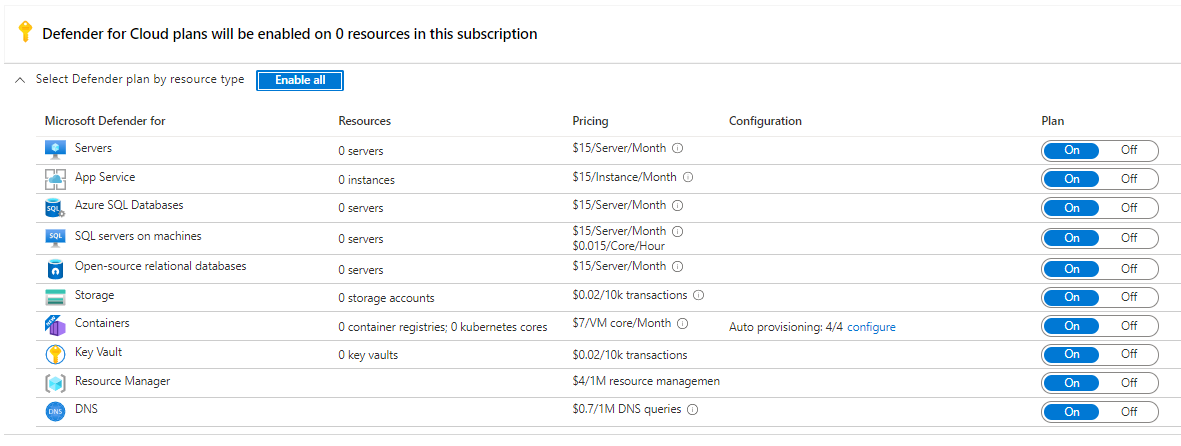
Enable Microsoft Defender Plans: You have the option to Enable all Microsoft Defender plans to upgrade the security for all available services. Alternatively, you can select individual services that you want to protect. This flexibility allows you to tailor the security features to your specific needs https://learn.microsoft.com/en-us/training/modules/what-is-azure-defender/5-enable-azure-defender .
Save Your Configuration: After selecting the desired Microsoft Defender plans, make sure to click Save to apply the changes. This action will activate Defender for Cloud for your chosen subscription or workspace, providing you with additional security features https://learn.microsoft.com/en-us/training/modules/what-is-azure-defender/5-enable-azure-defender .
Review Security Policies: Once enabled, Defender for Cloud’s security policy is reflected in Azure Policy as a built-in initiative under the Defender for Cloud category. This initiative is automatically assigned to all registered subscriptions and contains audit policies to help you maintain compliance and security standards https://learn.microsoft.com/en-us/training/modules/what-is-azure-defender/3-understand-azure-secure-center .
Investigate Alerts: Defender for Cloud’s security analytics engine will correlate events collected from agents and Azure to provide tailored recommendations and alerts. It is essential to investigate these alerts promptly to ensure that your workloads are secure and that no malicious activities are occurring https://learn.microsoft.com/en-us/training/modules/what-is-azure-defender/3-understand-azure-secure-center .
Additional Resources: For more detailed instructions and guidance on enabling Defender for Cloud, you can refer to the following resources:
By following these steps, you can successfully enable Defender for Cloud on your Azure subscription, significantly improving the security posture of your cloud environment.
Secure Azure services and workloads with Microsoft Defender for Cloud regulatory compliance controls
Set up Microsoft Defender for Cloud
Azure Arc Overview
Azure Arc is a set of technologies that brings Azure services and management to any infrastructure. It extends Azure’s management capabilities to Linux and Windows servers, as well as Kubernetes clusters across on-premises, multi-cloud, and edge environments.
Key Features of Azure Arc:
Unified Management: Azure Arc provides a single pane of glass for managing resources across various environments, including on-premises, multi-cloud, and edge locations https://learn.microsoft.com/en-us/training/modules/connect-non-azure-machines-to-azure-defender/2-protect-non-azure-resources .
Consistent Azure Experience: It enables you to manage virtual machines, Kubernetes clusters, and databases as if they are running in Azure, using the same Azure management tools and capabilities https://learn.microsoft.com/en-us/training/modules/connect-non-azure-machines-to-azure-defender/2-protect-non-azure-resources .
Hybrid Cloud Operations: Azure Arc supports traditional IT operations while enabling DevOps practices with cloud-native patterns, helping to streamline governance and management across diverse environments https://learn.microsoft.com/en-us/training/modules/connect-non-azure-machines-to-azure-defender/2-protect-non-azure-resources .
Project Resources into Azure Resource Manager: With Azure Arc, you can project your non-Azure resources into Azure Resource Manager, allowing you to manage these resources alongside your Azure resources https://learn.microsoft.com/en-us/training/modules/connect-non-azure-machines-to-azure-defender/2-protect-non-azure-resources .
Extend Azure Services: Azure Arc allows you to run Azure services on-premises, at the edge, or in other clouds, bringing Azure security and management to your infrastructure https://learn.microsoft.com/en-us/training/modules/connect-windows-hosts-to-azure-sentinel/2-plan-for-windows-hosts-security-events-connector https://learn.microsoft.com/en-us/training/modules/connect-non-azure-machines-to-azure-defender/2-protect-non-azure-resources .
Azure Arc-enabled Servers: This feature makes non-Azure machines appear as Azure resources, providing capabilities such as deploying the Log Analytics agent as an extension and enabling guest configuration policies https://learn.microsoft.com/en-us/training/modules/connect-non-azure-machines-to-azure-defender/3-connect-non-azure-machines .
Azure Arc for Data Services: It enables you to run Azure data services like Azure SQL Managed Instance and PostgreSQL Hyperscale on any infrastructure https://learn.microsoft.com/en-us/training/modules/connect-non-azure-machines-to-azure-defender/2-protect-non-azure-resources .
Cost Management: Azure Arc for servers is a free service, but you may incur charges for other Azure services used on Arc-enabled servers, such as Azure Defender for Cloud https://learn.microsoft.com/en-us/training/modules/what-is-azure-defender/2-what-is-azure-defender .
Installation and Configuration:
To install Azure Arc on non-Azure Linux machines, you would typically follow these steps:
- Search for “Arc” in the Azure portal and navigate to Azure Arc’s Servers section.
- Generate an installation script from the Azure portal.
- Review prerequisites and provide resource details such as subscription, resource group, and region.
- Download or copy the script and run it on your non-Azure Linux machine with administrative privileges.
- The script will install the Azure Arc agent and create the Azure Arc-enabled server resource.
- Connect the non-Azure Linux server to Azure Arc using a Bash script with the required parameters.
- Verify the connection in the Azure portal, where the machine should appear with a status of “Connected” https://learn.microsoft.com/en-us/training/modules/connect-syslog-data-sources-to-azure-sentinel/3-collect-data-from-linux-based-sources-using-syslog .
Additional Resources:
For more information on Azure Arc, you can refer to the following URLs:
Please note that the URLs provided are for additional information and are part of the retrieved documents.
Secure Azure services and workloads with Microsoft Defender for Cloud regulatory compliance controls
Set up Microsoft Defender for Cloud
Azure Arc Capabilities
Azure Arc is a powerful tool that extends Azure’s management capabilities to resources located outside of Azure, whether they are on-premises, in multi-cloud environments, or at the edge. Here’s a detailed explanation of its capabilities:
Unified Management: Azure Arc provides a single pane of glass for managing various resources as if they were native Azure resources. This includes servers, Kubernetes clusters, and databases, which can be projected into Azure Resource Manager for a unified management experience https://learn.microsoft.com/en-us/training/modules/connect-non-azure-machines-to-azure-defender/2-protect-non-azure-resources .
Hybrid Environment Support: With Azure Arc, you can run Azure services across hybrid environments, maintaining consistency with Azure management and governance tools. This allows for the deployment and management of applications across different infrastructures using the same Azure-based tools https://learn.microsoft.com/en-us/training/modules/connect-windows-hosts-to-azure-sentinel/2-plan-for-windows-hosts-security-events-connector https://learn.microsoft.com/en-us/training/modules/connect-non-azure-machines-to-azure-defender/2-protect-non-azure-resources .
Enhanced Server Management: Azure Arc enabled servers allow non-Azure machines to become Azure resources, appearing in Azure with recommendations similar to other Azure resources. This includes the ability to enable guest configuration policies, deploy the Log Analytics agent as an extension, and simplify deployment with other Azure services https://learn.microsoft.com/en-us/training/modules/connect-non-azure-machines-to-azure-defender/3-connect-non-azure-machines .
DevOps and ITOps Integration: Azure Arc supports traditional ITOps while also enabling DevOps practices, facilitating the implementation of cloud-native patterns in your environment. This helps in managing complex environments and adopting new operational models https://learn.microsoft.com/en-us/training/modules/connect-non-azure-machines-to-azure-defender/2-protect-non-azure-resources .
Azure Data Services: Azure Arc enables you to run Azure data services like Azure SQL Managed Instance and PostgreSQL Hyperscale services outside of Azure, providing the same management and data services you would expect in the cloud https://learn.microsoft.com/en-us/training/modules/connect-non-azure-machines-to-azure-defender/2-protect-non-azure-resources .
Security and Governance: By extending Defender for Cloud capabilities to hybrid environments, Azure Arc helps protect non-Azure servers and virtual machines in other clouds. It provides customized threat intelligence and prioritized alerts tailored to your specific environment https://learn.microsoft.com/en-us/training/modules/what-is-azure-defender/2-what-is-azure-defender .
Cost Management: While Azure Arc for servers is a free service, any services used on Arc-enabled servers, such as Defender for Cloud, will incur charges according to the pricing for that service https://learn.microsoft.com/en-us/training/modules/what-is-azure-defender/2-what-is-azure-defender .
For additional information on Azure Arc and its capabilities, you can refer to the following resources:
By leveraging Azure Arc, organizations can effectively manage and govern their IT resources across various locations, bringing the agility and innovation of cloud computing to on-premises and multi-cloud environments.
Secure Azure services and workloads with Microsoft Defender for Cloud regulatory compliance controls
Set up Microsoft Defender for Cloud
Microsoft Cloud Security Benchmark Overview
The Microsoft Cloud Security Benchmark (MCSB) is a comprehensive set of security best practices and recommendations designed to help organizations secure their cloud solutions on Azure. It provides guidance that is aligned with global security standards, enabling Azure users to improve their security posture and compliance.
Key Features of the MCSB:
Security Controls: The MCSB is organized around a set of security controls that are defined to cover various aspects of cloud security. These controls are intended to provide a structured approach to securing cloud resources.
Guidance for Azure Services: The benchmark includes specific guidance applicable to different Azure services, helping users understand how to implement the security controls in the context of each service.
Compliance Measurement: Users can monitor their compliance with the MCSB recommendations using tools like Microsoft Defender for Cloud. Azure Policy definitions related to the MCSB are listed in the Regulatory Compliance section of the Microsoft Defender for Cloud portal, aiding in the assessment and enforcement of compliance.
Security Baselines: Azure security baselines are part of the MCSB, providing a set of recommendations that represent a consensus among various Azure security teams. These baselines serve as a starting point for securing Azure services and can be customized to meet specific organizational needs.
Additional Resources:
For an overview of the Microsoft Cloud Security Benchmark, you can visit the MCSB overview page.
To learn more about Azure security baselines and how they relate to the MCSB, the Azure security baselines overview provides detailed information.
For network security-specific guidance within the MCSB, refer to the Network security section of the MCSB.
Service-Specific Security Baselines:
The MCSB also includes tailored guidance for specific Azure services, such as Azure Front Door, Azure App Configuration, and Azure Firewall. Each service has a security baseline that applies the MCSB guidance to the features and capabilities of the service. These baselines help users understand which features are applicable and how to secure them according to the MCSB.
Azure Front Door: For the complete mapping of Azure Front Door to the MCSB, see the full Azure Front Door security baseline mapping file.
Azure App Configuration: To see how Azure App Configuration aligns with the MCSB, refer to the full Azure App Configuration security baseline mapping file.
Azure Firewall: The complete mapping of Azure Firewall to the MCSB can be found in the full Azure Firewall security baseline mapping file.
By adhering to the MCSB, organizations can ensure that their Azure deployments are secure and compliant with industry standards, thereby reducing the risk of security breaches and enhancing the overall security of their cloud environment.
Secure Azure services and workloads with Microsoft Defender for Cloud regulatory compliance controls
Set up Microsoft Defender for Cloud
Improve Your Regulatory Compliance
Regulatory compliance is a critical aspect of cloud security and governance. Azure provides several tools and features to help organizations improve their regulatory compliance posture. Here’s a detailed explanation of how you can leverage Azure’s capabilities to enhance compliance:
Azure Policy Regulatory Compliance
Azure Policy helps you manage and enforce organizational standards and assess compliance at scale. With Azure Policy, you can:
- Understand Compliance with Built-in Definitions: Azure Policy provides built-in policy definitions that map to common regulatory standards and benchmarks, which can be used to assess your compliance status https://learn.microsoft.com/en-us/azure/azure-app-configuration/security-controls-policy .
- Customize Policies for Your Needs: You can create custom policies or edit built-in ones to tailor them to your organization’s specific compliance requirements.
- Monitor Compliance Continuously: Azure Policy continuously evaluates your resources for compliance with the policies you’ve set up. This helps ensure that any deviations are identified and can be addressed promptly https://learn.microsoft.com/security/benchmark/azure/baselines/azure-app-configuration-security-baseline .
Microsoft Defender for Cloud and Regulatory Compliance Dashboard
Microsoft Defender for Cloud offers a regulatory compliance dashboard that simplifies the monitoring of your compliance status:
- Automated Compliance Assessment: Defender for Cloud automatically assesses your resources against the compliance standards you’ve chosen and provides a detailed compliance dashboard https://learn.microsoft.com/en-us/training/modules/manage-cloud-security-posture-management/4-measure-enforce-regulatory-compliance .
- Integration with Azure Arc: For hybrid cloud environments, Defender for Cloud can onboard AWS EC2 instances to Azure Arc, enabling compliance assessment and threat protection across clouds https://learn.microsoft.com/en-us/training/modules/connect-non-azure-machines-to-azure-defender/4-connect-aws-accounts .
- Regular Scanning: Defender for Cloud scans for new resources at regular intervals, ensuring that your compliance posture is up-to-date https://learn.microsoft.com/en-us/training/modules/connect-non-azure-machines-to-azure-defender/4-connect-aws-accounts .
- Actionable Recommendations: The dashboard provides actionable security recommendations to help you remediate non-compliant resources and improve your compliance score https://learn.microsoft.com/en-us/training/modules/connect-non-azure-machines-to-azure-defender/4-connect-aws-accounts .
Managing Compliance Standards
To manage and add compliance standards in Defender for Cloud:
- Navigate to the Regulatory compliance dashboard in Defender for Cloud.
- Select ‘Manage compliance policies’ to view and manage the compliance standards for your subscriptions or management groups.
- Add the standards relevant to your organization by selecting ‘Add more standards’ and searching for the available standards.
- Enter the necessary details for the specific initiative, such as scope, parameters, and remediation, to tailor the compliance assessment to your needs https://learn.microsoft.com/en-us/training/modules/manage-cloud-security-posture-management/4-measure-enforce-regulatory-compliance .
Reporting and Tracking
- Downloadable Reports: You can download summary reports for any of the compliance standards assigned to your scope, which can be used for audits and evidence of compliance https://learn.microsoft.com/en-us/training/modules/manage-cloud-security-posture-management/4-measure-enforce-regulatory-compliance .
- Automatic Updates: Microsoft tracks changes in regulatory standards and automatically updates the coverage in its compliance packages, ensuring that your compliance assessments are always based on the latest requirements https://learn.microsoft.com/en-us/training/modules/manage-cloud-security-posture-management/4-measure-enforce-regulatory-compliance .
For more information on improving your regulatory compliance using Azure tools, you can refer to the following resources:
- Azure Policy Regulatory Compliance: Learn More https://learn.microsoft.com/en-us/azure/azure-app-configuration/security-controls-policy .
- Azure Policy GitHub Repository for Built-ins: View on GitHub https://learn.microsoft.com/en-us/azure/azure-app-configuration/security-controls-policy .
- Azure Policy Tutorial: Create and Manage Policies https://learn.microsoft.com/security/benchmark/azure/baselines/azure-app-configuration-security-baseline .
- Azure Policy Regulatory Compliance Controls for Azure App Configuration: Learn More https://learn.microsoft.com/security/benchmark/azure/baselines/azure-app-configuration-security-baseline .
By following these steps and utilizing Azure’s compliance management tools, organizations can significantly improve their regulatory compliance posture, ensuring they meet industry standards and regulatory requirements.
Secure Azure services and workloads with Microsoft Defender for Cloud regulatory compliance controls
Set up Microsoft Defender for Cloud
Configure Microsoft Defender for Cloud Policies
Microsoft Defender for Cloud is an essential tool for enhancing the security posture of your cloud workloads. It provides advanced threat protection across your Azure services, as well as on-premises and even other clouds. Here’s how you can configure Microsoft Defender for Cloud policies to ensure your workloads are secure:
Enable Defender for Cloud: To start using Defender for Cloud, you must first enable it. This service is natively integrated with Azure and automatically monitors and protects Azure PaaS services such as Service Fabric, SQL Database, SQL Managed Instance, and storage accounts. There is no need for additional deployment for these services https://learn.microsoft.com/en-us/training/modules/what-is-azure-defender/3-understand-azure-secure-center .
Install Log Analytics Agent: For non-Azure servers and virtual machines, both Windows and Linux, you need to install the Log Analytics agent. This allows Defender for Cloud to collect and analyze security events from these machines. Azure virtual machines are automatically provisioned with Defender for Cloud https://learn.microsoft.com/en-us/training/modules/what-is-azure-defender/3-understand-azure-secure-center .
Review Security Recommendations: Defender for Cloud’s security analytics engine correlates the collected events to provide tailored recommendations, known as hardening tasks. These recommendations should be investigated promptly to prevent potential security breaches https://learn.microsoft.com/en-us/training/modules/what-is-azure-defender/3-understand-azure-secure-center .
Understand Defender for Cloud Policies in Azure Policy: When you enable Defender for Cloud, a built-in security policy is reflected in Azure Policy as a built-in initiative under the Defender for Cloud category. This initiative is automatically assigned to all registered subscriptions and contains audit policies. For more information, you can refer to the guide on Working with security policies https://learn.microsoft.com/en-us/training/modules/what-is-azure-defender/3-understand-azure-secure-center .
Set Policies at Different Scopes: In Defender for Cloud, policies can be applied to management groups, across subscriptions, or even at the tenant level. This flexibility allows you to tailor your security policies to the specific needs of your organization https://learn.microsoft.com/en-us/training/modules/what-is-azure-defender/3-understand-azure-secure-center .
Identify and Protect Shadow IT: Defender for Cloud can help you identify Shadow IT by showing subscriptions labeled as “not covered” in your dashboard. This enables you to ensure that all subscriptions are under the purview of your security policies and protected by Defender for Cloud https://learn.microsoft.com/en-us/training/modules/what-is-azure-defender/3-understand-azure-secure-center .
Manage Compliance Policies: You can assign and manage regulatory compliance policies, including the Microsoft cloud security benchmark (MCSB), and improve your Defender for Cloud secure score by applying recommended remediations https://learn.microsoft.com/en-us/credentials/certifications/resources/study-guides/sc-200 .
Monitor Security Baselines: Microsoft Defender for Cloud allows you to monitor security baselines and their recommendations. Azure Policy definitions related to these baselines will be listed in the Regulatory Compliance section of the Defender for Cloud portal page. Some recommendations may require a paid Microsoft Defender plan https://learn.microsoft.com/security/benchmark/azure/baselines/azure-front-door-security-baseline .
By following these steps, you can configure Microsoft Defender for Cloud policies to protect your cloud environment effectively. Remember to regularly review and update your policies to adapt to new threats and changes in your cloud infrastructure.
Secure Azure services and workloads with Microsoft Defender for Cloud regulatory compliance controls
Set up Microsoft Defender for Cloud
View and Edit Security Policies
Security policies are critical in defining the behavior and protection level against predefined threats within an organization. These policies can be configured and managed through various Microsoft security platforms, each serving a specific purpose and providing a layer of defense against potential security risks.
Microsoft Defender for Office 365
Microsoft Defender for Office 365 allows security teams to set up detailed protection policies. These policies can be tailored at different levels, such as user, organization, recipient, and domain, to ensure fine-grained threat protection. Regular review and updates of these policies are essential due to the constantly evolving threat landscape https://learn.microsoft.com/en-us/training/modules/m365-threat-remediate/configure-protect-detect .
Key Steps: 1. Access the Microsoft 365 Defender portal. 2. Navigate to the policy management section. 3. Review existing policies and edit as necessary to adjust protection settings.
Microsoft Defender for Cloud Apps
Defender for Cloud Apps provides tools to discover and manage applications, identify security risks, and enforce policies to protect organizational data across cloud services https://learn.microsoft.com/en-us/credentials/certifications/resources/study-guides/sc-200 .
Key Steps: 1. Sign in to the Microsoft Defender for Cloud Apps portal. 2. Utilize the policy catalog to view available policies. 3. Create new policies or edit existing ones to align with your security requirements.
Conditional Access Policies
Conditional Access policies in Azure Active Directory (Azure AD) help control access to corporate resources based on specific conditions. These policies ensure that only secure, compliant devices can access sensitive information https://learn.microsoft.com/en-us/training/modules/configure-manage-automation-microsoft-defender-for-endpoint/5-block-risk-devices .
Key Steps: 1. Sign in to the Azure AD portal with the appropriate administrator role. 2. Navigate to the Conditional Access section. 3. Create new policies or edit existing ones to define access conditions for your resources.
Data Loss Prevention (DLP) Policies
DLP policies in Microsoft 365 help prevent sensitive information from being shared inappropriately. These policies can trigger alerts and take protective actions when sensitive data is at risk https://learn.microsoft.com/en-us/credentials/certifications/resources/study-guides/sc-200 .
Key Steps: 1. Access the Microsoft 365 compliance center. 2. Go to the Data loss prevention section. 3. Configure DLP policies to protect sensitive information according to organizational standards.
Insider Risk Policies
Insider risk policies help identify and take action on activities within the organization that may pose a risk to company data or security https://learn.microsoft.com/en-us/credentials/certifications/resources/study-guides/sc-200 .
Key Steps: 1. Sign in to the Microsoft 365 compliance center. 2. Navigate to the Insider risk management section. 3. Set up policies to monitor and mitigate insider risks.
For additional information on configuring and managing security policies, you can refer to the following resources:
- Microsoft Defender for Office 365
- Microsoft Defender for Cloud Apps
- Conditional Access in Azure AD
- Data Loss Prevention in Microsoft 365
- Insider Risk Management in Microsoft 365
Please note that access to these portals and the ability to configure policies require specific administrative roles, which vary depending on the platform and the actions being performed. It is important to ensure that the individuals responsible for policy management have the necessary permissions to perform these tasks effectively.
Secure Azure services and workloads with Microsoft Defender for Cloud regulatory compliance controls
Set up Microsoft Defender for Cloud
Manage and Implement Microsoft Defender for Cloud Recommendations
Microsoft Defender for Cloud is a comprehensive security management system that provides advanced threat protection across hybrid cloud workloads in Azure, on-premises, and other cloud platforms. Managing and implementing its recommendations is crucial for maintaining a strong security posture. Here’s a detailed explanation of how to manage and implement these recommendations:
Overview of Recommendations
Microsoft Defender for Cloud continually assesses your resources for security issues and aggregates the findings into a secure score. This score reflects your current security situation—the higher the score, the lower the identified risk level https://learn.microsoft.com/en-us/training/modules/manage-cloud-security-posture-management/2-explore-secure-score .
Detection of Security Misconfigurations
Defender for Cloud detects security misconfigurations in your cloud environments. It provides a single view showing both Defender for Cloud recommendations and findings from other security services, such as the GCP Security Command Center, thus offering visibility and protection across multiple cloud environments https://learn.microsoft.com/en-us/training/modules/connect-non-azure-machines-to-azure-defender/5-connect-gcp-accounts .
Secure Score Calculations
Your GCP resources are incorporated into Defender for Cloud’s secure score calculations. This score is presented as a percentage value on the Microsoft Defender for Cloud Overview page, with the underlying values also clearly presented https://learn.microsoft.com/en-us/training/modules/manage-cloud-security-posture-management/2-explore-secure-score .
Regulatory Compliance Dashboard
Defender for Cloud integrates recommendations based on the CIS standard into its regulatory compliance dashboard. This helps you understand how well your organization is complying with industry standards and best practices https://learn.microsoft.com/en-us/training/modules/connect-non-azure-machines-to-azure-defender/5-connect-gcp-accounts .
Security Controls and Recommendations
Recommendations are grouped into security controls, which are logical groups of related security recommendations reflecting your vulnerable attack surfaces. To improve your secure score, you should remediate all the recommendations for a single resource within a control https://learn.microsoft.com/en-us/training/modules/manage-cloud-security-posture-management/2-explore-secure-score .
Remediation Instructions
To increase your security, review Defender for Cloud’s recommendations page and implement the remediation instructions for each issue. Your score only improves when you remediate all of the recommendations for a single resource within a control https://learn.microsoft.com/en-us/training/modules/manage-cloud-security-posture-management/2-explore-secure-score .
Kubernetes Clusters
For Kubernetes clusters, Defender for Cloud continuously assesses configurations and compares them with the initiatives applied to your subscriptions. It generates security recommendations for misconfigurations, which you can view and remediate on the recommendations page https://learn.microsoft.com/en-us/training/modules/understand-azure-defender-cloud-workload-protection/11-understand-azure-defender-for-container-registries .
Security Baselines
Microsoft provides security baselines, such as the Microsoft cloud security benchmark, which offers recommendations on securing cloud solutions on Azure. You can monitor these security baselines and their recommendations using Microsoft Defender for Cloud, and Azure Policy definitions will be listed in the Regulatory Compliance section of the Defender for Cloud portal page https://learn.microsoft.com/security/benchmark/azure/baselines/azure-front-door-security-baseline https://learn.microsoft.com/security/benchmark/azure/baselines/application-gateway-security-baseline .
Compliance with Azure Policy Definitions
When a feature has relevant Azure Policy Definitions, they are listed in the security baseline to help you measure compliance with the Microsoft cloud security benchmark controls and recommendations. Some recommendations may require a paid Microsoft Defender plan to enable certain security scenarios https://learn.microsoft.com/security/benchmark/azure/baselines/azure-front-door-security-baseline https://learn.microsoft.com/security/benchmark/azure/baselines/application-gateway-security-baseline .
Additional Resources
For more detailed guidance and to see how specific Azure services map to the Microsoft cloud security benchmark, you can refer to the full security baseline mapping files for Azure Front Door and Application Gateway https://learn.microsoft.com/security/benchmark/azure/baselines/azure-front-door-security-baseline https://learn.microsoft.com/security/benchmark/azure/baselines/application-gateway-security-baseline .
By following these steps and utilizing the resources provided, you can effectively manage and implement Microsoft Defender for Cloud recommendations to enhance your organization’s security posture.
Secure Azure services and workloads with Microsoft Defender for Cloud regulatory compliance controls
Set up Microsoft Defender for Cloud
Explore Secure Score
Secure Score is a key metric within Microsoft’s security solutions that quantifies an organization’s security posture. A higher Secure Score indicates that an organization has implemented more improvement actions to enhance its security. Here’s a detailed explanation of Secure Score and how to explore it:
Understanding Secure Score
- Definition: Secure Score reflects the security measures an organization has taken, with a higher score indicating a more robust security posture https://learn.microsoft.com/en-us/training/modules/mitigate-incidents-microsoft-365-defender/10-understand-microsoft-secure-score .
- Location: It is accessible through the Microsoft 365 Defender portal, providing a centralized dashboard for monitoring and improving the security of Microsoft 365 identities, apps, and devices https://learn.microsoft.com/en-us/training/modules/mitigate-incidents-microsoft-365-defender/10-understand-microsoft-secure-score .
Benefits of Secure Score
- Visualization: Organizations can view robust visualizations of their security metrics and trends https://learn.microsoft.com/en-us/training/modules/mitigate-incidents-microsoft-365-defender/10-understand-microsoft-secure-score .
- Integration: Secure Score is integrated with other Microsoft products, offering a comprehensive view of security across services https://learn.microsoft.com/en-us/training/modules/mitigate-incidents-microsoft-365-defender/10-understand-microsoft-secure-score .
- Benchmarking: It allows organizations to compare their scores with those of similar organizations, helping them understand their security standing in the industry https://learn.microsoft.com/en-us/training/modules/mitigate-incidents-microsoft-365-defender/10-understand-microsoft-secure-score .
- Third-Party Solutions: The score also accounts for security actions addressed by third-party solutions https://learn.microsoft.com/en-us/training/modules/mitigate-incidents-microsoft-365-defender/10-understand-microsoft-secure-score .
Exploring Secure Score in Defender for Cloud
- Accessing Recommendations: To view Secure Score recommendations, sign in to the Azure portal and navigate to Microsoft Defender for Cloud > Recommendations https://learn.microsoft.com/en-us/training/modules/manage-cloud-security-posture-management/3-explore-recommendations .
- Security Controls: Recommendations are grouped into security controls, and selecting ‘Secure score recommendations’ will show how they affect the Secure Score https://learn.microsoft.com/en-us/training/modules/manage-cloud-security-posture-management/3-explore-recommendations .
- Recommendation Details: For each recommendation, users can view details, including severity indicators, freshness intervals, and counts of exempted resources if applicable https://learn.microsoft.com/en-us/training/modules/manage-cloud-security-posture-management/3-explore-recommendations .
- Regulatory Compliance: Recommendations are also mapped to different regulatory compliance standards, providing guidance on meeting specific industry requirements https://learn.microsoft.com/en-us/training/modules/manage-cloud-security-posture-management/3-explore-recommendations .
Managing Security Posture
- Security Posture Page: The Security posture page in Defender for Cloud displays the Secure Score for the entire subscription and individual environments https://learn.microsoft.com/en-us/training/modules/manage-cloud-security-posture-management/2-explore-secure-score .
- Subscription Management: Users can manage individual subscriptions, accounts, and projects, viewing their Secure Scores and recommendations https://learn.microsoft.com/en-us/training/modules/manage-cloud-security-posture-management/2-explore-secure-score .
Additional Resources
- Regulatory Compliance: Defender for Cloud includes regulatory compliance management, which is part of the overall security posture management https://learn.microsoft.com/en-us/training/modules/manage-cloud-security-posture-management/7-summary-resources .
- Security Recommendations: Implementing security recommendations is a critical step in improving the Secure Score https://learn.microsoft.com/en-us/training/modules/manage-cloud-security-posture-management/7-summary-resources .
- Microsoft Cloud Security Benchmark: Assigning and managing regulatory compliance policies, such as the Microsoft Cloud Security Benchmark (MCSB), contributes to a better Secure Score https://learn.microsoft.com/en-us/credentials/certifications/resources/study-guides/sc-200 .
For more information on Secure Score and how to improve it, you can refer to the following resources: - Microsoft 365 Defender portal - Azure portal - Microsoft Defender for Cloud documentation
By exploring and improving the Secure Score, organizations can significantly enhance their security measures and reduce their exposure to potential threats.
Secure Azure services and workloads with Microsoft Defender for Cloud regulatory compliance controls
Set up Microsoft Defender for Cloud
MITRE ATT&CK Matrix in Microsoft Sentinel
The MITRE ATT&CK matrix is a comprehensive knowledge base that includes a variety of tactics and techniques observed in real-world cyber attacks. It is widely utilized by organizations to develop threat models and methodologies for assessing their security posture. Microsoft Sentinel integrates the MITRE ATT&CK framework to enhance threat detection, investigation, and to provide a visualization of an organization’s security status.
Understanding the MITRE ATT&CK Matrix in Microsoft Sentinel
Coverage Matrix: Microsoft Sentinel features a coverage matrix that displays both active scheduled query rules and near real-time (NRT) rules. This matrix helps users understand the number of detections active in their workspace for specific techniques https://learn.microsoft.com/en-us/training/modules/what-is-threat-hunting-azure-sentinel/3a-explore-mitre-att-ck .
Technique Search: Users can search for specific techniques within the matrix using the technique name or ID. This functionality is crucial for evaluating an organization’s security status concerning selected techniques https://learn.microsoft.com/en-us/training/modules/what-is-threat-hunting-azure-sentinel/3a-explore-mitre-att-ck .
Technique Details: By selecting a technique in the matrix, users can access more details on the right side of the interface. This includes links to the MITRE ATT&CK framework knowledge base for further information about the technique https://learn.microsoft.com/en-us/training/modules/what-is-threat-hunting-azure-sentinel/3a-explore-mitre-att-ck .
Simulated Coverage: The matrix also provides insights into simulated coverage, which refers to detections that are available but not currently configured in the user’s workspace. This allows organizations to understand the potential security status if all available detections were configured https://learn.microsoft.com/en-us/training/modules/what-is-threat-hunting-azure-sentinel/3a-explore-mitre-att-ck .
Hunting with MITRE ATT&CK: When conducting threat hunting in Microsoft Sentinel, the MITRE ATT&CK framework can be used to categorize and run queries based on specific tactics. This is facilitated by the MITRE ATT&CK tactics timeline on the Hunting page, where selecting a tactic filters the available queries accordingly https://learn.microsoft.com/en-us/training/modules/hunt-threats-sentinel/3-query-management-creation .
Alert Categories: The alert categories in Microsoft Sentinel align with the attack tactics and techniques in the MITRE ATT&CK Enterprise matrix, providing a structured approach to categorizing threats. Some categories may include items not part of the ATT&CK matrices, such as ‘Unwanted Software’ https://learn.microsoft.com/en-us/training/modules/mitigate-incidents-microsoft-365-defender/5-manage-investigate-alerts .
Additional Resources
For more information on the MITRE ATT&CK framework and its application within Microsoft Sentinel, you can refer to the following resources:
- MITRE ATT&CK Framework: https://attack.mitre.org
- Microsoft Sentinel Documentation: https://learn.microsoft.com/en-us/azure/sentinel/
By leveraging the MITRE ATT&CK matrix within Microsoft Sentinel, organizations can gain a deeper understanding of their security coverage and enhance their threat detection and response capabilities.
Secure Azure services and workloads with Microsoft Defender for Cloud regulatory compliance controls
Set up Microsoft Defender for Cloud
Define Brute Force Attacks
Brute force attacks are a type of cybersecurity threat where an attacker systematically tries a large number of possible combinations to guess the correct credentials, such as usernames and passwords, to gain unauthorized access to systems, networks, or data. These attacks rely on the trial-and-error method and can be conducted manually by attackers or automated using software tools.
Characteristics of Brute Force Attacks:
- Anomalous Access Patterns: Brute force attacks often involve an abnormally high number of failed sign-in attempts, which can be detected as unusual database access patterns https://learn.microsoft.com/en-us/training/modules/understand-azure-defender-cloud-workload-protection/6-understand-azure-defender-for-open-source-databases .
- Persistence: Attackers may persistently attempt to access accounts by trying different credentials until they succeed or are locked out.
- Automated Tools: Attackers may use automated tools that can rapidly generate and test a vast array of credential combinations.
- Targeted or Random: These attacks can be either targeted at specific user accounts or random, attempting to find any vulnerable accounts.
Types of Brute Force Attacks:
- Simple Brute Force: An attacker tries all possible combinations of credentials without any prior knowledge of valid usernames or passwords https://learn.microsoft.com/en-us/training/modules/understand-azure-defender-cloud-workload-protection/6-understand-azure-defender-for-open-source-databases .
- Brute Force on a Valid User: The attacker knows a valid username and only needs to determine the corresponding password https://learn.microsoft.com/en-us/training/modules/understand-azure-defender-cloud-workload-protection/6-understand-azure-defender-for-open-source-databases .
- Successful Brute Force: The attack continues until the correct credentials are discovered, granting the attacker access https://learn.microsoft.com/en-us/training/modules/understand-azure-defender-cloud-workload-protection/6-understand-azure-defender-for-open-source-databases .
Mitigation Strategies:
- Vulnerability Assessment: Regular scans to discover and remediate potential vulnerabilities that could be exploited by brute force attacks https://learn.microsoft.com/en-us/training/modules/understand-azure-defender-cloud-workload-protection/5-understand-azure-defender-for-sql .
- Advanced Threat Protection: Continuous monitoring for suspicious activities, such as brute force attacks, and providing security alerts with mitigation guidance https://learn.microsoft.com/en-us/training/modules/understand-azure-defender-cloud-workload-protection/5-understand-azure-defender-for-sql .
- Just-In-Time VM Access: Limiting exposure to brute force attacks by reducing access to virtual machine ports and setting secure access policies https://learn.microsoft.com/en-us/training/modules/what-is-azure-defender/3-understand-azure-secure-center .
- Normalized Analytics Rules: Detecting attacks across various systems and sources, including brute force attacks, by using analytics rules that work across on-premises and cloud environments https://learn.microsoft.com/en-us/training/modules/data-normalization-microsoft-sentinel/2-understand .
Incident Response:
- Incident Details: Reviewing the incident details, such as the number of failed login attempts, can help understand the context and scale of a brute force attack https://learn.microsoft.com/en-us/training/modules/incident-management-sentinel/5-manage-incidents .
For additional information on brute force attacks and their mitigation, you can refer to the following resources: - Microsoft Defender for Cloud - Microsoft Sentinel Incident Management
Please note that the URLs provided are for reference purposes to supplement the study guide material.
Secure Azure services and workloads with Microsoft Defender for Cloud regulatory compliance controls
Set up Microsoft Defender for Cloud
Understanding Just-in-Time VM Access
Just-in-time (JIT) VM access is a security feature that enhances the protection of virtual machines (VMs) from potential attacks by managing access to VMs. This feature is part of Microsoft Defender for Servers and is available in Defender for Servers Plan 2. JIT VM access helps to reduce the attack surface on your Azure VMs by allowing you to control and manage inbound traffic https://learn.microsoft.com/en-us/training/modules/understand-azure-defender-cloud-workload-protection/2-understand-azure-defender-for-servers .
How Just-in-Time VM Access Works
Locking Down Inbound Traffic: By default, all management ports such as Remote Desktop Protocol (RDP) or Secure Shell (SSH) are closed. This prevents unauthorized users from accessing VMs through these ports https://learn.microsoft.com/en-us/training/modules/understand-azure-defender-cloud-workload-protection/2-understand-azure-defender-for-servers .
On-Demand Access: When there is a need to connect to a VM, JIT VM access allows you to open the necessary ports for a limited time. Access is granted based on a request and approval process, ensuring that only authorized users can connect to the VM during the specified time window https://learn.microsoft.com/en-us/training/modules/understand-azure-defender-cloud-workload-protection/2-understand-azure-defender-for-servers https://learn.microsoft.com/en-us/training/modules/what-is-azure-defender/3-understand-azure-secure-center .
Reducing Exposure to Attacks: By keeping remote access ports closed until they are needed, JIT VM access minimizes the risk of brute force attacks and other network-based attacks targeting open ports https://learn.microsoft.com/en-us/training/modules/what-is-azure-defender/3-understand-azure-secure-center .
Setting Access Policies: Administrators can define policies that specify who is authorized to request JIT access, from which IP address ranges, and for how long the ports should remain open. Once the approved time expires, the ports are automatically closed again https://learn.microsoft.com/en-us/training/modules/what-is-azure-defender/3-understand-azure-secure-center .
Integration with Azure Services: JIT VM access is integrated with other Azure services, such as Azure Security Center and Azure Monitor, to provide alerts and logs for access requests and activities. This integration helps in monitoring and auditing access to VMs https://learn.microsoft.com/en-us/training/modules/understand-azure-defender-cloud-workload-protection/2-understand-azure-defender-for-servers .
Additional Resources
For more information on configuring and using JIT VM access, you can refer to the following URLs:
- Just-in-time VM access in Azure Security Center
- How to configure just-in-time VM access with Azure Security Center
By implementing JIT VM access, organizations can significantly enhance their VM security posture, ensuring that VMs are accessible only when necessary and only by authorized personnel. This proactive approach to VM access management is a critical component of a robust cloud security strategy.
Secure Azure services and workloads with Microsoft Defender for Cloud regulatory compliance controls
Set up Microsoft Defender for Cloud
Implementing Just-In-Time VM Access
Just-in-Time (JIT) VM access is a security feature that helps to protect your virtual machines (VMs) from unauthorized access and potential attacks. By implementing JIT access, you can control and monitor who is accessing your VMs, when they are accessing them, and for how long. Here’s a detailed explanation of how JIT VM access works and how to implement it:
Rationale for JIT VM Access: Threat actors often target VMs with open management ports, such as RDP (Remote Desktop Protocol) or SSH (Secure Shell). By keeping these ports closed and only opening them when necessary, JIT VM access significantly reduces the attack surface and the risk of VMs being compromised https://learn.microsoft.com/en-us/training/modules/understand-azure-defender-cloud-workload-protection/2-understand-azure-defender-for-servers .
Enabling JIT VM Access: To enable JIT VM access, you must have Microsoft Defender for Servers activated. This feature is part of the security management tools provided by Microsoft Defender for Cloud. Once enabled, you can configure JIT policies that will govern how and when the ports are opened https://learn.microsoft.com/en-us/training/modules/understand-azure-defender-cloud-workload-protection/2-understand-azure-defender-for-servers .
Configuring Access Policies: Access policies can be set for specific ports on your VMs. These policies define who can request access, from which IP address ranges, and for what duration. Access is granted on a need-to-use basis, ensuring that ports are not left open unnecessarily and reducing the potential for brute force attacks https://learn.microsoft.com/en-us/training/modules/what-is-azure-defender/3-understand-azure-secure-center .
Requesting Access: When an authorized user needs to connect to a VM, they must request access through the Microsoft Defender for Cloud or Microsoft 365 Defender portal. The request will be evaluated against the JIT policies, and if approved, the necessary ports will be opened for the time specified in the policy https://learn.microsoft.com/en-us/training/modules/understand-azure-defender-cloud-workload-protection/2-understand-azure-defender-for-servers https://learn.microsoft.com/en-us/training/modules/what-is-azure-defender/2-what-is-azure-defender .
Monitoring and Auditing: All JIT access requests and activities are logged, allowing for monitoring and auditing of access to the VMs. This helps in identifying any unusual activity and ensuring compliance with security policies.
Additional Protections: Besides JIT VM access, Microsoft Defender for Cloud offers other advanced analytics and protections for your resources, including adaptive application controls and network hardening, which complement the security provided by JIT access https://learn.microsoft.com/en-us/training/modules/what-is-azure-defender/2-what-is-azure-defender .
For more information on implementing JIT VM access and other security features, you can refer to the following resources:
- Microsoft Defender for Cloud - Just-In-Time VM Access
- Microsoft Defender for Servers - Plans and Features
By following these steps and utilizing the resources provided, you can effectively implement JIT VM access to enhance the security of your virtual machine environment.
Secure Azure services and workloads with Microsoft Defender for Cloud regulatory compliance controls
Set up Microsoft Defender for Cloud
Enable Just-In-Time Access on Virtual Machines
Just-In-Time (JIT) VM access is a security feature provided by Microsoft Defender for Cloud that enhances the protection of your virtual machines (VMs) from potential attacks. It is designed to reduce the attack surface on your VMs by controlling access to management ports and ensuring they are only open when needed for a limited amount of time.
How JIT VM Access Works
Locking Down Inbound Traffic: JIT VM access helps to lock down the inbound traffic to your VMs, ensuring that remote access ports such as RDP (Remote Desktop Protocol) or SSH (Secure Shell) are closed by default https://learn.microsoft.com/en-us/training/modules/understand-azure-defender-cloud-workload-protection/2-understand-azure-defender-for-servers .
Reducing Exposure to Attacks: By keeping management ports closed unless they are explicitly opened for an approved amount of time, JIT VM access reduces the VMs’ exposure to brute force and other network attacks https://learn.microsoft.com/en-us/training/modules/what-is-azure-defender/3-understand-azure-secure-center .
Requesting Access: When access to a VM is needed, authorized users can request access through the Defender for Cloud. The request specifies the ports to be opened, the source IP addresses that are allowed to connect, and the duration for which the ports will remain open https://learn.microsoft.com/en-us/training/modules/what-is-azure-defender/3-understand-azure-secure-center .
Approval and Access: Once the request is approved, the specified ports are opened for the duration requested, and the requesting IP addresses are allowed to connect. After the time expires, the ports are automatically closed https://learn.microsoft.com/en-us/training/modules/what-is-azure-defender/3-understand-azure-secure-center .
Monitoring and Logging: All JIT access activities are logged, providing an audit trail of when access was requested, approved, and used. This helps in monitoring and investigating access patterns and potential security incidents.
Benefits of JIT VM Access
- Minimizes Attack Surface: By ensuring that management ports are not open all the time, JIT VM access minimizes the attack surface of your VMs https://learn.microsoft.com/en-us/training/modules/what-is-azure-defender/2-what-is-azure-defender .
- Adaptive Controls: It allows for adaptive application controls to create allowlists for applications that should run on your machines, further enhancing security https://learn.microsoft.com/en-us/training/modules/what-is-azure-defender/2-what-is-azure-defender .
- Streamlined Access Management: JIT VM access streamlines the process of managing who has access to your VMs, when, and for how long, making it easier to enforce security policies https://learn.microsoft.com/en-us/training/modules/what-is-azure-defender/3-understand-azure-secure-center .
Additional Resources
For more information on how to enable and configure JIT VM access, you can refer to the following resources:
- Defender for Cloud - Just-In-Time VM Access
- Troubleshoot Bad Gateway errors in Azure Application Gateway
By implementing JIT VM access, organizations can significantly enhance the security posture of their virtual machines within Azure, ensuring that they are better protected against unauthorized access and potential security threats.
Secure Azure services and workloads with Microsoft Defender for Cloud regulatory compliance controls
Configure and integrate a Log Analytics agent and workspace in Defender for Cloud
Collecting Data from Workloads with the Log Analytics Agent
The Log Analytics agent is a critical component for collecting telemetry and other data from various workloads. It plays a pivotal role in monitoring, management, and security solutions provided by Azure services such as Microsoft Defender for Cloud and Microsoft Sentinel. Here’s a detailed explanation of how to collect data from your workloads using the Log Analytics agent:
Enabling Auto Provisioning for Azure VMs
To ensure that all Azure VMs, including newly created ones, have the Log Analytics agent deployed, you can enable automatic provisioning through Defender for Cloud:
- Navigate to Environment settings in the Defender for Cloud’s menu.
- Select the subscription you wish to configure.
- On the Auto provisioning page, toggle the status of auto provisioning for the Log Analytics agent to On.
- In the configuration options pane, you can define the workspace that the agent will use to send data https://learn.microsoft.com/en-us/training/modules/connect-azure-assets-to-azure-defender/3-configure-auto-provisioning .
Workspace Configuration Options
When connecting Azure VMs to a workspace, you have two primary options:
Default Workspace: Defender for Cloud can create a new resource group and default workspace in the same geolocation as the VMs. The naming convention for these resources is as follows:
- Workspace:
DefaultWorkspace-[subscription-ID]-[geo] - Resource Group:
DefaultResourceGroup-[geo]
Defender for Cloud will automatically enable the necessary solutions on the workspace according to the subscription’s pricing tier https://learn.microsoft.com/en-us/training/modules/connect-azure-assets-to-azure-defender/3-configure-auto-provisioning .
- Workspace:
Custom Workspace: Alternatively, you can select a different workspace from a dropdown list that includes all workspaces across your subscriptions. This is useful for centralizing data collection in a single workspace, even from VMs running in different subscriptions https://learn.microsoft.com/en-us/training/modules/connect-azure-assets-to-azure-defender/3-configure-auto-provisioning .
Data Collection Tiers
The data collection tier you select in Defender for Cloud affects how security events are stored in your Log Analytics workspace. However, the Log Analytics agent will continue to collect and analyze the necessary security events for Defender for Cloud’s threat protection, independent of the storage level chosen https://learn.microsoft.com/en-us/training/modules/connect-azure-assets-to-azure-defender/3-configure-auto-provisioning .
Collecting Syslog Events
For Linux-based systems, you can stream Syslog events into Microsoft Sentinel using the Azure Monitor Agent for Linux and Data Collection Rules. This is applicable for devices that support the installation of the agent, such as those running rsyslog or syslog-ng daemons https://learn.microsoft.com/en-us/training/modules/connect-syslog-data-sources-to-azure-sentinel/2-plan-for-syslog-connector .
Collecting Windows Security Events
For Windows systems, System Monitor (Sysmon) is a service that monitors system activity and logs it to the Windows event log. To collect Sysmon events:
- Install the Sysmon agent on the Windows machine.
- In the Azure portal, navigate to Log Analytics workspaces.
- Select the workspace configured for Sentinel.
- In the Settings area, go to Legacy agents management.
- Under the Windows event logs tab, click + Add windows event log.
- Enter
Microsoft-Windows-Sysmon/Operationalin the search box and apply https://learn.microsoft.com/en-us/training/modules/connect-windows-hosts-to-azure-sentinel/3-collect-sysmon-event-logs .
Once configured, Sysmon events will be available in the Event table for analysis and investigation.
For additional information on configuring the Log Analytics agent and workspaces, you can refer to the following resources:
By following these steps, you can effectively collect data from your workloads using the Log Analytics agent, which is essential for monitoring, managing, and securing your Azure environment.
Secure Azure services and workloads with Microsoft Defender for Cloud regulatory compliance controls
Configure and integrate a Log Analytics agent and workspace in Defender for Cloud
Configure the Log Analytics agent and workspace
To configure the Log Analytics agent and workspace, follow these steps:
- Adding Windows Machines:
- Navigate to the Agents management page to download the appropriate agent file for your Windows machine (32/64-bit).
- Copy the Workspace ID and Primary Key from the Agents management page into Notepad.
- Transfer the downloaded setup file to the target computer and execute it.
- Proceed through the installation wizard, accepting the terms and selecting the appropriate options.
- On the Azure Log Analytics configuration page, input the Workspace ID and Workspace Key that you previously saved in Notepad.
- If reporting to a Log Analytics workspace in the Azure Government cloud is required, select Azure US Government from the Azure Cloud dropdown list.
- To communicate through a proxy server, select Advanced and enter the proxy server’s URL and port number.
- Review the settings on the Ready to Install page and select Install.
- Upon successful configuration, select Finish. The Microsoft Monitoring agent will now be visible in the Control Panel, where you can verify its connection https://learn.microsoft.com/en-us/training/modules/connect-non-azure-machines-to-azure-defender/3-connect-non-azure-machines .
- Automatic Provisioning for Azure VMs:
- In Defender for Cloud, go to Environment settings and select the relevant subscription.
- On the Auto provisioning page, turn the Log Analytics agent to On.
- Choose the workspace where the data will be stored. This can be the default workspace created by Defender for Cloud or a different workspace from the dropdown list, which includes all workspaces across your subscriptions https://learn.microsoft.com/en-us/training/modules/connect-azure-assets-to-azure-defender/3-configure-auto-provisioning .
- Sysmon Integration:
- After installing Sysmon on a Windows machine, go to the Azure portal.
- Navigate to Log Analytics workspaces and select the workspace for Sentinel.
- In the Settings area, choose Legacy agents management.
- Under the Windows event logs tab, select + Add windows event log.
- Enter Microsoft-Windows-Sysmon/Operational in the search box and click Apply. This will enable Microsoft Sentinel to query the Sysmon logs https://learn.microsoft.com/en-us/training/modules/connect-windows-hosts-to-azure-sentinel/3-collect-sysmon-event-logs .
- Linux Machine Configuration:
- Designate a Linux machine to forward logs to your Microsoft Sentinel workspace.
- Run the provided script on the machine to install the Log Analytics agent for Linux and configure it to listen for CEF messages and send them securely to your Microsoft Sentinel workspace https://learn.microsoft.com/en-us/training/modules/connect-common-event-format-logs-to-azure-sentinel/3-connect-your-external-solution-use-common-event-format-connector .
- Data Collection Tier Selection:
- In Defender for Cloud, selecting a data collection tier affects the storage of security events in your Log Analytics workspace.
- The Log Analytics agent will collect and analyze security events for Defender for Cloud’s threat protection, regardless of the storage level chosen for the workspace.
- Storing security events enables investigation, search, and auditing within the workspace https://learn.microsoft.com/en-us/training/modules/connect-azure-assets-to-azure-defender/3-configure-auto-provisioning .
For additional information on configuring the Log Analytics agent and workspace, you can refer to the following resources: - Agents management page - Defender for Cloud’s auto provisioning - Sysmon integration with Microsoft Sentinel - Log Analytics agent for Linux - Data collection in Defender for Cloud
Please note that the URLs provided are for reference purposes and are part of the study guide to offer additional information on the topic.
Secure Azure services and workloads with Microsoft Defender for Cloud regulatory compliance controls
Configure and integrate a Log Analytics agent and workspace in Defender for Cloud
Collecting Data from Workloads with the Log Analytics Agent
The Log Analytics agent is a critical component for collecting telemetry and other data from various workloads. It plays a pivotal role in monitoring, management, and security solutions provided by Azure services such as Microsoft Sentinel and Defender for Cloud. Here’s a detailed explanation of how to collect data from your workloads using the Log Analytics agent:
Enabling Auto Provisioning for the Log Analytics Agent
To ensure that the Log Analytics agent is automatically deployed on all supported Azure VMs, including any new ones that are created, follow these steps:
- Navigate to Defender for Cloud in the Azure portal and select Environment settings.
- Choose the subscription you want to configure.
- On the Auto provisioning page, toggle the status of auto provisioning for the Log Analytics agent to On.
- In the configuration options pane, specify the workspace that the agent should use to send data.
Workspace Configuration Options
When connecting Azure VMs to a workspace, you have two primary options:
- Default Workspace: Defender for Cloud can create a
new resource group and default workspace in the same geolocation as your
VMs and connect the agent to this workspace. The naming convention for
the workspace and resource group is as follows:
- Workspace:
DefaultWorkspace-[subscription-ID]-[geo] - Resource Group:
DefaultResourceGroup-[geo]
- Workspace:
- Custom Workspace: Alternatively, you can select a different workspace from a dropdown list that includes all workspaces across your subscriptions. This is useful for collecting data from VMs running in different subscriptions or if you prefer to use a centralized workspace for security data collection.
Data Collection and Storage
Data Connectors: Microsoft Sentinel utilizes data connectors to ingest data from various services. These connectors can collect events from computers running the Log Analytics agent, from Linux syslog servers, or directly from Azure services https://learn.microsoft.com/en-us/training/modules/incident-management-sentinel/3-describe-incident-management .
Data Collection Tiers: In Defender for Cloud, selecting a data collection tier only affects the storage of security events in your workspace. The Log Analytics agent will continue to collect and analyze security events necessary for threat protection, regardless of the storage level chosen https://learn.microsoft.com/en-us/training/modules/connect-azure-assets-to-azure-defender/3-configure-auto-provisioning .
Syslog and Sysmon: For Linux-based systems, events can be streamed into Microsoft Sentinel using the Azure Monitor Agent for Linux and Data Collection Rules. The agent supports messages sent by
rsyslogorsyslog-ngdaemons https://learn.microsoft.com/en-us/training/modules/connect-syslog-data-sources-to-azure-sentinel/2-plan-for-syslog-connector . For Windows systems, System Monitor (Sysmon) can be used to monitor and log system activity. To collect Sysmon events, you need to configure the Log Analytics Agent and Workspace accordingly https://learn.microsoft.com/en-us/training/modules/connect-windows-hosts-to-azure-sentinel/3-collect-sysmon-event-logs .
Additional Information
For more details on managing access to log data and workspaces in Azure Monitor, and to learn about the installation of Defender for Cloud solutions on the workspace, please refer to the following resources:
- Manage access to log data and workspaces in Azure Monitor: Learn more
- Install Defender for Cloud solutions on the workspace: Learn more
By following these guidelines, you can effectively collect data from your workloads using the Log Analytics agent, which is essential for monitoring, management, and security within the Azure ecosystem.
Secure Azure services and workloads with Microsoft Defender for Cloud regulatory compliance controls
Configure Azure Key Vault networking settings
Azure Key Vault Basic Concepts
Azure Key Vault is a cloud service provided by Microsoft Azure to securely store and manage sensitive information such as secrets, encryption keys, and certificates. It is designed to safeguard cryptographic keys and other secrets used by cloud applications and services. Here are the basic concepts associated with Azure Key Vault:
1. Secrets Management
Azure Key Vault can be used to store and manage secrets, such as API keys, passwords, or any other pieces of information that should be kept secure. Secrets are stored in a secure and centralized location, with the ability to control access and monitor their usage.
2. Key Management
Key Vault allows you to create and control encryption keys that are used to encrypt your data. These keys can be used for cryptographic operations within the Key Vault, ensuring that the key material does not leave the secure boundary of the service.
3. Certificate Management
Azure Key Vault also supports the management of TLS/SSL certificates that are used to secure communications. You can import, generate, and manage certificates, and Key Vault will handle the lifecycle of the certificates, including renewal and deployment.
4. Secure Access
Access to the Key Vault is controlled through Azure Active Directory, allowing you to grant specific users or applications the necessary permissions to access the keys, secrets, or certificates. You can also use Managed Identities for Azure resources to authenticate to Key Vault with Azure services.
5. Monitoring and Logging
Key Vault provides monitoring and logging capabilities, which allow you to track how and when your keys and secrets are accessed. This is crucial for compliance and security auditing purposes.
6. Integration with Other Azure Services
Key Vault integrates with various Azure services, such as Azure Application Gateway and Azure Front Door, to provide secure storage of certificates for TLS termination https://learn.microsoft.com/en-us/azure/application-gateway/configure-key-vault-portal https://learn.microsoft.com/en-us/azure/frontdoor/domain https://learn.microsoft.com/en-us/azure/application-gateway/key-vault-certs .
7. Automatic Rotation of Secrets
Key Vault can be configured to automatically rotate secrets and certificates when they are updated, ensuring that your applications always use the latest version without manual intervention https://learn.microsoft.com/en-us/azure/azure-app-configuration/use-key-vault-references-dotnet-core https://learn.microsoft.com/en-us/azure/application-gateway/key-vault-certs .
8. Soft-Delete and Recovery
Key Vault provides a soft-delete feature, which allows you to recover deleted vaults and vault objects within a retention period. This can be a safety net against accidental deletion of critical resources https://learn.microsoft.com/en-us/azure/application-gateway/application-gateway-key-vault-common-errors .
9. Network Access Restrictions
You can configure network access restrictions on your Key Vault to limit access to trusted networks or allow access from trusted Microsoft services https://learn.microsoft.com/en-us/azure/frontdoor/domain .
10. Compliance Standards
Azure Key Vault is designed to meet a variety of compliance standards, which is essential for organizations that have strict regulatory requirements for data security and privacy.
For more detailed information and tutorials on how to use Azure Key Vault, you can refer to the following resources: - Azure Key Vault Overview https://learn.microsoft.com/en-us/azure/application-gateway/configure-key-vault-portal - Managed Identity Integration https://learn.microsoft.com/en-us/azure/azure-app-configuration/use-key-vault-references-dotnet-core - TLS Termination with Key Vault Certificates https://learn.microsoft.com/en-us/azure/application-gateway/configure-key-vault-portal - Use Managed Identities with Azure Front Door Standard/Premium https://learn.microsoft.com/en-us/azure/frontdoor/domain
These resources provide a comprehensive guide to understanding and implementing Azure Key Vault in your applications and services.
Secure Azure services and workloads with Microsoft Defender for Cloud regulatory compliance controls
Configure Azure Key Vault networking settings
Best Practices for Azure Key Vault
Azure Key Vault is a cloud service that provides a secure store for secrets, such as keys, passwords, certificates, and other sensitive data. When using Azure Key Vault, it is important to follow best practices to ensure the security and manageability of your cryptographic keys and secrets. Below are some of the best practices for Azure Key Vault:
- Secure Access to Key Vault:
- Use Azure Active Directory (Azure AD) to authenticate to Key Vault.
- Assign minimal necessary permissions using Key Vault access policies or Azure role-based access control (RBAC).
- Enable multi-factor authentication for users accessing Key Vault.
- Key Management:
- Use Azure Key Vault to create and control the life cycle of your encryption keys.
- Rotate and revoke keys in Azure Key Vault based on a defined schedule or when there is a key retirement or compromise https://learn.microsoft.com/security/benchmark/azure/baselines/azure-front-door-security-baseline .
- Implement a key hierarchy with a key encryption key (KEK) and data encryption key (DEK) for added security https://learn.microsoft.com/security/benchmark/azure/baselines/azure-front-door-security-baseline .
- Integration with Other Services:
- Integrate Key Vault with other Azure services to manage keys, secrets, and certificates centrally https://learn.microsoft.com/security/benchmark/azure/baselines/content-delivery-network-security-baseline https://learn.microsoft.com/security/benchmark/azure/baselines/azure-front-door-security-baseline .
- Use Key Vault references in App Configuration to maintain a separation between code and secrets https://learn.microsoft.com/en-us/azure/azure-app-configuration/faq .
- Secrets and Certificates Rotation:
- Rotate secrets and certificates periodically as a good security practice https://learn.microsoft.com/en-us/azure/azure-app-configuration/reload-key-vault-secrets-dotnet .
- Automate the rotation process to avoid manual errors and reduce the risk of secret compromise.
- Monitoring and Logging:
- Enable logging for Key Vault access and actions to monitor for unusual or unauthorized access patterns.
- Use Azure Monitor to set up alerts for suspicious activities.
- Backup and Recovery:
- Back up Key Vault secrets and keys to recover from accidental deletion or loss.
- Utilize the soft-delete and purge protection features to protect against accidental deletion of key vaults and their content https://learn.microsoft.com/en-us/azure/application-gateway/application-gateway-key-vault-common-errors .
- Compliance and Certifications:
- Ensure that your use of Key Vault complies with relevant industry standards and regulations.
- Regularly review and update your compliance documentation as Key Vault features and your usage patterns evolve.
For additional information and guidance on Azure Key Vault, you can refer to the following resources:
- Azure Key Vault Overview https://learn.microsoft.com/security/benchmark/azure/baselines/content-delivery-network-security-baseline https://learn.microsoft.com/security/benchmark/azure/baselines/azure-front-door-security-baseline
- Secure your Origin with Private Link in Azure Front Door https://learn.microsoft.com/security/benchmark/azure/baselines/azure-front-door-security-baseline
- Use Key Vault references in an ASP.NET Core app https://learn.microsoft.com/en-us/azure/azure-app-configuration/faq
- How to rotate secrets and certificates in Azure Key Vault https://learn.microsoft.com/en-us/azure/azure-app-configuration/reload-key-vault-secrets-dotnet
- Recovering a deleted key vault https://learn.microsoft.com/en-us/azure/application-gateway/application-gateway-key-vault-common-errors
By adhering to these best practices, you can enhance the security and efficiency of managing your cryptographic keys and secrets in Azure Key Vault.
Secure Azure services and workloads with Microsoft Defender for Cloud regulatory compliance controls
Configure Azure Key Vault networking settings
Azure Key Vault Security
Azure Key Vault is a cloud service designed to safeguard cryptographic keys and secrets used in cloud applications and services. It provides secure storage for encryption keys, certificates, connection strings, and passwords, ensuring that these sensitive items are protected and managed effectively.
Key Features of Azure Key Vault:
Encryption and Key Management: Azure Key Vault allows you to create and control the lifecycle of encryption keys. This includes key generation, distribution, and storage. You can rotate and revoke keys based on a defined schedule or in response to specific events, such as key retirement or compromise https://learn.microsoft.com/security/benchmark/azure/baselines/azure-front-door-security-baseline .
Integration with Other Azure Services: Azure Key Vault can be integrated with other Azure services to manage keys, secrets, or certificates used by these services https://learn.microsoft.com/security/benchmark/azure/baselines/content-delivery-network-security-baseline https://learn.microsoft.com/security/benchmark/azure/baselines/azure-front-door-security-baseline .
Access Policies and Permissions: Key Vault provides granular access policies, which enable you to control who can access your keys and secrets and what operations they can perform. You can create access policies in Key Vault that grant permissions like ‘Get’ for secrets to specific identities https://learn.microsoft.com/azure/app-service/app-service-configuration-references .
Advanced Threat Protection: By enabling Microsoft Defender for Key Vault, you can add an extra layer of security intelligence that provides advanced threat protection for your key vaults https://learn.microsoft.com/en-us/training/modules/understand-azure-defender-cloud-workload-protection/7-understand-azure-defender-for-key-vault .
Hardware-Level Encryption: For the highest level of security for your application secrets, Key Vault offers hardware-level encryption https://learn.microsoft.com/en-us/azure/azure-app-configuration/faq .
Secrets Management: While Azure App Configuration is a service for managing application settings and feature flags, Key Vault is recommended for storing secrets due to its enhanced security features. App Configuration can reference secrets stored in Key Vault, allowing applications to retrieve these secrets securely https://learn.microsoft.com/en-us/azure/azure-app-configuration/faq https://learn.microsoft.com/azure/app-service/app-service-configuration-references .
Key Vault References: Azure App Configuration supports a specific format for storing Key Vault references. If an App Configuration value is a Key Vault reference, your application must have permission to access the specified key vault https://learn.microsoft.com/azure/app-service/app-service-configuration-references .
Best Practices for Using Azure Key Vault:
Use a Key Hierarchy: Implement a key hierarchy to generate a separate data encryption key (DEK) with your key encryption key (KEK) in your key vault https://learn.microsoft.com/security/benchmark/azure/baselines/azure-front-door-security-baseline .
Register Keys with Azure Key Vault: Ensure that all keys are registered with Azure Key Vault and are referenced via key IDs from the service or application https://learn.microsoft.com/security/benchmark/azure/baselines/azure-front-door-security-baseline .
Bring Your Own Key (BYOK): If you need to import HSM-protected keys from on-premises HSMs into Azure Key Vault, follow the recommended guidelines for initial key generation and key transfer https://learn.microsoft.com/security/benchmark/azure/baselines/azure-front-door-security-baseline .
Network Restrictions: If your vault needs to be network restricted or you require the application to periodically update to the latest versions of secrets, consider using the direct approach of App Service and Azure Functions Key Vault references instead of using an App Configuration reference https://learn.microsoft.com/azure/app-service/app-service-configuration-references .
For additional information on Azure Key Vault and its security features, you can refer to the following resources:
- Azure Key Vault Overview https://learn.microsoft.com/security/benchmark/azure/baselines/content-delivery-network-security-baseline https://learn.microsoft.com/security/benchmark/azure/baselines/azure-front-door-security-baseline
- Use Key Vault references in an ASP.NET Core app https://learn.microsoft.com/en-us/azure/azure-app-configuration/faq
- Secure your Origin with Private Link in Azure Front Door https://learn.microsoft.com/security/benchmark/azure/baselines/azure-front-door-security-baseline
- The Azure App Configuration Key Vault references concept https://learn.microsoft.com/azure/app-service/app-service-configuration-references
By understanding and implementing these security features and best practices, you can ensure that your Azure Key Vault is configured to provide robust protection for your sensitive data and cryptographic keys.
Secure Azure services and workloads with Microsoft Defender for Cloud regulatory compliance controls
Configure Azure Key Vault networking settings
Configure Azure Key Vault Firewalls and Virtual Networks
Azure Key Vault is a cloud service that provides a secure store for secrets, such as keys, passwords, certificates, and more. When integrating Azure Key Vault with your applications, it’s crucial to configure firewalls and virtual networks to enhance security. Here’s a detailed explanation of how to configure Azure Key Vault firewalls and virtual networks:
Access Key Vault Networking Pane: Begin by navigating to your Key Vault in the Azure portal. Once there, open the Networking pane to access the firewall and virtual network settings.
Firewall Settings: Under the Firewalls and virtual networks tab, you have the option to choose Private endpoint and selected networks. This setting allows you to restrict access to your Key Vault to only the networks you specify.
Configure Virtual Networks: Add your Application Gateway’s virtual network and subnet to the list of allowed networks. This is done by selecting + Add existing virtual networks and choosing the appropriate virtual network and subnet. During this process, ensure that the
Microsoft.KeyVaultservice endpoint is enabled for the subnet by checking the corresponding checkbox.Allow Trusted Services: To enable trusted Microsoft services to bypass the Key Vault firewall, select Yes under the option to allow trusted services. This is particularly important for services like Azure Application Gateway, which is recognized as a trusted service and can authenticate to Azure Key Vault using User Managed Identities https://learn.microsoft.com/en-us/azure/application-gateway/key-vault-certs .
Private Endpoints (Optional): If your Key Vault has a Private Endpoint enabled, the Application Gateway can access the Key Vault using the private IP address, and steps 1-3 are not required https://learn.microsoft.com/en-us/azure/application-gateway/key-vault-certs .
Custom DNS and Private DNS Zones: When using Private Endpoints, link the privatelink.vaultcore.azure.net private DNS zone to the virtual network containing the Application Gateway. If you are using custom DNS servers, ensure that the private DNS zone remains linked to the virtual network https://learn.microsoft.com/en-us/azure/application-gateway/key-vault-certs .
Certificate Management: Use Azure Key Vault to manage the lifecycle of certificates, including creation, importing, rotation, revocation, storage, and purging. Ensure that the certificate generation adheres to security standards, avoiding insecure properties like insufficient key size or overly long validity periods https://learn.microsoft.com/security/benchmark/azure/baselines/firewall-security-baseline https://learn.microsoft.com/security/benchmark/azure/baselines/application-gateway-security-baseline .
Automatic Rotation: Set up automatic rotation of the certificate in Azure Key Vault and the Azure service if supported. If automatic rotation is not available, rotate the certificates manually using Azure Key Vault https://learn.microsoft.com/security/benchmark/azure/baselines/firewall-security-baseline https://learn.microsoft.com/security/benchmark/azure/baselines/application-gateway-security-baseline .
For additional information on configuring Azure Key Vault firewalls and virtual networks, you can refer to the following resources: - Azure Key Vault General Overview https://learn.microsoft.com/security/benchmark/azure/baselines/application-gateway-security-baseline . - Azure Key Vault Certificates Scenarios https://learn.microsoft.com/security/benchmark/azure/baselines/firewall-security-baseline https://learn.microsoft.com/security/benchmark/azure/baselines/application-gateway-security-baseline . - Azure Firewall Premium Certificates and Azure Key Vault https://learn.microsoft.com/security/benchmark/azure/baselines/firewall-security-baseline . - Application Gateway Key Vault Integration https://learn.microsoft.com/security/benchmark/azure/baselines/application-gateway-security-baseline .
By following these steps and guidelines, you can ensure that your Azure Key Vault is securely integrated with your services while maintaining strict access controls through firewalls and virtual networks.
Secure Azure services and workloads with Microsoft Defender for Cloud regulatory compliance controls
Configure Azure Key Vault networking settings
Configure Key Vault Firewall and Virtual Networks
Azure Key Vault is a cloud service that provides a secure storage solution for secrets, keys, and certificates. When configuring Key Vault, it is crucial to ensure that access to these sensitive materials is restricted and controlled. One way to achieve this is by configuring the Key Vault firewall and virtual networks settings. Below are the steps and considerations for setting up these configurations:
Key Vault Firewall Configuration
Enable Firewall Settings: By default, Key Vault is accessible from any network. To restrict access, you should enable the Key Vault firewall. This can be done by navigating to the Key Vault in the Azure portal and selecting the Networking pane.
Configure Access to Selected Networks: In the Firewalls and virtual networks tab, you can choose to allow access to Key Vault only from selected virtual networks and subnets. This is done by adding your Application Gateway’s virtual network and subnet to the list of allowed networks https://learn.microsoft.com/en-us/azure/application-gateway/application-gateway-key-vault-common-errors https://learn.microsoft.com/en-us/azure/application-gateway/key-vault-certs .
Allow Trusted Services: If you are using services like Application Gateway, which is recognized as a trusted service by Key Vault, you should select Yes to allow these trusted services to bypass the Key Vault firewall. This ensures that while the Key Vault is protected from public access, trusted Azure services can still interact with it https://learn.microsoft.com/en-us/azure/application-gateway/application-gateway-key-vault-common-errors https://learn.microsoft.com/en-us/azure/application-gateway/key-vault-certs .
Virtual Networks Configuration
Service Endpoints: When adding a virtual network to the allowed list, ensure that the
Microsoft.KeyVaultservice endpoint is enabled on the subnet. This provides a secure connection to Key Vault from the specified subnet https://learn.microsoft.com/en-us/azure/application-gateway/key-vault-certs .Private Endpoints: For enhanced security, you can use Private Endpoints to access Key Vault. This ensures that traffic to Key Vault never leaves the Azure backbone network. If using Private Endpoints, link the privatelink.vaultcore.azure.net private DNS zone to the virtual network containing Application Gateway https://learn.microsoft.com/en-us/azure/application-gateway/key-vault-certs .
DNS Configuration: If you are using custom DNS servers, ensure that the private DNS zone remains linked to the virtual network. This is necessary for the Application Gateway to resolve the Key Vault’s private endpoint https://learn.microsoft.com/en-us/azure/application-gateway/key-vault-certs .
Additional Considerations
Certificate Lifecycle Management: Utilize Azure Key Vault to manage the lifecycle of certificates, including creation, import, rotation, and revocation. Set up automatic rotation of certificates if supported, or perform manual rotations as necessary https://learn.microsoft.com/security/benchmark/azure/baselines/firewall-security-baseline https://learn.microsoft.com/security/benchmark/azure/baselines/application-gateway-security-baseline .
Security Standards: Ensure that certificates generated or imported into Key Vault adhere to security standards, avoiding insecure properties such as weak key sizes or overly long validity periods https://learn.microsoft.com/security/benchmark/azure/baselines/firewall-security-baseline https://learn.microsoft.com/security/benchmark/azure/baselines/application-gateway-security-baseline .
Integration with Azure Services: Azure Key Vault can be integrated with various Azure services, such as Azure Firewall Premium and Application Gateway, to manage certificates for secure communications https://learn.microsoft.com/security/benchmark/azure/baselines/firewall-security-baseline https://learn.microsoft.com/security/benchmark/azure/baselines/application-gateway-security-baseline https://learn.microsoft.com/en-us/azure/firewall/premium-certificates .
For more detailed guidance on configuring Key Vault firewall and virtual networks, refer to the following resources: - Azure Key Vault Certificates Scenarios https://learn.microsoft.com/security/benchmark/azure/baselines/firewall-security-baseline https://learn.microsoft.com/security/benchmark/azure/baselines/application-gateway-security-baseline - Azure Application Gateway Key Vault Integration https://learn.microsoft.com/security/benchmark/azure/baselines/application-gateway-security-baseline - Azure Key Vault General Overview https://learn.microsoft.com/en-us/azure/firewall/premium-certificates
By following these steps and considerations, you can ensure that your Key Vault is configured to provide secure and controlled access to your certificates, keys, and secrets within Azure.
Secure Azure services and workloads with Microsoft Defender for Cloud regulatory compliance controls
Configure Azure Key Vault networking settings
Azure Key Vault Soft Delete Overview
Azure Key Vault is a cloud service that provides a secure store for secrets, keys, and certificates. The soft delete feature is an important aspect of Azure Key Vault that provides an additional layer of protection for your key vault items. When soft delete is enabled, items that are deleted from the Key Vault are retained for a period of time, allowing for the recovery of the deleted items if necessary.
Key Concepts of Soft Delete
- Retention Period: Deleted items are retained for a configurable retention period (by default, 90 days) during which they can be recovered or purged.
- Recovery: During the retention period, the deleted items can be recovered, effectively undoing the deletion.
- Purge Protection: When enabled, purge protection ensures that the items cannot be permanently purged until the retention period has elapsed.
Enabling Soft Delete
To enable soft delete, you can use the Azure portal or Azure CLI. The following steps outline the process using the Azure portal:
- In the Azure portal, search for and select Key vaults.
- Select or create a new Key Vault.
- Under the Properties section, enable the Soft delete and Purge protection options.
Managing Deleted Vaults
If a Key Vault is deleted, it enters a soft-delete state. To manage deleted vaults:
- In the Azure portal, navigate to Key vaults.
- Select Managed deleted vaults.
- From here, you can recover a deleted Key Vault or permanently delete (purge) it after the retention period.
Considerations
- When a Key Vault is soft-deleted, related services such as Azure RBAC role assignments, managed identities, Event Grid subscriptions, and private endpoints are also deleted and will need to be recreated upon recovery.
- It is recommended to enable both soft delete and purge protection to prevent accidental or malicious deletion of critical resources.
For additional information on Azure Key Vault soft delete, you can refer to the following resources:
- Azure Key Vault soft delete
- Recover a deleted key vault
- How to recover deleted stores in Azure App Configuration
- Soft-Delete in Azure App Configuration
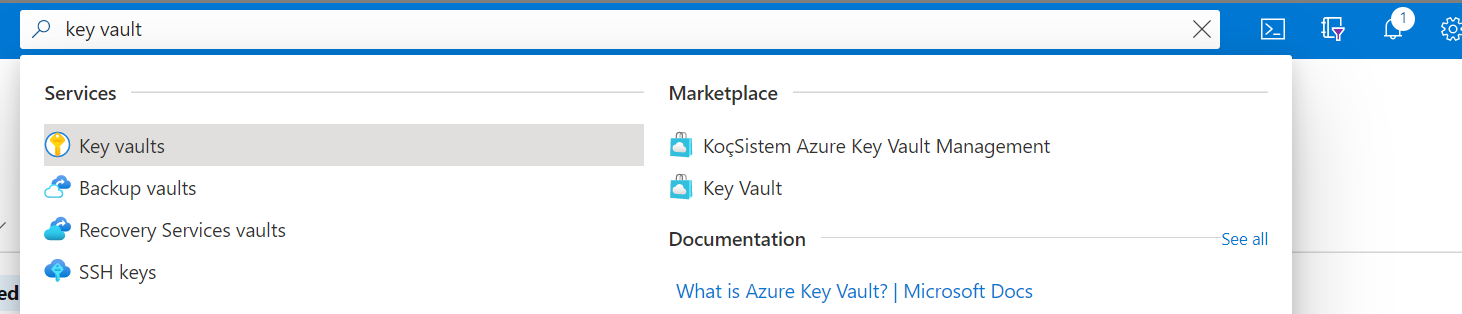
By understanding and utilizing the soft delete feature, you can enhance the security and resilience of your Azure Key Vault assets.
Secure Azure services and workloads with Microsoft Defender for Cloud regulatory compliance controls
Configure Azure Key Vault networking settings
Virtual Network Service Endpoints for Azure Key Vault
Azure Key Vault is a cloud service that provides a secure store for secrets, keys, and certificates. When integrating Azure Key Vault with other Azure services, it’s crucial to ensure secure access and protect these assets from unauthorized access. Virtual Network (VNet) service endpoints play a significant role in enhancing security by extending your virtual network’s private address space and the identity of your VNet to the Azure services over a direct connection.
Enabling VNet service endpoints for Azure Key Vault has several benefits:
Improved Security: Traffic from your VNet to the Azure service always stays on the Microsoft Azure backbone network. There is no exposure to the public internet, which significantly reduces the risk of external threats https://learn.microsoft.com/en-us/azure/application-gateway/key-vault-certs .
Optimal Routing: Service endpoints provide optimal routing by always taking the shortest path inside the Azure backbone network. This ensures that access to the Key Vault is both fast and reliable https://learn.microsoft.com/en-us/azure/application-gateway/key-vault-certs .
Granular Access Control: By using VNet service endpoints, you can configure your Key Vault to accept connections only from specific subnets within your VNet. This allows for fine-grained control over who can access your Key Vault, ensuring that only authorized resources within your Azure environment can access it https://learn.microsoft.com/en-us/azure/application-gateway/key-vault-certs https://learn.microsoft.com/en-us/azure/application-gateway/application-gateway-key-vault-common-errors .
Integration with Azure Services: Key Vault can recognize certain Azure services like Application Gateway as trusted services when using User Managed Identities for authentication. This allows for secure and seamless integration between Key Vault and other Azure services https://learn.microsoft.com/en-us/azure/application-gateway/key-vault-certs .
To configure VNet service endpoints for Azure Key Vault, follow these steps:
- Navigate to the Networking pane in your Key Vault settings in the Azure portal.
- Select the Firewalls and virtual networks tab.
- Choose Selected networks and add your virtual network and subnet.
- Enable the
Microsoft.KeyVaultservice endpoint on the subnet. - Set the Key Vault to allow trusted services to bypass the firewall https://learn.microsoft.com/en-us/azure/application-gateway/key-vault-certs https://learn.microsoft.com/en-us/azure/application-gateway/application-gateway-key-vault-common-errors .
It’s important to note that if you’re using Private Endpoints, which provide a private IP address within your VNet for your Key Vault, the above steps for service endpoints are not required. However, you must link the privatelink.vaultcore.azure.net private DNS zone to your VNet https://learn.microsoft.com/en-us/azure/application-gateway/key-vault-certs .
For additional information on configuring VNet service endpoints for Azure Key Vault, you can refer to the following resources:
- Azure Key Vault over a virtual network service endpoint
- Use Azure Key Vault to pass secure parameter value during deployment
Remember, when configuring your Key Vault with VNet service endpoints, it’s crucial to ensure that all network settings and access policies are correctly set up to maintain the security and integrity of your stored secrets, keys, and certificates.
Secure Azure services and workloads with Microsoft Defender for Cloud regulatory compliance controls
Configure Azure Key Vault networking settings
Configure Azure Key Vault Recovery Management with Soft Delete and Purge Protection
When configuring Azure Key Vault for recovery management, it is essential to enable both soft delete and purge protection features. These features provide an additional layer of data protection and ensure that critical resources are recoverable in case of accidental deletion or malicious activity.
Soft Delete
Soft delete is a feature that retains deleted key vaults and vault objects for a specified retention period. During this period, the deleted objects can be recovered, and the action of deletion can be reversed.
To enable soft delete, you can use the Azure CLI with the following
command, substituting the names of your Key Vault
(contoso-vault) and Resource Group
(contoso-resource-group):
az keyvault update --name contoso-vault --resource-group contoso-resource-group --enable-soft-deletePurge Protection
Purge protection is an additional feature that prevents the permanent deletion of key vaults and vault objects until the retention period has expired. This feature ensures that even if an attempt is made to purge a soft-deleted object, it will remain recoverable until the end of the retention period.
To enable purge protection, use the Azure CLI with the following command:
az keyvault update --name contoso-vault --resource-group contoso-resource-group --enable-purge-protectionRecovery Process
In the event that a key vault is in a soft-delete state, you can recover it through the Azure portal by navigating to Key vaults and selecting Managed deleted vaults. From there, you can find the deleted Key Vault resource and recover it https://learn.microsoft.com/en-us/azure/application-gateway/application-gateway-key-vault-common-errors .
Additional Information
For more details on the soft delete feature and how to set retention policies, enable purge protection, recover, and purge a soft-deleted store, you can refer to the Azure documentation on Soft-Delete in Azure App Configuration https://learn.microsoft.com/en-us/azure/azure-app-configuration/howto-recover-deleted-stores-in-azure-app-configuration .
To check the soft delete status of an existing store and manage its properties, you can log in to the Azure portal, select your standard tier App Configuration store, and navigate to the properties section as shown in the Azure documentation https://learn.microsoft.com/en-us/azure/azure-app-configuration/howto-recover-deleted-stores-in-azure-app-configuration .
By following these steps and utilizing the Azure CLI and Azure portal, you can effectively configure Azure Key Vault to safeguard your keys, secrets, and certificates, ensuring that they are recoverable in case of accidental or intentional deletion https://learn.microsoft.com/en-us/azure/azure-app-configuration/concept-customer-managed-keys https://learn.microsoft.com/en-us/azure/azure-app-configuration/concept-customer-managed-keys .
Secure Azure services and workloads with Microsoft Defender for Cloud regulatory compliance controls
Connect an Azure SQL server using an Azure Private Endpoint using the Azure portal
Azure Private Endpoint
Azure Private Endpoint is a network interface that connects you privately and securely to services powered by Azure Private Link. By using Azure Private Endpoint, you can access Azure service resources, such as Azure App Configuration stores, from your virtual network via a private IP address, ensuring that your data on the Azure network is not exposed to the public internet.
Key Features:
- Private Access: Azure Private Endpoint provides private access to Azure services by assigning a private IP address from your virtual network to the service resource https://learn.microsoft.com/en-us/azure/azure-app-configuration/howto-set-up-private-access .
- Secure Connectivity: The use of Azure Private Endpoint ensures that traffic between your virtual network and the service resource travels over the Azure backbone network, avoiding exposure to the public internet https://learn.microsoft.com/en-us/azure/azure-app-configuration/howto-set-up-private-access .
- Approval Workflow: When creating a private endpoint, the connection must be approved. If the resource is within your directory and you have the necessary permissions, the connection request is auto-approved. Otherwise, approval from the resource owner is required https://learn.microsoft.com/en-us/azure/azure-app-configuration/howto-set-up-private-access .
Creating a Private Endpoint:
To create a private endpoint for your Azure service resource, such as an App Configuration store, you can use the Azure portal, Azure CLI, or Azure PowerShell. Detailed guides for each method can be found at the following URLs: - Azure Portal: Create a private endpoint using the Private Link Center in the Azure portal - Azure CLI: Create a private endpoint using Azure CLI - Azure PowerShell: Create a private endpoint using Azure PowerShell
Managing Private Endpoint Connections:
Once a private endpoint is created, you can manage the connection
states, approve, reject, or remove connections through the Azure portal
or by using Azure CLI commands. For instance, to approve a private
endpoint connection, you can use the
az network private-endpoint-connection approve command with
the appropriate parameters https://learn.microsoft.com/en-us/azure/azure-app-configuration/howto-set-up-private-access
.
Deleting a Private Endpoint Connection:
If you need to delete a private endpoint connection, you can use the
Azure CLI command
az network private-endpoint-connection delete, specifying
the resource group and private endpoint name https://learn.microsoft.com/en-us/azure/azure-app-configuration/howto-set-up-private-access
.
Troubleshooting:
In case of issues with a private endpoint, you can refer to the troubleshooting guide for Azure Private Endpoint connectivity problems https://learn.microsoft.com/en-us/azure/azure-app-configuration/howto-set-up-private-access .
DNS Configuration:
Proper DNS configuration is essential for name resolution when using private endpoints. You can learn more about configuring your DNS server with private endpoints at the following URLs: - Name resolution for resources in Azure virtual networks - DNS configuration for Private Endpoints
By integrating Azure Private Endpoint into your network architecture, you can enhance the security and privacy of your Azure service connections, ensuring that your critical data remains within the Azure ecosystem and is not exposed to potential threats on the public internet.
Secure Azure services and workloads with Microsoft Defender for Cloud regulatory compliance controls
Connect an Azure SQL server using an Azure Private Endpoint using the Azure portal
Azure Private Link
Azure Private Link is a networking service that allows you to access Azure service resources securely by using a private IP address from your virtual network. The service provides private connectivity to services hosted on the Azure platform, simplifying the network architecture and securing the connection between endpoints in Azure by eliminating data exposure to the public internet.
Key Features:
- Private Access: Azure Private Link enables Azure resources like Azure App Configuration to interact with each other privately, using a private IP address.
- Secure Data Transfer: Data transferred between your virtual network and the service travels over the Microsoft backbone network, reducing exposure to the public internet and potential threats.
- Global Reach: Private Link works across Azure regions and subscriptions, allowing secure and private access to services regardless of their location.
- Integration with Azure Services: Many Azure services support Private Link, providing a consistent way to connect securely to services like Azure Storage, SQL Database, and others.
Configuration Steps:
- Create an Azure account: To use Azure Private Link, you must have an active Azure subscription. You can create an account for free if you don’t already have one https://learn.microsoft.com/en-us/azure/frontdoor/standard-premium/how-to-enable-private-link-internal-load-balancer .
- Understand Private Link: Before setting up Private Link, it’s important to review how it works with Azure Front Door by reading the documentation on securing your origin with Private Link https://learn.microsoft.com/en-us/azure/frontdoor/standard-premium/how-to-enable-private-link-internal-load-balancer .
- Create a Private Link Service: Set up a Private Link service for your origin web servers following the guide on creating a Private Link service https://learn.microsoft.com/en-us/azure/frontdoor/standard-premium/how-to-enable-private-link-internal-load-balancer .
- Enable Private Endpoints: For certain services like App Configuration, a Standard tier App Configuration store is required. Learn about the necessary steps and pricing details for enabling private endpoints at Azure Private Link pricing https://learn.microsoft.com/en-us/azure/azure-app-configuration/concept-private-endpoint .
- Configure Network Filtering: Use the service native IP filtering capability to filter network traffic. This is separate from network security groups (NSGs) or Azure Firewall. Configuration responsibility lies with the customer, and it’s not enabled by default https://learn.microsoft.com/security/benchmark/azure/baselines/application-gateway-security-baseline .
- Deploy Private Endpoints: For enhanced security, deploy private endpoints for all Azure resources that support Private Link. This establishes a private access point for the resources https://learn.microsoft.com/security/benchmark/azure/baselines/application-gateway-security-baseline .
- Learn More: For a comprehensive understanding of Azure Private Link, refer to the documentation on What is Azure Private Link? https://learn.microsoft.com/en-us/azure/application-gateway/private-link-configure .
Additional Resources:
- To create a private endpoint using different methods, refer to the following articles:
- For configuring DNS with private endpoints, see:
By following these steps and utilizing the provided resources, you can effectively implement Azure Private Link to ensure secure and private connectivity to Azure services within your network architecture.
Secure Azure services and workloads with Microsoft Defender for Cloud regulatory compliance controls
Connect an Azure SQL server using an Azure Private Endpoint using the Azure portal
Deploying a Virtual Machine for Private and Secure SQL Server Connectivity
To establish private and secure connectivity to an SQL server across a private endpoint, you need to deploy a virtual machine (VM) within your Azure environment. This process involves several steps to ensure that the VM can communicate with the SQL server without exposing the connection to the public internet. Here’s a detailed explanation of the process:
- Set Up Azure Private Endpoint:
- Azure Private Endpoint is a network interface that connects you privately and securely to a service powered by Azure Private Link https://learn.microsoft.com/en-us/azure/firewall-manager/private-link-inspection-secure-virtual-hub .
- You need to create a private endpoint for your SQL server to ensure that it can be accessed privately from your virtual network https://learn.microsoft.com/en-us/azure/firewall-manager/private-link-inspection-secure-virtual-hub .
- Deploy a Virtual Machine:
- Use Azure CLI or the Azure portal to deploy a VM in the same virtual network as your private endpoint https://learn.microsoft.com/en-us/azure/firewall/sql-fqdn-filtering .
- Ensure that the VM is configured with the necessary network security group rules to allow traffic to the SQL server.
- Configure DNS Settings:
- Deploy a DNS forwarder if your VM is in a virtual network that does not have direct access to the Azure Private DNS Zone https://learn.microsoft.com/en-us/azure/firewall-manager/private-link-inspection-secure-virtual-hub .
- Configure custom DNS settings to point to the DNS forwarder or the private IP of the Azure Firewall if it’s being used https://learn.microsoft.com/en-us/azure/firewall-manager/private-link-inspection-secure-virtual-hub .
- Set Up Azure Firewall (if required):
- Deploy an Azure Firewall to control outbound and inbound traffic to and from the virtual network https://learn.microsoft.com/en-us/azure/firewall/sql-fqdn-filtering .
- Configure the firewall to filter traffic using application rules for MSSQL on port 1433, which is the default port for SQL Server https://learn.microsoft.com/en-us/azure/firewall-manager/private-link-inspection-secure-virtual-hub .
- Ensure that the SQL connectivity mode is set to Proxy to allow Azure Firewall to filter traffic to the SQL server https://learn.microsoft.com/en-us/azure/firewall/sql-fqdn-filtering .
- Test Connectivity:
- Once the VM and the private endpoint are configured, test the connectivity from the VM to the SQL server.
- Validate that the Azure Firewall logs show that the traffic is allowed if a firewall is in place https://learn.microsoft.com/en-us/azure/firewall/sql-fqdn-filtering .
- Monitor and Maintain:
- Regularly monitor the connectivity and review the firewall logs to ensure that the traffic flow is secure and complies with your organization’s policies.
By following these steps, you can deploy a VM that securely connects to an SQL server across a private endpoint, ensuring that your data remains secure and is not exposed to the public internet.
For additional information on the topics mentioned, you can refer to the following URLs: - Azure Private Endpoint Overview: Azure Private Endpoint documentation - Deploying Azure Firewall using Azure CLI: Azure Firewall deployment documentation - Configuring Azure SQL Connectivity Settings: Azure SQL Connectivity Settings documentation - Azure Firewall Application Rule with SQL FQDN: Azure Firewall application rule documentation
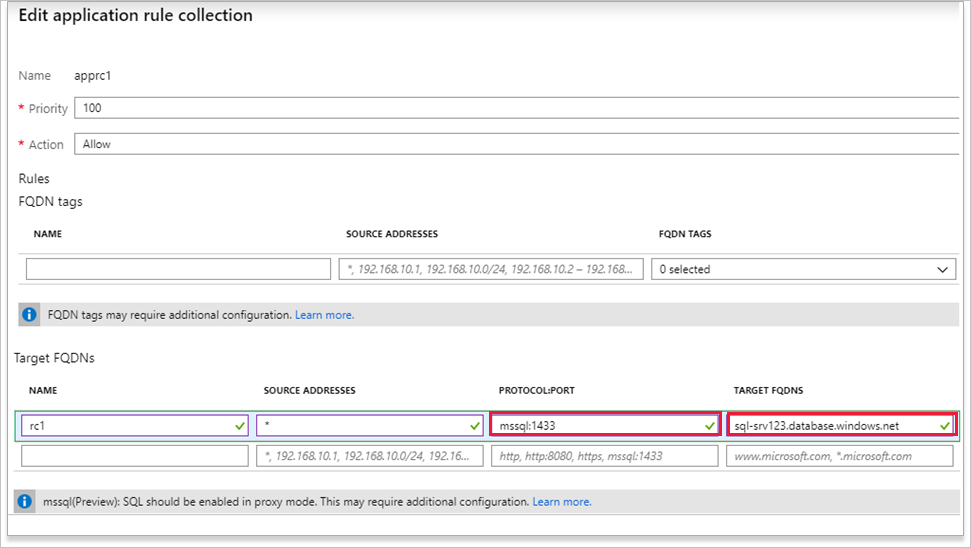
Please note that the URLs provided are for reference purposes and are part of the detailed explanation to facilitate understanding of the deployment process.
Secure Azure services and workloads with Microsoft Defender for Cloud regulatory compliance controls
Connect an Azure SQL server using an Azure Private Endpoint using the Azure portal
Deploying a Virtual Machine for Private and Secure SQL Server Connectivity
To establish private and secure connectivity to an SQL server across a private endpoint, you need to deploy a virtual machine (VM) within the same virtual network or a network that is peered with the virtual network where the private endpoint resides. Here’s a step-by-step guide to achieve this:
- Set Up the Virtual Network and Private Endpoint:
- Ensure that you have a virtual network with a private endpoint connected to your SQL server. The private endpoint provides a secure connection to your SQL service, and it’s crucial for private access https://learn.microsoft.com/en-us/azure/firewall-manager/private-link-inspection-secure-virtual-hub .
- Deploy a DNS Forwarder:
- Deploy a DNS forwarder VM in the virtual network connected to the secured virtual hub. This DNS forwarder will help resolve the private endpoint’s FQDN (Fully Qualified Domain Name) https://learn.microsoft.com/en-us/azure/firewall-manager/private-link-inspection-secure-virtual-hub .
- Configure Custom DNS Servers:
- Adjust the DNS settings of the virtual network to point to the DNS forwarder VM’s IP address. This step is necessary for FQDN-based network rules if you’re using Azure Firewall with DNS proxy enabled https://learn.microsoft.com/en-us/azure/firewall-manager/private-link-inspection-secure-virtual-hub .
- Deploy the Virtual Machine:
- Deploy a VM in the virtual network that has connectivity to the private endpoint. This VM will be used to test the secure and private connection to the SQL server https://learn.microsoft.com/en-us/azure/firewall/sql-fqdn-filtering .
- Configure SQL Connectivity Mode:
- If you’re using Azure SQL Database, Azure Synapse Analytics, or SQL Managed Instance, ensure that the SQL connectivity mode is set to Proxy. This setting is necessary for the Azure Firewall to filter traffic correctly https://learn.microsoft.com/en-us/azure/firewall/sql-fqdn-filtering .
- Validate Network and Application Rules:
- Configure network and application rules in the Azure Firewall to allow traffic from the VM to the SQL server. For SQL FQDN filtering, use application rules with the appropriate protocol, port, and SQL FQDN https://learn.microsoft.com/en-us/azure/firewall/sql-fqdn-filtering https://learn.microsoft.com/en-us/azure/firewall-manager/private-link-inspection-secure-virtual-hub .
- Test Connectivity:
- Once the VM is deployed and configured, test the connectivity to the SQL server. Ensure that the traffic is routed through the Azure Firewall and that the firewall logs show the traffic is allowed https://learn.microsoft.com/en-us/azure/firewall/sql-fqdn-filtering .
- Monitor and Adjust as Necessary:
- Monitor the connectivity and adjust firewall rules as needed to ensure secure and private communication between the VM and the SQL server.
For additional information on the topics mentioned, you can refer to the following URLs: - Azure Private Endpoint Overview - Azure Firewall Documentation - Azure SQL Connectivity Settings
By following these steps, you can deploy a VM that will allow you to test connectivity to your SQL server privately and securely across a private endpoint. This setup is essential for maintaining a secure and isolated environment for your SQL workloads.