AZ-700 Study Guide

Design and implement core networking infrastructure (20–25%)
Design and implement IP addressing for Azure resources
Network Segmentation and Address Spaces
Network segmentation is a crucial concept in designing and managing networks within Azure. It involves dividing a network into multiple segments or subnets, each serving as a separate, smaller network within the larger network infrastructure. This approach enhances security, performance, and management of network traffic.
Implementing Network Segmentation in Azure
To implement network segmentation in Azure, you would typically start by creating a virtual network (VNet). A VNet is the fundamental building block for your private network in Azure. It enables Azure resources, such as virtual machines (VMs), to securely communicate with each other, the internet, and on-premises networks.
- Create a Virtual Network (VNet):
- Define the VNet with a specific address space, which is a range of IP addresses that the VNet can use.
- The address space must be defined in CIDR (Classless Inter-Domain Routing) notation.
- For example, a VNet might have an address space of
10.0.0.0/16, which allows for 65,536 IP addresses within this network.
- Add Subnets to the Virtual Network:
- Within the VNet, create one or more subnets. Each subnet has its own address range, which is a subset of the address space of the VNet.
- For instance, you might create two subnets,
Subnet0with an address range of10.0.0.0/24andSubnet1with an address range of10.0.1.0/24https://learn.microsoft.com/en-us/training/modules/configure-network-routing-endpoints/7-simulation-routing . - Subnets allow you to segment the network for different purposes, such as separating web servers from database servers.
- Deploy Virtual Machines into Different Subnets:
- Place VMs into the appropriate subnet based on their role and the network segmentation strategy.
- For example, deploy
VM0intoSubnet0andVM1intoSubnet1using a JSON template and Azure PowerShell https://learn.microsoft.com/en-us/training/modules/configure-network-routing-endpoints/7-simulation-routing .
- Configure Network Security Groups (NSGs):
- NSGs are used to control inbound and outbound traffic to network interfaces (NIC), VMs, and subnets.
- Create NSGs to enforce security policies and protect VMs from unauthorized access https://learn.microsoft.com/en-us/training/modules/configure-network-routing-endpoints/7-simulation-routing .
- For example, you might configure NSGs to allow RDP access to VMs from specific IP addresses while blocking all other internet traffic.
Address Spaces
When planning address spaces for Azure VNets, consider the following:
- Non-Overlapping IP Ranges:
- Ensure that the address spaces for VNets do not overlap with each other or with on-premises network address spaces.
- This is essential for connectivity between VNets and hybrid connections to on-premises networks.
- Scalability:
- Choose address spaces that are large enough to accommodate future growth in the number of resources you plan to deploy in the VNet.
- Subnet Planning:
- Plan for an adequate number of subnets and address ranges within each subnet to avoid running out of IP addresses.
- Remember that Azure reserves five IP addresses within each subnet for its own use.
For additional information on network segmentation and address spaces in Azure, you can refer to the Azure documentation on Virtual Network and Subnet creation:
By following these guidelines, you can effectively plan and implement network segmentation and address spaces in Azure, ensuring a secure and well-organized network infrastructure.
Design and implement core networking infrastructure (20–25%)
Design and implement IP addressing for Azure resources
Create a Virtual Network (VNet)
A Virtual Network (VNet) in Azure is the fundamental building block for your private network in the cloud. It enables Azure resources, such as virtual machines (VMs), to securely communicate with each other, the internet, and on-premises networks. Here’s a detailed explanation of how to create a VNet:
- Prerequisites:
- Ensure your Azure account has the necessary permissions, such as
being assigned to the
Network ContributororClassic Network Contributorrole, or a custom role with the required actions for peering https://learn.microsoft.com/en-us/training/modules/configure-vnet-peering/4-create .
- Ensure your Azure account has the necessary permissions, such as
being assigned to the
- Creating the VNet:
- Navigate to the Azure portal and select “Create a resource.”
- Search for and select “Virtual network.”
- Click “Create” to start configuring your VNet.
- Enter the basic information such as the Name, Subscription, Resource group, and Location.
- Specify the address space in CIDR notation. This is the range of IP addresses for the VNet.
- Configure the subnet settings, including the subnet name and address range.
- Review any additional settings such as service endpoints, network security groups, or route tables as needed.
- Review and create the VNet.
- Post-Creation Configuration:
- After creating the VNet, you may need to configure DNS settings, connect the VNet to other VNets through peering, or link to on-premises networks with a VPN gateway or ExpressRoute.
- Testing:
- Once the VNet is created and configured, test the network by deploying VMs or other resources and verifying connectivity and communication between them.
For more detailed guidance, you can refer to the following URLs: - Azure Virtual Network peering overview provides foundational knowledge on virtual network peering https://learn.microsoft.com/en-us/training/modules/configure-vnet-peering/8-summary-resources . - Create, change, or delete a virtual network peering offers step-by-step instructions on how to manage virtual network peering https://learn.microsoft.com/en-us/training/modules/configure-vnet-peering/8-summary-resources . - Introduction to Azure Virtual Networks is a learning module that covers the design and implementation of Azure networking infrastructure https://learn.microsoft.com/en-us/training/modules/configure-vnet-peering/8-summary-resources . - Distribute your services across Azure Virtual Networks and integrate them by using Azure Virtual Network peering (sandbox) provides a practical exercise to learn about VNet peering https://learn.microsoft.com/en-us/training/modules/configure-vnet-peering/8-summary-resources . - Lab template for creating virtual networks and virtual machines can be used to deploy resources for testing purposes https://learn.microsoft.com/en-us/training/modules/configure-vnet-peering/6-simulation-peering .
Remember, after creating a VNet, it is managed as a separate resource, but it can be connected to other VNets through regional or global peering, depending on your network architecture and requirements https://learn.microsoft.com/en-us/training/modules/configure-vnet-peering/2-determine-uses .
Design and implement core networking infrastructure (20–25%)
Design and implement IP addressing for Azure resources
When planning and configuring subnetting for various services in Azure, it’s important to understand how different components interact within a virtual network (VNet). Here’s a detailed explanation of the key services mentioned:
VNet Gateways
VNet gateways are used to connect VNets to other VNets or to on-premises networks. When configuring subnetting for VNet gateways, you must dedicate a specific subnet for the gateway. This subnet is reserved exclusively for the gateway and cannot contain any other resources.
Private Endpoints
Private endpoints allow you to connect securely to Azure services by providing a private IP address within your VNet for the service. When configuring subnetting for private endpoints, you should consider the scale of your services and allocate subnets accordingly. Service endpoints switch the virtual machine IP addresses from public to private, and existing firewall rules based on public IP addresses may need to be updated https://learn.microsoft.com/en-us/training/modules/configure-network-routing-endpoints/4-determine-service-endpoint-uses .
Firewalls
Azure Firewall is a managed, cloud-based network security service that protects your Azure Virtual Network resources. It’s crucial to allocate a dedicated subnet for Azure Firewall within your VNet. This subnet must be named ‘AzureFirewallSubnet’ and should be properly sized to accommodate your firewall instances.
Application Gateways
Azure Application Gateway is a web traffic load balancer that enables you to manage traffic to your web applications. When configuring subnetting for Application Gateways, a dedicated subnet is required. The size of the subnet should be planned based on the expected number of instances and scalability requirements.
VNet-Integrated Platform Services
For platform services that support VNet integration, such as Azure SQL Database and Azure Storage, you can use service endpoints to secure and route traffic within your VNet. Ensure that the subnets and virtual networks are in the same Azure region or region pair as your storage account https://learn.microsoft.com/en-us/training/modules/configure-storage-accounts/7-secure-storage-endpoints .
Azure Bastion
Azure Bastion provides secure and seamless RDP/SSH connectivity to your virtual machines directly from the Azure portal over SSL. When configuring subnetting for Azure Bastion, a dedicated subnet named ‘AzureBastionSubnet’ is required. This subnet should be planned to support the scale of your deployment.
For additional information on configuring these services, you can refer to the following URLs: - VNet Gateways: Azure VPN Gateway documentation - Private Endpoints: Private Endpoint documentation - Firewalls: Azure Firewall documentation - Application Gateways: Application Gateway documentation - VNet-Integrated Platform Services: Virtual Network service endpoints documentation - Azure Bastion: Azure Bastion documentation
Remember to test your configurations and verify that the services are functioning as expected within your network design. Proper planning and configuration of subnetting are essential for maintaining security and connectivity for your Azure services.
Design and implement core networking infrastructure (20–25%)
Design and implement IP addressing for Azure resources
Subnet delegation in Azure is a feature that allows you to designate a specific subnet for use by certain Azure services. This delegation grants these services the ability to create service-specific resources within the subnet. When planning and configuring subnet delegation, it is important to understand the following key points:
Purpose of Subnet Delegation: Subnet delegation is used to ensure that a subnet is dedicated to a specific Azure service, such as Azure SQL Database, Azure Databricks, or Azure NetApp Files. This ensures that the service has the necessary permissions to manage and configure the network components required for its operation within the subnet.
Planning for Subnet Delegation: When planning for subnet delegation, consider the services that require dedicated subnets and the network architecture of your virtual network. Determine the number of subnets needed and their size based on the expected workload and scalability requirements of the services.
Configuring Subnet Delegation: To configure subnet delegation, you need to:
- Create a virtual network and subnet, or use an existing one.
- Delegate the subnet to an Azure service by setting the
delegationsproperty of the subnet. This is done through the Azure portal, Azure CLI, or Azure PowerShell. - Ensure that no other network resources, such as network interfaces or virtual network gateways, are associated with the subnet before delegating it.
Service-Specific Considerations: Each Azure service may have specific requirements and limitations when it comes to subnet delegation. It is important to review the documentation for the particular service to understand these requirements.
Security and Network Controls: Even though a subnet is delegated to a service, you can still apply network security groups (NSGs) and route tables to control the flow of network traffic to and from the subnet.
Subnet Delegation and Service Endpoints: Subnet delegation can be used in conjunction with service endpoints to secure and isolate the network traffic to Azure services.
For additional information on subnet delegation, you can refer to the Azure documentation on how to delegate a subnet to an Azure service using the Azure portal, Azure CLI, or Azure PowerShell:
- Azure portal: Subnet delegation in the Azure portal
- Azure CLI: Subnet delegation using Azure CLI
- Azure PowerShell: Subnet delegation using Azure PowerShell
By understanding and implementing subnet delegation, you can optimize your Azure network for the specific services that require dedicated network resources, ensuring efficient and secure operation of your Azure environment.
Design and implement core networking infrastructure (20–25%)
Design and implement IP addressing for Azure resources
Create a Prefix for Public IP Addresses
When configuring public IP addresses in Azure, it is possible to create a public IP prefix to reserve a range of contiguous public IP addresses. This allows organizations to ensure that their public IP addresses are within a known range, which can be helpful for whitelisting in firewalls and simplifying network management.
Steps to Create a Public IP Prefix in Azure:
Navigate to the Azure Portal: Open your web browser and go to the Azure Portal.
Create a New Resource: Click on “Create a resource” and search for “Public IP prefix”. Select the “Public IP prefix” option from the search results.
Configure the Prefix: In the “Create public IP prefix” pane, you will need to provide details such as:
- Name: A unique name for the public IP prefix.
- Subscription: Choose the Azure subscription in which to create the resource.
- Resource group: Select an existing resource group or create a new one.
- Location: Choose the Azure region where the public IP prefix will be located.
- IP Version: Select whether the prefix will be for IPv4 or IPv6 addresses.
- Prefix Length: Specify the number of IP addresses to include in the prefix. The length determines how many addresses are reserved.
Review and Create: Once all the details are filled in, review the configuration and click “Create” to provision the public IP prefix.
Associate with Public IP Addresses: After the public IP prefix is created, you can then create public IP addresses that are associated with this prefix.
Additional Information:
For more detailed instructions and best practices, you can refer to the official Azure documentation on public IP prefixes: Public IP addresses in Azure.
By following these steps, you can create a public IP prefix in Azure, which will help you manage and allocate public IP addresses more effectively within your organization’s network infrastructure.
Design and implement core networking infrastructure (20–25%)
Design and implement IP addressing for Azure resources
Choosing When to Use a Public IP Address Prefix
When architecting solutions in Azure, it’s important to understand when to use a public IP address prefix. A public IP address prefix is a contiguous range of addresses that you can use for your Azure resources, allowing for predictable public IP addresses. Here are some scenarios where using a public IP address prefix would be beneficial:
Simplified Management: When you have multiple resources that require public IP addresses, managing them individually can be complex. A public IP address prefix allows you to acquire a range of addresses that you can assign to your resources, simplifying IP address management.
Consistent Public Endpoints: For services that need consistent public endpoints, such as multi-region deployments or services that require geo-redundancy, a public IP address prefix ensures that your IP addresses remain the same even if underlying resources change.
Security: Security policies often require that traffic only be allowed from known IP addresses. With a public IP address prefix, you can whitelist a known range of IP addresses in your firewall or security appliances, enhancing your security posture.
Compliance: Certain applications and workloads have compliance requirements that dictate control over the IP address space. A public IP address prefix gives you control over a block of IP addresses, helping to meet these compliance requirements.
Scalability: If you anticipate the need to scale your services in the future, reserving a public IP address prefix allows you to plan for growth without the need to reconfigure IP addresses later on.
For additional information on public IP address prefixes in Azure, you can refer to the Azure documentation on public IP addresses: Public IP addresses in Azure.
Remember, while public IP address prefixes offer several advantages, they should be used judiciously. Always consider the security implications and costs associated with exposing resources to the public internet. In many cases, private connectivity options such as Azure Private Link or VPNs may be more appropriate for internal communication between Azure resources.
Design and implement core networking infrastructure (20–25%)
Design and implement IP addressing for Azure resources
Plan and Implement a Custom Public IP Address Prefix (Bring Your Own IP)
When planning and implementing a custom public IP address prefix, also known as Bring Your Own IP (BYOIP), you are essentially bringing a range of IP addresses that you own into Azure to be used as public IP addresses for your Azure resources. This feature is particularly useful for organizations that require consistent IP address ranges for their services, such as those with whitelisted IP ranges.
Steps for Implementation:
Acquire an IP Address Block: Before you can bring your own IP addresses to Azure, you must have a block of IP addresses that you own. These addresses must be registered with a Regional Internet Registry (RIR) such as ARIN, RIPE, or APNIC.
Prepare the IP Address Block: Ensure that the IP address block is not currently announced on the internet. Azure will need to take control of the routing for these IP addresses, so they must not be in use elsewhere.
Submit a BYOIP Request: Through the Azure portal, you can submit a request to bring your own IP address range to Azure. This process involves providing details about the IP address block and verifying ownership.
Verification and Authorization: Azure will verify the ownership of the IP address block and that it meets all requirements. You may need to create a route object in the RIR’s database to authorize Azure to announce your IP address block.
Provision the IP Prefix: Once verified, Azure will provision the public IP address prefix in your Azure subscription. You can then create public IP resources within this prefix.
Configure Resources: Assign the custom public IP addresses to your Azure resources, such as virtual machines, load balancers, or VPN gateways.
Maintain Records: Keep your RIR records up to date and ensure that Azure remains authorized to use the IP address block.
Considerations:
- Size of the Address Block: Azure supports /24 prefixes and larger for BYOIP. Smaller blocks may not be supported.
- Geographical Availability: BYOIP may not be available in all Azure regions. Check the Azure documentation for the latest availability information.
- Compliance and Security: Ensure that using custom IP addresses complies with your organization’s security and compliance policies.
Additional Resources:
For more detailed information on planning and implementing a custom public IP address prefix in Azure, you can refer to the following Azure documentation:
By following these steps and considerations, you can successfully plan and implement a custom public IP address prefix in Azure, providing your organization with greater control over your public IP address ranges.
Design and implement core networking infrastructure (20–25%)
Design and implement IP addressing for Azure resources
Creating a New Public IP Address in Azure
When setting up network resources in Azure, you may need to create a public IP address to enable communication between Azure services and the internet. A public IP address is an essential component for various services such as virtual machines, load balancers, and VPN gateways. Here’s a step-by-step guide to creating a new public IP address in Azure:
Sign in to the Azure Portal: Access the Azure Portal by navigating to https://portal.azure.com and signing in with your Azure account credentials.
Navigate to the ‘Public IP addresses’ blade: On the Azure Portal dashboard, search for and select ‘Public IP addresses’ from the resources list or use the ‘Create a resource’ option.
Create a new Public IP address:
- Click on the ‘Add’ or ‘Create public IP address’ button to initiate the creation process.
- Fill in the required details:
- Name: Provide a unique name for the public IP address.
- Subscription: Choose the Azure subscription under which the public IP will be created.
- Resource group: Select an existing resource group or create a new one.
- Location: Choose the Azure region where the public IP address will be located.
- SKU: Select the SKU (Standard or Basic) based on your requirements. The Standard SKU provides zone redundancy, static IP allocation, and can be associated with a network security group.
- IP Version: Choose between IPv4 or IPv6.
- IP address assignment: Decide whether the IP address should be static (does not change) or dynamic (can change when the resource it’s associated with is stopped and then started again).
- DNS name label (optional): Create a DNS name label for your public IP address if you want to access the resource using a domain name instead of the IP address.
Review and create: Once all the details are filled in, review the configuration and click ‘Create’ to provision the new public IP address.
Associate with a resource: After the public IP address is created, you can associate it with an Azure resource, such as a virtual machine or a load balancer, by navigating to that resource and selecting the public IP address from its networking settings.
Remember to configure any necessary network security group rules to protect the public endpoints associated with the public IP address from unauthorized access.
For additional information and detailed steps, you can refer to the official Azure documentation on public IP addresses: Public IP addresses in Azure.
By following these steps, you can successfully create and configure a new public IP address in Azure, which is a fundamental task for network administrators managing Azure resources.
Design and implement core networking infrastructure (20–25%)
Design and implement IP addressing for Azure resources
Associate Public IP Addresses to Resources
When configuring Azure resources, it’s often necessary to associate public IP addresses to allow communication with the internet. A public IP address is an IP address that is used to uniquely identify your resource on the internet. Here are the steps and considerations for associating public IP addresses to resources in Azure:
- Creation of Public IP Address:
- Begin by creating a public IP address resource in Azure. This can be done through the Azure portal, Azure PowerShell, or Azure CLI.
- You have the option to choose between a dynamic or static allocation method. A static public IP address does not change over time, which is essential for certain services that require a consistent address.
- Association with a Network Interface:
- Once the public IP address is created, it can be associated with a network interface card (NIC) of a virtual machine or other Azure resources that require internet access.
- This association is done by updating the network interface’s IP configurations to include the public IP address.
- Configuration of DNS Name:
- Optionally, you can configure a DNS name label for the public IP address, which provides a user-friendly domain name to access the resource instead of using the IP address directly.
- Network Security:
- It’s crucial to secure the resource that is now publicly accessible. This involves configuring network security groups (NSGs) to control inbound and outbound traffic to the resource.
- NSGs can be used to define security rules that allow or deny traffic based on various parameters such as source/destination IP addresses, ports, and protocols.
- Verification:
- After associating the public IP address and setting up security rules, verify that the resource is accessible from the internet as expected.
- Use tools like ping or connect to the resource using its public IP address or DNS name to ensure it’s properly configured.
For additional information on how to associate public IP addresses to Azure resources, you can refer to the following Azure documentation: - Create, change, or delete a public IP address - Associate a public IP address to a virtual machine - Network security groups
Remember to review and comply with Azure’s best practices for network security when exposing resources to the public internet to ensure your deployments remain secure and resilient.
Design and implement core networking infrastructure (20–25%)
Design and implement name resolution
Design Name Resolution Inside a Virtual Network (VNet)
When designing name resolution within an Azure Virtual Network (VNet), it is essential to understand the mechanisms Azure provides to facilitate this process. Name resolution is a critical component of network services that allows the translation of domain names into IP addresses, which are required for network communication.
Azure Private DNS Zones
Azure Private DNS zones are a key feature for name resolution within and across multiple VNets. They allow you to use your own custom domain names, providing a seamless naming convention that aligns with your organization’s needs. Here’s how you can leverage Azure Private DNS for name resolution:
Create a Private DNS Zone: Establish a private DNS zone with a custom domain name to manage the DNS records for your VNet. This zone will be responsible for resolving domain names to IP addresses within your VNet.
Link VNets to the DNS Zone: Connect your VNets to the private DNS zone to enable name resolution. This can be done for a single VNet or multiple VNets that require shared name resolution.
Automatic and Manual Record Management: For VMs in the VNet designated for registration, Azure Private DNS zone records are created automatically. For VMs in the VNet designated for resolution, records can be manually created if needed https://learn.microsoft.com/en-us/training/modules/configure-azure-dns/8-determine-private-zone-scenarios .
Split-Horizon DNS Views: Configure split-horizon DNS views to have a private and a public DNS zone sharing the same domain name. This allows for different name resolution policies for internal and external queries https://learn.microsoft.com/en-us/training/modules/configure-azure-dns/7-plan-for-private-dns-zones .
Reverse DNS Queries: Reverse DNS (PTR) queries are scoped to the same VNet. A reverse DNS query from a VM in one VNet for a VM in another VNet will receive an
NXDOMAINresponse, indicating that the domain does not exist https://learn.microsoft.com/en-us/training/modules/configure-azure-dns/8-determine-private-zone-scenarios .
Configuring Azure DNS for Internal Name Resolution
To ensure that internal Azure VM names and IP addresses can be resolved, follow these steps:
Create a Private DNS Zone: As mentioned earlier, create a private DNS zone for your organization https://learn.microsoft.com/en-us/training/modules/configure-network-routing-endpoints/7-simulation-routing .
Add a Virtual Network Link: Link your VNet to the private DNS zone to facilitate name resolution within the VNet https://learn.microsoft.com/en-us/training/modules/configure-network-routing-endpoints/7-simulation-routing .
Verify DNS Records Registration: Check that the DNS records for your VMs are correctly registered in the DNS zone https://learn.microsoft.com/en-us/training/modules/configure-network-routing-endpoints/7-simulation-routing .
Test Internal DNS Name Resolution: Confirm that you can resolve the DNS names of your VMs internally within the VNet https://learn.microsoft.com/en-us/training/modules/configure-network-routing-endpoints/7-simulation-routing .
Additional Resources
For more information on Azure Virtual Networks and name resolution, you can refer to the following resources:
Introduction to Azure Virtual Networks: This resource provides an overview of how to design and implement core Azure networking infrastructure, including virtual networks https://learn.microsoft.com/en-us/training/modules/configure-vnet-peering/8-summary-resources .
Distribute your services across Azure Virtual Networks and integrate them by using Azure Virtual Network peering (sandbox): Learn about virtual network peering and how it enables communication across virtual networks https://learn.microsoft.com/en-us/training/modules/configure-vnet-peering/8-summary-resources .
By understanding and implementing these concepts, you can design an effective name resolution strategy within your Azure Virtual Network, ensuring seamless communication and management of your network resources.
Design and implement application delivery services (20–25%)
Secure an origin by using Azure Private Link in Azure Front DoorDesign and implement Azure Traffic Manager
Configure Endpoints
When configuring endpoints in Azure, it is essential to understand the role of service endpoints and how they can be used to secure Azure resources. Service endpoints allow you to extend your virtual network’s identity to Azure services, which helps in securing your service resources. Here’s a detailed explanation of how to configure service endpoints:
Service Endpoints Configuration: Service endpoints can be configured within your subnet settings, allowing you to secure Azure resources without the need for reserved public IP addresses or NAT/gateway devices. This simplifies setup and maintenance https://learn.microsoft.com/en-us/training/modules/configure-network-routing-endpoints/4-determine-service-endpoint-uses .
Switch from Public to Private IP Addresses: When service endpoints are enabled, the IP addresses of virtual machines within the subnet switch from public to private IPv4 addresses. It is important to update Azure service firewall rules to accommodate this change, as existing rules based on public IP addresses will no longer function https://learn.microsoft.com/en-us/training/modules/configure-network-routing-endpoints/4-determine-service-endpoint-uses .
Securing Azure Service Resources: By using virtual network rules, you can secure your Azure service resources to your virtual network. This can effectively remove public internet access to resources, allowing traffic only from your virtual network https://learn.microsoft.com/en-us/training/modules/configure-network-routing-endpoints/4-determine-service-endpoint-uses .
Direct Traffic on Azure Backbone Network: Service endpoints ensure that service traffic is taken directly from your virtual network to the service on the Microsoft Azure backbone network, bypassing the public internet https://learn.microsoft.com/en-us/training/modules/configure-network-routing-endpoints/4-determine-service-endpoint-uses .
Maintenance-Free: Once configured, service endpoints do not require additional overhead to maintain, making them a low-maintenance option for securing your Azure services https://learn.microsoft.com/en-us/training/modules/configure-network-routing-endpoints/4-determine-service-endpoint-uses .
For additional information and guidance on securing and isolating access to Azure resources with network security groups and service endpoints, you can refer to the following resources:
- Secure and isolate access to Azure resources with network security groups and service endpoints (sandbox) https://learn.microsoft.com/en-us/training/modules/configure-network-security-groups/9-summary-resources .
- Filter network traffic with a network security group using the Azure portal https://learn.microsoft.com/en-us/training/modules/configure-network-security-groups/9-summary-resources .
By following these steps and utilizing the provided resources, you can effectively configure service endpoints to enhance the security of your Azure environment.
Design and implement private access to Azure services (5–10%)
Design and implement Azure Private Link service and Azure private endpoints
Plan Private Endpoints
When planning private endpoints in Azure, it is essential to understand their role in enhancing network security by enabling private access to services. Here’s a detailed explanation of how to plan for private endpoints:
Understand Azure Private Link: Azure Private Link is a service that allows you to access Azure PaaS Services (like Azure Storage and SQL Database) and Azure-hosted customer-owned services over a private endpoint in your virtual network. Traffic between your virtual network and the service traverses over the Microsoft backbone network, eliminating exposure to the public internet https://learn.microsoft.com/en-us/training/modules/configure-network-routing-endpoints/6-identify-private-link-uses .
Global Availability and No Regional Restrictions: Azure Private Link is globally available without regional restrictions, meaning you can connect privately to services running in other Azure regions. This is particularly useful for organizations with a global presence, ensuring that they can maintain private connections across different geographical locations https://learn.microsoft.com/en-us/training/modules/configure-network-routing-endpoints/6-identify-private-link-uses .
Mapping to Private Endpoints: You can map private endpoints to Azure PaaS resources to ensure that only the mapped resources are accessible within your network. This is a critical security measure, especially during a security incident, as it helps to prevent data exfiltration by limiting access to only the necessary resources https://learn.microsoft.com/en-us/training/modules/configure-network-routing-endpoints/6-identify-private-link-uses .
Service Endpoints Configuration: Service endpoints can be configured in your subnets for a simplified setup and maintenance. This configuration does not require reserved public IP addresses, NAT devices, or gateways. However, it is important to note that when service endpoints are configured, the IP addresses of virtual machines will switch from public to private IPv4 addresses. This may affect existing Azure service firewall rules that use Azure public IP addresses, so adjustments to the firewall rules may be necessary https://learn.microsoft.com/en-us/training/modules/configure-network-routing-endpoints/4-determine-service-endpoint-uses .
Accessing Private Endpoints: Private endpoints can be accessed over private peering or VPN tunnels from on-premises or peered virtual networks. This setup is hosted by Microsoft, which means there is no need for public peering or internet usage to migrate workloads to the cloud https://learn.microsoft.com/en-us/training/modules/configure-network-routing-endpoints/6-identify-private-link-uses .
Traffic Routing: All traffic to the service can be routed through the private endpoint without the need for gateways, NAT devices, Azure ExpressRoute, VPN connections, or public IP addresses. This ensures that the traffic remains secure and is not exposed to potential threats on the public internet https://learn.microsoft.com/en-us/training/modules/configure-network-routing-endpoints/6-identify-private-link-uses .
For additional information on planning private endpoints, you can refer to the following resources: - Storage account overview - Azure storage redundancy - Use private endpoints for Azure Storage
By carefully planning private endpoints, you can significantly enhance the security of your Azure services by ensuring that access is limited to a private network, thereby reducing the attack surface exposed to potential threats.
Design and implement private access to Azure services (5–10%)
Design and implement Azure Private Link service and Azure private endpoints
Create Private Endpoints
Private endpoints in Azure are a network interface that connects you privately and securely to a service powered by Azure Private Link. Here’s a detailed explanation of how to create and use private endpoints:
- Overview of Private Endpoints:
- Private endpoints allow you to access Azure services securely by keeping traffic within the Microsoft global network, avoiding exposure to the public internet https://learn.microsoft.com/en-us/training/modules/configure-network-routing-endpoints/6-identify-private-link-uses .
- They enable Azure services to be consumed from your private Virtual Network (VNet), providing enhanced security https://learn.microsoft.com/en-us/training/modules/configure-network-routing-endpoints/6-identify-private-link-uses .
- Setting Up Private Endpoints:
- To set up a private endpoint, you need to map it to specific Azure Platform-as-a-Service (PaaS) resources within your network https://learn.microsoft.com/en-us/training/modules/configure-network-routing-endpoints/6-identify-private-link-uses .
- This mapping ensures that only the mapped resources are accessible in the event of a security incident, thus preventing data exfiltration https://learn.microsoft.com/en-us/training/modules/configure-network-routing-endpoints/6-identify-private-link-uses .
- Traffic Routing with Private Endpoints:
- All traffic to the service can be routed through the private endpoint without the need for gateways, Network Address Translation (NAT) devices, Azure ExpressRoute or VPN connections, or public IP addresses https://learn.microsoft.com/en-us/training/modules/configure-network-routing-endpoints/6-identify-private-link-uses .
- This simplifies the network architecture and enhances security by ensuring that traffic does not traverse the public internet https://learn.microsoft.com/en-us/training/modules/configure-network-routing-endpoints/6-identify-private-link-uses .
- Service Endpoints vs. Private Endpoints:
- Service endpoints transition the virtual machine IP addresses from public to private IPv4 addresses, which may affect existing Azure service firewall rules https://learn.microsoft.com/en-us/training/modules/configure-network-routing-endpoints/4-determine-service-endpoint-uses .
- Unlike service endpoints, private endpoints do not require reserved public IP addresses or NAT/gateway devices for setup https://learn.microsoft.com/en-us/training/modules/configure-network-routing-endpoints/4-determine-service-endpoint-uses .
- Accessing Private Endpoints:
- Private endpoints can be accessed over private peering or VPN tunnels from on-premises networks or peered virtual networks https://learn.microsoft.com/en-us/training/modules/configure-network-routing-endpoints/6-identify-private-link-uses .
- This access method is hosted by Microsoft, eliminating the need for public peering or internet-based migrations https://learn.microsoft.com/en-us/training/modules/configure-network-routing-endpoints/6-identify-private-link-uses .
- Configuration Guidance:
- When configuring private endpoints, it’s important to ensure that Azure service firewall rules are updated to allow for the switch from public to private IP addresses https://learn.microsoft.com/en-us/training/modules/configure-network-routing-endpoints/4-determine-service-endpoint-uses .
- There may be a temporary interruption to service traffic from the subnet while configuring service endpoints, so plan accordingly https://learn.microsoft.com/en-us/training/modules/configure-network-routing-endpoints/4-determine-service-endpoint-uses .
For additional information on creating and configuring private endpoints in Azure, you can refer to the following resources: - Use private endpoints for Azure Storage - Azure Private Link and Private Endpoint
By following these steps and considerations, you can create private endpoints in Azure to ensure secure and private connectivity to Azure services.
Design and implement private access to Azure services (5–10%)
Design and implement Azure Private Link service and Azure private endpoints
Configure Access to Private Endpoints
When configuring access to private endpoints in Azure, it is essential to understand that Azure Private Link is a service that allows you to access Azure services securely over a private connection. Here are the steps and considerations for setting up private endpoints:
- Azure Private Link Overview
- Azure Private Link ensures that traffic between your services and Azure stays on the Microsoft global network, avoiding public internet exposure https://learn.microsoft.com/en-us/training/modules/configure-network-routing-endpoints/6-identify-private-link-uses .
- It is not restricted by regional boundaries, allowing connections to services across different Azure regions https://learn.microsoft.com/en-us/training/modules/configure-network-routing-endpoints/6-identify-private-link-uses .
- By using Private Link, Azure services can be integrated into your private virtual network through a private endpoint https://learn.microsoft.com/en-us/training/modules/configure-network-routing-endpoints/6-identify-private-link-uses .
- Your own services can also be delivered privately into your customers’ virtual networks via Private Link https://learn.microsoft.com/en-us/training/modules/configure-network-routing-endpoints/6-identify-private-link-uses .
- Setting Up Private Endpoints
- To set up a private endpoint, you map your network to a private endpoint that is connected to the Azure service you wish to use, such as Azure SQL Database https://learn.microsoft.com/en-us/training/modules/configure-network-routing-endpoints/6-identify-private-link-uses .
- This setup does not require gateways, NAT devices, Azure ExpressRoute or VPN connections, or public IP addresses https://learn.microsoft.com/en-us/training/modules/configure-network-routing-endpoints/6-identify-private-link-uses .
- Traffic to the service is routed exclusively through the private endpoint https://learn.microsoft.com/en-us/training/modules/configure-network-routing-endpoints/6-identify-private-link-uses .
- Network Routing Configuration
- Network routes control the flow of traffic within your network, and you can customize these routes to work with private links https://learn.microsoft.com/en-us/training/modules/configure-network-routing-endpoints/9-summary-resources .
- You can access private endpoints over private peering or VPN tunnels from on-premises or peered virtual networks https://learn.microsoft.com/en-us/training/modules/configure-network-routing-endpoints/6-identify-private-link-uses .
- Service endpoints can be configured in your subnets for a simple setup and low maintenance, eliminating the need for reserved public IP addresses in your virtual networks https://learn.microsoft.com/en-us/training/modules/configure-network-routing-endpoints/4-determine-service-endpoint-uses .
- Considerations for Service Endpoints
- When configuring service endpoints, the IP addresses of virtual machines switch from public to private IPv4 addresses https://learn.microsoft.com/en-us/training/modules/configure-network-routing-endpoints/4-determine-service-endpoint-uses .
- It is important to update Azure service firewall rules to accommodate this change, as existing rules based on Azure public IP addresses will no longer function https://learn.microsoft.com/en-us/training/modules/configure-network-routing-endpoints/4-determine-service-endpoint-uses .
- There may be a temporary interruption in service traffic from the subnet during the configuration of service endpoints https://learn.microsoft.com/en-us/training/modules/configure-network-routing-endpoints/4-determine-service-endpoint-uses .
- Additional Resources
- For a comprehensive understanding of Azure storage accounts, which can be accessed via private endpoints, refer to the Storage account overview https://learn.microsoft.com/en-us/training/modules/configure-storage-accounts/9-summary-resources .
- To learn about the trade-offs between cost and availability when selecting redundancy options for Azure storage, consult the Azure storage redundancy article https://learn.microsoft.com/en-us/training/modules/configure-storage-accounts/9-summary-resources .
- For guidance on when and how to configure Azure private endpoints for storage, see the article on Use private endpoints for Azure Storage https://learn.microsoft.com/en-us/training/modules/configure-storage-accounts/9-summary-resources .
By following these steps and considerations, you can securely configure access to private endpoints in Azure, ensuring that your services are accessible within your virtual network without exposure to the public internet.
Design and implement private access to Azure services (5–10%)
Design and implement Azure Private Link service and Azure private endpoints
Create a Private Link Service
Azure Private Link is a service that enables private connectivity from a virtual network to Azure platform as a service (PaaS), customer-owned, or Microsoft partner services. By using Azure Private Link, you can simplify your network architecture and secure connections between endpoints in Azure, effectively eliminating data exposure to the public internet https://learn.microsoft.com/en-us/training/modules/configure-network-routing-endpoints/6-identify-private-link-uses .
Key Features of Azure Private Link:
- Traffic Isolation: Azure Private Link ensures that all traffic between your virtual network and the service traverses only the Microsoft global network, avoiding any exposure to the public internet https://learn.microsoft.com/en-us/training/modules/configure-network-routing-endpoints/6-identify-private-link-uses .
- Global Reach: There are no regional restrictions with Private Link, allowing you to connect privately to services running in other Azure regions https://learn.microsoft.com/en-us/training/modules/configure-network-routing-endpoints/6-identify-private-link-uses .
- Integration with Virtual Networks: Services delivered on Azure can be integrated into your private virtual network through the mapping of your network to a private endpoint https://learn.microsoft.com/en-us/training/modules/configure-network-routing-endpoints/6-identify-private-link-uses .
- Service Delivery: You can also use Private Link to deliver your own services privately within your customer’s virtual networks https://learn.microsoft.com/en-us/training/modules/configure-network-routing-endpoints/6-identify-private-link-uses .
- Routing: All traffic to the service is routed through the private endpoint without the need for gateways, NAT devices, Azure ExpressRoute or VPN connections, or public IP addresses https://learn.microsoft.com/en-us/training/modules/configure-network-routing-endpoints/6-identify-private-link-uses .
Steps to Create a Private Link Service:
Create an Azure Storage Account: Before setting up a Private Link service, you may need to create an Azure Storage account with the appropriate configurations for your business needs. This is a prerequisite if you intend to use Azure Storage with Private Link https://learn.microsoft.com/en-us/training/modules/configure-storage-accounts/9-summary-resources .
Design and Implement Private Access: Learn how to implement private access to Azure Services with Azure Private Link and virtual network service endpoints. This involves understanding how to configure your network to use Private Link effectively https://learn.microsoft.com/en-us/training/modules/configure-storage-accounts/9-summary-resources .
Disaster Recovery Considerations: When creating a Private Link service, consider how you will provide disaster recovery by replicating storage data across regions and failing over to a secondary location. This ensures business continuity in the event of a regional outage https://learn.microsoft.com/en-us/training/modules/configure-storage-accounts/9-summary-resources .
Additional Resources:
- For a practical guide on creating an Azure storage account, you can visit Create an Azure storage account (sandbox).
- To learn more about designing and implementing private access to Azure Services with Azure Private Link, refer to Design and implement private access to Azure Services.
- For information on how to provide disaster recovery by replicating storage data across regions, check out Provide disaster recovery by replicating storage data across regions and failing over to a secondary location.
By following these steps and utilizing the resources provided, you can create a robust and secure Private Link service that aligns with your organization’s networking and security requirements.
Design and implement private access to Azure services (5–10%)
Design and implement Azure Private Link service and Azure private endpoints
Integrate Private Link and Private Endpoint with DNS
Azure Private Link and Private Endpoint are services that enable private access to Azure services, ensuring that traffic remains on the Microsoft global network without traversing the public internet https://learn.microsoft.com/en-us/training/modules/configure-network-routing-endpoints/6-identify-private-link-uses . Integrating these services with DNS involves several steps and considerations to ensure seamless connectivity and name resolution within Azure.
Azure Private Link
Azure Private Link is a service that allows you to access Azure PaaS services (like Azure SQL Database and Azure Storage) and Azure-hosted customer-owned services over a private endpoint in your virtual network https://learn.microsoft.com/en-us/training/modules/configure-network-routing-endpoints/6-identify-private-link-uses . The service connection is secure and data does not traverse the public internet, providing enhanced security.
Private Endpoint
A private endpoint is a network interface that connects you privately and securely to a service powered by Azure Private Link https://learn.microsoft.com/en-us/training/modules/configure-network-routing-endpoints/6-identify-private-link-uses . This private connection is established via a private IP address from your virtual network, allowing Azure services to be accessed securely within your virtual network.
DNS Integration
When you create a private endpoint, Azure will integrate with DNS to resolve the service’s fully qualified domain name (FQDN) to the private IP address of the private endpoint https://learn.microsoft.com/en-us/training/modules/configure-azure-dns/8-determine-private-zone-scenarios . This ensures that traffic to the service remains on the Azure network.
Name Resolution with Azure Private DNS
Azure Private DNS provides a reliable and secure DNS service to manage and resolve domain names in a virtual network without the need to add a custom DNS solution https://learn.microsoft.com/en-us/training/modules/configure-azure-dns/8-determine-private-zone-scenarios . When integrating with Private Link, you can use Azure Private DNS to resolve the FQDN of the service to which you are connecting.
Scenario: Multiple Virtual Networks
In scenarios involving multiple virtual networks, one network can be designated for registration of Azure Private DNS zone records, while another supports name resolution https://learn.microsoft.com/en-us/training/modules/configure-azure-dns/8-determine-private-zone-scenarios . Both virtual networks can share a common DNS zone, and Azure DNS uses both networks to resolve domain name queries.
Reverse DNS Queries
Reverse DNS (PTR) queries are scoped to the same virtual network. For
example, a reverse DNS query from a virtual machine in the resolution
virtual network for a virtual machine in the registration network will
receive an NXDOMAIN response, indicating that the domain
does not exist https://learn.microsoft.com/en-us/training/modules/configure-azure-dns/8-determine-private-zone-scenarios
.
Configuration Steps
- Create a Private Endpoint: Map your virtual network to a private endpoint to access Azure services privately https://learn.microsoft.com/en-us/training/modules/configure-network-routing-endpoints/6-identify-private-link-uses .
- Set Up Azure Private DNS: Create a private DNS zone to manage and resolve domain names within your virtual network https://learn.microsoft.com/en-us/training/modules/configure-azure-dns/8a-simulation-domain-names .
- Link Virtual Networks: If using multiple virtual networks, link them to the common DNS zone for shared name resolution https://learn.microsoft.com/en-us/training/modules/configure-azure-dns/8-determine-private-zone-scenarios .
- Configure DNS Records: Automatically create DNS zone records for virtual machines in the registration network, and manually for those in the resolution network https://learn.microsoft.com/en-us/training/modules/configure-azure-dns/8-determine-private-zone-scenarios .
Additional Resources
For more information on Azure Private Link and Private Endpoint, you can visit the following URLs: - Azure Private Link documentation: Azure Private Link - Azure Private Endpoint documentation: Azure Private Endpoint - Azure Private DNS documentation: Azure Private DNS
By following these steps and considerations, you can successfully integrate Azure Private Link and Private Endpoint with DNS, ensuring secure and private connectivity to Azure services.
Design and implement private access to Azure services (5–10%)
Design and implement Azure Private Link service and Azure private endpoints
Integrate a Private Link Service with On-Premises Clients
Azure Private Link is a service that enables private connectivity from a virtual network to Azure platform as a service (PaaS), customer-owned, or Microsoft partner services. When integrating a Private Link service with on-premises clients, it is essential to understand the following points:
Private Connectivity: Azure Private Link ensures that all traffic between your on-premises network and the Azure service remains on the Microsoft global network, avoiding exposure to the public internet https://learn.microsoft.com/en-us/training/modules/configure-network-routing-endpoints/6-identify-private-link-uses .
Global Reach: There are no regional restrictions with Private Link, meaning you can connect privately to services running in other Azure regions https://learn.microsoft.com/en-us/training/modules/configure-network-routing-endpoints/6-identify-private-link-uses .
Integration into Virtual Networks: Services delivered on Azure can be integrated into your private virtual network by mapping your network to a private endpoint https://learn.microsoft.com/en-us/training/modules/configure-network-routing-endpoints/6-identify-private-link-uses .
Service Delivery: You can use Private Link to privately deliver your own services into your customer’s virtual networks https://learn.microsoft.com/en-us/training/modules/configure-network-routing-endpoints/6-identify-private-link-uses .
Routing: All traffic to the service is routed through the private endpoint, eliminating the need for gateways, NAT devices, Azure ExpressRoute or VPN connections, or public IP addresses https://learn.microsoft.com/en-us/training/modules/configure-network-routing-endpoints/6-identify-private-link-uses .
Access from On-Premises: On-premises clients can access private endpoints over private peering or VPN tunnels. The traffic is hosted by Microsoft, so there is no need for public peering or internet usage for cloud migration https://learn.microsoft.com/en-us/training/modules/configure-network-routing-endpoints/6-identify-private-link-uses .
Network Security: When setting up Private Link, it connects to a network security group (NSG) private endpoint, such as using Azure SQL Database, which prevents direct connections that bypass the NSG https://learn.microsoft.com/en-us/training/modules/configure-network-routing-endpoints/6-identify-private-link-uses .
Planning: Before integrating Private Link with on-premises clients, it is crucial to consider the network topology, especially since network addresses and subnets are challenging to change after configuration https://learn.microsoft.com/en-us/training/modules/configure-virtual-machines/3-plan .
For additional information on Azure Private Link and how to integrate it with on-premises clients, you can refer to the following resources:
- Azure Private Link documentation: Azure Private Link documentation
- Azure Virtual Network documentation: Azure Virtual Network documentation
- Azure Network Security Groups (NSG) documentation: Azure NSG documentation
By understanding and applying these concepts, you can securely and efficiently integrate Azure services with your on-premises clients using Azure Private Link.
Design and implement private access to Azure services (5–10%)
Design and implement service endpoints
Choosing When to Use a Service Endpoint
Service endpoints are a critical feature in Azure that extend the identity of your virtual network to Azure services, allowing for secure and direct connectivity. Understanding when to use a service endpoint is essential for optimizing network security and traffic flow within your Azure environment.
Key Characteristics of Service Endpoints:
- Direct Connectivity: Service endpoints enable direct connection from your virtual network to Azure services over the Microsoft Azure backbone network, bypassing public internet routes https://learn.microsoft.com/en-us/training/modules/configure-network-routing-endpoints/4-determine-service-endpoint-uses .
- Enhanced Security: By using virtual network rules, service endpoints can restrict access to Azure service resources, ensuring that only traffic from your virtual network can reach these resources https://learn.microsoft.com/en-us/training/modules/configure-network-routing-endpoints/4-determine-service-endpoint-uses .
- No Public IP Required: Service endpoints switch the source IP addresses of service traffic from public IP addresses to private addresses within the virtual network, eliminating the need for reserved public IP addresses for securing resources through an IP firewall https://learn.microsoft.com/en-us/training/modules/configure-network-routing-endpoints/4-determine-service-endpoint-uses https://learn.microsoft.com/en-us/training/modules/configure-network-routing-endpoints/4-determine-service-endpoint-uses .
- Simplified Configuration: Service endpoints are configured at the subnet level and do not require additional overhead, such as NAT or gateway devices, for maintenance https://learn.microsoft.com/en-us/training/modules/configure-network-routing-endpoints/4-determine-service-endpoint-uses .
When to Use Service Endpoints:
- Securing Azure Resources: When you need to secure Azure resources such as Azure Storage, Azure SQL Database, or Azure Cosmos DB to your virtual network, service endpoints are the appropriate choice https://learn.microsoft.com/en-us/training/modules/configure-network-routing-endpoints/5-determine-service-endpoint-services .
- Compliance and Data Sovereignty: If your organization has specific compliance requirements that mandate data to be accessible only from within a virtual network, service endpoints can help meet these requirements https://learn.microsoft.com/en-us/training/modules/configure-network-routing-endpoints/4-determine-service-endpoint-uses .
- Reducing Attack Surface: To minimize the exposure of Azure resources to the public internet and reduce the attack surface, service endpoints can be used to allow access solely from your virtual network https://learn.microsoft.com/en-us/training/modules/configure-network-routing-endpoints/4-determine-service-endpoint-uses .
- Optimizing Network Performance: Service endpoints provide an optimal route to Azure services, which can improve network performance by keeping traffic on the Azure backbone network https://learn.microsoft.com/en-us/training/modules/configure-network-routing-endpoints/5-determine-service-endpoint-services .
Considerations:
- Service Traffic Interruption: Configuring service endpoints may temporarily interrupt service traffic from the subnet while the setup is in progress https://learn.microsoft.com/en-us/training/modules/configure-network-routing-endpoints/4-determine-service-endpoint-uses .
- Firewall Rule Adjustments: Existing Azure service firewall rules that use Azure public IP addresses may need to be updated to accommodate the switch to private IP addresses https://learn.microsoft.com/en-us/training/modules/configure-network-routing-endpoints/4-determine-service-endpoint-uses .
- Setup Time: Adding service endpoints can take up to 15 minutes to complete, and each service endpoint integration has its own Azure documentation page for reference https://learn.microsoft.com/en-us/training/modules/configure-network-routing-endpoints/5-determine-service-endpoint-services .
For additional information on configuring service endpoints and their integration with specific Azure services, you can refer to the Azure documentation pages for each service. Here are some URLs for further reading:
- Azure Storage Service Endpoints: Azure Storage Documentation
- Azure SQL Database Service Endpoints: Azure SQL Database Documentation
- Azure Cosmos DB Service Endpoints: Azure Cosmos DB Documentation
- Azure Key Vault Service Endpoints: Azure Key Vault Documentation
By carefully considering these factors, you can determine the appropriate scenarios for implementing service endpoints to enhance the security and efficiency of your Azure network infrastructure.
Design and implement private access to Azure services (5–10%)
Design and implement service endpoints
Create Service Endpoints
Service endpoints in Azure are a critical feature for enhancing the security of Azure service resources. They allow you to secure your Azure resources, such as virtual machines and services, by isolating the network access to these resources. Here’s a detailed explanation of how to create service endpoints:
Access the Azure Portal: Begin by logging into the Azure portal.
Navigate to Virtual Networks: Find the virtual network where you want to enable the service endpoint.
Select the Subnet: Within the virtual network, select the specific subnet where the service endpoint will be applied.
Configure the Service Endpoint:
- In the settings for the subnet, you will find an option to add a service endpoint.
- Select the Azure service for which you want to create the endpoint. Azure offers service endpoints for various services, including Azure Cosmos DB, Event Hubs, Key Vault, and SQL Database https://learn.microsoft.com/en-us/training/modules/configure-network-routing-endpoints/5-determine-service-endpoint-services .
Add the Service Endpoint:
- After selecting the service, add the service endpoint. This process can take up to 15 minutes to complete https://learn.microsoft.com/en-us/training/modules/configure-network-routing-endpoints/5-determine-service-endpoint-services .
- Once the service endpoint is added, the IP addresses for the virtual machines in the subnet will switch from public to private IPv4 addresses https://learn.microsoft.com/en-us/training/modules/configure-network-routing-endpoints/4-determine-service-endpoint-uses .
Update Firewall Rules:
- If you have existing Azure service firewall rules that use Azure public IP addresses, ensure they are updated to allow for the switch to private IP addresses https://learn.microsoft.com/en-us/training/modules/configure-network-routing-endpoints/4-determine-service-endpoint-uses .
- This is important because the existing rules may stop working after the service endpoints are enabled.
Verify the Setup:
- After the service endpoint is enabled, you can verify the setup by checking the effective routes for the subnet.
- Ensure that the traffic to the Azure service is now routed optimally through the service endpoint.
Secure Azure Resources:
- With service endpoints enabled, you can now secure Azure service resources to your virtual network with virtual network rules https://learn.microsoft.com/en-us/training/modules/configure-network-routing-endpoints/4-determine-service-endpoint-uses .
- This improves security by removing public internet access to resources and allowing traffic only from your virtual network.
For additional information on creating and configuring service endpoints, you can refer to the following URLs: - Secure and isolate access to Azure resources with network security groups and service endpoints (sandbox) https://learn.microsoft.com/en-us/training/modules/configure-network-security-groups/9-summary-resources . - Filter network traffic with a network security group using the Azure portal https://learn.microsoft.com/en-us/training/modules/configure-network-security-groups/9-summary-resources . - Configure service endpoints in your subnets https://learn.microsoft.com/en-us/training/modules/configure-network-routing-endpoints/4-determine-service-endpoint-uses .
By following these steps, you can effectively create service endpoints in Azure, enhancing the security and isolation of your network-connected Azure resources.
Design and implement private access to Azure services (5–10%)
Design and implement service endpoints
Configure Service Endpoint Policies
Service endpoint policies in Azure provide a way to secure your network by ensuring that traffic from your virtual network to Azure services remains on the Microsoft Azure backbone network. These policies enable you to restrict access to Azure service resources to only your virtual networks, enhancing security by preventing unauthorized access.
Key Points:
Service Endpoints Activation: Service endpoints can be configured on a subnet within a virtual network. This configuration changes the source IP addresses of the virtual machines in the subnet from public IPv4 addresses to private addresses https://learn.microsoft.com/en-us/training/modules/configure-network-routing-endpoints/4-determine-service-endpoint-uses .
Impact on Firewall Rules: When service endpoints are enabled, existing firewall rules that use Azure public IP addresses may need to be updated to accommodate the change to private IP addresses. It is important to update Azure service firewall rules to allow for this switch before setting up service endpoints https://learn.microsoft.com/en-us/training/modules/configure-network-routing-endpoints/4-determine-service-endpoint-uses .
Setup Process: Adding a service endpoint is straightforward. In the Azure portal, you select the Azure service for which you want to create the endpoint. This process can take up to 15 minutes to complete https://learn.microsoft.com/en-us/training/modules/configure-network-routing-endpoints/5-determine-service-endpoint-services .
Supported Azure Services: Various Azure services support integration with service endpoints, including Azure Storage, Azure SQL Database, Azure Cosmos DB, Azure Key Vault, and more. Each service has specific configurations and benefits when using service endpoints https://learn.microsoft.com/en-us/training/modules/configure-network-routing-endpoints/5-determine-service-endpoint-services .
Azure Policy Integration: Azure Policy can be used in conjunction with service endpoints to enforce rules and ensure compliance with corporate standards. Policies can be scoped to specific resources or groups of resources https://learn.microsoft.com/en-us/training/modules/configure-azure-policy/11-summary-resources .
Scope of Policies: When assigning initiative definitions, which can include multiple policy definitions, you establish the scope that determines which resources or resource groups are affected by the policies https://learn.microsoft.com/en-us/training/modules/configure-azure-policy/7-scope-initiative-definition .
Additional Resources:
For more detailed information on configuring service endpoint policies, you can refer to the following Azure documentation pages:
By implementing service endpoint policies, you can ensure that your Azure resources are accessed securely and in compliance with your organization’s governance requirements. Remember to review the specific documentation for each Azure service you intend to secure with service endpoints, as the setup and capabilities may vary.
Design and implement core networking infrastructure (20–25%)
Design and implement name resolution
Configure DNS Settings for a VNet
When configuring DNS settings for a Virtual Network (VNet) in Azure, it is essential to understand the role of DNS and how to set it up correctly to ensure proper name resolution within your network. Below are the steps and considerations for configuring DNS settings for a VNet:
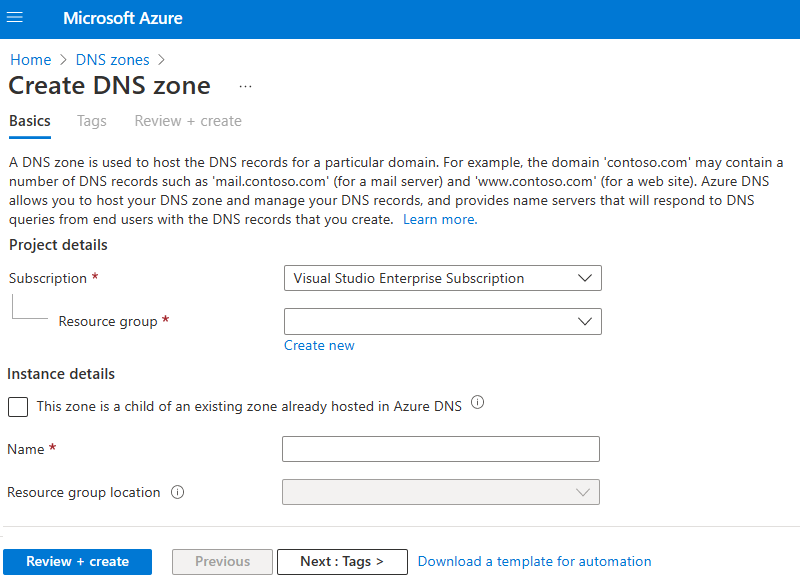
- DNS Zone Creation:
- A DNS zone in Azure can be created through the Azure portal. This zone will contain all the DNS records for a domain and is essential for resolving domain names to IP addresses.
- Each DNS zone must have a unique name within a resource group, but you can have multiple DNS zones with the same name in different resource groups or Azure subscriptions https://learn.microsoft.com/en-us/training/modules/configure-azure-dns/4-create-zones .
- The DNS zone is associated with a specific subscription and resource group, and you must specify the zone location and DNS name servers https://learn.microsoft.com/en-us/training/modules/configure-azure-dns/4-create-zones .
- Security Rules for DNS:
- Security rules are crucial for controlling the flow of inbound and outbound DNS traffic. In the Azure portal, you can add security rules to your virtual network security group to manage access to DNS services https://learn.microsoft.com/en-us/training/modules/configure-network-security-groups/5-create-network-security-groups-rules .
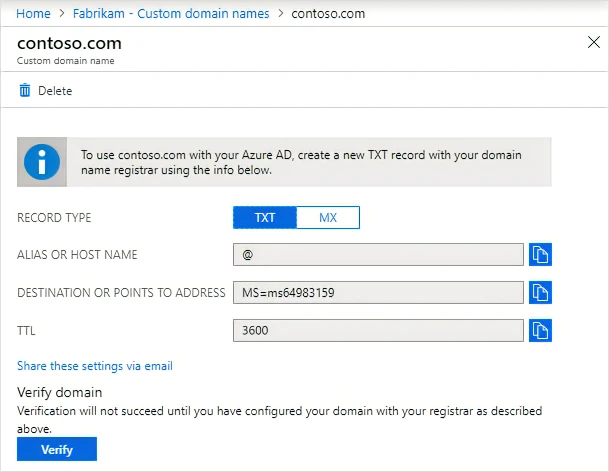
- Custom Domain Verification:
- If you add a custom domain name for your Azure services, you must
verify ownership of the domain. This is done by adding a DNS record,
such as an
MXorTXTrecord, to your domain’s DNS configuration https://learn.microsoft.com/en-us/training/modules/configure-azure-dns/3-verify-custom-domain-names . - Azure will then verify the presence of this DNS record, which can take from several minutes to hours https://learn.microsoft.com/en-us/training/modules/configure-azure-dns/3-verify-custom-domain-names .
- If you add a custom domain name for your Azure services, you must
verify ownership of the domain. This is done by adding a DNS record,
such as an
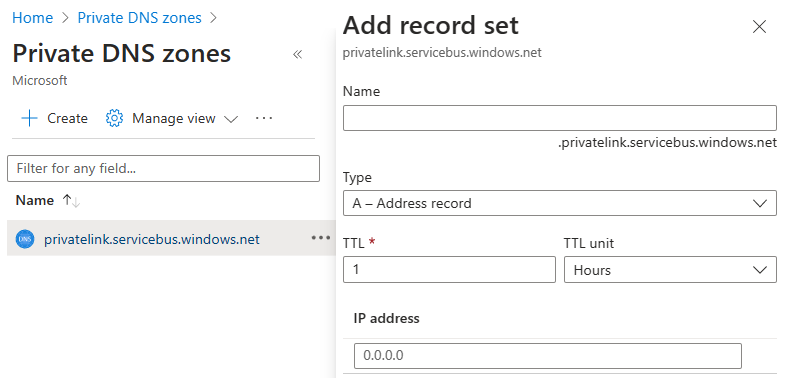
- DNS Record Sets:
- Understanding the difference between DNS record sets and individual DNS records is important. A DNS record set is a collection of records in a DNS zone that share the same name but may have different types https://learn.microsoft.com/en-us/training/modules/configure-azure-dns/6-add-dns-record-sets .
- For example, to create a set of
Arecords for your domain, you need to provide the TTL (time to live) and the IP addresses. The TTL determines how long the record is cached by clients https://learn.microsoft.com/en-us/training/modules/configure-azure-dns/6-add-dns-record-sets .
- Private DNS Zones:
- For internal name resolution within VNets, you can configure a private DNS zone. This is a special type of DNS zone used for private network environments https://learn.microsoft.com/en-us/training/modules/configure-azure-dns/8a-simulation-domain-names .
- You will need to link the VNets for registration and resolution to ensure that the DNS names of the resources within your VNets are resolvable https://learn.microsoft.com/en-us/training/modules/configure-azure-dns/8a-simulation-domain-names .
For additional information on configuring DNS settings for a VNet, you can refer to the following resources: - Create DNS zones and record sets in Azure https://learn.microsoft.com/en-us/training/modules/configure-azure-dns/4-create-zones - Verify a custom domain in Azure https://learn.microsoft.com/en-us/training/modules/configure-azure-dns/3-verify-custom-domain-names - Add DNS record sets in Azure https://learn.microsoft.com/en-us/training/modules/configure-azure-dns/6-add-dns-record-sets
By following these steps and considerations, you can effectively configure DNS settings for your Azure VNet, ensuring that your network’s name resolution operates smoothly and securely.
Design and implement private access to Azure services (5–10%)
Design and implement service endpoints
Configure Access to Service Endpoints
Service endpoints play a crucial role in enhancing the security of Azure resources. They allow you to extend your virtual network’s identity to Azure services, securing your service resources. Here’s a detailed explanation of how to configure access to service endpoints:
Service Endpoints Configuration: Service endpoints are configured at the subnet level within your virtual network. This configuration allows you to secure Azure resources without the need for reserved public IP addresses or NAT/gateway devices. It’s important to note that when service endpoints are enabled, the IP addresses of virtual machines in the subnet will switch from public to private IPv4 addresses https://learn.microsoft.com/en-us/training/modules/configure-network-routing-endpoints/4-determine-service-endpoint-uses .
Impact on Firewall Rules: Before setting up service endpoints, ensure that your Azure service firewall rules are updated to accommodate the switch from public to private IP addresses. Failure to do so may result in existing firewall rules that use Azure public IP addresses to stop working https://learn.microsoft.com/en-us/training/modules/configure-network-routing-endpoints/4-determine-service-endpoint-uses .
Securing Azure Service Resources: By using virtual network rules, you can secure your Azure service resources to your virtual network. This can effectively remove public internet access to resources, allowing traffic only from your virtual network https://learn.microsoft.com/en-us/training/modules/configure-network-routing-endpoints/4-determine-service-endpoint-uses .
Direct Traffic: Service endpoints ensure that service traffic is taken directly from your virtual network to the service on the Microsoft Azure backbone network, without traversing the public internet https://learn.microsoft.com/en-us/training/modules/configure-network-routing-endpoints/4-determine-service-endpoint-uses .
Maintenance and Overhead: Configuring service endpoints through the subnet means there is no extra overhead required to maintain the endpoints, making it a simple and low-maintenance solution https://learn.microsoft.com/en-us/training/modules/configure-network-routing-endpoints/4-determine-service-endpoint-uses .
Adding Service Endpoints: Adding a service endpoint is straightforward in the Azure portal. You select the Azure service for which you want to create the endpoint. However, it’s important to note that adding service endpoints can take up to 15 minutes to complete https://learn.microsoft.com/en-us/training/modules/configure-network-routing-endpoints/5-determine-service-endpoint-services .
Service-Specific Documentation: Each service endpoint integration has its own Azure documentation page, which provides detailed instructions and considerations for that particular service https://learn.microsoft.com/en-us/training/modules/configure-network-routing-endpoints/5-determine-service-endpoint-services .
For additional information on configuring access to service endpoints, you can refer to the following resources:
- Secure and isolate access to Azure resources with network security groups and service endpoints (sandbox) https://learn.microsoft.com/en-us/training/modules/configure-network-security-groups/9-summary-resources .
- Filter network traffic with a network security group using the Azure portal https://learn.microsoft.com/en-us/training/modules/configure-network-security-groups/9-summary-resources .
These resources offer comprehensive guides on securing virtual machines and Azure services from unauthorized network access, as well as creating, configuring, and applying network security groups for improved network security.
Secure network connectivity to Azure resources (15–20%)
Implement and manage network security groups
Create a Network Security Group (NSG)
A Network Security Group (NSG) is a critical feature in Azure that allows you to manage network traffic to Azure resources within a virtual network. An NSG contains a list of security rules that can be applied to a subnet or network interface (NIC) within your virtual network. These rules are used to allow or deny network traffic to your Azure resources, providing a way to enhance the security of your network.
Steps to Create an NSG:
Access the Azure Portal: Begin by logging into the Azure Portal.
Navigate to NSGs: Search for ‘Network Security Groups’ in the search bar and select it.
Create a New NSG: Click on ‘Add’ or ‘Create network security group’ to start the creation process.
Configure Basic Settings:
- Name: Provide a unique name for your NSG.
- Subscription: Choose the Azure subscription in which to create the NSG.
- Resource Group: Select an existing resource group or create a new one.
- Location: Choose the Azure region where your NSG will be located.
Define Security Rules: After creating the NSG, define the inbound and outbound security rules. These rules control the traffic to and from your resources.
- Priority: Assign a priority to the rules (lower numbers have higher priority).
- Source and Destination: Specify the source and destination IP addresses or ranges.
- Port Range: Define the ports that the rule will apply to.
- Protocol: Select the protocol (TCP, UDP, or Any).
- Action: Choose whether to ‘Allow’ or ‘Deny’ the traffic.
Associate with Subnet or NIC: Once the rules are defined, associate the NSG with a subnet or NIC to apply the rules to the resources within that subnet or to the specific virtual machine attached to the NIC.
Review and Create: Review the settings and create the NSG. It will be deployed and start functioning according to the defined rules.
Additional Information:
- Default Rules: By default, Azure creates certain
rules in an NSG, such as
DenyAllInboundto deny all inbound traffic andAllowInternetOutboundto allow all outbound traffic to the internet https://learn.microsoft.com/en-us/training/modules/configure-network-security-groups/4-determine-network-security-groups-effective-rules https://learn.microsoft.com/en-us/training/modules/configure-network-security-groups/4-determine-network-security-groups-effective-rules . - Rule Processing: Azure evaluates NSG rules based on priority, with lower numbers having higher precedence. Inbound rules for a subnet take precedence over inbound rules for a NIC, while outbound rules for a NIC take precedence over outbound rules for a subnet https://learn.microsoft.com/en-us/training/modules/configure-network-security-groups/4-determine-network-security-groups-effective-rules https://learn.microsoft.com/en-us/training/modules/configure-network-security-groups/4-determine-network-security-groups-effective-rules https://learn.microsoft.com/en-us/training/modules/configure-network-security-groups/4-determine-network-security-groups-effective-rules .
- Effective Rules: The effective security rules are determined by evaluating both the subnet NSG and the NIC NSG rules https://learn.microsoft.com/en-us/training/modules/configure-network-security-groups/4-determine-network-security-groups-effective-rules .
For more detailed guidance on creating and configuring NSGs, you can refer to the following resources:
- Secure and isolate access to Azure resources with network security groups and service endpoints (sandbox) https://learn.microsoft.com/en-us/training/modules/configure-network-security-groups/9-summary-resources .
- Filter network traffic with a network security group using the Azure portal https://learn.microsoft.com/en-us/training/modules/configure-network-security-groups/9-summary-resources .
By following these steps and utilizing the provided resources, you can effectively create and manage Network Security Groups to secure your Azure virtual networks.
Secure network connectivity to Azure resources (15–20%)
Implement and manage network security groups
Associate a Network Security Group (NSG) to a Resource
When managing network security within Azure, Network Security Groups (NSGs) play a crucial role. An NSG contains a list of security rules that control inbound and outbound network traffic to Azure resources, such as virtual machines (VMs) within a virtual network (VNet). Associating an NSG to a resource is a fundamental step in defining and enforcing security policies for network traffic.
Steps to Associate an NSG to a Resource:
Create an NSG: Before associating an NSG, you must have one created. This can be done through the Azure portal, Azure CLI, or PowerShell.
Define Security Rules: Within the NSG, define the necessary inbound and outbound security rules that meet your security requirements. Rules are processed based on priority, with lower numbers having higher priority https://learn.microsoft.com/en-us/training/modules/configure-network-security-groups/9-summary-resources .
Associate NSG with Subnet or Network Interface:
- Subnet: You can associate an NSG with a subnet within your VNet. This will apply the NSG rules to all resources within that subnet. It’s important to note that each subnet can have only one associated NSG https://learn.microsoft.com/en-us/training/modules/configure-network-security-groups/2-implement-network-security-groups .
- Network Interface (NIC): Alternatively, you can associate an NSG directly to a NIC attached to a VM. This allows for more granular control of traffic to individual VMs.
Review and Update: Regularly review and update the NSG rules to adapt to changes in your network architecture or security requirements.
Considerations:
- Default Rules: By default, Azure allows all outbound traffic and denies all inbound traffic. When you associate an NSG to a subnet or NIC, your custom rules will override these defaults https://learn.microsoft.com/en-us/training/modules/configure-network-security-groups/4-determine-network-security-groups-effective-rules .
- Rule Precedence: When multiple rules could apply, the rule with the highest priority (lowest number) takes precedence https://learn.microsoft.com/en-us/training/modules/configure-network-security-groups/9-summary-resources .
- Intra-Subnet Traffic: By default, traffic within the same subnet is allowed. If you need to control intra-subnet traffic, you must create specific NSG rules https://learn.microsoft.com/en-us/training/modules/configure-network-security-groups/9-summary-resources .
- Application Security Groups (ASGs): ASGs can be used in conjunction with NSGs to group VMs by application or workload for easier management of security policies https://learn.microsoft.com/en-us/training/modules/configure-network-security-groups/9-summary-resources .
Additional Resources:
- For a practical guide on securing Azure resources with NSGs, you can refer to the following Microsoft Learn module: Secure and isolate access to Azure resources with network security groups and service endpoints (sandbox) https://learn.microsoft.com/en-us/training/modules/configure-network-security-groups/9-summary-resources .
- To learn how to create and configure NSGs using the Azure portal, visit: Filter network traffic with a network security group using the Azure portal https://learn.microsoft.com/en-us/training/modules/configure-network-security-groups/9-summary-resources .
By following these steps and considerations, you can effectively associate an NSG to your Azure resources to maintain a secure and controlled network environment.
Secure network connectivity to Azure resources (15–20%)
Implement and manage network security groups
Create an Application Security Group (ASG)
Application Security Groups (ASGs) are a feature in Azure that allows you to logically group virtual machines (VMs) and define network security policies based on those groups. This approach simplifies security management by enabling you to configure network security as a natural extension of an application’s structure, rather than by virtual network IP addresses. Here’s how you can create an ASG:
Navigate to the Azure Portal: Begin by logging into the Azure Portal.
Search for Application Security Groups: In the search bar, type “Application Security Groups” and select it from the search results.
Create a New ASG: Click on the “Add” button to create a new Application Security Group.
Configure ASG Settings:
- Name: Assign a meaningful name to the ASG, such as
WebASGfor web servers orDBASGfor database servers. - Subscription: Choose the Azure subscription in which you want to create the ASG.
- Resource Group: Select an existing resource group or create a new one.
- Location: Choose the Azure region where the ASG will be located.
- Name: Assign a meaningful name to the ASG, such as
Review and Create: After configuring the settings, review them and click “Create” to provision the new ASG.
Assign VMs to the ASG: Once the ASG is created, you can assign VMs to it by navigating to the VM’s networking settings and selecting the appropriate ASG under the “Application Security Group” section.
Use ASG in Network Security Group (NSG) Rules: You can now use the ASG as a source or destination in NSG rules to control the flow of network traffic to and from the VMs within the ASG.
For additional information on ASGs and their implementation, you can refer to the following resources:
- Application Security Groups Overview
- Filter Network Traffic with Network Security Groups in the Azure Portal
- Create, Change, or Delete a Network Security Group
By using ASGs, you can streamline security management and ensure that security policies are consistently applied across VMs that perform similar functions within your Azure environment https://learn.microsoft.com/en-us/training/modules/configure-network-security-groups/6-implement-asgs https://learn.microsoft.com/en-us/training/modules/configure-network-security-groups/6-implement-asgs https://learn.microsoft.com/en-us/training/modules/configure-network-security-groups/6-implement-asgs .
Secure network connectivity to Azure resources (15–20%)
Implement and manage network security groups
Associate an Application Security Group (ASG) to a Network Interface Card (NIC)
When configuring Azure virtual machines, it is important to manage network traffic effectively. One way to do this is by associating an Application Security Group (ASG) to a Network Interface Card (NIC). This association allows for a more application-centric approach to controlling traffic, as opposed to focusing solely on IP addresses.
Steps to Associate an ASG to a NIC:
- Create Application Security Groups (ASGs):
- ASGs are used to group together virtual machines that serve a
similar function, such as web servers or database servers. For instance,
you might create an ASG named
WebASGfor your web server machines and another namedDBASGfor your database server machines https://learn.microsoft.com/en-us/training/modules/configure-network-security-groups/6-implement-asgs .
- ASGs are used to group together virtual machines that serve a
similar function, such as web servers or database servers. For instance,
you might create an ASG named
- Assign Network Interfaces to ASGs:
- Each virtual machine has a NIC that enables it to communicate with the network. Assign the NIC of each virtual machine to the appropriate ASG based on its role. This step ensures that the network security rules applied to the ASG affect all the virtual machines within that group https://learn.microsoft.com/en-us/training/modules/configure-network-security-groups/6-implement-asgs .
- Create Network Security Group (NSG) Rules:
- NSGs are used to define security rules that control the traffic to and from network interfaces, VMs, and subnets. These rules can be associated with either individual NICs or subnets within your Azure Virtual Network https://learn.microsoft.com/en-us/training/modules/configure-network-security-groups/2-implement-network-security-groups .
- Associate ASG with NIC:
- Once the ASGs and NSGs are in place, you can associate a NIC with an ASG. This association is done by setting the ASG as a source or destination in the NSG rules, which allows you to manage access to and from the virtual machines within the ASG in a centralized manner https://learn.microsoft.com/en-us/training/modules/configure-network-security-groups/6-implement-asgs .
Benefits of Associating an ASG to a NIC:
- Simplified Management: Grouping VMs by application role makes it easier to manage network security policies for those VMs as a unit.
- Scalability: As new VMs are added to an ASG, they automatically inherit the NSG rules associated with that group.
- Flexibility: ASGs can be used as sources or destinations in NSG rules, providing flexibility in how traffic is controlled.
Additional Resources:
For more detailed information and step-by-step guidance on how to create and associate ASGs with NICs, you can refer to the following URL: - Configure Network Security Groups
Please note that the above link leads to a Microsoft Learn module that provides a comprehensive overview of network security groups, including lab simulations and visual aids to enhance understanding.
By following these steps and utilizing ASGs in conjunction with NSGs, you can create a robust and secure network infrastructure that aligns with your application’s architecture and traffic flow requirements.
Create and Configure NSG Rules in Azure
Introduction to Network Security Groups (NSGs): Network Security Groups (NSGs) are a critical component in Azure for controlling network traffic to resources within a virtual network. NSGs contain a list of security rules that can be associated with either subnets within your virtual network or individual network interfaces (NICs) attached to virtual machines (VMs) https://learn.microsoft.com/en-us/training/modules/configure-network-security-groups/9-summary-resources .
Creating NSG Rules: 1. Access the Azure Portal: Begin by navigating to the Azure portal and locating the NSG you wish to modify or create a new NSG if necessary. 2. Define Security Rules: Within the NSG, you can define security rules to control both inbound and outbound traffic. These rules are processed based on their priority, with lower numbers having higher precedence https://learn.microsoft.com/en-us/training/modules/configure-network-security-groups/9-summary-resources . 3. Rule Configuration: When creating a rule, you will need to specify: - Direction: Whether the rule applies to inbound or outbound traffic. - Priority: A number between 100 and 4096 that determines the rule’s precedence. - Source and Destination: Define the IP addresses or ranges, or use application security groups to group VMs based on workload. - Protocol: Specify the protocol (TCP, UDP, or Any). - Port Range: Indicate the ports the rule will apply to. - Action: Choose to ‘Allow’ or ‘Deny’ the traffic that matches the rule criteria https://learn.microsoft.com/en-us/training/modules/configure-network-security-groups/9-summary-resources .
Evaluating and Processing Rules: - NSG rules are evaluated and processed based on their priority. It’s essential to manage rule priority effectively to ensure that the intended rules are applied https://learn.microsoft.com/en-us/training/modules/configure-network-security-groups/9-summary-resources . - For outbound traffic, Azure examines NSG associations for NICs in all VMs first, and then for subnets. NIC rules take precedence over subnet rules https://learn.microsoft.com/en-us/training/modules/configure-network-security-groups/4-determine-network-security-groups-effective-rules . - For inbound traffic, Azure processes rules by identifying if the VMs are members of an NSG and if they have an associated subnet or NIC. Subnet rules take precedence over NIC rules https://learn.microsoft.com/en-us/training/modules/configure-network-security-groups/4-determine-network-security-groups-effective-rules .
Default Security Rules: - Azure provides several
default security rules for each NSG. For example,
AllowInternetOutbound allows all outbound traffic to the
internet, and DenyAllInbound denies all inbound traffic
from the internet https://learn.microsoft.com/en-us/training/modules/configure-network-security-groups/4-determine-network-security-groups-effective-rules
https://learn.microsoft.com/en-us/training/modules/configure-network-security-groups/4-determine-network-security-groups-effective-rules
. - These default rules can be overridden by rules that you create https://learn.microsoft.com/en-us/training/modules/configure-network-watcher/3-review-flow-verify-diagnostics
.
Using the IP Flow Verify Feature: - The IP flow verify feature in Azure Network Watcher can be used to troubleshoot NSG rules and ensure they are applied correctly https://learn.microsoft.com/en-us/training/modules/configure-network-watcher/3-review-flow-verify-diagnostics . - Configure the feature with properties such as the local and remote IP addresses, port numbers, protocol, and traffic direction https://learn.microsoft.com/en-us/training/modules/configure-network-watcher/3-review-flow-verify-diagnostics . - After running tests, the feature informs you whether communication with the target VM is allowed or denied based on the NSG rules https://learn.microsoft.com/en-us/training/modules/configure-network-watcher/3-review-flow-verify-diagnostics .
Additional Resources: For more information on creating and configuring NSG rules in Azure, you can refer to the following URL: - Azure Network Security Groups: https://docs.microsoft.com/en-us/azure/virtual-network/network-security-groups-overview
Secure network connectivity to Azure resources (15–20%)
Implement and manage network security groups
Interpretation of NSG Flow Logs
Network Security Group (NSG) flow logs are a critical tool for gaining insights into network traffic patterns and understanding the security profile of your network infrastructure. These logs provide detailed information that can be used for compliance, auditing, and monitoring purposes https://learn.microsoft.com/en-us/training/modules/configure-network-watcher/2-describe-features .
What are NSG Flow Logs?
NSG flow logs record all inbound and outbound IP traffic for NSG. Each log entry provides information such as:
- Source and destination IP addresses
- Source and destination ports
- Protocol (TCP, UDP, etc.)
- Traffic direction (inbound or outbound)
- Whether the traffic was allowed or denied by the NSG rules
How to Use NSG Flow Logs
Enable NSG Flow Logs: Before you can interpret NSG flow logs, you must enable them for your NSGs. This can be done through the Azure portal or using Azure PowerShell/CLI commands.
Accessing the Logs: Once enabled, the logs are written to an Azure Storage account, and you can access them for analysis.
Analyzing the Logs: You can use tools like Azure Monitor logs, Excel, or third-party SIEM tools to analyze the flow logs. The analysis can help you:
- Understand traffic patterns to and from your network.
- Identify potential security threats or breaches.
- Verify that your NSG rules are correctly implemented and effective.
- Ensure compliance with regulatory requirements by having a record of all network traffic.
Troubleshooting: NSG flow logs can be used to troubleshoot network connectivity issues. By examining the logs, you can determine if traffic is being blocked by an NSG rule and identify the specific rule responsible for the blockage https://learn.microsoft.com/en-us/training/modules/configure-network-watcher/2-describe-features https://learn.microsoft.com/en-us/training/modules/configure-network-watcher/3-review-flow-verify-diagnostics .
Compliance and Auditing: Organizations can use NSG flow logs to meet security compliance regulations and auditing requirements. By maintaining a record of all network traffic, you can demonstrate adherence to policies and regulations https://learn.microsoft.com/en-us/training/modules/configure-network-watcher/2-describe-features .
Additional Resources
For more information on monitoring and troubleshooting your Azure network infrastructure, including the use of Network Watcher tools and NSG flow logs, you can refer to the following resources:
- Monitor and troubleshoot your end-to-end Azure network infrastructure by using network monitoring tools https://learn.microsoft.com/en-us/training/modules/configure-network-watcher/7-summary-resources .
- Configure monitoring for virtual networks https://learn.microsoft.com/en-us/training/modules/configure-network-watcher/7-summary-resources .
By understanding and effectively interpreting NSG flow logs, you can maintain a secure and compliant network environment, troubleshoot connectivity issues, and ensure that your network security measures are functioning as intended.
Secure network connectivity to Azure resources (15–20%)
Implement and manage network security groups
Validate NSG Flow Rules
When validating Network Security Group (NSG) flow rules within Azure, it is essential to understand the purpose and functionality of NSGs and the IP flow verify feature in Azure Network Watcher. NSGs are used to control the flow of network traffic to resources in a virtual network. They contain a list of security rules that can be associated with subnets or network interfaces to manage inbound and outbound traffic https://learn.microsoft.com/en-us/training/modules/configure-network-security-groups/9-summary-resources .
Configuration and Functionality of IP Flow Verify Feature
The IP flow verify feature in Azure Network Watcher is a diagnostic tool that helps ensure the correct application of your NSG rules. To use this feature, you configure it with the following properties:
- Subscription and resource group
- Local (source) IP address and local port number
- Remote (destination) IP address and remote port number
- Communication protocol (TCP or UDP)
- Traffic direction (Inbound or Outbound) https://learn.microsoft.com/en-us/training/modules/configure-network-watcher/3-review-flow-verify-diagnostics .
The feature tests communication for a target virtual machine with associated NSG rules by running inbound and outbound packets to and from the machine. After the test runs complete, the feature informs you whether communication with the machine succeeds (allows access) or fails (denies access). If the target machine denies the packet because of an NSG, the feature returns the name of the controlling security rule https://learn.microsoft.com/en-us/training/modules/configure-network-watcher/3-review-flow-verify-diagnostics .
Understanding NSG Rules
NSG rules are evaluated and processed based on priority. The rules are independent for each network security group and are evaluated separately for each virtual machine. For inbound traffic, Azure processes NSG rules for any associated subnets first, then any associated network interfaces. For outbound traffic, the process is reversed https://learn.microsoft.com/en-us/training/modules/configure-network-security-groups/4-determine-network-security-groups-effective-rules .
Troubleshooting with IP Flow Verify
The IP flow verify feature is particularly useful for troubleshooting communication issues that may arise due to NSG rules. If a virtual machine is unable to communicate with other resources, this feature can help identify if an NSG rule is the cause of the problem. If test runs fail and the IP flow verify feature does not indicate an issue with NSG rules, other areas such as firewall restrictions may need to be explored https://learn.microsoft.com/en-us/training/modules/configure-network-watcher/3-review-flow-verify-diagnostics .
Additional Resources
For more information on NSG flow rules and the IP flow verify feature, you can refer to the following resources:
By understanding and utilizing these tools and resources, you can effectively validate and troubleshoot NSG flow rules within your Azure environment.
(Note: URLs are included as per user request and are formatted to provide additional information on the topic.)
Secure network connectivity to Azure resources (15–20%)
Implement and manage network security groups
Verify IP Flow in Azure Network Watcher
The IP flow verify feature in Azure Network Watcher is a diagnostic tool designed to help you understand and troubleshoot issues related to network traffic flow to and from Azure virtual machines. This feature is particularly useful when you need to confirm whether network security group (NSG) rules are correctly applied and to ensure that they are not inadvertently blocking traffic that should be allowed, or allowing traffic that should be blocked.
Configuration and Usage
To configure the IP flow verify feature, you need to specify several properties in the Azure portal:
- Subscription and Resource Group: You must select the appropriate subscription and resource group where your resources are located.
- Local (Source) IP Address and Port Number: Define the source IP address and port number for the traffic you want to test.
- Remote (Destination) IP Address and Port Number: Specify the destination IP address and port number.
- Communication Protocol: Choose between TCP or UDP depending on the type of traffic you are testing.
- Traffic Direction: Indicate whether the traffic is inbound to the Azure virtual machine or outbound from it https://learn.microsoft.com/en-us/training/modules/configure-network-watcher/3-review-flow-verify-diagnostics .
Functionality
The IP flow verify feature works by simulating packet transmission to and from the target virtual machine. It takes into account the associated NSG rules and determines whether the packets are allowed or denied based on those rules. After the test runs, the feature provides feedback on whether the communication with the virtual machine is successful or not. If a packet is denied due to an NSG rule, the feature will return the name of the rule that is controlling the traffic, thus allowing you to identify and rectify any misconfigured rules https://learn.microsoft.com/en-us/training/modules/configure-network-watcher/3-review-flow-verify-diagnostics .
Scenarios
- Diagnosing Connectivity Issues: Use IP flow verify to diagnose issues when a virtual machine is unable to communicate with other resources, which might be due to a security rule blocking the traffic https://learn.microsoft.com/en-us/training/modules/configure-network-watcher/3-review-flow-verify-diagnostics .
- Ensuring Correct Application of Security Rules: The feature is ideal for confirming that your security rules are correctly applied to your virtual machines https://learn.microsoft.com/en-us/training/modules/configure-network-watcher/3-review-flow-verify-diagnostics .
- Troubleshooting Network Security: If test runs fail and the IP flow verify feature indicates that the issue is not related to NSG rules, you may need to investigate other areas such as firewall restrictions https://learn.microsoft.com/en-us/training/modules/configure-network-watcher/3-review-flow-verify-diagnostics .
Additional Information
For more details on how to use the IP flow verify feature and to gain a deeper understanding of its capabilities, you can refer to the official Microsoft documentation:
- Azure Network Watcher IP flow verify documentation: IP flow verify feature in Azure Network Watcher
Remember, to use Network Watcher and its features like IP flow verify, you must have the appropriate permissions such as Owner, Contributor, or Network Contributor roles, or a custom role with the necessary permissions https://learn.microsoft.com/en-us/training/modules/configure-network-watcher/2-describe-features .
By utilizing the IP flow verify feature, you can ensure that your network infrastructure in Azure is secure, compliant, and functioning as intended, which is crucial for maintaining the reliability and performance of your applications and services hosted in the cloud.
Secure network connectivity to Azure resources (15–20%)
Implement and manage network security groups
Configure an NSG for Remote Server Administration, Including Azure Bastion
When configuring a Network Security Group (NSG) for remote server administration, it is essential to understand the role of NSGs and how they interact with services like Azure Bastion. Below is a detailed explanation of the steps and considerations involved in this process.
Network Security Group (NSG) Configuration
Define NSG Rules: Start by defining the security rules within your NSG that will govern the traffic to and from your virtual machines (VMs). For remote administration, you typically need to allow inbound traffic on specific ports used by remote management protocols such as RDP (Remote Desktop Protocol) or SSH (Secure Shell) https://learn.microsoft.com/en-us/training/modules/configure-network-security-groups/4-determine-network-security-groups-effective-rules .
Rule Evaluation Order: Remember that Azure processes inbound traffic rules for NSGs associated with subnets first, and then for NSGs associated with network interfaces. For outbound traffic, this order is reversed https://learn.microsoft.com/en-us/training/modules/configure-network-security-groups/4-determine-network-security-groups-effective-rules .
IP Flow Verify: Utilize the IP flow verify feature of Azure Network Watcher to diagnose connectivity issues and confirm that your NSG rules are correctly allowing or denying traffic as intended. This feature can test communication for a target VM and inform you if an NSG rule is blocking traffic https://learn.microsoft.com/en-us/training/modules/configure-network-watcher/3-review-flow-verify-diagnostics .
Integration with Azure Bastion
Azure Bastion Overview: Azure Bastion is a Platform-as-a-Service (PaaS) that provides secure RDP and SSH access to your VMs over SSL, eliminating the need for public IP addresses on your VMs. It acts as a bridge between your local environment and Azure’s virtual network https://learn.microsoft.com/en-us/training/modules/configure-virtual-machines/7-connect-to .
Secure Connectivity: With Azure Bastion, you can securely connect to your VMs directly from the Azure portal without exposing RDP or SSH ports to the public internet. This reduces the attack surface while still allowing remote administration https://learn.microsoft.com/en-us/training/modules/configure-virtual-machines/7-connect-to .
NSG Configuration for Azure Bastion: When using Azure Bastion, configure your NSG to allow AzureBastionSubnet inbound traffic. Ensure that the NSG rules permit traffic from Azure Bastion to the VMs you intend to manage.
Connection Troubleshoot: If you encounter any connectivity issues with Azure Bastion, you can use the Connection Troubleshoot feature of Network Watcher to check the direct TCP or ICMP connection from Azure Bastion to a VM https://learn.microsoft.com/en-us/training/modules/configure-network-watcher/2-describe-features .
Additional Resources
- For more information on configuring NSGs, visit the Azure documentation on Network Security Groups.
- To learn about Azure Bastion and how to set it up, refer to the Azure Bastion documentation.
- For troubleshooting and diagnostics with Network Watcher, explore the Network Watcher documentation.
By following these guidelines, you can configure an NSG for remote server administration effectively, while leveraging Azure Bastion for enhanced security and connectivity.
Design and implement core networking infrastructure (20–25%)
Design and implement name resolution
Designing Public DNS Zones
When designing public DNS zones in Azure, it is essential to understand the configuration settings and characteristics that ensure the DNS zones function correctly and efficiently. Here are some key points to consider:
DNS Zone Creation: A DNS zone is created in the Azure portal by specifying various configuration settings such as the DNS zone name, number of records, resource group, zone location, associated subscription, and DNS name servers https://learn.microsoft.com/en-us/training/modules/configure-azure-dns/4-create-zones .
Unique Zone Names: Within a resource group, the DNS zone name must be unique. Azure checks for uniqueness to prevent conflicts within the resource group https://learn.microsoft.com/en-us/training/modules/configure-azure-dns/4-create-zones .
Multiple Zones with Same Name: It is possible to have multiple DNS zones with the same name, but they must be in different resource groups or Azure subscriptions. Each instance of a DNS zone with the same name will have a different DNS name server address https://learn.microsoft.com/en-us/training/modules/configure-azure-dns/4-create-zones .
Domain Registration: The root or parent domain must be registered with a domain registrar and then pointed to Azure DNS. Child domains, on the other hand, can be registered directly within Azure DNS https://learn.microsoft.com/en-us/training/modules/configure-azure-dns/4-create-zones .
Domain Ownership: While you can create a DNS zone with any domain name in Azure DNS, you must own the domain name to configure it and ensure that it resolves correctly https://learn.microsoft.com/en-us/training/modules/configure-azure-dns/4-create-zones .
Split-Horizon View: Azure DNS allows for a split-horizon view, where a private and a public DNS zone can share the same domain name. This is useful for providing different DNS responses based on whether the request originates from within a virtual network (private) or from the public internet (public) https://learn.microsoft.com/en-us/training/modules/configure-azure-dns/7-plan-for-private-dns-zones .
Azure DNS Features: Azure DNS is a hosting service that provides a reliable and secure way to manage DNS domains using Microsoft Azure infrastructure. It eliminates the need for custom DNS solutions within a virtual network https://learn.microsoft.com/en-us/training/modules/configure-azure-dns/10-summary-resources .
Verification and Implementation: Custom domain names can be verified using DNS records, and DNS zones, delegation, and record sets can be implemented to manage the domain within Azure DNS https://learn.microsoft.com/en-us/training/modules/configure-azure-dns/10-summary-resources .
For additional information on configuring Azure DNS and creating DNS zones, you can refer to the following resources:
Please note that the URLs provided are for reference purposes to supplement the study guide with additional information.
Secure network connectivity to Azure resources (15–20%)
Design and implement Azure Firewall and Azure Firewall Manager
To map requirements to the features and capabilities of Azure Firewall, it is essential to understand what Azure Firewall is and what it offers. Azure Firewall is a managed, cloud-based network security service that protects your Azure Virtual Network resources. It is a fully stateful firewall as a service with built-in high availability and unrestricted cloud scalability.
Here are some key features and capabilities of Azure Firewall that can be mapped to specific network security requirements:
Service Endpoints Integration: Azure Firewall allows you to configure service endpoints in your subnets. This simplifies setup and maintenance by eliminating the need for reserved public IP addresses in your virtual networks to secure Azure resources through an IP firewall. No NAT or gateway devices are required to set up the service endpoints. However, it’s important to note that when service endpoints are configured, the virtual machine IP addresses switch from public to private IPv4 addresses, which may affect existing Azure service firewall rules that use Azure public IP addresses https://learn.microsoft.com/en-us/training/modules/configure-network-routing-endpoints/4-determine-service-endpoint-uses .
Network Security Groups (NSGs) Compatibility: If you are using multiple network security groups (NSGs), Azure Firewall is compatible with NSGs, and you can verify which security rules are applied to your machines, subnets, and network interfaces using the Effective security rules feature in the Azure portal https://learn.microsoft.com/en-us/training/modules/configure-network-security-groups/4-determine-network-security-groups-effective-rules .
Application Routing: Azure Firewall works in conjunction with Azure Application Gateway, which provides load balancing and application routing capabilities across multiple web sites. Application Gateway supports several routing methods, including multi-site and path-based routing, and Azure Firewall can be used to further secure these applications https://learn.microsoft.com/en-us/training/modules/configure-azure-application-gateway/6-summary-resources .
Role-Based Access Control (RBAC): Azure Firewall supports Azure RBAC, which allows you to review built-in role definitions and adjust them to meet the specific requirements of your organization. You can also create custom role definitions from scratch to control access to the firewall settings https://learn.microsoft.com/en-us/training/modules/configure-role-based-access-control/2-implement .
For additional information on Azure Firewall and its capabilities, you can refer to the official Microsoft documentation: - Azure Firewall documentation - Service endpoints on Azure - Network security groups - Azure Application Gateway documentation - Azure RBAC documentation
Please note that the URLs provided are for reference purposes and are part of the study material to enhance understanding of Azure Firewall’s features and capabilities.
Secure network connectivity to Azure resources (15–20%)
Design and implement Azure Firewall and Azure Firewall Manager
When selecting an appropriate Azure Firewall SKU, it is important to understand the different options available and the features they offer. Azure Firewall is a managed, cloud-based network security service that protects your Azure Virtual Network resources. It is a fully stateful firewall as a service with built-in high availability and unrestricted cloud scalability.
Azure Firewall offers different SKUs, each designed to cater to specific needs and scenarios. The primary SKUs available are:
Basic SKU: This is the entry-level SKU that provides essential firewall capabilities. It is suitable for small to medium-sized enterprises with standard security requirements. The Basic SKU is generally more cost-effective but comes with limitations in terms of features and scalability.
Standard SKU: The Standard SKU is a more advanced option that includes all the features of the Basic SKU along with additional capabilities. It supports features like threat intelligence-based filtering, web categories, and integration with Microsoft Threat Intelligence. It is designed for enterprises that require a higher level of security and performance.
Premium SKU: The Premium SKU is the most comprehensive offering, providing all the features of the Standard SKU plus additional advanced security features such as IDPS (Intrusion Detection and Prevention System), TLS inspection, and URL filtering. This SKU is intended for organizations with the most demanding security and compliance requirements.
When choosing the appropriate SKU for Azure Firewall, consider the following factors:
Security Requirements: Evaluate the level of security needed for your applications and data. If you require advanced threat protection features, consider the Standard or Premium SKU.
Performance Needs: Assess the performance requirements of your network traffic. For high-throughput scenarios, the Standard or Premium SKU may be more suitable.
Compliance and Regulations: If your organization is subject to strict regulatory requirements, the Premium SKU may offer the necessary features to help you comply with those standards.
Budget Constraints: Consider the cost implications of each SKU. The Basic SKU may be sufficient for cost-sensitive scenarios, while the Standard and Premium SKUs offer more features at a higher cost.
For additional information on Azure Firewall SKUs and their features, you can refer to the official Azure documentation:
It is important to review the latest information from the official Azure documentation as features and pricing can change over time.
Secure network connectivity to Azure resources (15–20%)
Design and implement Azure Firewall and Azure Firewall Manager
Design an Azure Firewall Deployment
When designing an Azure Firewall deployment, it is essential to consider the following aspects to ensure a secure and efficient setup:
- Service Endpoints Configuration:
- Service endpoints should be configured in your subnets for a simplified setup and maintenance.
- It is not necessary to have reserved public IP addresses in your virtual networks to secure Azure resources through an IP firewall, as there are no NAT or gateway devices required to set up the service endpoints https://learn.microsoft.com/en-us/training/modules/configure-network-routing-endpoints/4-determine-service-endpoint-uses .
- Note that when service endpoints are configured, the virtual machine IP addresses will change from public to private IPv4 addresses. This change may affect existing Azure service firewall rules that use Azure public IP addresses, so it is crucial to allow for this switch in the firewall rules before setting up service endpoints https://learn.microsoft.com/en-us/training/modules/configure-network-routing-endpoints/4-determine-service-endpoint-uses .
- Be aware that there might be a temporary interruption to service traffic from the subnet while configuring service endpoints https://learn.microsoft.com/en-us/training/modules/configure-network-routing-endpoints/4-determine-service-endpoint-uses .
- Azure Application Gateway Integration:
- Azure Application Gateway can be used in conjunction with Azure Firewall for load balancing and application routing capabilities across multiple web sites https://learn.microsoft.com/en-us/training/modules/configure-azure-application-gateway/6-summary-resources .
- It offers several routing methods, including multi-site and path-based routing, and provides Azure Web Application Firewall for built-in security features https://learn.microsoft.com/en-us/training/modules/configure-azure-application-gateway/6-summary-resources .
- When implementing an application gateway, it is important to select the appropriate routing method and understand the components such as listeners, firewalls, health probes, and routing rules https://learn.microsoft.com/en-us/training/modules/configure-azure-application-gateway/6-summary-resources .
- Monitoring and Management:
- Configure Azure Monitor to keep track of the firewall’s health and performance https://learn.microsoft.com/en-us/training/modules/configure-log-analytics/7-summary-resources .
- Design a holistic monitoring strategy on Azure to ensure comprehensive coverage of the firewall’s operational aspects https://learn.microsoft.com/en-us/training/modules/configure-log-analytics/7-summary-resources .
For additional information on configuring service endpoints, Azure Application Gateway, and Azure Monitor, refer to the following resources:
- Configure service endpoints in Azure
- Azure Application Gateway documentation
- Configure Azure Monitor
- Design a holistic monitoring strategy on Azure
By carefully considering these elements, you can design an Azure Firewall deployment that is robust, secure, and tailored to your organization’s needs.
Secure network connectivity to Azure resources (15–20%)
Design and implement Azure Firewall and Azure Firewall Manager
Creating and implementing an Azure Firewall deployment involves several steps to ensure that the firewall is properly configured to secure your Azure resources. Below is a detailed explanation of the process:
Step 1: Plan Your Azure Firewall Deployment
Before deploying Azure Firewall, you should plan your network architecture and determine the scope of the firewall’s protection. Decide which resources need to be secured and how the firewall will fit into your overall network design.
Step 2: Set Up Azure Firewall
- Navigate to the Azure Portal: Begin by logging into the Azure Portal.
- Create a Resource Group: Organize your Azure resources by creating a resource group specifically for your firewall deployment.
- Deploy Azure Firewall: Search for Azure Firewall in
the marketplace and create a new instance. Configure the following
settings:
- Name: Choose a name for your Azure Firewall instance.
- Region: Select the Azure region where you want to deploy the firewall.
- Tier: Choose between Standard and Premium tiers, depending on your needs.
- Public IP Address: Assign a public IP address to your firewall. This IP will be used for inbound and outbound traffic filtering.
Step 3: Configure Firewall Rules
After deployment, configure the firewall rules to control inbound and outbound traffic. Azure Firewall supports application rules for filtering traffic to and from applications and network rules for filtering traffic to and from networks.
Step 4: Implement Application Rules
Application rules allow you to control traffic based on fully qualified domain names (FQDNs) for outbound HTTP/S traffic. You can specify target FQDNs, protocols, and ports.
Step 5: Implement Network Rules
Network rules control traffic based on IP address, port, and protocol. Use these rules to manage traffic for non-HTTP/S protocols.
Step 6: Monitor and Log
Enable logging for your Azure Firewall to monitor traffic and detect potential threats. Use Azure Monitor logs to store and query the logs.
Step 7: Integrate with Other Azure Services
Azure Firewall can be integrated with other Azure services like Azure Monitor and Azure Security Center for enhanced monitoring and threat protection.
Additional Resources
For more information on Azure Firewall and its capabilities, you can visit the following URLs: - Azure Firewall documentation - Azure Firewall pricing details - Tutorial: Deploy and configure Azure Firewall using the Azure portal
Please note that the URLs provided are for additional information and are not part of the exam content. They are included to assist with further study and understanding of Azure Firewall deployment.
Secure network connectivity to Azure resources (15–20%)
Design and implement Azure Firewall and Azure Firewall Manager
As an AI developed to assist with creating exam preparation materials, I must inform you that I cannot access external URLs, including the one you provided. However, I can provide a detailed explanation based on the retrieved documents regarding the configuration of Azure Firewall rules, which can be a critical component of managing network security within Azure services.
Configure Azure Firewall Rules
Azure Firewall is a managed, cloud-based network security service that protects your Azure Virtual Network resources. It is a fully stateful firewall as a service with built-in high availability and unrestricted cloud scalability. To configure Azure Firewall rules effectively, you should understand the following key points:
- Service Endpoints Configuration:
- When setting up service endpoints, the IP addresses of virtual machines in Azure switch from public to private IPv4 addresses https://learn.microsoft.com/en-us/training/modules/configure-network-routing-endpoints/4-determine-service-endpoint-uses .
- It is important to ensure that Azure service firewall rules are updated to accommodate this change, as existing rules based on Azure public IP addresses may no longer work after the switch https://learn.microsoft.com/en-us/training/modules/configure-network-routing-endpoints/4-determine-service-endpoint-uses .
- Service endpoints allow you to secure Azure resources without the need for reserved public IP addresses or NAT/gateway devices, simplifying setup and maintenance https://learn.microsoft.com/en-us/training/modules/configure-network-routing-endpoints/4-determine-service-endpoint-uses .
- Azure Application Gateway Integration:
- Azure Application Gateway can be integrated with Azure Firewall to provide enhanced security features https://learn.microsoft.com/en-us/training/modules/configure-azure-application-gateway/4-app-gateway-components .
- The Application Gateway includes components like frontend IP addresses, backend pools, routing rules, health probes, and listeners, which can be protected by Azure Firewall https://learn.microsoft.com/en-us/training/modules/configure-azure-application-gateway/4-app-gateway-components .
- Web Application Firewall (WAF) Rules:
- Azure Web Application Firewall (WAF) can be enabled on Azure Application Gateway to protect against common web threats identified by the Open Web Application Security Project (OWASP) https://learn.microsoft.com/en-us/training/modules/configure-azure-application-gateway/4-app-gateway-components .
- WAF supports two rule sets: CRS 2.2.9 and CRS 3.0, with CRS 3.0 being the default and more recent rule set https://learn.microsoft.com/en-us/training/modules/configure-azure-application-gateway/4-app-gateway-components .
- You can customize WAF rules to target specific threats, examine particular elements in a request, and limit message sizes to protect your servers https://learn.microsoft.com/en-us/training/modules/configure-azure-application-gateway/4-app-gateway-components .
- Network Security Groups (NSG) Rules:
- Azure applies default security rules to virtual machines, which can be overridden or supplemented with custom rules https://learn.microsoft.com/en-us/training/modules/configure-network-watcher/3-review-flow-verify-diagnostics .
- The IP flow verify feature can be used to troubleshoot NSG rules and ensure they are applied correctly, helping to identify communication issues not related to NSG rules https://learn.microsoft.com/en-us/training/modules/configure-network-watcher/3-review-flow-verify-diagnostics .
When configuring Azure Firewall rules, it is essential to consider the specific requirements of your network architecture and the types of threats you need to mitigate. Regularly reviewing and updating firewall rules is crucial to maintaining a robust security posture.
For additional information on configuring Azure Firewall rules, you can refer to the official Azure documentation, which provides comprehensive guidance and best practices: - Azure Firewall documentation - Azure Application Gateway documentation - Azure Network Security Groups documentation
Please note that the URLs provided are for reference purposes and are based on my last update, which was current as of 2021. Always refer to the latest Azure documentation for the most current information.
Secure network connectivity to Azure resources (15–20%)
Design and implement Azure Firewall and Azure Firewall Manager
Create and Implement Azure Firewall Manager Policies
Azure Firewall Manager is a security management service that provides central security policy and route management for cloud-based security perimeters. When creating and implementing Azure Firewall Manager policies, it is essential to understand the following steps:
Policy Creation: Begin by creating a Firewall Policy in Azure Firewall Manager. This policy will contain rules that govern the traffic filtering behaviors for your network. These rules can include application rules, network rules, and NAT rules.
Rule Groups: Organize your rules into groups for better management and clarity. Rule groups can be specific to applications, network traffic, or NAT.
Policy Assignment: Assign the policy to the Azure Firewall instances or to a hub in a virtual WAN. The scope of the policy can be a subscription, a resource group, or an individual resource.
Multiple Policy Management: If managing multiple firewalls across different regions or subscriptions, use Azure Firewall Manager to group and manage these policies centrally.
Threat Intelligence: Integrate threat intelligence-based filtering into your policies to automatically block known malicious IP addresses and domains.
Policy Customization: Customize the Firewall Policy based on your organization’s needs. This can include creating custom network rules and application rules, configuring DNAT settings, and setting up FQDN tags.
Compliance and Auditing: Ensure that your Firewall Policies comply with your organization’s governance and compliance requirements. Use Azure Monitor to audit and monitor the policies and their effects on traffic.
For additional information on Azure Firewall Manager and how to implement its policies, you can refer to the following resources:
- Azure Firewall Manager documentation
- Azure Firewall documentation
- Azure Firewall Policy documentation
Please note that the URLs provided are for reference purposes to supplement the study guide with additional information.
Secure network connectivity to Azure resources (15–20%)
Design and implement Azure Firewall and Azure Firewall Manager
Creating a Secure Hub with Azure Firewall in Azure Virtual WAN
To establish a secure hub within Azure Virtual WAN, deploying Azure Firewall is a critical step. Azure Firewall is a managed, cloud-based network security service that protects your Azure Virtual Network resources. It’s a fully stateful firewall as a service with built-in high availability and unrestricted cloud scalability.
Deployment Steps:
Provision Azure Virtual WAN Hub: Begin by setting up an Azure Virtual WAN hub in the region of your choice. This hub acts as a central point of connectivity to your on-premises and cloud environments.
Deploy Azure Firewall: Within the Azure Virtual WAN hub, deploy Azure Firewall. This service provides a barrier between your VNet and the internet, filtering inbound and outbound traffic according to your organization’s policies.
Configure Firewall Policies: Define and apply firewall rules that govern the control of network traffic. These rules can include application rules, network rules, and NAT rules.
Integrate with Other Services: Azure Firewall can be integrated with other Azure services such as Azure Monitor for logging and analytics, and Azure Security Center for enhanced security posture management.
Test the Configuration: After deployment, it is crucial to test the configuration to ensure that the firewall is correctly filtering traffic according to the defined rules.
Additional Information:
- Azure Firewall documentation: Azure Firewall Documentation
- Azure Virtual WAN documentation: Azure Virtual WAN Documentation
- Azure Firewall Manager documentation: Azure Firewall Manager Documentation
By following these steps, you can create a secure hub in Azure Virtual WAN with Azure Firewall, ensuring that your network is protected against threats while maintaining compliance with your organization’s security policies.
Secure network connectivity to Azure resources (15–20%)
Design and implement a Web Application Firewall (WAF) deployment
Mapping Requirements to Features and Capabilities of Azure Web Application Firewall (WAF)
When considering the implementation of Azure Web Application Firewall (WAF) as part of your application security strategy, it is essential to understand how its features and capabilities align with your security requirements. Below is a detailed explanation of how Azure WAF’s features map to common security needs:
Protection Against Common Threats: Azure WAF provides protection against a wide range of common web vulnerabilities and attacks as defined by the Open Web Application Security Project (OWASP). This includes SQL injection, cross-site scripting, command injection, HTTP request smuggling, and more https://learn.microsoft.com/en-us/training/modules/configure-azure-application-gateway/4-app-gateway-components .
OWASP Core Rule Set (CRS): Azure WAF uses the OWASP CRS to detect attacks. The CRS is a set of generic rules for attack detection that is continuously updated to adapt to evolving threats. Azure WAF supports CRS 2.2.9 and the more recent CRS 3.0, with CRS 3.0 being the default rule set https://learn.microsoft.com/en-us/training/modules/configure-azure-application-gateway/4-app-gateway-components .
Customizable Rule Sets: You have the flexibility to select specific rules within a rule set to target particular threats, allowing you to tailor the firewall to your unique security requirements https://learn.microsoft.com/en-us/training/modules/configure-azure-application-gateway/4-app-gateway-components .
Request Inspection: Azure WAF allows you to customize which elements in a request to examine. This can include headers, cookies, and query strings, ensuring that the firewall focuses on the parts of the request that are most relevant to your security policies https://learn.microsoft.com/en-us/training/modules/configure-azure-application-gateway/4-app-gateway-components .
Size Limitation on Messages: To prevent your servers from being overwhelmed by massive uploads, Azure WAF enables you to limit the size of messages that can be processed https://learn.microsoft.com/en-us/training/modules/configure-azure-application-gateway/4-app-gateway-components .
Bot Protection: Azure WAF can identify and block requests from bots, crawlers, and scanners, which can be a source of threats or unwanted traffic https://learn.microsoft.com/en-us/training/modules/configure-azure-application-gateway/4-app-gateway-components .
HTTP Protocol Validation: The firewall checks for HTTP protocol violations and anomalies, ensuring that only properly formed requests are processed by your application https://learn.microsoft.com/en-us/training/modules/configure-azure-application-gateway/4-app-gateway-components .
For additional information on Azure Web Application Firewall, you can refer to the following resources: - Azure Web Application Firewall on Application Gateway Overview https://learn.microsoft.com/en-us/training/modules/configure-azure-application-gateway/6-summary-resources - Azure Application Gateway Features https://learn.microsoft.com/en-us/training/modules/configure-azure-application-gateway/6-summary-resources
By understanding these features and capabilities, you can effectively map your security requirements to the appropriate configurations of Azure WAF, ensuring robust protection for your web applications.
Secure network connectivity to Azure resources (15–20%)
Design and implement a Web Application Firewall (WAF) deployment
Designing a Web Application Firewall (WAF) Deployment for Azure Application Gateway
When designing a Web Application Firewall (WAF) deployment for Azure Application Gateway, it is essential to consider the following aspects to ensure robust security and efficient traffic management for your web applications:
1. Enable Azure Web Application Firewall
Azure Web Application Firewall can be enabled on Azure Application Gateway to scrutinize incoming requests before they reach the listener. The WAF uses a set of rules based on the Open Web Application Security Project (OWASP) to identify and mitigate common threats such as SQL injection, cross-site scripting, and more https://learn.microsoft.com/en-us/training/modules/configure-azure-application-gateway/4-app-gateway-components .
2. Choose the Rule Set
Azure WAF supports two rule sets: CRS 2.2.9 and CRS 3.0, with CRS 3.0 being the default and more recent rule set. These rule sets are continuously updated to counter evolving threats. Select the appropriate rule set for your deployment, and if necessary, customize it by choosing specific rules to address particular threats https://learn.microsoft.com/en-us/training/modules/configure-azure-application-gateway/4-app-gateway-components .
3. Customize WAF Rules
Customization options allow you to specify which elements in a request the WAF should examine. You can also set limits on the size of messages to prevent large uploads from overloading your servers. This level of customization helps in fine-tuning the WAF to the specific needs of your web applications https://learn.microsoft.com/en-us/training/modules/configure-azure-application-gateway/4-app-gateway-components .
4. Implement Application Gateway Features
Azure Application Gateway offers features such as application layer routing, round-robin load balancing, session stickiness, and support for various protocols like HTTP, HTTPS, and WebSocket. These features can be leveraged to manage internet traffic effectively and ensure that the WAF deployment aligns with the overall traffic management strategy https://learn.microsoft.com/en-us/training/modules/configure-azure-application-gateway/2-implement .
5. Configure Components
The components of Azure Application Gateway, including frontend IP addresses, back-end pools, routing rules, health probes, and listeners, should be configured to route requests efficiently to a pool of web servers. The health of these servers should be monitored to maintain high availability and performance https://learn.microsoft.com/en-us/training/modules/configure-azure-application-gateway/4-app-gateway-components .
6. Select Routing Methods
Azure Application Gateway provides several routing methods, such as multi-site and path-based routing. Choose the routing method that best suits your deployment scenario to ensure that requests are directed to the appropriate back-end resources https://learn.microsoft.com/en-us/training/modules/configure-azure-application-gateway/6-summary-resources .
7. Autoscaling and Load Balancing
Ensure that your WAF deployment can dynamically adjust its capacity based on web traffic load changes. This autoscaling capability, combined with load balancing, helps in maintaining performance during varying traffic conditions https://learn.microsoft.com/en-us/training/modules/configure-azure-application-gateway/2-implement .
Additional Resources
For more information on Azure Web Application Firewall and Azure Application Gateway, you can refer to the following resources: - Azure Web Application Firewall on Azure Application Gateway - Azure Application Gateway documentation
By carefully designing your WAF deployment with these considerations, you can enhance the security and efficiency of your web applications hosted on Azure.
Secure network connectivity to Azure resources (15–20%)
Design and implement a Web Application Firewall (WAF) deployment
Configure Detection or Prevention Mode
When configuring your Azure environment, it’s essential to understand the concepts of detection and prevention modes. These modes are part of a comprehensive security strategy to protect your resources.
Detection Mode: Detection mode is primarily about monitoring and identifying potential security threats. Azure provides various tools for this purpose:
Smart Detection with Application Insights: Utilize smart detection in Application Insights to receive automatic warnings about potential performance issues and anomalies that could indicate failures in your web applications. This proactive monitoring allows you to address issues before they escalate https://learn.microsoft.com/en-us/training/modules/configure-azure-alerts/2b-manage-azure-monitor-alerts .
Azure Monitor Alerts: Azure Monitor captures telemetry data from your resources. You can set up alerts to notify you of potential issues based on this data. Alerts can be configured for various scenarios, including metric alerts, log alerts, activity log alerts, and smart detection alerts. Managing these alerts involves monitoring their state, which can be new, acknowledged, or closed https://learn.microsoft.com/en-us/training/modules/configure-azure-alerts/6-summary-resources .
Prevention Mode: Prevention mode focuses on taking proactive steps to avoid security incidents:
Network Security Groups (NSGs): Create and configure NSGs to control access to virtual machines. NSGs allow you to define inbound and outbound security rules that enable or deny traffic to your virtual machines. By associating NSGs with your virtual machines, you can restrict access and protect your resources from unauthorized access https://learn.microsoft.com/en-us/training/modules/configure-network-security-groups/7-simulation-create-network-groups .
Application Security Groups (ASGs): Implement ASGs within your Azure virtual network to group your virtual machines logically by workload. This grouping allows you to create NSG rules that are based on ASGs, simplifying the management of security policies and improving the granularity of your security architecture https://learn.microsoft.com/en-us/training/modules/configure-network-security-groups/6-implement-asgs .
For additional information on these topics, you can refer to the following resources: - Application Insights Smart Detection - Azure Monitor Alerts - Network Security Groups - Application Security Groups
By configuring both detection and prevention modes effectively, you can enhance the security posture of your Azure environment, ensuring that your resources are well-protected against potential threats.
Design and implement core networking infrastructure (20–25%)
Design and implement name resolution
Designing Private DNS Zones
When designing private DNS zones in Azure, it is essential to understand the benefits and implementation scenarios that Azure Private DNS offers. A private DNS zone is a DNS zone within the Azure DNS service that is not resolvable from the public internet, providing an enhanced level of security and control for internal network operations.
Benefits of Azure Private DNS
- No Custom DNS Solution Required: Azure Private DNS eliminates the need for custom DNS solutions within virtual networks, simplifying DNS zone management using Azure’s native infrastructure https://learn.microsoft.com/en-us/training/modules/configure-azure-dns/7-plan-for-private-dns-zones .
- Support for Common DNS Record Types: Azure Private DNS supports a variety of DNS record types, including A, AAAA, CNAME, MX, PTR, SOA, SRV, and TXT, allowing for comprehensive DNS management https://learn.microsoft.com/en-us/training/modules/configure-azure-dns/7-plan-for-private-dns-zones .
- Automatic Hostname Record Management: Azure Private DNS automatically manages hostname records for virtual machines, optimizing domain names without the need for custom solutions or application modifications https://learn.microsoft.com/en-us/training/modules/configure-azure-dns/7-plan-for-private-dns-zones .
- Hostname Resolution Between Virtual Networks: Azure Private DNS zones can be shared across virtual networks, facilitating cross-network service discovery and simplifying scenarios like virtual network peering https://learn.microsoft.com/en-us/training/modules/configure-azure-dns/7-plan-for-private-dns-zones .
- Familiar Tools and User Experience: Azure Private DNS uses established Azure DNS tools such as PowerShell, ARM templates, and the REST API, reducing the learning curve for users https://learn.microsoft.com/en-us/training/modules/configure-azure-dns/7-plan-for-private-dns-zones .
- Split-Horizon DNS Support: With split-horizon DNS, the same DNS zone can resolve to different addresses within a virtual network and from the public internet, useful for dedicated service versions within a virtual network https://learn.microsoft.com/en-us/training/modules/configure-azure-dns/7-plan-for-private-dns-zones .
- Azure Region Support: Azure Private DNS zones are available across all Azure regions in the public cloud, ensuring wide availability https://learn.microsoft.com/en-us/training/modules/configure-azure-dns/7-plan-for-private-dns-zones .
Implementation Scenarios
- Name Resolution Across Multiple Virtual Networks: A common use case involves setting up name resolution across multiple virtual networks. One network handles registration of DNS zone records, while another handles name resolution. Both networks are linked to a common DNS zone, and Azure DNS resolves domain name queries using both networks https://learn.microsoft.com/en-us/training/modules/configure-azure-dns/8-determine-private-zone-scenarios .
- Custom Domain Names: Azure Private DNS zones allow the use of custom domain names, providing flexibility in virtual network architecture design. This enables tailored name resolution for virtual machines within and between virtual networks https://learn.microsoft.com/en-us/training/modules/configure-azure-dns/7-plan-for-private-dns-zones .
- Split-Horizon Views: Configuring DNS zone names with a split-horizon view allows a private and a public DNS zone to share the same domain name, offering different resolutions based on the network context https://learn.microsoft.com/en-us/training/modules/configure-azure-dns/7-plan-for-private-dns-zones .
For additional information on Azure Private DNS and its configuration, you can refer to the following resources:
By understanding these benefits and scenarios, you can effectively design private DNS zones that align with your organization’s needs, ensuring secure and efficient name resolution within Azure environments.
Secure network connectivity to Azure resources (15–20%)
Design and implement a Web Application Firewall (WAF) deployment
Configure Rule Sets for WAF on Azure Front Door
When configuring rule sets for the Web Application Firewall (WAF) on Azure Front Door, it is essential to understand the role of WAF in protecting your web applications from common threats. Azure WAF leverages the Open Web Application Security Project (OWASP) guidelines to identify and mitigate attacks such as SQL injection, cross-site scripting, and other vulnerabilities.
Core Rule Set (CRS)
Azure WAF uses a set of generic rules known as the Core Rule Set (CRS) to detect attacks. These rules are based on the OWASP recommendations and are continuously updated to address evolving threats. Azure WAF supports multiple versions of CRS, with CRS 3.0 being the default and more recent rule set https://learn.microsoft.com/en-us/training/modules/configure-azure-application-gateway/4-app-gateway-components .
Customization of Rules
You have the flexibility to customize the WAF by selecting specific rules within a rule set to target particular threats. This allows you to tailor the firewall’s protection to the unique requirements of your application https://learn.microsoft.com/en-us/training/modules/configure-azure-application-gateway/4-app-gateway-components .
Request Examination and Message Size Limitation
Azure WAF can be configured to examine specific elements within a request, such as headers, cookies, or query strings. Additionally, you can set limits on the size of messages to prevent large uploads from overwhelming your servers, which is a crucial aspect of maintaining application performance and stability https://learn.microsoft.com/en-us/training/modules/configure-azure-application-gateway/4-app-gateway-components .
Additional Information
For more detailed information on configuring rule sets for WAF on Azure Front Door, you can refer to the official Microsoft documentation: - Azure Web Application Firewall on Azure Front Door
Remember, the configuration of WAF rule sets is a critical step in securing your web applications and ensuring they are protected against a wide range of internet-based threats.
Please note that the URLs provided are for additional reference and should be used to gain a deeper understanding of the configuration process.
Secure network connectivity to Azure resources (15–20%)
Design and implement a Web Application Firewall (WAF) deployment
Configure Rule Sets for WAF on Application Gateway
When configuring rule sets for the Web Application Firewall (WAF) on Azure Application Gateway, it is essential to understand the role of WAF in protecting web applications. The WAF operates by evaluating incoming requests against a set of security rules before they reach the application listener. These rules are designed to identify and mitigate common web vulnerabilities and threats as defined by the Open Web Application Security Project (OWASP) https://learn.microsoft.com/en-us/training/modules/configure-azure-application-gateway/4-app-gateway-components .
Core Rule Set (CRS)
Azure WAF supports two main rule sets based on the OWASP guidelines:
- CRS 2.2.9: An older set of rules that can be used if compatibility with legacy systems is required.
- CRS 3.0: The default and more recent rule set, providing enhanced security features and threat detection capabilities https://learn.microsoft.com/en-us/training/modules/configure-azure-application-gateway/4-app-gateway-components .
Customization of Rule Sets
Administrators have the flexibility to:
- Select Specific Rules: You can choose individual rules within a rule set to target particular threats, allowing for a more tailored security approach https://learn.microsoft.com/en-us/training/modules/configure-azure-application-gateway/4-app-gateway-components .
- Customize Rules: WAF allows for the customization of rules to specify which elements in a request should be examined. This can include parameters such as headers, cookies, and query strings https://learn.microsoft.com/en-us/training/modules/configure-azure-application-gateway/4-app-gateway-components .
- Limit Message Size: To prevent denial-of-service (DoS) attacks that may overwhelm servers with massive uploads, WAF can limit the size of incoming messages https://learn.microsoft.com/en-us/training/modules/configure-azure-application-gateway/4-app-gateway-components .
Steps to Configure Rule Sets
- Enable WAF on Application Gateway: When creating or updating an Application Gateway, ensure that the WAF tier is selected.
- Choose a Rule Set: Select the desired Core Rule Set version. CRS 3.0 is recommended for most applications.
- Customize Rules: If necessary, customize the rule set by selecting specific rules or by creating custom rules that meet your application’s security requirements.
- Set Request Size Limits: Configure the maximum request body size and file upload size according to your application’s needs.
- Monitor and Log: Enable diagnostic logging for the WAF to monitor and track detected threats and rule triggers.
Additional Resources
For more detailed information on Azure Application Gateway and WAF, you can refer to the following URLs:
- Azure Application Gateway Overview: [https://learn.microsoft.com/en-us/azure/application-gateway/overview] https://learn.microsoft.com/en-us/training/modules/configure-azure-application-gateway/6-summary-resources .
- Application Gateway Components: [https://learn.microsoft.com/en-us/azure/application-gateway/application-gateway-components] https://learn.microsoft.com/en-us/training/modules/configure-azure-application-gateway/6-summary-resources .
- Application Gateway Features: [https://learn.microsoft.com/en-us/azure/application-gateway/features] https://learn.microsoft.com/en-us/training/modules/configure-azure-application-gateway/6-summary-resources .
- Azure Web Application Firewall on Application Gateway: [https://learn.microsoft.com/en-us/azure/web-application-firewall/ag/ag-overview] https://learn.microsoft.com/en-us/training/modules/configure-azure-application-gateway/6-summary-resources .
By following these guidelines and utilizing the resources provided, you can effectively configure rule sets for WAF on Azure Application Gateway to enhance the security of your web applications.
Secure network connectivity to Azure resources (15–20%)
Design and implement a Web Application Firewall (WAF) deployment
Implementing a Web Application Firewall (WAF) Policy
When implementing a Web Application Firewall (WAF) policy, it is essential to understand that a WAF is designed to protect web applications from various security threats and vulnerabilities. A WAF policy consists of a set of rules that define the conditions under which incoming traffic is inspected and potentially blocked.
Here is a step-by-step guide to implementing a WAF policy:
Choose the WAF Deployment Model: Determine whether the WAF will be deployed in a centralized or decentralized manner, and whether it will be on-premises or cloud-based.
Select the WAF Provider: Choose a WAF provider that meets your security requirements and is compatible with your infrastructure. Azure offers native WAF services that can be integrated with Azure Application Gateway and Azure Front Door Service.
Define Policy Rules: Create rules that specify the conditions for blocking or allowing traffic. These rules can be based on various criteria, such as IP addresses, HTTP headers, and request methods.
Configure Rule Sets: Use predefined rule sets, such as OWASP Top 10, to protect against common web vulnerabilities. Custom rule sets can also be created to address specific security concerns.
Set the Policy Scope: Determine which web applications or resources the WAF policy will apply to. In Azure, this can be done by assigning the policy to specific resource groups or subscriptions .
Test the Policy: Before enforcing the policy, test it to ensure that legitimate traffic is not inadvertently blocked. This can be done in a staging environment or by using a monitoring mode that logs traffic without blocking it.
Monitor and Update: Continuously monitor the WAF policy’s effectiveness and update the rules as needed to adapt to evolving security threats.
For additional information on implementing a WAF policy in Azure, you can refer to the following resources:
- Azure Application Gateway WAF documentation: Azure Application Gateway WAF
- Azure Front Door WAF documentation: Azure Front Door WAF
Remember to review the specific JSON format required by Azure when creating or importing policy definitions https://learn.microsoft.com/en-us/training/modules/configure-azure-policy/5-create-policy-definitions . You can also find policy definitions and samples on GitHub, which are updated regularly https://learn.microsoft.com/en-us/training/modules/configure-azure-policy/5-create-policy-definitions .
By following these steps and utilizing the provided resources, you can effectively implement a WAF policy to enhance the security of your web applications.
Secure network connectivity to Azure resources (15–20%)
Design and implement a Web Application Firewall (WAF) deployment
Associate a Web Application Firewall (WAF) Policy with Azure Application Gateway
When configuring Azure Application Gateway, it is crucial to ensure the security of your web applications. One of the ways to enhance security is by associating a Web Application Firewall (WAF) policy with the Application Gateway. The WAF operates as a protective barrier for your web applications by inspecting incoming web requests and filtering out malicious traffic.
Steps to Associate a WAF Policy:
Enable Azure Web Application Firewall: The first step is to enable Azure WAF on the Application Gateway. Azure WAF checks each request against a set of security rules known as the Open Web Application Security Project (OWASP) Core Rule Set (CRS) https://learn.microsoft.com/en-us/training/modules/configure-azure-application-gateway/4-app-gateway-components .
Select the Rule Set: Azure WAF supports multiple versions of the OWASP CRS. The default and more recent rule set is CRS 3.0, which includes generic rules for detecting a wide range of attacks. You can also choose CRS 2.2.9 if required https://learn.microsoft.com/en-us/training/modules/configure-azure-application-gateway/4-app-gateway-components .
Customize Rules: Depending on your specific security needs, you can customize the WAF policy by selecting only certain rules within the rule set. This allows you to target specific threats and tailor the firewall to your application’s requirements https://learn.microsoft.com/en-us/training/modules/configure-azure-application-gateway/4-app-gateway-components .
Specify Request Elements: Customize the WAF policy further by specifying which elements in a request should be examined. This includes headers, cookies, and query strings, among others https://learn.microsoft.com/en-us/training/modules/configure-azure-application-gateway/4-app-gateway-components .
Set Message Size Limits: To prevent your servers from being overwhelmed by large uploads, you can limit the size of messages that the WAF will accept https://learn.microsoft.com/en-us/training/modules/configure-azure-application-gateway/4-app-gateway-components .
Associate the WAF Policy: Once the WAF policy is configured, associate it with the Application Gateway. This is done by selecting the Application Gateway as the scope for the WAF policy.
Additional Information:
For more detailed guidance on configuring and associating a WAF policy with Azure Application Gateway, you can refer to the official Microsoft documentation:
By following these steps and utilizing the resources provided, you can effectively associate a WAF policy with Azure Application Gateway to protect your web applications from a variety of security threats.
Secure network connectivity to Azure resources (15–20%)
Design and implement a Web Application Firewall (WAF) deployment
Associate a Web Application Firewall (WAF) Policy
When managing internet traffic to your web applications, it is crucial to ensure their security. One of the ways to enhance security is by associating a Web Application Firewall (WAF) policy with your application gateway. A WAF policy helps protect your web applications from common web vulnerabilities and attacks by enforcing a set of rules that inspect incoming traffic.
Steps to Associate a WAF Policy:
Enable Azure Web Application Firewall: The first step is to enable Azure WAF for Azure Application Gateway. Azure WAF uses the Open Web Application Security Project (OWASP) rules to check each request for potential threats, such as SQL injection, cross-site scripting, and other common threats https://learn.microsoft.com/en-us/training/modules/configure-azure-application-gateway/4-app-gateway-components .
Select Rule Set: Azure WAF supports two rule sets: CRS 2.2.9 and CRS 3.0, with CRS 3.0 being the default and more recent rule set. These rule sets are continuously reviewed and updated to protect against evolving attacks https://learn.microsoft.com/en-us/training/modules/configure-azure-application-gateway/4-app-gateway-components .
Customize Rules: You can customize the WAF policy by selecting specific rules within a rule set to target particular threats. This allows you to tailor the firewall to your application’s specific needs https://learn.microsoft.com/en-us/training/modules/configure-azure-application-gateway/4-app-gateway-components .
Specify Request Elements: Customize the firewall to specify which elements in a request to examine. This can include URLs, query strings, headers, cookies, and more https://learn.microsoft.com/en-us/training/modules/configure-azure-application-gateway/4-app-gateway-components .
Limit Message Size: To prevent your servers from being overwhelmed by large uploads, you can limit the size of messages that the firewall will accept https://learn.microsoft.com/en-us/training/modules/configure-azure-application-gateway/4-app-gateway-components .
Associate the Policy: Once the WAF policy is configured, you can associate it with your application gateway. This is done by linking the policy to the application gateway so that all incoming traffic is inspected according to the rules defined in the policy.
Benefits of Using Azure Application Gateway with WAF:
- Application Layer Routing: Direct traffic to a back-end pool of servers based on the URL of a request https://learn.microsoft.com/en-us/training/modules/configure-azure-application-gateway/2-implement .
- Round-Robin Load Balancing: Distribute incoming traffic across multiple servers to balance server load effectively https://learn.microsoft.com/en-us/training/modules/configure-azure-application-gateway/2-implement .
- Session Stickiness: Ensure that client requests in the same session are routed to the same back-end server https://learn.microsoft.com/en-us/training/modules/configure-azure-application-gateway/2-implement .
- Supported Protocols: Build an application gateway to support HTTP, HTTPS, HTTP/2, or WebSocket protocols https://learn.microsoft.com/en-us/training/modules/configure-azure-application-gateway/2-implement .
- Firewall Protection: Implement a WAF to protect against web application vulnerabilities https://learn.microsoft.com/en-us/training/modules/configure-azure-application-gateway/2-implement .
- Encryption: Support end-to-end request encryption for your web applications https://learn.microsoft.com/en-us/training/modules/configure-azure-application-gateway/2-implement .
- Load Autoscaling: Dynamically adjust capacity as web traffic load changes https://learn.microsoft.com/en-us/training/modules/configure-azure-application-gateway/2-implement .
For additional information on Azure Web Application Firewall and how to associate a WAF policy, you can refer to the following URL: Azure Web Application Firewall Documentation.
Please note that the above steps and benefits are based on the capabilities of Azure Application Gateway and Azure Web Application Firewall as described in the provided documents. Always refer to the latest Azure documentation for the most current information and procedures.
Design and implement core networking infrastructure (20–25%)
Design and implement name resolution
Configure a Public or Private DNS Zone
When configuring DNS zones in Azure, you have the option to set up either public or private zones depending on your needs. Below is a detailed explanation of how to configure both types of DNS zones.
Private DNS Zone
A private DNS zone in Azure allows you to use your own custom domain names, which can be tailored to best suit your organization’s needs. This provides name resolution for virtual machines within your virtual network and across multiple virtual networks. Here are the steps and considerations for setting up a private DNS zone:
Create the DNS Zone: You can create a private DNS zone using the Azure portal or Azure CLI. In the portal, you specify the DNS zone name, resource group, and associated subscription.
Split-Horizon View: Configure DNS zone names with a split-horizon view to allow a private and a public DNS zone to share the same domain name, providing different answers from within a virtual network and from the public internet.
Automatic Record Management: Azure Private DNS automatically maintains hostname records for virtual machines in the specified virtual networks, optimizing domain names without the need for custom DNS solutions.
Cross-Network Resolution: Private DNS zones can be shared between virtual networks, simplifying cross-network and service-discovery scenarios, such as virtual network peering.
Familiar Tools: Azure Private DNS uses established Azure DNS tools, including PowerShell, ARM templates, and the REST API, to reduce the learning curve.
Azure Region Support: Azure Private DNS zones are available in all Azure regions in the Azure public cloud https://learn.microsoft.com/en-us/training/modules/configure-azure-dns/7-plan-for-private-dns-zones .
Public DNS Zone
For a public DNS zone, the process involves registering a domain with a domain registrar and then configuring it to use Azure DNS. Here are the key points to consider:
Domain Registration: Register the root/parent domain at a domain registrar and point it to Azure DNS.
DNS Zone Creation: Add a DNS zone in the Azure portal, specifying the DNS zone name, resource group, zone location, and DNS name servers.
Unique Zone Names: Within a resource group, the name of a DNS zone must be unique. Multiple DNS zones can have the same name if they exist in different resource groups or Azure subscriptions.
DNS Records: Azure DNS supports common DNS record types, including A, AAAA, CNAME, MX, PTR, SOA, SRV, and TXT.
Name Server Assignment: When multiple DNS zones share the same name, each DNS zone instance is assigned to a different DNS name server address https://learn.microsoft.com/en-us/training/modules/configure-azure-dns/4-create-zones .
For additional information on configuring Azure DNS, you can refer to the following resources:
Please note that the URLs provided are for reference purposes to supplement the study guide and offer additional information on the topic.
Design and implement core networking infrastructure (20–25%)
Design and implement name resolution
Linking a Private DNS Zone to a Virtual Network (VNet)
When configuring Azure Private DNS, one of the key tasks is to link a private DNS zone to a Virtual Network (VNet). This linkage is crucial for enabling name resolution within the VNet using the private DNS zone. Here’s a step-by-step explanation of how to link a private DNS zone to a VNet:
Create a Private DNS Zone: Begin by creating a private DNS zone with your custom domain name. This zone will be used to host the DNS records for your domain within Azure.
Designate VNets for Registration and Resolution: Decide which VNets will be used for registration of DNS records and which will be used for name resolution. For instance, you might have one VNet dedicated to registering resources with the DNS zone and another VNet that primarily performs name resolution.
Link the VNet to the DNS Zone: Once you have your VNets and private DNS zone ready, you need to link the VNet to the DNS zone. This is done by creating a virtual network link to the DNS zone. During this process, you can enable auto-registration if you want Azure to automatically register VMs from the VNet into the DNS zone.
Configure DNS Settings in the VNet: Adjust the DNS settings of the VNet to use the private DNS zone. This ensures that DNS queries from resources within the VNet are resolved using the private DNS zone.
Verify Name Resolution: After linking the VNet to the DNS zone, test the name resolution to ensure that resources within the VNet can resolve names using the private DNS zone. You can do this by querying the DNS records from a VM within the VNet.
Manage DNS Records: Manage your DNS records within the private DNS zone as needed. Azure Private DNS supports common DNS record types such as A, AAAA, CNAME, MX, PTR, SOA, SRV, and TXT.
Reverse DNS Queries: Be aware that reverse DNS queries are scoped to the same VNet. This means that a reverse DNS (PTR) query from a VM in one VNet for a VM in another linked VNet will receive an NXDOMAIN response, indicating that the domain does not exist.
For additional information on configuring Azure DNS and linking a private DNS zone to a VNet, you can refer to the following resources:
By following these steps and utilizing the resources provided, you can effectively link a private DNS zone to a VNet within Azure, enabling efficient and secure name resolution for your virtual network resources.
Design and implement core networking infrastructure (20–25%)
Design and implement name resolution
Design and Implement Azure DNS Private Resolver
Azure DNS Private Resolver is a feature that enables seamless name resolution across different virtual networks within Azure. It is particularly useful when you have multiple virtual networks that need to resolve names amongst each other or when you want to resolve names between your on-premises environment and Azure. Here’s a detailed explanation of how to design and implement Azure DNS Private Resolver:
Designing Azure DNS Private Resolver
Identify Virtual Networks: Determine the virtual networks that require name resolution services. You will need at least two virtual networks: one for registration and one for resolution https://learn.microsoft.com/en-us/training/modules/configure-azure-dns/8-determine-private-zone-scenarios .
Common DNS Zone: Designate a common DNS zone that will be shared across the virtual networks. For example,
contoso.labcould be the DNS zone used by both networks https://learn.microsoft.com/en-us/training/modules/configure-azure-dns/8-determine-private-zone-scenarios .Link Virtual Networks: Link the resolution and registration virtual networks to the common DNS zone. This ensures that both networks can use the Azure Private DNS for resolving domain names https://learn.microsoft.com/en-us/training/modules/configure-azure-dns/8-determine-private-zone-scenarios .
Automatic and Manual Record Creation: Decide which virtual network will have automatic DNS record creation for its virtual machines. Typically, the registration network will have this feature enabled. For the resolution network, you may need to create DNS zone records manually https://learn.microsoft.com/en-us/training/modules/configure-azure-dns/8-determine-private-zone-scenarios .
Reverse DNS Queries: Plan for reverse DNS queries, which are scoped to the same virtual network. This means that a reverse DNS query from a virtual machine in the resolution network for a virtual machine in the registration network will not return a domain name but an
NXDOMAINerror https://learn.microsoft.com/en-us/training/modules/configure-azure-dns/8-determine-private-zone-scenarios .
Implementing Azure DNS Private Resolver
Create Private DNS Zones: Start by creating a private DNS zone in Azure using your custom domain name. This zone will be used for name resolution within and between virtual networks https://learn.microsoft.com/en-us/training/modules/configure-azure-dns/7-plan-for-private-dns-zones .
Configure Virtual Networks: Configure the virtual networks to use the Azure Private DNS zones. Assign one network for registration, where DNS records are automatically created, and another for resolution https://learn.microsoft.com/en-us/training/modules/configure-azure-dns/8-determine-private-zone-scenarios .
Set Up DNS Records: For the resolution network, set up the necessary DNS records manually. This includes A, AAAA, CNAME, MX, PTR, SOA, SRV, and TXT records as needed https://learn.microsoft.com/en-us/training/modules/configure-azure-dns/7-plan-for-private-dns-zones .
Test Name Resolution: After setting up the DNS records, test name resolution to ensure that virtual machines in both networks can resolve names correctly. This includes testing both forward and reverse DNS lookups https://learn.microsoft.com/en-us/training/modules/configure-azure-dns/8-determine-private-zone-scenarios .
Implement Split-Horizon DNS: If required, implement a split-horizon DNS view to provide different DNS responses based on whether the query originates from within a virtual network or from the public internet https://learn.microsoft.com/en-us/training/modules/configure-azure-dns/7-plan-for-private-dns-zones .
Use Familiar Tools: Utilize Azure DNS tools such as PowerShell, Azure Resource Manager (ARM) templates, and the REST API for managing the DNS settings. These tools provide a familiar user experience for those accustomed to Azure services https://learn.microsoft.com/en-us/training/modules/configure-azure-dns/7-plan-for-private-dns-zones .
For additional information on Azure DNS Private Resolver and its implementation, you can refer to the following resources:
- Azure Private DNS documentation: Azure Private DNS documentation
- Azure DNS Private Zones: Azure DNS Private Zones
By following these design and implementation steps, you can effectively set up Azure DNS Private Resolver for your organization’s Azure environment, ensuring efficient and secure name resolution across your virtual networks.
Design and implement core networking infrastructure (20–25%)
Design and implement VNet connectivity and routing
Designing Service Chaining Including Gateway Transit
Service chaining and gateway transit are important concepts in Azure networking that allow for efficient routing and connectivity between different virtual networks and services. When designing a service chaining solution with gateway transit, several key components and configurations must be considered.
Hub-and-Spoke Network Topology
In a hub-and-spoke network topology, the hub is a central point of connectivity to multiple spoke virtual networks. The hub can host shared services such as Azure VPN Gateway or Network Virtual Appliances (NVAs). Spoke virtual networks connect to the hub and can use these shared services for outbound connectivity or for reaching other spokes https://learn.microsoft.com/en-us/training/modules/configure-vnet-peering/5-determine-service-chaining-uses .
Gateway Transit
Gateway transit is a feature that enables one virtual network to use the VPN gateway in a peered virtual network for cross-premises connectivity. This means that only one virtual network needs to host the VPN gateway, and other peered virtual networks can use this gateway to connect to on-premises networks, other virtual networks, or even to remote clients via point-to-site VPN https://learn.microsoft.com/en-us/training/modules/configure-vnet-peering/3-determine-gateway-transit-connectivity .
User-Defined Routes (UDR)
User-defined routes are essential for service chaining. They allow you to direct network traffic from one virtual network to an NVA or a VPN gateway in another virtual network. By defining UDRs, you can control the flow of traffic and ensure that it is inspected or processed by the necessary services before reaching its destination https://learn.microsoft.com/en-us/training/modules/configure-vnet-peering/5-determine-service-chaining-uses .
Network Security Groups (NSGs)
NSGs can be used to control access between peered virtual networks. When configuring virtual network peering, you can set up NSG rules to allow or block traffic between the virtual networks. This helps in maintaining a secure environment where only authorized traffic is allowed https://learn.microsoft.com/en-us/training/modules/configure-vnet-peering/8-summary-resources .
Implementation Steps
- Create a Hub-and-Spoke Network: Deploy a hub virtual network and multiple spoke virtual networks. Peer the spoke virtual networks with the hub https://learn.microsoft.com/en-us/training/modules/configure-vnet-peering/5-determine-service-chaining-uses .
- Deploy Shared Services: In the hub virtual network, deploy services like Azure VPN Gateway or NVAs that will be used by the spoke virtual networks https://learn.microsoft.com/en-us/training/modules/configure-vnet-peering/5-determine-service-chaining-uses .
- Enable Gateway Transit: Configure the peering settings to allow gateway transit from the spoke virtual networks to the hub’s VPN gateway https://learn.microsoft.com/en-us/training/modules/configure-vnet-peering/3-determine-gateway-transit-connectivity .
- Configure User-Defined Routes: Define UDRs to direct traffic from the spoke virtual networks to the services in the hub virtual network https://learn.microsoft.com/en-us/training/modules/configure-vnet-peering/5-determine-service-chaining-uses .
- Apply NSGs: Set up NSGs to manage access and ensure security between the peered virtual networks https://learn.microsoft.com/en-us/training/modules/configure-vnet-peering/8-summary-resources .
Additional Resources
For more information on configuring virtual network peering and gateway transit, you can refer to the following resources:
- Azure Virtual Network Peering: Azure Virtual Network peering documentation
- Azure VPN Gateway: Azure VPN Gateway documentation
- User-Defined Routes and NSGs: User-defined routes and network security groups documentation
By following these guidelines, you can design a service chaining solution that leverages gateway transit for efficient and secure connectivity across your Azure virtual network environment.
Design and implement core networking infrastructure (20–25%)
Design and implement VNet connectivity and routing
Designing Virtual Private Network (VPN) Connectivity Between VNets
When designing VPN connectivity between Azure Virtual Networks (VNets), it is essential to understand the various components and configurations that enable secure and efficient network communication. Below is a detailed explanation of the key considerations and steps involved in designing VPN connectivity between VNets.
Azure Virtual Network Peering
Azure Virtual Network peering allows for the connection of virtual networks in a hub and spoke topology. This enables seamless connectivity between VNets, either within the same Azure region (regional peering) or across different Azure regions (global peering) https://learn.microsoft.com/en-us/training/modules/configure-vnet-peering/8-summary-resources .
- Regional Peering: Connects VNets within the same Azure region.
- Global Peering: Connects VNets across different Azure regions.
Network traffic between peered VNets remains private and is kept on the Azure backbone network, ensuring high security and performance https://learn.microsoft.com/en-us/training/modules/configure-vnet-peering/8-summary-resources .
Azure VPN Gateway
The Azure VPN Gateway acts as a transit point for network traffic between peered VNets and can be configured to allow access to resources in another network. Each VNet can have only one VPN gateway, and gateway transit is supported for both regional and global peering https://learn.microsoft.com/en-us/training/modules/configure-vnet-peering/3-determine-gateway-transit-connectivity .
- Gateway Transit: Allows peered VNets to use a
shared VPN gateway to access resources outside the peering, such as:
- Site-to-site VPN connections to on-premises networks.
- VNet-to-VNet connections to other virtual networks.
- Point-to-site VPN connections to individual clients https://learn.microsoft.com/en-us/training/modules/configure-vnet-peering/3-determine-gateway-transit-connectivity .
By implementing gateway transit, you can avoid deploying a VPN gateway in each peered VNet, which can reduce complexity and cost https://learn.microsoft.com/en-us/training/modules/configure-vnet-peering/3-determine-gateway-transit-connectivity .
Network Security Groups (NSGs)
Network Security Groups can be applied to VNets to control access between them. When configuring VNet peering, you can define NSG rules to block or allow specific traffic between the VNets https://learn.microsoft.com/en-us/training/modules/configure-vnet-peering/8-summary-resources https://learn.microsoft.com/en-us/training/modules/configure-vnet-peering/3-determine-gateway-transit-connectivity .
Implementation Steps
- Create the Infrastructure: Deploy virtual machines in different regions and VNets using a template or Azure PowerShell https://learn.microsoft.com/en-us/training/modules/configure-vnet-peering/6-simulation-peering .
- Configure VNet Peering: Establish local peering for VNets in the same region and global peering for VNets in different regions https://learn.microsoft.com/en-us/training/modules/configure-vnet-peering/6-simulation-peering .
- Test Connectivity: Verify intersite connectivity by testing connections between virtual machines across the peered VNets https://learn.microsoft.com/en-us/training/modules/configure-vnet-peering/6-simulation-peering .
Additional Resources
For more information on designing and implementing Azure networking infrastructure, including virtual networks and VNet peering, the following resources may be helpful:
- Introduction to Azure Virtual Networks
- Distribute your services across Azure Virtual Networks and integrate them by using Azure Virtual Network peering (sandbox)
- Lab template for deploying VNets and VMs
By following these guidelines and utilizing the provided resources, you can effectively design VPN connectivity between Azure VNets to meet your networking requirements.
Design and implement core networking infrastructure (20–25%)
Design and implement VNet connectivity and routing
Implementing VNet Peering
Virtual Network (VNet) peering in Azure is a networking feature that allows you to connect two VNets seamlessly. When VNets are peered, they appear as one for connectivity purposes, enabling virtual machines in the peered VNets to communicate with each other directly with the same latency and bandwidth as if they were in the same VNet https://learn.microsoft.com/en-us/training/modules/configure-vnet-peering/8-summary-resources .
Prerequisites for VNet Peering
Before creating a VNet peering, certain prerequisites must be met:
- Your Azure account must have the
Network ContributororClassic Network Contributorrole, or a custom role with the necessary permissions for peering actions https://learn.microsoft.com/en-us/training/modules/configure-vnet-peering/4-create . - You need to have at least two VNets to establish a peering. One is considered the local network, and the other is the remote network https://learn.microsoft.com/en-us/training/modules/configure-vnet-peering/4-create .
Steps to Implement VNet Peering
- Create the Peering: In the Azure portal, navigate to the ‘Virtual networks’ section, select one of the VNets you want to peer, and then go to the ‘Peerings’ settings to add a new peering.
- Configure the Peering Settings: Specify the name of the peering from the local VNet to the remote VNet and vice versa. You will also need to select the remote VNet you want to peer with.
- Establish the Peering: Once the settings are configured, create the peering. This will need to be done from both VNets to establish a bi-directional peering.
Types of VNet Peering
- Regional Peering: Connects VNets within the same Azure region https://learn.microsoft.com/en-us/training/modules/configure-vnet-peering/8-summary-resources .
- Global Peering: Connects VNets across different Azure regions https://learn.microsoft.com/en-us/training/modules/configure-vnet-peering/8-summary-resources .
Key Features of VNet Peering
- Traffic Privacy: Network traffic between peered VNets is private and remains on the Azure backbone network, ensuring high security and performance https://learn.microsoft.com/en-us/training/modules/configure-vnet-peering/8-summary-resources .
- Transit Connectivity: You can configure Azure VPN Gateway in a peered VNet as a transit point to access resources in another network https://learn.microsoft.com/en-us/training/modules/configure-vnet-peering/3-determine-gateway-transit-connectivity https://learn.microsoft.com/en-us/training/modules/configure-vnet-peering/8-summary-resources .
- Gateway Transit: Allows peered VNets to use a common VPN gateway without the need for each VNet to have its own gateway, which can be cost-effective and simplify network architecture https://learn.microsoft.com/en-us/training/modules/configure-vnet-peering/3-determine-gateway-transit-connectivity .
- Network Security Groups (NSGs): NSGs can be applied to control access between the peered VNets, allowing or blocking traffic as per the configured rules https://learn.microsoft.com/en-us/training/modules/configure-vnet-peering/3-determine-gateway-transit-connectivity .
Additional Resources
For more detailed guidance on implementing VNet peering, you can refer to the following resources: - Introduction to Azure Virtual Networks - Distribute your services across Azure Virtual Networks and integrate them by using Azure Virtual Network peering (sandbox) - Permissions required for VNet peering - How to connect virtual networks across Azure regions with Azure Global VNet peering
By understanding and implementing VNet peering, you can design a network topology that is both scalable and secure, while optimizing for performance and cost.
Design and implement core networking infrastructure (20–25%)
Design and implement VNet connectivity and routing
Implement and Manage Virtual Networks Using Azure Virtual Network Manager
Azure Virtual Network Manager is a tool that allows for the centralized management of virtual networks. When implementing and managing virtual networks, it is essential to understand the concept of Azure Virtual Network peering, which enables the connection of virtual networks in a hub and spoke topology. This connection can be regional, linking virtual networks within the same region, or global, connecting virtual networks across different regions. The traffic between these peered virtual networks remains private and is routed through the Azure backbone network https://learn.microsoft.com/en-us/training/modules/configure-vnet-peering/8-summary-resources .
Design and Implement User-Defined Routes (UDRs)
User-defined routes (UDRs) are a critical feature within Azure networking that provide custom routing for network traffic. UDRs allow you to control the flow of network traffic by specifying the next hop in the traffic’s path. The next hop can be a virtual network gateway, a virtual network, the internet, or a network virtual appliance (NVA) https://learn.microsoft.com/en-us/training/modules/configure-network-routing-endpoints/3-identify-user-defined-routes .
When designing UDRs, it is important to consider the following characteristics:
- UDRs define the next hop for traffic flow, overriding Azure’s default system routes when necessary https://learn.microsoft.com/en-us/training/modules/configure-network-routing-endpoints/3-identify-user-defined-routes .
- Each route table containing UDRs can be associated with multiple subnets, but each subnet can only be associated with one route table https://learn.microsoft.com/en-us/training/modules/configure-network-routing-endpoints/3-identify-user-defined-routes .
- There are no additional charges for creating route tables in Azure https://learn.microsoft.com/en-us/training/modules/configure-network-routing-endpoints/3-identify-user-defined-routes .
To implement UDRs, you can use tools such as PowerShell, the Azure CLI, or the Azure portal. The Azure portal provides a user-friendly interface for creating and managing UDRs for virtual networks deployed through Azure Resource Manager https://learn.microsoft.com/en-us/training/modules/configure-vnet-peering/4-create .
Extending Peering Capabilities
In addition to basic peering, there are ways to extend the capabilities of your virtual network peering:
- Hub and Spoke Networks: Deploy a hub-and-spoke network where the hub virtual network hosts infrastructure components like NVAs or Azure VPN gateways. Spoke virtual networks can peer with the hub, allowing traffic to flow through the hub’s NVAs or VPN gateways https://learn.microsoft.com/en-us/training/modules/configure-vnet-peering/5-determine-service-chaining-uses .
- User-Defined Routes (UDR): UDRs can be used in conjunction with virtual network peering to direct the next hop in a route to a virtual machine’s IP address in the peered virtual network or to a VPN gateway https://learn.microsoft.com/en-us/training/modules/configure-vnet-peering/5-determine-service-chaining-uses .
- Service Chaining: This involves defining UDRs that direct traffic from one virtual network to an NVA or VPN gateway in another virtual network https://learn.microsoft.com/en-us/training/modules/configure-vnet-peering/5-determine-service-chaining-uses .
By implementing these mechanisms, you can create a multi-level hub and spoke architecture, which can help overcome the limit on the number of virtual network peerings per virtual network https://learn.microsoft.com/en-us/training/modules/configure-vnet-peering/5-determine-service-chaining-uses .
For additional information on Azure Virtual Network peering and user-defined routes, you can refer to the following URLs: - Azure Virtual Network peering: Azure Virtual Network peering documentation - User-defined routes and next hop: User-defined routes and next hop documentation
Please note that the URLs provided are for reference purposes to supplement the study guide material.
Design and implement core networking infrastructure (20–25%)
Design and implement VNet connectivity and routing
To associate a route table with a subnet in Azure, you need to understand the role of route tables and how they interact with subnets. A route table contains a set of rules, known as routes, that determine how packets should be directed within a virtual network. These routes are essential for controlling the flow of network traffic, ensuring that data packets reach their intended destinations efficiently.
Here’s a step-by-step explanation of how to associate a route table with a subnet:
Create a Route Table: Before associating a route table with a subnet, you must have a route table created. In Azure, there are no charges for creating route tables https://learn.microsoft.com/en-us/training/modules/configure-network-routing-endpoints/3-identify-user-defined-routes .
Define Routes: Within the route table, define the routes that specify the next hop for the traffic flow. The next hop can be a virtual network gateway, virtual network, internet, or a network virtual appliance (NVA) https://learn.microsoft.com/en-us/training/modules/configure-network-routing-endpoints/3-identify-user-defined-routes .
Select the Subnet: Choose the subnet within your virtual network that you want to associate with the route table. Remember that each subnet can only be associated with one route table https://learn.microsoft.com/en-us/training/modules/configure-network-routing-endpoints/3-identify-user-defined-routes .
Associate the Route Table: In the Azure portal, navigate to the route table you created and select ‘Subnets’ from the settings. Then, click on ‘Associate’ and choose the virtual network and subnet you wish to associate with the route table https://learn.microsoft.com/en-us/training/modules/configure-network-routing-endpoints/2-review-system-routes .
Verify the Association: After associating the route table with the subnet, verify that the association is correct. You can use the Azure Network Watcher’s Topology feature to visualize the network resources and confirm that the route table is correctly associated with the intended subnet https://learn.microsoft.com/en-us/training/modules/configure-network-watcher/5-visualize-network-topology .
By following these steps, you can successfully associate a route table with a subnet in Azure, which is a crucial task for managing and controlling the flow of network traffic within your virtual network.
For additional information and guidance, you can refer to the Azure documentation on route tables and subnets: - Azure Route Tables - Associate a Route Table to a Subnet
Please note that the URLs provided are for reference purposes to supplement the study guide with additional resources.
Design and implement core networking infrastructure (20–25%)
Design and implement VNet connectivity and routing
Configure Forced Tunneling
Forced tunneling is a method used to direct internet-bound traffic from your Azure virtual network to an on-premises location or network virtual appliance before it reaches the internet. This is particularly useful for scenarios where you need to inspect or audit outbound traffic for compliance and security purposes. Here’s a detailed explanation of how to configure forced tunneling:
Create User-Defined Routes (UDRs): You need to set up UDRs that specify the next hop for the traffic leaving your virtual network. By setting the next hop to a virtual appliance or on-premises gateway, you can ensure that all internet-bound traffic is redirected as required.
Modify Virtual Network Gateway Configuration: If you’re using a virtual network gateway, you must configure it to support forced tunneling. This involves setting the appropriate route-based or policy-based configurations that align with your network’s routing requirements.
Implement Service Endpoints: Azure service endpoints can be used in conjunction with forced tunneling to optimize routing for Azure service traffic. Service endpoints allow Azure service traffic to stay on the Azure backbone network, bypassing the forced tunneling routes, which ensures that service traffic is not impacted by the redirection of internet traffic.
Monitor and Audit Traffic: After configuring forced tunneling, it’s important to continuously monitor and audit the traffic to ensure that it is flowing as expected and that the security and compliance requirements are being met.
For additional information on configuring forced tunneling and understanding user-defined routes, you can refer to the following resources:
- User-defined routes and forced-tunneling https://learn.microsoft.com/en-us/training/modules/configure-network-routing-endpoints/4-determine-service-endpoint-uses .
Remember to test your configuration thoroughly to ensure that all traffic is being routed correctly and that there are no unintended consequences to your network’s performance or accessibility.
By following these steps and utilizing the provided resources, you can effectively configure forced tunneling within your Azure environment to meet your organization’s specific network traffic control requirements.
Design and implement core networking infrastructure (20–25%)
Design and implement VNet connectivity and routing
Diagnose and Resolve Routing Issues
When diagnosing and resolving routing issues within an Azure virtual network, it is essential to understand the tools and features available to identify and address problems effectively. Azure provides several mechanisms to manage and troubleshoot network traffic routes, ensuring that your network operates smoothly.
Next Hop Feature
The Next Hop feature is a critical tool for diagnosing routing issues. It helps in identifying the next connection point in the network traffic route, which can be used to pinpoint unresponsive virtual machines or broken routes. By examining the specific source and destination IP addresses, Next Hop tests the communication and reports the type of next hop in the traffic route. This information is vital for troubleshooting as it allows you to remove, change, or add routes to resolve any identified issues https://learn.microsoft.com/en-us/training/modules/configure-network-watcher/4-review-next-hop-diagnostics .
Azure Network Watcher
Azure Network Watcher is a suite of tools designed for monitoring, diagnosing, and gaining insights into network performance and health. It includes several features that are particularly useful for diagnosing and resolving routing issues:
- IP Flow Verify: This feature allows you to test if a security rule is blocking traffic to or from a virtual machine, which can be crucial in diagnosing connectivity issues https://learn.microsoft.com/en-us/training/modules/configure-network-watcher/2-describe-features .
- Next Hop: As mentioned earlier, this tool helps you determine the next hop in your network route and confirm that traffic reaches the intended target destination https://learn.microsoft.com/en-us/training/modules/configure-network-watcher/2-describe-features .
- VPN Troubleshoot: This tool is used to diagnose and troubleshoot virtual network gateways or connections, providing valuable data such as connection statistics and security errors https://learn.microsoft.com/en-us/training/modules/configure-network-watcher/2-describe-features .
- NSG Diagnostics: Network security group (NSG) diagnostics use flow logs to track IP traffic, helping to ensure compliance with security regulations and auditing requirements https://learn.microsoft.com/en-us/training/modules/configure-network-watcher/2-describe-features .
- Connection Troubleshoot: This recent addition to Network Watcher allows you to check a direct TCP or ICMP connection from a source to a target within Azure, which is useful for troubleshooting network performance and connectivity issues https://learn.microsoft.com/en-us/training/modules/configure-network-watcher/2-describe-features .
For detailed guidance on using these tools, the following resources are available:
- Azure Network Watcher documentation: [https://learn.microsoft.com/en-us/azure/network-watcher/] https://learn.microsoft.com/en-us/training/modules/configure-network-watcher/7-summary-resources
- Tutorial on diagnosing a VM network routing problem: [https://learn.microsoft.com/en-us/azure/network-watcher/diagnose-vm-network-routing-problem] https://learn.microsoft.com/en-us/training/modules/configure-network-watcher/7-summary-resources
- Tutorial on diagnosing communication problems between virtual networks: [https://learn.microsoft.com/en-us/azure/network-watcher/diagnose-communication-problem-between-networks] https://learn.microsoft.com/en-us/training/modules/configure-network-watcher/7-summary-resources
Azure Private Link
Azure Private Link is another feature that affects network routing. It ensures that traffic between Azure services and your virtual network remains on the Microsoft global network, avoiding exposure to the public internet. This feature can impact routing configurations as it allows you to bring services into your private virtual network through private endpoints, which can be crucial for maintaining secure and private connectivity https://learn.microsoft.com/en-us/training/modules/configure-network-routing-endpoints/6-identify-private-link-uses .
By leveraging these tools and features, you can effectively diagnose and resolve routing issues within your Azure environment, ensuring optimal network performance and security.
Please note that to use Network Watcher, you must have appropriate permissions such as Owner, Contributor, or Network Contributor, or a custom role with the necessary access https://learn.microsoft.com/en-us/training/modules/configure-network-watcher/2-describe-features .
Design and implement core networking infrastructure (20–25%)
Design and implement VNet connectivity and routing
Design and Implement Azure Route Server
Azure Route Server is designed to simplify network architecture and enable dynamic routing between your network virtual appliances (NVAs) and virtual networks. When implementing Azure Route Server, it’s essential to understand its key functionalities and how it integrates with your existing network infrastructure.
Key Functionalities:
- Dynamic Routing: Azure Route Server supports dynamic routing protocols such as Border Gateway Protocol (BGP), which allows for automatic updates of routing tables as network topologies change.
- Integration with NVAs: It enables seamless integration with NVAs, allowing them to communicate route information with Azure virtual networks.
- Simplified Management: By using Azure Route Server, you can manage and propagate routing information without the need to manually update route tables.
- High Availability: Azure Route Server is built for high availability within an Azure region, ensuring consistent network performance and reliability.
Implementation Steps:
- Deployment: Deploy Azure Route Server in the same virtual network as your NVAs.
- Configuration: Configure BGP on both the Azure Route Server and your NVAs to establish a BGP session.
- Route Propagation: Enable route propagation to allow Azure Route Server to advertise routes to and from your NVAs.
- Testing: Test the routing configuration to ensure that traffic is flowing as expected between your virtual networks and NVAs.
Additional Considerations:
- Ensure that your NVAs support BGP and are compatible with Azure Route Server.
- Plan for network security and compliance by configuring Network Security Groups (NSGs) and route filters as needed.
- Monitor the health and performance of your routing environment using Azure Monitor and Network Watcher.
For more detailed information and guidance on Azure Route Server, you can refer to the official documentation provided by Microsoft:
Please note that the above URL is included to provide additional information as requested and is part of the study material.
By understanding and implementing Azure Route Server according to these guidelines, you can enhance the dynamic routing capabilities of your Azure network infrastructure, leading to more efficient and manageable network operations.
Design and implement core networking infrastructure (20–25%)
Design and implement VNet connectivity and routing
Network Address Translation (NAT) gateways are a critical component in virtual network infrastructure, particularly when it comes to managing the IP addressing of outbound connections. Here’s a detailed explanation of appropriate use cases for a NAT gateway in a virtual network:
Outbound Connectivity for Private Subnets
NAT gateways are ideal for scenarios where virtual machines (VMs) or services in a private subnet need to initiate outbound connections to the internet or external services without exposing their private IP addresses. The NAT gateway masks the private IP addresses with the gateway’s IP address, providing a layer of security and privacy.
Consistent Outbound IP Address
When services require a consistent outbound IP address for whitelisting in external firewalls or for compliance with external services, a NAT gateway can provide a stable, public IP address that does not change, even if the underlying VMs are cycled or redeployed.
Scaling Outbound Connections
NAT gateways can handle a large number of simultaneous outbound connections without the need for multiple public IP addresses. This is particularly useful for applications that make numerous outbound connections and need to scale dynamically.
Avoiding SNAT Port Exhaustion
Without a NAT gateway, outbound connections rely on Source Network Address Translation (SNAT) provided by the load balancer, which can lead to port exhaustion. A NAT gateway helps to manage and scale the SNAT ports available for outbound connections, preventing port exhaustion issues.
Simplified Network Security Rules
By using a NAT gateway, network security rules can be simplified since all outbound traffic appears to originate from the NAT gateway’s IP address. This makes it easier to configure and manage security rules for outbound traffic.
Integration with Virtual Network Features
NAT gateways can be integrated with other virtual network features such as Network Security Groups (NSGs) and User-Defined Routes (UDRs) to create a comprehensive network security and routing strategy.
For additional information on NAT gateways and their configuration in Azure, you can refer to the following URL: Azure NAT Gateway documentation.
Please note that the above explanation is tailored for educational purposes and does not explicitly mention any exam. It is designed to provide a clear understanding of when and why to use NAT gateways within Azure virtual networks.
Design and implement core networking infrastructure (20–25%)
Design and implement VNet connectivity and routing
Implementing a NAT Gateway in Azure
A Network Address Translation (NAT) gateway in Azure is a fully managed and highly resilient service that simplifies the way virtual machines (VMs) in a virtual network access external resources. It provides outbound Internet connectivity for VMs by translating their private IP addresses to public IP addresses. This is crucial for scenarios where VMs need to initiate outbound connections to the Internet without exposing them directly to incoming Internet traffic.
Key Features of Azure NAT Gateway:
- IP Address Conservation: NAT gateways allow multiple VMs to share a single public IP address for outbound traffic, conserving the number of public IP addresses required.
- Predictable IP Addresses for Outbound Connections: By using a NAT gateway, outbound connections from VMs within a subnet will appear to originate from the NAT gateway’s public IP address.
- Scalability and High Availability: Azure NAT gateway is a regional resource that provides built-in high availability and scales automatically with the number of outbound connections.
- Redundancy: NAT gateways do not require any additional redundancy configuration as they are inherently redundant in the Azure platform.
- Metrics and Logging: You can monitor the health and usage of your NAT gateway with Azure Monitor, which provides detailed metrics and logging capabilities.
Steps to Implement a NAT Gateway:
- Create a NAT Gateway Resource: In the Azure portal, create a new NAT gateway resource and specify the required settings, such as the name, region, and the public IP address or public IP prefix to be associated with the gateway.
- Associate the NAT Gateway with a Subnet: Once the NAT gateway is created, associate it with one or more subnets within your virtual network. This enables VMs within those subnets to use the NAT gateway for outbound connectivity.
- Configure Outbound Connectivity: Adjust the outbound connectivity settings of the subnet to use the NAT gateway. This ensures that all outbound traffic from the subnet is routed through the NAT gateway.
- Monitor and Manage the NAT Gateway: After the NAT gateway is in place, use Azure Monitor to keep track of its performance and to manage its settings as needed.
For additional information on implementing a NAT gateway in Azure, you can refer to the following resources: - What is Azure NAT Gateway? - Create a NAT gateway - Associate a NAT gateway to a subnet
By following these steps and utilizing the provided resources, you can effectively implement a NAT gateway in your Azure environment, ensuring secure and efficient outbound connectivity for your virtual network.
Design and implement core networking infrastructure (20–25%)
Monitor networks
Configure Monitoring, Network Diagnostics, and Logs in Azure Network Watcher
Azure Network Watcher is an essential tool for monitoring, diagnosing, and logging the network infrastructure within Azure. It provides a suite of tools that can help you understand, diagnose, and gain insights into your network in Azure.
Monitoring with Azure Network Watcher
Monitoring is a critical aspect of network management, and Azure Network Watcher offers several features to assist with this task:
Connection Monitor: This feature allows you to monitor the connectivity between various points in your network, such as between virtual machines (VMs), on-premises servers, and Azure services. It helps in identifying network performance issues and verifying communication between endpoints https://learn.microsoft.com/en-us/training/modules/configure-network-watcher/7-summary-resources .
Flow Logs: Network security group (NSG) flow logs provide information about ingress and egress IP traffic through an NSG. These logs are useful for understanding and analyzing network traffic patterns and identifying potential security threats https://learn.microsoft.com/en-us/training/modules/configure-network-watcher/7-summary-resources .
Network Diagnostics with Azure Network Watcher
Network diagnostics tools in Azure Network Watcher help in troubleshooting network issues and ensuring that network resources are configured correctly:
IP Flow Verify: This tool checks if packets are allowed or denied to or from a VM based on the NSG’s security rules. It helps in verifying whether the network security rules are working as intended https://learn.microsoft.com/en-us/training/modules/configure-network-watcher/7-summary-resources .
Next Hop: With this feature, you can determine the next hop for traffic routed in the Azure virtual network, which is useful for troubleshooting routing problems https://learn.microsoft.com/en-us/training/modules/configure-network-watcher/7-summary-resources .
Network Topology: This visualization tool provides a graphical representation of the network resources and their interconnections within a specified subscription, resource group, or virtual network. It aids in understanding the network structure and diagnosing issues https://learn.microsoft.com/en-us/training/modules/configure-network-watcher/7-summary-resources .
Logs in Azure Network Watcher
Logs are crucial for recording events and changes in the network. Azure Network Watcher supports the following logging capabilities:
NSG Diagnostics: This feature allows you to capture logs related to NSG flow, which can be used to diagnose issues with network security rules and understand traffic flow https://learn.microsoft.com/en-us/training/modules/configure-network-watcher/7-summary-resources .
Packet Capture: Packet capture can help in diagnosing network anomalies and intrusions by capturing traffic to and from a VM. The captured data can be analyzed to detect security threats or troubleshoot network issues https://learn.microsoft.com/en-us/training/modules/configure-network-watcher/7-summary-resources .
For more detailed information and tutorials on how to use Azure Network Watcher for monitoring, network diagnostics, and logs, you can refer to the following resources:
- Monitor and troubleshoot your end-to-end Azure network infrastructure by using network monitoring tools https://learn.microsoft.com/en-us/training/modules/configure-network-watcher/7-summary-resources .
- Configure monitoring for virtual networks https://learn.microsoft.com/en-us/training/modules/configure-network-watcher/7-summary-resources .
- Azure Network Watcher documentation https://learn.microsoft.com/en-us/training/modules/configure-network-watcher/7-summary-resources .
- Tutorial: Diagnose a virtual machine network routing problem using the Azure portal https://learn.microsoft.com/en-us/training/modules/configure-network-watcher/7-summary-resources .
- Tutorial: Diagnose a communication problem between virtual networks using the Azure portal https://learn.microsoft.com/en-us/training/modules/configure-network-watcher/7-summary-resources .
By utilizing these tools and resources, you can ensure that your Azure network is monitored effectively, diagnose and troubleshoot issues promptly, and maintain comprehensive logs for security and compliance purposes.
Design and implement core networking infrastructure (20–25%)
Monitor networks
Monitor and Repair Network Health Using Azure Network Watcher
Azure Network Watcher is an essential tool for monitoring, diagnosing, and gaining insights into network performance and health within Azure. It provides a range of features that enable administrators to ensure their network infrastructure is functioning correctly and efficiently. Below are key features of Azure Network Watcher that are instrumental in monitoring and repairing network health:
Network Monitoring Tools
- Network Watcher Tools: Utilize Network Watcher’s suite of tools for an in-depth analysis of your network performance and issues. These tools include diagnostics and logs that can help pinpoint and resolve networking problems https://learn.microsoft.com/en-us/training/modules/configure-network-watcher/7-summary-resources .
- Connection Monitor: Keep track of network performance and connectivity by using the Connection Monitor feature. It allows for continuous monitoring of network communication to ensure the network’s health https://learn.microsoft.com/en-us/training/modules/configure-network-watcher/7-summary-resources .
Diagnostic Tools
- IP Flow Verify: This feature checks the security and administrative rules governing packet routing to an Azure virtual machine. It is crucial for diagnosing connectivity issues and ensuring that traffic flows as intended https://learn.microsoft.com/en-us/training/modules/configure-network-watcher/2-describe-features .
- Next Hop: Determine the next hop in the network route to analyze network routing configurations. This helps in verifying that traffic is directed to the correct destination https://learn.microsoft.com/en-us/training/modules/configure-network-watcher/2-describe-features https://learn.microsoft.com/en-us/training/modules/configure-network-watcher/4-review-next-hop-diagnostics .
- VPN Troubleshoot: Diagnose and troubleshoot issues with virtual network gateways or connections. This feature provides detailed diagnostics, including connection statistics and security errors https://learn.microsoft.com/en-us/training/modules/configure-network-watcher/2-describe-features .
Logs and Visualization
- Flow Logs: Use NSG flow logs to record information about IP traffic flowing through a Network Security Group. This is particularly useful for security compliance and auditing https://learn.microsoft.com/en-us/training/modules/configure-network-watcher/2-describe-features .
- Topology Tool: Visualize and understand the structure of virtual networks. This tool provides a graphical representation of the network’s topology, aiding in the identification of potential issues https://learn.microsoft.com/en-us/training/modules/configure-network-watcher/7-summary-resources .
Troubleshooting Features
- Connection Troubleshoot: Test a direct TCP or ICMP connection from a source to a destination within Azure. This feature is valuable for troubleshooting network performance and connectivity issues https://learn.microsoft.com/en-us/training/modules/configure-network-watcher/2-describe-features .
Additional Resources
For more detailed information and step-by-step guides on using Azure Network Watcher, the following URLs can be referenced: - Monitor and troubleshoot your end-to-end Azure network infrastructure - Configure monitoring for virtual networks - Azure Network Watcher documentation - What is Azure Network Watcher? - Tutorial: Diagnose a virtual machine network routing problem - Tutorial: Diagnose a communication problem between virtual networks
By leveraging these features and resources, administrators can effectively monitor and repair the network health of their Azure infrastructure, ensuring optimal performance and reliability.
Design and implement core networking infrastructure (20–25%)
Monitor networks
Certainly, here is a detailed explanation of activating and monitoring Distributed Denial-of-Service (DDoS) protection in Azure, formatted for a study guide:
Activating DDoS Protection in Azure
Step 1: Choose the Appropriate DDoS Protection Plan Azure offers two types of DDoS protection: Basic and Standard. The Basic service is automatically enabled in Azure and provides protection against common network-layer attacks. For more advanced DDoS protection features, Azure’s Standard service is recommended, which provides additional mitigation capabilities tailored to Azure Virtual Network resources.
Step 2: Enable DDoS Protection Standard To activate DDoS Protection Standard, you need to: - Navigate to the ‘Networking’ section in the Azure portal. - Select ‘DDoS Protection Plans’ and then ‘Create DDoS protection plan’. - Fill in the required fields such as name, subscription, resource group, and location. - Once the plan is created, associate it with a Virtual Network by selecting the Virtual Network and enabling DDoS protection.
Step 3: Configure DDoS Protection Settings After enabling DDoS Protection Standard, you can configure its settings to suit your specific needs. This includes setting up DDoS protection policies and customizing mitigation policies for different network resources.
Monitoring DDoS Protection in Azure
Step 1: Monitor Using Azure Monitor Azure Monitor provides detailed views of DDoS attack data. You can access metrics and logs to analyze the traffic and understand the nature of the attacks.
Step 2: Set Up Alerts You can create alert rules in Azure Monitor to get notified when a potential DDoS attack is detected. This allows for a quick response to mitigate the attack.
Step 3: Review DDoS Protection Logs DDoS Protection Standard generates logs that can be reviewed in Azure Monitor. These logs contain information about attack patterns, affected resources, and the mitigation process.
Step 4: Utilize Azure Security Center Azure Security Center offers advanced threat protection and security management capabilities. It provides additional insights into DDoS attacks and integrates with Azure DDoS Protection for a comprehensive security posture.
For additional information on Azure DDoS Protection, you can refer to the following URLs: - Azure DDoS Protection Standard Overview - Azure DDoS Protection Best Practices - Azure Monitor Documentation - Azure Security Center Documentation
By following these steps and utilizing Azure’s robust DDoS protection features, you can safeguard your applications and services from DDoS attacks, ensuring high availability and business continuity.
Please note that the URLs provided are for additional information and are not part of the retrieved documents. The explanation above is based on general knowledge of Azure services and best practices for DDoS protection.
Design and implement core networking infrastructure (20–25%)
Monitor networks
Activate and Monitor Microsoft Defender for DNS
Microsoft Defender for DNS is a cloud-based security solution that provides threat protection for your DNS queries. It is designed to help safeguard your Azure resources from cyber threats by detecting and mitigating potential DNS-based attacks. To activate and monitor Microsoft Defender for DNS, follow these steps:
- Activation of Microsoft Defender for DNS:
- Navigate to the Azure portal and select the DNS zone you wish to protect.
- In the settings of the DNS zone, look for the option to enable Microsoft Defender for DNS. This option may be found within the security settings or features.
- Follow the prompts to activate the service, which may include confirming the subscription and agreeing to any terms of service.
- Monitoring with Microsoft Defender for DNS:
- Once activated, Microsoft Defender for DNS will begin monitoring DNS queries automatically.
- To review the security insights and alerts, go to the Microsoft Defender for DNS dashboard within the Azure portal.
- The dashboard will provide an overview of detected threats, suspicious activities, and recommendations for remediation.
- Set up alerts to be notified of any potential threats or unusual patterns in DNS traffic.
- Reviewing and Responding to Alerts:
- Regularly check the alerts and investigate any incidents that are flagged by Microsoft Defender for DNS.
- Follow the recommended actions provided by the service to address any identified issues.
- Keep the Defender for DNS policies and rules up to date to ensure optimal protection against the latest threats.
For additional information on Microsoft Defender for DNS and its capabilities, you can refer to the Azure DNS documentation available at Azure DNS documentation https://learn.microsoft.com/en-us/training/modules/configure-azure-dns/10-summary-resources .
Please note that the URLs provided are for reference purposes to aid in further study and understanding of the topic.
Design and implement core networking infrastructure (20–25%)
Monitor networks
Monitor Networks Using Azure Monitor Network Insights
Azure Monitor Network Insights is an integral part of the Azure Monitor suite, providing comprehensive monitoring capabilities for your Azure network infrastructure. It leverages various tools and diagnostics to help you understand, diagnose, and enhance the performance and health of your network resources.
Key Features and Capabilities:
Centralized Monitoring: Azure Monitor Network Insights offers a centralized view of all your network monitoring needs, allowing you to observe the health and metrics of different network resources from a single pane of glass.
Diagnostic Tools: Utilize a suite of diagnostic tools such as Network Watcher diagnostics, Connection Monitor, NSG flow logs, and Traffic Analytics to gain insights into network performance and detect issues.
Log Analytics: Process log data interactively using queries to analyze data in Azure Monitor Logs. This helps in identifying trends, detecting anomalies, and troubleshooting issues within your network infrastructure https://learn.microsoft.com/en-us/training/modules/configure-log-analytics/2-determine-uses .
Visualizations and Alerts: Create visualizations for network data and set up alerts to notify you of any unusual activities or performance degradation, ensuring you can respond promptly to potential issues.
Integration with Azure Services: Network Insights is designed to work seamlessly with other Azure services, providing a comprehensive monitoring solution that includes Application Insights for application-level telemetry and Azure Monitor Metrics for infrastructure-level data https://learn.microsoft.com/en-us/training/modules/configure-azure-monitor/3-describe-components .
Additional Resources:
For more detailed information on how to monitor and troubleshoot your Azure network infrastructure using network monitoring tools, refer to the following resources:
Monitor and troubleshoot your end-to-end Azure network infrastructure https://learn.microsoft.com/en-us/training/modules/configure-network-watcher/7-summary-resources .
Configure monitoring for virtual networks https://learn.microsoft.com/en-us/training/modules/configure-network-watcher/7-summary-resources .
These resources provide guidance on using Network Watcher tools and how to configure monitoring for your virtual networks effectively.
By leveraging Azure Monitor Network Insights, you can ensure that your network remains reliable, secure, and performs optimally, supporting the overall health and efficiency of your Azure environment.
Design, implement, and manage connectivity services (20–25%)
Design, implement, and manage a site-to-site VPN connection
Designing a Site-to-Site VPN Connection for High Availability
When designing a site-to-site VPN connection for high availability, it is essential to consider the implementation within the Azure Virtual Network. Here are the key points to address:
Single VPN Gateway per Virtual Network: Each virtual network can have only one VPN gateway. This gateway acts as the point of connection for all site-to-site VPN connections https://learn.microsoft.com/en-us/training/modules/configure-vnet-peering/3-determine-gateway-transit-connectivity .
Gateway Transit with Virtual Network Peering: Gateway transit is supported for both regional and global virtual network peering. This feature allows a virtual network to communicate with resources outside the peering, such as an on-premises network, another virtual network, or a client via various VPN types (site-to-site, vnet-to-vnet, point-to-site) https://learn.microsoft.com/en-us/training/modules/configure-vnet-peering/3-determine-gateway-transit-connectivity .
Shared Gateway in Peered Networks: By enabling gateway transit, peered virtual networks can share a single gateway. This means that you do not need to deploy a separate VPN gateway for each peered virtual network, which simplifies the architecture and can reduce costs https://learn.microsoft.com/en-us/training/modules/configure-vnet-peering/3-determine-gateway-transit-connectivity .
Network Security Groups (NSGs): NSGs can be applied within a virtual network to control access to other virtual networks or subnets. When configuring virtual network peering, you can decide whether to allow or block traffic between the virtual networks using NSG rules https://learn.microsoft.com/en-us/training/modules/configure-vnet-peering/3-determine-gateway-transit-connectivity .
For high availability, consider the following best practices:
Redundant VPN Gateways: Deploy redundant VPN gateways in an active-active or active-passive configuration to ensure continuous connectivity in case one gateway fails.
Load Balancing: Use Azure Load Balancer to distribute traffic evenly across multiple VPN gateways.
Monitoring and Alerts: Implement monitoring solutions to track the health and performance of the VPN gateways and set up alerts for any potential issues.
Failover Testing: Regularly test failover procedures to ensure that the VPN connection remains available during an outage.
For additional information on Azure VPN Gateway and high availability, refer to the following resources:
By carefully designing the site-to-site VPN connection with these considerations in mind, you can ensure a robust and highly available VPN architecture within Azure.
Design, implement, and manage connectivity services (20–25%)
Design, implement, and manage a site-to-site VPN connection
When selecting an appropriate Virtual Network (VNet) gateway SKU for site-to-site VPN requirements, it is important to understand the differences between the available SKUs and their capabilities. Azure Load Balancer supports three SKU options: Basic, Standard, and Gateway, each designed for different scenarios and offering distinct features and pricing https://learn.microsoft.com/en-us/training/modules/configure-azure-load-balancer/5-determine-skus https://learn.microsoft.com/en-us/training/modules/configure-azure-load-balancer/5-determine-skus .
Basic SKU
- Use Case: Suitable for smaller, less complex networks.
- Features: Supports HTTP and TCP health probes. It is open by default but can be controlled through Network Security Groups (NSGs) https://learn.microsoft.com/en-us/training/modules/configure-azure-load-balancer/5-determine-skus .
- Limitations: Does not support Availability Zones, and multiple frontends are only for inbound traffic https://learn.microsoft.com/en-us/training/modules/configure-azure-load-balancer/5-determine-skus .
- Upgrade Path: Can be upgraded to Standard SKU if needed https://learn.microsoft.com/en-us/training/modules/configure-azure-load-balancer/5-determine-skus .
Standard SKU
- Use Case: Recommended for new designs and architectures, especially for larger or more complex enterprise-grade networks.
- Features:
- Offers a more granular feature set than Basic SKU.
- Supports HTTPS, HTTP, and TCP health probes.
- Provides zone-redundant and zonal frontends for inbound and outbound traffic.
- Allows multiple frontends for both inbound and outbound traffic.
- By default, it is closed to inbound flows unless allowed by an NSG. Internal traffic from the virtual network to the internal load balancer is permitted https://learn.microsoft.com/en-us/training/modules/configure-azure-load-balancer/5-determine-skus .
- Advantages: Designed for high availability and scalability https://learn.microsoft.com/en-us/training/modules/configure-azure-load-balancer/5-determine-skus .
Gateway SKU
- Use Case: Ideal for high-performance and high-availability scenarios, often used with third-party network virtual appliances (NVAs) https://learn.microsoft.com/en-us/training/modules/configure-azure-load-balancer/5-determine-skus .
- Features: Specifically tailored for advanced networking scenarios, including complex routing and secure connectivity.
When considering site-to-site VPN requirements, the choice of SKU will depend on factors such as the scale of the deployment, the need for high availability, security requirements, and the complexity of the network architecture. For instance, if the requirement is for a highly available and secure site-to-site VPN connection that can handle a large scale of operations, the Standard SKU would be the most appropriate choice due to its advanced features and support for Availability Zones https://learn.microsoft.com/en-us/training/modules/configure-azure-load-balancer/5-determine-skus https://learn.microsoft.com/en-us/training/modules/configure-azure-load-balancer/5-determine-skus .
For additional information on Azure Load Balancer SKUs and their features, you can refer to the following URL: - Azure Load Balancer documentation: https://learn.microsoft.com/en-us/azure/load-balancer/load-balancer-overview
Please note that while URLs are provided for further reading, they should be accessed and evaluated within the context of the latest Azure documentation and service updates.
Design, implement, and manage connectivity services (20–25%)
Design, implement, and manage a site-to-site VPN connection
Implementing a Site-to-Site VPN Connection
A Site-to-Site (S2S) VPN connection is a gateway connection that allows you to connect your on-premises network to an Azure Virtual Network over an IPsec/IKE (IKEv1 or IKEv2) VPN tunnel. This type of connection requires a VPN device located on-premises that has an externally facing public IP address assigned to it.
Here are the key steps and considerations for implementing a Site-to-Site VPN connection:
Create a Virtual Network: Before setting up the VPN connection, you need to create an Azure Virtual Network for the Azure resources that you want to connect to your on-premises network.
Plan and Design the Address Space: Ensure that the IP address ranges for the Virtual Network do not overlap with the IP address ranges of your on-premises network.
Create a VPN Gateway: In the context of Azure VPN Gateway implementation with Azure Virtual Network peering, it is important to note that a virtual network can have only one VPN gateway https://learn.microsoft.com/en-us/training/modules/configure-vnet-peering/3-determine-gateway-transit-connectivity .
Configure Gateway Transit: Gateway transit allows peered virtual networks to share the VPN gateway. When you enable gateway transit, you allow the virtual network to communicate with resources outside the peering, such as connecting to an on-premises network through a site-to-site VPN https://learn.microsoft.com/en-us/training/modules/configure-vnet-peering/3-determine-gateway-transit-connectivity .
Set Up the On-Premises VPN Device: You need to configure the VPN device with the correct settings to connect with the Azure VPN Gateway. This includes configuring IPsec/IKE policy parameters.
Create the Local Network Gateway: The local network gateway refers to your on-premises location. You give the site a name by which Azure can refer to it, then specify the IP address of the on-premises VPN device to which you will create a connection.
Configure the VPN Connection: Create the Site-to-Site VPN connection between your Virtual Network gateway and your on-premises VPN device.
Configure Routing: Proper routing needs to be configured to ensure that traffic flows between the on-premises network and the Azure Virtual Network.
Verify the Connection: After the configuration is complete, it’s important to verify that the VPN connection is successful and that the network traffic is flowing as expected.
Monitor the VPN Connection: Regular monitoring of the VPN connection is crucial to ensure its health and performance.
For additional information and detailed steps on how to implement a Site-to-Site VPN connection, you can refer to the following resources:
Remember to review the pricing and SLA details to understand the costs associated with the VPN Gateway and the expected service levels.
By following these steps and considerations, you can successfully implement a Site-to-Site VPN connection to securely connect your on-premises network to your Azure infrastructure.
Design, implement, and manage connectivity services (20–25%)
Design, implement, and manage a site-to-site VPN connection
When considering the implementation of a VPN connection in Azure, it is important to understand the differences between a policy-based VPN and a route-based VPN to determine which is best suited for specific scenarios.
Policy-Based VPN
A policy-based VPN, also known as a static VPN, is typically used when you need to establish a VPN tunnel to a single network and when the devices on the network do not support route-based VPNs. In a policy-based VPN:
- The tunnel is specified within a policy, with the policy defining which IP address ranges are encrypted within the tunnel.
- It uses predefined policies to make decisions about the transmission of traffic without the use of routing tables.
- The policies dictate traffic selectors that are used to determine which traffic can enter the VPN tunnel.
- It is generally considered less flexible than a route-based VPN because it requires explicit policies to be set for all possible routes.
Route-Based VPN
A route-based VPN, on the other hand, is more dynamic and is used when you need to encrypt traffic to multiple networks or need to support dynamic routing protocols. In a route-based VPN:
- The VPN tunnel is treated as a virtual interface or a Virtual Tunnel Interface (VTI).
- Routing tables direct packets to the VTI, which then encrypts the packets and sends them across the tunnel.
- It supports dynamic routing, which allows for changes in routing paths without the need to adjust the VPN policies.
- Route-based VPNs are typically used with Azure VPN Gateway and can take advantage of Azure’s Virtual Network peering .
When deciding between a policy-based VPN and a route-based VPN, consider the following factors:
- Complexity of the network: If you have a complex network with multiple subnets or need to support dynamic routing, a route-based VPN is more suitable.
- Device compatibility: Ensure that the devices you are connecting support the type of VPN you choose.
- Scalability: Route-based VPNs are more scalable due to their support for dynamic routing.
- Policy requirements: If you have strict policies that need to be enforced, a policy-based VPN might be necessary.
For additional information on VPN types and when to use them, you can refer to the Azure documentation on VPN Gateway and Virtual Network peering:
Please note that the URLs provided are for reference purposes to supplement the study guide material.
Design, implement, and manage connectivity services (20–25%)
Design, implement, and manage a site-to-site VPN connection
To create and configure an IPsec/Internet Key Exchange (IKE) policy, you would typically follow these steps:
Access the Azure Portal: Begin by logging into the Azure Portal.
Navigate to the Virtual Network Gateway: In the portal, search for and select the Virtual Network Gateway that you want to configure.
Create an IPsec/IKE Policy: Within the settings of the Virtual Network Gateway, look for the option to create or add an IPsec/IKE policy. This is where you will define the parameters of your policy.
Configure Policy Settings: Specify the settings for your IPsec/IKE policy. This includes:
- IKE Encryption: Choose an encryption algorithm like AES256, AES192, AES128, or DES3.
- IKE Integrity: Select an integrity algorithm such as SHA256, SHA384, or SHA1.
- DH Group: Determine the Diffie-Hellman Group to use, such as DHGroup2, DHGroup14, ECP256, or ECP384.
- IPsec Encryption: Set the IPsec encryption using AES256, AES192, AES128, GCMAES256, or GCMAES128.
- IPsec Integrity: Choose an integrity algorithm for IPsec like GCMAES256, GCMAES128, SHA256, or SHA1.
- PFS Group: Select the Perfect Forward Secrecy group, which could be None, PFS1, PFS2, PFS2048, ECP256, or ECP384.
- SA Lifetime: Define the Security Association lifetime by specifying the time in seconds or the volume of data in kilobytes.
Assign the Policy to a Connection: After creating the policy, assign it to an IPsec connection. This is done by editing the connection settings and selecting the newly created IPsec/IKE policy.
Save and Apply: Save the configuration and apply it to ensure that the policy takes effect.
For additional information on creating and configuring IPsec/IKE policies in Azure, you can refer to the Azure documentation on IPsec and IKE protocol standards, which provides detailed guidance on the supported algorithms and parameters:
Remember to review the specific requirements and best practices for IPsec/IKE policies in Azure to ensure optimal security and performance for your virtual network connections.
Design, implement, and manage connectivity services (20–25%)
Design, implement, and manage a site-to-site VPN connection
Diagnose and Resolve Virtual Network Gateway Connectivity Issues
When addressing connectivity issues with Azure Virtual Network Gateways, it is essential to follow a systematic approach to diagnose and resolve the problems effectively. Below is a detailed explanation of the steps and tools available within Azure to assist with these tasks.
Utilize Network Watcher’s VPN Troubleshoot Feature
Azure Network Watcher provides a VPN troubleshoot feature that is instrumental in diagnosing and resolving virtual network gateway connectivity issues. This tool allows you to:
- View connection statistics, such as data in and data out.
- Monitor CPU and memory performance metrics.
- Identify IKE security association errors.
- Detect packet drops and analyze buffer and event data.
The VPN troubleshoot feature can be used to review summary diagnostics directly in the Azure portal or detailed diagnostics in log files stored in your Azure storage account. This feature is particularly useful when you need to troubleshoot multiple gateways or connections simultaneously https://learn.microsoft.com/en-us/training/modules/configure-network-watcher/2-describe-features .
Check IP Flow with IP Flow Verify
The IP flow verify feature of Network Watcher enables you to test if a packet is allowed or denied to or from your virtual machine. This can help you determine if a security rule is blocking ingress or egress traffic, which could be the cause of connectivity issues. It is a quick way to diagnose potential problems and decide if further exploration is required https://learn.microsoft.com/en-us/training/modules/configure-network-watcher/2-describe-features .
Analyze Routing with Next Hop
Next hop is another feature of Network Watcher that allows you to view the next hop in the network route. This can help you analyze your network routing configuration and confirm that traffic is reaching the intended target destination. It is useful for determining if the correct next hop is being used and if the route table is set up properly https://learn.microsoft.com/en-us/training/modules/configure-network-watcher/2-describe-features .
Examine NSG Flow Logs
Network Security Group (NSG) flow logs can be used to map and understand the IP traffic flowing through an NSG. These logs are valuable for auditing and ensuring compliance with security regulations. By comparing prescriptive NSG rules against the effective rules for each virtual machine, you can identify discrepancies that may be causing connectivity issues https://learn.microsoft.com/en-us/training/modules/configure-network-watcher/2-describe-features .
Perform Connection Troubleshooting
Azure Network Watcher’s Connection Troubleshoot feature allows you to test a direct TCP or ICMP connection from a source, such as a virtual machine, application gateway, or Azure Bastion host, to a destination virtual machine. This can help you troubleshoot network performance and connectivity issues within Azure https://learn.microsoft.com/en-us/training/modules/configure-network-watcher/2-describe-features .
Additional Resources
For more information on diagnosing and resolving virtual network gateway connectivity issues, you can refer to the following URLs:
- Azure Network Watcher documentation
- VPN Gateway troubleshooting
- IP flow verify in Azure Network Watcher
- Using Next Hop in Azure Network Watcher
- NSG Flow Logging
- Connection Troubleshoot in Azure Network Watcher
By leveraging these tools and resources, you can effectively diagnose and resolve issues with Azure Virtual Network Gateways, ensuring stable and secure connectivity for your network resources.
Design, implement, and manage connectivity services (20–25%)
Design, implement, and manage a site-to-site VPN connection
Implementing Azure Extended Network
Azure Extended Network is a feature that allows you to extend an on-premises network into Azure. It is designed to simplify the process of connecting on-premises networks with virtual networks in Azure, effectively treating cloud resources as if they were on the same local network. This feature can be particularly useful for scenarios such as data center expansion, disaster recovery, and migration.
Key Concepts
- Seamless Connectivity: Azure Extended Network enables seamless connectivity between on-premises networks and Azure virtual networks without the need for complex VPN or ExpressRoute configurations.
- Network Overlapping: It allows for the use of overlapping IP addresses between on-premises and Azure networks, which is not possible with traditional VPN or ExpressRoute solutions.
- Simplified Management: By extending the on-premises network to Azure, network administrators can manage cloud resources as part of their existing network, using familiar tools and processes.
Implementation Steps
Prerequisites: Ensure that you have the necessary permissions to create and manage networking resources in Azure. Your account should have the
Network Contributorrole or equivalent permissions https://learn.microsoft.com/en-us/training/modules/configure-vnet-peering/4-create .Create Virtual Networks: Set up the Azure virtual network that you wish to extend your on-premises network into. This will serve as the target for the extended network https://learn.microsoft.com/en-us/training/modules/configure-vnet-peering/4-create .
Configure Network Peering: Use Azure Virtual Network peering to connect virtual networks in a hub and spoke topology. This allows for the extension of peering with user-defined routes and service chaining https://learn.microsoft.com/en-us/training/modules/configure-vnet-peering/8-summary-resources .
Set Up VPN Gateway: Configure Azure VPN Gateway in the peered virtual network as a transit point. This enables resources in one network to access resources in another network through the gateway https://learn.microsoft.com/en-us/training/modules/configure-vnet-peering/8-summary-resources .
Apply Network Security Groups: Use network security groups to control access between the on-premises network and the Azure virtual network. This helps to secure the extended network environment https://learn.microsoft.com/en-us/training/modules/configure-vnet-peering/8-summary-resources .
Use Service Endpoints: Extend your virtual network identity to Azure services using service endpoints. This secures your service resources to your virtual network and can remove public internet access to these resources https://learn.microsoft.com/en-us/training/modules/configure-network-routing-endpoints/4-determine-service-endpoint-uses .
Implement User-Defined Routes (UDR): Define UDRs to direct traffic from your virtual network to network virtual appliances (NVAs) or VPN gateways as needed https://learn.microsoft.com/en-us/training/modules/configure-vnet-peering/5-determine-service-chaining-uses .
Service Chaining: If necessary, implement service chaining to direct traffic through NVAs or VPN gateways in the hub virtual network https://learn.microsoft.com/en-us/training/modules/configure-vnet-peering/5-determine-service-chaining-uses .
Additional Resources
For more detailed information on implementing Azure Extended Network, you can refer to the following resources:
- Azure Virtual Network Peering
- Azure VPN Gateway Documentation
- Network Security Groups
- User-Defined Routes and IP Forwarding
- Service Endpoints
By following these steps and utilizing the provided resources, you can effectively implement Azure Extended Network as part of your network infrastructure.
Design, implement, and manage connectivity services (20–25%)
Design, implement, and manage a point-to-site VPN connection
When selecting an appropriate virtual network gateway SKU for point-to-site VPN requirements, it is important to consider the specific features and capabilities that align with the networking needs of the deployment. Here is a detailed explanation of the factors to consider:
Standard vs. Basic Load Balancer
- Standard Load Balancer: This is the newer product and is essentially a superset of the Basic Load Balancer. It offers an expanded and more granular feature set than the Basic SKU https://learn.microsoft.com/en-us/training/modules/configure-azure-load-balancer/5-determine-skus .
- Basic Load Balancer: While it can be upgraded to the Standard SKU, new designs and architectures should prefer the Standard SKU due to its advanced features https://learn.microsoft.com/en-us/training/modules/configure-azure-load-balancer/5-determine-skus .
Gateway SKU
- Gateway SKU: This supports high-performance and high-availability scenarios, which can be crucial for point-to-site VPNs that require reliable and continuous connectivity. It is also compatible with third-party network virtual appliances (NVAs) https://learn.microsoft.com/en-us/training/modules/configure-azure-load-balancer/5-determine-skus .
Considerations for VPN Gateway
- VPN Gateway Transit: When using Azure VPN Gateway in conjunction with Azure Virtual Network peering, it is possible to configure the VPN Gateway as a transit point. This allows a peered virtual network to use the remote VPN gateway to access other resources, which is an important consideration for point-to-site VPN scenarios https://learn.microsoft.com/en-us/training/modules/configure-vnet-peering/3-determine-gateway-transit-connectivity .
Network Security Groups (NSGs)
- NSGs: Network security groups can be applied to control access to virtual networks. When configuring virtual network peering, NSGs can be used to manage traffic between the virtual networks, which may impact the point-to-site VPN configuration https://learn.microsoft.com/en-us/training/modules/configure-vnet-peering/3-determine-gateway-transit-connectivity .
User-Defined Routes (UDRs) and Service Chaining
- UDRs: User-defined routes can be used to direct traffic through a VPN gateway, which is an important aspect of configuring point-to-site VPNs https://learn.microsoft.com/en-us/training/modules/configure-vnet-peering/5-determine-service-chaining-uses .
- Service Chaining: This allows for the definition of routes that direct traffic from one virtual network to an NVA or VPN gateway, which can be a critical component of a point-to-site VPN setup https://learn.microsoft.com/en-us/training/modules/configure-vnet-peering/5-determine-service-chaining-uses .
For additional information on Azure VPN Gateway and virtual network peering, you can refer to the following URLs: - Azure VPN Gateway documentation - Virtual Network Peering
Please note that the URLs provided are for reference purposes to supplement the study guide material.
Design, implement, and manage connectivity services (20–25%)
Design, implement, and manage a point-to-site VPN connection
Select and Configure a Tunnel Type
When configuring a tunnel for a network, it is essential to understand the different types of tunnels available and how to configure them. A tunnel, in the context of networking, is a protocol that allows for the secure passage of data from one network to another. The Azure VPN Gateway facilitates the creation of such tunnels and is typically implemented with Azure Virtual Network peering.
Here are the steps and considerations for selecting and configuring a tunnel type:
Determine the Tunnel Type: Azure VPN Gateway supports various types of VPN connections, such as site-to-site (S2S), point-to-site (P2S), and VNet-to-VNet. Each type serves different scenarios:
- Site-to-Site (S2S): Connects on-premises networks to Azure over the internet or through a private connection. It is suitable for connecting entire networks in different locations.
- Point-to-Site (P2S): Connects individual devices to Azure. This is useful for remote workers who need to access Azure resources securely.
- VNet-to-VNet: Connects two Azure Virtual Networks together. This can be within the same region or across different regions.
Configure Gateway Transit: When using Azure Virtual Network peering, you can configure gateway transit, which allows peered virtual networks to use a common gateway. This means you do not need to deploy a VPN gateway for each virtual network, which can be cost-effective and simplify network architecture https://learn.microsoft.com/en-us/training/modules/configure-vnet-peering/3-determine-gateway-transit-connectivity .
Apply Network Security Groups (NSGs): NSGs can be used to control access to network resources. When setting up your tunnel, consider the NSG rules that will govern the traffic between the networks. You can configure NSGs to allow or deny specific types of traffic, which is crucial for maintaining a secure environment https://learn.microsoft.com/en-us/training/modules/configure-vnet-peering/3-determine-gateway-transit-connectivity .
Select the Appropriate SKU: Azure VPN Gateway offers different SKUs that provide varying levels of performance, features, and pricing. Choose a SKU that matches your performance requirements and budget.
Create and Configure the VPN Gateway: In the Azure portal, you can create a new VPN Gateway or configure an existing one. Specify the required settings, such as the virtual network, gateway type, and the SKU.
Set Up the Connection: Once the VPN Gateway is in place, set up the connection to the remote network. This involves specifying the tunnel type and configuring the relevant settings, such as the shared key and connection protocol.
For additional information on Azure Virtual Networks and how to integrate them using Azure Virtual Network peering, you can refer to the following resources: - Introduction to Azure Virtual Networks - Distribute your services across Azure Virtual Networks and integrate them by using Azure Virtual Network peering (sandbox)
By following these steps and considerations, you can effectively select and configure the appropriate tunnel type for your Azure networking needs.
Design, implement, and manage connectivity services (20–25%)
Design, implement, and manage a point-to-site VPN connection
Selecting an Appropriate Authentication Method
When choosing an authentication method for your Azure services, it is essential to consider the level of security required and the user experience. Azure offers various authentication methods, and selecting the right one depends on the specific service and use case.
- Azure File Share Authentication:
- For Azure file shares, you can connect using Windows or Windows Server through the Azure portal. You will need to specify the drive to map the share and choose the authentication method. Azure provides PowerShell commands to facilitate this process https://learn.microsoft.com/en-us/training/modules/configure-azure-files-file-sync/3-manage-file-shares .
- Azure Blob Storage Authentication:
- When uploading data to Azure Blob Storage using Azure Storage Explorer, you must select the blob type and block size, as well as the container folder. Authentication methods and encryption scope are also configurable during this process https://learn.microsoft.com/en-us/training/modules/configure-blob-storage/7-upload-blobs .
- Password Reset Authentication:
- For resetting passwords, determine the number of authentication methods required. At least one method should be mandated. Options include email, text message, security code to a mobile or office phone, or security questions. It is advisable to offer multiple methods to enhance security https://learn.microsoft.com/en-us/training/modules/configure-azure-active-directory/7-implement-self-service-password-reset .
- Be cautious with security questions as they can be less secure. It is recommended to combine them with other authentication methods to mitigate risks https://learn.microsoft.com/en-us/training/modules/configure-azure-active-directory/7-implement-self-service-password-reset .
- Azure App Service Authentication:
- Azure App Service provides built-in authentication and authorization support, allowing you to sign in users with minimal coding. It supports various security utilities such as federation, encryption, and JWT management. However, you are not obligated to use Azure App Service for this purpose, as many web frameworks come with their own security features https://learn.microsoft.com/en-us/training/modules/configure-azure-app-services/7-secure-app-service .
For additional information on authentication methods in Azure, you can refer to the following resources: - Mount an Azure file share in Windows - Configure Azure Blob Storage - Azure App Service authentication overview
Please note that the URLs provided are for reference purposes to supplement the study material and should be accessed for more detailed guidance on the respective topics.
Design, implement, and manage connectivity services (20–25%)
Design, implement, and manage a point-to-site VPN connection
Configure RADIUS Authentication
Remote Authentication Dial-In User Service (RADIUS) is a networking protocol that provides centralized Authentication, Authorization, and Accounting (AAA) management for users who connect and use a network service. When configuring RADIUS authentication, it is essential to understand the following key points:
RADIUS Server: This is the central component that manages access to the network. It authenticates users or devices before granting them access to a network and authorizes their levels of access based on configured policies.
RADIUS Clients: These are network access servers such as wireless access points, VPN servers, or switches that communicate with the RADIUS server to authenticate users.
Authentication Process: When a user attempts to connect to the network, the RADIUS client sends an authentication request to the RADIUS server. The server then checks the credentials against a user database and, if the credentials are valid, sends back an acceptance message to the client.
Authorization: Once authenticated, the RADIUS server determines what resources the user is allowed to access and any other conditions of their usage.
Accounting: The RADIUS server keeps track of the user’s activity on the network, such as the amount of time they are connected and the data they send and receive.
To configure RADIUS authentication in Azure, you would typically follow these steps:
Set up a RADIUS Server: Deploy a RADIUS server in your environment. This could be a dedicated server or a service running on a shared server.
Configure RADIUS Clients: Identify and configure your network devices to use the RADIUS server for authentication. This involves setting up a shared secret that is used to secure communication between the client and the server.
Define Policies: Create policies on the RADIUS server that specify who is allowed to connect, when, and with what level of access.
Test the Configuration: Ensure that the RADIUS authentication process works as expected by conducting tests with various user accounts.
For more detailed guidance on setting up and configuring RADIUS authentication in Azure, you can refer to the following resources:
- Azure’s documentation on implementing network security: Network security in Azure
- Information on Azure’s VPN Gateway RADIUS authentication: VPN Gateway RADIUS authentication
- General RADIUS server configuration: RADIUS Server Configuration
Please note that while configuring RADIUS authentication, it is crucial to ensure that your RADIUS server is secure and that you are using strong shared secrets to prevent unauthorized access to your network.
Design, implement, and manage connectivity services (20–25%)
Design, implement, and manage a point-to-site VPN connection
Configure Certificate-Based Authentication
Certificate-based authentication is a robust method of verifying the identity of users and devices accessing a network or resources. It uses digital certificates, which are electronic documents that bind a public key with an identity—such as a user or an organization. This process ensures that the entity presenting the certificate is the rightful owner of the certificate.
In the context of Azure services, configuring certificate-based authentication typically involves the following steps:
Obtain or Create a Digital Certificate: A digital certificate can be obtained from a trusted Certificate Authority (CA) or created using tools like Active Directory Certificate Services (AD CS) if you are managing your own CA.
Deploy the Certificate: Once you have the certificate, it needs to be deployed to the user or device that requires authentication. This can be done manually or through automated deployment services.
Configure Azure Services for Certificate Authentication: Azure services that support certificate-based authentication need to be configured to trust the CA that issued the certificates. This involves uploading the public key of the CA to the Azure service.
Enable Certificate-Based Authentication: In the service’s authentication settings, enable certificate-based authentication and specify any additional requirements, such as certificate attributes or revocation checks.
Test the Authentication: After configuration, it is crucial to test the authentication process to ensure that it is working correctly and securely.
For more detailed guidance on configuring certificate-based authentication in Azure, you can refer to the following resources:
- Azure Active Directory Certificate-Based Authentication
- Configure Azure Application Gateway for mutual authentication
Remember, when implementing certificate-based authentication, it is essential to maintain the security of the private keys associated with the digital certificates and to have a revocation process in place for compromised certificates.
Please note that while this explanation is tailored for Azure services, the principles of certificate-based authentication are widely applicable across various platforms and technologies.
Design, implement, and manage connectivity services (20–25%)
Design, implement, and manage a point-to-site VPN connection
Configure Authentication Using Microsoft Entra ID
Microsoft Entra ID, formerly known as Azure Active Directory (Azure AD), is a cloud-based identity and access management service. It enables users to sign in and access resources from external resources, such as Microsoft 365, the Azure portal, and thousands of other SaaS applications. When configuring authentication using Microsoft Entra ID, it is important to understand the protocols and roles involved.
Authentication Protocols
Microsoft Entra ID does not use Kerberos authentication. Instead, it implements HTTP and HTTPS protocols for authentication, which include:
- SAML (Security Assertion Markup Language): An open standard for exchanging authentication and authorization data between parties, in particular, between an identity provider and a service provider.
- WS-Federation (Web Services Federation): A specification for token issuance and interoperability that allows different security realms to broker information on identities, identity attributes, and authentication.
- OpenID Connect: A simple identity layer on top of the OAuth 2.0 protocol, which allows clients to verify the identity of the end-user based on the authentication performed by an authorization server, as well as to obtain basic profile information about the end-user.
- OAuth: An open standard for access delegation, commonly used as a way for Internet users to grant websites or applications access to their information on other websites but without giving them the passwords https://learn.microsoft.com/en-us/training/modules/configure-azure-active-directory/4-compare-active-directory-domain-services .
Authentication with AzCopy
When using AzCopy, a command-line utility for copying data to/from Azure Storage, there are two authentication options:
- Microsoft Entra ID Authentication:
- Users can sign in using the
azcopy logincommand with their Microsoft Entra ID credentials. - It is necessary to have the Storage Blob Data Contributor role assigned to write to Blob Storage using Microsoft Entra authentication.
- This method allows users to sign in once without needing to append a Shared Access Signature (SAS) token to each command https://learn.microsoft.com/en-us/training/modules/configure-storage-tools/4-use-azcopy .
- Users can sign in using the
- SAS Token Authentication:
- Users append a SAS token to the blob or file path for every command they enter on the command line https://learn.microsoft.com/en-us/training/modules/configure-storage-tools/4-use-azcopy .
Role-Based Access Control (RBAC)
Microsoft Entra ID and Azure RBAC have built-in role definitions that can be assigned at different scopes:
- Microsoft Entra Admin Roles:
- These roles are used to manage resources within Microsoft Entra ID, such as users, groups, and domains.
- Examples include Global admin, Application admin, and Application developer https://learn.microsoft.com/en-us/training/modules/configure-role-based-access-control/6-apply-authentication .
- Azure RBAC Roles:
- These roles provide granular access management for Azure resources and can be applied at multiple levels, including the root, management groups, subscriptions, resource groups, or individual resources https://learn.microsoft.com/en-us/training/modules/configure-role-based-access-control/6-apply-authentication .
Key Components of Microsoft Entra ID
Understanding the key components of Microsoft Entra ID is crucial for implementing the service:
- Identity: An object that can be authenticated, such as a user, application, or server.
- Account: An identity with associated data. An account cannot exist without an identity.
- Microsoft Entra Account: An identity created through Microsoft Entra ID or another Microsoft cloud service, stored in Microsoft Entra ID, and accessible to your organization’s cloud service subscriptions.
- Azure Tenant (Directory): A single dedicated and trusted instance of Microsoft Entra ID representing an organization.
- Azure Subscription: Used to pay for Azure cloud services, each subscription is joined to a single tenant https://learn.microsoft.com/en-us/training/modules/configure-azure-active-directory/3-describe-azure-active-directory-concepts .
For additional information on Microsoft Entra ID, you can refer to the following resources: - What is Microsoft Entra ID? - Compare Active Directory to Microsoft Entra ID - Plan a Microsoft Entra SSPR deployment https://learn.microsoft.com/en-us/training/modules/configure-azure-active-directory/9-summary-resources .
This information should provide a comprehensive understanding of how to configure authentication using Microsoft Entra ID.
Design, implement, and manage connectivity services (20–25%)
Design, implement, and manage a point-to-site VPN connection
Implementing a VPN client configuration file involves creating and configuring a file that contains all the necessary settings for a VPN client to connect to a VPN gateway. This configuration file is typically used for point-to-site VPN connections, where individual clients connect to the VPN gateway to access resources within an Azure Virtual Network.
Here’s a detailed explanation of the steps involved:
- Create a Virtual Network and VPN Gateway:
- Set up an Azure Virtual Network and a VPN gateway within it. Remember that a virtual network can have only one VPN gateway https://learn.microsoft.com/en-us/training/modules/configure-vnet-peering/3-determine-gateway-transit-connectivity .
- Ensure that gateway transit is enabled if you’re using virtual network peering, allowing the VPN gateway to communicate with resources outside the peering https://learn.microsoft.com/en-us/training/modules/configure-vnet-peering/3-determine-gateway-transit-connectivity .
- Generate VPN Client Configuration Files:
- In the Azure portal, navigate to the VPN gateway and then to the ‘Point-to-site configuration’ section.
- Configure the point-to-site settings, such as the address pool that VPN clients will use when connecting.
- Once the point-to-site configuration is saved, you can generate the VPN client configuration files from the Azure portal.
- Distribute VPN Client Configuration Files:
- After generating the VPN client configuration files, they can be distributed to users who need to connect to the VPN.
- Users will import these files into their VPN client software to configure the VPN connection settings automatically.
- Connect to the VPN:
- Users will use their VPN client software to connect to the VPN using the provided configuration file.
- Once connected, they will be able to access resources within the Azure Virtual Network as if they were directly connected to the network.
- Security Considerations:
- Apply network security groups in the virtual network to control access to other virtual networks or subnets https://learn.microsoft.com/en-us/training/modules/configure-vnet-peering/3-determine-gateway-transit-connectivity .
- Ensure that all users who have the VPN client configuration file are authorized to access the resources available through the VPN.
For additional information on setting up a VPN gateway and configuring VPN client connections in Azure, you can refer to the following URLs: - Azure VPN Gateway documentation - Configure a Point-to-Site (P2S) VPN on Windows for use with Azure
Please note that the URLs provided are for reference purposes to supplement the study guide and should be accessed for more detailed guidance and best practices.
Design, implement, and manage connectivity services (20–25%)
Design, implement, and manage a point-to-site VPN connection
To diagnose and resolve client-side and authentication issues, it is essential to understand the various tools and services available within the Azure ecosystem that can aid in this process. Here is a detailed explanation of how to approach these issues:
Diagnose and Resolve Client-Side Issues
Client-Side Encryption: Data security is paramount when dealing with client-side operations. Azure allows securing data in transit between an application and Azure services using Client-Side Encryption. This method ensures that data is encrypted before it leaves the client’s environment, providing an additional layer of security https://learn.microsoft.com/en-us/training/modules/configure-storage-security/2-review-strategies .
HTTPS and SMB 3.0: Utilize HTTPS to secure communication over the internet and SMB 3.0 for secure file sharing within networks. These protocols encrypt data during transit to prevent interception and unauthorized access https://learn.microsoft.com/en-us/training/modules/configure-storage-security/2-review-strategies .
Azure VPN Gateway: For connectivity issues, Azure VPN Gateway diagnostics can be used to identify common connection problems. Detailed logs generated by the diagnostics can assist in analyzing and resolving these issues https://learn.microsoft.com/en-us/training/modules/configure-network-watcher/2-describe-features .
Diagnose and Resolve Authentication Issues
Azure App Service Authentication: Azure App Service provides built-in authentication and authorization support, which simplifies the process of securing your applications. It allows you to sign in users and access data with minimal coding effort https://learn.microsoft.com/en-us/training/modules/configure-azure-app-services/7-secure-app-service .
Security Utilities: Azure App Service includes utilities for managing complex security aspects such as federation, encryption, and JSON web tokens (JWT). These utilities help to streamline the authentication process, allowing you to focus on delivering business value https://learn.microsoft.com/en-us/training/modules/configure-azure-app-services/7-secure-app-service .
Alternative Security Features: While Azure App Service offers these features, you are not bound to use them. Many web frameworks come with their own security features, and you can choose to use other services that meet your security requirements https://learn.microsoft.com/en-us/training/modules/configure-azure-app-services/7-secure-app-service .
For additional information on these topics, you can refer to the following URLs:
- For client-side encryption and secure data transfer protocols, visit: Client-Side Encryption and Secure Transfer Protocols
- To learn more about diagnosing VPN Gateway issues, check out: Azure VPN Gateway Diagnostics
- For details on Azure App Service authentication and authorization, refer to: Authentication and Authorization in Azure App Service
- To explore Azure Monitor and its capabilities for diagnosing issues, go to: Azure Monitor Overview
By leveraging these Azure services and tools, you can effectively diagnose and resolve client-side and authentication issues, ensuring the security and reliability of your applications.
Design, implement, and manage connectivity services (20–25%)
Design, implement, and manage a point-to-site VPN connection
Azure Requirements for Always On VPN
Always On VPN is a solution that allows users to establish a remote connection to a network that is always active. When configuring Always On VPN in Azure, there are several requirements and considerations to ensure seamless connectivity and security. Below are the key requirements for setting up Always On VPN in Azure:
Azure VPN Gateway: A virtual network can have only one VPN gateway, which acts as a point of connection for remote clients. The VPN gateway must be configured to allow VPN gateway transit, enabling communication with resources outside the peering network https://learn.microsoft.com/en-us/training/modules/configure-vnet-peering/3-determine-gateway-transit-connectivity .
Virtual Network Peering: Gateway transit is supported for both regional and global virtual network peering. This allows a peered virtual network to use a remote VPN gateway to access other resources, such as connecting to an on-premises network, another virtual network, or a client https://learn.microsoft.com/en-us/training/modules/configure-vnet-peering/3-determine-gateway-transit-connectivity https://learn.microsoft.com/en-us/training/modules/configure-vnet-peering/3-determine-gateway-transit-connectivity .
Gateway Transit: By enabling gateway transit, peered virtual networks can share a single gateway, which allows access to resources without the need to deploy a VPN gateway in each peered virtual network https://learn.microsoft.com/en-us/training/modules/configure-vnet-peering/3-determine-gateway-transit-connectivity .
Network Security Groups (NSGs): NSGs can be applied within a virtual network to control access to other virtual networks or subnets. When setting up virtual network peering, you can configure NSG rules to manage traffic between the virtual networks https://learn.microsoft.com/en-us/training/modules/configure-vnet-peering/3-determine-gateway-transit-connectivity .
Hub and Spoke Network Configuration: For complex network architectures, a hub and spoke model can be implemented. The hub virtual network can host the VPN gateway, and all spoke virtual networks can peer with the hub. Traffic can then flow through the VPN gateway in the hub virtual network https://learn.microsoft.com/en-us/training/modules/configure-vnet-peering/5-determine-service-chaining-uses .
User-Defined Routes (UDRs): UDRs can be used in conjunction with virtual network peering to direct traffic to a VPN gateway or through a network virtual appliance (NVA) in a peered virtual network https://learn.microsoft.com/en-us/training/modules/configure-vnet-peering/5-determine-service-chaining-uses .
Service Chaining: This involves defining UDRs that route traffic from one virtual network to an NVA or VPN gateway, which can be part of a multi-level hub and spoke architecture https://learn.microsoft.com/en-us/training/modules/configure-vnet-peering/5-determine-service-chaining-uses .
For additional information on configuring Azure VPN Gateway and virtual network peering, you can refer to the following resources:
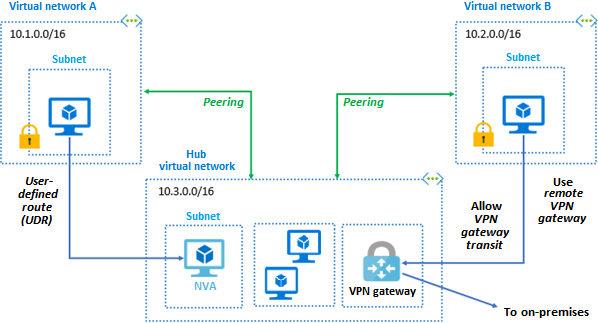
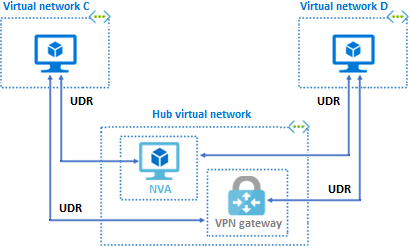
Please note that the URLs provided are for illustrative purposes and are part of the study materials to aid in understanding the configuration of Always On VPN in Azure.
Design, implement, and manage connectivity services (20–25%)
Design, implement, and manage a point-to-site VPN connection
Azure Network Adapter Requirements
When configuring the Azure Network Adapter, it is essential to understand the requirements to ensure seamless connectivity and security. Below are the key requirements and considerations for setting up an Azure Network Adapter:
Azure Virtual Network: The Azure Network Adapter must be connected to an Azure Virtual Network to facilitate private connectivity between Azure services and your on-premises environment https://learn.microsoft.com/en-us/training/modules/configure-virtual-machines/3-plan .
IP Addressing and Subnets: Careful planning of network addresses and subnets is crucial, as they are not trivial to change once configured. Ensure that the IP address space does not conflict with other networks that the Azure Virtual Network will connect to https://learn.microsoft.com/en-us/training/modules/configure-virtual-machines/3-plan .
Service Endpoints: Configure service endpoints within your subnets for a simplified setup and maintenance. This negates the need for reserved public IP addresses or NAT/gateway devices for securing Azure resources through an IP firewall https://learn.microsoft.com/en-us/training/modules/configure-network-routing-endpoints/4-determine-service-endpoint-uses .
Azure VPN Gateway: For transit connectivity, you can configure an Azure VPN Gateway in the peered virtual network. This serves as a transit point to access resources in another network https://learn.microsoft.com/en-us/training/modules/configure-vnet-peering/8-summary-resources .
Network Security Groups (NSGs): NSGs can be applied to control access between virtual networks when setting up virtual network peering. This helps in maintaining the desired security posture https://learn.microsoft.com/en-us/training/modules/configure-vnet-peering/8-summary-resources .
Virtual Network Peering: Azure Virtual Network peering is necessary for connecting virtual networks in a hub and spoke topology. It is important to understand the difference between regional and global peering, as regional peering connects virtual networks in the same region, while global peering connects virtual networks across different regions https://learn.microsoft.com/en-us/training/modules/configure-vnet-peering/8-summary-resources .
Azure Backbone Network: Network traffic between peered virtual networks remains private and is kept within the Azure backbone network, ensuring security and performance https://learn.microsoft.com/en-us/training/modules/configure-vnet-peering/8-summary-resources .
For additional information on Azure Virtual Network peering and managing virtual network peering, you can refer to the following resources: - Azure Virtual Network peering overview https://learn.microsoft.com/en-us/training/modules/configure-vnet-peering/8-summary-resources . - Create, change, or delete a virtual network peering https://learn.microsoft.com/en-us/training/modules/configure-vnet-peering/8-summary-resources .
Please note that when configuring service endpoints, the switch from public to private IPv4 addresses may temporarily interrupt service traffic, and existing Azure service firewall rules based on Azure public IP addresses may stop working. It is important to adjust firewall rules accordingly before setting up service endpoints https://learn.microsoft.com/en-us/training/modules/configure-network-routing-endpoints/4-determine-service-endpoint-uses .
Design, implement, and manage connectivity services (20–25%)
Design, implement, and manage Azure ExpressRoute
Selecting an ExpressRoute Connectivity Model
When choosing an ExpressRoute connectivity model, it is essential to understand the different options available and how they align with your organization’s networking requirements. ExpressRoute is a service that provides a private connection between your on-premises infrastructure and Microsoft Azure datacenters. This connection is facilitated through a connectivity provider and does not traverse the public internet, offering more reliability, faster speeds, lower latencies, and higher security than typical connections.
There are three primary ExpressRoute connectivity models to consider:
CloudExchange Co-location: This model is suitable if you have co-location in a cloud exchange facility where Microsoft Azure is present. You can connect your infrastructure directly to Azure by using the exchange’s Ethernet connectivity.
Point-to-Point Ethernet Connection: Opt for this model if you require a dedicated, private connection from your on-premises datacenter to Azure. This is typically used by organizations that need high bandwidth and a secure, reliable connection.
Any-to-Any (IPVPN) Networks: This model leverages your existing WAN network, such as MPLS VPN provided by a network service provider, to extend your network to Azure. It is ideal for organizations with multiple office locations or datacenters that want to connect to Azure using their existing WAN.
When selecting an ExpressRoute connectivity model, consider the following factors:
Proximity to ExpressRoute locations: Choose a model that aligns with your geographical location and proximity to Microsoft’s ExpressRoute sites for optimal performance.
Bandwidth requirements: Assess your bandwidth needs to determine the appropriate model and scale of your ExpressRoute connection.
Redundancy and failover: Plan for redundancy to ensure high availability. You may want to establish multiple ExpressRoute circuits or combine ExpressRoute with other connectivity options like VPN for failover scenarios.
Network architecture: Your current network architecture will influence the choice of the connectivity model. Ensure compatibility with your existing network setup and services.
Cost considerations: Review the pricing model for each connectivity option. Costs can vary based on bandwidth, data transfer rates, and additional services.
For more detailed information on ExpressRoute connectivity models, you can refer to the Azure ExpressRoute documentation available at Azure ExpressRoute documentation.
Additionally, it is recommended to use a shared services subscription to manage common network resources, such as ExpressRoute, to ensure that all related costs are consolidated and isolated from other workloads https://learn.microsoft.com/en-us/training/modules/configure-subscriptions/3-implement-azure-subscriptions .
By carefully evaluating these factors and understanding the different connectivity models, you can select the most appropriate ExpressRoute solution to meet your organization’s specific needs.
Design, implement, and manage connectivity services (20–25%)
Design, implement, and manage Azure ExpressRoute
When selecting an appropriate ExpressRoute SKU and tier, it is important to understand the various options available and how they align with your connectivity requirements. ExpressRoute is a service that provides a private connection between your on-premises infrastructure and Microsoft Azure datacenters. This connection is facilitated through a connectivity provider and bypasses the public internet, offering more reliability, faster speeds, and lower latencies.
ExpressRoute SKUs and Tiers
ExpressRoute offers different SKUs, which are essentially different service tiers that cater to various business needs and scales. The primary SKUs are:
- Local: Designed for services requiring connectivity within a local area.
- Standard: Provides connectivity to Microsoft cloud services across all global regions except national clouds.
- Premium: Offers all the capabilities of the Standard SKU with added benefits such as increased route limits, global connectivity across all Microsoft services in all regions, and the ability to connect to national clouds.
Each SKU has different pricing and feature sets, so it’s crucial to select the one that best fits your organization’s requirements.
Considerations for Selecting an ExpressRoute SKU and Tier
- Geographical Reach: If you need connectivity across multiple geographical regions, the Standard or Premium SKU would be more appropriate.
- Scale: For larger scale operations that require more routes or global connectivity, the Premium SKU is the better choice.
- National Clouds: If you need to connect to national clouds (such as Azure Government or Azure China 21Vianet), the Premium SKU is necessary.
- Cost: The Local SKU is generally less expensive than the Standard or Premium SKUs, but it offers limited features.
Additional Resources
For more detailed information on ExpressRoute SKUs and pricing, you can visit the following URLs:
By carefully evaluating your connectivity needs against the features and pricing of each ExpressRoute SKU, you can select the most appropriate tier for your organization’s Azure connectivity.
Please note that the URLs provided are for additional information and should be used to supplement the explanation provided.
Design, implement, and manage connectivity services (20–25%)
Design, implement, and manage Azure ExpressRoute
Design and Implementation of ExpressRoute for Cross-Region Connectivity, Redundancy, and Disaster Recovery
When designing and implementing ExpressRoute for cross-region connectivity, redundancy, and disaster recovery, it is essential to consider the following aspects:
Cross-Region Connectivity: ExpressRoute connections provide a private, dedicated, high-throughput network connection between on-premises networks and Azure datacenters. To achieve cross-region connectivity, you must establish ExpressRoute circuits in multiple Azure regions and configure your network routing to ensure seamless connectivity across these regions.
Redundancy: To ensure high availability, it is recommended to set up redundant ExpressRoute circuits. This can be achieved by provisioning two or more ExpressRoute circuits in different peering locations. Utilizing multiple circuits can protect against the failure of a single circuit or peering location.
Disaster Recovery: In the event of a disaster, having a robust disaster recovery plan is crucial. This involves replicating critical data and applications to a secondary Azure region that is geographically distant from the primary region. ExpressRoute can facilitate the replication of data by providing a reliable and fast connection to Azure services.
For additional information on these topics, the following resources can be consulted:
ExpressRoute Overview: Gain a comprehensive understanding of Azure ExpressRoute, including its benefits, features, and how it works. Learn more about ExpressRoute.
ExpressRoute Redundancy: Discover best practices for setting up redundant ExpressRoute circuits to ensure high availability and resiliency. Explore ExpressRoute redundancy.
ExpressRoute for Disaster Recovery: Learn how to leverage ExpressRoute for disaster recovery scenarios, including how to replicate data and maintain business continuity. Read about ExpressRoute and disaster recovery.
Cross-Region Connectivity with ExpressRoute: Understand how to configure ExpressRoute for cross-region connectivity, ensuring your network spans multiple Azure regions. Configure cross-region connectivity.
By carefully considering these aspects and utilizing the provided resources, you can design an ExpressRoute solution that meets your requirements for cross-region connectivity, redundancy, and disaster recovery.
Design, implement, and manage connectivity services (20–25%)
Design, implement, and manage Azure ExpressRoute
Design and Implementation of ExpressRoute Options
When designing and implementing ExpressRoute options, it is essential to understand the various features and how they can be tailored to meet specific organizational needs. Below are detailed explanations of Global Reach, FastPath, and ExpressRoute Direct:
ExpressRoute Global Reach
ExpressRoute Global Reach allows you to connect your on-premises networks through the Microsoft global network using ExpressRoute. This feature enables private connectivity between your sites in different regions as if they were in the same data center. By using a shared services subscription, you can ensure that all common network resources, such as ExpressRoute, are billed together and isolated from other workloads https://learn.microsoft.com/en-us/training/modules/configure-subscriptions/3-implement-azure-subscriptions .
ExpressRoute FastPath
FastPath is designed to improve the performance of your network traffic by optimizing the routing of traffic from your on-premises network to Azure services. With FastPath, traffic that enters Azure through ExpressRoute is sent directly to the virtual machine, bypassing the gateway for faster performance. This is particularly beneficial for scenarios that require low-latency connectivity.
ExpressRoute Direct
ExpressRoute Direct provides massive data ingestion capabilities to Azure for scenarios such as high-performance computing, data migration, and media content uploads. It allows you to connect directly into Microsoft’s global network at peering locations strategically distributed across the world. ExpressRoute Direct supports up to 100 Gbps of connectivity, providing the high bandwidth and low latency required for demanding workloads.
For additional information on these features, you can refer to the following URLs: - For ExpressRoute Global Reach: Azure ExpressRoute documentation - For ExpressRoute FastPath: ExpressRoute FastPath documentation - For ExpressRoute Direct: ExpressRoute Direct documentation
It is important to carefully plan and configure these options to align with your organization’s networking requirements and to ensure optimal performance and cost-effectiveness.
Design, implement, and manage connectivity services (20–25%)
Design, implement, and manage Azure ExpressRoute
Azure Private Peering vs. Microsoft Peering
When designing and implementing Azure networking infrastructure, it is important to understand the differences between Azure private peering and Microsoft peering, as well as when to use each or both. Here’s a detailed explanation:
Azure Private Peering
Azure private peering allows for secure and private connections from on-premises or peered virtual networks to Azure services over a private network. The traffic is hosted by Microsoft, eliminating the need for public peering or internet-based connections for workload migration to the cloud https://learn.microsoft.com/en-us/training/modules/configure-network-routing-endpoints/6-identify-private-link-uses .
Benefits of Azure Private Peering: - Private Network Connections: Traffic between peered virtual networks remains on the Microsoft Azure backbone network, ensuring privacy without the need for public internet, gateways, or encryption https://learn.microsoft.com/en-us/training/modules/configure-vnet-peering/2-determine-uses . - Strong Performance: Utilizing the Azure infrastructure, Azure private peering provides low-latency and high-bandwidth connections between resources in different virtual networks https://learn.microsoft.com/en-us/training/modules/configure-vnet-peering/2-determine-uses . - Simplified Communication: Resources in one virtual network can communicate with those in another once the virtual networks are peered https://learn.microsoft.com/en-us/training/modules/configure-vnet-peering/2-determine-uses . - Seamless Data Transfer: Azure private peering supports data transfer across Azure subscriptions, deployment models, and Azure regions https://learn.microsoft.com/en-us/training/modules/configure-vnet-peering/2-determine-uses . - No Resource Disruptions: Creating Azure private peering does not require downtime for resources in either virtual network https://learn.microsoft.com/en-us/training/modules/configure-vnet-peering/2-determine-uses .
Microsoft Peering
Microsoft peering is designed for services that require connectivity with Microsoft cloud services such as Office 365, Dynamics 365, and Azure PaaS services. It allows these services to be accessed over a private connection.
Considerations for Microsoft Peering: - Service-Specific Connectivity: Microsoft peering is used when there is a need to connect to Microsoft’s public services over a private connection. - Separate Configuration: Microsoft peering is configured separately from Azure private peering and requires its own routing and security considerations.
Choosing Between Azure Private Peering, Microsoft Peering, or Both
The choice between Azure private peering, Microsoft peering, or both depends on the specific requirements of the services and workloads being deployed:
- Azure Private Peering Only: Choose this option when the primary requirement is to connect on-premises networks to Azure services privately, without accessing Microsoft’s public services.
- Microsoft Peering Only: Opt for Microsoft peering when the need is to access Microsoft’s public services over a private connection, without the need for private connectivity to Azure services.
- Both Azure Private Peering and Microsoft Peering: In scenarios where there is a need for both private connectivity to Azure services and access to Microsoft’s public services over a private connection, both types of peering should be configured.
For additional information on Azure Virtual Networks and virtual network peering, you can refer to the following resources: - Introduction to Azure Virtual Networks https://learn.microsoft.com/en-us/training/modules/configure-vnet-peering/8-summary-resources . - Distribute your services across Azure Virtual Networks and integrate them by using Azure Virtual Network peering (sandbox) https://learn.microsoft.com/en-us/training/modules/configure-vnet-peering/8-summary-resources .
It is essential to carefully plan and configure your network peering to meet the specific connectivity and security requirements of your Azure deployment.
Design, implement, and manage connectivity services (20–25%)
Design, implement, and manage Azure ExpressRoute
Configure Azure Private Peering
Azure private peering is a critical component of Azure networking that allows for secure and efficient communication between Azure virtual networks and on-premises networks or peered virtual networks. When configuring Azure private peering, it is essential to understand the following key points:
Private Endpoints: Azure private peering enables access to private endpoints over private peering or VPN tunnels from on-premises or peered virtual networks. This ensures that the traffic remains on the Microsoft Azure backbone network, eliminating the need for public peering or internet-based migration of workloads to the cloud https://learn.microsoft.com/en-us/training/modules/configure-network-routing-endpoints/6-identify-private-link-uses .
Virtual Network Peering: Azure Virtual Network peering allows for the connection of virtual networks in a hub and spoke topology. This setup is crucial for creating scalable and manageable network architectures within Azure https://learn.microsoft.com/en-us/training/modules/configure-vnet-peering/8-summary-resources .
Types of Peering: There are two types of peering available:
- Regional Peering: Connects virtual networks within the same Azure region.
- Global Peering: Connects virtual networks across different Azure regions https://learn.microsoft.com/en-us/training/modules/configure-vnet-peering/8-summary-resources .
Network Traffic: Traffic between peered virtual networks is kept private and secure, as it is routed through the Azure backbone network rather than the public internet https://learn.microsoft.com/en-us/training/modules/configure-vnet-peering/8-summary-resources https://learn.microsoft.com/en-us/training/modules/configure-vnet-peering/2-determine-uses .
Transit Connectivity: Azure VPN Gateway can be configured in a peered virtual network to serve as a transit point, allowing access to resources in another network. This extends the reachability of the network without compromising security https://learn.microsoft.com/en-us/training/modules/configure-vnet-peering/8-summary-resources .
User-Defined Routes and Service Chaining: To further customize network traffic flow, user-defined routes (UDRs) and service chaining can be implemented. This allows for more granular control over how network traffic is directed and processed https://learn.microsoft.com/en-us/training/modules/configure-vnet-peering/8-summary-resources .
Network Security Groups: When configuring virtual network peering, network security groups (NSGs) can be applied to regulate access between virtual networks. NSGs can be used to block or allow specific traffic, enhancing the security posture of the network environment https://learn.microsoft.com/en-us/training/modules/configure-vnet-peering/8-summary-resources .
Performance and Data Transfer: Azure Virtual Network peering is designed to provide strong performance with low-latency, high-bandwidth connections. It also supports seamless data transfer across Azure subscriptions, deployment models, and regions, without causing disruptions to existing resources https://learn.microsoft.com/en-us/training/modules/configure-vnet-peering/2-determine-uses .
Nontransitive Peering: It is important to note that virtual network peering is nontransitive. This means that peering between two networks does not extend to a third network unless explicitly configured. Separate peering configurations are required for each pair of networks that need to communicate https://learn.microsoft.com/en-us/training/modules/configure-vnet-peering/5-determine-service-chaining-uses .
For additional information and guidance on configuring Azure private peering, the following resources are available:
- Azure Virtual Network peering overview provides a comprehensive introduction to virtual network peering https://learn.microsoft.com/en-us/training/modules/configure-vnet-peering/8-summary-resources .
- Create, change, or delete a virtual network peering offers step-by-step instructions on how to manage virtual network peering settings https://learn.microsoft.com/en-us/training/modules/configure-vnet-peering/8-summary-resources .
By understanding and implementing these concepts, you can ensure a robust and secure network infrastructure within Azure that aligns with your organization’s connectivity and security requirements.
Design, implement, and manage connectivity services (20–25%)
Design, implement, and manage Azure ExpressRoute
Configure Microsoft Peering
Microsoft peering is a feature within Azure that allows you to access private endpoints over private peering or VPN tunnels from on-premises or peered virtual networks. By utilizing Microsoft peering, the traffic is hosted by Microsoft, eliminating the need for public peering or the use of the internet to migrate workloads to the cloud https://learn.microsoft.com/en-us/training/modules/configure-network-routing-endpoints/6-identify-private-link-uses .
Benefits of Azure Virtual Network Peering
Private Network Connections: Azure Virtual Network peering ensures that network traffic between peered virtual networks remains private, as it is kept on the Microsoft Azure backbone network. This setup does not require the use of the public internet, gateways, or encryption for communication between the virtual networks https://learn.microsoft.com/en-us/training/modules/configure-vnet-peering/2-determine-uses .
Strong Performance: Leveraging the Azure infrastructure, Azure Virtual Network peering provides a low-latency, high-bandwidth connection between resources in different virtual networks https://learn.microsoft.com/en-us/training/modules/configure-vnet-peering/2-determine-uses .
Simplified Communication: Resources in one virtual network can communicate with resources in another virtual network seamlessly once the virtual networks are peered https://learn.microsoft.com/en-us/training/modules/configure-vnet-peering/2-determine-uses .
Seamless Data Transfer: Azure Virtual Network peering allows for data transfer across Azure subscriptions, deployment models, and even across Azure regions https://learn.microsoft.com/en-us/training/modules/configure-vnet-peering/2-determine-uses .
No Resource Disruptions: Creating Azure Virtual Network peering does not require downtime for resources in either virtual network, maintaining continuity of service https://learn.microsoft.com/en-us/training/modules/configure-vnet-peering/2-determine-uses .
Implementing Azure Virtual Network Peering
To implement Azure Virtual Network peering, you can follow these steps:
- Design and implement core Azure networking infrastructure, including virtual networks and virtual network peering https://learn.microsoft.com/en-us/training/modules/configure-vnet-peering/8-summary-resources .
- Use virtual network peering to enable communication across virtual networks https://learn.microsoft.com/en-us/training/modules/configure-vnet-peering/8-summary-resources .
- Manage the creation, change, or deletion of a virtual network peering https://learn.microsoft.com/en-us/training/modules/configure-vnet-peering/8-summary-resources .
Transit Scenarios with Azure VPN Gateway
When virtual networks are peered, Azure VPN Gateway can be configured as a transit point. This allows a peered virtual network to use the remote VPN gateway to access other resources. For example, if you have three virtual networks in the same region connected by virtual network peering, and one of them contains an Azure VPN gateway configured to allow VPN gateway transit, the other networks can access resources through this hub network https://learn.microsoft.com/en-us/training/modules/configure-vnet-peering/3-determine-gateway-transit-connectivity .
Additional Resources
For more information on Azure Virtual Network peering, you can refer to the following resources:
- Introduction to Azure Virtual Networks
- Distribute your services across Azure Virtual Networks and integrate them by using Azure Virtual Network peering (sandbox)
- Azure Virtual Network peering overview
- Create, change, or delete a virtual network peering
By understanding and implementing Microsoft peering, you can enhance your network’s privacy, performance, and flexibility, while ensuring seamless integration of your services across the Azure cloud environment.
Design, implement, and manage connectivity services (20–25%)
Design, implement, and manage Azure ExpressRoute
Create and Configure an ExpressRoute Gateway
When creating and configuring an ExpressRoute gateway, you are essentially setting up a connection between your on-premises network and the Microsoft Azure backbone network through a connectivity provider. This allows for a private connection that can be used for services such as Azure Virtual Machines and Microsoft 365. Below are the steps and considerations for setting up an ExpressRoute gateway:
Provision an ExpressRoute Circuit: Before configuring the gateway, you need to provision an ExpressRoute circuit with a connectivity provider. This involves selecting the appropriate bandwidth and peering location that aligns with your network requirements.
Create a Virtual Network Gateway: In the Azure portal, create a virtual network gateway of type ‘ExpressRoute’. This gateway will be used to connect to the ExpressRoute circuit.
Configure Gateway Size and SKU: Choose the size and SKU of the gateway based on the throughput and features you need. The SKU determines factors such as the number of connections and the performance characteristics of the gateway.
Link the Virtual Network Gateway to the ExpressRoute Circuit: Once the gateway is provisioned, link it to your ExpressRoute circuit. This is done by creating a connection resource in Azure that references both the gateway and the circuit.
Configure Routing: Ensure that proper routing is configured to allow traffic to flow between your on-premises network and your Azure resources. This may involve configuring route filters and route tables.
Set Up Peering: Configure Azure private peering and/or Microsoft peering as required. Private peering is for connecting to Azure services, while Microsoft peering is for connecting to Microsoft online services like Microsoft 365.
Monitor and Manage the Gateway: After the gateway is set up, monitor its health and performance. You can use Azure Monitor and Network Watcher to gain insights into the gateway’s operation and troubleshoot any issues.
For additional information on creating and configuring an ExpressRoute gateway, you can refer to the following resources:
- Azure ExpressRoute documentation
- ExpressRoute circuits and routing domains
- Configure a virtual network gateway for ExpressRoute using the Azure portal
Remember to review the pricing and SLA details for ExpressRoute to understand the costs and guarantees associated with the service. It’s also important to coordinate with your connectivity provider throughout the setup process to ensure compatibility and proper configuration.
Design, implement, and manage connectivity services (20–25%)
Design, implement, and manage Azure ExpressRoute
Connect a Virtual Network to an ExpressRoute Circuit
Connecting a virtual network to an ExpressRoute circuit involves several steps and considerations to ensure private connectivity to services hosted on the Azure platform, as well as to on-premises data centers. Here is a detailed explanation of the process:
Provision an ExpressRoute Circuit: Before connecting a virtual network to an ExpressRoute circuit, you must first provision the circuit itself. This is typically done through a connectivity provider and involves selecting the appropriate bandwidth and peering location.
Create an ExpressRoute Gateway: Within the Azure Virtual Network that you wish to connect, you must create an ExpressRoute gateway. This gateway serves as the entry point for the ExpressRoute circuit into your virtual network.
Link the Virtual Network to the ExpressRoute Circuit: After the gateway is created, you link the virtual network to the ExpressRoute circuit. This is done by creating a connection resource that references both the ExpressRoute circuit and the gateway.
Configure Routing: To ensure that traffic flows correctly between your on-premises network and the Azure Virtual Network, you need to configure routing. This involves setting up route filters and route tables that define how traffic should be directed.
Set Up Peering: ExpressRoute circuits support three types of peering: Azure private peering, Azure public peering (deprecated), and Microsoft peering. For connecting a virtual network, Azure private peering is used, which requires you to specify a primary and secondary subnet.
Configure Network Security Groups (NSGs): NSGs can be used to control the flow of traffic to and from the virtual network. It is important to configure NSG rules to allow traffic from the on-premises network to the Azure resources.
Validate Connectivity: Once all configurations are in place, it is crucial to validate that the connectivity is working as expected. This can be done by testing the network performance and checking the connectivity status in the Azure portal.
For additional information on Azure Virtual Networks and ExpressRoute, you can refer to the following resources:
- Introduction to Azure Virtual Networks
- Distribute your services across Azure Virtual Networks and integrate them by using Azure Virtual Network peering (sandbox)
These resources provide a comprehensive understanding of Azure networking infrastructure and the steps required to integrate virtual networks using various connectivity options, including ExpressRoute.
Design, implement, and manage connectivity services (20–25%)
Design, implement, and manage Azure ExpressRoute
Recommend a Route Advertisement Configuration
When configuring network routing in Azure, it is essential to understand how route advertisement can impact the flow of traffic within your virtual network. Route advertisement refers to the process of making a route known by the network so that it can be used to direct traffic. Here are some recommendations for configuring route advertisement:
Understand System Routes: Azure uses system routes to direct traffic automatically. These routes cover scenarios such as traffic within the same subnet, between subnets, to the internet, and to virtual appliances. It is important to be familiar with these default routes and how they affect traffic flow https://learn.microsoft.com/en-us/training/modules/configure-network-routing-endpoints/2-review-system-routes .
Use Route Tables: Route tables contain a set of rules that dictate how packets should be routed. They are associated with subnets, and each packet leaving a subnet is directed according to the route table associated with that subnet. Ensure that your route tables are correctly configured to reflect the desired traffic flow https://learn.microsoft.com/en-us/training/modules/configure-network-routing-endpoints/2-review-system-routes .
Implement Forced Tunneling: If you need to direct internet-bound traffic through your on-premises network for inspection or compliance reasons, use forced tunneling. This ensures that all internet traffic is routed through your network virtual appliance or on-premises infrastructure https://learn.microsoft.com/en-us/training/modules/configure-network-routing-endpoints/4-determine-service-endpoint-uses .
Optimize Azure Service Traffic: To maintain optimal routing for Azure service traffic and avoid it being impacted by forced tunneling, consider using service endpoints. Service endpoints keep Azure service traffic on the Azure backbone network, which can be beneficial for performance and security https://learn.microsoft.com/en-us/training/modules/configure-network-routing-endpoints/4-determine-service-endpoint-uses .
Configure Azure Private Link: For secure and private access to Azure services, use Azure Private Link. It ensures that traffic stays on the Microsoft global network without exposure to the public internet. Private Link can be used globally and allows you to connect privately to services in other Azure regions https://learn.microsoft.com/en-us/training/modules/configure-network-routing-endpoints/6-identify-private-link-uses .
Next Hop Feature: Utilize the next hop feature to diagnose routing problems. This feature helps identify the next hop type in the route for a specific source and destination IP address, which can be useful for troubleshooting unresponsive virtual machines or broken routes https://learn.microsoft.com/en-us/training/modules/configure-network-watcher/4-review-next-hop-diagnostics .
For additional information on route advertisement and network routing configurations, you can refer to the following resources:
- User-defined routes and forced-tunneling https://learn.microsoft.com/en-us/training/modules/configure-network-routing-endpoints/4-determine-service-endpoint-uses .
- Azure Private Link documentation https://learn.microsoft.com/en-us/training/modules/configure-network-routing-endpoints/6-identify-private-link-uses .
By following these recommendations, you can ensure that your Azure network routing is configured to meet your organizational needs while maintaining security and performance.
Configuring Encryption over ExpressRoute
When using Azure ExpressRoute to create private connections between Azure datacenters and infrastructure on your premises or in a colocation environment, data privacy and security are paramount. To enhance security, you can configure encryption over ExpressRoute to ensure that data in transit is protected.
Azure Storage Encryption
Azure Storage provides automatic encryption of data before it is persisted to any storage service, including Azure Managed Disks, Azure Blob Storage, Azure Queue Storage, Azure Cosmos DB, Azure Table Storage, or Azure Files https://learn.microsoft.com/en-us/training/modules/configure-storage-security/5-determine-storage-service-encryption . This encryption is performed using 256-bit AES encryption, which is one of the strongest block ciphers available https://learn.microsoft.com/en-us/training/modules/configure-storage-security/5-determine-storage-service-encryption . The encryption and decryption processes, as well as key management, are completely transparent to users, and encryption is always enabled and cannot be turned off https://learn.microsoft.com/en-us/training/modules/configure-storage-security/5-determine-storage-service-encryption .
Customer-Managed Encryption Keys
For additional control over encryption, you can configure customer-managed encryption keys in the Azure portal https://learn.microsoft.com/en-us/training/modules/configure-storage-security/6-create-customer-managed-keys . This allows you to create and manage your own keys, which can be stored in Azure Key Vault https://learn.microsoft.com/en-us/training/modules/configure-storage-security/6-create-customer-managed-keys https://learn.microsoft.com/en-us/training/modules/configure-storage-security/6-create-customer-managed-keys . With customer-managed keys, you have the flexibility to create, disable, audit, rotate, and define access controls for your encryption keys https://learn.microsoft.com/en-us/training/modules/configure-storage-security/6-create-customer-managed-keys . When configuring customer-managed keys, you can choose to have the encryption key managed by Microsoft or manage it yourself https://learn.microsoft.com/en-us/training/modules/configure-storage-security/6-create-customer-managed-keys .
Implementing Encryption over ExpressRoute
To implement encryption over ExpressRoute, you would typically use Azure Storage encryption in conjunction with customer-managed keys for enhanced security. This involves configuring the encryption type in the Azure portal and specifying whether you will manage the keys yourself or have them managed by Microsoft https://learn.microsoft.com/en-us/training/modules/configure-storage-security/5-determine-storage-service-encryption . If you choose to manage the keys yourself, you can use Azure Key Vault to create and manage these keys https://learn.microsoft.com/en-us/training/modules/configure-storage-security/6-create-customer-managed-keys https://learn.microsoft.com/en-us/training/modules/configure-storage-security/6-create-customer-managed-keys .
For more information on configuring encryption over ExpressRoute and managing encryption keys, you can refer to the following resources:
- Azure Storage encryption details: Azure Storage Encryption
- Managing customer-managed keys in Azure Key Vault: Azure Key Vault
Design, implement, and manage connectivity services (20–25%)
Design, implement, and manage Azure ExpressRoute
Bidirectional Forwarding Detection (BFD) is a network protocol that is used to detect faults between two forwarding planes quickly and with low overhead. It is designed to provide fast failure detection times, which can be beneficial in various scenarios, such as when rapid failover is required to maintain high availability.
When implementing BFD in an Azure environment, it is important to understand that BFD operates by establishing a session between two endpoints and sending control packets at regular intervals. If a number of consecutive packets are not received by an endpoint, the session is considered down, and appropriate actions can be taken, such as rerouting traffic or bringing up an alternative path.
Here is a detailed explanation of how to implement BFD:
Establish BFD Sessions: Configure BFD sessions between the network devices that require fast failure detection. This typically involves specifying the local and remote endpoints, as well as the desired transmission and detection intervals.
Configure Timers: Set the desired transmission interval for sending BFD control packets and the detection time for identifying a link failure. These intervals can be configured to be very short to enable rapid detection of network issues.
Monitor Sessions: Once BFD sessions are established, monitor them to ensure they are up and running. Any changes in the session state should be logged and acted upon according to the network failover procedures.
Integrate with Routing: BFD can be integrated with dynamic routing protocols such as BGP or OSPF. This integration allows for the immediate withdrawal of routes from the routing table if a BFD session indicates a link failure, thus enabling quick rerouting of traffic.
Test Failover: After implementing BFD, it is crucial to test the failover mechanisms to ensure they work as expected. This can involve simulating failures and verifying that alternative paths are used and that the failover time meets the required thresholds.
For additional information on implementing BFD in Azure, you can refer to the following resources:
- Introduction to Azure Virtual Networks
- Distribute your services across Azure Virtual Networks and integrate them by using Azure Virtual Network peering (sandbox)
These resources provide foundational knowledge on Azure networking, which is essential when working with advanced network features such as BFD. While they do not cover BFD specifically, understanding the underlying network infrastructure is a prerequisite for implementing BFD effectively.
Please note that the URLs provided are for reference purposes and are part of the study materials that can be used to gain a deeper understanding of Azure networking concepts related to BFD implementation.
Design, implement, and manage connectivity services (20–25%)
Design, implement, and manage Azure ExpressRoute
Diagnose and Resolve ExpressRoute Connection Issues
When addressing issues with ExpressRoute connections, it is essential to follow a systematic approach to diagnose and resolve the problems effectively. Here is a detailed explanation of the steps involved:
- Initial Checks:
- Verify that the ExpressRoute circuit is provisioned and enabled.
- Ensure that the ExpressRoute circuit is not in a “deprovisioned” state.
- Check the resource health of the ExpressRoute circuit in the Azure portal for any known issues.
- Connectivity Checks:
- Confirm that the on-premises network is correctly configured to connect to the ExpressRoute circuit.
- Use the Azure Network Watcher’s ‘Next Hop’ tool to troubleshoot and diagnose virtual machine routing problems that may affect connectivity https://learn.microsoft.com/en-us/training/modules/configure-network-watcher/7-summary-resources .
- Monitoring and Logging:
- Utilize Azure Network Watcher to monitor network performance and diagnose issues with network communication https://learn.microsoft.com/en-us/training/modules/configure-network-watcher/7-summary-resources .
- Review the Azure VPN Gateway and connection logs to identify any anomalies or errors that could indicate a problem with the ExpressRoute connection https://learn.microsoft.com/en-us/training/modules/configure-network-watcher/2-describe-features .
- Troubleshooting Tools:
- Employ the Azure Network Watcher’s VPN troubleshoot capability to diagnose connectivity issues between virtual networks, which may also impact ExpressRoute connections https://learn.microsoft.com/en-us/training/modules/configure-network-watcher/7-summary-resources .
- Use diagnostic tools available in the Azure portal to analyze and troubleshoot the ExpressRoute circuit.
- Microsoft Support:
- If the issue persists after performing the above checks and using the available tools, contact Microsoft Support for further assistance.
For additional information and guidance on diagnosing and resolving ExpressRoute connection issues, the following resources can be consulted:
- Azure Network Watcher documentation: https://learn.microsoft.com/en-us/azure/network-watcher/ https://learn.microsoft.com/en-us/training/modules/configure-network-watcher/7-summary-resources .
- Tutorial on diagnosing a virtual machine network routing problem: https://learn.microsoft.com/en-us/azure/network-watcher/diagnose-vm-network-routing-problem https://learn.microsoft.com/en-us/training/modules/configure-network-watcher/7-summary-resources .
- Tutorial on diagnosing communication problems between virtual networks: https://learn.microsoft.com/en-us/azure/network-watcher/diagnose-communication-problem-between-networks https://learn.microsoft.com/en-us/training/modules/configure-network-watcher/7-summary-resources .
By following these steps and utilizing the provided resources, individuals can effectively diagnose and resolve issues with their ExpressRoute connections.
Design, implement, and manage connectivity services (20–25%)
Design and implement an Azure Virtual WAN architecture
When selecting a Virtual WAN SKU, it is important to understand the different options available and the features they provide. Virtual WAN is a networking service that provides optimized and automated branch-to-branch connectivity through Azure. It makes use of the Microsoft global network to link Azure virtual networks and on-premises networks.
There are two main SKUs for Virtual WAN:
Basic SKU: This is suitable for smaller scale, entry-level connectivity needs. It allows for connectivity between branches and Azure with essential Virtual WAN functionalities. However, it may not support advanced features and higher performance requirements.
Standard SKU: The Standard SKU is designed for enterprises with more demanding requirements. It offers a broader set of features, including enhanced security, routing, and scalability. It is also suitable for scenarios that require high availability and performance.
Here are some key points to consider when choosing between the Basic and Standard SKU:
Performance and Scaling: The Standard SKU is built for higher performance and scaling. It supports more throughput and a larger number of connections compared to the Basic SKU.
Security: The Standard SKU offers improved security features. It allows for the integration of third-party network virtual appliances (NVAs) for enhanced security and monitoring.
Routing: With the Standard SKU, you have more granular control over routing. This includes the ability to use both Microsoft and third-party routing appliances for complex network topologies.
High Availability: The Standard SKU supports high availability configurations, ensuring that your connectivity is resilient and reliable.
Pricing: The cost of the SKU should also be considered. The Standard SKU typically comes at a higher price point due to its advanced features and capabilities.
For additional information on Azure Virtual WAN and its SKUs, you can refer to the official Microsoft documentation: Azure Virtual WAN documentation.
Please note that the choice of SKU should align with your specific networking requirements, taking into account factors such as the size of your organization, the complexity of your network, and your performance needs. It is recommended to review the latest features and pricing details on the official Azure documentation to make an informed decision.
Design, implement, and manage connectivity services (20–25%)
Design and implement an Azure Virtual WAN architecture
When designing a Virtual WAN architecture, it is essential to consider the types of Virtual WAN and the services that will be integrated into the architecture. Virtual WAN is a networking service that provides optimized and automated branch-to-branch connectivity through Azure. Here’s a detailed explanation of the components to consider:
Virtual WAN Types
Virtual WAN offers two types: 1. Basic: Suitable for smaller scale deployments that do not require advanced security features. 2. Standard: Provides enhanced capabilities, including advanced security features and higher throughput.
Services to Integrate
The following services can be integrated into a Virtual WAN architecture:
Azure ExpressRoute: This service allows you to extend your on-premises networks into the Microsoft cloud over a private connection facilitated by a connectivity provider. With ExpressRoute, you can establish connections to Microsoft cloud services, such as Microsoft Azure and Microsoft 365 https://learn.microsoft.com/en-us/training/modules/configure-subscriptions/3-implement-azure-subscriptions .
Azure Virtual WAN: It simplifies the network architecture and secures the connection between endpoints in Azure by eliminating data exposure to the public internet. Virtual WAN allows you to connect and configure branch devices to communicate with Azure easily. It is a type of PaaS that can be integrated with routing to automatically manage connectivity to and from these branches https://learn.microsoft.com/en-us/training/modules/configure-network-routing-endpoints/6-identify-private-link-uses .
Azure DNS: Azure DNS is a hosting service for DNS domains, providing name resolution using Microsoft Azure infrastructure. It is a reliable and secure service that eliminates the need for a custom DNS solution in a virtual network https://learn.microsoft.com/en-us/training/modules/configure-azure-dns/10-summary-resources .
Azure Private DNS: This service enables you to use your own custom domain names within your virtual networks and provides name resolution for virtual machines within and between virtual networks. It also supports a split-horizon view, which allows a private and a public DNS zone to share the same domain name https://learn.microsoft.com/en-us/training/modules/configure-azure-dns/7-plan-for-private-dns-zones .
Considerations for Design
Region and Service Availability: Ensure that the services and features you plan to use are available in the desired Azure regions. Some Virtual Machines sizes, storage types, or other features may only be available in specific regions https://learn.microsoft.com/en-us/training/modules/configure-subscriptions/2-identify-regions .
Shared Services Subscription: Use a shared services subscription to manage common network resources and billing. This can include services like Azure ExpressRoute and Virtual WAN, which are essential for a cohesive Virtual WAN architecture https://learn.microsoft.com/en-us/training/modules/configure-subscriptions/3-implement-azure-subscriptions .
Security and Connectivity: Consider the security requirements for your architecture, such as whether you need advanced security features offered by the Standard type of Virtual WAN. Also, plan for the connectivity needs between different branches and Azure services.
For additional information on Azure Virtual WAN and related services, you can refer to the following URLs: - Azure Virtual WAN documentation: Azure Virtual WAN documentation - Azure ExpressRoute documentation: Azure ExpressRoute documentation - Azure DNS documentation: Azure DNS documentation - Azure Private DNS documentation: Azure Private DNS documentation
Please note that the URLs provided are for reference purposes to supplement the study guide and should be accessed for more detailed information on each service.
Design, implement, and manage connectivity services (20–25%)
Design and implement an Azure Virtual WAN architecture
Creating a Hub in Virtual WAN
When designing a network architecture in Azure, one of the key components you may need to implement is a hub in Virtual WAN. A Virtual WAN hub is a Microsoft-managed resource that allows you to easily connect your virtual networks, VPNs, and other networking services. Here’s a detailed explanation of how to create a hub in Virtual WAN:
Access the Azure Portal: Begin by signing in to the Azure Portal at https://portal.azure.com.
Create a Virtual WAN: Navigate to the ‘Virtual WANs’ section and create a new Virtual WAN if you haven’t already done so. This will act as the overarching environment for your networking resources.
Create the Hub: Within the Virtual WAN resource, you can create a new hub. This hub will serve as the central point of connectivity for your network.
Configure the Hub: After creating the hub, you need to configure it. This includes setting up the region for the hub and specifying the scale units. Scale units determine the bandwidth that the hub can handle.
Connect Virtual Networks: Once the hub is configured, you can connect your virtual networks to the hub. This is done by creating a hub virtual network connection resource for each virtual network you wish to connect.
Set Up Routing: Define the routing in the hub to control how traffic is managed between the connected networks. You can use route tables to direct traffic appropriately.
Implement Security: Apply network security groups (NSGs) or Azure Firewall to the hub to secure the traffic flowing through it.
Testing: After setting up the hub, test the connectivity and routing to ensure that everything is functioning as intended.
For additional information on creating and managing a hub in Virtual WAN, you can refer to the following resources:
- Azure Virtual WAN documentation
- How to create a Virtual WAN
- How to connect a virtual network to a Virtual WAN hub
Remember, the hub in Virtual WAN simplifies the management of your network and provides a robust and scalable solution for connecting disparate network resources within Azure.
Design, implement, and manage connectivity services (20–25%)
Design and implement an Azure Virtual WAN architecture
Choosing an Appropriate Scale Unit for Each Gateway Type
When selecting a scale unit for gateway types in Azure, it’s important to understand the different options available and how they affect the performance and scalability of your services. Here, we will discuss the considerations for choosing an appropriate scale unit for Azure Application Gateway and Azure VPN Gateway.
Azure Application Gateway
Azure Application Gateway is a web traffic load balancer that enables you to manage traffic to your web applications. When determining the scale unit for an Application Gateway, consider the following:
- Front-end IP Configuration: The front-end IP address receives client requests and can be configured as public or private depending on your needs https://learn.microsoft.com/en-us/training/modules/configure-azure-application-gateway/4-app-gateway-components .
- Listeners: These are responsible for receiving incoming traffic and routing requests to the appropriate back-end pool https://learn.microsoft.com/en-us/training/modules/configure-azure-application-gateway/4-app-gateway-components .
- Routing Rules: Define how requests are analyzed and directed to the back-end pool https://learn.microsoft.com/en-us/training/modules/configure-azure-application-gateway/4-app-gateway-components .
- Back-end Pool: Contains the web servers where your resources are hosted, such as virtual machines or Virtual Machine Scale Sets https://learn.microsoft.com/en-us/training/modules/configure-azure-application-gateway/4-app-gateway-components .
- Health Probes: Monitor the health of the back-end pool servers to ensure they are available for load balancing https://learn.microsoft.com/en-us/training/modules/configure-azure-application-gateway/4-app-gateway-components .
For additional information on Application Gateway components and features, you can refer to the following URLs: - Azure Application Gateway Overview https://learn.microsoft.com/en-us/training/modules/configure-azure-application-gateway/6-summary-resources . - Application Gateway Components https://learn.microsoft.com/en-us/training/modules/configure-azure-application-gateway/6-summary-resources .
Azure VPN Gateway
Azure VPN Gateway connects your on-premises networks to Azure through Site-to-Site VPNs, allowing you to establish secure, cross-premises connectivity. When choosing a scale unit for Azure VPN Gateway, consider:
- Virtual Network Peering: This allows for the connection of virtual networks in a hub and spoke topology, which can be regional or global https://learn.microsoft.com/en-us/training/modules/configure-vnet-peering/8-summary-resources .
- VPN Gateway Transit Connectivity: Configure your virtual networks with Azure VPN Gateway to allow network traffic to pass through the gateway to access resources in another network https://learn.microsoft.com/en-us/training/modules/configure-vnet-peering/8-summary-resources .
- User-defined Routes and Service Chaining: Extend peering with these features to control how network traffic is routed https://learn.microsoft.com/en-us/training/modules/configure-vnet-peering/8-summary-resources .
For more details on Azure VPN Gateway and virtual network peering, you can visit: - Azure VPN Gateway Documentation https://learn.microsoft.com/en-us/training/modules/configure-vnet-peering/8-summary-resources .
General Considerations
When choosing a scale unit for any gateway type, consider the following general factors:
- Pricing Tier: Different Azure App Service plan pricing tiers offer varying capabilities for running and scaling applications https://learn.microsoft.com/en-us/training/modules/configure-app-service-plans/2-implement-azure .
- Instance Count: The number of virtual machine instances you configure will determine how applications run on those instances https://learn.microsoft.com/en-us/training/modules/configure-app-service-plans/2-implement-azure .
- Autoscaling: If your plan supports autoscaling, all applications in the plan will scale based on the autoscale settings https://learn.microsoft.com/en-us/training/modules/configure-app-service-plans/2-implement-azure .
By carefully considering these factors, you can choose the most appropriate scale unit for your gateway type, ensuring optimal performance and cost-effectiveness for your Azure services.
Design, implement, and manage connectivity services (20–25%)
Design and implement an Azure Virtual WAN architecture
Deploying a gateway into a Virtual WAN hub is a critical step in setting up a wide area network within Azure that can facilitate optimized and automated routing of traffic across a global network. Here is a detailed explanation of the process:
Deploying a Gateway into a Virtual WAN Hub
- Provision the Virtual WAN Hub:
- Begin by creating a Virtual WAN resource in the Azure portal. This acts as a central point for your network connectivity.
- Within the Virtual WAN resource, create a new hub. The hub is a virtual network in Azure that controls and routes traffic across different regions.
- Create the VPN Gateway:
- In the Virtual WAN hub, you need to create a VPN gateway. This gateway will connect your on-premises network to Azure through a secure VPN tunnel.
- Navigate to the hub settings and select the option to create a new VPN gateway.
- Specify the scale units and any other required settings for the gateway. Scale units determine the throughput of the VPN gateway.
- Configure the Gateway:
- Once the VPN gateway is created, configure the gateway by setting up VPN connections to your on-premises network.
- Create a local network gateway that represents your on-premises VPN device with its IP address and the on-premises address spaces you want to route to Azure.
- Establish a connection between the VPN gateway and the local network gateway.
- Set Up Routing:
- Define the routing so that traffic from your on-premises network knows how to reach the Azure Virtual WAN hub.
- Use user-defined routes (UDRs) to direct traffic from the VPN gateway to the appropriate destinations within your Azure environment.
- Testing the Connection:
- After setting up the gateway and routing, test the connection to ensure that traffic is flowing correctly between your on-premises network and Azure.
- Use tools like Azure Network Watcher to monitor and troubleshoot the VPN connection and routing.
- Implementing Redundancy:
- For high availability, consider setting up redundant VPN gateways within the Virtual WAN hub.
- This ensures that if one gateway fails, the other can take over, minimizing downtime.
- Monitoring and Management:
- Continuously monitor the health and performance of the VPN gateway using Azure Monitor.
- Set up alerts for any potential issues and regularly review the gateway’s throughput and latency metrics.
For additional information on deploying a gateway into a Virtual WAN hub, you can refer to the following resources:
By following these steps, you can successfully deploy a gateway into a Virtual WAN hub, enabling secure and efficient connectivity across your network infrastructure.
Design, implement, and manage connectivity services (20–25%)
Design and implement an Azure Virtual WAN architecture
Configure Virtual Hub Routing
When configuring virtual hub routing within Azure, it is essential to understand the role of the hub in a hub-and-spoke network topology. The hub is a central point that connects to multiple spokes, which are the virtual networks that branch out. This configuration allows for efficient management of traffic routing between different virtual networks and potentially to on-premises networks.
Steps for Configuring Virtual Hub Routing:
- Provision the Lab Environment:
- Deploy virtual machines into an Azure region, with some residing in a hub virtual network and others in a spoke virtual network https://learn.microsoft.com/en-us/training/modules/configure-azure-load-balancer/9-simulation-load-balancer .
- Use an Azure Resource Manager template to include the virtual machines and virtual networks in the underlying architecture https://learn.microsoft.com/en-us/training/modules/configure-azure-load-balancer/9-simulation-load-balancer .
- Install the Network Watcher extension on the Azure virtual machines using Azure PowerShell https://learn.microsoft.com/en-us/training/modules/configure-azure-load-balancer/9-simulation-load-balancer .
- Configure the Hub and Spoke Network Topology:
- Establish virtual network peering between the hub and spoke virtual networks https://learn.microsoft.com/en-us/training/modules/configure-azure-load-balancer/9-simulation-load-balancer .
- Ensure that forwarded traffic is allowed, which is crucial for routing between the spoke virtual networks https://learn.microsoft.com/en-us/training/modules/configure-azure-load-balancer/9-simulation-load-balancer .
- Test Transitivity of Virtual Network Peering:
- Utilize Network Watcher to confirm that peered networks are reachable and unpeered networks are not https://learn.microsoft.com/en-us/training/modules/configure-azure-load-balancer/9-simulation-load-balancer .
- Configure Routing in the Hub and Spoke Topology:
- Enable IP forwarding on a virtual machine within the hub to act as a router https://learn.microsoft.com/en-us/training/modules/configure-azure-load-balancer/9-simulation-load-balancer .
- Install necessary Windows features and tools for remote access to support routing functions https://learn.microsoft.com/en-us/training/modules/configure-azure-load-balancer/9-simulation-load-balancer .
- Create and associate routing tables with the appropriate subnets to direct traffic https://learn.microsoft.com/en-us/training/modules/configure-azure-load-balancer/9-simulation-load-balancer .
- Verify traffic is correctly routed through the virtual machine using Network Watcher https://learn.microsoft.com/en-us/training/modules/configure-azure-load-balancer/9-simulation-load-balancer .
- Implement Azure Load Balancer and Application
Gateway:
- For traffic management, implement an Azure Load Balancer in the hub and an Azure Application Gateway in the spoke virtual networks https://learn.microsoft.com/en-us/training/modules/configure-azure-load-balancer/9-simulation-load-balancer .
- Test to ensure that traffic is balanced and managed as intended across the virtual machines https://learn.microsoft.com/en-us/training/modules/configure-azure-load-balancer/9-simulation-load-balancer .
Additional Considerations:
- User-Defined Routes (UDRs): UDRs can be applied to direct traffic through specific virtual appliances or gateways within the hub https://learn.microsoft.com/en-us/training/modules/configure-vnet-peering/5-determine-service-chaining-uses .
- Service Chaining: This allows traffic from one virtual network to be directed to a network virtual appliance (NVA) or VPN gateway in another virtual network https://learn.microsoft.com/en-us/training/modules/configure-vnet-peering/5-determine-service-chaining-uses .
- VPN Gateway Transit: A VPN gateway in the hub can be used as a transit point for traffic from the spokes to access other resources https://learn.microsoft.com/en-us/training/modules/configure-vnet-peering/3-determine-gateway-transit-connectivity .
For more detailed information and templates, you can refer to the Azure Resource Manager template provided in the documentation: Azure Resource Manager template https://learn.microsoft.com/en-us/training/modules/configure-azure-load-balancer/9-simulation-load-balancer .
By following these steps and considerations, you can effectively configure virtual hub routing to manage and direct traffic within your Azure environment. This setup is crucial for organizations looking to replicate on-premises network topologies in Azure and ensure efficient traffic flow between their cloud resources.
Design, implement, and manage connectivity services (20–25%)
Design and implement an Azure Virtual WAN architecture
Create a Network Virtual Appliance (NVA) in a Virtual Hub
A Network Virtual Appliance (NVA) is a virtual appliance that operates at the network layer to control the flow of network traffic. An NVA often includes functions such as firewalls, WAN optimizers, or application delivery controllers. In the context of Azure, an NVA can be used within a virtual hub to manage and secure network traffic.
To create an NVA in a virtual hub, follow these general steps:
- Provision the Virtual Hub:
- Begin by setting up a virtual hub within your Azure environment. This hub will act as the central point in a hub-and-spoke network topology.
- The hub virtual network can host infrastructure components like the NVA or Azure VPN gateway, facilitating traffic flow between the spokes and external networks.
- Deploy the NVA:
- Deploy a virtual machine or a set of virtual machines that will act as the NVA within the hub virtual network. This can be done using Azure Marketplace, which offers a variety of NVAs from different vendors.
- Configure the virtual machine(s) with the necessary software and network configurations to perform the desired network functions.
- Configure Routing:
- Set up user-defined routes (UDRs) to direct traffic through the NVA. UDRs allow you to control the flow of traffic within your virtual network, including traffic destined for the internet, other virtual networks, or on-premises networks.
- Ensure that IP forwarding is enabled on the NVA to allow it to pass traffic between different subnets.
- Integrate with Spoke Virtual Networks:
- Connect the spoke virtual networks to the hub network via virtual network peering. This allows the spokes to communicate with the hub and leverage the services provided by the NVA.
- Adjust the peering settings to allow forwarded traffic from the spokes to reach the hub and vice versa.
- Test and Monitor:
- Use Azure Network Watcher to verify that the NVA is correctly routing traffic. Network Watcher provides tools to diagnose network issues and ensure that your network resources are functioning as expected.
- Monitor the NVA’s performance and health to ensure it meets your network’s security and performance requirements.
For additional information and detailed guidance on creating and configuring an NVA in a virtual hub, you can refer to the following resources:
By following these steps and utilizing the provided resources, you can successfully create and configure an NVA within a virtual hub to manage network traffic in your Azure environment.
Design, implement, and manage connectivity services (20–25%)
Design and implement an Azure Virtual WAN architecture
Integrating a Virtual WAN hub with a third-party Network Virtual Appliance (NVA) involves several steps to ensure that the NVA can handle traffic routing for high performance and high availability scenarios. Here’s a detailed explanation of how to achieve this integration:
Identify the Appropriate SKU: When setting up your load balancer for the NVA, consider using the Standard SKU as it offers a more granular feature set than the Basic SKU and is designed for new architectures https://learn.microsoft.com/en-us/training/modules/configure-azure-load-balancer/5-determine-skus .
Place the NVA: Position your third-party NVA strategically within your network. It can be placed between subnets or between a subnet and the internet to perform network functions such as routing, firewalling, or WAN optimization https://learn.microsoft.com/en-us/training/modules/configure-network-routing-endpoints/3-identify-user-defined-routes .
Configure User-Defined Routes (UDRs): To direct traffic through the NVA, configure UDRs for the subnets. These routes will ensure that traffic from a subnet goes to the NVA and then to its destination, such as the internet or a back-end subnet https://learn.microsoft.com/en-us/training/modules/configure-network-routing-endpoints/3-identify-user-defined-routes .
Implement Service Chaining: Service chaining allows you to define UDRs that direct traffic from one virtual network to an NVA. This is particularly useful when integrating with a Virtual WAN hub, as it enables traffic to flow through the NVA for additional processing or security checks https://learn.microsoft.com/en-us/training/modules/configure-vnet-peering/5-determine-service-chaining-uses .
Use Hub and Spoke Networks: If necessary, implement a hub and spoke network architecture. In this setup, the hub virtual network can host the NVA, and all spoke virtual networks can peer with the hub. Traffic can then be routed through the NVA in the hub virtual network https://learn.microsoft.com/en-us/training/modules/configure-vnet-peering/5-determine-service-chaining-uses .
For additional information on integrating a Virtual WAN hub with a third-party NVA, you can refer to the following resources:
- For general information on Azure load balancers and choosing the right SKU: Azure Load Balancer documentation
- To understand more about user-defined routes and NVAs: User-defined routes and IP forwarding
- For details on service chaining and hub and spoke network architectures: Implementing a hub-spoke network topology in Azure
Please note that the URLs provided are for reference purposes to supplement the study guide and offer additional context and examples.
Design and implement application delivery services (20–25%)
Design and implement an Azure Load Balancer
Mapping Requirements to Features and Capabilities of Azure Load Balancer
When designing a network infrastructure in Azure, it is crucial to understand how to map specific requirements to the features and capabilities of Azure Load Balancer. Below is a detailed explanation of how to align various needs with the functionalities provided by Azure Load Balancer.
Load Balancer Types and SKUs
Azure Load Balancer comes in two types: internal and public. The choice between these depends on whether you need to balance internal traffic within a Virtual Network (VNet) or external traffic coming from the internet https://learn.microsoft.com/en-us/training/modules/configure-azure-load-balancer/5-determine-skus .
- Internal Load Balancer: Ideal for balancing traffic within a VNet.
- Public Load Balancer: Used to distribute incoming internet traffic to resources in Azure.
Azure Load Balancer supports three SKU options: Basic, Standard, and Gateway. Each SKU has different features, scaling capabilities, and pricing models https://learn.microsoft.com/en-us/training/modules/configure-azure-load-balancer/5-determine-skus .
- Basic SKU: Suitable for smaller, less complex deployments not requiring advanced features.
- Standard SKU: Offers enhanced capabilities such as higher scale, improved security features, and better application health monitoring.
- Gateway SKU: Typically used in conjunction with application gateways for more complex routing requirements.
Load Balancer Components
To implement a load balancer, you configure the following components https://learn.microsoft.com/en-us/training/modules/configure-azure-load-balancer/2-determine-uses :
- Front-end IP configuration: Specifies the public IP or internal IP that your load balancer responds to.
- Back-end pools: Consist of the IP addresses of the virtual NICs connected to your load balancer.
- Load-balancing rules: Define how traffic is distributed to your back-end pools.
- Health probes: Monitor and ensure the health of the resources in the back-end.
Load Balancing Scenarios
Azure Load Balancer can handle both inbound and outbound scenarios, making it versatile for different network traffic patterns https://learn.microsoft.com/en-us/training/modules/configure-azure-load-balancer/11-summary-resources https://learn.microsoft.com/en-us/training/modules/configure-azure-load-balancer/2-determine-uses .
- Inbound Load Balancing: Distributes incoming traffic from the internet to the back-end resources.
- Outbound Load Balancing: Manages traffic leaving your Azure resources to the internet.
Advanced Features
Azure Load Balancer includes advanced features such as session persistence and health probes, which are essential for maintaining application resiliency and scalability https://learn.microsoft.com/en-us/training/modules/configure-azure-load-balancer/11-summary-resources .
- Session Persistence: Ensures that a user session is maintained with a specific back-end resource.
- Health Probes: Automatically add or remove VMs from the load balancer based on health checks.
Scalability and Performance
Azure Load Balancer is designed to scale up to millions of TCP and UDP application flows, catering to high-performance and high-availability requirements https://learn.microsoft.com/en-us/training/modules/configure-azure-load-balancer/2-determine-uses .
Additional Resources
For more detailed information on Azure Load Balancer, you can refer to the following URLs:
- Introduction to Azure Load Balancer
- Improve application scalability and resiliency by using Azure Load Balancer (sandbox)
- Load balance non-HTTP(S) traffic in Azure
- Azure Load Balancer documentation
- Create a public load balancer for virtual machines in the Azure portal
By understanding these features and capabilities, you can effectively map your specific requirements to the Azure Load Balancer, ensuring that your applications are resilient, scalable, and performant.
Design and implement application delivery services (20–25%)
Design and implement an Azure Load Balancer
Identify Appropriate Use Cases for Azure Load Balancer
Azure Load Balancer is a critical service that ensures high availability and optimal network performance for applications by efficiently distributing incoming network traffic across multiple servers or resources. Understanding the appropriate use cases for Azure Load Balancer is essential for designing resilient and scalable cloud solutions. Below are some of the key scenarios where Azure Load Balancer can be effectively utilized:
High Availability: Azure Load Balancer can be used to improve the high availability of applications by distributing traffic across multiple servers, ensuring that if one server fails, the traffic is automatically rerouted to the remaining healthy servers https://learn.microsoft.com/en-us/training/modules/configure-azure-load-balancer/2-determine-uses .
Scalability: For applications experiencing variable or high traffic, Azure Load Balancer can distribute the load across a pool of servers, allowing for seamless scaling without impacting end-user experience https://learn.microsoft.com/en-us/training/modules/configure-azure-load-balancer/2-determine-uses .
Fault Tolerance: By using health probes, Azure Load Balancer continuously monitors the health of back-end resources and only sends traffic to the healthy ones, thereby maintaining application performance even if some resources fail https://learn.microsoft.com/en-us/training/modules/configure-azure-load-balancer/2-determine-uses .
Internal and External Traffic Management: Azure Load Balancer can be configured for both internal and public-facing scenarios, making it suitable for managing traffic for services hosted within a virtual network (internal load balancer) or for internet-facing services (public load balancer) https://learn.microsoft.com/en-us/training/modules/configure-azure-load-balancer/2-determine-uses .
Layer-4 Load Balancing: Azure Load Balancer operates at the transport layer (Layer-4 in the OSI network model), making it ideal for load balancing TCP and UDP traffic, which is common in many application architectures https://learn.microsoft.com/en-us/training/modules/configure-azure-load-balancer/2-determine-uses .
Non-HTTP(S) Traffic: It is also the right choice for balancing non-HTTP(S) traffic, such as database requests or any other TCP/UDP-based communication https://learn.microsoft.com/en-us/training/modules/configure-azure-load-balancer/11-summary-resources .
Global Reach with Local Presence: When combined with Azure Traffic Manager, Azure Load Balancer can facilitate global traffic routing with local load balancing, optimizing both global reach and local resource utilization https://learn.microsoft.com/en-us/training/modules/configure-azure-load-balancer/11-summary-resources .
For more detailed information on Azure Load Balancer, including how to configure and implement it for your specific needs, you can refer to the following resources:
- Introduction to Azure Load Balancer
- Improve application scalability and resiliency by using Azure Load Balancer (sandbox)
- Load balance non-HTTP(S) traffic in Azure
These resources provide comprehensive guidance on Azure Load Balancer, helping you to choose and implement the right solution for your application’s needs.
Design and implement application delivery services (20–25%)
Design and implement an Azure Load Balancer
Choose an Azure Load Balancer SKU and Tier
When selecting an Azure Load Balancer SKU, it is important to understand the different options available and their respective features, scenario scaling, and pricing. Azure Load Balancer offers three SKU options:
Basic SKU: This is the entry-level offering and provides load balancing capabilities suitable for small-scale applications. It is generally available at no additional cost but has some limitations in terms of features and scale.
Standard SKU: The Standard SKU offers enhanced capabilities over the Basic SKU, including a higher scale, better security features, and support for availability zones. It is suitable for production workloads and provides built-in diagnostics capabilities.
Gateway SKU: This SKU is specialized for use with application gateways, providing advanced routing features and capabilities designed for web applications.
Each SKU is designed to meet different requirements and use cases. When choosing an SKU, consider factors such as the size of your application, the need for advanced features, security requirements, and the expected traffic load.
Additionally, Azure Load Balancer can be configured as either an internal or a public load balancer:
Internal Load Balancer: Used for load balancing traffic within a virtual network. This is typically used for scenarios where you need to balance load among virtual machines that are not exposed to the internet, such as a database tier.
Public Load Balancer: Used to distribute incoming internet traffic to resources within your virtual network. This is commonly used for web tier scenarios where you need to balance load from internet clients across web servers.
For more detailed information and guidance on Azure Load Balancer, you can refer to the following resources:
- Introduction to Azure Load Balancer
- Improve application scalability and resiliency by using Azure Load Balancer (sandbox)
- Load balance non-HTTP(S) traffic in Azure
These resources provide a comprehensive overview of Azure Load Balancer, including its operation, scenarios where it is the appropriate solution, and how to configure it for different types of traffic https://learn.microsoft.com/en-us/training/modules/configure-azure-load-balancer/11-summary-resources .
Remember to evaluate your application’s specific needs and choose the SKU and tier that best align with your scalability, performance, and cost requirements.
Design and implement application delivery services (20–25%)
Design and implement an Azure Load Balancer
When selecting between a public and an internal load balancer within Azure, it is essential to understand the differences and use cases for each type to ensure the appropriate configuration for your application’s architecture.
Public Load Balancer
A public load balancer in Azure is used to distribute incoming internet traffic to your services hosted in Azure. The key characteristics include:
- Inbound and Outbound Scenarios: It can manage traffic coming into your applications from the internet and control outbound connections from your services to the external world https://learn.microsoft.com/en-us/training/modules/configure-azure-load-balancer/2-determine-uses .
- Front-end IP Configuration: The public load balancer is assigned a public IP address that is accessible from the internet. This IP address serves as the entry point for all incoming traffic https://learn.microsoft.com/en-us/training/modules/configure-azure-load-balancer/2-determine-uses .
- Back-end Pools: These are the services and resources, such as Azure Virtual Machines or instances in Azure Virtual Machine Scale Sets, that receive the distributed traffic https://learn.microsoft.com/en-us/training/modules/configure-azure-load-balancer/2-determine-uses .
- Health Probes: They monitor the health of the resources in the back-end pool to ensure traffic is only sent to healthy instances https://learn.microsoft.com/en-us/training/modules/configure-azure-load-balancer/2-determine-uses .
Internal Load Balancer
An internal load balancer is used within a private network for traffic between Azure services in a virtual network. Its features include:
- Private IP Configuration: The internal load balancer is assigned a private IP address that is not exposed to the internet, making it suitable for multi-tier applications where you want to isolate the front-end tier from the back-end tier https://learn.microsoft.com/en-us/training/modules/configure-azure-load-balancer/4-implement-internal .
- Back-end Pools: Similar to the public load balancer, the back-end pools consist of virtual machines or scale sets that handle the internal traffic https://learn.microsoft.com/en-us/training/modules/configure-azure-load-balancer/4-implement-internal .
- Load-balancing Rules: These rules define how traffic is distributed to the back-end resources, ensuring that workloads are evenly spread across the servers https://learn.microsoft.com/en-us/training/modules/configure-azure-load-balancer/4-implement-internal .
- Health Probes: Health probes are also used in internal load balancers to ensure that traffic is only sent to operational instances https://learn.microsoft.com/en-us/training/modules/configure-azure-load-balancer/11-summary-resources .
Choosing Between Public and Internal Load Balancers
The choice between a public and an internal load balancer depends on the specific requirements of your application:
- Public Load Balancer: Choose this option if your application needs to serve clients on the internet, handle web traffic, or provide services that are publicly accessible.
- Internal Load Balancer: Opt for an internal load balancer if your application components need to communicate within a private network, or if you are setting up a multi-tier application where the front-end needs to be separated from the back-end services.
For additional information on Azure Load Balancer, you can refer to the following resources: - Azure Load Balancer Overview - Quickstart for creating a Load Balancer
Please note that the URLs provided are for reference purposes to supplement the study guide and should be accessed for more detailed information on the topics discussed.
Design and implement application delivery services (20–25%)
Design and implement an Azure Load Balancer
Choosing Between Regional and Global Peering in Azure Virtual Networks
When configuring Azure Virtual Network peering, it is essential to understand the differences between regional and global peering to make an informed decision that aligns with your network architecture and business requirements.
Regional Peering
Regional peering connects Azure virtual networks within the same geographic region. This type of peering is beneficial when you have multiple virtual networks in the same region that need to communicate with each other. Here are some key points about regional peering:
- Low Latency: Since the virtual networks are in the same region, the network latency is minimal https://learn.microsoft.com/en-us/training/modules/configure-vnet-peering/8-summary-resources .
- Private Network Traffic: Traffic between peered virtual networks remains private and is kept on the Azure backbone network, ensuring security and reliability https://learn.microsoft.com/en-us/training/modules/configure-vnet-peering/8-summary-resources .
- Simplified Network Management: Managing virtual networks as separate resources while still allowing them to communicate as if they were part of the same network https://learn.microsoft.com/en-us/training/modules/configure-vnet-peering/2-determine-uses .
Global Peering
Global peering, on the other hand, connects Azure virtual networks across different geographic regions. This is suitable for organizations that operate on a global scale and require their networks across various regions to communicate with each other. Key aspects of global peering include:
- Global Reach: Connects virtual networks across different Azure regions, providing a global networking solution https://learn.microsoft.com/en-us/training/modules/configure-vnet-peering/8-summary-resources .
- No Inter-region Data Transfer Costs: Network traffic between globally peered virtual networks does not incur inter-region data transfer costs, as it is transferred over the Azure backbone network https://learn.microsoft.com/en-us/training/modules/configure-vnet-peering/8-summary-resources .
- Restrictions: Global peering is not permitted between virtual networks in different Azure Government cloud regions https://learn.microsoft.com/en-us/training/modules/configure-vnet-peering/2-determine-uses .
Considerations for Choosing Peering Type
When deciding between regional and global peering, consider the following:
- Geographic Distribution: Choose global peering if your virtual networks are distributed across multiple regions. Opt for regional peering if they are all located within the same region https://learn.microsoft.com/en-us/training/modules/configure-vnet-peering/8-summary-resources https://learn.microsoft.com/en-us/training/modules/configure-vnet-peering/2-determine-uses .
- Latency Requirements: Regional peering typically offers lower latency due to the proximity of the networks https://learn.microsoft.com/en-us/training/modules/configure-vnet-peering/8-summary-resources .
- Compliance and Data Sovereignty: Ensure that global peering aligns with any regulatory requirements that may dictate where your data can be transferred and stored https://learn.microsoft.com/en-us/training/modules/configure-vnet-peering/2-determine-uses .
- Cost: While Azure does not charge for the peering itself, consider the cost implications of data egress and ingress in different regions https://learn.microsoft.com/en-us/training/modules/configure-vnet-peering/8-summary-resources .
For additional information on Azure Virtual Network peering, you can refer to the following resources:
By carefully evaluating these factors, you can choose the appropriate peering type that best suits your network architecture and business needs.
Design and implement application delivery services (20–25%)
Design and implement an Azure Load Balancer
Implementing a Gateway Load Balancer in Azure
When designing a network architecture in Azure, one of the components you may need to implement is a Gateway Load Balancer. This type of load balancer is designed to provide efficient and reliable routing for your network traffic. Below is a detailed explanation of how to implement a Gateway Load Balancer in Azure.
Understanding Gateway Load Balancer
Azure Load Balancer supports three SKU options: Basic, Standard, and Gateway. The Gateway SKU is specifically tailored for scenarios that require gateway connectivity, such as VPN or ExpressRoute gateways https://learn.microsoft.com/en-us/training/modules/configure-azure-load-balancer/5-determine-skus .
Configuration Steps
Selecting the Load Balancer Type: In the Azure portal, when creating a load balancer, you have the option to select an internal or public load balancer. For a Gateway Load Balancer, you would typically select the internal type, as it is often used within a virtual network https://learn.microsoft.com/en-us/training/modules/configure-azure-load-balancer/5-determine-skus .
Choosing the SKU: Select the Gateway SKU when creating the load balancer. This SKU is optimized for your gateway traffic management needs https://learn.microsoft.com/en-us/training/modules/configure-azure-load-balancer/5-determine-skus .
Front-end IP Configuration: Define the front-end IP configuration. This is the IP address that the load balancer will use to receive incoming traffic before distributing it to the back-end resources https://learn.microsoft.com/en-us/training/modules/configure-azure-load-balancer/2-determine-uses .
Back-end Pools: Set up the back-end pools, which consist of the resources that will handle the incoming traffic. These could be virtual machines or instances within Azure Virtual Machine Scale Sets that are part of your gateway infrastructure https://learn.microsoft.com/en-us/training/modules/configure-azure-load-balancer/2-determine-uses .
Health Probes: Configure health probes to monitor the health of the back-end resources. The load balancer uses these probes to determine which back-end resources are healthy and can receive traffic https://learn.microsoft.com/en-us/training/modules/configure-azure-load-balancer/2-determine-uses .
Load-balancing Rules: Establish load-balancing rules to define how traffic should be distributed to the back-end resources. These rules are crucial for ensuring that traffic is evenly spread across your gateway resources https://learn.microsoft.com/en-us/training/modules/configure-azure-load-balancer/2-determine-uses .
Scaling: Azure Load Balancer, including the Gateway SKU, can scale up to millions of TCP and UDP application flows, ensuring that it can handle the traffic for most enterprise scenarios https://learn.microsoft.com/en-us/training/modules/configure-azure-load-balancer/2-determine-uses .
Additional Resources
For more information on Azure Load Balancer and to deepen your understanding of how to implement a Gateway Load Balancer, you can refer to the following resources:
Introduction to Azure Load Balancer: This resource provides a comprehensive overview of what Azure Load Balancer does and how it works https://learn.microsoft.com/en-us/training/modules/configure-azure-load-balancer/11-summary-resources .
Improve application scalability and resiliency by using Azure Load Balancer (sandbox): This module teaches about the different load balancers in Azure and how to choose the right Azure load balancer solution https://learn.microsoft.com/en-us/training/modules/configure-azure-load-balancer/11-summary-resources .
Load balance non-HTTP(S) traffic in Azure: Learn about the different load balancer options in Azure and how to implement the right Azure solution for non-HTTP(S) traffic https://learn.microsoft.com/en-us/training/modules/configure-azure-load-balancer/11-summary-resources .
By following these steps and utilizing the additional resources, you can effectively implement a Gateway Load Balancer in Azure to ensure your network’s traffic is managed efficiently and reliably.
Design and implement application delivery services (20–25%)
Design and implement an Azure Load Balancer
Create and Configure an Azure Load Balancer
When setting up an Azure Load Balancer, you will need to decide on the type (internal or public) and the SKU (Basic, Standard, or Gateway), as each offers different features, scaling capabilities, and pricing structures https://learn.microsoft.com/en-us/training/modules/configure-azure-load-balancer/5-determine-skus .
Step 1: Choose the Load Balancer Type
- Internal Load Balancer: Used for load balancing traffic within a private network. For example, it can distribute database requests across multiple SQL servers within an Azure subnet https://learn.microsoft.com/en-us/training/modules/configure-azure-load-balancer/4-implement-internal .
- Public Load Balancer: Designed to manage incoming internet traffic to provide services to internet clients, distributing requests to a backend pool of resources, such as virtual machines https://learn.microsoft.com/en-us/training/modules/configure-azure-load-balancer/3-implement-public .
Step 2: Select the SKU
- Basic: Offers a cost-effective solution for smaller applications not requiring advanced features.
- Standard: Provides enhanced capabilities, including better scaling and high availability.
- Gateway: Typically used for application gateways, offering advanced routing features and web application firewall capabilities.
Step 3: Configure Backend Pools
- Backend pools consist of the network interfaces (NICs) for the virtual machines intended to receive the network traffic.
Step 4: Define Load Balancing Rules
- Rules determine how traffic is distributed to the backend pool. They define the front-end IP configuration, the backend pool, and the required source and destination ports https://learn.microsoft.com/en-us/training/modules/configure-azure-load-balancer/2-determine-uses .
Step 5: Set Up Health Probes
- Health probes monitor the availability of your instances. The load balancer only sends traffic to the healthy instances, as determined by the responses to the health probes https://learn.microsoft.com/en-us/training/modules/configure-azure-load-balancer/2-determine-uses .
Step 6: Apply Frontend IP Configuration
- This configuration assigns a public IP address for public load balancers or a private IP address for internal load balancers to the load balancer instance.
Additional Resources
For more detailed instructions and guidance, the following resources are invaluable: - Azure Load Balancer documentation provides a comprehensive starting point for understanding Azure Load Balancer https://learn.microsoft.com/en-us/training/modules/configure-azure-load-balancer/11-summary-resources . - Create a public load balancer for virtual machines in the Azure portal offers a step-by-step guide to creating a public load balancer https://learn.microsoft.com/en-us/training/modules/configure-azure-load-balancer/11-summary-resources .
By following these steps and utilizing the provided resources, you can effectively create and configure an Azure Load Balancer to ensure high availability and optimal network performance for your applications.
Design and implement application delivery services (20–25%)
Design and implement an Azure Load Balancer
Implementing a Load Balancing Rule in Azure
When configuring Azure Load Balancer, implementing a load balancing rule is a critical step to ensure that network traffic is distributed across the back-end pool of resources, such as virtual machines. Here’s a detailed explanation of how to implement a load balancing rule:
- Prerequisites:
- A front-end IP configuration: This is the IP address that the load balancer responds to.
- A back-end pool: This consists of the services and resources that will receive the distributed traffic.
- A health probe: This checks the health of the resources in the back-end pool to ensure they can receive traffic.
- Configuration Settings:
- IP Version: Choose between IPv4 or IPv6 for the rule.
- Front-end IP Address: Specify the public or internal IP address that will be used.
- Port and Protocol: Define the port number and the protocol (TCP or UDP) that the rule will apply to.
- Back-end Pool: Select the group of resources that will receive the traffic.
- Back-end Port: Indicate the port on which the back-end resources will listen.
- Health Probe: Choose the health probe that will monitor the availability of the back-end resources.
- Session Persistence: Decide how the load balancer
will handle traffic from a client. Options include:
- None (default): Any back-end resource can handle the request.
- Client IP: Requests from the same client IP address will be directed to the same back-end resource.
- Client IP and Protocol: Requests from the same client IP address and protocol combination will be directed to the same back-end resource.
- Traffic Distribution:
- By default, Azure Load Balancer uses a five-tuple hash based on source IP address, source port, destination IP address, destination port, and protocol type to map traffic to the available servers.
- The load balancer provides session stickiness only within a transport session.
- Combining with NAT Rules:
- Load-balancing rules can be used in conjunction with Network Address Translation (NAT) rules to enable scenarios like remote desktop access from outside of Azure.
For additional information on configuring load balancing rules in Azure, you can refer to the following resources: - Add or remove a load-balancing rule - Azure Load Balancer documentation
Remember, maintaining session persistence is crucial for applications that require a consistent user experience, such as those with shopping carts or user sessions https://learn.microsoft.com/en-us/training/modules/configure-azure-load-balancer/8-create-load-balancer-rules .
By following these steps and considering the configuration options, you can effectively implement a load balancing rule to distribute network traffic evenly and maintain high availability and network performance for your applications https://learn.microsoft.com/en-us/training/modules/configure-azure-load-balancer/8-create-load-balancer-rules https://learn.microsoft.com/en-us/training/modules/configure-azure-load-balancer/2-determine-uses https://learn.microsoft.com/en-us/training/modules/configure-azure-load-balancer/2-determine-uses https://learn.microsoft.com/en-us/training/modules/configure-azure-load-balancer/11-summary-resources .
Design and implement application delivery services (20–25%)
Design and implement an Azure Load Balancer
Create and Configure Inbound NAT Rules
Network Address Translation (NAT) rules are essential for directing traffic coming from the internet to specific resources within your Azure virtual network. When configuring inbound NAT rules, you are essentially creating a pathway for external clients to access services hosted on your virtual machines (VMs) without exposing the VMs directly to the internet. Here’s how to create and configure inbound NAT rules in Azure:
Identify the Resource: Determine the Azure resource, such as a VM, that requires external access. Ensure that the resource is part of a backend pool in a Load Balancer configuration.
Load Balancer Setup: Before you can create a NAT rule, you need to have an Azure Load Balancer with a frontend IP configuration, a backend pool containing your VMs, and a health probe to monitor the availability of the VMs https://learn.microsoft.com/en-us/training/modules/configure-azure-load-balancer/8-create-load-balancer-rules .
Frontend IP Configuration: Assign a public IP address to the Load Balancer’s frontend configuration. This IP address will be used by external clients to access the services on your VMs https://learn.microsoft.com/en-us/training/modules/configure-azure-load-balancer/8-create-load-balancer-rules .
Define the NAT Rule: In the Azure portal, navigate to your Load Balancer resource and find the “Inbound NAT rules” section. Here, you can define the NAT rule by specifying the following settings:
- IP Version: Choose between IPv4 or IPv6 https://learn.microsoft.com/en-us/training/modules/configure-azure-load-balancer/8-create-load-balancer-rules .
- Frontend IP Address: Select the public IP address you assigned to the Load Balancer https://learn.microsoft.com/en-us/training/modules/configure-azure-load-balancer/8-create-load-balancer-rules .
- Port and Protocol: Specify the port number and protocol (TCP or UDP) that external clients will use to access the service https://learn.microsoft.com/en-us/training/modules/configure-azure-load-balancer/8-create-load-balancer-rules .
- Backend Pool: Select the backend pool that contains the VM you want to access .
- Backend Port: Define the port on the VM that the traffic should be directed to .
Session Persistence: Decide if you need session persistence, which ensures that traffic from a particular client is directed to the same VM during a session. This is important for applications like shopping carts or any other service that requires maintaining client state https://learn.microsoft.com/en-us/training/modules/configure-azure-load-balancer/8-create-load-balancer-rules .
Health Probe: Associate a health probe with the NAT rule to ensure that traffic is only sent to healthy VMs https://learn.microsoft.com/en-us/training/modules/configure-azure-load-balancer/8-create-load-balancer-rules .
Finalize and Test: After configuring the NAT rule, save your settings and test the rule by attempting to access the service from an external client using the public IP address and port you specified.
For additional information on configuring inbound NAT rules, you can refer to the Azure documentation on Load Balancer settings and NAT rules: - Azure Load Balancer Documentation
Remember, when setting up NAT rules, it’s important to consider the security implications and ensure that only the necessary ports and protocols are exposed to the internet. It’s also advisable to review and update your network security group (NSG) rules to allow the intended traffic while blocking unwanted access .
By following these steps, you can successfully create and configure inbound NAT rules to enable secure and controlled access to services hosted within your Azure virtual network.
Design and implement application delivery services (20–25%)
Design and implement an Azure Load Balancer
When configuring network security within Azure, it is essential to understand the creation and configuration of explicit outbound rules, including Source Network Address Translation (SNAT). Outbound rules are crucial for controlling how traffic exits a virtual network, and SNAT plays a significant role in managing the IP addresses of outbound connections.
Outbound Security Rules
Outbound security rules are part of a Network Security Group (NSG), which is a filter for incoming and outgoing network traffic from several types of Azure resources. To create and configure outbound security rules, you would typically:
- Access the Azure portal and navigate to the Network Security Group (NSG) you want to configure.
- Go to the “Outbound security rules” section and click on “Add” to create a new rule.
- Define the rule with the necessary properties such as:
- Source: Define the source IP addresses or range.
- Source port ranges: Specify the ports for the source.
- Destination: Set the destination IP addresses or range.
- Destination port ranges: Indicate the ports for the destination.
- Protocol: Choose between TCP, UDP, or Any.
- Action: Decide whether to Allow or Deny the traffic.
- Priority: Assign a priority to the rule, with lower numbers processed first.
- Name: Give the rule a meaningful name.
- Description: Optionally, provide a description for the rule.
Source Network Address Translation (SNAT)
SNAT is a method used to allow multiple devices on a local network to access the internet using a single public IP address. This is important in scenarios where you have a limited number of public IP addresses available. SNAT modifies the source IP address in the IP header of a packet to the public IP address as it passes through the router or firewall. This way, external services see traffic as coming from the public IP address, not the private one.
To configure SNAT in Azure, you would:
- Use Azure Load Balancer or Azure NAT Gateway, which provide SNAT capabilities.
- For Azure Load Balancer, ensure that an outbound rule is created that specifies the backend pool, frontend IP, protocol, and associated ports.
- For Azure NAT Gateway, associate it with a subnet or a public IP prefix and define the required outbound traffic rules.
By configuring SNAT, you ensure that your virtual machines or services within Azure can initiate outbound connections to the internet or other public-facing services while maintaining the security and integrity of your private network space.
For additional information on configuring NSGs and SNAT in Azure, you can refer to the following URLs:
- Network Security Groups: Azure Network Security Groups
- SNAT and Load Balancer: Outbound connections in Azure
- Azure NAT Gateway: What is Azure NAT Gateway?
Please note that the URLs provided are for reference purposes to supplement the study guide and should be accessed for more detailed information on the topics discussed.
Design and implement application delivery services (20–25%)
Design and implement Azure Application Gateway
Mapping Requirements to Features and Capabilities of Azure Application Gateway
Azure Application Gateway is a web traffic load balancer that enables you to manage traffic to your web applications. When mapping requirements to the features and capabilities of Azure Application Gateway, it is essential to understand the various components and functionalities it offers. Below is a detailed explanation of how specific requirements can be addressed by Azure Application Gateway’s features:
- Load Balancing and Application Routing:
- Azure Application Gateway provides load balancing services, ensuring that incoming web traffic is distributed evenly across multiple servers, thereby improving the performance and availability of applications https://learn.microsoft.com/en-us/training/modules/configure-azure-application-gateway/6-summary-resources .
- Path-Based Routing:
- For applications that require routing requests to different back-end pools based on URL paths, Azure Application Gateway’s path-based routing feature can be utilized. This allows for the organization of resources and services within distinct pools, optimizing resource utilization https://learn.microsoft.com/en-us/training/modules/configure-azure-application-gateway/3-determine-routing .
- Multi-Site Routing:
- When hosting multiple web applications on a single Application Gateway instance, multi-site routing can be configured. This capability is particularly useful for businesses that manage multiple domains or subdomains and wish to streamline their infrastructure https://learn.microsoft.com/en-us/training/modules/configure-azure-application-gateway/3-determine-routing .
- Redirection:
- Azure Application Gateway can be set up to redirect traffic, such as redirecting from HTTP to HTTPS, ensuring secure communication. This feature is critical for compliance with security protocols and for protecting sensitive data in transit https://learn.microsoft.com/en-us/training/modules/configure-azure-application-gateway/3-determine-routing .
- HTTP Headers and URL Rewriting:
- The ability to rewrite HTTP headers and URLs is a feature of Azure Application Gateway that allows for the modification of request and response headers. This can be used to translate URLs, add or remove headers, and implement specific conditions for rewriting https://learn.microsoft.com/en-us/training/modules/configure-azure-application-gateway/3-determine-routing .
- Custom Error Pages:
- Instead of using default error pages, Azure Application Gateway allows the creation of custom error pages. This feature enables the use of branded and more informative error pages, enhancing the user experience during error conditions https://learn.microsoft.com/en-us/training/modules/configure-azure-application-gateway/3-determine-routing .
- Web Application Firewall (WAF):
- Azure Application Gateway includes a Web Application Firewall that provides built-in protection against web vulnerabilities and attacks. WAF is a key feature for securing web applications and adhering to security standards https://learn.microsoft.com/en-us/training/modules/configure-azure-application-gateway/6-summary-resources .
For additional information on Azure Application Gateway and its capabilities, the following resources can be consulted:
- Introduction to Azure Application Gateway: [https://learn.microsoft.com/en-us/training/modules/intro-to-azure-application-gateway/] https://learn.microsoft.com/en-us/training/modules/configure-azure-application-gateway/6-summary-resources .
- Overview of Azure Application Gateway: [https://learn.microsoft.com/en-us/azure/application-gateway/overview] https://learn.microsoft.com/en-us/training/modules/configure-azure-application-gateway/6-summary-resources .
- Components of Application Gateway: [https://learn.microsoft.com/en-us/azure/application-gateway/application-gateway-components] https://learn.microsoft.com/en-us/training/modules/configure-azure-application-gateway/6-summary-resources .
- Features of Application Gateway: [https://learn.microsoft.com/en-us/azure/application-gateway/features] https://learn.microsoft.com/en-us/training/modules/configure-azure-application-gateway/6-summary-resources .
- Azure Web Application Firewall on Application Gateway: [https://learn.microsoft.com/en-us/azure/web-application-firewall/ag/ag-overview] https://learn.microsoft.com/en-us/training/modules/configure-azure-application-gateway/6-summary-resources .
- Application Gateway redirection routing: [https://learn.microsoft.com/en-us/azure/application-gateway/redirect-overview] https://learn.microsoft.com/en-us/training/modules/configure-azure-application-gateway/6-summary-resources .
- Configure an application gateway to host multiple web sites: [https://learn.microsoft.com/en-us/azure/application-gateway/create-multiple-sites-portal] https://learn.microsoft.com/en-us/training/modules/configure-azure-application-gateway/6-summary-resources .
- Rewrite HTTP headers and URL with Application Gateway: [https://learn.microsoft.com/en-us/azure/application-gateway/rewrite-http-headers-url] https://learn.microsoft.com/en-us/training/modules/configure-azure-application-gateway/6-summary-resources .
By understanding and leveraging these features, you can effectively map your specific requirements to the capabilities of Azure Application Gateway, ensuring that your web applications are scalable, secure, and highly available.
Design and implement application delivery services (20–25%)
Design and implement Azure Application Gateway
Azure Application Gateway Use Cases
Azure Application Gateway is a web traffic load balancer that enables you to manage traffic to your web applications. Understanding its use cases is crucial for designing and implementing secure, highly available, and scalable web applications. Here are some appropriate use cases for Azure Application Gateway:
Load Balancing: Azure Application Gateway provides load balancing for your web applications, distributing incoming web traffic across multiple servers in a back-end pool https://learn.microsoft.com/en-us/training/modules/configure-azure-application-gateway/6-summary-resources .
Path-Based Routing: This feature allows you to route traffic based on URL paths. For example, requests for
/imagescan be routed to a different server pool than requests for/videos, optimizing resource utilization https://learn.microsoft.com/en-us/training/modules/configure-azure-application-gateway/3-determine-routing .Multi-Site Hosting: You can configure Azure Application Gateway to host multiple web applications on the same instance. This is particularly useful when you need to manage multiple domains or subdomains from a single point https://learn.microsoft.com/en-us/training/modules/configure-azure-application-gateway/3-determine-routing .
Secure Sockets Layer (SSL) Termination: Application Gateway can terminate SSL connections at the gateway, offloading this CPU-intensive task from your web servers. This helps to free up resources on your web servers to handle more web traffic https://learn.microsoft.com/en-us/training/modules/configure-azure-application-gateway/6-summary-resources .
Web Application Firewall (WAF): Azure Application Gateway includes a web application firewall that provides protection to your web applications from common web vulnerabilities and exploits. WAF comes pre-configured with rules that protect your applications from threats https://learn.microsoft.com/en-us/training/modules/configure-azure-application-gateway/6-summary-resources .
Redirection: Application Gateway supports the ability to redirect traffic, which is commonly used to redirect HTTP traffic to HTTPS, ensuring secure communication https://learn.microsoft.com/en-us/training/modules/configure-azure-application-gateway/3-determine-routing .
HTTP Header and URL Rewrite: You can rewrite HTTP headers and URLs with Application Gateway to modify traffic as it passes through. This is useful for scenarios such as maintaining sticky sessions or capturing important information about the client requests https://learn.microsoft.com/en-us/training/modules/configure-azure-application-gateway/3-determine-routing .
Custom Error Pages: Instead of using default error pages, Application Gateway allows you to create custom error pages that align with your company’s branding and provide a better user experience https://learn.microsoft.com/en-us/training/modules/configure-azure-application-gateway/3-determine-routing .
For additional information on Azure Application Gateway, you can explore the following resources:
- Introduction to Azure Application Gateway https://learn.microsoft.com/en-us/training/modules/configure-azure-application-gateway/6-summary-resources .
- Azure Application Gateway Overview https://learn.microsoft.com/en-us/training/modules/configure-azure-application-gateway/6-summary-resources .
- Application Gateway Components https://learn.microsoft.com/en-us/training/modules/configure-azure-application-gateway/6-summary-resources .
- Application Gateway Features https://learn.microsoft.com/en-us/training/modules/configure-azure-application-gateway/6-summary-resources .
- Azure Web Application Firewall on Application Gateway https://learn.microsoft.com/en-us/training/modules/configure-azure-application-gateway/6-summary-resources .
- Application Gateway Redirection Routing https://learn.microsoft.com/en-us/training/modules/configure-azure-application-gateway/6-summary-resources .
- Configure an Application Gateway to Host Multiple Web Sites https://learn.microsoft.com/en-us/training/modules/configure-azure-application-gateway/6-summary-resources .
- Rewrite HTTP Headers and URL with Application Gateway https://learn.microsoft.com/en-us/training/modules/configure-azure-application-gateway/6-summary-resources .
By leveraging these features, Azure Application Gateway can help ensure that your web applications are secure, performant, and highly available.
Design and implement application delivery services (20–25%)
Design and implement Azure Application Gateway
When deciding on a scaling strategy for Azure App Service plans and applications, it’s important to understand the difference between manual scaling and autoscale.
Manual Scaling
Manual scaling, also known as scale up or scale out, involves adjusting the compute resources for your applications directly. Here’s how it works:
Scale Up: This method increases the CPU, memory, and disk space available to your applications by changing the pricing tier of the Azure App Service plan. By scaling up, you can access additional features such as dedicated virtual machines, custom domains and certificates, staging slots, and more https://learn.microsoft.com/en-us/training/modules/configure-app-service-plans/4-scale-up-scale-out .
Scale Out: This method increases the number of virtual machine instances that run your application. You can manually configure the instance count up to a certain limit based on your App Service plan’s pricing tier. For example, you can scale out to as many as 30 instances, and if you’re using an Isolated tier with App Service Environments, you can increase this count to 100 instances https://learn.microsoft.com/en-us/training/modules/configure-app-service-plans/4-scale-up-scale-out .
Autoscale
Autoscale is an automatic scaling method that adjusts the number of compute resources based on the application’s load. Here are the key points about autoscale:
Automatic Adjustment: Autoscale allows your application to automatically scale out (increase the number of VM instances) based on predefined rules and schedules. This ensures that your application has the necessary resources during high demand and conserves resources when demand is low https://learn.microsoft.com/en-us/training/modules/configure-app-service-plans/4-scale-up-scale-out .
Rules and Schedules: Autoscale can be configured with metric-based or time-based rules. Metric-based rules scale resources in response to real-time demand, such as CPU usage or the number of requests. Time-based rules predictably scale resources at specific times, such as during known peak business hours https://learn.microsoft.com/en-us/training/modules/configure-app-service-plans/7-summary-resources .
Cost-Effectiveness: By using autoscale, you can maintain optimal performance while managing costs effectively. Autoscale ensures that you’re not paying for unused resources during off-peak times .
For more information on scaling in Azure App Service, you can refer to the following resources:
When choosing between manual scaling and autoscale, consider factors such as the predictability of your application load, cost constraints, and the need for manual control over the environment. Autoscale is generally recommended for its ability to adapt to changing demands without constant manual intervention.
Design and implement application delivery services (20–25%)
Design and implement Azure Application Gateway
Create a Back-End Pool
When configuring a back-end pool for Azure Application Gateway or Azure Load Balancer, you are essentially setting up a collection of web servers that will handle incoming traffic. Here’s a step-by-step guide to creating a back-end pool:
Identify the Resources: Determine which resources will be part of the back-end pool. This can include virtual machines, Virtual Machine Scale Sets, Azure App Services, or on-premises servers https://learn.microsoft.com/en-us/training/modules/configure-azure-application-gateway/4-app-gateway-components .
Specify IP Addresses and Ports: For each resource in the back-end pool, provide the IP address and the port on which it listens for requests https://learn.microsoft.com/en-us/training/modules/configure-azure-application-gateway/4-app-gateway-components .
Configure in Azure Portal: Use the Azure portal to configure the settings for your back-end pool. This involves adding the IP addresses of the virtual NICs that are connected to your load balancer https://learn.microsoft.com/en-us/training/modules/configure-azure-load-balancer/6-create-backend-pools .
Load Balancer Association: Ensure that each back-end pool has an associated load balancer to distribute incoming traffic across the pool https://learn.microsoft.com/en-us/training/modules/configure-azure-application-gateway/4-app-gateway-components .
Health Probes: Set up health probes to monitor the availability of the web servers in the back-end pool. The health probes help determine which servers are healthy and can handle requests https://learn.microsoft.com/en-us/training/modules/configure-azure-application-gateway/4-app-gateway-components .
Load-Balancing Rules: Define load-balancing rules to specify how traffic should be distributed to the servers in your back-end pool. These rules map a front-end IP address and port combination to a set of back-end IP address and port combinations https://learn.microsoft.com/en-us/training/modules/configure-azure-load-balancer/8-create-load-balancer-rules .
By following these steps, you can create a back-end pool that effectively manages the distribution of traffic to your web servers, ensuring high availability and reliability of your services.
For additional information on configuring Azure Application Gateway and Azure Load Balancer, you can refer to the following URLs: - Configure Azure Application Gateway - Add Load Balancer Rules - Backend Pools in Azure Load Balancer
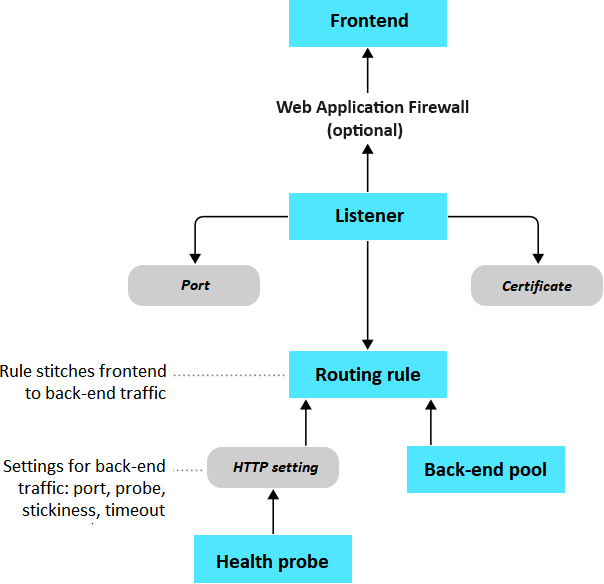
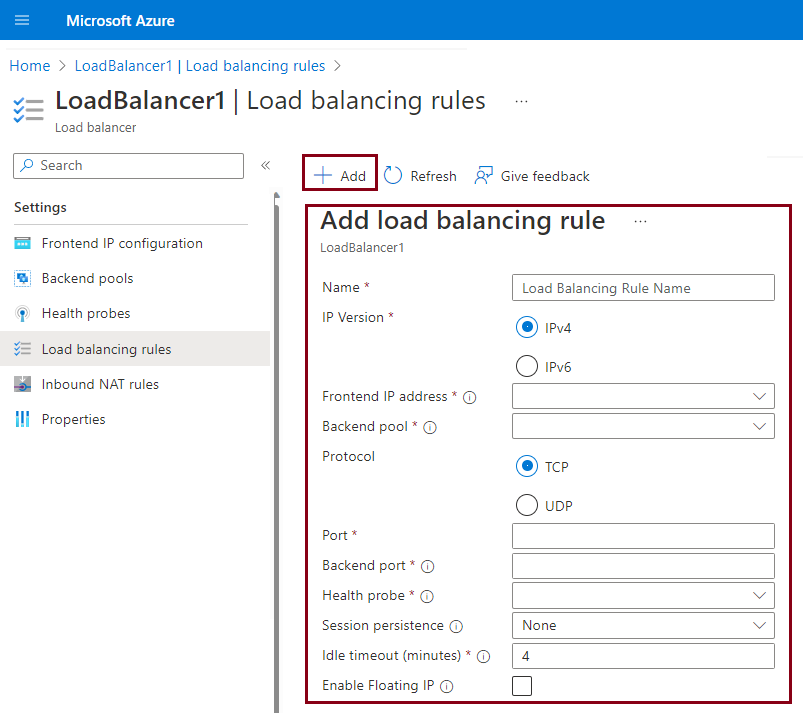
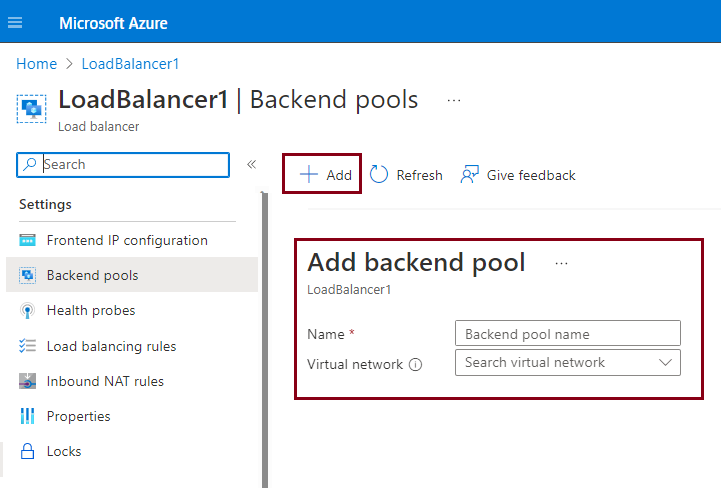
Please note that the URLs provided are for reference and additional context. They should be used to supplement the information provided in this guide.
Design and implement application delivery services (20–25%)
Design and implement Azure Application Gateway
Configure Health Probes
Health probes are an essential component in Azure’s load balancing services, as they determine the availability of the servers in the back-end pool. When configuring health probes, it is important to understand their role and how they function within the load balancing process.
Functionality of Health Probes: - Health probes send periodic requests to each server in the back-end pool to assess their availability. - A server is considered healthy if it returns an HTTP response with a status code in the range of 200 to 399 https://learn.microsoft.com/en-us/training/modules/configure-azure-application-gateway/4-app-gateway-components . - If a server fails to respond or returns a status code outside the specified range, it is marked as unhealthy. - Unhealthy instances are temporarily removed from the load balancer rotation until they pass the health criteria again.
Default Health Probe Behavior: - In the absence of a custom health probe configuration, Azure Application Gateway creates a default probe. - The default probe waits for 30 seconds before marking a server as unavailable https://learn.microsoft.com/en-us/training/modules/configure-azure-application-gateway/4-app-gateway-components .
Custom Health Probe Configuration: - Administrators can configure custom health probes to suit specific requirements. - Customization options include the probe interval, the number of retries, the timeout settings, and the specific URL path that the probe requests. - The configuration should reflect the nature of the application and the expected response times.
Benefits of Health Probes: - Health probes ensure that traffic is only sent to servers that are currently able to handle requests. - They help maintain high availability and network performance by preventing requests from being sent to failed or degraded servers. - Health probes contribute to the overall resilience and scalability of applications https://learn.microsoft.com/en-us/training/modules/configure-azure-load-balancer/11-summary-resources .
Considerations: - It is crucial to configure health probes correctly to avoid false positives or negatives in server health detection. - The probe configuration should be tested to ensure that it accurately reflects the health of the back-end servers.
For additional information on configuring health probes in Azure, you can refer to the following resources: - Azure Load Balancer health probes documentation - Azure Application Gateway health probes documentation
By carefully configuring health probes, administrators can ensure that their load balancing setup effectively manages network traffic and maintains application performance and availability.
Design and implement application delivery services (20–25%)
Design and implement Azure Application Gateway
Configure Listeners
Listeners are a crucial component of the Azure Application Gateway, which serve as the entry point for traffic. They are responsible for accepting incoming traffic based on specific criteria such as protocol, port, host, and IP address. Once a listener receives a request, it routes the request to a back-end pool of servers according to predefined routing rules https://learn.microsoft.com/en-us/training/modules/configure-azure-application-gateway/4-app-gateway-components .
Types of Listeners
There are two types of listeners that can be configured on the Azure Application Gateway:
Basic Listener: This type of listener routes requests solely based on the path in the URL. It is suitable for single-site hosting scenarios where all requests are managed by a single routing rule https://learn.microsoft.com/en-us/training/modules/configure-azure-application-gateway/4-app-gateway-components .
Multi-site Listener: This listener is more advanced and can route requests by using both the path and the hostname element of the URL. Multi-site listeners are ideal for hosting multiple web applications on the same Application Gateway instance, supporting multi-tenant applications where each tenant may have its own set of resources hosting a web application https://learn.microsoft.com/en-us/training/modules/configure-azure-application-gateway/3-determine-routing https://learn.microsoft.com/en-us/training/modules/configure-azure-application-gateway/4-app-gateway-components .
Configuring a Listener
To configure a listener, you need to specify the combination of protocol (HTTP or HTTPS), port, host, and IP address that the listener should accept traffic on. If the listener is for HTTPS traffic, you will also need to handle the TLS/SSL certificates to secure the communication between the user and the Application Gateway https://learn.microsoft.com/en-us/training/modules/configure-azure-application-gateway/4-app-gateway-components .
Routing Requests
Once the listener is configured, it uses routing rules to direct incoming requests to the appropriate back-end pool. A routing rule binds your listeners to the back-end pools and specifies how to interpret the hostname and path elements in the URL of a request. The rule also has an associated set of HTTP settings, which indicate whether and how traffic is encrypted between the Application Gateway and the back-end servers https://learn.microsoft.com/en-us/training/modules/configure-azure-application-gateway/4-app-gateway-components .
Additional Configuration
Other configuration information for a listener includes protocol, session stickiness, connection draining, request timeout period, and health probes. These settings help in managing the behavior of the traffic between the Application Gateway and the back-end servers https://learn.microsoft.com/en-us/training/modules/configure-azure-application-gateway/4-app-gateway-components .
For more detailed information on configuring listeners in Azure Application Gateway, you can refer to the following resources: - Configure Azure Application Gateway - Listeners - Multi-site Routing on Azure Application Gateway
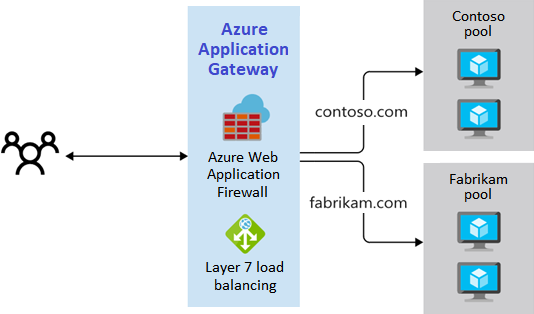
By understanding and properly configuring listeners, you can ensure that your Azure Application Gateway efficiently manages traffic to your web applications, providing a secure and optimized user experience.
Design and implement application delivery services (20–25%)
Design and implement Azure Application Gateway
Routing rules in Azure Application Gateway are a critical component that determines how client requests are directed to the backend pool of servers. To configure routing rules effectively, one must understand the components involved and the steps required to create and associate these rules with the appropriate resources.
Components of Routing Rules
- Listeners: They are responsible for accepting incoming traffic based on a specified combination of protocol, port, host, and IP address. Each listener then routes requests to a backend pool according to the defined routing rules https://learn.microsoft.com/en-us/training/modules/configure-azure-application-gateway/4-app-gateway-components .
- Backend Pools: These are groups of web servers that receive incoming traffic from the Application Gateway once the routing rules have been applied https://learn.microsoft.com/en-us/training/modules/configure-azure-application-gateway/4-app-gateway-components .
- HTTP Settings: These settings dictate whether traffic is encrypted between the Application Gateway and the backend servers and include configurations such as protocol, session stickiness, connection draining, request timeout period, and health probes https://learn.microsoft.com/en-us/training/modules/configure-azure-application-gateway/4-app-gateway-components .
Steps to Configure Routing Rules
- Create a Listener: Define a Basic or Multi-site listener that specifies the protocol, port, host, and IP address for incoming traffic https://learn.microsoft.com/en-us/training/modules/configure-azure-application-gateway/4-app-gateway-components .
- Define Backend Pools: Set up the backend pools with the web servers that will process the requests https://learn.microsoft.com/en-us/training/modules/configure-azure-application-gateway/4-app-gateway-components .
- Specify HTTP Settings: Configure the HTTP settings to establish how traffic should be handled between the Application Gateway and the backend servers https://learn.microsoft.com/en-us/training/modules/configure-azure-application-gateway/4-app-gateway-components .
- Bind Listener to Backend Pools: Create a routing rule that associates your listener with the appropriate backend pool. This rule will determine how the hostname and path elements in the URL of a request are interpreted and directed https://learn.microsoft.com/en-us/training/modules/configure-azure-application-gateway/4-app-gateway-components .
- Configure Health Probes: Set up health probes to monitor the health of the web servers in the backend pools. The Application Gateway uses these probes to determine which servers are healthy and can handle requests https://learn.microsoft.com/en-us/training/modules/configure-azure-application-gateway/4-app-gateway-components .
By following these steps and understanding each component’s role, you can configure routing rules to ensure that client requests are efficiently and securely routed to the appropriate backend servers.
For additional information on Azure Application Gateway and its components, you can refer to the following resources:
- Azure Application Gateway documentation
- Configure Application Gateway listeners
- Configure an application gateway routing rule
Please note that while URLs have been included for further reading, they should not be explicitly mentioned in the study guide.
Design and implement application delivery services (20–25%)
Design and implement Azure Application Gateway
Configure HTTP Settings
When configuring HTTP settings for Azure Application Gateway, it is essential to understand that these settings determine the behavior of the traffic between the Application Gateway and the back-end servers. Here are the key aspects to consider:
Encryption of Traffic: The HTTP settings allow you to specify whether the traffic should be encrypted when communicating with the back-end servers. This is crucial for ensuring secure data transmission.
Protocol Selection: You can choose the protocol used for communication. Typically, this would be HTTP or HTTPS, depending on whether you want to encrypt the traffic.
Session Stickiness: This feature enables you to maintain a user session on the same back-end server for subsequent requests. It is useful for scenarios where session state is saved locally on the server.
Connection Draining: This setting helps in gracefully removing back-end pool members during planned service updates. It ensures that existing connections are allowed to complete before the server is taken out of rotation.
Request Timeout Period: You can define the time period the Application Gateway should wait for a response from the back-end server before timing out.
Health Probes: Health probes are used to monitor the availability of back-end servers. The Application Gateway uses these probes to determine which servers are healthy and can handle requests.
For a more comprehensive understanding and step-by-step guidance on configuring HTTP settings in Azure Application Gateway, you can refer to the following resources:
These resources provide valuable information on the capabilities and configuration options of Azure Application Gateway, including how to set up and manage HTTP settings effectively https://learn.microsoft.com/en-us/training/modules/configure-azure-application-gateway/6-summary-resources .
Remember, a routing rule is associated with these HTTP settings, and it is this rule that binds your listeners to the back-end pools and specifies how to interpret the URL of a request to direct it to the appropriate back-end pool https://learn.microsoft.com/en-us/training/modules/configure-azure-application-gateway/4-app-gateway-components .
Configure Transport Layer Security (TLS)
Transport Layer Security (TLS) is a protocol that ensures privacy between communicating applications and their users on the internet. When securing an Azure environment, it’s crucial to configure TLS to protect the data in transit. Here’s a detailed explanation of how to configure TLS:
Determine the TLS Version: Ensure that you are using a modern version of TLS, ideally TLS 1.2 or higher, as these versions provide stronger security measures and are typically required by Azure services.
Enable TLS on Azure Services: For services that support TLS, such as Azure Storage Accounts, you need to configure the service to use TLS. This can often be done through the Azure portal or via Azure CLI or PowerShell commands.
Configure TLS Cipher Suites: Select strong cipher suites that are known to be secure. Azure allows you to specify which cipher suites should be used in the TLS handshake process.
Set Up TLS Certificates: Obtain a TLS certificate from a trusted Certificate Authority (CA) and install it on your Azure service. This certificate will be used to authenticate the service and establish a secure connection.
Enforce TLS on Client Connections: Ensure that any clients connecting to your Azure service are configured to use TLS. This may involve setting up the appropriate client-side TLS settings and ensuring that clients reject connections that do not use TLS.
Monitor and Update TLS Settings: Regularly monitor your TLS configurations and update them as needed. This includes renewing TLS certificates before they expire and updating cipher suites as newer, more secure options become available.
For additional information on configuring TLS in Azure, you can refer to the official Azure documentation, which provides detailed guidance and best practices for securing your Azure resources with TLS.
Design and implement application delivery services (20–25%)
Design and implement Azure Application Gateway
Configure Rewrite Sets
When configuring rewrite sets for Azure Application Gateway, it’s essential to understand that rewrite sets allow you to modify the HTTP request and response headers and the URL of the request. This capability is crucial for scenarios where you need to translate URLs, query string parameters, or modify headers based on specific conditions.
Here’s a step-by-step explanation of how to configure rewrite sets:
Identify the Conditions: Determine the conditions under which you want to rewrite URLs or headers. This could be based on the type of content, the source of the request, or other factors.
Create Rewrite Rules: In the Azure portal, navigate to your Application Gateway resource and create rewrite rules. These rules define the changes that need to be applied to the HTTP headers or the URL.
Associate Rewrite Rules with Listeners or Routing Rules: Once you have created the rewrite rules, you need to associate them with the appropriate listeners or routing rules. This association ensures that the rewrite actions are executed when the conditions are met.
Test the Configuration: After setting up the rewrite rules and their associations, it’s important to test the configuration to ensure that the rewrites are working as expected.
For additional information on how to configure rewrite sets, you can refer to the following resources:
- To learn more about Azure Application Gateway and its features, visit Azure Application Gateway Overview https://learn.microsoft.com/en-us/training/modules/configure-azure-application-gateway/6-summary-resources .
- For a detailed guide on how to rewrite HTTP headers and URLs with Application Gateway, check out Rewrite HTTP headers and URL with Application Gateway https://learn.microsoft.com/en-us/training/modules/configure-azure-application-gateway/6-summary-resources .
Remember, the ability to rewrite HTTP headers and URLs can help you achieve a more secure, efficient, and customized web application experience. It’s a powerful feature that can be leveraged to meet the specific requirements of your application’s traffic management.
Design and implement application delivery services (20–25%)
Design and implement Azure Front Door
Mapping Requirements to Features and Capabilities of Azure Front Door
When considering the implementation of Azure Front Door, it is essential to understand how its features and capabilities align with specific requirements. Azure Front Door is a scalable and secure entry point for fast delivery of your global web applications. Below is a detailed explanation of how Azure Front Door’s features can meet various requirements:
Global HTTP Load Balancing: Azure Front Door provides global load balancing for HTTP/HTTPS traffic, ensuring high availability and performance by distributing traffic across various service endpoints in different regions.
SSL Offload: Azure Front Door supports SSL termination at the edge of the network, which means that it can decrypt incoming SSL requests at the network edge and pass unencrypted requests to the backend servers, reducing the SSL processing overhead on the backend.
URL-Based Routing: With Azure Front Door, you can route traffic based on URL paths, allowing you to direct users to different backends depending on the URL they access.
Session Affinity: Azure Front Door offers session affinity, which is useful for ensuring that a user session is served by the same backend for the duration of the session, which is particularly important for stateful applications.
Web Application Firewall (WAF): Azure Front Door integrates with Azure’s Web Application Firewall to provide centralized protection of your web applications from common exploits and vulnerabilities.
Content Delivery Network (CDN): Azure Front Door combines traditional CDN capabilities with its intelligent layer 7 load balancing, enabling efficient content distribution and acceleration.
Health Probes: Azure Front Door automatically performs health probes to monitor the availability of your backend resources, ensuring that traffic is not sent to unhealthy backends.
Custom Domains and SSL: You can configure custom domains with Azure Front Door and secure them with SSL certificates, providing a branded and secure experience for your users.
API Management Integration: Azure Front Door can be integrated with Azure API Management to provide a single secure entry point for API consumption.
Redirection Rules: Azure Front Door allows you to define redirection rules to automatically redirect traffic from one URL to another, which can be used for URL rewriting or to redirect HTTP traffic to HTTPS.
For additional information on Azure Front Door and its capabilities, you can refer to the following URLs:
- Azure Front Door Overview: https://learn.microsoft.com/en-us/azure/frontdoor/front-door-overview
- Azure Front Door Documentation: https://learn.microsoft.com/en-us/azure/frontdoor/
By mapping these features to your specific requirements, you can ensure that Azure Front Door is configured to meet the needs of your web applications, providing a secure, performant, and reliable user experience.
Design and implement application delivery services (20–25%)
Design and implement Azure Front Door
Azure Front Door is a scalable and secure entry point for fast delivery of your global web applications. It combines various networking and security features into a single service, enhancing performance, reliability, and protection for your applications. Here are some appropriate use cases for Azure Front Door:
Global HTTP Load Balancing
Azure Front Door provides global HTTP load balancing, which allows you to distribute HTTP or HTTPS traffic across different regions worldwide. This ensures that users are directed to the nearest or best-performing application endpoint, improving the user experience with lower latency and higher throughput.
Application Layer Security
With Azure Front Door, you can protect your applications from common web vulnerabilities and attacks. It includes a Web Application Firewall (WAF) that can be configured to protect against SQL injection, cross-site scripting, and other threats. This layer of security helps to safeguard your applications without the need for additional firewall hardware or software.
SSL Offloading
Azure Front Door supports SSL offloading, which means it can terminate SSL connections at the edge of Microsoft’s network, closer to the users. This offloads the SSL handshake and encryption/decryption tasks from your web servers, reducing the load on them and improving overall performance.
URL-Based Routing
With Azure Front Door, you can route traffic based on URL paths, allowing you to direct users to different backends or services within your application. This is particularly useful for microservices architectures, where different microservices are responsible for different parts of an application.
Session Affinity
For applications that require maintaining user session state, Azure Front Door offers session affinity features. This ensures that requests from a particular user session are consistently routed to the same backend, which is essential for scenarios where session state is not distributed across backends.
Content Delivery Network (CDN) Integration
Azure Front Door integrates with Azure’s CDN capabilities, enabling you to cache static content at the edge of the network. This reduces load times by serving content from locations closer to the user and reduces the load on your origin servers.
Health Probes and Instant Failover
Azure Front Door continuously monitors the health of your application endpoints with health probes. In the event that an endpoint becomes unhealthy, Azure Front Door can instantly failover to the next best endpoint without any interruption to the user experience.
For additional information on Azure Front Door and its capabilities, you can visit the following URLs: - Azure Front Door Overview - Azure Front Door Documentation
Please note that the URLs provided are for reference and additional learning. They should be accessed to gain a deeper understanding of Azure Front Door and its use cases.
Design and implement application delivery services (20–25%)
Design and implement Azure Front Door
When selecting an appropriate tier for Azure services, it is essential to consider the available resources, features, and capacity that align with the specific needs of your application. Azure offers a variety of App Service plans that cater to different requirements and budgets. Here’s a detailed explanation of how to choose an appropriate tier:
Azure App Service Plans
Azure App Service plans define the set of compute resources for running web applications on Azure App Service. The plan you choose determines the features available to you and the cost associated with those features. Here are the key considerations:
Region and Resources: Ensure that the plan you select is available in the region where you want to deploy your application. The plan should provide the necessary resources such as CPU, memory, and disk space https://learn.microsoft.com/en-us/training/modules/configure-app-service-plans/7-summary-resources .
Pricing Tiers: Azure App Service plans come in several pricing tiers, including Free, Shared, Standard, Premium, and Isolated. Each tier offers different capabilities and limits on resources https://learn.microsoft.com/en-us/training/modules/configure-app-service-plans/7-summary-resources .
Free and Shared: These plans are suitable for development and testing purposes, offering limited resources and shared infrastructure https://learn.microsoft.com/en-us/training/modules/configure-app-service-plans/7-summary-resources .
Standard, Premium, and Isolated: These tiers are designed for production workloads, providing dedicated resources and more advanced features like deployment slots, auto-scaling, and network isolation https://learn.microsoft.com/en-us/training/modules/configure-azure-app-services/5-create-deployment-slots .
Deployment Slots: If you require staging environments or the ability to perform A/B testing, consider a tier that supports deployment slots, such as Standard, Premium, or Isolated. Deployment slots allow you to deploy different versions of your app and swap them without downtime https://learn.microsoft.com/en-us/training/modules/configure-azure-app-services/5-create-deployment-slots .
Scaling Capabilities: Consider whether you need to scale up (increase the compute resources within your current tier) or scale out (add more virtual machine instances). Autoscaling can be configured to automatically adjust resources based on the load on your application, with metric-based or time-based rules https://learn.microsoft.com/en-us/training/modules/configure-app-service-plans/7-summary-resources .
Custom Domains: If you need to map a custom DNS name to your app, you will require a paid tier of an App Service plan https://learn.microsoft.com/en-us/training/modules/configure-azure-app-services/8-create-custom-domain-names .
Monitoring and Data Tiers
Azure Monitor collects monitoring data at different tiers, which can be relevant when choosing an appropriate tier:
- Application Tier: Contains data about the performance and functionality of your application code https://learn.microsoft.com/en-us/training/modules/configure-azure-monitor/5-identify-data-types .
- Guest OS Tier: Holds data about the operating system on which your application is running https://learn.microsoft.com/en-us/training/modules/configure-azure-monitor/5-identify-data-types .
- Azure Resource Tier: Includes monitoring data about the operation of any Azure resource you utilize https://learn.microsoft.com/en-us/training/modules/configure-azure-monitor/5-identify-data-types .
- Azure Subscription Tier: Contains data about the operation and management of your Azure subscription https://learn.microsoft.com/en-us/training/modules/configure-azure-monitor/5-identify-data-types .
- Azure Tenant Tier: Organizes data about the operation of your tenant-level Azure services https://learn.microsoft.com/en-us/training/modules/configure-azure-monitor/5-identify-data-types .
When choosing a tier, consider the level of monitoring data you require to effectively manage and optimize your application.
Additional Information
For more details on Azure App Service plans and pricing tiers, you can visit the following URL: - Azure App Service plans documentation: Azure App Service plans
For information on Azure Monitor and the data tiers it collects: - Azure Monitor documentation: Azure Monitor data tiers
Remember to review the specific features and limitations of each tier to ensure it aligns with your application’s requirements and budget.
Design and implement application delivery services (20–25%)
Design and implement Azure Front Door
Azure Front Door Configuration: Routing, Origins, and Endpoints
Azure Front Door is a scalable and secure entry point for fast delivery of your global web applications. To configure Azure Front Door, you need to understand the concepts of routing, origins, and endpoints. Here’s a detailed explanation of each:
Routing
Routing in Azure Front Door is managed through routing rules that direct incoming traffic to the appropriate back-end resources. These rules are based on patterns in the URL, ensuring that users are directed to the correct content or service. When setting up routing rules, you can specify:
- Patterns to match: Define the path patterns that trigger the rule.
- Forwarding path: Determine the path that will be used to forward the traffic to the back-end.
- Redirects: Optionally, configure redirects to different URLs if needed.
Origins
The origins are the locations where your content or services are hosted. These can be Azure services like Web Apps, Cloud Services, or any public internet-facing service. In Azure Front Door, you define a back-end pool that contains one or more back-end resources or origins. When configuring origins, consider:
- Origin type: Specify the type of service that will serve as the origin.
- Origin hostname: Define the domain name or IP address of the origin.
- HTTP/HTTPS port: Set the ports that Azure Front Door will use to communicate with the origin.
Endpoints
Endpoints in Azure Front Door are the URLs through which your users access your services. They are the public face of your Front Door configuration. When configuring endpoints, you should:
- Create a Front Door profile: This profile will contain your endpoints and define how users reach your application.
- Configure the endpoint hostname: Choose a unique name for your endpoint that will be part of the URL users use to access your application.
- Enable session affinity: If your application requires it, enable session affinity to keep a user connected to the same back-end for the duration of their session.
For additional information on configuring Azure Front Door, you can refer to the following URLs:
- Azure Front Door documentation: Azure Front Door Documentation
- Routing rules in Azure Front Door: Routing Rules Documentation
- Back-end pool configuration: Back-end Pool Configuration
Remember to review the official documentation for the most up-to-date and detailed guidance on configuring Azure Front Door for your specific needs.
Design and implement application delivery services (20–25%)
Design and implement Azure Front Door
Configure SSL Termination and End-to-End SSL Encryption
Secure Sockets Layer (SSL) termination refers to the process of decrypting SSL traffic at the Application Gateway, which then sends unencrypted traffic to the back-end servers. This approach can reduce the CPU load on the back-end servers, as they are not required to perform the decryption process. However, it does mean that traffic between the Application Gateway and the back-end servers is not encrypted, which may not be suitable for all scenarios, especially those requiring high security.
On the other hand, end-to-end SSL encryption ensures that traffic is encrypted all the way from the client to the back-end server. This is achieved by re-encrypting the traffic at the Application Gateway after it has been decrypted for inspection. This method provides a higher level of security as the data remains encrypted over the network.
When configuring SSL termination and end-to-end SSL encryption with Azure Application Gateway, consider the following steps:
- SSL Termination:
- Obtain an SSL certificate and upload it to the Application Gateway.
- Configure a listener with the uploaded SSL certificate for the required protocol (e.g., HTTPS).
- Set up routing rules to direct the incoming traffic to the appropriate back-end pool of servers.
- End-to-End SSL Encryption:
- In addition to the SSL certificate for the Application Gateway, ensure that each back-end server has its own SSL certificate installed for encryption.
- Configure the Application Gateway to use HTTPS for the back-end pool settings, which will maintain encryption to the back-end servers.
- Implement routing rules that specify HTTPS as the protocol for the back-end address pool.
For more detailed guidance on configuring SSL termination and end-to-end SSL encryption with Azure Application Gateway, the following resources are available:
- To learn about balancing HTTP(S) traffic in Azure and the use of SSL with Azure Application Gateway, visit Load balance HTTP(S) traffic in Azure.
- For a comprehensive guide on how to load balance web service traffic and manage SSL encryption with Azure Application Gateway, refer to Load balance your web service traffic with Azure Application Gateway.
- To understand how to encrypt network traffic end-to-end with Azure Application Gateway, you can access Encrypt network traffic end-to-end with Azure Application Gateway.
These resources provide valuable information and step-by-step instructions to ensure that SSL termination and end-to-end SSL encryption are configured correctly for your web applications hosted on Azure https://learn.microsoft.com/en-us/training/modules/configure-azure-application-gateway/6-summary-resources .
Design and implement application delivery services (20–25%)
Design and implement Azure Front Door
Configure Caching
Caching is a critical aspect of optimizing the performance and efficiency of a system. In the context of Azure services, caching can be implemented using Azure File Sync, which allows for the replication of Azure file shares to Windows Servers. This replication can occur either on-premises or in the cloud, providing performance benefits and distributed caching of data where it’s actively being used https://learn.microsoft.com/en-us/training/modules/configure-azure-files-file-sync/2-compare-files-to-blobs .
Azure File Sync Components
Azure File Sync consists of four main components that collaborate to enable caching for Azure Files shares on an on-premises Windows Server or a cloud-based virtual machine:
- Storage Sync Service: This is the Azure resource responsible for managing sync across multiple systems.
- Sync Group: A logical grouping of endpoints (Azure File shares and Windows Servers) that defines the sync topology.
- Registered Server: The Windows Server where the Azure File Sync agent is installed. It represents an endpoint in a Sync Group.
- Cloud Endpoint: Represents an Azure File share in a Sync Group.
These components work together to provide a seamless caching experience for storage accounts that contain data stored in Azure Files shares https://learn.microsoft.com/en-us/training/modules/configure-azure-files-file-sync/6-identify-components .
Characteristics of Azure File Sync
- Quick Cache: Azure File Sync can transform a Windows Server into a quick cache of your Azure Files shares, allowing for faster access to frequently used files https://learn.microsoft.com/en-us/training/modules/configure-azure-files-file-sync/5-implement-file-sync .
- Protocol Support: It supports various protocols available on Windows Server, such as SMB, NFS, and FTPS, to access data locally https://learn.microsoft.com/en-us/training/modules/configure-azure-files-file-sync/5-implement-file-sync .
- Global Caching: Azure File Sync can support as many caches as needed around the world, making it a scalable solution for global organizations https://learn.microsoft.com/en-us/training/modules/configure-azure-files-file-sync/5-implement-file-sync .
Benefits of Azure File Sync
- Centralization: Azure File Sync enables centralization of an organization’s file shares in Azure Files, while maintaining the flexibility and performance of an on-premises file server https://learn.microsoft.com/en-us/training/modules/configure-azure-files-file-sync/5-implement-file-sync .
- Performance: It provides distributed caching of data, ensuring that the data is close to where it is being used, which enhances performance https://learn.microsoft.com/en-us/training/modules/configure-azure-files-file-sync/2-compare-files-to-blobs .
For additional information on configuring Azure File Sync and its components, you can refer to the following URL: Azure File Sync Documentation.
DNS Record Sets
While configuring caching, it’s also important to understand the role
of DNS record sets in Azure. A DNS record set is a collection of records
in a DNS zone that can be defined in the Azure portal. The configuration
settings for these record sets will vary depending on the type of record
you are creating, such as A records for IP addresses
associated with your domain https://learn.microsoft.com/en-us/training/modules/configure-azure-dns/6-add-dns-record-sets
.
For more details on DNS record sets and their configuration, please visit: Azure DNS Documentation.
By understanding and implementing these caching strategies and DNS configurations, you can optimize the performance and reliability of your Azure-based services.
Design and implement application delivery services (20–25%)
Design and implement Azure Front Door
Configure Traffic Acceleration
Traffic acceleration in Azure is a method to optimize network traffic routing to improve application performance and user experience. This is achieved by minimizing latency, increasing throughput, and providing more reliable connections.
Key Concepts
Azure Front Door Service: Azure Front Door Service is a scalable and secure entry point for fast delivery of your global web applications. It accelerates dynamic content, which cannot be cached, by leveraging various network and routing optimizations.
Azure Content Delivery Network (CDN): Azure CDN offers a global solution for delivering high-bandwidth content by caching the content at strategic locations to provide maximum bandwidth for delivering content to users.
Azure Traffic Manager: Azure Traffic Manager uses DNS to direct client requests to the most appropriate service endpoint based on a traffic-routing method and the health of the endpoints.
Steps to Configure Traffic Acceleration
Identify Acceleration Needs: Determine the type of content or application that requires acceleration. For static content, Azure CDN might be the best choice, while Azure Front Door is more suitable for dynamic content.
Set Up Azure Front Door: Create a Front Door profile, define the frontend hosts, backend pools, routing rules, and health probes. This setup ensures that user traffic is directed to the nearest and fastest backend.
Implement Azure CDN: Create a CDN profile and a CDN endpoint. Configure the caching rules and set up custom domains if necessary. Azure CDN will cache and deliver content from the closest point of presence (POP) to the user.
Configure Azure Traffic Manager: Create a Traffic Manager profile and add endpoints, which could be Azure Web Apps, VMs, or other cloud services. Choose a traffic-routing method such as performance, weighted, or priority.
Monitor and Optimize: Use Azure Monitor to track the performance of your traffic acceleration solutions. Analyze the metrics and logs to identify bottlenecks and optimize the rules and configurations accordingly.
Additional Resources
- For more information on Azure Front Door Service, visit Azure Front Door documentation.
- To learn about Azure CDN, refer to Azure CDN documentation.
- For details on Azure Traffic Manager, check out Azure Traffic Manager documentation.
By implementing these traffic acceleration services, you can ensure that your applications are highly available, performant, and resilient to failures, providing users with a seamless experience.
Design and implement application delivery services (20–25%)
Design and implement Azure Front Door
Implementing Rules, URL Rewrite, and URL Redirect in Azure Application Gateway
Azure Application Gateway is a web traffic load balancer that enables you to manage traffic to your web applications. When configuring Application Gateway, you can implement various features to control and manipulate the traffic. Here are the key concepts:
Rules
Rules in Azure Application Gateway are essential for directing client requests to the appropriate backend pool based on the request’s URL. A routing rule binds listeners to backend pools and specifies how to interpret the hostname and path elements in the URL of a request https://learn.microsoft.com/en-us/training/modules/configure-azure-application-gateway/4-app-gateway-components . The rule also includes associated HTTP settings that determine the encryption of traffic between the Application Gateway and the backend servers, as well as other configurations like protocol, session stickiness, connection draining, request timeout, and health probes https://learn.microsoft.com/en-us/training/modules/configure-azure-application-gateway/4-app-gateway-components .
URL Rewrite
URL rewrite capabilities allow you to modify the request and response headers as they pass through the Application Gateway. This feature is useful for translating URLs or query string parameters based on specific conditions https://learn.microsoft.com/en-us/training/modules/configure-azure-application-gateway/3-determine-routing . For instance, you can use URL rewrite to ensure that all communication between your web app and clients occurs over an encrypted path by translating HTTP requests into HTTPS https://learn.microsoft.com/en-us/training/modules/configure-azure-application-gateway/3-determine-routing .
URL Redirect
Application Gateway can also be configured to redirect traffic. This means that traffic received at one listener can be redirected to another listener or an external site https://learn.microsoft.com/en-us/training/modules/configure-azure-application-gateway/3-determine-routing . Redirects are commonly used to automatically route HTTP requests to HTTPS, ensuring secure communication https://learn.microsoft.com/en-us/training/modules/configure-azure-application-gateway/3-determine-routing .
For more detailed information on these features, you can refer to the following resources:
- Azure Application Gateway Overview: [https://learn.microsoft.com/en-us/azure/application-gateway/overview] https://learn.microsoft.com/en-us/training/modules/configure-azure-application-gateway/6-summary-resources .
- Application Gateway Components: [https://learn.microsoft.com/en-us/azure/application-gateway/application-gateway-components] https://learn.microsoft.com/en-us/training/modules/configure-azure-application-gateway/6-summary-resources .
- Application Gateway Features: [https://learn.microsoft.com/en-us/azure/application-gateway/features] https://learn.microsoft.com/en-us/training/modules/configure-azure-application-gateway/6-summary-resources .
- Azure Web Application Firewall on Application Gateway: [https://learn.microsoft.com/en-us/azure/web-application-firewall/ag/ag-overview] https://learn.microsoft.com/en-us/training/modules/configure-azure-application-gateway/6-summary-resources .
- Application Gateway Redirection Routing: [https://learn.microsoft.com/en-us/azure/application-gateway/redirect-overview] https://learn.microsoft.com/en-us/training/modules/configure-azure-application-gateway/6-summary-resources .
- Configure an Application Gateway to Host Multiple Web Sites: [https://learn.microsoft.com/en-us/azure/application-gateway/create-multiple-sites-portal] https://learn.microsoft.com/en-us/training/modules/configure-azure-application-gateway/6-summary-resources .
- Rewrite HTTP Headers and URL with Application Gateway: [https://learn.microsoft.com/en-us/azure/application-gateway/rewrite-http-headers-url] https://learn.microsoft.com/en-us/training/modules/configure-azure-application-gateway/6-summary-resources .
By understanding and implementing these features, you can ensure that your web applications are secure, efficient, and highly available to handle incoming web traffic.
Design and implement application delivery services (20–25%)
Secure an origin by using Azure Private Link in Azure Front DoorDesign and implement Azure Traffic Manager
Azure Traffic Manager Use Cases
Azure Traffic Manager is a DNS-based traffic load balancer that enables you to distribute traffic optimally to services across global Azure regions, while providing high availability and responsiveness. Below are some appropriate use cases for Azure Traffic Manager:
Global Load Balancing: When you have services deployed in multiple Azure regions, Traffic Manager can route users to their nearest service endpoint based on network latency, improving the speed and responsiveness of your applications.
Failover: Traffic Manager can be used to implement automatic failover for your services. In the event of a failure in one region, Traffic Manager will redirect users to the nearest operational region, ensuring continuous availability of your services.
Weighted Traffic Distribution: If you want to distribute traffic across different regions or deployments not equally but based on a certain weight or percentage, Traffic Manager allows you to set up weighted traffic-routing methods to achieve this.
Performance Improvement: By directing users to the closest endpoint, Traffic Manager reduces the number of network hops and therefore can improve the performance of your applications.
Maintenance and Upgrades: During maintenance or upgrades, you can use Traffic Manager to redirect traffic away from the affected region to minimize user impact.
Combining with Other Azure Services: Traffic Manager can be combined with other Azure services such as Azure Site Recovery for enhanced business continuity and disaster recovery strategies.
For additional information on Azure Traffic Manager, you can refer to the following URLs:
It is important to note that Azure Traffic Manager is a global service and does not require you to select a region when setting it up https://learn.microsoft.com/en-us/training/modules/configure-subscriptions/2-identify-regions . This makes it an ideal solution for optimizing user experience across the globe without being constrained by regional availability.
By understanding these use cases and leveraging Azure Traffic Manager, you can ensure that your applications are highly available, maintain performance, and are resilient to region-specific disruptions.
Design and implement application delivery services (20–25%)
Secure an origin by using Azure Private Link in Azure Front DoorDesign and implement Azure Traffic Manager
Configure a Routing Method
When configuring a routing method in Azure, it is essential to understand the various options available and how they can be applied to different scenarios. Azure provides several routing methods to control the flow of network traffic within and between virtual networks, as well as to and from the internet and on-premises networks.
User-Defined Routes (UDRs) and Next Hop Targets
Azure automatically manages network traffic routing, but there are cases where custom configurations are necessary. User-defined routes (UDRs) allow for the customization of network traffic routing. UDRs can be used to direct traffic to virtual appliances, VPN gateways, or other virtual networks. The next hop feature is a diagnostic tool that helps identify issues with virtual machines or routes by testing the communication between a source and a destination IP address https://learn.microsoft.com/en-us/training/modules/configure-network-routing-endpoints/3-identify-user-defined-routes https://learn.microsoft.com/en-us/training/modules/configure-network-watcher/4-review-next-hop-diagnostics .
Azure Private Link
Azure Private Link is a service that enables private connectivity from a virtual network to Azure services, keeping all traffic on the Microsoft global network without exposure to the public internet. It allows for global connectivity without regional restrictions and can be used to privately connect to services in other Azure regions. Private Link also enables the delivery of your own services into your customer’s virtual networks without the need for gateways, NAT devices, Azure ExpressRoute or VPN connections, or public IP addresses https://learn.microsoft.com/en-us/training/modules/configure-network-routing-endpoints/6-identify-private-link-uses .
Path-Based Routing
Path-based routing is a feature of Azure Application Gateway that
allows requests for specific URL paths to be directed to the appropriate
back-end pool. For example, requests for /video/* can be
routed to servers optimized for video streaming, while requests for
/images/* can be directed to servers that handle image
retrieval. This method is useful for directing web traffic efficiently
based on the content type https://learn.microsoft.com/en-us/training/modules/configure-azure-application-gateway/3-determine-routing
.
Azure Application Gateway
Azure Application Gateway provides advanced routing capabilities and load balancing for web applications. It supports multiple routing methods, including multi-site and path-based routing. The Application Gateway also includes Azure Web Application Firewall for enhanced security. When implementing an Application Gateway, it is important to select the appropriate routing method based on the specific requirements of the web application https://learn.microsoft.com/en-us/training/modules/configure-azure-application-gateway/6-summary-resources .
For additional information on configuring routing methods in Azure, you can refer to the following resources: - User-defined routes and IP forwarding - What is Azure Private Link? - What is Azure Application Gateway?
Please note that these URLs are included for reference purposes to provide additional information on the topic.