PL-900 Study Guide

Describe the business value of Microsoft Power Platform (20–25%)
Describe the business value of Microsoft Power Platform services
Microsoft Power Apps: Value Proposition for Building Applications
Microsoft Power Apps is a suite of apps, services, connectors, and a data platform that provides a rapid application development environment to build custom apps for your business needs. The value of using Power Apps to build applications lies in its efficiency, flexibility, and accessibility for users with varying levels of technical expertise.
Efficiency in Application Development
Power Apps streamlines the application development process by allowing users to describe the app they want to build, and then the AI designs it for them. This reduces the need for manual construction of every element, making the building process more efficient. The AI assistant on the Power Apps home screen guides users through the creation of a Dataverse table, which is then used to build a canvas app https://learn.microsoft.com/en-us/training/modules/introduction-power-platform/5-use-artificial-intelligence-increase-productivity .
Flexibility and Customization
With Power Apps, you can customize applications to meet specific business requirements. It supports the creation of both canvas apps, which start with a user experience and connect to data sources using a variety of connectors, and model-driven apps, which start with your data model and build up from the shape of your core business data and processes https://learn.microsoft.com/en-us/training/modules/introduction-power-platform/5-use-artificial-intelligence-increase-productivity https://learn.microsoft.com/en-us/training/modules/introduction-power-apps/8-build-basic-model-driven-app .
Accessibility and Collaboration
Power Apps is designed to be accessible to users with different levels of technical expertise. It allows not only individual creators but also teams to collaborate on app development. The coauthoring feature in Power Apps enables multiple makers to edit model-driven applications together in real time, which can significantly reduce the time it takes to build applications https://learn.microsoft.com/en-us/training/modules/introduction-power-apps/8-build-basic-model-driven-app .
Control Over Data Storage
In Power BI Desktop, which integrates with Power Apps, you can specify the storage mode of a table, allowing you to control whether or not table data is cached in-memory for reports. This provides the flexibility to set the storage mode for each table individually, enabling a single semantic model that can be leveraged across applications https://learn.microsoft.com/en-us/power-bi/transform-model/desktop-storage-mode .
Licensing and Usage
Power Apps offers various licensing plans that determine the usage rights for customized Microsoft Lists, SharePoint library forms, canvas apps, and model-driven apps. These plans range from no license to Power Apps per user plan, each with different levels of access to premium connectors and app types https://learn.microsoft.com/en-us/power-apps/maker/canvas-apps/share-app-guests .
For more information about the capabilities and pricing of various Power Apps plans, you can refer to the Microsoft Power Apps and Power Automate Licensing Guide https://learn.microsoft.com/en-us/power-apps/maker/canvas-apps/share-app-guests .
In summary, Microsoft Power Apps provides a powerful, efficient, and collaborative environment for building custom business applications. Its AI-assisted development, flexible design options, and comprehensive licensing plans make it a valuable tool for organizations looking to streamline their app development processes.
Please note that the URLs provided are for additional information and are part of the retrieved documents.
Describe the business value of Microsoft Power Platform (20–25%)
Describe the business value of Microsoft Power Platform services
Describe the Value of Microsoft Power Automate to Automate Processes
Microsoft Power Automate is a versatile tool designed to streamline repetitive tasks and processes within an organization. By automating these tasks, Power Automate helps to minimize the potential for human error, save time, and ensure consistency in business operations. Here’s a detailed explanation of the value that Power Automate brings to process automation:
Automation of Repetitive Tasks
Power Automate enables the automation of repetitive tasks such as data movement between systems, which can be both time-consuming and prone to errors when done manually. By creating automated workflows, also known as flows, these tasks can be performed quickly and accurately https://learn.microsoft.com/en-us/training/modules/introduction-power-automate/2-describe-capabilities-power-automate .
Guided Processes
The platform can guide users through multi-stage processes, ensuring that each step is completed correctly. For instance, a sales organization might use Power Automate to guide sellers through the stages of selling products to customers, ensuring that no steps are missed and that the process is consistent across the organization https://learn.microsoft.com/en-us/training/modules/introduction-power-automate/2-describe-capabilities-power-automate .
Robotic Process Automation (RPA)
With RPA capabilities, Power Automate can automate desktop and web-based tasks. For example, a bank employee can use RPA to update exchange rates daily by automating the process of logging into a website, saving the rates, and updating them in a company spreadsheet https://learn.microsoft.com/en-us/training/modules/introduction-power-automate/2-describe-capabilities-power-automate .
Types of Flows
Power Automate offers different types of flows to cater to various automation needs:
- Power Automate Desktop: This is used to create RPA flows that automate tasks on the desktop https://learn.microsoft.com/en-us/training/modules/introduction-power-automate/3-explore-different-power-automate-apps .
- Business Process Flows: These are used to guide users through a business process, such as preparing a home for an open house in a real estate company. The flow can change depending on the information logged at each stage https://learn.microsoft.com/en-us/training/modules/introduction-power-automate/2-describe-capabilities-power-automate .
Triggers and Actions
Flows in Power Automate are driven by triggers and actions. A trigger, such as receiving a new email, can start a series of actions like creating a new file on OneDrive for Business. These actions are predefined and can be customized to fit the specific needs of a process https://learn.microsoft.com/en-us/training/modules/introduction-power-automate/4-describe-components-cloud-flow .
No-Code Solutions
Power Automate allows users to create complex workflows without the need for coding. This democratizes the process of automation, enabling users with knowledge of the business process but not necessarily coding skills to create and manage flows https://learn.microsoft.com/en-us/training/modules/introduction-power-automate/4-describe-components-cloud-flow .
Integration with Microsoft 365
Power Automate seamlessly integrates with other Microsoft 365 services, such as Teams and Power Apps, to create comprehensive automation solutions. For example, a purchase order approval process can be automated using a Power App to initiate the request and Power Automate to handle the approval workflow https://learn.microsoft.com/en-us/training/modules/introduction-power-automate/4-describe-components-cloud-flow .
Testing and Deployment
Users can test their flows at any point during creation to ensure they perform as intended. Once a desktop flow is created, it can be run manually by an individual user or automatically triggered by a cloud flow https://learn.microsoft.com/en-us/training/modules/introduction-power-automate/7-build-desktop-flow .
By leveraging Microsoft Power Automate, organizations can significantly improve their efficiency and productivity. The ability to automate complex processes without writing code, along with the integration with other Microsoft services, makes Power Automate a valuable tool for any business looking to optimize their operations.
For additional information on Microsoft Power Automate and its capabilities, you can visit the following URL: Power Automate Documentation.
Describe the business value of Microsoft Power Platform (20–25%)
Describe the business value of Microsoft Power Platform services
Microsoft Power BI: Gaining Insights into Data
Microsoft Power BI is a powerful analytics tool that enables users to transform raw data into meaningful insights through interactive visualizations and business intelligence capabilities. Here’s how Power BI adds value in gaining insights into data:
Sophisticated Reporting: Power BI Desktop is a feature-rich application that allows users to create complex reports. It is designed to work like PowerPoint for data, enabling the creation of data visualizations that provide insights into data trends and patterns https://learn.microsoft.com/en-us/power-bi/consumer/business-user-teams-create-reports .
Data Import and Modeling: Power BI Desktop offers robust capabilities for importing, cleaning, and modeling data. Users can prepare and model their data to create reports that are based on a well-structured data model https://learn.microsoft.com/en-us/power-bi/consumer/business-user-teams-create-reports .
Publishing and Sharing: Reports created in Power BI Desktop can be published to the Power BI service, making it easy to share insights with colleagues and stakeholders. This facilitates collaboration and decision-making within teams https://learn.microsoft.com/en-us/power-bi/consumer/business-user-teams-create-reports .
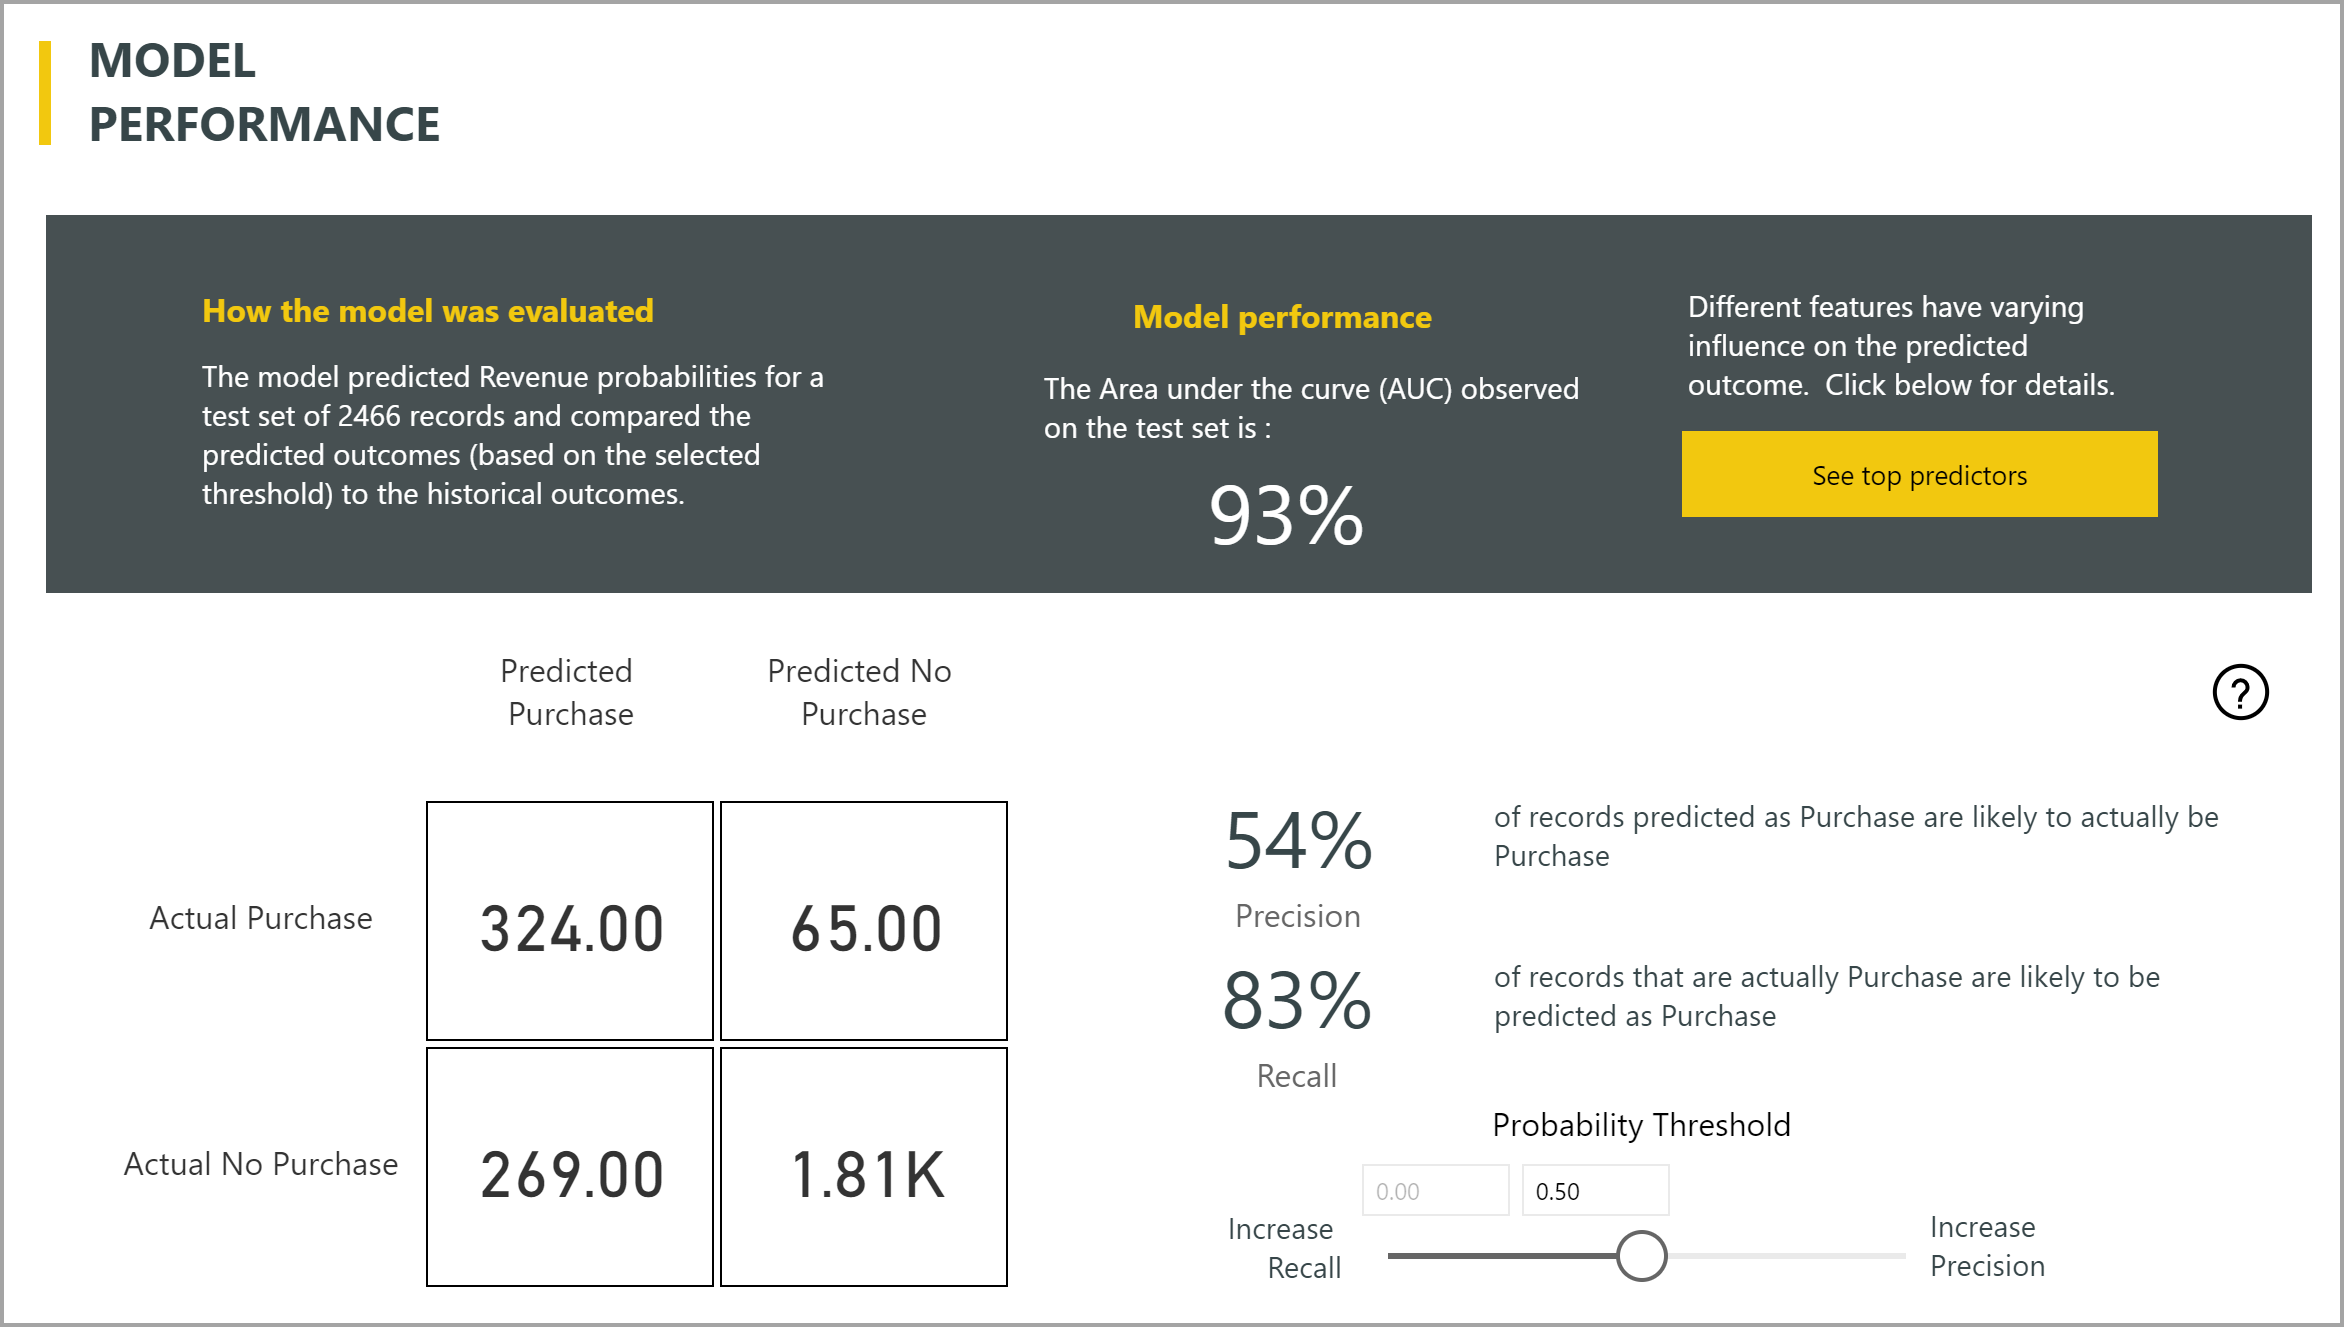
Binary Prediction Model: Power BI includes a Binary Prediction model that outputs the probability of a row achieving a target outcome. It provides an interactive way to understand model performance through True Positives, False Positives, True Negatives, and False Negatives, as well as statistical measures like Precision and Recall https://learn.microsoft.com/en-us/power-bi/transform-model/dataflows/dataflows-machine-learning-integration .
Cost-Benefit Analysis: The tool includes a Cost-Benefit analysis feature to help identify the most profitable subset of the population to target. This maximizes profit by allowing users to select an optimal probability threshold https://learn.microsoft.com/en-us/power-bi/transform-model/dataflows/dataflows-machine-learning-integration .
Accuracy Report: The Accuracy Report page in Power BI includes Cumulative Gains charts and ROC curves, providing statistical measures of model performance and helping users to evaluate the effectiveness of their predictive models https://learn.microsoft.com/en-us/power-bi/transform-model/dataflows/dataflows-machine-learning-integration .
Dashboard Insights: Power BI service offers dashboard insights that allow users to explore data through interactive visuals. The insights feature uses advanced analytical algorithms to find interesting facts or trends in the data https://learn.microsoft.com/en-us/power-bi/consumer/end-user-insights .
Steady Share Insight: This insight highlights cases where there is a consistent share of a child value in relation to the overall value of the parent across a continuous variable, such as time. It helps in identifying stable trends within the data https://learn.microsoft.com/en-us/power-bi/create-reports/../consumer/end-user-insight-types .
Integration with PowerPoint: Power BI now offers an add-in for PowerPoint, enabling users to generate insights directly into their presentations. This feature enhances the ability to communicate data stories effectively https://learn.microsoft.com/en-us/power-bi/collaborate-share/service-power-bi-powerpoint-add-in-whats-new .
For additional information on how to get started with Power BI Desktop and to create reports, you can refer to the following resources: - Get Power BI Desktop https://learn.microsoft.com/en-us/power-bi/consumer/business-user-teams-create-reports - Tutorial: From dimensional model to stunning report in Power BI Desktop https://learn.microsoft.com/en-us/power-bi/consumer/business-user-teams-create-reports - Publish and share reports in Power BI https://learn.microsoft.com/en-us/power-bi/consumer/business-user-teams-create-reports
For a deeper understanding of Power BI’s predictive modeling and accuracy reporting, the following resources may be helpful: - Binary Prediction model in Power BI https://learn.microsoft.com/en-us/power-bi/transform-model/dataflows/dataflows-machine-learning-integration - Dashboard tiles and insights in Power BI https://learn.microsoft.com/en-us/power-bi/consumer/end-user-insights - Generate data insights on your semantic model automatically with Power BI https://learn.microsoft.com/en-us/power-bi/consumer/end-user-insights
By leveraging these features, Power BI empowers users to gain a deeper understanding of their data, enabling data-driven decision-making and strategic business actions.
Describe the business value of Microsoft Power Platform (20–25%)
Describe the business value of Microsoft Power Platform services
Microsoft Power Pages: Value in Building Websites
Microsoft Power Pages is a powerful tool for building low-code, responsive websites that enable external users to interact with data stored in Dataverse. It is part of the broader Microsoft Power Platform, which aims to empower users to create business solutions.
Key Features of Power Pages:
Low-Code Development: Power Pages provides a user-friendly environment that allows users to create websites without the need for extensive programming knowledge. This democratizes the website creation process, making it accessible to a wider range of users within an organization.
Responsive Design: Websites built with Power Pages are designed to be responsive, ensuring that they work well on a variety of devices and screen sizes. This is crucial for providing a good user experience in today’s mobile-first world.
External User Interaction: Power Pages enables organizations to create websites that external users can interact with. This can be particularly valuable for scenarios such as customer service portals, feedback forms, and information hubs.
Authentication Options: Power Pages supports both anonymous access and authenticated access via various sign-in providers. This flexibility allows organizations to control how users interact with their website, whether it’s openly accessible or restricted to certain users.
Integration with Dataverse: As Power Pages is tightly integrated with Dataverse, it allows for seamless interaction with data stored in this centralized data service. This integration is key for organizations that want to leverage their existing data within their websites.
Customization and Branding: Organizations can customize their Power Pages websites to match their branding and specific business needs. This includes the ability to add custom code if needed, providing a balance between low-code development and the flexibility of traditional web development.
Comparison with Canvas Apps:
While both Power Pages and canvas apps are part of the Power Platform, they serve different purposes and have distinct capabilities:
- Guest Access: Power Pages allows for anonymous access, while canvas apps require authentication via Microsoft Entra ID.
- Interface: Power Pages is a browser-only experience, whereas canvas apps can be used on both browsers and mobile apps.
- Accessible Data Sources: Power Pages primarily interacts with Dataverse, while canvas apps can connect to a wide variety of data sources through approximately 150 out-of-the-box connectors and custom connectors.
Additional Resources:
For more information on Power Pages and its capabilities, you can visit the following URLs:
- Overview of Power Pages: Power Pages Introduction
- Overview of canvas-app connectors for Power Apps: Canvas-app Connectors
By leveraging Power Pages, organizations can quickly and efficiently build websites that are not only visually appealing and responsive but also deeply integrated with their business data and processes. This enables them to provide value to their customers and stakeholders through interactive and data-driven web experiences.
Describe the business value of Microsoft Power Platform (20–25%)
Describe the business value of Microsoft Power Platform services
Microsoft Power Virtual Agents and Their Value in Creating Chatbots
Microsoft Power Virtual Agents offer a significant value proposition for creating chatbots due to their integration with the Microsoft Power Platform. These chatbots can be developed without the need for extensive coding knowledge, making it accessible for a broader range of users to create and deploy functional bots.
Key Features of Power Virtual Agents:
No-Code Solution: Power Virtual Agents enable the creation of chatbots using a guided, no-code graphical interface. This democratizes the development process, allowing users without programming expertise to build and manage chatbots https://learn.microsoft.com/en-us/training/modules/introduction-power-automate/9-describe-business-value-power-automate .
AI-Driven Topic Creation: The AI within Power Virtual Agents can assist in building your bot based on the topics you describe. This feature simplifies the process of creating a bot by automating the generation of topics, which are the building blocks of chatbot conversations https://learn.microsoft.com/en-us/training/modules/introduction-power-platform/5-use-artificial-intelligence-increase-productivity .
Integration with Microsoft Services: Power Virtual Agents are deeply integrated with other Microsoft services, including Microsoft Teams, allowing for seamless collaboration and deployment within the Teams environment https://learn.microsoft.com/en-us/power-bi/collaborate-share/service-collaborate-microsoft-teams .
Rapid Deployment: The ease of use and integration capabilities mean that prototypes and functional bots can be quickly created and put into action, as demonstrated by TruGreen’s ability to have a prototype running in just two days https://learn.microsoft.com/en-us/training/modules/introduction-power-automate/9-describe-business-value-power-automate .
Robotic Process Automation (RPA): For systems without APIs, Power Virtual Agents can utilize desktop flows to mimic onscreen actions through robotic process automation, thus extending the bot’s capabilities to interact with a wider range of systems https://learn.microsoft.com/en-us/training/modules/introduction-power-automate/9-describe-business-value-power-automate .
Extensive Connectivity: The platform offers hundreds of connectors to various data sources and services, enhancing the bot’s ability to interact with back-end systems and provide more comprehensive services https://learn.microsoft.com/en-us/training/modules/introduction-power-automate/9-describe-business-value-power-automate .
Dataverse for Teams: Power Virtual Agents can leverage Dataverse for Teams to build custom bots within Microsoft Teams, further integrating chatbot functionality into daily workflows and collaboration spaces https://learn.microsoft.com/en-us/training/modules/introduction-power-platform/8-explore-how-power-platform-works-microsoft-teams .
Additional Resources:
- To learn more about how Power Virtual Agents can be used to create chatbots, you can visit the following resources:
By leveraging the capabilities of Power Virtual Agents, organizations can quickly and efficiently build chatbots that enhance customer service, streamline internal processes, and contribute to digital transformation strategies.
Describe the business value of Microsoft Power Platform (20–25%)
Describe the business value of Microsoft Power Platform services
Connectors play a crucial role in integrating services and data, as they serve as the bridge between different applications and data sources, enabling them to communicate and share information seamlessly. In the context of Power Platform, which includes Power Apps, Power Automate, and Power BI, connectors are essential for creating end-to-end solutions that leverage data and services from various sources.
Value of Connectors
Simplified Integration: Connectors abstract the underlying integration complexity, allowing users to easily connect their apps to external services and data sources without needing to write custom code or understand the API details https://learn.microsoft.com/en-us/power-apps/maker/canvas-apps/dev-enterprise-intro .
Extensive Connectivity: With a wide range of available connectors, users can connect to various services, including cloud-based applications like Office 365, SharePoint, and third-party services like Salesforce or Twitter, thus expanding the capabilities of their applications.
Real-time Data Access: Connectors enable real-time access to data, ensuring that applications and workflows can react to changes and updates as they happen, providing up-to-date information and enhancing decision-making processes https://learn.microsoft.com/en-us/power-bi/connect-data/service-gateway-custom-connectors .
Custom Connector Creation: For services or data sources that do not have a pre-built connector, users have the option to create custom connectors. This allows for tailored integration with proprietary or niche systems, ensuring that all necessary data can be included in the solution https://learn.microsoft.com/en-us/power-apps/maker/canvas-apps/dev-enterprise-intro .
Efficiency and Productivity: By automating data exchange between different services, connectors reduce manual data entry and the potential for errors, thereby increasing efficiency and productivity.
Enhanced Collaboration: Connectors facilitate the sharing of data across different applications, which can improve collaboration among teams by providing a unified view of information.
Scalability: As business needs grow, connectors allow for the easy addition of new services and data sources, making it possible to scale solutions without significant redevelopment efforts.
Additional Resources
- To learn more about developing custom data connectors for Power BI, visit the DataConnectors SDK on GitHub https://learn.microsoft.com/en-us/power-bi/connect-data/service-gateway-custom-connectors .
- For information on using SharePoint with Power Apps, refer to the Power Apps SharePoint connector documentation https://learn.microsoft.com/en-us/power-apps/maker/canvas-apps/sharepoint/scenarios-intro .
- To understand how to build and certify custom connectors for Power Apps, see the guide on building and certifying custom connectors https://learn.microsoft.com/en-us/power-apps/maker/canvas-apps/dev-enterprise-intro .
- For listing your solution on Microsoft AppSource and generating new leads, visit publishing to Microsoft AppSource https://learn.microsoft.com/en-us/power-apps/maker/canvas-apps/dev-enterprise-intro .
- To get started with Power Apps for free, sign up for the Power Apps Developer Plan at Power Apps Developer Plan https://learn.microsoft.com/en-us/power-apps/maker/canvas-apps/dev-enterprise-intro .
In summary, connectors are a vital component of the Power Platform ecosystem, enabling users to create comprehensive, data-driven solutions that integrate various services and data sources efficiently and effectively.
Describe the business value of Microsoft Power Platform (20–25%)
Describe the business value of Microsoft Power Platform services
Microsoft Dataverse is a critical component of the Power Platform, providing a secure and cloud-based storage system for organizing and managing business data. It serves as a centralized data repository that enables users to store and manage data used by business applications. Dataverse is designed to be flexible, allowing the creation of custom tables, attributes, and relationships to model business-specific data. It also supports rich metadata, ensuring that data is described in a way that is easy to understand and use.
The value of Microsoft Dataverse in organizing business data can be summarized as follows:
Unified Data Model: Dataverse provides a consistent and uniform way to store data, ensuring that it is accessible across various applications within the Power Platform ecosystem, including Power Apps, Power Automate, and Power Virtual Agents https://learn.microsoft.com/en-us/power-apps/maker/canvas-apps/how-to/mobile-apps-address-map .
Security: Data security is a top priority, and Dataverse includes robust security features such as row-level security, role-based security, and field-level security to ensure that data is protected and only accessible by authorized users.
Integration: Dataverse is designed to work seamlessly with other Microsoft services and applications, such as Dynamics 365, Office 365, and Azure. This integration allows for the easy flow of data across different services and enhances the overall functionality of business applications https://learn.microsoft.com/en-us/training/modules/introduction-power-platform/9-describe-how-power-platform-works-microsoft-dynamics-365-apps .
Productivity Tools: With Dataverse, users can leverage a suite of productivity tools, such as Power Query, to import, transform, and integrate data from various sources. This simplifies the process of data management and allows for more efficient data operations.
Rich Data Types: Dataverse supports a variety of data types, including complex types like images and files, which can be used to enrich business applications with multimedia and documents.
Logic and Validation: Business rules, workflows, and custom logic can be applied directly within Dataverse to ensure data quality and automate business processes, reducing the need for manual intervention and increasing efficiency.
Scalability: As organizations grow, their data needs evolve. Dataverse is built to scale, accommodating large volumes of data and complex data models without compromising performance.
Ease of Use: Creating and managing data within Dataverse does not require extensive technical expertise, making it accessible to a wide range of users, including those with less technical backgrounds.
For more information on Microsoft Dataverse and its capabilities, you can refer to the following resources:
- Power Apps environments and the Dataverse
- Create a new environment with a Dataverse database
- List of all Power Apps connectors
By leveraging Microsoft Dataverse, organizations can ensure that their business data is well-organized, secure, and easily accessible, which is essential for building efficient and effective business applications.
Describe the business value of Microsoft Power Platform (20–25%)
Describe the business value of Microsoft Power Platform services
AI Builder is a feature of the Microsoft Power Platform that enhances the capabilities of apps and flows by integrating artificial intelligence. It allows users to add AI to their applications without the need for coding or data science expertise. Here’s a detailed explanation of the value AI Builder brings to apps and flows:
Enhancing Apps with AI Builder
- Prebuilt AI Models: AI Builder provides prebuilt AI models that can be easily added to Power Apps. These models cover common business scenarios such as form processing, object detection, and text classification https://learn.microsoft.com/en-us/training/modules/introduction-power-automate/3-explore-different-power-automate-apps .
- Custom AI Models: Users can build custom AI models tailored to their specific needs. This includes the ability to train the model using their own data, which AI Builder can then use to make predictions or take actions within the app https://learn.microsoft.com/en-us/training/modules/introduction-power-automate/3-explore-different-power-automate-apps .
- Natural Language Processing: AI Builder incorporates natural language processing, allowing apps to understand and process human language. This can be used to create chatbots or other interactive features within an app https://learn.microsoft.com/en-us/training/modules/introduction-power-platform/5-use-artificial-intelligence-increase-productivity .
Enhancing Flows with AI Builder
- Process Automation: AI Builder can automate processes within Power Automate flows. For example, it can extract information from documents or images and use that data to trigger other actions in the flow https://learn.microsoft.com/en-us/training/modules/introduction-power-automate/3-explore-different-power-automate-apps .
- Efficiency and Accuracy: By automating tasks that would typically require manual input, AI Builder increases efficiency and reduces the potential for human error. This can lead to more reliable and consistent workflows https://learn.microsoft.com/en-us/training/modules/introduction-power-automate/3-explore-different-power-automate-apps .
- Adaptive Cards in Teams: Within Microsoft Teams, AI Builder can be used with Power Automate to create flows that respond to messages, using Adaptive Cards to create interactive and dynamic content https://learn.microsoft.com/en-us/training/modules/introduction-power-platform/8-explore-how-power-platform-works-microsoft-teams .
Additional Resources
For those looking to delve deeper into the capabilities of AI Builder and how it can be used to enhance apps and flows, the following resources provide further information:
- Power Automate Maker Portal: The maker portal is the starting point for creating and managing Power Automate flows, and it provides access to AI Builder tools https://learn.microsoft.com/en-us/training/modules/introduction-power-automate/3-explore-different-power-automate-apps .
- Microsoft Copilot: Copilot uses AI to assist in building applications and can be interacted with through natural language, making the development process more intuitive and efficient https://learn.microsoft.com/en-us/training/modules/introduction-power-platform/5-use-artificial-intelligence-increase-productivity https://learn.microsoft.com/en-us/training/modules/introduction-power-platform/5-use-artificial-intelligence-increase-productivity .
- Power BI and AI: In the context of Power BI, AI Builder can be used to perform advanced analytics, including the use of AI components to analyze data and generate insights https://learn.microsoft.com/en-us/power-bi/support/service-support-options .
By integrating AI Builder into Power Apps and Power Automate, organizations can transform their business processes, making them more intelligent, efficient, and adaptable to complex scenarios. AI Builder’s ease of use and the breadth of its capabilities make it a valuable tool for enhancing both apps and flows within the Microsoft Power Platform ecosystem.
Describe the business value of Microsoft Power Platform (20–25%)
Describe the business value of extending business solutions by using Microsoft Power Platform
Integration of Microsoft Power Platform and Microsoft Dynamics 365
Microsoft Power Platform and Microsoft Dynamics 365 are designed to work seamlessly together to enhance and extend the capabilities of both platforms. Here’s how they integrate:
Common Data Service (CDS): Microsoft Power Platform uses Microsoft Dataverse (formerly known as the Common Data Service) as its underlying data platform. This allows for secure and scalable data storage that is shared with Dynamics 365 applications, ensuring that both Power Platform apps and Dynamics 365 apps can operate on the same data model.
Dataflows: Power Platform’s dataflows enable data integration and transformation across various services, including Dynamics 365. Dataflows can automate the movement and transformation of data from Dynamics 365 into the Dataverse, making it available for Power Platform apps https://learn.microsoft.com/en-us/power-bi/transform-model/dataflows/dataflows-best-practices .
Connectors: Power Automate, a component of Power Platform, provides over 900 connectors, including those for Dynamics 365. These connectors allow for the creation of automated workflows that can move data between Dynamics 365 and other services, facilitating complex business processes https://learn.microsoft.com/en-us/training/modules/introduction-power-automate/4-describe-components-cloud-flow .
Extensibility: Dynamics 365 apps can be extended using Power Apps, another component of Power Platform. This allows for the creation of custom applications that can interact with Dynamics 365 data, providing tailored solutions for specific business needs.
Automation and AI: Power Automate and AI Builder within Power Platform can be used to automate workflows and integrate intelligent algorithms within Dynamics 365, enhancing productivity and providing advanced analytics.
Unified Interface: Both Power Platform and Dynamics 365 use a unified interface, which provides a consistent look and feel across applications, simplifying user adoption and training.
For additional information on how Microsoft Power Platform apps work together with Microsoft Dynamics 365 apps, you can refer to the following resources:
- For an overview of dataflows across Power Platform and Dynamics 365, visit What are dataflows https://learn.microsoft.com/en-us/power-bi/transform-model/dataflows/dataflows-best-practices .
- To understand the update process and how new features are rolled out to both platforms, check the Dynamics 365 and Microsoft Power Platform release plans https://learn.microsoft.com/power-platform/admin/policies-communications https://learn.microsoft.com/power-platform/admin/policies-communications .
- For support and assistance with Dynamics 365 and Power Platform, use the Power Platform admin center https://learn.microsoft.com/power-platform/admin/support-overview .
By leveraging the integration capabilities between Microsoft Power Platform and Microsoft Dynamics 365, organizations can create a more connected and efficient ecosystem of business applications.
Describe the business value of Microsoft Power Platform (20–25%)
Describe the business value of extending business solutions by using Microsoft Power Platform
Microsoft Power Platform Integration with Microsoft 365 Apps and Services
Microsoft Power Platform is designed to work seamlessly with Microsoft 365 apps and services, providing organizations with a comprehensive suite of tools to enhance productivity and streamline business processes. The integration between Power Platform and Microsoft 365 leverages the capabilities of both platforms to create powerful business solutions.
Power Platform Connectors for Microsoft 365
Power Platform includes a variety of connectors specifically designed to interact with Microsoft 365 services, enabling administrators, managers, and end-users to become more productive https://learn.microsoft.com/en-us/training/modules/introduction-power-platform/7-describe-how-power-platform-works-microsoft-365-apps-services . Some of the connectors available for Microsoft 365 include:
- Office 365 Outlook
- Office 365 Users
- Excel
- SharePoint
These connectors allow users to automate routine tasks. For example, Power Automate can be used to create a flow that monitors an inbox for incoming emails with attachments and automatically saves those attachments to a SharePoint site or OneDrive folder https://learn.microsoft.com/en-us/training/modules/introduction-power-platform/7-describe-how-power-platform-works-microsoft-365-apps-services . This automation can save significant time, reducing a process that might take 1 to 2 minutes manually to a few seconds.
Enhancing Excel with Power Platform
Microsoft Excel is widely used for managing departmental functions, thanks to its robust formula capabilities and features like Charts and Pivot Tables. However, data entry into Excel is often manual, which can be time-consuming. Power Platform offers personal productivity automation tools, such as Power Automate Desktop flows, to automate data capture and entry into Excel, thus saving hours of manual work each week https://learn.microsoft.com/en-us/training/modules/introduction-power-platform/7-describe-how-power-platform-works-microsoft-365-apps-services .
Power Automate and Data Sources
Power Automate supports over 900 connectors, making it easy to connect to various data sources, both on the web and on-premises https://learn.microsoft.com/en-us/training/modules/introduction-power-automate/4-describe-components-cloud-flow . Common data sources include:
- Microsoft Dataverse
- Salesforce
- Dynamics 365
- Google Drive
- Office 365
- Oracle
This extensive range of connectors allows for the integration of multiple data sources into a single automation, enhancing the functionality and efficiency of Microsoft 365 apps and services https://learn.microsoft.com/en-us/training/modules/introduction-power-automate/4-describe-components-cloud-flow .
Dynamics 365 and Power Platform
Dynamics 365 is a suite of intelligent business applications that integrate with Power Platform to provide AI-driven insights and support business operations https://learn.microsoft.com/en-us/training/modules/introduction-power-platform/9-describe-how-power-platform-works-microsoft-dynamics-365-apps . Dynamics 365 customer engagement apps are model-driven applications built using Power Apps and are based on data models stored within Microsoft Dataverse. These applications utilize various Power Platform components, such as forms, views, charts, and dashboards, to present data to end-users https://learn.microsoft.com/en-us/training/modules/introduction-power-platform/9-describe-how-power-platform-works-microsoft-dynamics-365-apps .
Communication and Updates
Microsoft ensures that users are kept informed about maintenance, updates, security, and new features for Power Platform and Dynamics 365 apps through the Microsoft 365 admin center. This includes the Message Center and the Service health dashboard, which provide details on service incidents and available workarounds https://learn.microsoft.com/power-platform/admin/policies-communications .
Licensing Changes
It is important to note that some connectors have been reclassified from Standard to Premium, affecting the licensing requirements for apps using these connectors. Users should refer to the Power Apps licensing FAQ for detailed information on these changes and the designations for app access https://learn.microsoft.com/en-us/power-apps/maker/canvas-apps/license-designation .
For additional information on Power Platform and Microsoft 365 integration, please refer to the following resources:
- Power Automate Documentation
- Power Apps Documentation
- Microsoft 365 Documentation
- Power Platform Licensing FAQ
By leveraging the integration between Microsoft Power Platform and Microsoft 365 apps and services, organizations can create more efficient workflows, automate mundane tasks, and gain deeper insights into their operations, all while ensuring they are using the appropriate licensing for their solutions.
Describe the business value of Microsoft Power Platform (20–25%)
Describe the business value of extending business solutions by using Microsoft Power Platform
Microsoft Power Platform App Integration
Microsoft Power Platform is a suite of applications, connectors, and a data platform (Dataverse) that provides a rapid development environment to build custom apps for your business needs. The Power Platform apps include Power BI, Power Apps, Power Automate, and Power Virtual Agents, all of which can work together seamlessly to create end-to-end business solutions.
Power Apps and Power Automate
Power Apps is a service that allows users to build custom apps with little to no code. These apps can range from simple to complex and can be standalone or model-driven. Model-driven apps are built on top of the data model in the Microsoft Dataverse and are designed to be used with the Dynamics 365 applications https://learn.microsoft.com/en-us/training/modules/introduction-power-platform/9-describe-how-power-platform-works-microsoft-dynamics-365-apps .
Power Automate, formerly known as Microsoft Flow, is a service that helps you create automated workflows between your favorite apps and services to synchronize files, get notifications, collect data, and more. Power Automate can be integrated with Power Apps to automate tasks and processes without writing code https://learn.microsoft.com/en-us/power-bi/collaborate-share/service-collaborate-microsoft-teams .
Power Virtual Agents and Teams Integration
Power Virtual Agents enables the creation of powerful chatbots that can engage conversationally with your users. These bots can be integrated with Microsoft Teams, allowing users to interact with the bot directly within the Teams platform. This integration extends the capabilities of Teams, making it a more powerful collaboration tool https://learn.microsoft.com/en-us/power-bi/collaborate-share/service-collaborate-microsoft-teams .
Microsoft Dataverse
At the core of the Power Platform is Microsoft Dataverse, a scalable data service and app platform that enables users to securely store and manage data used by business applications. Dataverse allows these apps to interoperate, by providing a unified data schema that applications can use. Power Apps, for example, can be used to create apps that interact with this data directly https://learn.microsoft.com/en-us/power-apps/maker/canvas-apps/how-to/build-connected-dataverse .
Power Platform and Dynamics 365
Dynamics 365 is a suite of intelligent business applications that can work closely with the Power Platform. All Dynamics 365 customer engagement apps are model-driven applications that are built using Power Apps and are based on the data model stored within the Microsoft Dataverse. This integration allows for seamless data and process integration between Dynamics 365 and Power Platform applications https://learn.microsoft.com/en-us/training/modules/introduction-power-platform/9-describe-how-power-platform-works-microsoft-dynamics-365-apps .
Security and Compliance
When integrating these applications, it’s important to consider security and compliance. For instance, to run a flow in a canvas app that is included in a solution, users must be assigned a Dataverse security role with the appropriate privileges https://learn.microsoft.com/en-us/power-apps/maker/canvas-apps/add-app-solution .
Additional Resources
For more information on how the Power Platform apps integrate and work together, you can refer to the following resources:
- Power Platform admin experience: Power Platform admin experience
- Power Automate in Teams: Power Automate
- Power Apps in Teams: Power Apps
- Power Virtual Agents: Power Virtual Agents
By leveraging the integration capabilities of the Power Platform, organizations can streamline their processes, increase efficiency, and enhance their overall productivity.
Describe the business value of Microsoft Power Platform (20–25%)
Describe the business value of extending business solutions by using Microsoft Power Platform
Microsoft Power Platform Integration with Microsoft Teams
Microsoft Power Platform and Microsoft Teams integration provides a powerful combination that enables organizations to enhance collaboration and streamline business processes. The integration allows users to build custom applications, automate workflows, and deploy virtual agents within the Teams environment, leveraging the low-code capabilities of the Power Platform.
Key Components of Power Platform in Teams
Power Apps: Users can create custom applications using Power Apps within Teams, allowing for tailored solutions that fit specific organizational needs. These apps can be shared and used directly within the Teams interface https://learn.microsoft.com/en-us/power-bi/collaborate-share/service-collaborate-microsoft-teams .
Power Automate: Power Automate can be used to create automated workflows that connect to Teams. This helps in automating routine tasks and processes, improving efficiency and productivity https://learn.microsoft.com/en-us/power-bi/collaborate-share/service-collaborate-microsoft-teams .
Power Virtual Agents: With Power Virtual Agents, users can build and deploy chatbots within Teams. These bots can interact with users, answer questions, and assist with tasks, all without leaving the Teams platform https://learn.microsoft.com/en-us/power-bi/collaborate-share/service-collaborate-microsoft-teams .
Dataverse for Teams: This is a low-code data platform integrated into Teams. It empowers users to build apps, bots, and workflows with Power Apps, Power Virtual Agents, and Power Automate, all within the Teams environment https://learn.microsoft.com/en-us/training/modules/introduction-power-platform/8-explore-how-power-platform-works-microsoft-teams .
Examples of Power Platform in Teams
Custom Applications: Organizations can build custom applications tailored to their needs. For instance, a real estate company could create an expense submission app using Dataverse for Teams, enabling agents to submit expenses directly through Teams https://learn.microsoft.com/en-us/training/modules/introduction-power-platform/8-explore-how-power-platform-works-microsoft-teams .
Embedded Power BI Reports: Power BI reports can be integrated into Teams, providing analytics and insights directly within the collaboration platform. This allows for data-driven decision-making within the context of team discussions https://learn.microsoft.com/en-us/training/modules/introduction-power-platform/8-explore-how-power-platform-works-microsoft-teams .
Virtual Agents for Assistance: Dedicated Copilots or chatbots can be embedded in Teams to assist with day-to-day tasks, such as answering questions about protocols or helping with scheduling https://learn.microsoft.com/en-us/training/modules/introduction-power-platform/8-explore-how-power-platform-works-microsoft-teams .
Requirements and Considerations
Power BI Integration: To use the “Chat in Teams” functionality in Power BI, the “Share to Teams” tenant setting must be enabled by the Power BI administrator. This allows users to share Power BI content directly within Teams https://learn.microsoft.com/en-us/power-bi/collaborate-share/service-share-report-teams .
Sharing Apps: When sharing a link to a Power Apps application in a Teams chat, both the sender and receiver must be in the same tenant and have access to the app. Organizations must allow interaction with custom apps and enable Shared Power Apps https://learn.microsoft.com/en-us/power-apps/maker/canvas-apps/share-app .
Additional Resources
For more information on how to integrate and utilize Power Platform components within Microsoft Teams, you can visit the following URLs:
- Power Platform admin experience: Admin Guide
- Power Automate in Teams: Power Automate Overview
- Power Apps in Teams: Power Apps Overview
- Power Virtual Agents: Power Virtual Agents Guide
- Collaborate in Teams with Power BI: Collaboration Guide
- Manage custom app policies and settings in Teams: Custom App Policies
- Manage Power Platform apps in Teams: Power Platform Apps Management
By leveraging the integration of Microsoft Power Platform with Microsoft Teams, organizations can create a more connected and efficient work environment that adapts to their evolving business needs.
Describe the business value of Microsoft Power Platform (20–25%)
Describe the business value of extending business solutions by using Microsoft Power Platform
Microsoft Power Platform and Azure Services Integration
Microsoft Power Platform offers robust capabilities to build business solutions that can seamlessly integrate with Microsoft Azure services. This integration enables organizations to extend the functionality of their Power Platform solutions by leveraging the vast array of services available in Azure. Here are some key points on how Power Platform business solutions can consume Azure services:
Virtual Network Support
Power Platform can integrate with enterprise resources over public networks, but with Azure Virtual Network support, it can also use a private network to integrate with cloud services or services hosted within an enterprise network. This is achieved through Azure services protected within a virtual network using private endpoints and the ability to bring on-premises resources to the virtual network through Express Route https://learn.microsoft.com/en-us/power-platform/admin/vnet-support-overview https://learn.microsoft.com/en-us/power-platform/admin/vnet-support-overview .
Azure Subnet Delegation
Azure Virtual Network support for Power Platform uses Azure subnet delegation to manage outbound traffic from Power Platform at runtime. This allows for integration with resources within your virtual network without exposing them over the public internet, enhancing security and control over the data flow https://learn.microsoft.com/en-us/power-platform/admin/vnet-support-overview .
Custom Connectors and Azure Functions
Developers can build custom connectors to connect Power Platform to their organization’s data and web services, including those hosted on Azure. Additionally, Azure Functions can be crafted to extend apps with custom server-side logic, providing a powerful way to execute code in response to events triggered by Power Platform https://learn.microsoft.com/en-us/power-apps/maker/canvas-apps/dev-enterprise-intro .
Virtual Network Data Gateway
The virtual network data gateway is a managed gateway that allows access to Azure and Power Platform services from within your virtual network. This eliminates the need for an on-premises data gateway and supports ETL workloads for services like Power BI and Power Platform dataflows https://learn.microsoft.com/en-us/power-platform/admin/vnet-support-overview .
Azure Machine Learning Integration
Power Platform can access Azure Machine Learning models, enabling advanced analytics and AI capabilities within business solutions. Users must have Read access to the Azure subscription and the Machine Learning workspace to integrate these models into Power BI as a Power Query function https://learn.microsoft.com/en-us/power-bi/transform-model/dataflows/dataflows-machine-learning-integration .
For additional information on integrating Power Platform with Azure services, you can refer to the following resources: - Private Endpoint Overview - Express Route - Azure Virtual Network Overview - Subnet Delegation Overview - Custom Connectors - Power Platform CLI - Azure Functions - Virtual Network Data Gateway Architecture - Assign Azure Roles Using the Azure Portal
By leveraging these integrations, organizations can create more comprehensive, secure, and scalable business solutions that harness the full potential of both Power Platform and Azure services.
Describe the business value of Microsoft Power Platform (20–25%)
Describe Microsoft Power Platform administration and governance
Microsoft Power Platform Security Model
The Microsoft Power Platform security model is designed to ensure that data and resources are protected while allowing users the flexibility to create and share applications and workflows. Here’s a detailed explanation of the key components of the security model:
Dataverse and Environment Security
- Dataverse Database: Solutions in Power Platform, such as canvas apps and cloud flows, are stored in Microsoft Dataverse. To utilize these features, an environment must have a Dataverse database https://learn.microsoft.com/en-us/power-apps/maker/canvas-apps/add-app-solution-default .
- Environment Roles: To create canvas apps in solutions, users must have Write privileges to the CanvasApp table. For cloud flows, the Environment Maker role is required. These roles are part of the predefined security roles within Power Platform https://learn.microsoft.com/en-us/power-apps/maker/canvas-apps/add-app-solution-default .
- Sharing: A canvas app or cloud flow within a solution must be shared with a user before they can view or edit it https://learn.microsoft.com/en-us/power-apps/maker/canvas-apps/add-app-solution-default .
Security Roles and Privileges
- Dataverse Security Roles: To use or run a flow in a canvas app included in a solution, users must be assigned a Dataverse security role with the Read privilege on the Process (Workflow) table. Security roles and privileges in Dataverse are crucial for controlling access to data and resources https://learn.microsoft.com/en-us/power-apps/maker/canvas-apps/add-app-solution .
- Custom Table Configurations: If custom tables are used in Dataverse, additional security configuration might be required for users to view records with canvas apps. This involves setting up appropriate security roles and privileges https://learn.microsoft.com/en-us/power-apps/maker/canvas-apps/app-performance-considerations .
Data Access and Management
- Data Requests: When using Microsoft Dataverse as the data source, data requests go directly to the environment instance, which can be faster than other data sources https://learn.microsoft.com/en-us/power-apps/maker/canvas-apps/app-performance-considerations .
- Connection References and Environment Variables: Dataverse capabilities allow for the management of canvas apps and cloud flows in a solution, including connection references and environment variables https://learn.microsoft.com/en-us/power-apps/maker/canvas-apps/add-app-solution-default .
- Dataverse API: The Dataverse API can be used to interact with data and metadata in Dataverse, providing programmatic access to the platform https://learn.microsoft.com/en-us/power-apps/maker/canvas-apps/add-app-solution-default .
- Role-Based Security: Role-based security in Dataverse ensures that only authorized users can access specific data and functionalities based on their assigned roles https://learn.microsoft.com/en-us/power-apps/maker/canvas-apps/add-app-solution-default .
Application Lifecycle Management (ALM)
- ALM in Solutions: The Power Platform provides solution-based application lifecycle management, which allows for the structured management, deployment, and governance of Power Platform resources https://learn.microsoft.com/en-us/power-apps/maker/canvas-apps/add-app-solution-default .
Preview Features
- Preview Features: It’s important to note that some features, such as the Power Apps Test Engine, are considered preview features. These features are not meant for production use and may have restricted functionality. They are available for early access and feedback https://learn.microsoft.com/en-us/power-apps/maker/../developer/test-engine/overview .
For additional information on the Microsoft Power Platform security model, you can refer to the following resources:
- Security roles and privileges
- Database security in Power Platform
- Security concepts in Dataverse
- Configure user security to resources in an environment
Please note that the URLs provided are for reference and further reading. The security model is subject to change, and it is recommended to consult the latest documentation for the most up-to-date information.
Describe the business value of Microsoft Power Platform (20–25%)
Describe Microsoft Power Platform administration and governance
Describe Environments
In the context of Power Platform, environments are containers that house applications, data, and other assets. They serve as a space where you can manage and store your resources securely. Each environment is tied to a Microsoft Dataverse database, which allows for the structured storage of data used by the apps within that environment.
Types of Environments
There are different types of environments within the Power Platform:
- Default Environment: This is created automatically when a Power Platform environment is set up. It is shared by all users in a tenant and has a broad set of permissions.
- Production Environment: Intended for hosting live applications that are in use by an organization.
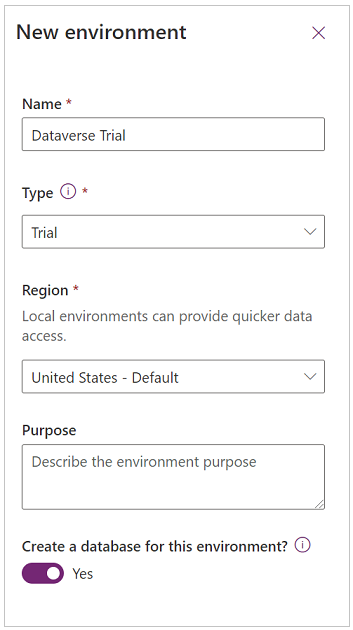
- Trial Environment: A temporary environment used for exploration and learning about the Power Platform.
- Sandbox Environment: Used for development, testing, and training without affecting the production environment.
Environment ID
Each environment has a unique Environment ID, which is used to identify it within the Power Platform Admin Center. You can find your Environment ID from the Environments tab of the Power Platform Admin Center https://learn.microsoft.com/en-us/power-platform/admin/manage-high-privileged-admin-roles .
Virtual Network Support
Environments can be configured with Virtual Network support, enhancing security by ensuring that data is only accessed from a private network. You can validate the connection in the Power Platform admin center by selecting the environment and checking the History tab to see if the enterprise policies link with your environment is successful https://learn.microsoft.com/en-us/power-platform/admin/vnet-support-setup-configure .
Solutions and Legacy Packages
When managing apps and flows within an environment, it is recommended to use solutions for exporting and importing. Solutions allow for the packaging of apps, flows, logic apps, and more, making it easier to move them between environments. Legacy packages can still be imported into environments that have the relevant environment setting turned off https://learn.microsoft.com/en-us/power-apps/maker/canvas-apps/add-app-solution-default .
Integration with Microsoft Teams
Power Platform environments integrate seamlessly with Microsoft Teams, allowing for the creation and management of apps directly within the Teams platform. This integration extends to other Power Platform apps such as Power Automate, Power Apps, and Power Virtual Agents https://learn.microsoft.com/en-us/power-bi/collaborate-share/service-collaborate-microsoft-teams .
Microsoft Dataverse
At the core of Power Platform environments is Microsoft Dataverse, a data platform that enables secure storage and management of data used by apps. It organizes data into a set of tables, which can be utilized by apps connected to the Power Platform environment https://learn.microsoft.com/en-us/power-apps/maker/canvas-apps/how-to/build-connected-dataverse .
For additional information on Power Platform environments, you can refer to the following resources: - Power Platform Admin Center - Virtual Network Support - Export and Import Solutions - Power Platform Integration with Microsoft Teams
Please note that the URLs provided are for reference and further reading on the respective topics.
Describe the business value of Microsoft Power Platform (20–25%)
Describe Microsoft Power Platform administration and governance
Administrative Tasks in Microsoft Power Platform and Microsoft 365 Admin Centers
Administrative tasks for Microsoft Power Platform and Microsoft 365 can be performed in their respective admin centers. Each admin center is tailored to manage specific services and features within the Microsoft ecosystem.
Microsoft Power Platform Admin Center
The Microsoft Power Platform admin center is designed to manage the Power Platform services, which include Power Apps, Power Automate, and Power Virtual Agents. Here are some of the specific administrative tasks that can be performed in the Power Platform admin center:
- Environment Management: Admins can create, configure, and delete environments. Each environment is a space to store, manage, and share your organization’s business data, apps, and flows.
- Data Policies: Admins can set up data loss prevention (DLP) policies to help protect organizational data.
- Capacity Analytics: View and manage your organization’s storage and other capacity metrics.
- User Management: Assign security roles and permissions to users within specific environments.
For more information on managing environments, visit the Power Platform admin center.
Microsoft 365 Admin Center
The Microsoft 365 admin center is the primary hub for managing all Microsoft 365 services. It provides a wide range of administrative capabilities:
- User and Group Management: Admins can add or remove users, assign licenses, and manage groups.
- Service Health and Continuity: Monitor service health and view detailed information about service incidents and maintenance activities.
- Message Center: Receive updates and announcements about new features, updates, and other changes to Microsoft 365 services.
- Security and Compliance: Access security and compliance settings, including data governance, threat management, and search and investigation tools.
- Reports and Analytics: View reports on usage and activity within your Microsoft 365 environment.
For more information on Microsoft 365 administration, visit the Microsoft 365 admin center.
Additional Administrative Tasks
- Service Communications API: Connect to Service Communications using the Service Communication API for programmatic access to service updates and incident notifications https://learn.microsoft.com/power-platform/admin/policies-communications .
- PowerShell: Use PowerShell to configure additional notification email addresses in Dataverse https://learn.microsoft.com/power-platform/admin/policies-communications .
- Email Notifications: Manage email notifications for admins and other recipients https://learn.microsoft.com/power-platform/admin/policies-communications .
- System Administrator Role: Understand the distinction between Microsoft Entra ID roles and the System Administrator role within Dataverse https://learn.microsoft.com/en-us/power-platform/admin/manage-high-privileged-admin-roles .
It is important for administrators to familiarize themselves with both admin centers to effectively manage their organization’s Microsoft services and ensure smooth operation.
Please note that access to certain administrative functions may require specific admin roles. For instance, creating and managing autoclaim policies in Microsoft 365 requires global admin privileges https://learn.microsoft.com/en-us/power-platform/admin/power-automate-licensing/power-automate-auto-claim . It is recommended to review the About admin roles in the Microsoft 365 admin center for detailed information on the permissions associated with each admin role https://learn.microsoft.com/en-us/power-platform/admin/power-automate-licensing/power-automate-auto-claim .
Describe the business value of Microsoft Power Platform (20–25%)
Describe Microsoft Power Platform administration and governance
Microsoft Power Platform and Privacy & Accessibility Guidelines
Microsoft Power Platform is designed with privacy and accessibility in mind, ensuring that applications built using its components adhere to relevant guidelines and standards.
Privacy
The Power Platform provides mechanisms to control and protect data privacy across its services:
Data Source Privacy Levels: When configuring data sources for Power Platform, administrators can set privacy levels that control how data is combined during scheduled refreshes. This setting is crucial for maintaining data isolation and preventing unauthorized data exposure https://learn.microsoft.com/en-us/power-bi/connect-data/service-gateway-enterprise-manage-sap .
Virtual Network Support: Power Platform can integrate with enterprise resources over private networks. By using Azure services like private endpoints and Express Route, data can be protected within a virtual network, eliminating the need to expose sensitive information over the public internet https://learn.microsoft.com/en-us/power-platform/admin/vnet-support-overview .
For more information on privacy levels, you can refer to the Power Query documentation on setting privacy levels here https://learn.microsoft.com/en-us/power-bi/connect-data/service-gateway-enterprise-manage-sap .
Accessibility
Power Platform is committed to creating accessible applications:
Power Fx Language: Power Fx, the low-code language used in Power Platform, is designed to be accessible to a wide range of users. Its similarity to Excel formulas makes it easy for non-professional developers to understand and use, thus democratizing app development https://learn.microsoft.com/en-us/training/modules/introduction-power-platform/6-explore-business-value-power-fx .
UI Control Accessibility: Power Fx allows for the creation of accessible UI controls in Canvas apps. For example, the visibility of a control can be tied to whether a certain condition is met, such as the presence of text in another control. This dynamic behavior supports the creation of user interfaces that can adapt to the needs of users with disabilities https://learn.microsoft.com/en-us/training/modules/introduction-power-platform/6-explore-business-value-power-fx .
For detailed examples of how Power Fx is used to bind objects and create accessible applications, you can view the PowerApps-TestEngine samples here https://learn.microsoft.com/en-us/power-apps/maker/../developer/test-engine/yaml .
Supporting Documentation and Resources
- To learn more about Power Fx and its role in creating accessible applications, visit the Power Fx documentation here https://learn.microsoft.com/en-us/power-apps/maker/../developer/test-engine/yaml .
- For information on how to protect and monitor your virtual network when using Power Platform, see the documentation on Azure private endpoints and Express Route here and here https://learn.microsoft.com/en-us/power-platform/admin/vnet-support-overview .
- To validate the connection of your Power Platform environment with Virtual Network support, you can go to the Power Platform admin center here https://learn.microsoft.com/en-us/power-platform/admin/vnet-support-setup-configure .
By leveraging these features and resources, developers can ensure that their Power Platform applications are both privacy-compliant and accessible to all users.
Identify foundational components of Microsoft Power Platform (10–15%)
Describe Microsoft Dataverse
Differences between Traditional Databases and Dataverse
When comparing traditional databases to Microsoft Dataverse, several key differences stand out. These differences are important to understand when considering data management and application development within the Microsoft Power Platform ecosystem.
Data Model: - Traditional databases often require a predefined schema and are designed to store data in tables with rows and columns. They are typically normalized to reduce redundancy and improve data integrity. - Dataverse uses a more flexible and metadata-driven data model. It allows for the definition of custom entities (similar to tables) and relationships between them, which can be easily modified as business requirements change https://learn.microsoft.com/en-us/power-apps/maker/canvas-apps/offline-apps .
Integration and Connectivity: - Traditional databases may require custom development or third-party tools to connect with other systems and services. - Dataverse is deeply integrated with the Power Platform and other Microsoft services, providing out-of-the-box connectivity. It supports a wide range of standard and custom connectors, making it easier to integrate with various data sources and services https://learn.microsoft.com/en-us/power-apps/maker/canvas-apps/share-app-guests .
Security: - Security in traditional databases is managed at the database level, often requiring database administrators to set up and maintain access controls. - Dataverse provides a role-based security model that is managed at the data level. This allows for fine-grained access control over the data, including field-level security, and is integrated with Microsoft’s Azure Active Directory for authentication and authorization.
Development: - Developing applications on top of traditional databases typically requires knowledge of SQL and programming languages like C# or Java. - Dataverse is designed for low-code development, enabling power users and developers to create applications using Power Apps without writing traditional code. This accelerates the app development process and democratizes the ability to build business solutions https://learn.microsoft.com/en-us/power-apps/maker/canvas-apps/share-app-guests .
Accessibility and Compliance: - Traditional databases may not have built-in features to ensure accessibility and compliance, which can require additional effort from developers. - Dataverse is designed with accessibility in mind, and Microsoft ensures that it complies with various standards and regulations, which can reduce the burden on organizations to meet these requirements.
Scalability and Maintenance: - Scaling and maintaining traditional databases can be complex and resource-intensive, often requiring specialized knowledge. - Dataverse is a cloud-based solution that is maintained and scaled by Microsoft, which can reduce the complexity and cost of infrastructure management for organizations.
Offline Capabilities: - Traditional databases do not typically offer built-in offline capabilities for applications. - Power Apps with Dataverse can use local collections to manage data offline, and the apps can be easily retargeted to different data sources with minimal changes to the app’s logic https://learn.microsoft.com/en-us/power-apps/maker/canvas-apps/offline-apps .
For more information on Dataverse and its capabilities, you can refer to the following resources: - Power Apps and Dataverse - Overview of canvas-app connectors for Power Apps - Power Platform admin center
Please note that the URLs provided are for additional information and are part of the study materials.
Identify foundational components of Microsoft Power Platform (10–15%)
Describe Microsoft Dataverse
Describe Tables, Columns, and Relationships in Dataverse
Dataverse is a cloud-based storage service that allows users to securely store and manage data used by business applications. Understanding the structure of Dataverse is crucial for leveraging its capabilities effectively. Here’s a detailed explanation of the core components: tables, columns, and relationships.
Tables
In Dataverse, tables are used to model and manage business data. Tables are similar to tables in a database and are used to store a collection of records. Each table in Dataverse is designed to store data about a particular type of entity, such as contacts, accounts, or sales orders. For instance, you might have a table to store line items for sales orders, which would include all the necessary details about each line item in a structured format.
Columns
Columns within Dataverse tables are used to store data for a particular attribute of an entity. Each column has a specific data type, such as text, choice, or date, which defines the nature of the data that can be stored in that column. For example, a sales order line item table might include columns for the product name (single line of text), quantity (numeric), and the list price (currency). Dataverse also allows the creation of calculated columns using Power Fx formulas, enabling dynamic calculation of values based on other columns in the table. An example of this would be a formula to calculate the total price of a line item by multiplying the list price by the quantity https://learn.microsoft.com/en-us/training/modules/introduction-power-platform/6-explore-business-value-power-fx .
Relationships
Relationships in Dataverse define how tables are connected to each other. These relationships can be one-to-one, one-to-many, or many-to-many, and they help in establishing the context between different entities. For example, a relationship might be defined between a sales order table and a line items table to indicate that each sales order can have multiple line items. Relationships are crucial for maintaining data integrity and for performing complex data analysis and reporting.
For more information on Dataverse tables, columns, and relationships, you can refer to the following resources: - Understanding Tables in Dataverse - Working with Columns in Dataverse - Defining Relationships in Dataverse
By understanding these components, users can effectively structure their data within Dataverse to support their business processes and application requirements.
Identify foundational components of Microsoft Power Platform (10–15%)
Describe Microsoft Dataverse
Describe Business Logic in Dataverse
Dataverse is a cloud-based storage platform that allows users to securely store and manage data used by business applications. Business logic in Dataverse refers to the set of rules and automated processes that govern the behavior of data and its interaction within applications. Here are the key components of business logic in Dataverse:
Business Rules: Business rules are set at the entity level and can be used to apply validation, set field values, show or hide fields, enable or disable fields, and create business recommendations based on conditions within a form. They are designed to be set up by an app maker without the need for writing code.
Workflows: Workflows in Dataverse are automated processes that run in the background to perform tasks such as sending emails, creating records, or updating fields when certain conditions are met. They can be triggered by events such as the creation or updating of a record.
Power Automate Integration: Dataverse is tightly integrated with Power Automate, which allows for the creation of advanced workflows that can span across multiple services and applications. Power Automate provides a visual designer to create automated workflows that can connect to more than 200 different services, enabling complex business processes to be automated with ease https://learn.microsoft.com/en-us/power-apps/maker/canvas-apps/transform-infopath .
Business Process Flows: These guide users through a set of steps to complete a task or get to a desired outcome. Business Process Flows ensure that people enter data consistently and follow the same steps every time they work with a customer or work on a particular task.
Plugins: Plugins are custom code that can be used to extend the functionality of Dataverse. They can be triggered by a wide array of events to perform operations that are not possible with the out-of-the-box features of Dataverse. Plugins are typically developed by developers familiar with .NET and the Dataverse SDK.
Actions: Actions are a type of process in Dataverse that allow you to define a single operation, such as creating a record or updating a field, that can then be called from workflows, plugins, or even from outside of Dataverse using the Web API.
Virtual Entities: Virtual entities allow Dataverse to integrate with external data sources without the need to copy the data into Dataverse. Business logic can be applied to these virtual entities as if they were regular Dataverse entities.
For more information on how to implement and manage business logic in Dataverse, you can refer to the official Microsoft documentation:
- Business Rules and Recommendations
- Workflows
- Power Automate
- Business Process Flows
- Plugin Development
- Actions
- Virtual Entities
By understanding and utilizing these components, app makers and developers can create rich, automated, and consistent experiences within their business applications, ensuring that data is handled efficiently and in accordance with business requirements.
Identify foundational components of Microsoft Power Platform (10–15%)
Describe Microsoft Dataverse
Describe Dataflows for Dataverse
Dataflows in Microsoft Dataverse are a powerful feature that allows users to ingest data from various data sources, transform it, and then store it within Dataverse tables. They are designed to enable the integration and harmonization of large volumes of data, which can then be used for analytics, reporting, and by business applications.
Key Features of Dataflows for Dataverse:
Data Ingestion: Dataflows can import data from a wide range of sources, including on-premises databases, cloud services, and Excel files. This flexibility allows organizations to bring together data from disparate systems into a unified Dataverse environment.
Data Transformation: Once data is ingested, dataflows provide capabilities to transform the data using Power Query, a powerful data mashup and transformation tool. Users can clean, reshape, and enrich the data as part of the dataflow process.
Scheduled Refresh: Dataflows can be configured to refresh the data at scheduled intervals, ensuring that the data in Dataverse is up-to-date and reflects the latest information from the source systems.
Integration with Azure Data Lake: For organizations using Azure Data Lake Storage Gen2, dataflows can be set up to store data directly in the data lake, enabling advanced analytics and machine learning scenarios https://learn.microsoft.com/en-us/power-bi/transform-model/dataflows/dataflows-premium-features .
Ease of Use: Dataflows are designed with a user-friendly interface, making it possible for users without deep technical expertise to create and manage dataflows.
Applying Machine Learning Models:
Dataflows in Dataverse can also be enriched with machine learning models. Users can apply pre-built or custom machine learning models to their data within a dataflow, adding predictions and insights directly to their Dataverse tables https://learn.microsoft.com/en-us/power-bi/create-reports/../transform-model/dataflows/dataflows-machine-learning-integration .
Best Practices:
- When working with data from different sources, such as on-premises and cloud data, it is recommended to create separate dataflows for each source and then merge them as needed https://learn.microsoft.com/en-us/power-bi/transform-model/dataflows/dataflows-premium-features .
- Monitoring refresh statistics can help optimize the performance of dataflows, ensuring efficient data processing and storage https://learn.microsoft.com/en-us/power-bi/transform-model/dataflows/dataflows-understand-optimize-refresh .
Additional Resources:
For more information on creating and managing dataflows in Dataverse, you can refer to the following resources:
- Power BI dataflows documentation
- Using Power Query with Dataflows
- Connecting to Dataflows in Power BI Desktop
By leveraging dataflows in Dataverse, organizations can streamline their data integration processes, enhance their data with machine learning, and unlock valuable insights to drive informed decision-making.
Identify foundational components of Microsoft Power Platform (10–15%)
Describe connectors
Components of a Connector
Connectors in Power Platform serve as bridges between your app and various data sources or services. They enable you to interact with external data and services in a seamless manner. Here’s a detailed explanation of the components that make up a connector:
Triggers: Triggers are the starting point of any automation in Power Automate. They kick off a flow when a specific event occurs. For example, a trigger can be set to initiate a flow when a new record is added to a database or when a file is uploaded to a storage service.
Actions: Actions are the operations carried out by the flow once it has been triggered. They can range from sending an email, creating or updating records, to calling external APIs. Each connector provides a set of actions that define what operations can be performed with it.
Connections: A connection is an instance of a connector that has been authenticated and configured to interact with a specific service. For example, a connection to a SQL Server database would require authentication credentials and the database’s address.
APIs: Connectors are built on top of APIs provided by the service. The API defines the set of commands that the connector can execute, and the connector translates these into actions that can be used within Power Automate, Power Apps, and other Power Platform services.
Data: Connectors can handle different types of data, such as tabular data from databases or file data from storage services. The structure of the data is defined by the API and is represented in the connector through parameters and return types for actions and triggers.
Authentication: To ensure secure access to the external service, connectors use various authentication mechanisms like OAuth, API keys, or username/password credentials. The authentication process is handled by the connector, abstracting the complexity from the user.
Policies and Standards: Connectors adhere to policies and standards set by the external service and Power Platform. This includes compliance with data handling, security standards, and throttling policies to ensure fair usage.
For additional information on connectors and how they function within the Power Platform, you can refer to the following resources:
Remember, the specific components and capabilities of a connector may vary depending on the service it connects to and the operations it supports. It’s important to review the documentation for each connector to understand its unique features and limitations.
Identify foundational components of Microsoft Power Platform (10–15%)
Describe connectors
Standard and Premium Connectors in Power Platform
In the Power Platform ecosystem, connectors are essential components that enable communication between different services and applications. Connectors can be categorized into two main types: Standard and Premium.
Standard Connectors
Standard connectors are those that provide connectivity to common services without additional costs beyond the base Power Apps or Power Automate licenses. These connectors are typically associated with Microsoft services or popular online services that are widely used. Users with any Office 365 subscription have access to standard connectors in Power Automate https://learn.microsoft.com/en-us/power-bi/collaborate-share/service-automate-power-bi-report-export https://learn.microsoft.com/en-us/power-bi/collaborate-share/service-automate-paginated-local-file .
Premium Connectors
Premium connectors, on the other hand, offer connectivity to specialized services or applications that may require a higher level of functionality or unique integration capabilities. These connectors are often associated with third-party services, on-premises data sources, or custom APIs. To use premium connectors, an end user must have a specific Power Apps per app plan or per user plan https://learn.microsoft.com/en-us/power-apps/maker/canvas-apps/license-designation https://learn.microsoft.com/en-us/power-apps/maker/canvas-apps/share-app-guests .
Connector Reclassification
It’s important to note that the classification of connectors can change. For instance, starting October 2019, several connectors were reclassified from Standard to Premium. Users who had apps using these connectors before the reclassification were given an extended timeframe to adjust to this change. The Power Apps licensing FAQ provides a list of connectors that were reclassified https://learn.microsoft.com/en-us/power-apps/maker/canvas-apps/license-designation .
Licensing and Access
- Apps that only use standard connectors can be accessed by users with a Power Apps for Office 365 plan, per app plan, or a per user plan https://learn.microsoft.com/en-us/power-apps/maker/canvas-apps/license-designation .
- If an app uses at least one premium connector, a custom connector, or an on-premises gateway, then an end user must have a per app plan or per user plan to access it https://learn.microsoft.com/en-us/power-apps/maker/canvas-apps/license-designation .
- Custom forms in Microsoft Lists or SharePoint that use premium connectors require users to have a Power Apps license https://learn.microsoft.com/en-us/power-apps/maker/canvas-apps/share-app-guests https://learn.microsoft.com/en-us/power-apps/maker/canvas-apps/share-app-guests .
Additional Information
For more details about Power Platform internal consent plans and trial license commands, you can refer to the Power Platform admin documentation https://learn.microsoft.com/en-us/power-apps/maker/canvas-apps/share-app-guests . To understand the designations of connectors and which license an end user must have to access an app, the Power Apps licensing FAQ is a valuable resource https://learn.microsoft.com/en-us/power-apps/maker/canvas-apps/license-designation . For information about pricing and the capabilities of various plans, the Microsoft Power Apps and Power Automate Licensing Guide provides comprehensive guidance https://learn.microsoft.com/en-us/power-apps/maker/canvas-apps/share-app-guests .
URLs for Additional Information
- Power Platform Internal Consent Plans: Block Trial Licenses Commands https://learn.microsoft.com/en-us/power-apps/maker/canvas-apps/share-app-guests .
- Power Apps Licensing FAQ: Office 365 https://learn.microsoft.com/en-us/power-apps/maker/canvas-apps/license-designation .
- Reserved Capacities in Power BI Premium: Power BI Premium https://learn.microsoft.com/en-us/power-bi/collaborate-share/service-automate-power-bi-report-export .
- Microsoft Power Apps and Power Automate Licensing Guide: Licensing Guide https://learn.microsoft.com/en-us/power-apps/maker/canvas-apps/share-app-guests .
- Contributor Role for Workspaces: Workspace Roles https://learn.microsoft.com/en-us/power-bi/collaborate-share/service-automate-paginated-local-file .
This information should provide a clear understanding of standard and premium connectors within the Power Platform, which is crucial for creating effective solutions that integrate various services and applications.
Identify foundational components of Microsoft Power Platform (10–15%)
Describe connectors
Use Cases for Custom Connectors in Power BI
Custom connectors in Power BI are designed to extend the capabilities of Power BI by connecting to data sources that are not supported by the built-in connectors. These connectors can be developed by users or third parties to access a wide range of data sources for various use cases. Below are some scenarios where custom connectors are particularly useful:
Accessing Business-Specific APIs: Custom connectors can be created to connect Power BI to proprietary or business-specific APIs that are critical for an organization’s operations but are not supported by the existing set of Power BI connectors https://learn.microsoft.com/en-us/power-bi/connect-data/desktop-connector-extensibility .
Industry-Specific Services: For industries that have specialized services or databases, custom connectors can be used to bridge the gap between Power BI and these industry-specific data sources, enabling more relevant and detailed analysis https://learn.microsoft.com/en-us/power-bi/connect-data/desktop-connector-extensibility .
Integrating with Vendor-Distributed Connectors: Many vendors distribute their own connectors to allow integration with their services. If Microsoft has not released a connector for a particular service, a custom connector provided by the vendor can be used https://learn.microsoft.com/en-us/power-bi/connect-data/desktop-connector-extensibility .
Enabling DirectQuery Mode with Specific Data Sources: When working in DirectQuery mode, which allows for real-time data querying without importing the data into Power BI, custom connectors can be used to connect to a single data source that is not natively supported by Power BI https://learn.microsoft.com/en-us/power-bi/connect-data/service-gateway-custom-connectors https://learn.microsoft.com/en-us/power-bi/connect-data/desktop-connector-extensibility .
Handling Non-Standard Data Formats: If data is stored in a non-standard format that is not supported by the built-in connectors, a custom connector can be developed to parse and load this data into Power BI for analysis https://learn.microsoft.com/en-us/power-bi/connect-data/desktop-connector-extensibility .
Enhancing Data Security and Privacy: Developers can sign their custom connectors with a certificate, allowing users to use the connector without changing their security settings in Power BI Desktop, thus maintaining a higher level of security and privacy https://learn.microsoft.com/en-us/power-bi/connect-data/desktop-connector-extensibility .
On-Premises Data Integration: Custom connectors can be used with the on-premises data gateway to connect Power BI to data sources that are located within an organization’s internal network https://learn.microsoft.com/en-us/power-bi/connect-data/service-gateway-custom-connectors .
For additional information on custom connectors and how to implement them, you can refer to the following resources:
- For general information on custom connectors and certified connectors: Power BI Custom Connectors
- To learn about using custom connectors with the on-premises data gateway: On-Premises Data Gateway Custom Connectors
- For details on implementing a TestConnection section in custom connector code: TestConnection for Custom Connectors
- Information on trusted third-party connectors: Trusted Third-Party Connectors
It is important to note that while custom connectors offer flexibility and extended functionality, they should be used with caution, especially when dealing with sensitive data, as they can bypass certain security and privacy settings. Always ensure that custom connectors are obtained from trusted sources and are maintained with security in mind.
Demonstrate the capabilities of Power BI (10–15%)
Identify basic Power BI components
Power BI Desktop
Power BI Desktop is a free application that can be installed on your local computer, allowing you to connect to, transform, and visualize your data. With Power BI Desktop, you can:
- Connect to Data: It supports connections to a wide variety of data sources, including local databases, Excel files, and cloud services.
- Transform and Model Data: It includes Power Query Editor, a powerful tool for data transformation and cleansing. Additionally, you can create relationships, calculated columns, measures, and tables.
- Create Reports: You can design interactive reports with visual analytics at your fingertips. Power BI Desktop provides a rich canvas where you can drag-and-drop elements to create compelling reports.
- Publish Reports: Once your reports are complete, you can publish them to the Power BI service for sharing and collaboration.
For more information on Power BI Desktop, you can visit the official documentation here.
Power BI Service
The Power BI service is a cloud-based analytics service that provides a single view of your most critical business data. It enables users to:
- View and Interact with Reports: Once reports are published from Power BI Desktop, users can view and interact with them through the Power BI service.
- Collaborate and Share: It offers collaboration features that allow you to share dashboards and reports with colleagues and stakeholders.
- Create Dashboards: Users can create dashboards by pinning visuals from reports or by adding new tiles. Dashboards provide a 360-degree view of the most important metrics in one place.
- Schedule Refreshes: The service can be set up to automatically refresh the data in your reports and dashboards at scheduled intervals.
- Access Insights Anywhere: With the Power BI mobile apps, you can access your data and insights from anywhere, on any device.
For additional details on the Power BI service, you can refer to the official documentation here.
Both Power BI Desktop and the Power BI service are integral parts of the Power BI suite, which work together to provide a comprehensive data analysis and visualization solution. Power BI Desktop is typically used for the creation and initial exploration of reports, while the Power BI service is used for distribution, consumption, and further interaction with the reports and dashboards.
Demonstrate the capabilities of Power BI (10–15%)
Identify basic Power BI components
Dashboards vs. Workspaces vs. Reports vs. Paginated Reports
Dashboards: A dashboard in Power BI is a single canvas that displays multiple tiles, with each tile representing a visualization created from data in reports. Dashboards are designed to provide a quick overview of key metrics and trends at a glance. They are highly interactive and can be personalized to display relevant data that supports decision-making. Dashboards are often the end product of the data analysis process and are shared with users to convey insights.
Workspaces: Workspaces in Power BI are collaborative environments where teams can work together to create and manage collections of dashboards, reports, and paginated reports. They serve as containers for organizing and securing content, which can then be bundled into an app for distribution. Workspaces allow for role-based access control, giving different levels of permissions to users, such as viewing, editing, or managing the workspace and its content https://learn.microsoft.com/en-us/power-bi/collaborate-share/service-create-the-new-workspaces https://learn.microsoft.com/en-us/power-bi/collaborate-share/service-new-workspaces .
Reports: Reports in Power BI are collections of visuals that represent data analyses. They are more detailed and flexible than dashboards, allowing users to drill down into data and explore it interactively. Reports can consist of one or more pages, with each page containing different visualizations that are interconnected. Users can create reports using Power BI Desktop and publish them to the Power BI service for sharing and collaboration https://learn.microsoft.com/en-us/power-bi/collaborate-share/service-new-workspaces .
Paginated Reports: Paginated reports are designed to display data in a tabular format that can be printed or shared as a PDF. They are called “paginated” because they are formatted to fit well on a page. These reports are ideal for scenarios where a detailed, fixed-layout document is required, such as invoices, sales reports, or operational reports. Paginated reports are created using Power BI Report Builder or SQL Server Data Tools https://learn.microsoft.com/en-us/power-bi/collaborate-share/end-user-subscribe .
For additional information on these topics, you can refer to the following resources: - Workspaces in Power BI - Create a workspace - Subscribe yourself and others to Power BI reports and dashboards - Fabric and Power BI licenses and subscriptions
It’s important to understand the differences between these elements to effectively use Power BI for data visualization and reporting. Each serves a unique purpose in the data analysis and sharing process, and knowing when and how to use them is crucial for leveraging the full capabilities of Power BI.
Demonstrate the capabilities of Power BI (10–15%)
Identify basic Power BI components
Cleaning and Transforming Data with Power Query
Power Query is an essential tool in data preparation, allowing users to clean and transform data efficiently. The process of cleaning and transforming data typically involves several steps, which can be performed using Power Query Editor in Power BI Desktop. Here’s a detailed explanation of how to clean and transform data using Power Query:
Accessing Power Query Editor: To begin cleaning and transforming data, you first need to access the Power Query Editor. This can be done by loading your data into Power BI Desktop and then clicking on the “Transform Data” button in the “Home” tab.
Removing Unnecessary Columns: Often, datasets contain columns that are not needed for analysis. In Power Query Editor, you can right-click a column header and select “Remove Columns” to delete unnecessary columns from your dataset https://learn.microsoft.com/en-us/power-bi/transform-model/desktop-common-query-tasks .
Renaming Columns: For better clarity, you can rename columns to more descriptive names. Simply right-click the column header and choose “Rename” from the context menu https://learn.microsoft.com/en-us/power-bi/transform-model/desktop-common-query-tasks .
Changing Data Types: Ensuring that each column has the correct data type is crucial. You can change the data type by selecting the column, then choosing the desired data type from the “Data Type” dropdown in the “Transform” tab.
Handling Missing Values: Power Query provides options to deal with missing values, such as removing rows with missing values or replacing them with a specific value. This can be done from the “Home” tab by selecting “Remove Rows” or “Replace Values” https://learn.microsoft.com/en-us/power-bi/transform-model/desktop-common-query-tasks .
Filtering Data: To focus on relevant data, you can apply filters to your columns. Use the dropdown arrow in the column header to select which values to include or exclude.
Splitting Columns: If a column contains combined information, such as full names or addresses, you can split the column into separate columns based on a delimiter like a space or comma. This is done using the “Split Column” feature in the “Home” tab https://learn.microsoft.com/en-us/power-bi/transform-model/desktop-common-query-tasks .
Merging Queries: When you have related data in different tables, you can merge these queries to create a single table. This is similar to performing a JOIN operation in SQL and can be done using the “Merge Queries” option.
Aggregating Data: Power Query allows you to perform aggregations such as sum, average, count, etc., by grouping rows based on one or more columns. This can be done using the “Group By” feature in the “Home” tab https://learn.microsoft.com/en-us/power-bi/transform-model/desktop-common-query-tasks .
Pivoting and Unpivoting: To reorganize data, you can pivot (turn unique values from one column into multiple columns) or unpivot (turn columns into rows) data. These options are available in the “Transform” tab.
Using Advanced Transformations: For more complex transformations, Power Query provides advanced features such as conditional columns, custom columns with M code, and invoking custom functions.
Refreshing Data: After setting up the transformations, you can apply them to new or updated data by refreshing the query. This ensures that your data remains up-to-date with the latest changes.
For additional information and step-by-step tutorials on how to use Power Query for cleaning and transforming data, you can refer to the following resources:
- Shape and combine Data with Power BI Desktop
- Tutorial: From dimensional model to stunning report in Power BI Desktop
By following these steps and utilizing the capabilities of Power Query, you can effectively clean and transform your data, preparing it for insightful analysis and reporting.
Demonstrate the capabilities of Power BI (10–15%)
Identify basic Power BI components
AI Insights in Power BI is a powerful feature that leverages artificial intelligence to help users identify anomalies and trends within their data. This feature is part of the broader capabilities of Power BI to provide advanced analytics and insights without requiring users to set up complex data models or write algorithms.
Here’s a detailed explanation of how AI Insights can be used to detect anomalies and trends:
Anomaly Detection
AI Insights includes anomaly detection capabilities that automatically identify irregularities in your data. When you’re exploring a report, Power BI can notify you if there are any unusual data points or patterns that deviate from the norm. This is particularly useful for spotting potential issues or opportunities that may require further investigation.
For example, if your sales data suddenly spikes on a particular day, AI Insights can flag this as an anomaly. It can also provide explanations for the anomaly, such as a successful marketing campaign or an external event that drove the increase in sales.
Trend Analysis
In addition to anomaly detection, AI Insights can analyze trends within your data. It can identify patterns over time, such as seasonal fluctuations or long-term growth or decline. This helps users understand the trajectory of their business metrics and make informed decisions based on the direction in which their data is trending.
For instance, if there is a gradual increase in website traffic over several months, AI Insights can highlight this trend, allowing you to correlate it with your marketing activities or product releases.
Interactive Insights
AI Insights is interactive and works directly within your Power BI reports. It provides insights such as anomalies and trends in an easily consumable format, often as visuals that you can interact with. This means you can quickly drill down into the underlying data or explore related information to get a deeper understanding of what’s driving the insights.
Access to Pre-Trained Machine Learning Models
AI Insights also provides access to pre-trained machine learning models from Azure Cognitive Services, which can be used to enhance data preparation and analysis. These models can perform tasks such as text analytics, image tagging, and language detection, further enriching your data and providing a more comprehensive view of your insights.
Additional Resources
For more information on how to use AI Insights in Power BI, you can refer to the following resources: - Power BI Insights - AI Insights for data models in Power Query - Insights for individual visuals - Insights for dashboard tiles - Quick Insights for datasets
By utilizing AI Insights, users can gain a deeper understanding of their data, uncover hidden patterns, and make data-driven decisions with confidence.
Demonstrate the capabilities of Power BI (10–15%)
Build a basic dashboard by using Power BI
Create a Power BI Report by Adding Visualizations
Creating a Power BI report involves adding and customizing visualizations to represent your data graphically. Here’s a step-by-step guide to help you create a Power BI report with visualizations:
- Add a Visualization to a Report
- To begin, you need to have edit access to a report in Power BI.
- In Power BI service or Desktop, select the type of visualization you want to add from the Visualizations pane.
- Click on the desired fields in the Fields pane to add them to the visualization. For example, to create a basic visualization, you might select checkboxes next to field names to add them to the visualization https://learn.microsoft.com/en-us/power-bi/create-reports/../visuals/power-bi-report-add-visualizations-ii .
- Resize and Move Visualizations
- You can click and drag the edges of a visualization to resize it.
- To move a visualization, click and drag it to the desired location on the canvas.
- Change Visualization Type
- If you want to change the type of visualization, select the new type from the Visualizations pane.
- For instance, you can change a visual to an Area chart by selecting the Area chart template from the Visualizations pane https://learn.microsoft.com/en-us/power-bi/create-reports/service-report-create-new .
- You can also change a visualization to a column chart by selecting the Stacked column chart button https://learn.microsoft.com/en-us/power-bi/create-reports/../visuals/power-bi-report-add-visualizations-i .
- Sort and Filter Data
- To sort the data in a visualization, select the ellipses (…) and choose the appropriate sort option, such as Sort by Period https://learn.microsoft.com/en-us/power-bi/create-reports/service-report-create-new .
- You can also add filters to your report at the visualization, page, or report level to narrow down the data displayed https://learn.microsoft.com/en-us/power-bi/create-reports/power-bi-report-add-filter .
- Use Slicers for Interactive Filtering
- Slicers are a type of visualization that allow you to filter the entire report page by selecting values.
- To add a slicer, select an empty area on the canvas and choose the Slicer template from the Visualizations pane.
- Then, from the Fields pane, select the field you want to use for slicing, such as District https://learn.microsoft.com/en-us/power-bi/create-reports/service-report-create-new .
- Publish and Share the Report
- Once your visualizations are set up, you can publish the report to the Power BI service.
- After publishing, you can share the report with others or pin visualizations to a dashboard for a summarized view https://learn.microsoft.com/en-us/power-bi/create-reports/service-report-create-new .
- Set Up Scheduled Refresh
- If your report is based on a dataset that gets updated, you can set up a scheduled refresh to ensure that your report always displays the latest data https://learn.microsoft.com/en-us/power-bi/create-reports/../connect-data/service-aml-integrate .
For additional information on creating and modifying visualizations in Power BI, you can refer to the following resources: - Create a Power BI report by adding visualizations - Part 1 - Create a Power BI report by adding visualizations - Part 2
Remember, the key to an effective Power BI report is to choose the right visualizations that best represent your data and provide insights to the viewers. Experiment with different types of visualizations and customization options to create a report that meets your needs.
Demonstrate the capabilities of Power BI (10–15%)
Build a basic dashboard by using Power BI
Create a Power BI Dashboard
Creating a Power BI dashboard is a process that involves selecting and organizing visualizations to provide insights at a glance. Dashboards are a collection of tiles, which are visual representations of your data. Here’s a step-by-step guide to creating a Power BI dashboard:
Understand the Relationship Between Dashboards and Reports: Before creating a dashboard, it’s important to understand that dashboards are a feature of the Power BI service and are designed to display visualizations from one or more reports. A dashboard is a single canvas that provides a consolidated view of key metrics and trends https://learn.microsoft.com/en-us/power-bi/create-reports/service-dashboard-create .
Pin Visualizations: To create a dashboard, you can pin visualizations from existing reports. When you pin a visualization, it becomes a tile on your dashboard. You can pin tiles from different reports to create a dashboard that displays a variety of data and insights https://learn.microsoft.com/en-us/power-bi/create-reports/service-dashboard-create .
Create a Dashboard from Scratch or from an Existing Report: You can start with a blank dashboard and pin tiles as needed, or you can create a dashboard by pinning visualizations from an existing report. To pin a tile, simply hover over the visualization in the report and click the pin icon. Then, choose the dashboard you want to pin it to, or create a new one https://learn.microsoft.com/en-us/power-bi/create-reports/service-dashboard-create .
Use Power BI Q&A: The Q&A feature allows you to ask questions about your data in natural language and receive answers in the form of visualizations. You can then pin these Q&A-generated visualizations to your dashboard. This feature is particularly useful for quickly creating visualizations without the need for complex report design https://learn.microsoft.com/en-us/power-bi/create-reports/sample-tutorial-connect-to-the-samples .
Navigate Between Dashboards and Reports: Once you have created a dashboard, you can easily navigate back to the underlying reports. This allows you to explore the data in more detail and make any necessary adjustments to the visualizations before pinning them to the dashboard https://learn.microsoft.com/en-us/power-bi/create-reports/service-dashboard-create .
Customize Your Dashboard: After pinning tiles to your dashboard, you can rearrange and resize them to create a layout that best presents your data. You can also set data alerts on tiles to receive email notifications when certain thresholds are reached https://learn.microsoft.com/en-us/power-bi/create-reports/service-dashboards .
Save and Share Your Dashboard: If you have edit permissions, you can save your visualizations by pinning them to your dashboard. You can also share your dashboards with others in your organization, allowing them to view and interact with the data https://learn.microsoft.com/en-us/power-bi/create-reports/../consumer/end-user-q-and-a .
For additional information and detailed tutorials on creating and using Power BI dashboards, you can refer to the following resources:
- Introduction to Dashboards in Power BI
- Create a Q&A Visual on a Dashboard
- Use Q&A in a Report
- Sample Dashboards and Tutorials
By following these steps and utilizing the provided resources, you can effectively create a Power BI dashboard that showcases the most relevant data for your needs.
Demonstrate the capabilities of Power BI (10–15%)
Build a basic dashboard by using Power BI
Add Visualizations to Dashboards by Using Q&A
Power BI Q&A is a feature that allows users to add visualizations to their dashboards using natural language queries. This capability enables users to explore their data and generate insights quickly and intuitively. Here’s a step-by-step explanation of how to use Q&A to add visualizations to dashboards:
Access the Q&A Field: Every Power BI dashboard includes a Q&A field, typically located in the upper left corner. This is where you can type your natural language questions https://learn.microsoft.com/en-us/power-bi/create-reports/../natural-language/q-and-a-intro .
Ask Questions: Type a question about your data in the Q&A field. The feature is interactive and designed to understand natural language, making it possible to ask questions as you would in a conversation https://learn.microsoft.com/en-us/power-bi/create-reports/../natural-language/q-and-a-intro .
Explore Data: As you ask questions, Power BI Q&A generates visualizations in real-time. This interactive process allows you to refine your questions, explore different angles of your data, and discover new insights https://learn.microsoft.com/en-us/power-bi/create-reports/../natural-language/q-and-a-intro .
Create and Save Visualizations: Once you have the desired visualization, you can save it directly to your dashboard or report. This is particularly useful for report designers who want to create and share visualizations based on their data exploration https://learn.microsoft.com/en-us/power-bi/create-reports/../natural-language/q-and-a-intro https://learn.microsoft.com/en-us/power-bi/create-reports/../natural-language/q-and-a-intro .
Use Q&A Visual in Reports: If a report creator has included a Q&A visual in a report, you can use and reuse that visual to continue exploring your data. This feature is available to all users, regardless of their permission levels https://learn.microsoft.com/en-us/power-bi/create-reports/../natural-language/q-and-a-intro .
Share Insights: After creating a visualization using Q&A, you can share it with others by adding it to a report or dashboard. This collaborative aspect of Power BI Q&A makes it a powerful tool for teams to work together on data analysis https://learn.microsoft.com/en-us/power-bi/create-reports/../natural-language/q-and-a-intro .
For additional information and tutorials on how to use Q&A in Power BI, you can refer to the following resources:
- Use Q&A on a dashboard
- Create and save Q&A results to a dashboard or report
- Use a Q&A visual in a report
- Create a Q&A visual in a report
By following these steps and utilizing the resources provided, users can effectively add visualizations to their dashboards using the Q&A feature in Power BI, enhancing their data analysis and reporting capabilities.
Demonstrate the capabilities of Power BI (10–15%)
Build a basic dashboard by using Power BI
Consume Power BI Reports and Dashboards
Power BI is a suite of business analytics tools that deliver insights throughout your organization. Consuming Power BI reports and dashboards is a critical skill for analyzing and making decisions based on data. Here’s a detailed explanation of how to consume Power BI reports and dashboards:
Understanding the Power BI Service Content Structure
In Power BI, content is interconnected. Reports are built on semantic models, and report visuals can be pinned to dashboards. Dashboards then link back to the reports. The Related content pane in the Power BI service is a feature that shows these connections and allows users to navigate between related content such as dashboards, reports, and semantic models https://learn.microsoft.com/en-us/power-bi/consumer/end-user-related .
Sharing Power BI Content
To share a report or dashboard in Power BI, you must have a Power BI Pro license, and so must the recipients, unless the content is in a workspace in a Premium capacity. When you share a dashboard or report, recipients can view and interact with it. They can also edit, make a copy, and share it with others if given permission. Shared content reflects the same data visible to the sharer, subject to any applied row-level security (RLS) https://learn.microsoft.com/en-us/power-bi/collaborate-share/service-how-to-collaborate-distribute-dashboards-reports .
Accessing Shared Reports and Dashboards
Reports can be shared via links or by granting users direct access. However, dashboards can only be shared by granting direct access, not via links. When sharing with individuals outside your organization, they can view and interact with the dashboard but cannot share it further https://learn.microsoft.com/en-us/power-bi/collaborate-share/service-how-to-collaborate-distribute-dashboards-reports .
Managing Permissions
If you need to revoke access to a report or dashboard, simply clearing the permission option does not remove access for users who have already been granted it. To manage permissions effectively, you must follow specific steps outlined in the Power BI service documentation https://learn.microsoft.com/en-us/power-bi/collaborate-share/service-troubleshoot-subscribe .
Subscription Access
When setting up subscriptions for reports or dashboards, you can choose whether to give recipients the ability to open and view the content in Power BI. This is done by selecting the Permission to access the report or dashboard in Power BI option and deciding whether to include a link to the content https://learn.microsoft.com/en-us/power-bi/collaborate-share/service-troubleshoot-subscribe .
Accessibility
Power BI also provides tools for consuming paginated reports that ensure accessibility for individuals with disabilities. These tools include keyboard navigation and screen reader support, allowing all users to interact with and derive value from paginated reports https://learn.microsoft.com/en-us/power-bi/create-reports/../paginated-reports/report-builder/paginated-consume-accessible-reports .
For additional information on consuming Power BI reports and dashboards, please refer to the following resources:
- Related content pane in Power BI service
- Sharing Power BI dashboards and reports
- Manage permissions to a dashboard
- Manage permissions to a report
- Accessibility tools for consuming paginated reports
By understanding and utilizing these features, you can effectively consume and interact with Power BI reports and dashboards, enabling data-driven decision-making within your organization.
Demonstrate the capabilities of Power Apps (20–25%)
Identify basic Power Apps capabilities
Differences between Canvas Apps and Model-Driven Apps
Canvas Apps and Model-Driven Apps are two types of applications that can be built using Microsoft Power Apps. Each serves a different purpose and caters to different business needs. Below is a detailed explanation of their differences:
Canvas Apps:
- User Interface Flexibility: Canvas Apps allow for a high degree of customization in the user interface. App makers can start with a blank canvas and design the app by dragging and dropping elements onto the canvas https://learn.microsoft.com/en-us/power-apps/maker/canvas-apps/create-component .
- Control Over Layout: Designers have complete control over the app layout and can place controls anywhere on the canvas to create a highly tailored user experience.
- Data Connections: They can connect to a wide variety of data sources using more than 900 connectors available in Power Apps https://learn.microsoft.com/en-us/training/modules/introduction-power-apps/1-introduction .
- Client-Side Logic: Canvas Apps rely heavily on client-side logic and can use Excel-like formulas to manage data and control the app’s behavior.
- Device Capabilities: These apps can take full advantage of device capabilities such as camera, GPS, and other sensors when running on mobile devices.
- Use Case: Ideal for scenarios where a custom user interface and client-specific functionality are required, such as replacing paper forms or legacy systems https://learn.microsoft.com/en-us/training/modules/introduction-power-apps/1-introduction .
Model-Driven Apps:
- Data-Centric Design: Model-Driven Apps are designed with a data-first approach. The user interface is determined by the underlying data model and relationships in Dataverse https://learn.microsoft.com/en-us/training/modules/introduction-power-apps/5-differentiate-between-canvas-apps-model-driven-apps .
- Unified Interface: They use a responsive design that adapts to various devices and screen sizes, providing a consistent experience across platforms.
- Business Process Flows: Model-Driven Apps can incorporate complex business processes and logic, guiding users through predefined workflows https://learn.microsoft.com/en-us/training/modules/introduction-power-apps/5-differentiate-between-canvas-apps-model-driven-apps .
- Component-Based: These apps can include components such as forms, views, and dashboards that are automatically generated based on the data model.
- Role-Based Access: Access to different parts of the app can be controlled based on user roles and permissions set within Dataverse.
- Use Case: Best suited for complex business applications that require standardized processes, such as enterprise resource planning or customer relationship management systems.
Additional Information:
For more details on Canvas Apps and Model-Driven Apps, you can refer to the following resources: - Custom pages in model-driven apps https://learn.microsoft.com/en-us/power-apps/maker/canvas-apps/working-with-large-apps . - Canvas components and component library https://learn.microsoft.com/en-us/power-apps/maker/canvas-apps/create-component . - Building solutions with Power Apps https://learn.microsoft.com/en-us/training/modules/introduction-power-apps/5-differentiate-between-canvas-apps-model-driven-apps . - Introduction to Power Apps https://learn.microsoft.com/en-us/training/modules/introduction-power-apps/1-introduction .
By understanding the differences between Canvas Apps and Model-Driven Apps, developers and business users can choose the right approach to meet their specific application needs and leverage the full capabilities of the Power Apps platform.
Demonstrate the capabilities of Power Apps (20–25%)
Identify basic Power Apps capabilities
Use Cases for Canvas Apps
Canvas apps in Microsoft Power Apps allow users to build custom applications with a flexible design interface. These apps are tailored to specific business needs and can be developed without writing code, making them accessible to a wide range of users. Here are some common use cases for canvas apps:
Data Collection and Management: Canvas apps can be used to create forms for data entry, enabling users to collect information from customers or employees. These apps can connect to various data sources like SQL Server, SharePoint, and Dataverse to store and manage the collected data.
Task Automation: Automate repetitive tasks and workflows, such as approvals or requests, by integrating with Power Automate. This can help streamline business processes and improve efficiency.
Customer Service: Develop apps that provide customer service representatives with quick access to customer data, support tickets, and communication tools to enhance the customer support experience.
Inventory Management: Create apps to track inventory levels, manage stock, and place orders. This can be particularly useful for retail businesses or warehouses.
Employee Onboarding: Design onboarding apps that guide new employees through the company’s policies, procedures, and provide them with necessary resources.
Event Management: Organize events by managing registrations, schedules, and feedback through a custom canvas app.
Inspection and Audits: Conduct inspections and audits by using apps that allow for checklist creation, photo uploads, and report generation.
Capabilities of Canvas Apps
Canvas apps offer a range of capabilities that empower users to create highly customized applications:
Flexible Design: Users can design the user interface by dragging and dropping elements onto a canvas, giving them control over the look and feel of the app https://learn.microsoft.com/en-us/power-apps/maker/canvas-apps/working-with-test-studio .
Data Connectivity: Connect to a wide variety of data sources, including Microsoft services like Office 365, Dynamics 365, and third-party services like Salesforce and Dropbox https://learn.microsoft.com/en-us/power-apps/maker/canvas-apps/working-with-test-studio .
Custom Business Logic: Implement custom business logic using Excel-like expressions without the need for traditional programming.
Integration with Other Services: Integrate with other Microsoft Power Platform services like Power Automate for workflow automation and Power BI for analytics https://learn.microsoft.com/en-us/power-apps/maker/canvas-apps/working-with-test-studio .
Cross-platform Accessibility: Canvas apps can run on web browsers, mobile devices, and tablets, providing users with access from anywhere https://learn.microsoft.com/en-us/power-apps/maker/canvas-apps/working-with-test-studio .
Offline Capabilities: Build apps that can be used offline and sync data when reconnected to the internet.
Sharing and Security: Share apps with team members while maintaining control over who has access and what they can do within the app.
For additional information on canvas apps and their capabilities, you can refer to the following resources:
- Introduction to canvas apps in Power Apps
- Connect to data sources from canvas apps
- Understand canvas-app forms
Please note that the URLs provided are for reference purposes to supplement the study guide and should not be explicitly mentioned in the exam context.
Demonstrate the capabilities of Power Apps (20–25%)
Identify basic Power Apps capabilities
Use Cases for Model-Driven Apps
Model-driven apps are designed to streamline and transform business processes. They are particularly useful in scenarios where complex logic and relationships are involved, and where the app needs to be responsive to various devices such as PCs, laptops, tablets, and mobile phones https://learn.microsoft.com/en-us/training/modules/introduction-power-apps/1-introduction .
Some common use cases for model-driven apps include:
- Modernizing Legacy Business Processes: Replacing outdated systems and paper-based processes with digital solutions that are more efficient and accessible https://learn.microsoft.com/en-us/training/modules/introduction-power-apps/1-introduction .
- Data-Driven Applications: Creating apps that interact with large amounts of data and require a robust data model with relationships between different entities.
- Enterprise-Level Solutions: Implementing solutions that need to be scalable and secure, often integrating with other enterprise systems.
Capabilities of Model-Driven Apps
Model-driven apps offer a range of capabilities that make them suitable for complex business scenarios:
- Data Modeling: They rely on a strong data model that defines the underlying data structure, ensuring data integrity and facilitating complex data relationships https://learn.microsoft.com/en-us/training/modules/introduction-power-apps/5-differentiate-between-canvas-apps-model-driven-apps .
- User Interface: The user interface is determined by the components of the data model rather than the layout of the screens, which allows for a more consistent user experience across different devices.
- Custom Pages: Sections within model-driven apps can be enhanced with custom pages, providing the flexibility of a canvas app within the structured environment of a model-driven app https://learn.microsoft.com/en-us/power-apps/maker/canvas-apps/working-with-large-apps .
- Visualization Components: They include various visualization components such as charts, dashboards, and embedded Microsoft Power BI to provide insightful business intelligence and reporting https://learn.microsoft.com/en-us/training/modules/introduction-power-apps/8-build-basic-model-driven-app .
- Cross-Platform Accessibility: Once built, model-driven apps are accessible on various platforms, including PCs, laptops, tablets, and mobile phones, allowing users to perform business processes from different devices https://learn.microsoft.com/en-us/training/modules/introduction-power-apps/1-introduction .
For additional information on building model-driven apps, you can refer to the following resources:
- Overview of creating apps in Power Apps https://learn.microsoft.com/en-us/power-apps/maker/canvas-apps/working-with-large-apps
- Introduction to Power Apps https://learn.microsoft.com/en-us/training/modules/introduction-power-apps/1-introduction
- Visualization components in Power Apps https://learn.microsoft.com/en-us/training/modules/introduction-power-apps/8-build-basic-model-driven-app
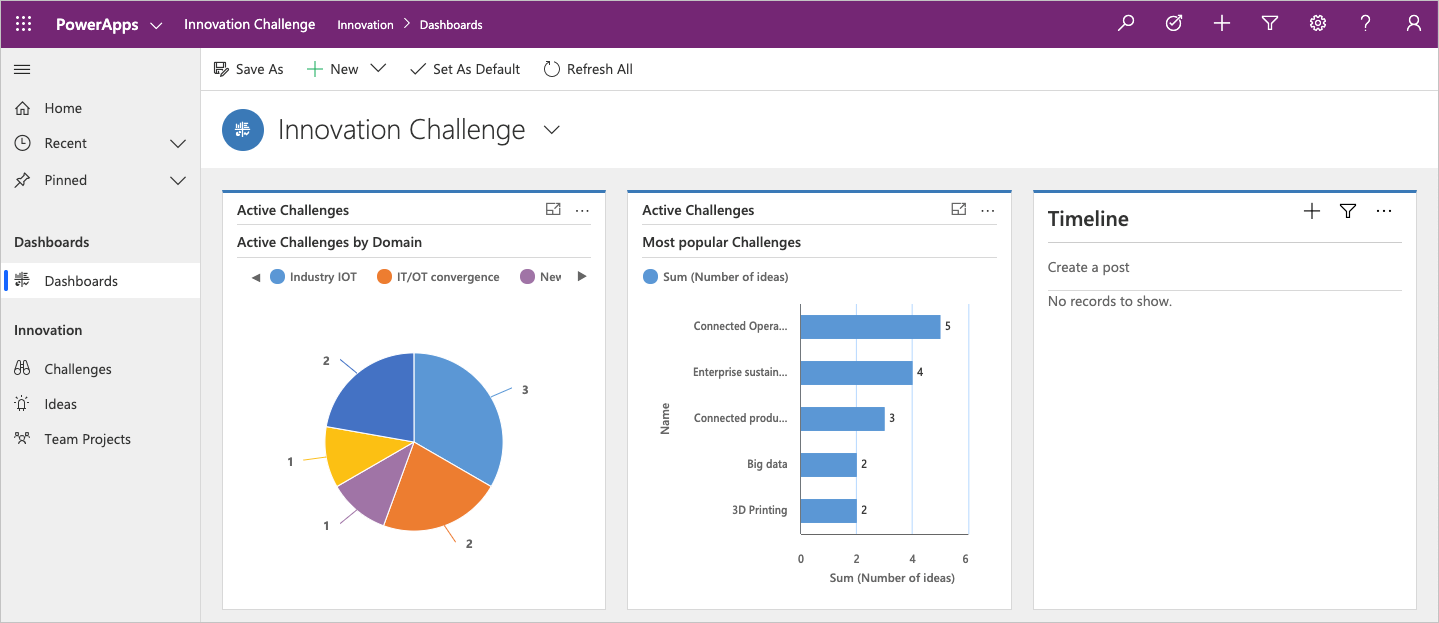
Please note that the URLs provided are for reference purposes to supplement the study guide with additional information.
Demonstrate the capabilities of Power Apps (20–25%)
Build a basic canvas app
Connect to Data Sources by Using Connectors
When working with the Microsoft Power Platform, connecting to various data sources is a fundamental task. This is achieved through the use of connectors, which are essentially prebuilt API wrappers that enable your apps and flows to communicate with a wide array of services and systems.
Types of Connectors
Connectors in the Power Platform can be categorized into several types:
Standard Connectors: These are out-of-the-box connectors provided by Microsoft that allow you to connect to common services such as Office 365, Dynamics 365, and Microsoft Dataverse https://learn.microsoft.com/en-us/training/modules/introduction-power-automate/4-describe-components-cloud-flow .
Premium Connectors: These connectors provide access to additional services and may require a premium plan. Examples include Salesforce, Adobe Sign, and others.
Custom Connectors: If a connector for a desired service is not available, you can create your own custom connector. This requires more technical knowledge, as you will need to define the connection and authentication to the external service https://learn.microsoft.com/en-us/power-bi/connect-data/desktop-connector-extensibility .
Certified Connectors: Some custom connectors are certified by Microsoft, ensuring they meet certain standards for security and performance. Certified connectors can be used with confidence in your applications https://learn.microsoft.com/en-us/power-bi/connect-data/desktop-connector-extensibility .
Using Connectors
To use a connector, you typically need to:
Select the Connector: Choose the appropriate connector for the data source you wish to access. Power Automate, for example, offers over 900 connectors for various services and data platforms https://learn.microsoft.com/en-us/training/modules/introduction-power-automate/4-describe-components-cloud-flow .
Configure the Connection: Provide the necessary authentication details to establish a secure connection between your app or flow and the data source. This may include signing in with your credentials or providing API keys https://learn.microsoft.com/en-us/training/modules/introduction-power-automate/4-describe-components-cloud-flow .
Use the Connector: Once connected, you can use the actions and triggers defined by the connector to interact with the data source. This could involve reading data, writing data, or responding to events https://learn.microsoft.com/en-us/training/modules/introduction-power-automate/4-describe-components-cloud-flow .
Security Considerations
When using non-certified custom connectors, it’s important to adjust your security settings carefully. These connectors can bypass certain security measures, so they should only be used if you trust the source completely. Alternatively, developers can sign their connectors with a certificate to allow their use without changing security settings https://learn.microsoft.com/en-us/power-bi/connect-data/desktop-connector-extensibility .
Additional Resources
For more information on using connectors within the Power Platform, you can refer to the following resources:
By understanding and utilizing connectors, you can greatly enhance the capabilities of your Power Platform solutions, allowing them to interact with a diverse ecosystem of services and data sources.
Demonstrate the capabilities of Power Apps (20–25%)
Build a basic canvas app
Create an App from Data
When building an app from data, it’s essential to understand the process and tools available to streamline app creation. Power Apps is a powerful suite that allows users to create custom applications tailored to their business needs. Here’s a step-by-step guide to creating an app from data, particularly using SharePoint as a data source:
- Start with SharePoint Data:
- Open the SharePoint list you wish to build an app from.
- Navigate to the menu bar and select Integrate -> Power Apps -> Create an app.
- Enter a name for your app and select Create https://learn.microsoft.com/en-us/power-apps/maker/canvas-apps/transform-infopath .
- Customize Your App:
- Power Apps will generate a basic app that you can then customize to suit your needs.
- Begin with a simple list containing a few fields of different types to avoid being overwhelmed as you learn the Power Apps canvas https://learn.microsoft.com/en-us/power-apps/maker/canvas-apps/transform-infopath .
- Utilize Documentation and Community Resources:
- For guidance on creating your first app, refer to the official documentation
and community resources like that provide walkthroughs for common tasks https://learn.microsoft.com/en-us/power-apps/maker/canvas-apps/transform-infopath .
- For guidance on creating your first app, refer to the official documentation
and community resources like
- Understand the App Types:
- Determine whether your app will connect to a Microsoft Dataverse database. If not, you will create a canvas app, as model-driven apps require Dataverse https://learn.microsoft.com/en-us/training/modules/introduction-power-apps/5-differentiate-between-canvas-apps-model-driven-apps .
- Canvas apps are task or screen-focused with a custom UI and device integration, while model-driven apps are more suited for back-office processes with a responsive and consistent UI https://learn.microsoft.com/en-us/training/modules/introduction-power-apps/5-differentiate-between-canvas-apps-model-driven-apps .
- Design for the End-User:
- Consider the user’s needs and the context in which the app will be used. For example, a field agent might benefit from a canvas app that allows for quick data entry and integrates with other services like Google Calendar https://learn.microsoft.com/en-us/training/modules/introduction-power-apps/5-differentiate-between-canvas-apps-model-driven-apps .
- Leverage Device Capabilities:
- Take advantage of the device integration capabilities of canvas apps, such as using a mobile device’s camera to take pictures and associate them with data entries https://learn.microsoft.com/en-us/training/modules/introduction-power-apps/5-differentiate-between-canvas-apps-model-driven-apps .
- Embed and Share Your App:
- Once your app is created, it can be shared with users to run in a browser or on a mobile device. Canvas apps can also be embedded into SharePoint sites, Power BI reports, model-driven applications, or Microsoft Teams https://learn.microsoft.com/en-us/training/modules/introduction-power-apps/3-explore-canvas-applications .
- Optimize Operations with Digitization:
- Use the app to digitize processes and optimize operations, as seen with Heathrow Airport’s use of Power Apps to build apps that save time and resources https://learn.microsoft.com/en-us/training/modules/introduction-power-apps/3-explore-canvas-applications .
By following these steps, you can create an app that not only serves your data management needs but also provides a tailored experience for end-users. Remember to start simple and gradually build up the complexity of your app as you become more comfortable with the Power Apps platform.
Demonstrate the capabilities of Power Apps (20–25%)
Build a basic canvas app
Add Controls to Canvas App Screens
When building a canvas app, adding controls to the screens is a fundamental step in creating an interactive and functional application. Controls are the building blocks of the app’s user interface, allowing users to view data, input information, and interact with the app.
Types of Controls
There are various types of controls that can be added to a canvas app screen, including:
- Labels: Display text to the user.
- Text input: Allow users to enter text.
- Buttons: Enable users to perform actions with a click.
- Galleries: Present a collection of items.
- Forms: Display and manage data entry in a structured format.
- Images: Add visual elements to the app.
Adding Controls
To add a control to a canvas app screen:
- In the Power Apps Studio, select the screen to which you want to add the control.
- Navigate to the Insert tab on the ribbon.
- Choose the control you want to add from the available options.
- Click on the control, and it will appear on the selected screen.
- You can then move and resize the control as needed.
Configuring Controls
Each control has properties that can be configured to change its appearance and behavior:
- Properties Pane: Use the properties pane to set properties like text, color, and size.
- Formula Bar: Use the formula bar to write expressions that define the control’s behavior and how it interacts with other controls or data sources.
Customizing Controls
For a more tailored experience, you can customize controls by:
- Naming: Give each control a descriptive name for easier reference in formulas.
- Styling: Adjust the style properties to match the app’s design requirements.
- Behavior: Set properties like
Visible,Disabled, orOnSelectto control how the user interacts with the control.
Additional Resources
For more detailed guidance on adding and configuring controls, refer to the following resources:
By following these steps and utilizing the resources provided, you can effectively add and configure controls to enhance the functionality and user experience of your canvas app https://learn.microsoft.com/en-us/power-apps/maker/canvas-apps/sharepoint/scenarios-sharepoint-form-from-scratch .
Demonstrate the capabilities of Power Apps (20–25%)
Build a basic model-driven app
Creating a Model-Driven App from Tables
Model-driven apps offer a data-centric approach to app development within the Microsoft Power Platform. They are built on top of Microsoft Dataverse and are designed to be responsive across devices like browsers, mobile phones, and tablets. The process of creating a model-driven app from tables involves several key steps:
Start with Dataverse Tables: Model-driven apps are always built from data in Microsoft Dataverse. You begin by defining the tables that will store the data your app will work with https://learn.microsoft.com/en-us/training/modules/introduction-power-apps/4-explore-model-driven-applications .
Use the App Designer: The App Designer is a user-friendly interface that allows you to specify which tables your app is based on and which visual elements should be included. You can access the App Designer for creating model-driven apps through the Power Apps platform https://learn.microsoft.com/en-us/training/modules/introduction-power-apps/8-build-basic-model-driven-app .
Define Forms and Views:
- Forms: Forms define how users see and interact with individual records. You can manage which specific forms to include for a table by selecting the table form and choosing “Manage forms” https://learn.microsoft.com/en-us/training/modules/introduction-power-apps/8-build-basic-model-driven-app .
- Views: Views define how lists of rows are presented for each table. You can create different views to display various subsets of data, such as all active records for a particular table. Manage views by selecting the table view and choosing “Manage Views” https://learn.microsoft.com/en-us/training/modules/introduction-power-apps/8-build-basic-model-driven-app .
Include Components: Add components such as charts, dashboards, and business rules to your tables using the app designer tool. These components enhance the functionality and user experience of your app https://learn.microsoft.com/en-us/training/modules/introduction-power-apps/4-explore-model-driven-applications .
Configure App Navigation: Set up the site map to define the navigation for your app. This includes configuring the areas, groups, and subareas that users will interact with.
Test and Publish: Once you have configured your app, test it to ensure that it functions as expected. After testing, you can publish your app so that it becomes available to users.
Manage App Security: Define security roles and permissions to control access to various parts of your app. This ensures that users can only access the data and features that are relevant to their role within the organization.
Responsive Design: Model-driven apps are responsive by default, meaning they automatically adjust to different screen sizes and devices. There is no need to design separate interfaces for desktop and mobile https://learn.microsoft.com/en-us/training/modules/introduction-power-apps/4-explore-model-driven-applications .
For additional information on creating model-driven apps, you can refer to the following resources: - Add or edit model-driven app components in the Power Apps app designer - Introduction to Power Apps - Microsoft Power Apps and Power Automate Licensing Guide
By following these steps and utilizing the resources provided, you can create a robust model-driven app tailored to your organization’s needs.
Demonstrate the capabilities of Power Apps (20–25%)
Build a basic model-driven app
Modify Forms in Power Apps
When working with Power Apps, modifying forms is a crucial aspect of customizing applications to fit the specific needs of a business or workflow. Forms in Power Apps are used to display and manage data entry in a structured manner. Here are the steps and considerations for modifying forms in Power Apps:
Accessing Forms
To modify a form, you must first access it within the Power Apps environment. If you are working with a SharePoint Form, follow these steps:
- Navigate to the Power Platform admin center at Power Platform admin center.
- Select the default environment for your organization from the list of environments.
- Click on Power Apps in the Resources section.
- Choose the app you wish to modify.
- Click on Details to view the app’s properties.
- Verify the App Type to ensure it is a SharePoint Form, which indicates it is a customized form https://learn.microsoft.com/en-us/power-apps/maker/canvas-apps/customize-list-form .
Customizing Forms
Once you have accessed the form, you can begin customizing it. Familiarize yourself with Power Apps basics by generating an app and then customizing the app’s controls, gallery, forms, and cards. Here are some resources to help you get started:
- Learn how to add and configure controls: Power Apps controls
- Understand how to work with galleries: Power Apps gallery
- Get to know form customization: Power Apps forms
- Explore how to use cards within forms: Power Apps cards
Licensing and Permissions
Before you can create or modify an app, ensure that you have the appropriate license and permissions. You must be assigned to the Environment Maker security role to create an app https://learn.microsoft.com/en-us/power-apps/maker/canvas-apps/how-to/create-app-barcode-scanner https://learn.microsoft.com/en-us/power-apps/maker/canvas-apps/how-to/deep-linking . Additionally, if the custom form uses a premium connector, a guest must have a Power Apps license to access the custom form https://learn.microsoft.com/en-us/power-apps/maker/canvas-apps/share-app-guests .
Considerations for Dynamics 365 Integration
If you are working with Dynamics 365, it’s important to note that all Dynamics 365 customer engagement apps are model-driven applications built using Power Apps. These applications leverage components such as forms, views, charts, and dashboards to present data to end users https://learn.microsoft.com/en-us/training/modules/introduction-power-platform/9-describe-how-power-platform-works-microsoft-dynamics-365-apps .
By following these guidelines and utilizing the provided resources, you can effectively modify forms in Power Apps to create tailored solutions that meet your organization’s requirements.
Demonstrate the capabilities of Power Apps (20–25%)
Build a basic model-driven app
Create and Modify Views
In the context of model-driven applications within the Power Platform, views are essential components that present data to end users. They are predefined layouts that display a list of records based on a set of criteria. Views can be customized to show only the most relevant information, making it easier for users to find what they need.
Creating Views
To create a new view, you would typically follow these steps:
- Navigate to the Power Apps portal and select the appropriate environment.
- Choose the Model-driven app from the available apps.
- Go to the Table where you want to create the view.
- Select the Views option and then click on New View.
- Define the view by specifying the columns to display, sorting order, and filter criteria.
- Save and publish the view so that it becomes available to users.
Modifying Views
Modifying an existing view involves:
- Accessing the Views section of the table you are interested in.
- Opening the view you want to modify.
- Adding or removing columns, changing the sort order, or adjusting the filter criteria as needed.
- Previewing the changes to ensure they meet the requirements.
- Saving and publishing the updated view.
Best Practices
When creating or modifying views, consider the following best practices:
- Limit the number of columns to display only the necessary information to improve load times and user experience.
- Use meaningful names for views to help users understand the purpose of the view.
- Apply filters to show the most relevant records to the users.
- Preview the view to ensure it displays correctly on different devices.
Additional Resources
For more detailed instructions and best practices on creating and modifying views, you can refer to the following resources:
Remember, views are a powerful way to tailor the presentation of data in model-driven applications, and mastering their creation and modification is key to building effective and user-friendly applications on the Power Platform.
Demonstrate the capabilities of Power Automate (15–20%)
Identify basic Power Automate components
Describe Use Cases for Cloud and Desktop Flows
Cloud flows and desktop flows are two distinct types of automation processes in Power Automate, each serving different purposes and scenarios.
Cloud Flows
Cloud flows are automated workflows that are executed in the cloud and use connectors to interact with various services. They are the most common type of flows in Power Automate and can be triggered by events, on a schedule, or manually. Here are some common use cases for cloud flows:
- Automated Workflows: Trigger actions in response to events such as receiving an email, a new record being added to a database, or a tweet mentioning a specific hashtag.
- Scheduled Tasks: Perform regular tasks like daily data uploads to Microsoft SharePoint or a database on a defined schedule https://learn.microsoft.com/en-us/training/modules/introduction-power-automate/2-describe-capabilities-power-automate .
- Data Integration: Use over 900 prebuilt connectors to interact with data from Microsoft products and non-Microsoft vendors like Google, Salesforce, Oracle, and more, allowing for seamless data integration across different platforms https://learn.microsoft.com/en-us/training/modules/introduction-power-automate/2-describe-capabilities-power-automate .
Desktop Flows
Desktop flows, often referred to as Robotic Process Automation (RPA), simulate user interaction with applications or websites. They are built using Power Automate for desktop and run on a local machine. Here are some common use cases for desktop flows:
- User Interaction Automation: Automate tasks that involve interacting with desktop applications or web browsers, such as filling out forms or extracting data from a website https://learn.microsoft.com/en-us/training/modules/introduction-power-automate/2-describe-capabilities-power-automate .
- Local Task Automation: Perform operations on a local machine, like automating interactions with an Excel spreadsheet or creating invoices based on local data https://learn.microsoft.com/en-us/training/modules/introduction-power-automate/7-build-desktop-flow .
- Integration with Cloud Flows: Desktop flows can be triggered manually or by cloud flows, allowing for a combination of cloud-based and local automation. For example, a cloud flow could collect data from an online form and trigger a desktop flow to process the data locally https://learn.microsoft.com/en-us/training/modules/introduction-power-automate/7-build-desktop-flow .
For additional information on creating and using cloud and desktop flows, you can refer to the following resources:
Please note that the URLs provided are for reference and additional information; they should be accessed for a deeper understanding of the topics discussed.
By understanding the distinct capabilities and use cases of cloud and desktop flows, you can leverage Power Automate to create efficient and effective automation solutions tailored to your specific needs.
Demonstrate the capabilities of Power Automate (15–20%)
Identify basic Power Automate components
Describe Use Cases for Cloud Flow Templates
Cloud flow templates in Power Automate serve as pre-built solutions that can be utilized to automate common business scenarios. These templates are designed to streamline the process of creating workflows, allowing users to quickly set up automation without the need to start from scratch. Here are some use cases for cloud flow templates:
Automating Data Entry: Cloud flow templates can be used to automate repetitive tasks such as data entry. For instance, a template might capture information from a form submission and automatically enter it into a database or a spreadsheet, saving time and reducing the potential for human error https://learn.microsoft.com/en-us/training/modules/introduction-power-automate/10-knowledge-check .
Integrating Applications: Templates can facilitate the integration of different applications, allowing them to communicate and share data seamlessly. An example might be a flow that automatically syncs new contacts from a CRM system into an email marketing tool.
File Management: Cloud flow templates can assist in managing files by automating tasks such as saving email attachments to specific locations like SharePoint or OneDrive for Business. This ensures that important documents are stored correctly and are easily accessible https://learn.microsoft.com/en-us/training/modules/introduction-power-automate/2-describe-capabilities-power-automate .
Notification Systems: Templates can be used to create notification systems that alert users when specific events occur, such as when a new item is added to a list or when a particular threshold is reached in a dataset.
Data Collection and Reporting: Cloud flow templates can automate the collection of data from various sources and compile it into reports. For example, a template might gather sales data from different platforms and generate a consolidated sales report.
Approval Workflows: Templates can streamline approval processes by automating the flow of documents that require approval. This can include purchase orders, time-off requests, or expense reports, where the document is sent to the appropriate person for approval and then moved to the next step in the process.
Customer Service: Cloud flow templates can be used to enhance customer service by automating responses to common inquiries or by routing support tickets to the right department or individual.
For additional information on cloud flow templates and how to utilize them, you can visit the Power Automate builder website, where you can find a variety of templates to suit different automation needs. Moreover, the Examples section provides templates broken down into common scenarios, ranging from beginner to advanced, to help users get started with building desktop flows https://learn.microsoft.com/en-us/training/modules/introduction-power-automate/7-build-desktop-flow .
Please note that while there are many templates available, users also have the flexibility to customize these templates or build their own flows to meet specific requirements https://learn.microsoft.com/en-us/training/modules/introduction-power-automate/7-build-desktop-flow .
Demonstrate the capabilities of Power Automate (15–20%)
Identify basic Power Automate components
Power Automate Cloud Flows: Connector Triggers and Actions
Power Automate cloud flows are designed to automate workflows across various services and applications. They primarily rely on connectors, which serve as the bridge between Power Automate and external services, enabling the flow to trigger actions or respond to events. Here’s a detailed explanation of how connector triggers and actions work within Power Automate cloud flows:
Connector Triggers
A connector trigger is an event that initiates a cloud flow. When a specific event occurs in an external service, the corresponding connector in Power Automate detects this event and triggers the flow to start. There are various types of triggers, such as when a new item is added to a list, an email is received, or a file is uploaded. Each connector has its own set of triggers based on the capabilities of the external service it connects to.
For example, the SharePoint connector might have a trigger for when an item is created in a SharePoint list, while the Outlook connector might trigger a flow when a new email arrives in your inbox.
Connector Actions
Once a flow is triggered, it can perform a series of actions using connectors. Actions are specific operations that the flow can execute within an external service. These can include creating, updating, or deleting items, sending notifications, or even calling other flows.
For instance, after a flow is triggered by the arrival of a new email, an action might be to create a new record in a CRM system like Dynamics 365 or to send a push notification to a mobile device using the Power Automate mobile app connector.
Building Cloud Flows with Connectors
To create a cloud flow, you can start from a blank flow or use a pre-built template. The process involves selecting the trigger, defining the conditions, and then specifying the actions to be performed. Power Automate provides over 900 prebuilt connectors, allowing you to interact with a wide range of services, including both Microsoft products and third-party services like Google, Salesforce, and Oracle https://learn.microsoft.com/en-us/training/modules/introduction-power-automate/2-describe-capabilities-power-automate .
Additional Resources
For more information on how to work with Power Automate cloud flows and connectors, you can refer to the following resources:
- Create a cloud flow from blank in a portal
- Create a cloud flow from a template in a portal
- Create a cloud flow from the Power Automate mobile app
- Create a cloud flow from SharePoint
These resources provide step-by-step guides and examples to help you understand and create effective cloud flows using Power Automate https://learn.microsoft.com/en-us/power-apps/maker/canvas-apps/add-app-solution-default .
Demonstrate the capabilities of Power Automate (15–20%)
Identify basic Power Automate components
Power Automate Use Cases
Power Automate is a versatile tool that can streamline various business processes by automating tasks across different Microsoft services. Below are some use cases for Power Automate with approvals, Microsoft Teams, Outlook, SharePoint, and Forms:
Approvals
- Automated Approval Workflows: Power Automate can be used to automate the approval process for documents, expenses, or any other items that require sign-off from managers or stakeholders. When an approval is submitted through a flow, approvers receive notifications and can review and act on the request directly from their email or the Power Automate approvals center https://learn.microsoft.com/en-us/training/modules/introduction-power-automate/5-consider-power-automate-scenarios .
Microsoft Teams
- Automated Notifications: Create flows that post messages to a Microsoft Teams channel when certain events occur, such as when a new lead is added to a CRM system or when a support ticket is updated.
- Streamlined Task Management: Use Power Automate to create tasks in Microsoft Teams based on specific triggers, like an email arriving in Outlook or a new row being added to an Excel spreadsheet.
Outlook
- Email Automation: Set up flows to automatically send emails based on certain triggers, such as a new entry in a SharePoint list or a scheduled reminder. Power Automate can also manage email attachments and responses https://learn.microsoft.com/en-us/power-bi/collaborate-share/service-flow-integration .
- Calendar Management: Automate calendar events creation, updates, and reminders based on inputs from other applications or forms.
SharePoint
- Document Management: Automate the process of managing permissions for SharePoint list items or document library files. For instance, when an item is created, a flow can send an approval request to a manager https://learn.microsoft.com/en-us/training/modules/introduction-power-automate/5-consider-power-automate-scenarios .
- Data Synchronization: Create SharePoint list items automatically based on actions in other applications, such as saving an invoice from an ERP application to a SharePoint document library as a PDF https://learn.microsoft.com/en-us/training/modules/introduction-power-automate/5-consider-power-automate-scenarios .
Forms
- Data Collection and Processing: When a Microsoft Form is submitted, use Power Automate to process the data, such as adding it to a SharePoint list or sending a summary email to a group of stakeholders.
- Feedback Loop Automation: Set up flows to automatically send follow-up emails or create tasks based on the responses received from a Microsoft Form.
For more information on how to use Power Automate with these services, you can visit the following URLs: - Use SharePoint and Power Automate to build workflows https://learn.microsoft.com/en-us/training/modules/introduction-power-automate/5-consider-power-automate-scenarios . - Automate exporting and distributing Power BI paginated reports with Power Automate https://learn.microsoft.com/en-us/power-bi/collaborate-share/service-automate-paginated-onedrive-sharepoint . - Data alerts in Power BI with Power Automate https://learn.microsoft.com/en-us/power-bi/collaborate-share/service-flow-integration .
These use cases demonstrate the flexibility of Power Automate in connecting and automating tasks across various Microsoft services, enhancing productivity and efficiency within organizations.
Demonstrate the capabilities of Power Automate (15–20%)
Identify basic Power Automate components
Power Automate Apps Overview
Power Automate is a versatile tool within the Microsoft Power Platform that enables users to create automated workflows between applications and services. These workflows can help automate repetitive tasks, synchronize files, collect data, and more. Power Automate is accessible through various applications, each tailored to different use cases and platforms.
Power Automate for Desktop
Power Automate for Desktop allows users to automate tasks on their local computers. This includes the ability to create desktop flows that can interact with web and desktop applications, work with files and folders, and automate data entry. Desktop flows can be particularly useful for integrating legacy systems that do not offer API-based integration, as they can mimic human interaction with the system.
For more information on Power Automate for Desktop, you can visit the following URL: Power Automate for Desktop.
Power Automate Mobile
The Power Automate Mobile app provides users with the ability to manage and trigger automated workflows from their mobile devices. Optimized for both Android and iOS, the mobile app ensures that users can stay connected to their automated processes while on the go. This can include receiving notifications, starting flows with a button press, and monitoring flow activity.
For additional details on Power Automate Mobile, refer to the following URL: Power Automate Mobile.
Power Automate Portal
The Power Automate portal is a web-based interface where users can create, manage, and monitor their flows. It provides a comprehensive environment to examine the capabilities of Power Automate, explore different types of flows, and build both cloud and desktop flows. The portal is also where users can connect to various data sources, manage connections, and share their flows with others.
For further exploration of the Power Automate portal, please visit: Power Automate Portal.
Additional Information
- Power Automate can send reminders for past due tasks, move data between systems on a schedule, and connect to over 900 data sources or any publicly available API https://learn.microsoft.com/en-us/training/modules/introduction-power-automate/1-introduction .
- It is designed to be accessible to users of all skill levels, from business users to IT professionals, enabling them to leverage the Power Platform to create powerful automation solutions https://learn.microsoft.com/en-us/training/modules/introduction-power-automate/1-introduction .
- Power Automate also includes features for test automation, although it is recommended to perform manual testing in addition to automated tests https://learn.microsoft.com/en-us/power-apps/maker/canvas-apps/test-studio .
- The platform supports advanced functionality such as reading NFC tags through custom code in Power Apps, demonstrating its ability to integrate with various technologies and devices https://learn.microsoft.com/en-us/power-apps/maker/canvas-apps/how-to/mobile-sensors .
- Insights into the utilization of hosted RPA capacity within Power Automate can be gained through the Hosted RPA capacity utilization page, which is part of the platform’s monitoring and management features https://learn.microsoft.com/en-us/power-automate/desktop-flows/capacity-utilization-hosted .
By utilizing these different applications, users can harness the full potential of Power Automate to streamline their workflows and increase efficiency across their organization.
Demonstrate the capabilities of Power Automate (15–20%)
Identify basic Power Automate components
Describe Actions for Power Automate Desktop Flows
Power Automate Desktop flows enable users to automate repetitive desktop processes by providing a suite of prebuilt drag-and-drop actions. These actions can be easily inserted into a flow, allowing for the automation of tasks across a variety of applications and services.
Key Features of Power Automate Desktop Flows:
Prebuilt Actions: The Power Automate desktop flow designer includes a wide range of prebuilt actions that can be used to automate tasks. These actions cover various categories such as file management, web automation, Excel automation, and more https://learn.microsoft.com/en-us/training/modules/introduction-power-automate/3-explore-different-power-automate-apps .
Drag-and-Drop Interface: Users can create desktop flows by dragging and dropping actions into the workspace. This intuitive interface simplifies the process of flow creation and allows users to build complex automations without writing code https://learn.microsoft.com/en-us/training/modules/introduction-power-automate/3-explore-different-power-automate-apps https://learn.microsoft.com/en-us/training/modules/introduction-power-automate/7-build-desktop-flow .
Recorder Functionality: Power Automate Desktop comes with a recorder feature that tracks user actions on websites, desktops, or within applications. The recorded steps are then saved and can be edited within the designer, making it easy to replicate and automate specific tasks https://learn.microsoft.com/en-us/training/modules/introduction-power-automate/7-build-desktop-flow .
Testing Flows: At any point during the creation of a desktop flow, users can test it to ensure it performs as expected. The testing process involves running the flow and observing the playback of the defined steps https://learn.microsoft.com/en-us/training/modules/introduction-power-automate/7-build-desktop-flow .
Manual and Automatic Triggers: Once created, desktop flows can be run manually by an individual user or automatically triggered by a cloud flow. This flexibility allows for both on-demand and scheduled automations https://learn.microsoft.com/en-us/training/modules/introduction-power-automate/7-build-desktop-flow https://learn.microsoft.com/en-us/training/modules/introduction-power-automate/7-build-desktop-flow .
Picture-in-Picture Mode: Desktop flows can be triggered to run in Picture-in-Picture mode, which allows the flow to execute in a separate window. This mode can be enabled through the Power Automate console or set as a default property for the flow. It also offers options such as “View only” to prevent user input and “Always on top” to keep the window in the foreground https://learn.microsoft.com/en-us/power-automate/desktop-flows/run-desktop-flows-pip .
Use Cases for Power Automate Desktop Flows:
- Organizing documents using file and folder actions.
- Extracting data from websites and storing them in Excel files.
- Automating interactions with legacy and modern applications, including terminal emulators, web and desktop applications https://learn.microsoft.com/en-us/training/modules/introduction-power-automate/3-explore-different-power-automate-apps .
Creating a Desktop Flow:
- Desktop flows are created using the Power Automate for Desktop application, which is installed on the user’s computer.
- Templates and examples are available to help users get started with common automation scenarios.
- The Power Automate Desktop designer provides a layout for building flows, with sections for actions, flow properties, and testing https://learn.microsoft.com/en-us/training/modules/introduction-power-automate/7-build-desktop-flow .
For additional information on Power Automate Desktop flows, you can refer to the following resources:
- Run a desktop flow in Picture-in-Picture mode
- Introduction to Power Automate for Desktop flows
- Creating and testing desktop flows
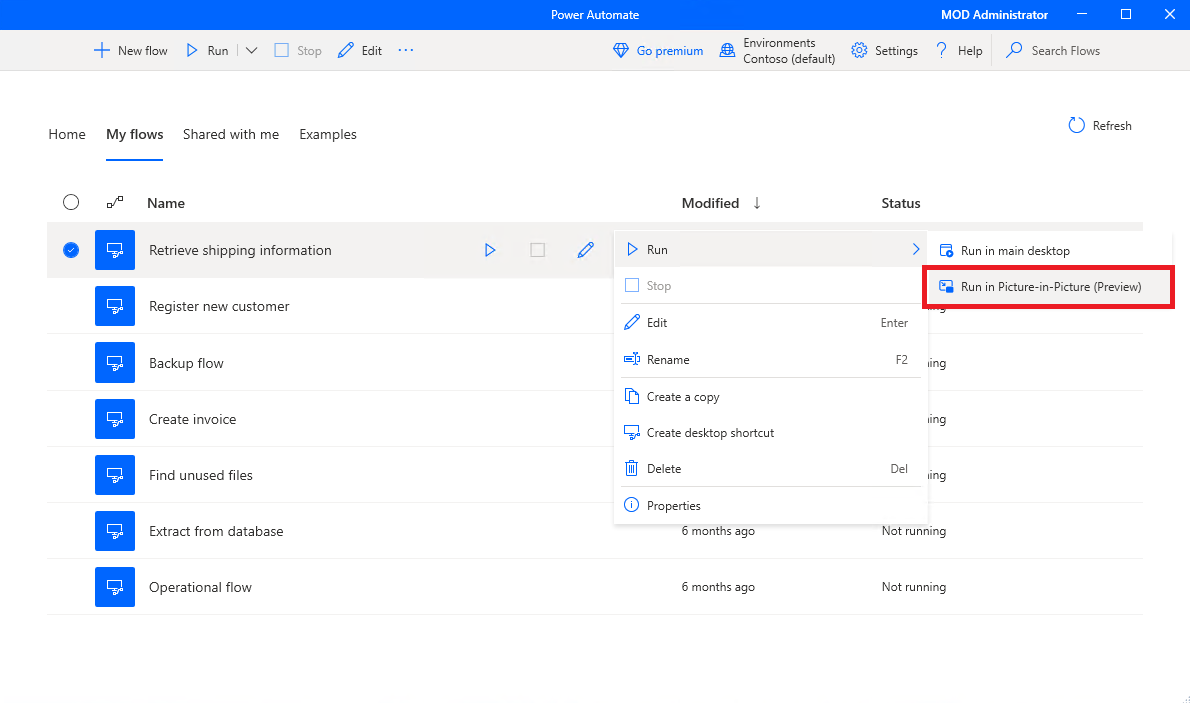
Please note that the URLs provided are for reference purposes and are part of the study material to help understand the concepts of Power Automate Desktop flows.
Demonstrate the capabilities of Power Automate (15–20%)
Identify basic Power Automate components
Describe Document Processing in Power Automate
Power Automate is a versatile tool that can be used to streamline document processing workflows in various business scenarios. Document processing typically involves the creation, approval, and management of documents, which can be automated to improve efficiency and accuracy.
Content Approval in SharePoint
One common use case for Power Automate in document processing is managing content approval in SharePoint. Documents that contain sensitive or critical information often require a review process before they can be published or used. Power Automate can be configured to work with SharePoint’s content approval feature, ensuring that documents in a specific library are not visible to the general user base until they have been reviewed and approved. This helps maintain organizational standards and prevent the accidental use of non-compliant documents, which could lead to financial losses or other issues https://learn.microsoft.com/en-us/training/modules/introduction-power-automate/5-consider-power-automate-scenarios .
SharePoint Site Management
In addition to document libraries, SharePoint sites themselves can benefit from automated approval processes. As users create and edit pages within a SharePoint site, organizations may want to ensure that the content meets certain standards. Power Automate can be set up to require approval for changes to a site before they are made live, thus ensuring content accuracy and appropriateness https://learn.microsoft.com/en-us/training/modules/introduction-power-automate/5-consider-power-automate-scenarios .
Managing Permissions and Approvals
Power Automate can also be used to manage permissions and approvals for individual items in SharePoint lists or document libraries. For instance, when a new item is added, a flow can automatically send an approval request to a manager. Upon approval, the flow can adjust the item’s permissions accordingly, granting access to the appropriate individuals or groups https://learn.microsoft.com/en-us/training/modules/introduction-power-automate/5-consider-power-automate-scenarios .
Integration with Other Applications
Another powerful feature of Power Automate is its ability to integrate with other applications. For example, when an invoice is generated in an Enterprise Resource Planning (ERP) system, a flow can be triggered to save the invoice as a PDF and then store it in a customer-specific folder within a SharePoint document library. This ensures that documents are organized and easily accessible across different business systems https://learn.microsoft.com/en-us/training/modules/introduction-power-automate/5-consider-power-automate-scenarios .
Power Automate for Desktop
Power Automate for desktop extends automation capabilities to desktop applications. For instance, it can open a Word document from a local machine or cloud storage like OneDrive or SharePoint, and perform subsequent actions within the document. This can be particularly useful for tasks that require interaction with desktop-based documents or applications https://learn.microsoft.com/en-us/power-automate/desktop-flows/actions-reference/word .
Business Process Flows
Power Automate also supports business process flows, which can guide users through multi-stage processes. For example, a real estate company might use a business process flow to manage the various stages of preparing a home for an open house. The flow can adapt to the information logged at each stage, dynamically changing the steps based on the data entered https://learn.microsoft.com/en-us/training/modules/introduction-power-automate/2-describe-capabilities-power-automate .
For more detailed information on using SharePoint and Power Automate together, you can refer to the following resource: Use SharePoint and Power Automate to build workflows https://learn.microsoft.com/en-us/training/modules/introduction-power-automate/5-consider-power-automate-scenarios .
By automating document processing with Power Automate, organizations can reduce manual errors, save time, and ensure that their document workflows are consistent and compliant with internal policies and standards.
Demonstrate the capabilities of Power Automate (15–20%)
Build a basic Power Automate flow
Create a Cloud Flow by Using an Instant, Automated, or Scheduled Flow Template
Creating a cloud flow in Power Automate can be accomplished through various methods, including using templates for instant, automated, or scheduled flows. Templates are prebuilt solutions that address common automation scenarios and can be a quick way to get started with Power Automate.
Instant Flow Template
An instant flow is triggered manually by a user. To create an instant cloud flow using a template:
- Sign in to Power Automate at flow.microsoft.com.
- Select Templates from the navigation menu.
- Search for templates that fit the instant trigger criteria.
- Choose a template that suits your needs and select it to see details about what the template does and the data sources it connects to.
- Click Continue to start configuring the flow according to the template’s instructions.
Automated Flow Template
Automated flows run when an event triggers them. To create an automated cloud flow using a template:
- Navigate to the Power Automate maker portal and select Templates.
- Use the search function to find a template that matches the event you want to trigger the flow.
- Select the desired template to view its details and the connected data sources.
- After selecting the template, you will be prompted to provide specific details to ensure the flow operates as intended.
- Configure the trigger and actions as per the template’s guidelines.
- Save the flow by clicking the Save button.
Scheduled Flow Template
Scheduled flows run at specified times. To create a scheduled cloud flow using a template:
- Go to flow.microsoft.com and sign in.
- Click on Templates and search for “scheduled” to find templates that trigger at designated times.
- Select a template that fits your scheduling needs.
- Click Continue and set the recurrence for your flow by selecting a Frequency and entering an Interval value.
- You may also select Show advanced options to configure additional recurrence parameters.
- Provide any other necessary details required by the template.
- Save the flow by selecting the Save button.
Templates can greatly simplify the process of creating flows by providing a structured starting point that you can customize to fit your specific requirements. Power Automate offers a wide range of templates for different purposes, and you can explore these templates directly from the Power Automate builder website https://learn.microsoft.com/en-us/training/modules/introduction-power-automate/6-build-basic-power-automate-cloud-flow .
For more advanced scenarios, you may decide to create your flows from scratch. However, when starting, templates offer a guided and efficient way to automate tasks without needing to build everything from the ground up https://learn.microsoft.com/en-us/training/modules/introduction-power-automate/6-build-basic-power-automate-cloud-flow .
Remember, the availability of certain templates and the ability to create cloud flows from various entry points can vary, so it’s important to check the current support status for the method you choose to use https://learn.microsoft.com/en-us/power-apps/maker/canvas-apps/add-app-solution-default .
Demonstrate the capabilities of Power Automate (15–20%)
Build a basic Power Automate flow
Modify a Cloud Flow
When modifying a cloud flow, you are essentially updating the steps or logic of an existing automated workflow within Power Automate. This process allows you to refine the flow’s functionality, correct any issues, or adapt the flow to changing business requirements. Here’s a step-by-step guide on how to modify a cloud flow:
Access Power Automate: Navigate to the Power Automate portal to access your existing cloud flows.
Locate the Flow: Find the cloud flow you wish to modify. You can do this by browsing the list of your flows or using the search functionality if you have many flows.
Edit the Flow: Click on the flow you want to modify, and then select the “Edit” option. This will open the flow’s canvas, where you can see all the steps currently in the flow.
Modify Steps: Click on any step to modify its properties. You can change the inputs, conditions, or actions within each step. If necessary, you can add new steps by selecting the “+ New step” button or delete steps by clicking on the ellipsis (…) and selecting “Delete”.
Save Changes: After making the desired changes, save your flow by clicking the “Save” button at the top of the canvas. This will update the flow with your modifications.
Test the Flow: It’s important to test the flow to ensure that it works as expected with the new changes. Use the “Test” button to run the flow with the current or new data and monitor the results.
Review and Resolve Issues: If the test uncovers any issues, review the steps and make further modifications as needed. Repeat the testing process until the flow performs correctly.
Turn on the Flow: If the flow was turned off for editing, make sure to turn it back on so it can be triggered according to its defined conditions.
For additional information on modifying cloud flows, you can refer to the following resources:
- Create a cloud flow from blank in a portal
- Create a cloud flow from a template in a portal
- Export a solution
- Import a solution
- Share a cloud flow
- Send a copy of a cloud flow
Remember, when modifying a cloud flow, it’s crucial to consider the impact of changes on any users or systems that depend on the flow. Ensure that all stakeholders are informed of the changes and that any integrations are tested to prevent disruptions to business processes.
Demonstrate the capabilities of Power Automate (15–20%)
Build a basic Power Automate flow
Add Flow Steps to Perform Data Operations
When building automation with Power Automate, one of the key functionalities is the ability to perform data operations within your flows. Data operations can include a variety of actions such as creating, updating, retrieving, and deleting records in various data sources. Here’s how you can add flow steps to perform these operations:
Selecting the Action: To begin adding a data operation to your flow, you need to select the “New step” button within the flow designer. This will allow you to search for and add new actions to your flow.
Choosing the Data Source: Depending on the data operation you wish to perform, you will need to choose the appropriate connector for your data source. For example, if you are working with SharePoint, you would search for and select the “SharePoint” connector https://learn.microsoft.com/en-us/power-apps/maker/canvas-apps/how-to/pdf-function .
Configuring the Action: After selecting the connector, you will be presented with a list of available actions. For instance, if you want to create a file in SharePoint, you would select the “Create file” action https://learn.microsoft.com/en-us/power-apps/maker/canvas-apps/how-to/pdf-function . You will then need to provide the necessary details such as:
- Site Address: The URL of the SharePoint site where you have permission to add files https://learn.microsoft.com/en-us/power-apps/maker/canvas-apps/how-to/pdf-function .
- Folder Path: The path to the document library where you have permission to add files https://learn.microsoft.com/en-us/power-apps/maker/canvas-apps/how-to/pdf-function .
- File Name: The name of the file you want to create. You can use dynamic content to set this value based on data from previous steps in the flow https://learn.microsoft.com/en-us/power-apps/maker/canvas-apps/how-to/pdf-function .
- File Content: The content of the file. This can also be set using dynamic content https://learn.microsoft.com/en-us/power-apps/maker/canvas-apps/how-to/pdf-function .
Testing the Flow: After configuring the action, it’s important to test the flow to ensure it performs as expected. You can do this by selecting the “Run” button and observing the flow’s execution https://learn.microsoft.com/en-us/training/modules/introduction-power-automate/7-build-desktop-flow .
Saving and Closing: Once you are satisfied with the flow’s performance, select “Save” to keep your changes. You can then close the flow designer https://learn.microsoft.com/en-us/power-apps/maker/canvas-apps/how-to/pdf-function .
By following these steps, you can effectively add data operations to your Power Automate flows, enabling you to automate complex tasks and streamline business processes.
For more information on using Power Automate to perform data operations, you can refer to the following resources: - Using Outlook and Power Automate https://learn.microsoft.com/en-us/training/modules/introduction-power-automate/5-consider-power-automate-scenarios - Introduction to Power Automate https://learn.microsoft.com/en-us/training/modules/introduction-power-automate/7-build-desktop-flow - Power Query Folding https://learn.microsoft.com/en-us/power-bi/transform-model/dataflows/dataflows-premium-workload-configuration
Remember, the specific steps and configurations may vary depending on the data source and the type of operation you are performing. Always refer to the official documentation for the most accurate and up-to-date information.
Demonstrate the capabilities of Power Automate (15–20%)
Build a basic Power Automate flow
Run a Cloud Flow
Running a cloud flow in Power Automate involves initiating a predefined sequence of actions that are executed in the cloud. Cloud flows can be triggered in various ways, depending on the design of the flow and the connectors it uses. Here’s a detailed explanation of how to run a cloud flow:
Manual Trigger: Some cloud flows are designed to be started manually by a user. This can be done through the Power Automate portal, where users can find their flow and select the “Run” button to initiate it.
Automated Trigger: Cloud flows can also be configured to run automatically in response to certain events, such as the arrival of an email, a new item being added to a SharePoint list, or a record being updated in Dynamics 365.
Scheduled Trigger: Flows can be set up to run at specific intervals, such as daily, weekly, or monthly, using a schedule trigger. This is useful for tasks that need to be performed regularly, like data synchronization or report generation.
Using Connectors: Cloud flows can be initiated from various applications using connectors. For example, you can create a cloud flow from within Teams, OneDrive, SharePoint, and even Excel using the Power Automate add-in.
Power Automate Management Connector: This allows for the creation and management of cloud flows programmatically, which can be useful for advanced scenarios where flows need to be managed as part of a larger automation strategy.
PowerShell and Power Apps: Cloud flows can also be created and run using PowerShell scripts or from within Power Apps, providing a way to integrate flow automation into custom applications or administrative tasks.
Mobile App: The Power Automate mobile app allows users to create and run cloud flows directly from their mobile device, offering flexibility to manage workflows on the go.
Unsupported Entry Points: It’s important to note that not all entry points support the creation of cloud flows in a solution. Unsupported entry points will fail to create any cloud flow until that support is added. Always ensure to use a supported method to create and run your cloud flows.
For additional information on creating and running cloud flows, you can refer to the following resources:
- Create a cloud flow from blank in a portal https://learn.microsoft.com/en-us/power-apps/maker/canvas-apps/add-app-solution-default .
- Create a cloud flow from a template in a portal https://learn.microsoft.com/en-us/power-apps/maker/canvas-apps/add-app-solution-default .
- Create a cloud flow from Teams https://learn.microsoft.com/en-us/power-apps/maker/canvas-apps/add-app-solution-default .
- Create a cloud flow from OneDrive https://learn.microsoft.com/en-us/power-apps/maker/canvas-apps/add-app-solution-default .
- Create a cloud flow from the Excel add-in https://learn.microsoft.com/en-us/power-apps/maker/canvas-apps/add-app-solution-default .
- Create a cloud flow from the Power Automate mobile app https://learn.microsoft.com/en-us/power-apps/maker/canvas-apps/add-app-solution-default .
- Create a cloud flow from SharePoint https://learn.microsoft.com/en-us/power-apps/maker/canvas-apps/add-app-solution-default .
By understanding these methods and utilizing the resources provided, users can effectively run cloud flows to automate their business processes and increase efficiency within their organizations.
Demonstrate the capabilities of Power Automate (15–20%)
Build a basic Power Automate flow
Build a Basic Desktop Flow by Recording Tasks
Desktop flows in Power Automate enable users to automate repetitive desktop tasks by recording a sequence of actions that the computer can replay. These actions can range from simple to complex and can involve interactions with applications, websites, and various user interface elements. Here’s a step-by-step guide on how to build a basic desktop flow by recording tasks:
Open Power Automate for Desktop: Start by launching the Power Automate for Desktop application on your computer.
Create a New Flow: Click on the option to create a new flow. Give your flow a descriptive name that reflects the task it will perform.
Use the Recorder: Utilize the recorder feature to capture the steps you want to automate. The recorder can track actions such as opening applications, navigating through menus, and entering data.
Perform the Desired Actions: Carry out the steps you wish to automate while the recorder is active. For example, if you want to automate opening a specific Excel spreadsheet, you would open the file dialog, navigate to the file, and open it.
Stop Recording: Once you have completed the sequence of actions, stop the recording. The recorded steps will be saved and can be edited within the flow designer.
Edit the Recorded Steps: Review the recorded steps in the flow designer. You can add, remove, or modify actions to ensure the flow performs exactly as intended.
Test the Flow: Before deploying the flow, test it by clicking the Run button. This will execute the recorded steps in the order they were captured to verify that the flow works correctly.
Save and Use the Flow: After testing and confirming that the flow operates as expected, save it. The desktop flow can then be run manually by a user or triggered automatically by a cloud flow.
For additional information and visual guidance on creating desktop flows, you can refer to the following resources:
By following these steps, you can build a basic desktop flow that automates a sequence of tasks, saving time and reducing the potential for human error in repetitive processes.
Describe complementary Microsoft Power Platform solutions (15–20%)
Describe the capabilities of Power Virtual Agents
Describe Use Cases for Power Virtual Agents
Power Virtual Agents are an integral part of the Microsoft Power Platform, enabling users to create powerful chatbots without the need for extensive coding knowledge. These chatbots can be deployed across multiple channels to engage with customers, provide support, and automate routine tasks. Below are some of the key use cases for Power Virtual Agents:
Customer Service Automation: Power Virtual Agents can handle common customer inquiries, such as tracking orders, answering FAQs, and providing account information. This allows human agents to focus on more complex issues, improving overall efficiency and customer satisfaction https://learn.microsoft.com/en-us/training/modules/introduction-power-platform/5-use-artificial-intelligence-increase-productivity .
Internal Employee Support: Organizations can use Power Virtual Agents to create internal bots that assist employees with HR-related queries, IT support, and internal processes. This helps in reducing the workload on support teams and streamlines internal operations https://learn.microsoft.com/en-us/training/modules/introduction-power-platform/8-explore-how-power-platform-works-microsoft-teams .
Integration with Microsoft Teams: Power Virtual Agents can be integrated with Microsoft Teams, allowing users to interact with bots directly within the Teams environment. This is particularly useful for remote workers who rely on Teams for collaboration and communication https://learn.microsoft.com/en-us/power-bi/collaborate-share/service-collaborate-microsoft-teams https://learn.microsoft.com/en-us/training/modules/introduction-power-platform/8-explore-how-power-platform-works-microsoft-teams .
Digital Transformation: Companies like TruGreen have utilized Power Virtual Agents as part of their digital transformation strategy. By incorporating chatbots, they have improved customer experience by providing proactive and predictive services. This showcases the potential of Power Virtual Agents to revolutionize customer interaction and service delivery https://learn.microsoft.com/en-us/training/modules/introduction-power-automate/9-describe-business-value-power-automate .
Robotic Process Automation (RPA): For systems without APIs, Power Virtual Agents can be combined with Power Automate to use desktop flows. This enables the automation of onscreen actions through RPA, further extending the capabilities of the chatbots to interact with legacy systems and perform complex tasks https://learn.microsoft.com/en-us/training/modules/introduction-power-automate/9-describe-business-value-power-automate .
Data-Driven Insights: With the integration of Power BI, chatbots can provide users with real-time analytics and data-driven insights. This is particularly useful for industries like real estate, where agents can receive up-to-date information on properties and market trends directly through the chatbot https://learn.microsoft.com/en-us/training/modules/introduction-power-platform/8-explore-how-power-platform-works-microsoft-teams .
For additional information on Power Virtual Agents and their capabilities, you can explore the following resources:
- Power Virtual Agents Overview
- Power Platform Admin Experience
- Power Automate in Teams
- Power Apps in Teams
- Virtual Network Peering Overview
These resources provide a deeper understanding of how Power Virtual Agents can be leveraged to create intelligent chatbots that enhance customer and employee experiences across various scenarios.
Describe complementary Microsoft Power Platform solutions (15–20%)
Describe the capabilities of Power Virtual Agents
Describe the Purpose of Topics, Entities, and Actions
Topics
Topics in the context of Power Virtual Agents refer to the subjects or
areas of conversation that a bot can recognize and respond to. When
creating a bot, you define topics by describing what users might want to
talk about with the bot. Each topic includes trigger phrases that help
the bot identify when a user wants to talk about that particular
subject. Once a topic is triggered, the bot can engage in a conversation
flow, providing information, taking actions, or guiding the user through
a process https://learn.microsoft.com/en-us/training/modules/introduction-power-platform/5-use-artificial-intelligence-increase-productivity
.
Entities
Entities are data structures used to store and manage data in Microsoft
Dataverse. They are similar to tables in a database and are used to
model and manage business data. Entities have a set of attributes
(columns) that define the data they can hold. In Power Apps and Power
Virtual Agents, entities are used to store information that can be used
in apps and bots. For example, a ‘Customer’ entity might store data
about customers, such as their name, contact information, and order
history. Entities are crucial for creating relational data models and
for defining the data that apps and bots can work with https://learn.microsoft.com/en-us/power-apps/maker/canvas-apps/add-app-solution
https://learn.microsoft.com/en-us/power-apps/maker/canvas-apps/add-app-solution-default
.
Actions
Actions refer to the operations that can be performed by a bot or app
within the Power Platform. In Power Virtual Agents, actions are the
steps that a bot takes in response to a user’s input or as part of a
conversation flow. These actions can include displaying messages, asking
questions, calling a Power Automate flow to perform more complex
operations, or interacting with entities in Dataverse. In Power Apps,
actions can be operations like creating, updating, or deleting records
in an entity, or triggering workflows and business processes https://learn.microsoft.com/en-us/training/modules/introduction-power-platform/5-use-artificial-intelligence-increase-productivity
https://learn.microsoft.com/en-us/power-apps/maker/canvas-apps/add-app-solution
https://learn.microsoft.com/en-us/power-apps/maker/canvas-apps/add-app-solution-default
.
For more information on these concepts, you can refer to the following resources: - Power Virtual Agents - Microsoft Dataverse - Security roles and privileges in Dataverse - Creating and managing entities in Dataverse - Using solutions in Power Platform
Describe complementary Microsoft Power Platform solutions (15–20%)
Describe the capabilities of Power Virtual Agents
Create Topics from Existing FAQs by Using Suggest Topics
When building a bot with Power Virtual Agents, one of the features available is the ability to create topics from existing FAQs using the “Suggest topics” functionality. This feature streamlines the process of bot development by automating the creation of topics based on the information provided in your FAQs. Here’s how it works:
Description of Topics: Topics in Power Virtual Agents are essentially the subjects or areas that the bot can understand and respond to. Each topic contains trigger phrases and a conversation flow that defines how the bot should interact with the user when the topic is invoked.
Using Suggest Topics: The “Suggest topics” tool in Power Virtual Agents allows you to input your existing FAQ URLs or documents. The AI then analyzes the content and suggests new topics based on the questions and answers it finds.
Automation of Topic Creation: Instead of manually creating multiple topics, which can be time-consuming, the “Suggest topics” feature automates this process. It identifies potential questions from your FAQs and generates topics that include trigger phrases and answers.
Review and Edit: After the topics are suggested, you can review and edit them to ensure they align with your bot’s conversational flows and provide accurate responses. This step is crucial to maintain the quality and relevance of the bot’s interactions.
Deployment: Once you are satisfied with the suggested topics, you can quickly deploy them, allowing your bot to handle a broader range of user inquiries without additional manual effort.
For more information on creating topics from existing FAQs by using “Suggest topics” and to explore the capabilities of Power Virtual Agents, you can visit the following resources:
By leveraging the “Suggest topics” feature, you can enhance the efficiency of bot development and ensure your bot is well-equipped to handle a wide array of user questions, providing a more robust and engaging user experience.
Describe complementary Microsoft Power Platform solutions (15–20%)
Describe the capabilities of Power Pages
Use Cases for Power Pages
Power Pages is a versatile tool that enables organizations to create externally facing websites which connect to Dataverse, providing a platform for a variety of use cases. Here are some detailed scenarios where Power Pages can be effectively utilized:
Customer Self-Service Portals: Organizations can build customer self-service portals that allow users to find information, interact with support, or open new support tickets. This empowers customers to get the help they need without direct interaction with customer service representatives, leading to increased customer satisfaction and reduced support costs.
Community Engagement: Power Pages can be used to create community forums and feedback sites where customers can engage with one another, share insights, and provide feedback to the organization. This fosters a sense of community and can provide valuable user-generated content and insights.
Event Management: For managing events, Power Pages can be used to create event websites where attendees can find event information, register for events, and check schedules. This streamlines the event management process and improves the attendee experience.
Educational Resources: Educational institutions can use Power Pages to provide students and faculty with access to academic resources, course materials, and other educational content in a secure and structured manner.
Partner Portals: Businesses can create portals for their partners to access shared resources, manage leads, register deals, and collaborate on projects. This enhances the efficiency of partner management and collaboration.
Employee Onboarding: Power Pages can be used to create onboarding sites for new employees, providing them with all the necessary information, documentation, and training materials in one centralized location.
Product Catalogs: Companies can build interactive product catalogs that allow customers to browse products, view detailed information, and even place orders directly through the website.
Compliance and Reporting: Organizations can create portals for compliance reporting where users can submit necessary documents and forms, ensuring that the organization meets regulatory requirements.
For additional information on Power Pages and its capabilities, you can visit the official Microsoft documentation: Power Pages Overview https://learn.microsoft.com/en-us/training/modules/introduction-power-platform/9-describe-how-power-platform-works-microsoft-dynamics-365-apps .
By leveraging Power Pages, organizations can create tailored, data-driven websites that enhance external engagement and streamline internal processes, all while maintaining a secure and compliant environment.
Describe complementary Microsoft Power Platform solutions (15–20%)
Describe the capabilities of Power Pages
Use Cases for Templates in Power Platform
Templates in the Power Platform serve as pre-built solutions that can be utilized to accelerate the development process and address common business scenarios. Here are some detailed use cases for templates:
Emergency Response Management: Templates can be used to quickly deploy solutions during emergencies. For instance, the Hospital Emergency Response Power Platform solution provides a template that, once installed and set up, creates the necessary data source references to populate the app with data, streamlining the management of emergency situations https://learn.microsoft.com/en-us/power-bi/connect-data/service-connect-to-health-emergency-response .
Bot Development with Power Virtual Agents: The Power Virtual Agents AI utilizes templates to build bots based on the description of topics provided by the user. This allows for the rapid creation and deployment of functional bots without the need to author multiple topics manually, enhancing customer service and internal process automation https://learn.microsoft.com/en-us/training/modules/introduction-power-platform/5-use-artificial-intelligence-increase-productivity .
Policy Deployment in Enterprises: Templates can be employed to deploy enterprise policies efficiently. The Microsoft.PowerPlatform/enterprisePolicies ARM template is an example of how templates can be used to implement governance across the Power Platform environment within an organization https://learn.microsoft.com/en-us/power-platform/admin/vnet-support-setup-configure .
Data Management and Process Extension: Templates can also be used to extend business processes through plug-ins. For example, templates are available for creating low code plug-ins in Dataverse, which can be used until those connector types are onboarded to subnet delegation https://learn.microsoft.com/en-us/power-platform/admin/vnet-support-overview .
Optimizing Data Operations: In scenarios where updating Gallery items can be slow due to the volume of items, templates can provide optimized methods for patching or updating records, ensuring that only the necessary data is reloaded, thus improving performance https://learn.microsoft.com/en-us/power-apps/maker/canvas-apps/gallery-best-practice .
For additional information on these use cases, you can refer to the following resources:
- For setting up the Hospital Emergency Response solution and connecting it to your data, visit Hospital Emergency Response Power Platform solution https://learn.microsoft.com/en-us/power-bi/connect-data/service-connect-to-health-emergency-response .
- To learn more about how Copilot can be used with Power Virtual Agents, see Power Virtual Agents AI https://learn.microsoft.com/en-us/training/modules/introduction-power-platform/5-use-artificial-intelligence-increase-productivity .
- For deploying enterprise policies, refer to the Microsoft.PowerPlatform/enterprisePolicies ARM template https://learn.microsoft.com/en-us/power-platform/admin/vnet-support-setup-configure .
- To understand the optimization of data operations in Power Platform, read about patching and updating Gallery items https://learn.microsoft.com/en-us/power-apps/maker/canvas-apps/gallery-best-practice .
- For information on Dataverse low code plug-ins and their current limitations, check Dataverse low code plug-ins https://learn.microsoft.com/en-us/power-platform/admin/vnet-support-overview .
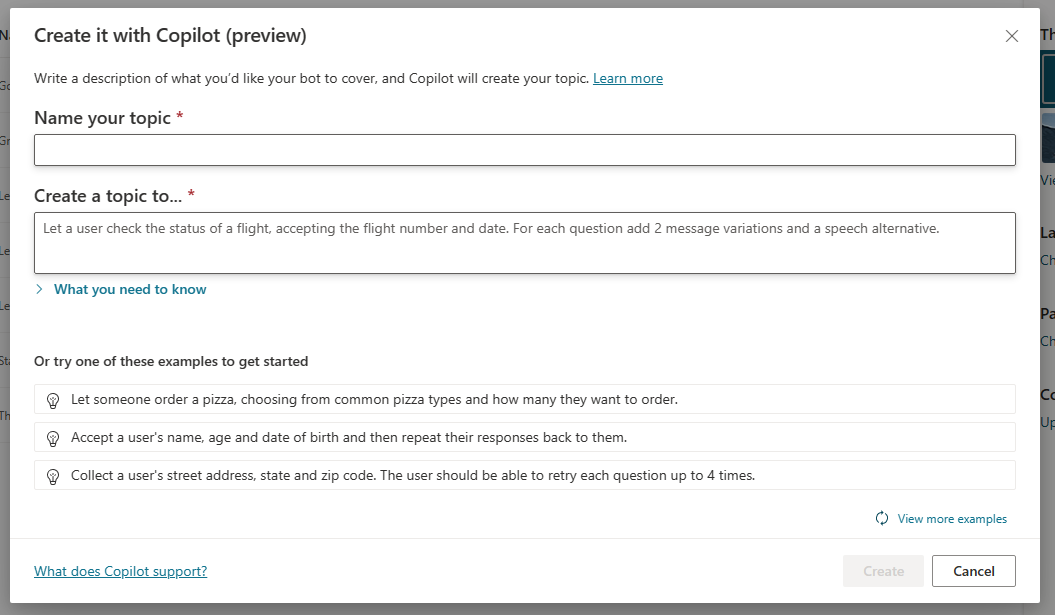
These resources provide a deeper understanding of how templates can be leveraged within the Power Platform to address various business needs and scenarios.
Describe complementary Microsoft Power Platform solutions (15–20%)
Describe the capabilities of Power Pages
Describe How to Share Data Externally
When sharing data externally in Power BI, there are several steps and settings that need to be configured to ensure a secure and successful sharing process. Here is a detailed explanation of how to share data externally:
- Tenant Settings Configuration:
- As a Power BI admin, you must first navigate to the Tenant settings in the admin portal.
- Locate and click on Allow specific users to turn on external data sharing.
- Ensure the toggle is set to Enable.
- Decide the scope of this setting, whether it applies to The entire organization, Specific security groups, or if you want to exclude specific security groups. If excluding, check the box next to Except specific security groups and add the groups you wish to exclude.
- Click Apply to save the settings https://learn.microsoft.com/en-us/power-bi/collaborate-share/service-dataset-external-org-share-admin .
- In-Place Semantic Model Sharing:
- Data providers can use in-place semantic model sharing to share semantic models with external users, allowing them to access the models in their own organization’s tenant.
- Before sharing, ensure that the new tenant settings are enabled for the data provider by their Power BI admins https://learn.microsoft.com/en-us/power-bi/collaborate-share/service-dataset-external-org-share-provider .
- Enable Access for External Guest Users:
- Utilize Microsoft Entra B2B to enable access for external guest users. This involves configuring settings to invite external users to your organization https://learn.microsoft.com/en-us/power-bi/collaborate-share/service-dataset-external-org-share-about .
- Multi-Factor Authentication (MFA):
- If the provider tenant has MFA enabled, the consumer tenant must also enable MFA to access the External Data tab in Power BI desktop.
- The provider tenant should turn on the Trust multi-factor authentication from Microsoft Entra tenants option https://learn.microsoft.com/en-us/power-bi/collaborate-share/service-dataset-external-org-share-about .
- Enable Necessary Tenant Settings:
- Several tenant settings must be enabled, including:
- Control the use of semantic models across workspaces.
- Allow Microsoft Entra guest users to access Power BI.
- Allow XMLA endpoints and analyze in Excel with on-premises datasets.
- Allow live connections https://learn.microsoft.com/en-us/power-bi/collaborate-share/service-dataset-external-org-share-about .
- Several tenant settings must be enabled, including:
- Admin Portal Settings for In-Place Sharing:
- Power BI admins must turn on settings in the admin portal to allow guest users to work with shared semantic models in their own tenants and to enable specific users to turn on external data sharing https://learn.microsoft.com/en-us/power-bi/collaborate-share/service-dataset-external-org-share-about .
- Enable Semantic Model External Sharing:
- Before sharing the semantic model, enable the semantic model external sharing option for the specified semantic model https://learn.microsoft.com/en-us/power-bi/collaborate-share/service-dataset-external-org-share-about .
For additional information and guidance, you can refer to the following resources: - Information for Power BI administrators - Distribute content to external guest users with Microsoft Entra B2B - Control the use of semantic models across workspaces - Allow Microsoft Entra guest users to access Power BI - Allow XMLA endpoints and analyze in Excel with on-premises datasets - Allow live connections
By following these steps and ensuring the proper settings are configured, you can securely share Power BI data externally with users from different tenants.
Describe complementary Microsoft Power Platform solutions (15–20%)
Describe the capabilities of AI Builder
AI Builder Use Cases: Sentiment Analysis and Receipt Processing
AI Builder is a feature of Power Platform that provides AI templates to enhance business processes. Two notable use cases for AI Builder are Sentiment Analysis and Receipt Processing.
Sentiment Analysis
Sentiment Analysis is a function within AI Builder that evaluates text input and returns a sentiment score for each document. The score ranges from 0, indicating negative sentiment, to 1, indicating positive sentiment. This function is particularly useful for analyzing feedback from social media, customer reviews, and discussion forums.
The Sentiment Analysis model in AI Builder is pre-trained and uses a machine learning classification algorithm. It employs techniques such as text processing, part-of-speech analysis, word placement, and word associations to determine sentiment. The model performs an objectivity assessment to decide if the text is objective or subjective. If subjective, it proceeds to score the sentiment. Texts that are mostly objective receive a neutral score of 0.50, while subjective texts receive scores above or below 0.50 based on the sentiment detected https://learn.microsoft.com/en-us/power-bi/create-reports/../transform-model/dataflows/dataflows-machine-learning-integration https://learn.microsoft.com/en-us/power-bi/transform-model/desktop-ai-insights .
For more information on Sentiment Analysis and the underlying algorithm, you can refer to the following resource: Machine Learning and Text Analytics.
Receipt Processing
Receipt Processing is another use case for AI Builder, where it can automate the extraction of information from receipts. This process involves scanning receipts and using pre-built AI models to identify and extract key data points such as the date, time, total amount, taxes, and items purchased. This extracted data can then be used for expense tracking, financial reporting, or inventory management.
AI Builder’s receipt processing capabilities streamline data entry tasks, reduce errors associated with manual entry, and improve the efficiency of financial operations. By leveraging AI Builder for receipt processing, businesses can save time and resources, allowing employees to focus on more strategic tasks.
For additional information on AI Builder and its capabilities, you can explore the following URL: AI Builder in Power Automate.
Please note that while the URLs provided offer further details, they should be used as supplementary resources to the primary content of the study guide.
Describe complementary Microsoft Power Platform solutions (15–20%)
Describe the capabilities of AI Builder
Describe the Lifecycle to Create an AI Builder Model
Creating an AI Builder model involves several steps, from data preparation to model training and evaluation. Below is a detailed explanation of the lifecycle to create an AI Builder model:
Data Preparation: The first step in creating an AI Builder model is to prepare your data. This involves collecting and cleaning the data that will be used to train the model. It is crucial to ensure that the data is accurate and representative of the scenarios the model will encounter.
Model Selection: Once the data is ready, the next step is to select the appropriate AI Builder model type based on the problem you are trying to solve. AI Builder provides various pre-built model types, such as prediction, form processing, object detection, and text classification.
Training: After selecting the model type, you need to train the model using your prepared data. During training, AI Builder will learn from the data patterns and relationships that are important for making predictions or decisions.
Evaluation: Once the model is trained, it is essential to evaluate its performance to ensure it meets the desired accuracy and reliability. This step may involve using a separate validation dataset to test the model’s predictions.
Publishing: If the model’s performance is satisfactory, the next step is to publish the model. Publishing makes the model available for use in Power Apps, Power Automate, or any other supported platform.
Consumption: After publishing, the model can be consumed in applications or workflows. You can integrate the model into Power Apps to add AI capabilities to your apps or use it in Power Automate to create intelligent workflows.
Monitoring and Maintenance: The final step in the lifecycle is to monitor the model’s performance over time and retrain it with new data as needed. This ensures that the model remains accurate and relevant as conditions change.
For additional information on creating AI Builder models, you can refer to the following resources:
Please note that the URLs provided are for reference and additional learning. They should be accessed to gain a deeper understanding of the AI Builder model lifecycle and to access step-by-step guides and best practices.
Describe complementary Microsoft Power Platform solutions (15–20%)
Describe the capabilities of AI Builder
Lifecycle to Create an AI Builder Model
Creating an AI Builder model involves several steps, from data preparation to model training and evaluation. Below is a detailed explanation of the lifecycle to create an AI Builder model:
Data Preparation: The first step in creating an AI Builder model is to prepare your data. This involves collecting the data that will be used to train the model and ensuring it is clean and well-structured. Data can be enriched using Text Analytics or Vision functions in Power BI by opening the Power Query Editor and selecting the desired function to apply to your data column https://learn.microsoft.com/en-us/power-bi/create-reports/../transform-model/desktop-ai-insights .
Model Creation: Once the data is ready, you can create a new AI Builder model. This is done by selecting the type of AI model you want to create based on the problem you are trying to solve, such as prediction, form processing, object detection, or text classification.
Model Training: With the model created and the data prepared, the next step is to train the model. This involves feeding the prepared data into the AI Builder model so that it can learn from the data patterns and relationships. The training process may require setting various parameters and choosing the right features that the model should consider.
Model Evaluation: After the model has been trained, it is important to evaluate its performance. This involves testing the model with a separate set of data that it hasn’t seen before (validation data) to assess its accuracy and effectiveness. The evaluation step helps to determine if the model is ready for deployment or if it needs further tuning.
Model Deployment: Once the model has been evaluated and is performing satisfactorily, it can be deployed for use in applications. This means integrating the model into your business processes or applications so that it can start providing predictions or insights based on new data.
Model Monitoring and Maintenance: After deployment, the model should be continuously monitored to ensure it is performing as expected. Over time, as more data becomes available or as the environment changes, the model may need to be retrained or updated to maintain its accuracy and relevance.
For additional information on using AI Insights in Power BI, including Text Analytics and Vision functions, you can refer to the following URLs:
Please note that the URLs provided are for reference and additional information. They should not be explicitly mentioned in the study guide.