SC-400 Microsoft Information Protection Administrator Study Guide | Quill Learning

Implement information protection (25–30%)
Create and manage sensitive info types
Identifying Sensitive Information Requirements for an Organization’s Data
When addressing the sensitive information requirements for an organization’s data, it is crucial to understand the nature of sensitive information and the mechanisms available to protect it. Sensitive information can include a wide range of data types, such as financial records, personal identification numbers, health records, and more. The goal is to ensure that this data is adequately protected from unauthorized access or inadvertent disclosure.
Understanding Sensitive Information
Sensitive information is defined by data that, if exposed, could result in harm to an individual or the organization. Examples include:
- Credit card numbers
- Social security numbers
- Health records
- Bank account details
Regulatory Compliance
Organizations must comply with various business standards and industry regulations that dictate how sensitive information should be handled. Compliance requirements can vary depending on the industry and the type of data an organization processes.
Data Loss Prevention (DLP) Policies
DLP policies are a set of rules that help identify and protect sensitive information across an organization’s digital environment. These policies can be configured to:
- Identify sensitive information across multiple locations, such as Exchange Online, SharePoint Online, OneDrive, and Microsoft Teams. For instance, DLP policies can detect documents containing credit card numbers stored in any OneDrive site https://learn.microsoft.com/en-us/training/modules/respond-to-data-loss-prevention-alerts-microsoft-365/2-understand-data-loss-prevention-alerts .
- Prevent accidental sharing of sensitive information by blocking emails or access to documents that contain regulated data when shared with unauthorized parties https://learn.microsoft.com/en-us/training/modules/respond-to-data-loss-prevention-alerts-microsoft-365/2-understand-data-loss-prevention-alerts .
- Monitor and protect sensitive information in desktop versions of Office applications like Excel, PowerPoint, and Word, providing continuous monitoring when content is shared https://learn.microsoft.com/en-us/training/modules/respond-to-data-loss-prevention-alerts-microsoft-365/2-understand-data-loss-prevention-alerts .
- Educate users on compliance by sending email notifications and showing policy tips within the context of their workflow, allowing them to override the policy with a business justification if necessary https://learn.microsoft.com/en-us/training/modules/respond-to-data-loss-prevention-alerts-microsoft-365/2-understand-data-loss-prevention-alerts .
Insider Risk Management
Insider risk management policies can be integrated with DLP policies to identify potential data leaks. These policies are designed to trigger alerts when there is a high volume of sensitive information detected, reducing the noise from less significant events https://learn.microsoft.com/en-us/training/modules/m365-compliance-insider-manage-insider-risk/policies .
Sensitive Information Types
Microsoft Purview Compliance provides built-in sensitive information types, such as credit card numbers and bank accounts. These are defined by patterns that can be identified by regular expressions, functions, corroborative evidence like keywords, and checksums. Organizations can also create custom sensitive information types to match their specific data patterns https://learn.microsoft.com/en-us/training/modules/respond-to-data-loss-prevention-alerts-microsoft-365/2-understand-data-loss-prevention-alerts .
Vulnerability Management
Part of protecting sensitive information involves identifying and remediating endpoint weaknesses. Real-time discovery of vulnerabilities and misconfigurations is essential for hardening the endpoint surface area and increasing organizational resilience https://learn.microsoft.com/en-us/training/modules/use-threat-vulnerability-management-microsoft-defender-for-endpoint/2-understand-threat-vulnerability-management .
Compliance with Cloud Applications
Defender for Cloud Apps helps assess if cloud applications comply with regulations and industry standards. It enables organizations to compare app usage against compliance requirements, prevent data leaks to noncompliant apps, and limit access to regulated data https://learn.microsoft.com/en-us/training/modules/microsoft-cloud-app-security/cloud-app-security-framework .
For additional information on configuring DLP policies and understanding sensitive information types, you can refer to the following resources:
- Test a DLP policy https://learn.microsoft.com/en-us/training/modules/m365-compliance-insider-manage-insider-risk/policies
- Microsoft Purview Compliance https://learn.microsoft.com/en-us/training/modules/respond-to-data-loss-prevention-alerts-microsoft-365/2-understand-data-loss-prevention-alerts
By following these guidelines and utilizing the available tools, organizations can effectively identify sensitive information requirements and implement measures to protect their data.
Implement information protection (25–30%)
Create and manage sensitive info types
Translate Sensitive Information Requirements into Built-in or Custom Sensitive Info Types
Sensitive information types are essential components in data protection strategies, as they enable organizations to identify and secure various forms of sensitive data according to regulatory and business requirements. Microsoft Purview Compliance provides a robust set of tools to manage sensitive information effectively.
Built-in Sensitive Information Types
Microsoft Purview Compliance includes a variety of predefined sensitive information types, such as Credit Card Numbers and Bank Accounts. These built-in types are designed to detect specific patterns, like those found in financial or personally identifiable information (PII), using methods such as regular expressions, keywords, and checksums. The detection process also incorporates confidence levels and proximity checks to ensure accuracy https://learn.microsoft.com/en-us/training/modules/respond-to-data-loss-prevention-alerts-microsoft-365/2-understand-data-loss-prevention-alerts .
Custom Sensitive Information Types
In addition to the built-in types, organizations have the flexibility to define custom sensitive information types. This is particularly useful when dealing with unique data that is considered sensitive within the specific context of an organization. Custom types can be created to match specific patterns using regular expressions, a list of keywords, or by uploading a dictionary that contains the sensitive terms or codes unique to the organization https://learn.microsoft.com/en-us/training/modules/respond-to-data-loss-prevention-alerts-microsoft-365/2-understand-data-loss-prevention-alerts .
Implementation Steps
Identify Sensitive Data: Determine what data is considered sensitive within your organization. This could include types of information not covered by the built-in definitions, such as proprietary project codes or industry-specific identifiers.
Define Custom Types: Create custom sensitive information types by specifying the pattern that matches the sensitive data. This can be done by writing regular expressions, identifying relevant keywords, or uploading a dictionary file that contains the sensitive terms https://learn.microsoft.com/en-us/training/modules/respond-to-data-loss-prevention-alerts-microsoft-365/2-understand-data-loss-prevention-alerts .
Test and Refine: After defining the custom types, it is important to test them to ensure they accurately identify the sensitive information without generating too many false positives or negatives. Refine the definitions as necessary to improve accuracy https://learn.microsoft.com/en-us/training/modules/respond-to-data-loss-prevention-alerts-microsoft-365/2-understand-data-loss-prevention-alerts .
Deploy and Monitor: Once the custom types are defined and tested, deploy them within your data protection policies. Monitor the effectiveness of these types and adjust them as your organization’s data landscape or sensitivity requirements change.
Audit and Compliance: Utilize Microsoft 365’s audit log to track activities related to sensitive information types and ensure compliance with data protection policies. The unified audit log supports searching for activities across various Microsoft 365 services and features https://learn.microsoft.com/en-us/training/modules/investigate-threats-using-audit-in-microsoft-365-defender-microsoft-purview-standard/5-search-audit-log .
Policy Creation: Create policies, such as File policies in Microsoft Defender for Cloud Apps, to detect sensitive information in real-time and for data at rest. These policies can trigger alerts, change file access, quarantine files, and more, based on the detection of sensitive information https://learn.microsoft.com/en-us/training/modules/microsoft-cloud-app-security/classify-protect-sensitive-information .
By translating sensitive information requirements into built-in or custom sensitive info types, organizations can better protect their sensitive data and comply with various regulations and internal policies.
For additional information on creating and managing sensitive information types, you can refer to the following resources: - Create a custom sensitive information type in the Microsoft Purview compliance portal - Sensitive information type entity definitions - Learn about sensitive information types
Please note that the URLs provided are for reference purposes and should be accessed for further details on the implementation and management of sensitive information types within Microsoft Purview Compliance.
Implement information protection (25–30%)
Create and manage sensitive info types
Create and Manage Custom Sensitive Information Types
Sensitive information types are essential in identifying and protecting sensitive data across an organization’s digital environment. Microsoft Purview Compliance provides a robust set of built-in sensitive information types, such as Credit Card Numbers and Bank Accounts. However, organizations often have unique requirements that necessitate the creation of custom sensitive information types.
Defining Custom Sensitive Information Types
To create a custom sensitive information type, you can use the following components:
Regular Expressions (Regex): Craft a regex pattern that matches the specific format of the sensitive data you wish to identify. For example, you might create a regex to detect a particular format of employee IDs unique to your organization.
Keywords: Include keywords that are commonly found in proximity to the sensitive data. For instance, for a custom project code, you might include keywords like “project,” “code,” or “ID.”
Checksums: If applicable, use checksums to validate the format of the sensitive data. This is often used for data types that follow a specific checksum formula, like credit card numbers.
Confidence Levels and Proximity: Determine the confidence level required to identify a match and set the proximity between the regex match and the corroborative evidence (keywords or checksums).
Steps to Create a Custom Sensitive Information Type
Access the Compliance Portal: Navigate to the Microsoft Purview compliance portal.
Create a New Custom Type: Go to the section for sensitive information types and choose to create a new custom type.
Define the Pattern: Enter the regex pattern that will be used to detect the sensitive information.
Add Evidence: Include any additional corroborative evidence such as keywords or checksums.
Set Confidence Level and Proximity: Adjust the confidence level and proximity settings according to the desired accuracy for detection.
Test the Custom Type: Before deploying, test the custom sensitive information type with sample data to ensure it accurately identifies the sensitive information.
Deploy: Once tested, deploy the custom sensitive information type so it can be used across the organization’s compliance solutions, such as data loss prevention (DLP) policies.
For more detailed guidance on creating and managing custom sensitive information types, refer to the official documentation:
Remember, the creation and management of custom sensitive information types should be done with careful consideration of the organization’s privacy requirements and regulatory obligations. Proper testing and validation are crucial to ensure that sensitive data is accurately identified and protected.
Implement information protection (25–30%)
Create and manage sensitive info types
Create and Manage Exact Data Match (EDM) Classifiers
Exact Data Match (EDM) classifiers are a sophisticated tool used in data protection strategies to identify and classify sensitive information accurately. EDM classifiers allow organizations to define and detect exact matches of sensitive data, such as personal information, financial details, or confidential records, within their environment.
Definition and Configuration
To create an EDM classifier, you must first define the sensitive data you want to protect. This involves creating a schema that represents the structure of the sensitive data. The schema includes various fields that correspond to the elements of the data you’re looking to classify, such as names, social security numbers, or credit card information.
Once the schema is defined, you populate a reference table with the actual sensitive data you want to match against. This table is hashed to protect the sensitive information and then uploaded to the service where the EDM classifier is hosted.
Hashing and Uploading
The EDM process involves hashing the sensitive data in your reference table to ensure privacy and security. Hashing converts the data into a fixed-size string of characters, which is unique to the specific data input. This hashed data is then uploaded to the service, where it is used to match against content found in locations such as emails, documents, and other data repositories.
Classification and Rules
After uploading the hashed data, you create classification rules that use the EDM classifier. These rules determine the conditions under which content is considered a match to the sensitive data defined in your EDM schema. When content matches the EDM classifier’s criteria, it is flagged for review or subjected to the appropriate data protection policies.
Management and Updates
Managing EDM classifiers involves regularly updating the reference data to reflect any changes or additions to the sensitive information you are monitoring. It is also essential to review and refine the classification rules to maintain accuracy and reduce false positives or negatives.
Additional Information
For more detailed guidance on creating and managing EDM classifiers, you can refer to the official documentation provided by the service hosting the EDM classifiers. This documentation will offer step-by-step instructions, best practices, and troubleshooting tips to ensure effective implementation and management of your data protection strategy.
Please note that while URLs to additional information were requested, I am unable to provide them directly. However, you can find more information on the official Microsoft documentation website by searching for “Exact Data Match (EDM) classifiers” in the context of the service you are using for data protection.
By following these steps and guidelines, you can effectively create and manage EDM classifiers to enhance your organization’s data protection capabilities and ensure sensitive information is accurately identified and secured.
Implement information protection (25–30%)
Create and manage sensitive info types
Document fingerprinting is a data protection feature that allows organizations to identify and protect sensitive information across different documents. This feature is particularly useful for protecting types of information that are unique to an organization, such as forms, templates, or any document that contains a specific set of information.
Here’s a detailed explanation of how document fingerprinting works:
Creation of Document Fingerprint: An administrator creates a document fingerprint by using a sample document. The sample document should be a standard form or template that contains the sensitive information the organization wants to protect. For example, a sample document could be a completed form that contains personally identifiable information (PII).
Analysis of Content: The document fingerprinting technology analyzes the content of the sample document and identifies the structure and the type of information it contains. It does not create a fingerprint of the exact data but rather the information type, allowing it to detect any document that contains similar types of information.
Policy Application: Once the fingerprint is created, the organization can apply data loss prevention (DLP) policies to it. These policies can be configured to take specific actions when content matching the fingerprint is detected. For example, the policy could block the sharing of documents containing the fingerprinted information outside the organization or require that the documents be labeled and protected with Azure Information Protection https://learn.microsoft.com/en-us/training/modules/microsoft-cloud-app-security/conditional-access-app-control .
Detection and Protection: When a user attempts to share or move a document, the DLP system scans the content. If it matches the fingerprint, the DLP policy actions are triggered. This ensures that sensitive information is not accidentally or maliciously leaked outside of the organization’s controlled environment.
Continuous Monitoring: Document fingerprinting is not a one-time process. Organizations should continuously monitor and update their document fingerprints and DLP policies to adapt to changes in the types of sensitive information they need to protect.
For additional information on implementing document fingerprinting and data loss prevention, you can refer to the official Microsoft documentation on Azure Information Protection and DLP policies:
- Azure Information Protection: Azure Information Protection Documentation
- Data Loss Prevention Policies: Data Loss Prevention Policies Documentation
Please note that while document fingerprinting is a powerful tool for protecting sensitive information, it should be part of a broader data protection strategy that includes user training, access controls, and regular audits to ensure the effectiveness of the organization’s data protection efforts.
Implement information protection (25–30%)
Create and manage trainable classifiers
Identifying When to Use Trainable Classifiers
Trainable classifiers in Microsoft 365 are advanced tools that leverage machine learning to categorize content automatically. They are particularly useful when you need to:
Classify content that cannot be easily identified by metadata or keyword searches: Trainable classifiers are designed to recognize content based on patterns and are therefore well-suited for scenarios where content is too complex for simple rule-based classification.
Deal with large volumes of content: When you have a substantial amount of data to classify, trainable classifiers can process and categorize this data more efficiently than manual methods.
Ensure consistent classification across your organization: Trainable classifiers provide a standardized approach to classifying content, which helps maintain consistency across different departments and content repositories.
Protect sensitive information: Trainable classifiers can be used to identify and protect sensitive information types, such as personal identification numbers or financial records, by applying appropriate labels and protection actions.
Comply with regulations and policies: Organizations can use trainable classifiers to help ensure compliance with internal policies and external regulations by automatically enforcing rules for handling and storing different types of content.
Improve search and discovery: By classifying content accurately, trainable classifiers enhance the searchability and retrievability of information, making it easier for users to find what they need.
For more information on trainable classifiers and how to implement them, you can refer to the following resources:
- Overview of trainable classifiers
- Create a trainable classifier
- Apply a sensitivity label to content automatically
It’s important to note that while trainable classifiers are powerful, they require a period of training and testing to ensure they accurately reflect the content classification needs of your organization. During this training phase, you will need to provide examples of the content you want to classify so that the classifier can learn to identify similar content on its own.
Implement information protection (25–30%)
Create and manage trainable classifiers
Design and Create a Trainable Classifier
Trainable classifiers in Microsoft 365 allow organizations to categorize content across their environment automatically. These classifiers use machine learning to recognize various types of content by learning from examples provided by the organization. Here’s a step-by-step guide on how to design and create a trainable classifier:
Identify the Type of Content to Classify: Determine the type of content you want to classify. This could be a specific category of documents, emails, or other digital content that shares common characteristics.
Gather Sample Data: Collect a set of sample files that are representative of the content you wish to classify. You will need both positive examples (content that should be classified) and negative examples (content that should not be classified).
Create the Classifier in the Compliance Center: Go to the Microsoft 365 compliance center, navigate to the ‘Data classification’ section, and select ‘Trainable classifiers’. Here, you can create a new classifier by providing a name and description.
Train the Classifier: Upload the sample data to the classifier. The system will use this data to learn and identify the characteristics of the content you’re targeting. It’s important to provide high-quality, diverse examples to ensure accurate classification.
Test the Classifier: After training, test the classifier with a new set of content it hasn’t seen before. This will help you evaluate its accuracy and make any necessary adjustments.
Tune the Classifier: Based on the test results, you may need to provide additional examples or refine the existing ones to improve the classifier’s performance.
Deploy the Classifier: Once you’re satisfied with the classifier’s accuracy, deploy it across your organization’s content. The classifier will automatically categorize content as it’s created or modified.
Monitor and Retrain as Needed: Over time, the classifier may need to be retrained with new examples to maintain its accuracy, especially if the nature of the content changes or new types of content are introduced.
For additional information on creating and managing trainable classifiers, you can refer to the official Microsoft documentation:
- Learn about trainable classifiers
- Create a trainable classifier
- Test and tune a trainable classifier
By following these steps, you can effectively design and create a trainable classifier to help manage and protect your organization’s information.
Implement information protection (25–30%)
Create and manage trainable classifiers
Test a Trainable Classifier
When preparing to test a trainable classifier, it’s important to understand that trainable classifiers are machine learning models that categorize content into specific classifications. These classifiers can be trained to recognize various types of content based on examples you provide. To effectively test a trainable classifier, follow these general steps:
Training Phase: Before testing, you need to train the classifier with a set of sample documents that are representative of the category you want to classify. This set should include both positive examples (that are in the category) and negative examples (that are not in the category).
Testing Phase: After training, you should test the classifier with a new set of documents that were not used during the training phase. This helps to evaluate the classifier’s accuracy and its ability to generalize from the training data to new, unseen data.
Evaluation: Examine the results of the classification to determine the precision and recall. Precision measures how many of the documents classified into a category are relevant, while recall measures how many of the relevant documents were classified correctly.
Adjustment: Based on the evaluation, you may need to adjust the classifier by providing more training samples or by tweaking the classifier settings. This iterative process helps improve the classifier’s performance.
Final Validation: Once you are satisfied with the classifier’s performance, conduct a final validation with a separate set of documents to ensure that the classifier is ready for deployment.
For additional information on trainable classifiers and their testing, you can refer to the following resources:
Remember, the goal of testing a trainable classifier is to ensure that it accurately identifies and categorizes content according to your organization’s needs. Proper testing is crucial for the classifier to be effective when deployed in a live environment.
Implement information protection (25–30%)
Create and manage trainable classifiers
Retraining a Trainable Classifier
When working with trainable classifiers in Microsoft 365, it’s essential to understand that these classifiers rely on machine learning algorithms to categorize content. Over time, as the nature of the content changes or as the business requirements evolve, it may become necessary to retrain these classifiers to maintain their accuracy and effectiveness.
Retraining a trainable classifier involves the following steps:
Evaluation of Current Classifier Performance: Before retraining, assess the current performance of the classifier. This can be done by reviewing the classification results and checking for any misclassifications.
Collection of Additional Samples: Gather new samples that represent the current state of the content you want to classify. These samples should include both positive examples (content that should be classified under the category) and negative examples (content that should not be classified under the category).
Submission of Samples for Analysis: Submit the collected samples to the trainable classifier. This process involves uploading the examples to the appropriate location in the Microsoft 365 compliance center.
Classifier Retraining: Initiate the retraining process. The system will use the new samples to adjust the classifier’s model, improving its ability to correctly categorize content.
Review and Validation: After retraining, validate the classifier’s performance by reviewing the classification results on a new set of content. Ensure that the accuracy has improved and that the classifier is meeting the desired classification goals.
Continuous Monitoring and Retraining: Regularly monitor the classifier’s performance and retrain it with new samples as needed to adapt to any changes in content patterns or business requirements.
For additional information on trainable classifiers and the retraining process, you can refer to the following resources:
By following these steps and utilizing the provided resources, you can ensure that your trainable classifiers remain effective and accurate over time.
Implement information protection (25–30%)
Implement and manage sensitivity labels
Implementing Roles and Permissions for Administering Sensitivity Labels
When managing sensitivity labels in an organization, it is crucial to implement appropriate roles and permissions to ensure that the classification and protection of documents are handled correctly. Sensitivity labels are used to classify documents into categories such as public, private, or classified, and can have additional functionality applied, such as encryption https://learn.microsoft.com/en-us/training/modules/respond-to-data-loss-prevention-alerts-microsoft-365/2-understand-data-loss-prevention-alerts .
Roles for Content Explorer
The Content Explorer in Microsoft 365 compliance center is a tool that provides insights into items that have been labeled. There are two specific roles associated with the Content Explorer:
Content Explorer List Viewer: Individuals with this role can view each item and its location in a list format. This role is suitable for users who need to oversee the classification status of items but do not require access to the content of the items themselves. The data classification list viewer role is pre-assigned to this role group https://learn.microsoft.com/en-us/training/modules/m365-compliance-insider-manage-insider-risk/actions .
Content Explorer Content Viewer: This role allows users to view the contents of each item listed in the Content Explorer. It is essential for users who need to review the actual content of files and email messages associated with risk alerts. The data classification content viewer role is pre-assigned to this role group, enabling them to review copies of all individual files and email messages https://learn.microsoft.com/en-us/training/modules/m365-compliance-insider-manage-insider-risk/actions .
For more information on using the Content Explorer, you can refer to the Insider risk management content explorer documentation.
Access Control in App Configuration
In scenarios where App Configuration is used, access control is managed at the store level. Separate stores should be used for each environment that requires distinct permissions, providing the best security isolation. However, if security isolation between environments is not a necessity, labels can be used to differentiate between configurations for various environments. A complete example of using labels for different configurations can be found in the guide on how to use labels in ASP.NET Core https://learn.microsoft.com/en-us/azure/azure-app-configuration/faq .
Azure and Log Analytics Roles
For broader access control, Azure and Log Analytics roles can be used:
- Azure Roles: These roles grant access across all Azure resources, including Log Analytics workspaces and Microsoft Sentinel resources. They include:
- Log Analytics Roles: These roles grant access
across all Log Analytics workspaces and include:
- Log Analytics Contributor
- Log Analytics Reader https://learn.microsoft.com/en-us/training/modules/create-manage-azure-sentinel-workspaces/5-understand-azure-sentinel-permissions-roles
It is important to assign roles carefully to ensure that users have the necessary permissions without overextending their access. For instance, a user with the Microsoft Sentinel Reader and Azure Contributor roles can edit data in Microsoft Sentinel. To restrict permissions to Microsoft Sentinel only, prior permissions that are not needed should be removed https://learn.microsoft.com/en-us/training/modules/create-manage-azure-sentinel-workspaces/5-understand-azure-sentinel-permissions-roles .
Additional Permissions
In the context of security and compliance, other permissions may include managing incidents, automated investigations, actions, and submissions in the Microsoft 365 Defender portal. Users may also need to identify threats using Kusto Query Language (KQL), analyze threat analytics, and configure custom detections and alerts https://learn.microsoft.com/en-us/credentials/certifications/resources/study-guides/sc-200 .
By carefully assigning roles and permissions, organizations can effectively administer sensitivity labels and protect sensitive information. It is essential to understand the scope of each role and permission to maintain a secure and compliant environment.
Implement information protection (25–30%)
Implement and manage sensitivity labels
Define and Create Sensitivity Labels
Sensitivity labels are a critical component of an organization’s information protection strategy. They allow the classification of documents and emails according to the content’s sensitivity. These labels can carry names like “Public,” “Private,” or “Classified,” and they enable the application of protection actions such as encryption and access restrictions https://learn.microsoft.com/en-us/training/modules/respond-to-data-loss-prevention-alerts-microsoft-365/2-understand-data-loss-prevention-alerts .
How to Define Sensitivity Labels
To define sensitivity labels, you need to consider the types of information that are handled within your organization and the level of protection each type requires. Common labels include:
- Public: Information that can be shared openly.
- General: Information that is not sensitive but is intended for internal use only.
- Confidential: Information that could cause damage to the organization if disclosed.
- Highly Confidential: Information that could cause severe damage if disclosed.
Each label should have a clear definition and guidelines for use so that users can apply them correctly.
How to Create Sensitivity Labels
Creating sensitivity labels involves the following steps:
Access the Compliance Center: Navigate to the Microsoft Purview compliance portal to begin the process of creating sensitivity labels.
Label Configuration: Start by configuring the label with a name, tooltip, and description to help users understand when to apply it.
Protection Settings: Choose the protection settings for the label, such as encryption and content marking. You can also define conditions for auto-labeling.
Publish the Label: Once the label is configured, you need to publish it by creating a label policy. This policy determines who the label applies to and how it is deployed to users and documents.
Monitor and Adjust: After publishing, monitor the use of the label and adjust the settings as necessary to ensure it meets the organization’s needs.
For additional guidance on creating and managing sensitivity labels, you can refer to the following resources:
By defining and creating sensitivity labels, organizations can ensure that sensitive information is handled appropriately, reducing the risk of data breaches and compliance issues.
Implement information protection (25–30%)
Implement and manage sensitivity labels
Configure and Manage Sensitivity Label Policies
Sensitivity labels are a critical component of an organization’s information protection strategy within Microsoft 365. They allow for the classification and protection of documents and emails by applying labels such as “public,” “private,” or “classified.” These labels can enforce protective actions like encryption and access restrictions https://learn.microsoft.com/en-us/training/modules/respond-to-data-loss-prevention-alerts-microsoft-365/2-understand-data-loss-prevention-alerts .
Step 1: Understanding Sensitivity Labels
Sensitivity labels specify the classification level of a document or email, which can be applied manually by the user or automatically based on sensitive information types https://learn.microsoft.com/en-us/training/modules/respond-to-data-loss-prevention-alerts-microsoft-365/2-understand-data-loss-prevention-alerts . Labels can be configured to apply different types of protection, such as encryption, content marking, and access restrictions.
Step 2: Creating Sensitivity Labels
To create sensitivity labels, you need to access the Microsoft Purview compliance portal. Once there, you can define labels and configure their settings, such as the label name, description, and protection settings like encryption and content marking.
Step 3: Publishing Sensitivity Labels
After creating sensitivity labels, you need to publish them by creating a sensitivity label policy. This policy determines who in your organization will see the labels and what content the labels can be applied to. You can select groups or users and define settings such as auto-labeling policies.
Step 4: Applying Sensitivity Labels
Once published, sensitivity labels can be applied to documents and emails. Users can apply labels manually, or administrators can set up rules for automatic labeling based on content detection.
Step 5: Monitoring and Adjusting Policies
It’s important to monitor the use of sensitivity labels to ensure they are being applied correctly and to adjust the policies as necessary. The Content Explorer in the insider risk management solution can be used to review how sensitivity labels are being used across the organization.
Additional Resources
For more detailed guidance on configuring and managing sensitivity label policies, you can refer to the following resources: - Learn about sensitivity labels - Create and manage sensitivity labels - Publish sensitivity labels by creating a label policy - Configure auto-labeling policies for sensitivity labels
By following these steps and utilizing the provided resources, you can effectively configure and manage sensitivity label policies to protect sensitive information within your organization.
Implement information protection (25–30%)
Implement and manage sensitivity labels
Configure Auto-Labeling Policies for Sensitivity Labels
Sensitivity labels are a critical component of an organization’s data protection strategy. They allow for the classification of documents and emails with labels such as “public,” “private,” or “classified.” Once a sensitivity label is applied, additional protections, such as encryption, can be enforced on the document or email https://learn.microsoft.com/en-us/training/modules/respond-to-data-loss-prevention-alerts-microsoft-365/2-understand-data-loss-prevention-alerts .
Auto-Labeling Policies
Auto-labeling policies enable organizations to automatically apply sensitivity labels to content that matches certain conditions. This ensures that sensitive information is consistently and accurately labeled without relying on user intervention. Here’s how to configure auto-labeling policies for sensitivity labels:
Identify Sensitive Information Types: Determine the types of sensitive information that require labeling within your organization. This could include financial data, personal identification numbers, or confidential project details.
Create Sensitivity Labels: Define sensitivity labels that correspond to the different levels of sensitivity in your organization. Each label should have a clear name and description to help users understand when to apply it.
Define Auto-Labeling Conditions: Specify the conditions under which a sensitivity label should be automatically applied. This could be based on the presence of certain keywords, content that matches a sensitive information type, or other criteria.
Configure Auto-Labeling Rules: In the Microsoft Purview compliance portal, create auto-labeling rules that apply the appropriate sensitivity labels to content that meets the defined conditions. You can set these rules to run across locations such as SharePoint Online, Exchange Online, and OneDrive for Business.
Test and Refine Policies: Before fully implementing auto-labeling policies, test them to ensure they accurately label content. Refine the policies as needed based on the test results.
Deploy Policies: Once you are satisfied with the policy configuration, deploy the policies to automatically label content across your organization.
Monitor and Review: Regularly monitor the effectiveness of your auto-labeling policies and review them to ensure they continue to meet your organization’s data protection needs.
For additional information on configuring auto-labeling policies for sensitivity labels, you can refer to the following resources:
By setting up auto-labeling policies, organizations can enhance their data governance and compliance posture, ensuring that sensitive information is adequately protected at all times.
Implement information protection (25–30%)
Implement and manage sensitivity labels
Monitoring Data Classification and Label Usage
Monitoring data classification and label usage is an essential aspect of data governance and compliance. Tools like Content Explorer, Activity Explorer, and Audit Search are instrumental in achieving this. Below is a detailed explanation of how each tool contributes to monitoring efforts:
Content Explorer
Content Explorer is a feature that provides visibility into items that have been classified within your organization. It allows users with specific roles to view and manage sensitive information effectively.
- Roles and Access:
- The Content Explorer List viewer role enables users to see items and their locations in a list view. This role is pre-assigned to the data classification list viewer role group https://learn.microsoft.com/en-us/training/modules/m365-compliance-insider-manage-insider-risk/actions .
- The Content Explorer Content viewer role allows users to view the contents of each item. This role is pre-assigned to the data classification content viewer role group, enabling the review of individual files and email messages associated with risk alerts https://learn.microsoft.com/en-us/training/modules/m365-compliance-insider-manage-insider-risk/actions .
- Functionality:
- Content Explorer provides a snapshot of items with sensitivity labels, retention labels, or classified as sensitive information types https://learn.microsoft.com/en-us/training/modules/m365-compliance-insider-manage-insider-risk/actions .
- It includes advanced search and filtering features to help users locate and manage sensitive content effectively https://learn.microsoft.com/en-us/training/modules/m365-compliance-insider-manage-insider-risk/actions .
- Use Case Example:
- If an alert is triggered by an employee downloading a large number of files to a USB device, Content Explorer can be used to review the downloaded files associated with the alert https://learn.microsoft.com/en-us/training/modules/m365-compliance-insider-manage-insider-risk/actions .
- Additional Information:
- For more details on using Content Explorer, refer to the Insider risk management content explorer documentation.
Activity Explorer
While Activity Explorer is not explicitly mentioned in the provided documents, it is generally used to track and investigate activities related to labeled content. It offers insights into user interactions with sensitive data, such as when and how users access labeled documents or emails.
Audit Search
Audit Search is a tool that allows administrators to perform an audit log search to investigate specific activities or events. It is useful for compliance and forensic purposes, as it can track user actions across various services.
- Functionality:
- Audit Search can be used to track access to sensitive information, modifications to data protection policies, and other related events that might impact data governance https://learn.microsoft.com/en-us/training/modules/m365-compliance-insider-manage-insider-risk/actions .
- Use Case Example:
- Administrators can use Audit Search to investigate incidents where data classification policies might have been violated or to ensure that sensitive information is being handled according to organizational policies https://learn.microsoft.com/en-us/training/modules/m365-compliance-insider-manage-insider-risk/actions .
Conclusion
By utilizing Content Explorer, Activity Explorer, and Audit Search, organizations can effectively monitor data classification and label usage. These tools provide the necessary oversight to maintain compliance with data protection regulations and to safeguard sensitive information.
For instructors creating exam preparation materials, it is important to emphasize the roles and capabilities of these tools in maintaining data governance and compliance within an organization.
Implement information protection (25–30%)
Implement and manage sensitivity labels
Apply Bulk Classification to On-Premises Data Using the Microsoft Purview Information Protection Scanner
When managing sensitive information within an organization, it is crucial to ensure that data is properly classified. Microsoft Purview Information Protection (formerly Azure Information Protection) provides a scanner that can be used to classify and optionally protect documents across on-premises repositories like File Servers and on-premises SharePoint servers.
Key Features of the Microsoft Purview Information Protection Scanner:
- Automated Discovery: The scanner can automatically discover sensitive data stored on-premises by scanning file systems and SharePoint sites https://learn.microsoft.com/security/benchmark/azure/baselines/application-gateway-security-baseline .
- Bulk Classification: Once the data is discovered, the scanner can apply classification in bulk, labeling files according to the organization’s classification taxonomy.
- Persistent Protection: After classification, the scanner can apply protection to the files using Azure Rights Management Services (Azure RMS), ensuring that the data remains protected both at rest and in transit.
- Central Management: The scanner is managed centrally through the Microsoft Purview compliance portal, allowing for consistent policy application across the organization https://learn.microsoft.com/en-us/training/modules/mitigate-incidents-microsoft-365-defender/2-use-microsoft-security-center-portal .
- Reporting and Monitoring: Administrators can use reports to monitor label usage and identify sensitive information that should be protected https://learn.microsoft.com/en-us/training/modules/mitigate-incidents-microsoft-365-defender/2-use-microsoft-security-center-portal .
Configuration Steps:
- Install the Scanner: Deploy the Microsoft Purview Information Protection scanner on a Windows Server machine that has access to the on-premises data stores you want to scan https://learn.microsoft.com/security/benchmark/azure/baselines/application-gateway-security-baseline .
- Configure Policies: Define the classification policies in the Microsoft Purview compliance portal, specifying the conditions under which certain types of information should be classified and protected https://learn.microsoft.com/en-us/training/modules/mitigate-incidents-microsoft-365-defender/2-use-microsoft-security-center-portal .
- Run the Scanner: Execute the scanner to analyze files across your on-premises repositories. The scanner will identify sensitive information based on the policies and apply the appropriate classification labels.
- Review and Refine: Monitor the scanner’s actions through the reports available in the compliance portal. Refine your classification policies as needed to ensure accurate and effective data protection https://learn.microsoft.com/en-us/training/modules/mitigate-incidents-microsoft-365-defender/2-use-microsoft-security-center-portal .
For additional information on configuring and using the Microsoft Purview Information Protection scanner, you can refer to the following resources:
- Microsoft Purview compliance portal: Manage your compliance needs across Microsoft 365 services using integrated solutions for information governance, classification, case management, and more https://learn.microsoft.com/en-us/training/modules/mitigate-incidents-microsoft-365-defender/2-use-microsoft-security-center-portal .
- Azure Information Protection: Configure and manage the Azure Information Protection client and scanner to automatically classify and protect your organization’s email and documents https://learn.microsoft.com/en-us/training/modules/mitigate-incidents-microsoft-365-defender/2-use-microsoft-security-center-portal .
By implementing the Microsoft Purview Information Protection scanner, organizations can significantly enhance their data governance and compliance posture, ensuring that sensitive information is consistently and accurately classified and protected across their on-premises environments.
Implement information protection (25–30%)
Implement and manage sensitivity labels
Manage Protection Settings and Marking for Applied Sensitivity Labels
Sensitivity labels are a critical component of an organization’s information protection strategy. They enable the classification and protection of documents and emails by applying labels such as “public,” “private,” or “classified.” Once a sensitivity label is applied, additional protection settings can be enforced, such as encryption and content marking https://learn.microsoft.com/en-us/training/modules/respond-to-data-loss-prevention-alerts-microsoft-365/2-understand-data-loss-prevention-alerts .
Protection Settings
When a sensitivity label is applied to a document or email, it can enforce protection actions like:
- Encryption: This ensures that only authorized users can access the content. The encryption travels with the content, even when it’s shared outside the organization.
- Content marking: Labels can automatically apply headers, footers, or watermarks to documents. These markings can include the label name, the user who labeled the document, and the date of labeling.
Applying Sensitivity Labels
Sensitivity labels can be applied in two ways:
- Manually by the user: Users can select the appropriate label based on the content’s sensitivity.
- Automatically based on sensitive info types: Labels can be automatically applied by configuring policies that detect sensitive information types within the content https://learn.microsoft.com/en-us/training/modules/respond-to-data-loss-prevention-alerts-microsoft-365/2-understand-data-loss-prevention-alerts .
Content Explorer
The Content Explorer is a tool within the Microsoft Purview compliance portal that provides insights into labeled content. It has two levels of access:
- Content Explorer List viewer: Allows viewing of items and their locations in a list view.
- Content Explorer Content viewer: Allows viewing the contents of each item in the list, which is essential for reviewing files and email messages associated with risk alerts https://learn.microsoft.com/en-us/training/modules/m365-compliance-insider-manage-insider-risk/actions .
For more information on using the Content Explorer, you can refer to the Insider risk management content explorer https://learn.microsoft.com/en-us/training/modules/m365-compliance-insider-manage-insider-risk/actions .
Insider Risk Management Policies
To ensure that activities triggering alerts are monitored, insider risk management policies can be configured. These policies can be set up to apply sensitivity labels based on:
- The location of the content.
- The sensitive information included.
- The sensitivity labels applied.
For creating and managing insider risk management policies, you can visit Create an insider risk policy https://learn.microsoft.com/en-us/training/modules/m365-compliance-insider-manage-insider-risk/policies .
Audit Logs
Microsoft 365 supports an audit log that records activities across
various services. For activities related to sensitivity labels, the
audit log records actions such as label application, access, and
encryption under record types like SensitivityLabelAction
and SensitivityLabeledFileAction https://learn.microsoft.com/en-us/training/modules/investigate-threats-using-audit-in-microsoft-365-defender-microsoft-purview-standard/5-search-audit-log
.
For a comprehensive list of auditing record types and how to search the audit log, you can explore the Office 365 Management Activity API schema https://learn.microsoft.com/en-us/training/modules/investigate-threats-using-audit-in-microsoft-365-defender-microsoft-purview-standard/5-search-audit-log .
Integration with Azure Information Protection
Azure Information Protection (AIP) can be integrated with Microsoft Defender for Cloud Apps to automatically scan and classify new files based on AIP classification labels. This integration enhances the protection of very sensitive data https://learn.microsoft.com/en-us/training/modules/microsoft-cloud-app-security/classify-protect-sensitive-information .
For enabling Azure Information Protection integration and managing sensitive information classification, you can refer to the settings in Microsoft Defender for Cloud Apps https://learn.microsoft.com/en-us/training/modules/microsoft-cloud-app-security/classify-protect-sensitive-information .
By understanding and managing these protection settings and markings for applied sensitivity labels, organizations can significantly enhance the security and compliance of their sensitive data.
Implement information protection (25–30%)
Design and implement encryption for email messages
Designing an Email Encryption Solution in Microsoft 365
When designing an email encryption solution in Microsoft 365, it is essential to consider the various methods available to ensure that emails are securely transmitted and stored. Microsoft 365 provides several encryption options that can be tailored to meet the specific needs of an organization. Below are the key components and steps to design an effective email encryption solution:
1. Understand Microsoft 365 Encryption Options
Microsoft 365 offers different encryption technologies, including Office 365 Message Encryption (OME), S/MIME, and Information Rights Management (IRM). Each method has its use cases and requirements.
Office 365 Message Encryption (OME): OME allows users to send encrypted emails to any email address, including Outlook.com, Yahoo, Gmail, and others. Recipients can read the encrypted message through a web interface or by using a one-time passcode.
S/MIME (Secure/Multipurpose Internet Mail Extensions): S/MIME provides message signing and encryption, enabling users to verify the sender’s identity and ensure that the message has not been tampered with during transit.
Information Rights Management (IRM): IRM uses Azure Rights Management Services (Azure RMS) to help prevent sensitive information from being printed, forwarded, or copied by unauthorized people.
2. Assess Organizational Requirements
Before implementing an encryption solution, assess the organization’s regulatory compliance needs, the sensitivity of the data being communicated, and the level of control required over email messages.
3. Configure Email Encryption
Based on the assessment, configure the appropriate encryption method. For OME, set up mail flow rules in the Exchange admin center to automatically encrypt outgoing emails based on specific conditions, such as the presence of sensitive information.
4. Set Up Encryption Policies
Define encryption policies that dictate when and how emails should be encrypted. Policies can be based on the content of the email, the sender, the recipient, or other criteria.
5. Educate Users
Train users on how to use encryption in their email communications. Provide guidance on when to encrypt emails and how to use the encryption features provided by Microsoft 365.
6. Monitor and Report
Implement monitoring to track the use of email encryption and generate reports to ensure that the encryption policies are being followed.
Additional Resources
For more detailed information on configuring and using these encryption methods, refer to the following resources:
- Office 365 Message Encryption
- Set up new Office 365 Message Encryption capabilities
- Information Rights Management in Exchange Online
- Configure S/MIME for Outlook Web App
By following these steps and utilizing the resources provided, organizations can design a robust email encryption solution that protects sensitive information and meets compliance requirements within Microsoft 365.
Implement information protection (25–30%)
Design and implement encryption for email messages
Implementing Microsoft Purview Message Encryption
Microsoft Purview Message Encryption is a feature that enables organizations to send and receive encrypted email messages. It helps protect sensitive information from being read by anyone other than the intended recipients. Here’s a detailed explanation of how to implement Microsoft Purview Message Encryption:
- Set Up Microsoft Purview Message Encryption:
- To begin using Microsoft Purview Message Encryption, you must have an Office 365 subscription that includes Microsoft Purview (formerly Microsoft 365 compliance).
- Ensure that Azure Rights Management is activated for your organization as it is required for Microsoft Purview Message Encryption.
- Define Mail Flow Rules:
- Create mail flow rules (also known as transport rules) in the Exchange admin center to automatically apply message encryption based on specific conditions.
- Conditions can include the presence of sensitive information, message recipient, or other criteria relevant to your organization’s policies.
- Configure Email Templates:
- Customize the email viewing portal to match your organization’s branding. This portal is where recipients without native encryption support view encrypted messages.
- Create email templates for encrypted messages and denial of access notifications to provide clear communication to message recipients.
- Educate Users:
- Train your users on how to send encrypted emails manually. Users can apply encryption by including specific keywords in the subject line or by selecting the “Encrypt” option in Outlook.
- Inform users about how to read and reply to encrypted messages, especially when communicating with external recipients.
- Monitor and Report:
- Use reporting features in the Microsoft Purview compliance portal to monitor the use of message encryption across your organization.
- Regularly review the effectiveness of your mail flow rules and adjust them as necessary to ensure that sensitive information is adequately protected.
- Review and Compliance:
- Ensure that your use of Microsoft Purview Message Encryption complies with regulatory requirements and industry standards for data protection.
- Regularly audit and review access to encrypted messages to prevent unauthorized use and to maintain compliance with data protection policies.
For additional information on setting up and managing Microsoft Purview Message Encryption, you can refer to the following resources:
- Office 365 Message Encryption (OME)
- Set up new Office 365 Message Encryption capabilities
- Define mail flow rules to encrypt email messages in Office 365
By following these steps and utilizing the provided resources, you can effectively implement Microsoft Purview Message Encryption to secure your organization’s email communications.
Implement information protection (25–30%)
Design and implement encryption for email messages
Implementing Microsoft Purview Advanced Message Encryption
Microsoft Purview Advanced Message Encryption, part of the Microsoft Purview compliance solutions, enhances the security of sensitive information transmitted via email. It allows organizations to maintain control over their email messages even after they have been sent outside the organization. Here’s a detailed explanation of how to implement this feature:
- Set Up Advanced Message Encryption:
- To begin using Advanced Message Encryption, an organization must have the appropriate Microsoft 365 subscription that includes this feature.
- The setup process involves configuring encryption policies in the Microsoft Purview compliance portal.
- Create Encryption Policies:
- Navigate to the Microsoft Purview compliance portal and access the ‘Information protection’ section.
- Within this section, administrators can define encryption rules and conditions that trigger encryption automatically. For example, they can set up a policy to encrypt all messages containing specific sensitive information types or messages directed to certain external domains.
- Define Email Templates:
- Advanced Message Encryption allows the customization of email templates that recipients see when they receive an encrypted message. This customization can include branding elements such as company logos and color schemes to provide a consistent user experience.
- These templates are used for encrypted messages and revocation messages when access to a previously sent email needs to be rescinded.
- Revoke Messages:
- One of the key features of Advanced Message Encryption is the ability to revoke sent messages. This means that if an email is sent in error or contains sensitive information that should no longer be accessible, the sender can revoke the email, rendering it unreadable by the recipient.
- The revocation process is managed through the Microsoft Purview compliance portal, where administrators can track and manage encrypted emails.
- Monitor and Audit:
- Organizations can monitor the use of Advanced Message Encryption through audit logs and reporting features available in the Microsoft Purview compliance portal.
- These tools provide insights into how encryption is being used, help identify potential compliance issues, and support forensic investigations if needed.
For additional information on implementing Microsoft Purview Advanced Message Encryption, you can refer to the following resources:
- Overview of Microsoft Purview Advanced Message Encryption
- Set up new Office 365 Message Encryption capabilities
- Define mail flow rules to encrypt email messages in Office 365
By following these steps and utilizing the resources provided, organizations can effectively implement Microsoft Purview Advanced Message Encryption to enhance the security and compliance of their email communications.
Implement DLP (15–20%)
Create and configure DLP policies
Designing Data Loss Prevention (DLP) Policies Based on an Organization’s Requirements
When designing Data Loss Prevention (DLP) policies, it is crucial to align the policies with the specific needs and requirements of the organization. The following steps outline the process of creating effective DLP policies:
Identify Sensitive Information: Determine what constitutes sensitive information within the organization. This could include financial data, personal information such as credit card numbers, social security numbers, or health records https://learn.microsoft.com/en-us/training/modules/respond-to-data-loss-prevention-alerts-microsoft-365/2-understand-data-loss-prevention-alerts .
Scope of Protection: Decide where to look for this information. DLP policies can be applied across various locations such as Exchange Online, SharePoint Online, OneDrive, and Microsoft Teams. For instance, you might want to identify any document containing a credit card number stored in any OneDrive site or monitor just the OneDrive sites of specific individuals https://learn.microsoft.com/en-us/training/modules/respond-to-data-loss-prevention-alerts-microsoft-365/2-understand-data-loss-prevention-alerts .
Define Policy Rules: Establish the rules that will trigger alerts or actions when sensitive information is detected. This includes setting conditions such as the volume of sensitive information (e.g., an alert will fire if a policy detects 10 or more credit card numbers in an email or document) https://learn.microsoft.com/en-us/training/modules/m365-compliance-insider-manage-insider-risk/policies .
Prevent Accidental Sharing: Implement measures to prevent the inadvertent disclosure of sensitive information. For example, automatically block access to a document containing health records that is shared with people outside the organization, or prevent an email containing sensitive information from being sent https://learn.microsoft.com/en-us/training/modules/respond-to-data-loss-prevention-alerts-microsoft-365/2-understand-data-loss-prevention-alerts .
User Education and Compliance: Help users understand DLP policies and how to comply with them without interrupting their workflow. Policy tips can be used to educate users when they attempt to share sensitive information, and these can be configured to allow overrides with a business justification https://learn.microsoft.com/en-us/training/modules/respond-to-data-loss-prevention-alerts-microsoft-365/2-understand-data-loss-prevention-alerts .
Continuous Monitoring: Ensure that DLP policies provide continuous monitoring of sensitive information, even in desktop versions of Office applications like Excel, PowerPoint, and Word https://learn.microsoft.com/en-us/training/modules/respond-to-data-loss-prevention-alerts-microsoft-365/2-understand-data-loss-prevention-alerts .
Alerts and Reports: Set up alerts to notify the appropriate personnel when sensitive information is shared in violation of DLP policies. Additionally, generate reports to provide insights into the content that matches the organization’s DLP policies https://learn.microsoft.com/en-us/training/modules/respond-to-data-loss-prevention-alerts-microsoft-365/2-understand-data-loss-prevention-alerts .
Integration with Insider Risk Management: Consider integrating DLP policies with insider risk management policies to help identify and manage the risk of sensitive information being exposed by insiders. This integration can drive alert indicators for sensitive information and is an important part of full risk management coverage https://learn.microsoft.com/en-us/training/modules/m365-compliance-insider-manage-insider-risk/policies .
Compliance Scans and eDiscovery: Utilize tools like Microsoft Defender for Cloud Apps to perform continuous compliance scans and support legal eDiscovery tasks. This can monitor any file type based on metadata filters https://learn.microsoft.com/en-us/training/modules/respond-to-data-loss-prevention-alerts-microsoft-365/2-understand-data-loss-prevention-alerts .
Security Posture Strengthening: Use tools provided by Defender for Cloud to manage and enforce security policies, ensuring compliance across Azure virtual machines, non-Azure servers, and Azure PaaS services https://learn.microsoft.com/en-us/training/modules/what-is-azure-defender/3-understand-azure-secure-center .
For additional information on configuring DLP policies, you can refer to the Test a DLP policy topic.
By following these steps and tailoring the DLP policies to the organization’s specific needs, you can help protect sensitive information and maintain compliance with business standards and industry regulations.
Implement DLP (15–20%)
Create and configure DLP policies
Configure Permissions for Data Loss Prevention (DLP)
When configuring permissions for Data Loss Prevention (DLP) in Microsoft 365, it is essential to understand the roles and responsibilities associated with DLP management. DLP policies help identify, monitor, and automatically protect sensitive information across various Microsoft services, including Teams, SharePoint Online, OneDrive, and Microsoft Defender for Cloud Apps https://learn.microsoft.com/en-us/credentials/certifications/resources/study-guides/sc-200 https://learn.microsoft.com/en-us/training/modules/respond-to-data-loss-prevention-alerts-microsoft-365/6-summary-resources https://learn.microsoft.com/en-us/training/modules/respond-to-data-loss-prevention-alerts-microsoft-365/4-investigate-data-loss-prevention-alerts-microsoft-cloud-app-security .
Roles and Permissions
To manage DLP policies effectively, certain roles and permissions must be assigned to the appropriate personnel within your organization. Here are the key roles involved in DLP management:
- Global Administrator: Has overall access to all administrative features in Microsoft 365, including the ability to manage DLP policies.
- Compliance Administrator: Can manage compliance features within the Microsoft 365 compliance center, including DLP policies.
- Security Administrator: Responsible for managing security features, including DLP policies.
- DLP Compliance Management: A role group specifically for managing DLP policies without broader administrative permissions.
Steps to Configure Permissions
Assign Roles: Determine which individuals or teams in your organization will be responsible for DLP policy management. Assign them to the appropriate role group using the Microsoft 365 admin center or the compliance center.
Access DLP Features: Once assigned, users can access DLP features through the Microsoft 365 compliance center. Navigate to the ‘Data loss prevention’ section to create, modify, or delete DLP policies.
Create DLP Policies: Use the policy creation wizard to define what constitutes sensitive information, set conditions for when the policy should apply, and specify actions to be taken when a match is found.
Investigate DLP Alerts: Monitor and investigate DLP alerts that may indicate potential data leaks or policy violations. Alerts can be managed and investigated through the Microsoft 365 compliance center or Defender for Cloud Apps https://learn.microsoft.com/en-us/training/modules/respond-to-data-loss-prevention-alerts-microsoft-365/6-summary-resources https://learn.microsoft.com/en-us/training/modules/respond-to-data-loss-prevention-alerts-microsoft-365/4-investigate-data-loss-prevention-alerts-microsoft-cloud-app-security .
Review and Remediate: Evaluate the nature of each alert and determine the appropriate response. This may involve modifying the policy, providing additional user training, or taking corrective actions to secure the data.
Additional Resources
For more detailed guidance on configuring DLP permissions and policies, you can refer to the following resources:
- Microsoft 365 compliance center: A central location for managing DLP policies and other compliance-related features.
- Defender for Cloud Apps: Provides visibility and control over data across various cloud services, including DLP capabilities https://learn.microsoft.com/en-us/training/modules/microsoft-cloud-app-security/cloud-app-security-framework .
- Azure Policy Regulatory Compliance: Offers insights into how Azure policies map to compliance standards, which can be relevant when configuring DLP in Azure environments https://learn.microsoft.com/en-us/azure/azure-app-configuration/security-controls-policy .
By following these steps and utilizing the available resources, you can effectively configure permissions for DLP in Microsoft 365 to protect sensitive information and maintain compliance with organizational policies and regulations.
Implement DLP (15–20%)
Create and configure DLP policies
Create and Manage DLP Policies
Data Loss Prevention (DLP) policies in Microsoft 365 are essential tools for protecting sensitive information from being shared inappropriately. These policies help organizations to identify, monitor, and automatically protect sensitive information across various Microsoft services such as Teams, SharePoint Online, OneDrive, and Microsoft Defender for Cloud Apps.
Creating DLP Policies
To create a DLP policy, you would typically follow these steps:
- Navigate to the Microsoft Purview compliance portal at Microsoft Purview compliance portal.
- Under the “Solutions” section in the left menu pane, select Data loss prevention.
- Click on + Create policy to start the policy creation wizard.
- Choose the type of information you want to protect, such as financial, medical, or custom sensitive information types.
- Define the locations where the policy will apply, like Exchange email, SharePoint sites, OneDrive accounts, or Microsoft Teams.
- Customize the policy settings, including conditions and actions to be taken when sensitive information is detected.
- Review and finalize the policy settings, then save the policy to enable it.
Managing DLP Policies
Once a DLP policy is created, it’s important to manage and refine it to ensure it’s effectively protecting sensitive information:
- Monitor DLP alerts by selecting the Alerts tab in the DLP section of the compliance portal. Here you can view and filter alerts generated by your DLP policies.
- Investigate specific alerts to understand the context and determine if the policy is working as intended or if it needs adjustment.
- Adjust policy settings based on the investigation findings to reduce false positives or to cover additional scenarios.
- Use the Events tab within an alert to view all associated events and their details.
- Manage the alert by changing its status (Active, Investigating, Dismissed, or Resolved) and add comments or assign the alert to a team member.
- Review the Sensitive Info Types tab for details about the detected sensitive information, including confidence levels and occurrence counts.
- Utilize the Management log to track the history of actions taken on an alert.
Insider Risk Management
DLP policies can also be integrated with insider risk management policies to identify and manage the risks of sensitive information exposure. When setting up an insider risk management policy with the Data leaks template, you must assign a specific DLP policy to drive the alert indicators for sensitive information https://learn.microsoft.com/en-us/training/modules/m365-compliance-insider-manage-insider-risk/policies .
Note: To minimize unnecessary alerts, DLP policies can be configured to trigger alerts only when a significant volume of sensitive information is detected, such as 10 or more credit card numbers in an email or document https://learn.microsoft.com/en-us/training/modules/m365-compliance-insider-manage-insider-risk/policies .
For more detailed guidance on creating and managing DLP policies, refer to the following resources:
- Data loss prevention (DLP) in Microsoft 365
- Create, test, and tune a DLP policy
- Respond to DLP alerts in Microsoft 365
- Test a DLP policy
By following these guidelines, you can ensure that your organization’s sensitive information is adequately protected by DLP policies within the Microsoft 365 ecosystem.
Implement DLP (15–20%)
Create and configure DLP policies
Interpretation of Policy and Rule Precedence in Data Loss Prevention (DLP)
When dealing with Data Loss Prevention (DLP) within Microsoft 365, understanding policy and rule precedence is crucial for ensuring the effective protection of sensitive information. DLP policies are designed to identify, monitor, and automatically protect sensitive data across various locations such as Exchange Online, SharePoint Online, OneDrive, and Microsoft Teams https://learn.microsoft.com/en-us/training/modules/respond-to-data-loss-prevention-alerts-microsoft-365/2-understand-data-loss-prevention-alerts .
Policy Precedence
DLP policies can be set up with multiple rules that define what happens when sensitive information is detected. When there are multiple DLP policies in place, the rules within these policies may overlap or conflict. In such cases, policy precedence determines which rule applies. The precedence is generally based on the following criteria:
- Priority Level: Policies can be assigned a priority level. A policy with a higher priority (lower priority number) will take precedence over a policy with a lower priority (higher priority number) https://learn.microsoft.com/en-us/training/modules/respond-to-data-loss-prevention-alerts-microsoft-365/2-understand-data-loss-prevention-alerts .
- Specificity of Conditions: Rules that have more specific conditions may be processed before rules with broader conditions. For example, a rule that applies to a specific set of users or a particular type of information might take precedence over a more general rule.
- Date of Creation: If two policies have the same priority level, the policy that was created first may be processed first.
Rule Precedence
Within a single DLP policy, there can be multiple rules. The rules are processed in the order they are listed in the policy, from top to bottom. If a piece of content matches multiple rules, the action defined in the first matching rule will be applied. It is important to order the rules within a policy carefully to ensure that the most critical rules are evaluated first https://learn.microsoft.com/en-us/training/modules/respond-to-data-loss-prevention-alerts-microsoft-365/2-understand-data-loss-prevention-alerts .
Best Practices for Managing Policy and Rule Precedence
- Clearly Define Policy Scope: Ensure that each policy has a clear scope and purpose to minimize conflicts and overlaps.
- Use Priority Levels Wisely: Assign priority levels to policies to control the order in which they are evaluated.
- Review and Update Regularly: Regularly review policies and rules to ensure they are up to date and reflect the current needs of the organization.
- Educate Users: Help users understand DLP policies and how to work within them to prevent inadvertent breaches https://learn.microsoft.com/en-us/training/modules/respond-to-data-loss-prevention-alerts-microsoft-365/2-understand-data-loss-prevention-alerts .
For additional information on DLP components and how to investigate DLP alerts in Microsoft 365, you can refer to the following resources:
By understanding and correctly interpreting policy and rule precedence, organizations can effectively manage and protect their sensitive information within the Microsoft 365 environment.
Implement DLP (15–20%)
Create and configure DLP policies
Configure a Microsoft Defender for Cloud Apps File Policy to Use DLP Policies
To effectively manage and protect sensitive information within an organization, configuring a Microsoft Defender for Cloud Apps file policy to use Data Loss Prevention (DLP) policies is crucial. Here’s a step-by-step guide on how to set up such a policy:
Open Microsoft Defender for Cloud Apps: Begin by navigating to the Microsoft Defender for Cloud Apps portal.
Access the Control Pane: Within the portal, select the “Control” pane to manage your policies.
Create a New File Policy: Go to “Policies” and then select “Create policy.” Choose “File policy” from the options provided https://learn.microsoft.com/en-us/training/modules/microsoft-cloud-app-security/classify-protect-sensitive-information .
Configure Policy Settings: Fill in the details of the policy form with the following fields:
Policy Severity: Assign a severity level to the policy to indicate its importance and whether it should trigger a notification https://learn.microsoft.com/en-us/training/modules/microsoft-cloud-app-security/classify-protect-sensitive-information .
Category: Label the policy for easy identification later. The default category for File policies is typically set to DLP https://learn.microsoft.com/en-us/training/modules/microsoft-cloud-app-security/classify-protect-sensitive-information .
Create a Filter: Decide which apps will activate the policy. Aim for specific criteria to minimize false positives https://learn.microsoft.com/en-us/training/modules/microsoft-cloud-app-security/classify-protect-sensitive-information .
Apply to (1st): Choose the scope of the policy application, whether to all files or selected folders within apps like Box, SharePoint, OneDrive, and Dropbox https://learn.microsoft.com/en-us/training/modules/microsoft-cloud-app-security/classify-protect-sensitive-information .
Apply to (2nd): Select the users and groups that the policy will apply to. Options include all file owners, file owners from selected user groups, or all file owners excluding selected groups https://learn.microsoft.com/en-us/training/modules/microsoft-cloud-app-security/classify-protect-sensitive-information .
Content Inspection Method: Choose the method for file inspection. Options include Built-in DLP or Data Classification Services (DCS). DCS is recommended for a unified labeling experience across Microsoft 365 services https://learn.microsoft.com/en-us/training/modules/microsoft-cloud-app-security/classify-protect-sensitive-information .
Governance Actions: Specify the actions that Microsoft Defender for Cloud Apps should take when a match is detected. These can include triggering alerts, changing file access, quarantining files, and more https://learn.microsoft.com/en-us/training/modules/microsoft-cloud-app-security/classify-protect-sensitive-information .
Finalize and Create the Policy: Review the settings and select “Create” to establish your file policy https://learn.microsoft.com/en-us/training/modules/microsoft-cloud-app-security/classify-protect-sensitive-information .
Once the policy is in place, it will continuously monitor for policy violations. If a violation is detected, you can investigate and manage these alerts in the Alerts area of Defender for Cloud Apps. The dashboard provides visibility into suspicious activities or policy breaches, allowing you to maintain the security posture of your cloud environment https://learn.microsoft.com/en-us/training/modules/respond-to-data-loss-prevention-alerts-microsoft-365/4-investigate-data-loss-prevention-alerts-microsoft-cloud-app-security .
For additional information on configuring file policies and managing DLP alerts in Microsoft Defender for Cloud Apps, you can refer to the following resources:
- Respond to Data Loss Prevention alerts in Microsoft 365
- Microsoft Defender for Cloud Apps documentation
By following these steps, you can ensure that your organization’s sensitive information is monitored and protected against accidental exposure or data leaks, maintaining compliance with internal and external regulations.
Implement DLP (15–20%)
Implement and monitor Endpoint DLP
Configure Advanced DLP Rules for Devices in DLP Policies
Data Loss Prevention (DLP) policies are essential in protecting sensitive information from being accidentally or intentionally shared outside of an organization. When configuring DLP policies for devices, it is important to create advanced rules that cater to the specific needs of the organization and the types of data it handles.
Steps to Configure Advanced DLP Rules for Devices:
Identify Sensitive Information: Begin by defining what constitutes sensitive information within your organization. This could include financial data, personal identification information, health records, or intellectual property.
Create DLP Policy: Navigate to the security and compliance center in your Microsoft 365 admin center. From there, you can create a new DLP policy or edit an existing one to include rules for devices.
Define Policy Scope: Determine which locations the DLP policy should apply to. This could include devices that are enrolled in Microsoft Endpoint Manager or other device management solutions.
Set Conditions and Actions: Specify the conditions under which the DLP rules should trigger. For example, you can set a rule to trigger when sensitive information is detected on a device. Then, define the actions that should be taken when a rule is matched, such as blocking the information from being shared or alerting an administrator.
Use Advanced Features: Utilize advanced features such as fingerprinting, which can detect sensitive information based on a template, or machine learning, which can identify sensitive content without explicit rules.
Test the Policy: Before fully implementing the policy, test it to ensure that it correctly identifies and acts upon sensitive information without disrupting normal business operations.
Deploy the Policy: Once tested, deploy the policy across the organization. Ensure that all devices that fall under the policy’s scope are covered.
Monitor and Refine: Regularly monitor the policy’s effectiveness and refine the rules as necessary. This could involve adjusting thresholds for when alerts are triggered or updating the types of information considered sensitive.
For additional information on configuring DLP policies and advanced rules, you can refer to the following resources:
By following these steps and utilizing the resources provided, you can effectively configure advanced DLP rules for devices within your organization’s DLP policies, helping to safeguard sensitive information and maintain compliance with regulatory requirements.
Implement DLP (15–20%)
Implement and monitor Endpoint DLP
Configure Endpoint Data Loss Prevention (DLP) Settings
Endpoint Data Loss Prevention (DLP) is a critical component of Microsoft 365 that helps organizations to identify, monitor, and automatically protect sensitive information across various services. When configuring Endpoint DLP settings, it is essential to understand the components and how they interact to provide comprehensive protection.
Key Components of Endpoint DLP
DLP Policies: These are the core of DLP protection, defining what is considered sensitive information and the actions to be taken when such information is found. DLP policies can be configured to trigger alerts and take protective actions automatically.
Alerts Investigation: When DLP policies are triggered, alerts are generated. It is crucial to investigate these alerts to understand the context of the potential data loss incident and to respond appropriately.
Remediation Actions: Based on the investigation, remediation actions can be taken to address the threat. This could include steps like blocking access to the information, notifying the user, or other corrective actions.
Steps to Configure Endpoint DLP Settings
Create DLP Policies: Define what constitutes sensitive information for your organization. This could include financial data, personal identification information, or other types of regulated data.
Assign DLP Policies: Apply these policies to the relevant Microsoft 365 services such as Teams, SharePoint Online, and OneDrive. Ensure that the policies are aligned with the organization’s compliance requirements.
Monitor DLP Alerts: Regularly monitor the alerts generated by DLP policies. This can be done through the Microsoft 365 compliance center or Microsoft Defender for Cloud Apps.
Investigate and Respond: When an alert is raised, investigate the incident to determine if it is a false positive or if there is a genuine risk. Then, take the necessary remediation steps.
Manage Apps with Defender for Cloud Apps: Discover and manage third-party apps that might be handling sensitive data and ensure they comply with your DLP policies.
Insider Risk Management: Use DLP policies in conjunction with insider risk management policies to detect and respond to internal threats. This helps in identifying potential data leaks by insiders.
Test DLP Policies: Before fully implementing, test your DLP policies to ensure they work as expected and do not generate excessive false positives. This helps in fine-tuning the policies for optimal performance.
For additional information on configuring DLP policies and testing them, you can refer to the following resources:
By following these steps and utilizing the resources provided, you can effectively configure Endpoint DLP settings to protect sensitive information within your organization.
Implement DLP (15–20%)
Implement and monitor Endpoint DLP
Recommend a Deployment Method for Device Onboarding
When considering the deployment method for onboarding devices to Microsoft 365 Defender, it is essential to evaluate the options based on the type of devices and the tools available within your organization. Here is a detailed explanation of the recommended deployment methods:
Group Policy: This method is suitable for organizations that manage a large number of devices and already use Group Policy for configurations. It allows for centralized management and can be used to deploy Microsoft Defender for Endpoint to multiple devices simultaneously https://learn.microsoft.com/en-us/training/modules/deploy-microsoft-defender-for-endpoints-environment/4-onboard-devices .
Microsoft Endpoint Configuration Manager: For organizations using Configuration Manager current branch, this tool provides a comprehensive management solution that can deploy, configure, manage, and monitor endpoints within an enterprise environment https://learn.microsoft.com/en-us/training/modules/deploy-microsoft-defender-for-endpoints-environment/4-onboard-devices .
Mobile Device Management (MDM) / Microsoft Intune: If your organization utilizes MDM solutions, such as Microsoft Intune, this method allows for the deployment and management of endpoint protection policies across mobile devices and ensures that devices adhere to corporate security policies https://learn.microsoft.com/en-us/training/modules/deploy-microsoft-defender-for-endpoints-environment/4-onboard-devices .
Local Script: For smaller environments or for testing purposes, a local script can be used to onboard up to 10 devices. This method is quick and does not require complex infrastructure but is not scalable for larger deployments https://learn.microsoft.com/en-us/training/modules/deploy-microsoft-defender-for-endpoints-environment/4-onboard-devices .
VDI Onboarding Script: For non-persistent Virtual Desktop Infrastructure (VDI) devices, a specialized onboarding script is available to ensure that these devices are properly managed and protected https://learn.microsoft.com/en-us/training/modules/deploy-microsoft-defender-for-endpoints-environment/4-onboard-devices .
System Center Configuration Manager (SCCM): For organizations still using SCCM versions 2012 / 2012 R2 / 1511 / 1602, this method allows for the integration of Microsoft Defender for Endpoint with existing SCCM infrastructure https://learn.microsoft.com/en-us/training/modules/deploy-microsoft-defender-for-endpoints-environment/4-onboard-devices .
It is important to run a detection test after onboarding devices to verify that they are properly reporting to the service https://learn.microsoft.com/en-us/training/modules/deploy-microsoft-defender-for-endpoints-environment/4-onboard-devices . Additionally, you can use the device discovery feature of Microsoft Defender for Endpoint to identify unmanaged devices on your network and onboard them to increase security visibility https://learn.microsoft.com/en-us/training/modules/perform-device-investigations-microsoft-defender-for-endpoints/5-detect-devices-with-device-discovery .
For further information and detailed steps on each deployment method, you can refer to the following URLs: - Group Policy Deployment - Microsoft Endpoint Configuration Manager Deployment - Mobile Device Management / Microsoft Intune Deployment - Local Script Deployment - VDI Onboarding Script Deployment - System Center Configuration Manager Deployment
Please note that the URLs provided are for additional information and are part of the study materials to help understand the deployment methods for device onboarding.
Implement DLP (15–20%)
Implement and monitor Endpoint DLP
Identify Endpoint Requirements for Device Onboarding
When preparing to onboard devices to Microsoft 365 Defender, it is crucial to ensure that the devices meet specific requirements to facilitate a smooth integration into the security service. Below is a detailed explanation of the endpoint requirements for device onboarding:
- Minimum Device Requirements:
- Verify that each device meets the minimum system requirements for onboarding. This includes checking the operating system version, system specifications, and any additional prerequisites that Microsoft 365 Defender may require https://learn.microsoft.com/en-us/training/modules/deploy-microsoft-defender-for-endpoints-environment/4-onboard-devices .
- Configuration Steps:
- Follow the configuration steps provided in the onboarding section of the Microsoft 365 Defender portal. These steps are tailored to the type of device being onboarded and will guide you through the necessary settings and configurations https://learn.microsoft.com/en-us/training/modules/deploy-microsoft-defender-for-endpoints-environment/4-onboard-devices .
- Management Tools and Deployment Methods:
- Choose the appropriate management tool and deployment method for your devices. Options may include Group Policy, Microsoft Endpoint Configuration Manager, Mobile Device Management (including Microsoft Intune), local script for small deployments, or VDI onboarding script for non-persistent devices https://learn.microsoft.com/en-us/training/modules/deploy-microsoft-defender-for-endpoints-environment/4-onboard-devices .
- Running a Detection Test:
- After onboarding, run a detection test to verify that the devices are properly onboarded and reporting to the service. This ensures that the devices are capable of receiving and implementing security policies and updates from Microsoft 365 Defender https://learn.microsoft.com/en-us/training/modules/deploy-microsoft-defender-for-endpoints-environment/4-onboard-devices .
- Device Discovery:
- Utilize Microsoft Defender for Endpoint’s device discovery capability to find unmanaged devices connected to your corporate network. This helps in identifying devices that are not yet onboarded but are present in the network, such as workstations, servers, mobile devices, network devices, and IoT devices https://learn.microsoft.com/en-us/training/modules/perform-device-investigations-microsoft-defender-for-endpoints/5-detect-devices-with-device-discovery .
- Discovery Modes:
- Choose between Basic and Standard discovery modes. Basic discovery passively collects network events, while Standard discovery actively probes the network to discover more devices and enrich device information https://learn.microsoft.com/en-us/training/modules/perform-device-investigations-microsoft-defender-for-endpoints/5-detect-devices-with-device-discovery .
- Onboarding Status Assessment:
- Assess the onboarding status of discovered devices using the device inventory list. Devices can be categorized as Onboarded, Can be onboarded, Unsupported, or Insufficient info based on their compatibility with Microsoft Defender for Endpoint https://learn.microsoft.com/en-us/training/modules/perform-device-investigations-microsoft-defender-for-endpoints/5-detect-devices-with-device-discovery .
For additional information on device onboarding and requirements, you can refer to the following resources: - Onboarding devices to Microsoft 365 Defender - Device discovery in Microsoft Defender for Endpoint - Deployment methods for Microsoft Defender for Endpoint
By adhering to these guidelines and utilizing the provided resources, you can ensure that your devices are properly onboarded to Microsoft 365 Defender, thereby enhancing the security posture of your environment.
Implement DLP (15–20%)
Implement and monitor Endpoint DLP
Monitoring Endpoint Activities
Monitoring endpoint activities is a critical aspect of maintaining the security and integrity of an organization’s IT environment. It involves the continuous observation and analysis of events occurring on endpoint devices, such as laptops, desktops, and mobile devices, to detect and respond to potential security threats.
Key Components of Endpoint Activity Monitoring:
- Microsoft Defender for Endpoint:
- Microsoft Defender for Endpoint is a comprehensive endpoint security solution designed to help enterprise networks prevent, detect, investigate, and respond to advanced threats. It monitors endpoints in real-time, offering behavioral-based detection and a response system that helps to identify and mitigate threats swiftly https://learn.microsoft.com/en-us/training/modules/m365-threat-safeguard/integrate-microsoft-tools .
- Integration with Microsoft Defender for Identity:
- By integrating Microsoft Defender for Endpoint with Microsoft Defender for Identity, organizations can achieve a more complete threat protection solution. Microsoft Defender for Identity specializes in monitoring Active Directory traffic to detect and investigate advanced threats, compromised identities, and malicious insider actions https://learn.microsoft.com/en-us/training/modules/m365-threat-safeguard/integrate-microsoft-tools .
- Alerts and Notifications:
- Azure Monitor alerts are essential for proactively notifying administrators when important conditions are found in monitoring data. This allows for the early identification and resolution of issues before they impact customers. Alerts can be set on metrics, logs, and the activity log, ensuring that administrators are informed of any suspicious activities or performance anomalies https://learn.microsoft.com/en-us/azure/application-gateway/monitor-application-gateway .
- Microsoft Defender for DNS:
- Microsoft Defender for DNS adds an additional layer of security by continuously monitoring all DNS queries from Azure resources. It employs advanced security analytics to alert administrators about any suspicious activity, helping to protect against potential DNS-related attacks https://learn.microsoft.com/en-us/training/modules/understand-azure-defender-cloud-workload-protection/9-understand-azure-defender-for-dns .
Additional Resources:
- For more information on Microsoft Defender for Endpoint and its capabilities, you can visit the official documentation page.
- To understand how to set up and manage Azure Monitor alerts, the Azure alerts documentation provides detailed guidance.
- Details on Microsoft Defender for DNS and how it can enhance your security posture are available in the Azure DNS documentation.
By effectively monitoring endpoint activities, organizations can significantly reduce the risk of security breaches and ensure that their IT infrastructure remains secure and compliant with industry standards and regulations.
Implement DLP (15–20%)
Implement and monitor Endpoint DLP
Implementing the Microsoft Purview Extension
To effectively implement the Microsoft Purview Extension, it is essential to understand the steps and requirements involved in the process. Microsoft Purview is a comprehensive set of solutions designed to manage data governance and compliance across your organization. Implementing the extension involves several key actions:
Azure Account and Subscription: Ensure that you have an Azure account with an active subscription. This is a prerequisite for accessing and managing the services provided by Microsoft Purview https://learn.microsoft.com/en-us/azure/frontdoor/quickstart-create-front-door-cli .
Azure CLI and Front-Door Extension: Installation of the Azure CLI is required on your local machine or you can use Azure Cloud Shell. Additionally, the front-door extension must be added to your Azure CLI to manage front-door specific resources. This can be done using the following command:
az extension add --name front-doorhttps://learn.microsoft.com/en-us/azure/frontdoor/quickstart-create-front-door-cli .
Permissions and Role Assignment: For certain operations, such as threat hunting with Content search, the user must have appropriate permissions. This includes being a member of the Organization Management role group in the Microsoft Purview compliance portal and enabling search permission filtering https://learn.microsoft.com/en-us/training/modules/investigate-threats-with-content-search-in-microsoft-purview/6-configure-search-permissions-filters .
Configuration of File Settings: In the Microsoft 365 Defender portal, navigate to Settings > Endpoints and select Automation uploads under the Rules section. Here, you can toggle the content analysis setting and configure the file extension names for files that should be submitted for further inspection https://learn.microsoft.com/en-us/training/modules/configure-manage-automation-microsoft-defender-for-endpoint/3-manage-automation-upload-folder-settings .
Export Management Role: To export search results, a user must be assigned the Export management role in the Microsoft Purview compliance portal. This role allows the user to handle the export of search results and is part of the built-in eDiscovery Manager role group https://learn.microsoft.com/en-us/training/modules/investigate-threats-with-content-search-in-microsoft-purview/5-export-search-results .
System Requirements for Exporting Data: The computer used to export search results must meet specific system requirements, including the latest version of Windows and Microsoft .NET Framework 4.7 or higher. Microsoft Edge is the supported browser for running the eDiscovery Export Tool https://learn.microsoft.com/en-us/training/modules/investigate-threats-with-content-search-in-microsoft-purview/5-export-search-results .
Temporary Storage and Export of Data: When exporting search results, the data is temporarily stored in a Microsoft-provided Azure Storage location. It is important to ensure that your organization can connect to the Azure endpoint, which follows the pattern
***.blob.core.windows.net. The data is retained in the Azure Storage location for two weeks before deletion https://learn.microsoft.com/en-us/training/modules/investigate-threats-with-content-search-in-microsoft-purview/5-export-search-results .Proxy Server Settings: If your organization uses a proxy server for internet communication, you must define the proxy server settings on the computer used to export search results. This ensures that the export tool can be authenticated by the proxy server. The settings are configured in the machine.config file https://learn.microsoft.com/en-us/training/modules/investigate-threats-with-content-search-in-microsoft-purview/5-export-search-results .
For additional information and guidance on implementing the Microsoft Purview Extension, you can refer to the following resources: - Create an Azure account for free - Assign eDiscovery permissions - Use the eDiscovery Export Tool in Microsoft Edge
By following these steps and ensuring that all requirements are met, you can successfully implement the Microsoft Purview Extension and leverage its capabilities for data governance and compliance within your organization.
Implement DLP (15–20%)
Monitor and manage DLP activities
Analyze DLP Reports
Data Loss Prevention (DLP) is a critical component of Microsoft 365 that helps organizations protect sensitive information and prevent its inadvertent disclosure. When analyzing DLP reports, it is essential to understand the information they provide and how it can be used to enhance the organization’s data protection strategies.
Understanding DLP Reports:
DLP reports in Microsoft 365 offer insights into how sensitive information is being handled within the organization. These reports can show when and where sensitive information is detected and if any policy violations have occurred. By analyzing these reports, you can:
Identify Sensitive Information: DLP reports help you track where sensitive information, such as financial data, personal identifiers, or health records, is located across various platforms like Exchange Online, SharePoint Online, OneDrive, and Microsoft Teams https://learn.microsoft.com/en-us/training/modules/respond-to-data-loss-prevention-alerts-microsoft-365/2-understand-data-loss-prevention-alerts .
Monitor Policy Violations: The reports provide details on incidents where sensitive information may have been shared in violation of DLP policies. This could include instances where sensitive documents or emails were shared with unauthorized external parties https://learn.microsoft.com/en-us/training/modules/respond-to-data-loss-prevention-alerts-microsoft-365/2-understand-data-loss-prevention-alerts .
Prevent Accidental Sharing: DLP reports can help you understand the effectiveness of policies aimed at preventing accidental sharing of sensitive information. For example, you can see if a DLP policy has successfully blocked an email containing sensitive data from being sent outside the organization https://learn.microsoft.com/en-us/training/modules/respond-to-data-loss-prevention-alerts-microsoft-365/2-understand-data-loss-prevention-alerts .
Educate Users: The reports can also be used to educate users about compliance. By reviewing the incidents of policy violations, you can identify common mistakes and provide targeted training to users to prevent future occurrences https://learn.microsoft.com/en-us/training/modules/respond-to-data-loss-prevention-alerts-microsoft-365/2-understand-data-loss-prevention-alerts .
Actionable Steps from DLP Reports:
Review Alerts and Incidents: Regularly check the DLP alerts and investigate each incident to understand the context and scope of the potential data exposure https://learn.microsoft.com/en-us/training/modules/respond-to-data-loss-prevention-alerts-microsoft-365/6-summary-resources .
Recommend Policy Adjustments: Based on the findings from the reports, you may need to recommend changes to existing DLP policies to better protect sensitive information https://learn.microsoft.com/en-us/training/modules/respond-to-data-loss-prevention-alerts-microsoft-365/2-understand-data-loss-prevention-alerts .
Test DLP Policies: It’s important to test DLP policies to ensure they are effectively identifying and protecting sensitive information without generating excessive false positives. This can help fine-tune the policies for better accuracy https://learn.microsoft.com/en-us/training/modules/m365-compliance-insider-manage-insider-risk/policies .
Manage Insider Risks: Use DLP reports in conjunction with insider risk management policies to identify potential intentional or accidental data leaks by insiders. Adjust the risk management policies based on the DLP findings to cover the full spectrum of risks https://learn.microsoft.com/en-us/training/modules/m365-compliance-insider-manage-insider-risk/policies .
For additional information on how to analyze DLP reports and configure DLP policies, you can refer to the following resources:
- Data loss prevention (DLP) in Microsoft 365
- View the DLP reports in the Microsoft 365 compliance center
- Test a DLP policy
By thoroughly analyzing DLP reports, organizations can gain valuable insights into how sensitive information is managed and take proactive steps to enhance data protection measures.
Implement DLP (15–20%)
Monitor and manage DLP activities
Analyze DLP Activities by Using Activity Explorer
Data Loss Prevention (DLP) is a critical component in safeguarding sensitive information within an organization. Activity Explorer is a feature within Microsoft 365 compliance solutions that provides insights into DLP activities. It allows administrators to monitor and investigate actions related to sensitive items that are governed by DLP policies.
When analyzing DLP activities using Activity Explorer, you can:
Access Detailed Information: Activity Explorer presents a comprehensive view of activities related to sensitive information across Microsoft 365 services. This includes actions taken on sensitive items that match DLP policy conditions https://learn.microsoft.com/en-us/training/modules/investigate-threats-using-audit-in-microsoft-365-defender-microsoft-purview-standard/5-search-audit-log .
Filter and Sort Data: You can filter the data by date range, users, activities, and more, to focus on specific events or trends. Sorting options allow you to organize the data in a way that best suits your analysis needs.
Investigate Specific Incidents: By selecting individual activities, you can drill down into detailed information about a particular event. This can include the context of the activity, such as the user involved and the exact nature of the DLP rule that was triggered.
Export Data for Reporting: Activity Explorer allows you to export the displayed data for further analysis or for creating reports that can be shared with stakeholders or used in compliance audits.
For additional information on how to utilize Activity Explorer for analyzing DLP activities, you can refer to the following resources:
Office 365 Management Activity API schema provides a detailed list of auditing record types that can be used to search the audit log for activities in the corresponding service https://learn.microsoft.com/en-us/training/modules/investigate-threats-using-audit-in-microsoft-365-defender-microsoft-purview-standard/5-search-audit-log .
Search-UnifiedAuditLog cmdlet in Exchange Online PowerShell, which can be used to search the audit log for specific activities https://learn.microsoft.com/en-us/training/modules/investigate-threats-using-audit-in-microsoft-365-defender-microsoft-purview-standard/5-search-audit-log .
By leveraging Activity Explorer, organizations can gain a better understanding of how their sensitive data is being handled and ensure that their DLP policies are effectively protecting their information assets.
Please note that the URLs provided are for reference purposes and should be accessed for more detailed guidance on using Activity Explorer within the Microsoft 365 compliance center https://learn.microsoft.com/en-us/training/modules/investigate-threats-using-audit-in-microsoft-365-defender-microsoft-purview-standard/5-search-audit-log .
Implement DLP (15–20%)
Monitor and manage DLP activities
Remediate DLP Alerts in the Microsoft Purview Compliance Portal
Data Loss Prevention (DLP) is a critical component of an organization’s compliance strategy, designed to protect sensitive information and prevent its inadvertent disclosure. When a potential risk to sensitive data is detected, DLP policies generate alerts. These alerts require investigation and remediation to ensure that sensitive information remains secure. The following steps outline how to manage and remediate DLP alerts within the Microsoft Purview compliance portal:
Accessing DLP Alerts: To begin, navigate to the Microsoft Purview compliance portal. Under the Solutions section, select “Data loss prevention” to access the DLP policies and alerts https://learn.microsoft.com/en-us/training/modules/respond-to-data-loss-prevention-alerts-microsoft-365/3-investigate-data-loss-prevention-alerts-microsoft-365-compliance .
Viewing Alerts Dashboard: Within the DLP section, click on the “Alerts” tab to see the dashboard displaying all the DLP alerts. Here, you can filter, sort, and customize the columns to display the most relevant information for your investigation https://learn.microsoft.com/en-us/training/modules/respond-to-data-loss-prevention-alerts-microsoft-365/3-investigate-data-loss-prevention-alerts-microsoft-365-compliance .
Investigating an Alert: Select an individual alert to view its details. This will provide you with information about the specific incident, including what triggered the alert and the sensitive information involved https://learn.microsoft.com/en-us/training/modules/respond-to-data-loss-prevention-alerts-microsoft-365/3-investigate-data-loss-prevention-alerts-microsoft-365-compliance .
Examining Events and Sensitive Info Types: The “Events” tab within an alert shows all the events associated with that alert. By selecting a particular event, you can view detailed information about it. The “Sensitive Info Types” tab provides insights into the detected sensitive information types, their confidence levels, and occurrence counts https://learn.microsoft.com/en-us/training/modules/respond-to-data-loss-prevention-alerts-microsoft-365/3-investigate-data-loss-prevention-alerts-microsoft-365-compliance .
Managing Alert Status: After investigating the alert, you can manage it by changing its status to Active, Investigating, Dismissed, or Resolved. It is also possible to add comments for context and assign the alert to a team member for further action https://learn.microsoft.com/en-us/training/modules/respond-to-data-loss-prevention-alerts-microsoft-365/3-investigate-data-loss-prevention-alerts-microsoft-365-compliance .
Workflow Management History: To track the actions taken on an alert, you can view the Management log. This log records the history of workflow management for the alert https://learn.microsoft.com/en-us/training/modules/respond-to-data-loss-prevention-alerts-microsoft-365/3-investigate-data-loss-prevention-alerts-microsoft-365-compliance .
Resolving the Alert: Once the necessary actions have been taken to address the risk, set the alert’s status to “Resolved.” This indicates that the issue has been appropriately handled and the alert no longer requires attention.
For additional guidance on configuring and testing DLP policies, refer to the “Test a DLP policy” documentation provided by Microsoft https://learn.microsoft.com/en-us/training/modules/m365-compliance-insider-manage-insider-risk/policies .
By following these steps, security operations analysts and compliance officers can effectively manage and remediate DLP alerts, ensuring that sensitive information is protected in accordance with the organization’s compliance requirements and industry regulations.
For more information on DLP alerts and policies, please visit the following URLs: - Data loss prevention in Microsoft Purview - View DLP alerts in the alerts dashboard - Test a DLP policy
Implement DLP (15–20%)
Monitor and manage DLP activities
Remediate DLP Alerts Generated by Defender for Cloud Apps
When using Microsoft Defender for Cloud Apps to manage and secure your cloud environment, you may encounter alerts triggered by Data Loss Prevention (DLP) policies. These alerts are critical as they indicate potential violations of the policies you have established to protect sensitive information within your organization. Here is a detailed explanation of how to remediate such DLP alerts:
Investigate the Alert: Begin by navigating to the Alerts area of Defender for Cloud Apps. Here, you can gain full visibility into any suspicious activity or policy violations https://learn.microsoft.com/en-us/training/modules/respond-to-data-loss-prevention-alerts-microsoft-365/4-investigate-data-loss-prevention-alerts-microsoft-cloud-app-security .
Alert Management: On the Alerts page, you can filter alerts by type or severity to prioritize the most critical ones. Select an alert to view detailed information and determine the nature of the violation https://learn.microsoft.com/en-us/training/modules/respond-to-data-loss-prevention-alerts-microsoft-365/4-investigate-data-loss-prevention-alerts-microsoft-cloud-app-security .
Take Action: Depending on the type of alert, you will see various actions that can be taken. These actions may include notifying users, adjusting policies, or other remediation steps to resolve the alert https://learn.microsoft.com/en-us/training/modules/respond-to-data-loss-prevention-alerts-microsoft-365/4-investigate-data-loss-prevention-alerts-microsoft-cloud-app-security .
Filter by App: You can also filter alerts based on the app where the activity was detected. This helps in quickly identifying which cloud applications are involved in the policy violation https://learn.microsoft.com/en-us/training/modules/respond-to-data-loss-prevention-alerts-microsoft-365/4-investigate-data-loss-prevention-alerts-microsoft-cloud-app-security .
Types of Violations: Be prepared to deal with different types of violations when investigating alerts. Each type may require a unique approach to remediation https://learn.microsoft.com/en-us/training/modules/respond-to-data-loss-prevention-alerts-microsoft-365/4-investigate-data-loss-prevention-alerts-microsoft-cloud-app-security .
Protection of Sensitive Information: Defender for Cloud Apps provides DLP capabilities to protect sensitive information at rest and avoid accidental data exposure. Understanding these capabilities is crucial for effective remediation https://learn.microsoft.com/en-us/training/modules/microsoft-cloud-app-security/cloud-app-security-framework .
Exporting Alerts: If necessary, alerts can be exported to Microsoft Sentinel, a third-party SIEM, or any other external tool for further analysis or record-keeping. This can be done by following the instructions provided for streaming alerts to external solutions https://learn.microsoft.com/en-us/training/modules/what-is-azure-defender/2-what-is-azure-defender .
For additional information on managing and remediating DLP alerts in Defender for Cloud Apps, you can refer to the following resources:
- Respond to data loss prevention alerts in Microsoft 365
- Stream alerts to a SIEM, SOAR, or IT Service Management solution
By following these steps and utilizing the resources provided, you can effectively manage and remediate DLP alerts in Defender for Cloud Apps, ensuring the security and compliance of your cloud environment.
Implement data lifecycle and records management (10–15%)
Retain and delete data by using retention labels
Plan for Information Retention and Disposition Using Retention Labels
When planning for information retention and disposition in Microsoft 365, retention labels play a crucial role. Retention labels allow organizations to classify and manage content over its lifecycle. Here’s a detailed explanation of how to plan for information retention and disposition using retention labels:
Understanding Retention Labels
Retention labels are tags that can be applied to content across Microsoft 365 services, including Exchange Online, SharePoint Online, OneDrive for Business, and Microsoft Teams. They define how long content is retained and what happens to it after the retention period ends, whether it should be retained or deleted.
Creating Retention Labels
To create retention labels, you can use the Microsoft Purview compliance portal. Labels are defined with retention settings that specify: - Retention Duration: How long the content should be kept. - Disposition Action: Whether to delete the content automatically or review it before deletion.
Applying Retention Labels
Once created, retention labels can be applied manually by users or automatically by administrators using auto-apply policies based on specific conditions, such as content containing certain sensitive information types.
Retention Policies and Labels
Retention policies are different from retention labels. Policies are applied at a container level (e.g., a SharePoint site), while labels are applied at an item level (e.g., a document). However, both can be used to enforce retention rules.
Retention for Different Content Types
Different types of content may require different retention settings. For example, financial documents may need to be retained for a longer period than regular business correspondence. Plan retention labels according to the types of content and their regulatory or business requirements.
Disposition Review
For content that requires review before deletion, you can set up a disposition review process. When content reaches the end of its retention period, it’s flagged for review, and designated reviewers are notified to decide whether to retain or delete the content.
Audit and Compliance
Retention labels also support audit and compliance requirements. Actions taken on labeled content are logged and can be reviewed in the audit log. This helps in demonstrating compliance with regulations that require specific retention periods for certain types of information.
Additional Resources
For more information on planning and implementing retention labels in Microsoft 365, you can refer to the following resources: - Overview of retention labels - Create and configure retention labels - Apply a retention label to content automatically - Disposition of content - Office 365 Management Activity API schema
By carefully planning and implementing retention labels, organizations can effectively manage the lifecycle of their information, ensuring that content is retained and disposed of in compliance with legal, regulatory, and business requirements.
Implement data lifecycle and records management (10–15%)
Retain and delete data by using retention labels
Create Retention Labels for Data Lifecycle Management
Retention labels in Microsoft 365 are used to manage the lifecycle of data across different services. They help organizations to retain content that is important for business or regulatory compliance and to delete content that is no longer needed. Here’s a detailed explanation of how to create retention labels for data lifecycle management:
Access the Microsoft Purview compliance portal: To begin creating retention labels, you need to access the Microsoft Purview compliance portal. This is where you can manage compliance features across Microsoft 365 services.
Navigate to Solutions: Within the compliance portal, go to the ‘Solutions’ section, where you will find options for various data governance tasks.
Create a Retention Label: Under the ‘Information governance’ or ‘Records management’ section, you can create new retention labels. Click on ‘Labels’ and then ‘Create a label’ to start the process.
Define Retention Settings: When creating a label, you will be prompted to define the retention settings. This includes specifying how long the content should be retained and what should happen when the retention period expires (e.g., delete the content, review it, or do nothing).
Apply Retention Label to Content: Once the label is created, it can be applied to content manually by users, automatically by administrators using label policies, or auto-applied using conditions such as content containing specific types of sensitive information.
Publish the Retention Label: After creating the label, you need to publish it by creating a label policy. This determines where in your organization the label will be available—such as in Exchange Online, SharePoint Online, OneDrive for Business, and Microsoft Teams.
Monitor and Review: It’s important to monitor the application of retention labels and review their effectiveness regularly. This ensures that the data lifecycle management aligns with organizational policies and compliance requirements.
For additional information on creating and managing retention labels, you can refer to the following resources:
- Overview of retention labels
- Create and configure retention labels
- Publish retention labels
- Apply a retention label to content automatically
By following these steps and utilizing the provided resources, you can effectively create retention labels to manage the data lifecycle within your organization. Remember to tailor the retention settings to meet your specific business and compliance needs.
Implement data lifecycle and records management (10–15%)
Retain and delete data by using retention labels
Adaptive scopes are a feature within Microsoft security solutions that allow administrators to dynamically define the scope of security policies and controls based on certain attributes or conditions. This capability is particularly useful in environments where resources, users, or workloads are constantly changing, and static security policies may not be sufficient to ensure comprehensive protection.
When configuring and managing adaptive scopes, administrators can leverage attributes such as resource tags, network locations, user groups, or device compliance status to create flexible and context-aware policies. For example, an adaptive scope could be configured to apply a specific security control only to resources tagged as “production” or to user accounts that are part of the “finance” department.
Here’s a step-by-step guide to configuring and managing adaptive scopes:
Identify the Criteria for the Scope: Determine the attributes or conditions that will define the adaptive scope. This could be based on resource tags, user groups, device states, or other relevant criteria.
Access the Security Solution: Log in to the appropriate Microsoft security solution where you want to configure the adaptive scope. This could be Microsoft Defender for Cloud, Microsoft 365 Defender, or another integrated security service.
Navigate to Policy Management: Find the section within the security solution where policies or controls are managed. This is typically under a “Policies,” “Settings,” or “Controls” menu.
Create or Edit a Policy: Choose to create a new policy or edit an existing one. When setting up the policy, look for an option to define the scope or conditions under which the policy will apply.
Define the Adaptive Scope: Use the identified criteria to define the adaptive scope. This may involve selecting tags, specifying network locations, choosing user or device groups, or setting other conditions.
Configure Policy Settings: Within the adaptive scope, configure the specific settings or controls that you want to enforce. This could include application control rules, access restrictions, or compliance requirements.
Test the Policy: Before deploying the policy broadly, test it to ensure that it behaves as expected. This may involve applying the policy to a limited set of resources or users and monitoring for any issues.
Deploy the Policy: Once you are satisfied with the policy configuration and testing, deploy it to the intended scope. Monitor the policy’s effectiveness and make adjustments as necessary.
Review and Update as Needed: Periodically review the adaptive scope and policy settings to ensure they remain relevant and effective. Update the scope or policy as your environment or security needs change.
For additional information on configuring and managing adaptive scopes within Microsoft security solutions, you can refer to the official Microsoft documentation:
Please note that while adaptive scopes are a powerful tool for tailoring security policies to the dynamic nature of modern IT environments, they should be used thoughtfully and in conjunction with other security best practices to ensure comprehensive protection.
Implement data lifecycle and records management (10–15%)
Retain and delete data by using retention labels
Configure a Retention Label Policy to Publish Labels
When configuring a retention label policy to publish labels, it is essential to understand the purpose and process of implementing such a policy within an organization. Retention labels in Microsoft 365 help organizations manage and govern their data by specifying retention periods for content. Once a retention label is created, it must be published so that users can apply it to their content across various Microsoft 365 services.
Steps to Configure a Retention Label Policy:
Create Retention Labels: Before publishing, you need to create retention labels. These labels define how long content is kept and what happens to it after the retention period ends, such as deletion or review.
Publish the Labels: After creating the labels, you must publish them using a retention label policy. This makes the labels available to users so they can classify content.
Select Content to Apply the Labels: Decide which locations will have the published labels available. You can choose from Exchange email, SharePoint sites, OneDrive accounts, and more.
Assign the Policy: Assign the retention label policy to the selected locations. You can also target specific users or groups if necessary.
Inform and Train Users: Educate your users on how to apply the retention labels to their content. Proper training ensures that the labels are used correctly and consistently.
Monitor and Adjust: Regularly review the policy’s effectiveness and make adjustments as needed. This may involve adding or removing labels, changing retention settings, or modifying the locations where labels are published.
Additional Information:
Retention Labels and Policies: Retention labels and policies are part of the Microsoft Purview compliance solutions. They allow organizations to comply with legal and regulatory policies and to manage the lifecycle of information effectively.
Permissions: Ensure that you have the necessary permissions to create and publish retention labels. Typically, this requires being a member of the Compliance Administrator or Organization Management role groups.
Audit Log: Use the audit log to track when labels are applied, modified, or removed. This helps in maintaining compliance and understanding user behavior.
For more detailed guidance on creating and publishing retention labels, you can refer to the official Microsoft documentation:
By following these steps and utilizing the resources provided, you can effectively configure a retention label policy to publish labels, ensuring that your organization’s content is managed in compliance with your data governance policies.
Implement data lifecycle and records management (10–15%)
Retain and delete data by using retention labels
Configure a Retention Label Policy to Auto-Apply Labels
Retention labels in Microsoft 365 help organizations manage and govern their data by ensuring that important information is retained and less important information is permanently deleted when it’s no longer needed. Configuring a retention label policy to auto-apply labels allows for the automatic classification of content across various locations such as SharePoint Online, Exchange Online, OneDrive for Business, and Microsoft Teams.
Here’s a step-by-step guide on how to configure a retention label policy to auto-apply labels:
Access the Microsoft Purview compliance portal: Navigate to the Microsoft Purview compliance portal to begin setting up your retention label policy.
Create a new retention label: Before you can auto-apply a label, you must create one. Go to the Information governance section and select Labels. Then, choose Create a label and define the retention settings for the label.
Publish the retention label: After creating the label, you need to publish it. Select Publish labels under the Information governance section. Choose the label you created and specify the locations where the label should be available.
Configure auto-apply label policy: Once the label is published, you can set up a policy to auto-apply it. Go to the Label policies section and select Auto-apply a label. You will need to define the conditions under which the label should be applied automatically. These conditions can be based on:
- Content that contains specific words or phrases.
- Content that matches specific types of sensitive information.
- Content that matches a query in the Keyword Query Language (KQL).
Set the policy settings: Fill in the necessary details for the policy, such as name, description, and review your settings. You can also specify whether to run the policy in simulation mode to see what content would be labeled without actually applying the label.
Review and activate the policy: Once you have configured the settings, review the policy and activate it. The system will then automatically apply the retention label to content that matches the conditions you’ve set.
By following these steps, you can ensure that your organization’s data is managed automatically and efficiently, reducing the risk of data loss and non-compliance with regulatory requirements.
For additional information on configuring retention label policies and auto-applying labels, you can refer to the following resources: - Overview of retention labels - Auto-apply retention labels
Please note that the ability to auto-apply retention labels requires specific licensing and permissions within your Microsoft 365 environment. Ensure that you have the necessary prerequisites before proceeding with the configuration.
Implement data lifecycle and records management (10–15%)
Retain and delete data by using retention labels
Interpretation of Policy Precedence Results and Using Policy Lookup
When managing policies within an organization, it’s crucial to understand how policy precedence works to ensure the correct application of rules and actions. Policy precedence determines which policy should be applied when multiple policies are in place that could affect the same set of data or users.
Understanding Policy Precedence
Policy precedence is typically based on a priority level assigned to each policy. When there are multiple policies, the one with the highest priority (usually the lowest numerical value) takes effect. This means that if two policies conflict, the system will enforce the policy with the higher precedence.
Using Policy Lookup
Policy lookup is a process used to determine which policies apply to a particular situation or set of data. This is especially important in complex environments where numerous policies might exist across different services or activities.
For example, in Microsoft 365 services, organizations can create and manage audit log retention policies in the Microsoft Purview compliance portal. These policies specify how long audit logs should be retained and can be based on various criteria, such as:
- All activities in one or more Microsoft 365 services.
- Specific activities performed by all users or by specific users.
- A priority level that specifies which policy takes precedence when multiple policies exist within an organization https://learn.microsoft.com/en-us/training/modules/investigate-threats-using-audit-in-microsoft-365-defender-microsoft-purview-premium/4-manage-audit-log-retention-policies .
When interpreting the results of policy precedence, it’s essential to review the policies in place and understand their assigned priority levels. The policy lookup process can be facilitated by tools or interfaces provided by the service, such as the Microsoft Purview compliance portal for audit log retention policies.
Additional Resources
For further information on policy definition structure and understanding policy effects, you can refer to the following resources:
- Azure Policy GitHub repository: Azure Policy GitHub repo.
- Azure Policy definition structure: Azure Policy definition structure.
- Understanding policy effects: Understanding policy effects https://learn.microsoft.com/en-us/azure/azure-app-configuration/policy-reference .
By reviewing these resources, you can gain a deeper understanding of how policies are structured, how they work, and how to interpret their effects within your organization’s governance framework. This knowledge is essential for ensuring that policies are applied correctly and consistently, and for resolving any conflicts that may arise due to overlapping policies.
Implement data lifecycle and records management (10–15%)
Manage data retention in Microsoft 365 workloads
Create and Apply Retention Policies for SharePoint and OneDrive
Retention policies in Microsoft Purview are essential for managing the lifecycle of information within an organization. They help ensure that critical data is preserved and that unnecessary data is deleted in compliance with company policies and regulations. Here’s a detailed explanation of how to create and apply retention policies for SharePoint and OneDrive:
Understanding Retention Policies
Retention policies allow you to:
- Retain content: Keep content for a specified period for compliance or regulatory reasons.
- Delete content: Automatically delete content that is no longer needed, reducing risk and liability.
- A combination of both: Retain content for a certain period and then delete it.
Creating Retention Policies
To create a retention policy for SharePoint and OneDrive, follow these steps:
- Navigate to the Microsoft Purview compliance portal: Access the portal to manage your retention policies.
- Create a new retention policy: Go to the ‘Information governance’ or ‘Records management’ section, depending on your version, and select ‘Retention policies’.
- Define the policy settings: Give your policy a name and description that clearly indicates its purpose.
- Choose locations to apply the policy: Select SharePoint Online and OneDrive for Business as the locations where the policy will be applied.
- Set retention settings: Decide if you want to retain content, delete content, or both, and specify the duration for each action.
- Review and create the policy: Confirm your settings and create the policy.
Applying Retention Policies
Once a retention policy is created, it can be applied to content in SharePoint and OneDrive:
- Policy application: The policy will automatically apply to the content in the selected locations.
- Manual application: For more granular control, you can manually tag content with the retention label linked to your policy.
Considerations
- Default Retention: If no other retention policy applies, the default policy will retain audit records for one year for E5 licensed users or 90 days for others https://learn.microsoft.com/en-us/training/modules/investigate-threats-using-audit-in-microsoft-365-defender-microsoft-purview-premium/4-manage-audit-log-retention-policies .
- Custom Policies: Organizations can create custom policies to meet specific requirements https://learn.microsoft.com/en-us/training/modules/investigate-threats-using-audit-in-microsoft-365-defender-microsoft-purview-premium/3-implement-microsoft-purview-audit-premium .
- Audit (Premium): With Audit (Premium), organizations can configure longer retention periods and create policies based on services, activities, or users https://learn.microsoft.com/en-us/training/modules/investigate-threats-using-audit-in-microsoft-365-defender-microsoft-purview-standard/2-explore-microsoft-purview-audit-solutions .
Additional Resources
For more information on creating and managing retention policies, you can refer to the following resources:
Remember, it’s important to regularly review and update your retention policies to align with any changes in compliance requirements or business needs.
Implement data lifecycle and records management (10–15%)
Manage data retention in Microsoft 365 workloads
Create and Apply Retention Policies for Microsoft 365 Groups
When managing data within Microsoft 365 Groups, it is crucial to establish retention policies to ensure that information is preserved or deleted according to organizational, legal, or compliance requirements. Retention policies in Microsoft 365 can be applied to various services, including Groups, to control the lifecycle of content within those services.
Steps to Create and Apply Retention Policies:
Access the Microsoft Purview compliance portal: To begin, navigate to the Microsoft Purview compliance portal, which is the centralized location for managing compliance-related features across Microsoft 365 services.
Assign appropriate roles: Ensure that the individuals responsible for creating and managing retention policies have been assigned the Organization Configuration role https://learn.microsoft.com/en-us/training/modules/investigate-threats-using-audit-in-microsoft-365-defender-microsoft-purview-premium/4-manage-audit-log-retention-policies .
Define the retention policy: Create a new retention policy by specifying the desired retention settings. This includes defining how long content should be retained, the actions to take after the retention period ends (such as deleting the content or reviewing it), and whether the policy should retain content, delete it, or both.
Select Microsoft 365 Groups: When configuring the policy, choose Microsoft 365 Groups as the location to which the policy will apply. You can apply the policy to all groups or select specific groups.
Set retention period: Determine the duration for which the content should be retained. This can range from days to years, depending on the organization’s needs. For Microsoft 365 Groups, the content includes group mailbox and site content.
Policy precedence: If there are multiple retention policies, you can set a priority level to determine which policy takes precedence https://learn.microsoft.com/en-us/training/modules/investigate-threats-using-audit-in-microsoft-365-defender-microsoft-purview-premium/4-manage-audit-log-retention-policies .
Review and save the policy: Before finalizing the policy, review all settings to ensure they align with your organization’s requirements. Once confirmed, save the policy to apply it to the selected Microsoft 365 Groups.
Additional Considerations:
- Maximum number of policies: An organization can have up to 50 audit log retention policies https://learn.microsoft.com/en-us/training/modules/investigate-threats-using-audit-in-microsoft-365-defender-microsoft-purview-premium/4-manage-audit-log-retention-policies .
- License requirements: To retain content for longer than 90 days, users must have specific licenses such as Office 365 E5 or Microsoft 365 E5 https://learn.microsoft.com/en-us/training/modules/investigate-threats-using-audit-in-microsoft-365-defender-microsoft-purview-premium/4-manage-audit-log-retention-policies .
- Custom vs. default policies: Custom policies created by an organization take precedence over the default retention policy https://learn.microsoft.com/en-us/training/modules/investigate-threats-using-audit-in-microsoft-365-defender-microsoft-purview-premium/4-manage-audit-log-retention-policies .
- Non-retroactive policies: New retention policies do not apply retroactively to content that was created before the policy was established https://learn.microsoft.com/en-us/training/modules/investigate-threats-using-audit-in-microsoft-365-defender-microsoft-purview-premium/2-explore-microsoft-purview-audit-premium .
For more detailed guidance on creating and managing retention policies, refer to the official Microsoft documentation on Manage retention policies.
By following these steps and considerations, organizations can effectively create and apply retention policies to Microsoft 365 Groups, helping to maintain compliance with various regulations and internal policies.
Implement data lifecycle and records management (10–15%)
Manage data retention in Microsoft 365 workloads
Create and Apply Retention Policies for Microsoft Teams
When managing data within Microsoft Teams, it is crucial to establish retention policies that align with an organization’s compliance requirements. Retention policies help ensure that critical information is preserved for a specified duration and that unnecessary data is deleted to minimize risk and manage the data lifecycle effectively.
Steps to Create and Apply Retention Policies for Microsoft Teams:
Access the Microsoft Purview Compliance Portal: Begin by navigating to the Microsoft Purview compliance portal. This is the centralized location where you can manage compliance features across Microsoft 365 services.
Navigate to the Retention Policies Section: Within the compliance portal, locate the ‘Information governance’ or ‘Data lifecycle management’ section, where you can find options to manage retention policies.
Create a New Retention Policy: Select the option to create a new retention policy. You will be prompted to provide a name and description for the policy, which should reflect its purpose and the type of data it will govern.
Specify Microsoft Teams Data to Retain: Choose Microsoft Teams as the location for the retention policy. You can apply the policy to entire teams, specific channels, or even individual chats.
Define Retention Settings: Decide on the retention duration, which is the length of time that the data will be kept. You can also specify whether to retain data forever or delete it after the retention period expires.
Review and Finalize the Policy: Review the settings of your retention policy to ensure they meet your organization’s requirements. Once confirmed, save the policy to apply it to the selected Teams data.
Monitor and Manage Policies: Use the ‘Audit retention policies’ dashboard to view, edit, or delete existing retention policies. This helps maintain an up-to-date retention strategy that adapts to changing compliance needs.
Additional Information:
Microsoft Purview Compliance Portal: This is the hub for managing compliance across your Microsoft 365 services. You can access it at Microsoft Purview Compliance Portal.
Information Governance: Learn more about information governance and how to manage the lifecycle of your data within Microsoft Teams at Information Governance.
Data Lifecycle Management: For a deeper understanding of data lifecycle management and retention policies, visit Data Lifecycle Management.
Teams Retention Policies: Detailed guidance on creating and managing retention policies specifically for Microsoft Teams can be found at Teams Retention Policies.
By following these steps and utilizing the resources provided, you can effectively create and apply retention policies for Microsoft Teams, ensuring that your organization’s data remains compliant with regulatory standards and internal policies.
Implement data lifecycle and records management (10–15%)
Manage data retention in Microsoft 365 workloads
Create and Apply Retention Policies for Yammer
When managing data within an organization, it’s crucial to establish retention policies that align with compliance requirements and business practices. Retention policies for Yammer are designed to help organizations control how long content is retained before it is permanently deleted. Here’s a detailed explanation of how to create and apply retention policies for Yammer:
Step 1: Understand Audit Log Retention Policies
Before creating a retention policy for Yammer, it’s important to understand that these policies are part of the Microsoft Purview Audit (Premium) solution. An audit log retention policy allows an organization to specify the duration for retaining audit logs, which can be up to 10 years. Policies can be based on activities across Microsoft 365 services or specific activities by all or certain users https://learn.microsoft.com/en-us/training/modules/investigate-threats-using-audit-in-microsoft-365-defender-microsoft-purview-premium/4-manage-audit-log-retention-policies .
Step 2: Meet Prerequisites
Ensure that the responsible individuals in your organization have the Organization Configuration role assigned to them in the Microsoft Purview compliance portal. This role is necessary to create and modify audit log retention policies https://learn.microsoft.com/en-us/training/modules/investigate-threats-using-audit-in-microsoft-365-defender-microsoft-purview-premium/4-manage-audit-log-retention-policies .
Step 3: Access the Microsoft Purview Compliance Portal
Sign in to the Microsoft Purview compliance portal using an account with the required Organization Configuration role. Navigate to the Audit section and select the Audit retention policies tab https://learn.microsoft.com/en-us/training/modules/investigate-threats-using-audit-in-microsoft-365-defender-microsoft-purview-premium/4-manage-audit-log-retention-policies .
Step 4: Create a New Policy
Select Create audit retention policy. In the new window, fill out the necessary fields, including the policy name, description, users, record type, duration, and priority. For Yammer, you will need to select the appropriate record type related to Yammer activities https://learn.microsoft.com/en-us/training/modules/investigate-threats-using-audit-in-microsoft-365-defender-microsoft-purview-premium/4-manage-audit-log-retention-policies .
Step 5: Set Policy Details
Define the scope of the policy by selecting specific users or leaving the field blank to apply to all users. Choose the duration for how long the audit logs should be retained. Set the priority to determine the processing order of this policy in relation to others https://learn.microsoft.com/en-us/training/modules/investigate-threats-using-audit-in-microsoft-365-defender-microsoft-purview-premium/4-manage-audit-log-retention-policies .
Step 6: Save the Policy
After configuring the policy details, select Save to create the new audit log retention policy. The policy will now appear in the list on the Audit retention policies tab and will be applied as specified https://learn.microsoft.com/en-us/training/modules/investigate-threats-using-audit-in-microsoft-365-defender-microsoft-purview-premium/4-manage-audit-log-retention-policies .
Step 7: Edit Policy if Necessary
If you need to edit the policy after creation, be aware that policies created with the New-UnifiedAuditLogRetentionPolicy cmdlet may require editing via PowerShell using the Set-UnifiedAuditLogRetentionPolicy cmdlet, as they might not be editable from the compliance portal https://learn.microsoft.com/en-us/training/modules/investigate-threats-using-audit-in-microsoft-365-defender-microsoft-purview-premium/4-manage-audit-log-retention-policies .
Additional Information
For more detailed steps and visual guidance, refer to the following URL: Manage audit log retention policies.
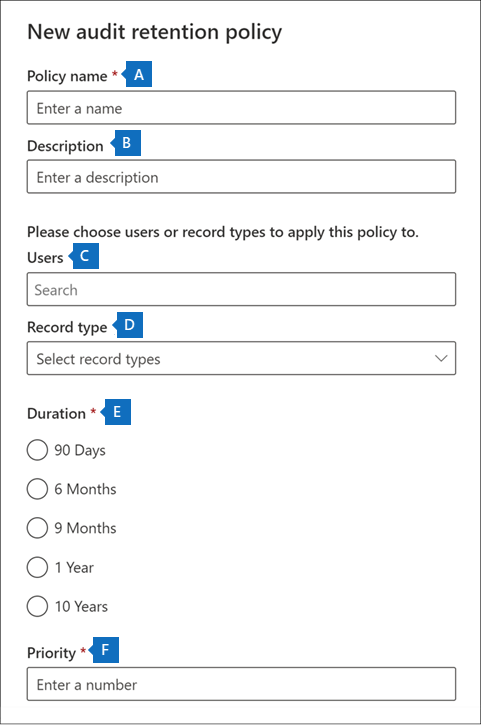
By following these steps, organizations can effectively create and apply retention policies for Yammer, ensuring that their compliance and data governance needs are met.
Implement data lifecycle and records management (10–15%)
Manage data retention in Microsoft 365 workloads
Create and Apply Retention Policies for Exchange Online
When managing data within an organization, it’s crucial to establish retention policies that align with compliance requirements and business needs. In Exchange Online, retention policies help manage the lifecycle of email data by specifying how long items should be retained and what actions should be taken when the retention period expires.
Understanding Retention Policies
Retention policies in Exchange Online are part of the Microsoft Purview Audit (Premium) suite. They serve to retain, delete, or both retain and delete content based on the policy’s configuration. Here’s an overview of how to create and apply these policies:
Access Rights: Ensure that the individuals responsible for creating and modifying retention policies are assigned the Organization Configuration role in the Microsoft Purview compliance portal https://learn.microsoft.com/en-us/training/modules/investigate-threats-using-audit-in-microsoft-365-defender-microsoft-purview-premium/4-manage-audit-log-retention-policies .
Default Retention Policy: By default, Exchange Online, SharePoint Online, OneDrive for Business, and Microsoft Entra audit records are retained for one year https://learn.microsoft.com/en-us/training/modules/investigate-threats-using-audit-in-microsoft-365-defender-microsoft-purview-premium/4-manage-audit-log-retention-policies . This applies to activities performed by users with an Office 365 or Microsoft 365 E5 license, or a Microsoft 365 E5 Compliance or E5 eDiscovery and Audit add-on license https://learn.microsoft.com/en-us/training/modules/investigate-threats-using-audit-in-microsoft-365-defender-microsoft-purview-premium/4-manage-audit-log-retention-policies .
Custom Retention Policies: Organizations can create customized audit log retention policies to retain records for up to one year, or up to 10 years with the required add-on license https://learn.microsoft.com/en-us/training/modules/investigate-threats-using-audit-in-microsoft-365-defender-microsoft-purview-standard/2-explore-microsoft-purview-audit-solutions . These policies can be based on the service where the activity occurred, specific activities, or the user who performed the activity https://learn.microsoft.com/en-us/training/modules/investigate-threats-using-audit-in-microsoft-365-defender-microsoft-purview-standard/2-explore-microsoft-purview-audit-solutions .
Policy Limits: An organization can have a maximum of 50 audit log retention policies https://learn.microsoft.com/en-us/training/modules/investigate-threats-using-audit-in-microsoft-365-defender-microsoft-purview-premium/4-manage-audit-log-retention-policies .
Longer Retention Requirements: To retain an audit log for longer than 90 days and up to one year, the user who generates the audit log must have an E5 license or an appropriate add-on license https://learn.microsoft.com/en-us/training/modules/investigate-threats-using-audit-in-microsoft-365-defender-microsoft-purview-premium/4-manage-audit-log-retention-policies . For a 10-year retention period, a 10-year audit log retention add-on license is also required https://learn.microsoft.com/en-us/training/modules/investigate-threats-using-audit-in-microsoft-365-defender-microsoft-purview-premium/4-manage-audit-log-retention-policies .
Policy Priority: Custom audit log retention policies take precedence over the default retention policy https://learn.microsoft.com/en-us/training/modules/investigate-threats-using-audit-in-microsoft-365-defender-microsoft-purview-premium/4-manage-audit-log-retention-policies . If a custom policy specifies a shorter retention period for certain activities, it will override the default one-year retention period https://learn.microsoft.com/en-us/training/modules/investigate-threats-using-audit-in-microsoft-365-defender-microsoft-purview-premium/4-manage-audit-log-retention-policies .
Steps to Create and Apply Retention Policies
Define Policy Scope: Determine which mailboxes or content types the policy should apply to. Consider the types of information that require retention and the regulatory requirements that must be met.
Create the Policy: In the Microsoft Purview compliance portal, navigate to the data governance section and create a new retention policy. Specify the retention settings, such as how long the content should be retained and the actions to take after the retention period ends (e.g., delete, retain, or both).
Assign the Policy: Apply the policy to the appropriate users, groups, or content locations. Ensure that the policy is assigned to all relevant mailboxes in Exchange Online.
Monitor and Review: Regularly review the retention policies to ensure they continue to meet the organization’s needs and compliance obligations. Update the policies as necessary to reflect changes in regulations or business operations.
For more detailed guidance on managing audit log retention policies, refer to the following resources:
By following these steps and utilizing the resources provided, organizations can effectively create and apply retention policies in Exchange Online to manage their data lifecycle and maintain compliance with regulatory standards.
Implement data lifecycle and records management (10–15%)
Manage data retention in Microsoft 365 workloads
Apply Mailbox Holds in Exchange Online
When managing an organization’s data, it’s often necessary to preserve mailbox content to meet legal, regulatory, or organizational information governance policies. In Exchange Online, this is achieved through mailbox holds. There are several types of holds that can be applied to mailboxes:
Litigation Hold: When a mailbox is placed on Litigation Hold, all mailbox content is preserved indefinitely or for a specified duration. This includes deleted items and original versions of modified items.
In-Place Hold: Similar to Litigation Hold, In-Place Hold allows for more granular control. You can specify query-based criteria to preserve only certain items within a mailbox. Multiple In-Place Holds can be placed on a mailbox for different cases or investigations.
eDiscovery Hold: As part of the eDiscovery process in the Microsoft Purview compliance portal, when you create an eDiscovery case, you can place associated mailboxes on hold. This preserves mailbox content until the hold is removed, even if the user deletes or modifies the content.
To apply a mailbox hold in Exchange Online, follow these general steps:
- Navigate to the Microsoft Purview compliance portal.
- For Litigation Hold, go to the Exchange admin center, select the mailbox you want to place on hold, and then edit the mailbox properties to enable Litigation Hold.
- For In-Place Hold and eDiscovery Hold, use the eDiscovery tool in the compliance portal to specify the mailboxes and the conditions for the hold.
It’s important to note that when a mailbox is on hold, the mailbox user can still work with their email normally; the user experience is not affected. However, the hold ensures that even if the user deletes items, those items are still preserved in the mailbox’s Recoverable Items folder.
For detailed instructions on how to apply these holds, you can refer to the following resources:
Remember to consult with your legal team or compliance officers when applying holds to ensure that your organization meets its legal and regulatory obligations.
Please note that the URLs provided are for reference and additional information. They should be accessed to gain a deeper understanding of the process and to follow any updates or changes to the procedures.
Implement data lifecycle and records management (10–15%)
Manage data retention in Microsoft 365 workloads
Implementing Exchange Online Archiving Policies
Exchange Online Archiving is a Microsoft 365 cloud-based, enterprise-class archiving solution for organizations that use Exchange Online. Archiving in Exchange Online assists organizations with their archiving, compliance, regulatory, and eDiscovery challenges. Implementing archiving policies in Exchange Online involves several steps and considerations:
Understanding Archiving Policies: Archiving policies in Exchange Online help manage the lifecycle of email data by allowing administrators to automatically move items from a user’s primary mailbox to their archive mailbox after a specified period.
Creating Archive Mailboxes:
- Before implementing archiving policies, ensure that archive mailboxes are enabled for users. This can be done through the Exchange admin center or via PowerShell commands.
- Archive mailboxes provide users with additional mailbox storage space and serve as a destination for archived email.
Retention Tags and Policies:
- Retention tags define how long a message should be kept and the action to be taken when the retention period expires, such as moving items to the archive or deleting them.
- There are different types of retention tags, including default policy tags (DPTs), retention policy tags (RPTs), and personal tags.
- Retention policies are a group of retention tags that can be applied to mailboxes.
Assigning Retention Policies to Users:
- Once retention policies are created, they can be assigned to users’ mailboxes. This can be done individually or in bulk.
- Users can also apply personal tags to specific items or folders if allowed by their retention policy.
Monitoring and Reporting:
- Administrators can use reporting features in the Security & Compliance Center to monitor and report on the archiving process and ensure that policies are being applied correctly.
Compliance and eDiscovery:
- Archived data can be placed on hold for legal or compliance reasons. This ensures that the data is preserved in its current state for eDiscovery purposes.
- The eDiscovery tools in the Security & Compliance Center can be used to search and export content from archive mailboxes.
For additional information on implementing Exchange Online archiving policies, you can refer to the following resources:
- Overview of archiving in Microsoft 365
- Set up an archive and deletion policy for mailboxes
- Retention tags and retention policies
By following these guidelines and utilizing the provided resources, you can effectively implement and manage Exchange Online archiving policies to meet your organization’s needs.
Implement data lifecycle and records management (10–15%)
Manage data retention in Microsoft 365 workloads
Configure Preservation Locks for Retention Policies and Retention Label Policies
When configuring retention policies and retention label policies, it is crucial to understand the concept of preservation locks. A preservation lock is a feature that, once applied, prevents anyone from turning off the retention policy or making it less restrictive. This is particularly important for organizations that need to ensure compliance with regulatory requirements that mandate specific data retention periods.
Steps to Configure Preservation Locks:
Assign Proper Roles: Before you can configure a preservation lock, ensure that you have the necessary permissions. You must be assigned the Compliance Administrator or Organization Management role in the Microsoft Purview compliance portal.
Create Retention Policy or Label: Set up your retention policy or retention label policy as needed. This includes defining what content is subject to retention, specifying retention durations, and deciding on the actions to take after the retention period ends.
Apply Preservation Lock: Once the policy is created, you can apply a preservation lock. Be aware that once a preservation lock is in place, you cannot delete the policy or make it less restrictive. You can only extend the retention period or make the policy more restrictive.
Understand the Implications: With a preservation lock, not even administrators can disable or remove the policy. This ensures that the policy remains in effect to meet legal or regulatory obligations.
Use PowerShell for Advanced Management: For more advanced management of retention policies, including viewing existing policies, you can use PowerShell cmdlets such as
Get-RetentionCompliancePolicyandSet-RetentionCompliancePolicy.
Additional Considerations:
Review Policy Settings: Before locking a policy, review all settings thoroughly. Once a preservation lock is applied, the only changes allowed are those that make the policy more stringent.
Document Policy Details: Keep detailed records of the policy settings and the rationale for applying a preservation lock. This documentation can be vital for compliance audits.
Monitor Policy Compliance: Regularly monitor the application of your retention policies to ensure they are working as intended and that your organization remains in compliance with relevant regulations.
For more detailed information on configuring preservation locks and managing retention policies, you can refer to the official Microsoft documentation:
Please note that the URLs provided are for additional information and are part of the study material. They should be used to gain a deeper understanding of the concepts and for practical guidance on implementation.
Implement data lifecycle and records management (10–15%)
Manage data retention in Microsoft 365 workloads
Recover Retained Content in Microsoft 365
When content is retained in Microsoft 365, it can be recovered depending on the type of deletion that has occurred. There are two main types of deletion: soft delete and hard delete.
Soft Delete
- When a message is soft-deleted, it is moved to the
Deletions folder within the user’s Recoverable Items
folder. This action is typically performed using the
New-ComplianceSearchAction -Purge -PurgeType SoftDeletecommand. - The user has the ability to recover messages from the Deleted Items folder during the deleted item retention period configured for the mailbox https://learn.microsoft.com/en-us/training/modules/investigate-threats-with-content-search-in-microsoft-purview/7-search-delete-email-messages .
- If the message is not recovered within this period, or if the user decides to purge it, the message is then moved to the Purges folder, where it is no longer accessible by the user https://learn.microsoft.com/en-us/training/modules/investigate-threats-with-content-search-in-microsoft-purview/7-search-delete-email-messages .
- If single item recovery is enabled (which is the default for new mailboxes in Microsoft 365), the message will be retained in the Purges folder for the duration of the deleted item retention period https://learn.microsoft.com/en-us/training/modules/investigate-threats-with-content-search-in-microsoft-purview/7-search-delete-email-messages .
- After the retention period expires, the message is marked for permanent deletion and will be purged from Microsoft 365 the next time the mailbox is processed by the Managed Folder assistant https://learn.microsoft.com/en-us/training/modules/investigate-threats-with-content-search-in-microsoft-purview/7-search-delete-email-messages .
Hard Delete
- A hard-deleted message is one that is removed from the mailbox and
placed directly into the Purges folder using the
New-ComplianceSearchAction -Purge -PurgeType HardDeletecommand. - The user cannot access a hard-deleted message once it is in the Purges folder https://learn.microsoft.com/en-us/training/modules/investigate-threats-with-content-search-in-microsoft-purview/7-search-delete-email-messages .
- Similar to soft-deleted messages, if single item recovery is enabled, the message is retained during the deleted item retention period before being marked for permanent deletion https://learn.microsoft.com/en-us/training/modules/investigate-threats-with-content-search-in-microsoft-purview/7-search-delete-email-messages .
- Once the retention period has expired, the message is permanently deleted from Microsoft 365 during the next processing cycle by the Managed Folder assistant https://learn.microsoft.com/en-us/training/modules/investigate-threats-with-content-search-in-microsoft-purview/7-search-delete-email-messages .
Audit Log Retention Policies
- Organizations can create audit log retention policies to specify how long audit logs should be retained, which can be up to 10 years https://learn.microsoft.com/en-us/training/modules/investigate-threats-using-audit-in-microsoft-365-defender-microsoft-purview-premium/4-manage-audit-log-retention-policies .
- These policies can be based on activities in one or more Microsoft 365 services, specific activities performed by all or specific users, and can have a priority level to determine which policy takes precedence https://learn.microsoft.com/en-us/training/modules/investigate-threats-using-audit-in-microsoft-365-defender-microsoft-purview-premium/4-manage-audit-log-retention-policies .
- Microsoft Purview Audit (Premium) provides a default audit log retention policy that retains certain audit records for one year https://learn.microsoft.com/en-us/training/modules/investigate-threats-using-audit-in-microsoft-365-defender-microsoft-purview-premium/4-manage-audit-log-retention-policies .
- The default policy applies to users with specific licenses, such as Office 365 or Microsoft 365 E5, or a Microsoft 365 E5 Compliance or E5 eDiscovery and Audit add-on license https://learn.microsoft.com/en-us/training/modules/investigate-threats-using-audit-in-microsoft-365-defender-microsoft-purview-premium/4-manage-audit-log-retention-policies .
- For users without these licenses, their audit records are retained for 90 days https://learn.microsoft.com/en-us/training/modules/investigate-threats-using-audit-in-microsoft-365-defender-microsoft-purview-premium/4-manage-audit-log-retention-policies .
For more information on managing and recovering retained content in Microsoft 365, you can refer to the following resources: - Learn about retention policies in Microsoft 365 - Manage inactive mailboxes in Exchange Online - Recover deleted items in Outlook for Windows
Please note that the URLs provided are for additional information and are not to be included in the study guide.
Implement data lifecycle and records management (10–15%)
Implement Microsoft Purview records management
Create and Configure Retention Labels for Records Management
Retention labels in Microsoft 365 are a critical component of records management. They allow organizations to classify data for governance, and ensure that important information is preserved, protected, and disposed of appropriately when no longer needed. Here’s a detailed explanation of how to create and configure retention labels for records management:
Access the Microsoft Purview compliance portal: To begin creating retention labels, you need to access the Microsoft Purview compliance portal. This is where you can manage compliance features across Microsoft 365 services.
Create a Retention Label: Within the compliance portal, navigate to the ‘Information governance’ or ‘Records management’ section, depending on your version. Here, you can create a new retention label by specifying a name, description, and retention settings that determine how long content is kept.
Configure Retention Settings: When configuring a retention label, you can decide if the content should be retained forever, for a specific period, or if it should be deleted after a certain time. You can also define actions to take when the retention period expires, such as deleting the content or reviewing it for disposition.
Apply Retention Labels to Content: Once created, retention labels can be applied to content across various Microsoft 365 services, such as SharePoint Online, Exchange Online, and OneDrive for Business. Labels can be applied manually by users, automatically by administrators using label policies, or auto-applied using conditions such as content types or sensitive information.
Publish Retention Labels: To make the labels available to users, you must publish them by creating a label policy. This policy specifies where the labels are published, to which locations or users, and includes settings for how users interact with the labels.
Monitor and Review: After retention labels are published and applied, it’s important to monitor their usage and review content as it reaches the end of its retention period. The compliance portal provides tools to track label usage and manage disposition reviews.
Retention Policies vs. Retention Labels: It’s important to understand the difference between retention policies and retention labels. Retention policies are broader and apply to entire locations or services, while retention labels are more granular and can be applied to specific items or documents.
For additional information on creating and configuring retention labels, you can refer to the following resources:
- Overview of retention labels
- Create and configure retention labels
- Apply a retention label to content automatically
- Publish retention labels
By following these steps and utilizing the provided resources, you can effectively create and configure retention labels to manage records within your organization, ensuring compliance with regulatory requirements and internal policies.
Implement data lifecycle and records management (10–15%)
Implement Microsoft Purview records management
Managing Retention Labels Using a File Plan and File Plan Descriptors
Retention labels in Microsoft 365 help organizations manage and govern their data by ensuring that important information is retained for a specified period of time while non-essential information is disposed of when it’s no longer needed. A file plan is an essential component of records management in Microsoft 365, as it provides a systematic way to categorize and manage retention labels and policies across the organization.
File Plan Descriptors: File plan descriptors are metadata tags that provide additional context and details about retention labels. They help to organize and manage the labels more effectively. Common descriptors include:
- Category: A broad classification that groups similar types of records.
- Department: The business unit or department responsible for the records.
- Authority Type: The type of regulatory or business authority that mandates the retention.
- Provision/Citation: The specific legal or regulatory citation that requires the retention.
- Event: A trigger that may start or change the retention period.
Creating and Managing a File Plan:
Access the Compliance Center: Navigate to the Microsoft 365 Compliance Center, which is the central location for managing compliance-related features.
File Plan Manager: Use the File Plan Manager within the Records Management solution to create and manage your file plan. This tool allows you to define and organize your retention labels with associated descriptors.
Define Retention Labels: Create retention labels that specify how long content is retained and what happens to it after the retention period ends (e.g., delete, review).
Apply Descriptors: Assign file plan descriptors to each retention label to provide clarity and ensure that each label is used consistently across the organization.
Publish Labels: Once the retention labels are defined and descriptors are assigned, publish the labels to the relevant locations such as SharePoint sites, Exchange mailboxes, or OneDrive accounts.
Monitor and Review: Regularly monitor the application of retention labels and review the file plan to ensure it remains up-to-date with organizational needs and regulatory changes.
Disposition Review: If a label includes a disposition review, ensure that the appropriate stakeholders are notified to review the content before it’s permanently deleted.
Additional Resources:
For more information on creating and managing a file plan in Microsoft 365, you can refer to the following resources:
- Overview of file plan manager
- Create and configure retention labels
- Publish retention labels
- Disposition review
By following these steps and utilizing the provided resources, you can effectively manage retention labels using a file plan and ensure your organization’s compliance with data retention policies and regulations.
Implement data lifecycle and records management (10–15%)
Implement Microsoft Purview records management
Classifying Records with Retention Labels and Retention Label Policies
Retention labels and retention label policies are essential components of information governance in Microsoft 365. They enable organizations to classify records for the purpose of managing their lifecycle and ensuring compliance with regulatory requirements.
Retention Labels
Retention labels are tags that can be applied to content across Microsoft 365 services, including SharePoint, Exchange, OneDrive, and Microsoft Teams. These labels define how long content should be retained before it is disposed of and whether to retain it or delete it at the end of the retention period.
Retention Label Policies
Retention label policies are used to publish these labels to locations where they can be applied to content. Policies can target specific users, groups, or locations such as SharePoint sites or Exchange mailboxes. Once a policy is in place, users can apply the labels manually, or labels can be applied automatically based on specific conditions or metadata.
Steps to Classify Records Using Retention Labels and Policies
Create Retention Labels: Administrators create retention labels in the Microsoft Purview compliance portal. Each label specifies retention settings and actions to take after the retention period expires.
Publish Retention Labels: Administrators then publish these labels by creating a retention label policy. This policy specifies where the labels are available and who can access them.
Apply Retention Labels: Users can apply labels manually to content, or administrators can set up rules for automatic labeling based on content types, sensitive information, or keywords.
Review and Monitor: Organizations should regularly review and monitor retention labels and policies to ensure they align with compliance requirements and business needs.
Benefits of Using Retention Labels and Policies
- Regulatory Compliance: Helps ensure that records are retained according to legal and regulatory requirements.
- Risk Management: Reduces the risk of data breaches by securely managing sensitive information.
- Efficient Information Management: Automates the retention and disposal of content, saving time and resources.
- Litigation Readiness: Prepares organizations for potential litigation by retaining necessary records.
For more detailed information on creating and managing retention labels and policies, you can refer to the following resources:
- Overview of retention labels
- Overview of retention policies
- Apply a retention label to content automatically
By understanding and implementing retention labels and policies, organizations can effectively manage their information lifecycle, reduce risks, and maintain compliance with various regulations.
Implement data lifecycle and records management (10–15%)
Implement Microsoft Purview records management
Manage Event-Based Retention
Event-based retention is a feature within Microsoft Purview that allows organizations to manage the lifecycle of their information by retaining or deleting content based on specific events. This capability is crucial for organizations that need to comply with legal, regulatory, or organizational information governance policies.
Key Concepts
Retention Policy: A retention policy is a set of rules that dictate how long information should be kept and when it should be disposed of. These policies can be applied to various types of content within Microsoft 365 services.
Event-Based Retention Trigger: An event that initiates the start of a retention period. This could be an employee’s departure, contract completion, project closure, or any other significant event that requires the preservation or deletion of related content.
Retention Period: The duration for which the content is to be retained. This period starts when the event trigger occurs.
Disposition Review: At the end of the retention period, content can be reviewed to decide if it should be permanently deleted or further retained.
Implementation Steps
Define Retention Events: Identify the types of events that are relevant to your organization and that should trigger retention or deletion of content.
Create Retention Labels: In the Microsoft Purview compliance portal, create retention labels that specify how content should be managed when an event occurs.
Publish Retention Labels: Apply the retention labels to content by publishing them to the relevant locations, such as specific users, SharePoint sites, or Exchange mailboxes.
Implement Event Triggers: Configure the system to recognize the occurrence of the defined events. This can be done through manual input or by integrating with other systems that can automatically signal an event.
Monitor and Review: Regularly monitor the application of retention policies and conduct disposition reviews to ensure compliance with the retention schedule.
Additional Resources
For more detailed information on setting up and managing event-based retention in Microsoft Purview, you can refer to the following resources:
- Overview of retention policies
- Learn how to create and manage retention labels
- Event-driven retention in Microsoft 365
By effectively managing event-based retention, organizations can ensure that they retain important information for the required duration and dispose of it when it is no longer needed, thus maintaining compliance with various regulations and policies.
Implement data lifecycle and records management (10–15%)
Implement Microsoft Purview records management
Manage the Disposition of Content in Records Management
Disposition in records management refers to the process of determining how records are retained, archived, and ultimately disposed of. Managing the disposition of content is a critical aspect of an organization’s records management strategy, as it ensures that records are kept for the appropriate amount of time and that they are disposed of in a secure and compliant manner.
Key Concepts
Retention Policies: Retention policies are used to specify how long content is kept before it is eligible for disposition. These policies are based on the organization’s compliance requirements, legal obligations, and business needs.
Disposition Review: Once the retention period expires, content is reviewed to determine if it should be permanently deleted or retained further. This review process often involves stakeholders from legal, compliance, or records management teams.
Records Repository: A secure location where records are stored for their retention period. This repository ensures that records are preserved in an unaltered state and protected from unauthorized access.
Audit Trails: Keeping detailed logs of when and how records are accessed, modified, or disposed of is essential for compliance. Audit trails provide evidence of proper records management practices.
Implementation Steps
Define Retention Labels: Create retention labels that define how long content is retained and what happens when the retention period ends. These labels can be applied to content manually or automatically based on specific conditions or metadata.
Apply Retention Policies: Assign retention policies to content to enforce the retention labels. Policies can be applied across different locations, such as SharePoint, Exchange, and OneDrive.
Disposition Review: Set up a disposition review process where reviewers are notified when content is eligible for disposition. Reviewers can then decide whether to dispose of the content or extend its retention.
Secure Deletion: Ensure that content is securely deleted in a way that prevents recovery. This is particularly important for sensitive or confidential information.
Documentation and Reporting: Maintain thorough documentation of the disposition process and generate reports for compliance audits. This includes details of disposed content, review decisions, and actions taken.
Additional Resources
For a detailed understanding of retention policies and labels in Microsoft 365, you can refer to the Overview of retention policies.
To learn more about setting up and managing retention labels, visit Learn about retention labels.
For guidance on the disposition review process, see Disposition of content.
To understand how to work with the records repository and secure deletion, review Records management in Microsoft 365.
By following these steps and utilizing the provided resources, organizations can effectively manage the disposition of content in their records management practices, ensuring compliance with regulatory requirements and internal policies.
Implement data lifecycle and records management (10–15%)
Implement Microsoft Purview records management
Configure Records Management Settings
Records management is a crucial aspect of compliance in Microsoft 365, allowing organizations to manage the lifecycle of their information effectively. Configuring records management settings involves setting up retention label settings and disposition settings to ensure that data is retained or disposed of according to organizational policies and regulatory requirements.
Retention Label Settings
Retention labels in Microsoft 365 help classify and manage content by applying retention rules to documents and emails. These labels can be applied automatically by administrators, manually by users, or through auto-apply policies based on specific conditions or content types.
When configuring retention label settings, consider the following:
- Creation of Retention Labels: Define retention labels with clear names and descriptions that reflect the types of content they will be applied to.
- Retention Policies: Determine how long content should be retained before it is eligible for deletion or review. Policies can be based on timeframes or specific events.
- Label Policies: Decide where the retention labels will be published. You can publish labels to specific locations such as mailboxes, sites, or apps.
- Auto-Apply Policies: Use conditions, such as content containing specific keywords or sensitive information, to automatically apply labels to content.
Disposition Settings
Disposition involves the review and deletion of content that has reached the end of its retention period. Disposition settings help ensure that content is not retained indefinitely, reducing risk and storage costs.
When configuring disposition settings, consider the following:
- Disposition Review: Set up a disposition review process where reviewers are notified when content is ready for disposition. Reviewers can then decide whether to delete the content or extend its retention.
- Automatic Deletion: Configure settings to automatically delete content at the end of its retention period if no review is required.
- Proof of Disposal: Maintain records of disposed content for auditing purposes.
Additional Resources
For more detailed guidance on configuring records management settings in Microsoft 365, refer to the following resources:
By carefully configuring retention label settings and disposition settings, organizations can effectively manage the lifecycle of their information, ensuring compliance with internal policies and regulatory requirements.
Monitor and investigate data and activities by using Microsoft Purview (15–20%)
Plan and manage regulatory requirements by using Microsoft Purview Compliance Manager
Plan for Regulatory Compliance in Microsoft 365
When planning for regulatory compliance in Microsoft 365, it is essential to understand the various services and tools available that can help organizations meet their compliance obligations. Here are the key points to consider:
Audit (Premium) Events in Microsoft 365 Services: Microsoft 365 services such as Microsoft Forms, Microsoft Stream, Microsoft Teams, and Yammer provide Audit (Premium) events. These events are logged when users are assigned the appropriate Audit (Premium) licensing, which is crucial for tracking and ensuring compliance with various regulations https://learn.microsoft.com/en-us/training/modules/investigate-threats-using-audit-in-microsoft-365-defender-microsoft-purview-premium/2-explore-microsoft-purview-audit-premium .
Azure Policy for Service Configurations: Azure Policy can be used to monitor and enforce configurations of Azure resources. This is important for maintaining compliance with regulatory standards. Azure Policy can audit and enforce secure configurations across Azure resources, and Azure Monitor can be used to create alerts for configuration deviations https://learn.microsoft.com/security/benchmark/azure/baselines/azure-app-configuration-security-baseline .
Regulatory Compliance Controls: Azure Policy Regulatory Compliance controls for Azure App Configuration provide guidance on configuring Azure resources in compliance with regulatory standards. These controls can be enforced using Azure Policy effects such as [deny] and [deploy if not exists] https://learn.microsoft.com/security/benchmark/azure/baselines/azure-app-configuration-security-baseline .
Microsoft Defender for Cloud: Microsoft Defender for Cloud offers hybrid cloud security posture management, which includes security recommendations, Secure Score, and regulatory compliance. This tool helps organizations review their regulatory compliance status and implement security recommendations to improve their compliance posture https://learn.microsoft.com/en-us/training/modules/manage-cloud-security-posture-management/7-summary-resources .
Managing Regulatory Compliance Policies: It is possible to assign and manage regulatory compliance policies, including the Microsoft Cloud Security Benchmark (MCSB). This helps organizations align with the security best practices and regulatory requirements https://learn.microsoft.com/en-us/credentials/certifications/resources/study-guides/sc-200 .
Improving Defender for Cloud Secure Score: By applying recommended remediations, organizations can improve their Defender for Cloud Secure Score, which is indicative of their security and compliance posture https://learn.microsoft.com/en-us/credentials/certifications/resources/study-guides/sc-200 .
Configuration of Microsoft Defender for Servers and DevOps: Configuring plans and agents for Microsoft Defender for Servers, as well as managing Microsoft Defender for DevOps, are part of maintaining a compliant and secure environment https://learn.microsoft.com/en-us/credentials/certifications/resources/study-guides/sc-200 .
For additional information on these topics, you can refer to the following resources:
- Microsoft Forms Audit Events
- Microsoft Stream Audit Events
- Microsoft Teams Audit Events
- Yammer Audit Events
- Azure Policy Tutorial
- Azure Policy Regulatory Compliance Controls
- Azure Policy Regulatory Compliance
- Azure Policy GitHub Repo
- Microsoft Defender for Cloud Overview
By leveraging these tools and resources, organizations can effectively plan for and maintain regulatory compliance within the Microsoft 365 ecosystem.
Monitor and investigate data and activities by using Microsoft Purview (15–20%)
Plan and manage regulatory requirements by using Microsoft Purview Compliance Manager
Create and Manage Assessments
When creating and managing assessments, it is essential to understand that assessments are tools used to evaluate compliance with industry standards, regulatory standards, and benchmarks. These assessments are represented within Defender for Cloud’s regulatory compliance dashboard and are defined through Azure Policy initiatives.
To effectively create and manage assessments, follow these steps:
Add a Compliance Standard: Begin by adding a compliance standard to your management group or subscription from the Security policy page. This action allows you to see compliance data as assessments in your dashboard.
Assign Standards or Benchmarks: Once you have selected a standard or benchmark, assign it to your chosen scope. The standard will then appear in your regulatory compliance dashboard, with all associated compliance data mapped as assessments.
Review and Manage Assessments: After assigning the standards, you can review the assessments in your dashboard. This includes checking compliance against the controls and identifying areas where your organization may not meet the required benchmarks.
Download Summary Reports: For any of the standards that have been assigned, you have the option to download summary reports. These reports provide a comprehensive overview of your compliance status with the selected standards.
Stay Updated with Microsoft’s Automatic Improvements: Microsoft tracks the regulatory standards and automatically updates its coverage in some of the packages over time. When new content for an initiative is released by Microsoft, it will automatically appear in your dashboard as new policies mapped to controls in the standard https://learn.microsoft.com/en-us/training/modules/manage-cloud-security-posture-management/4-measure-enforce-regulatory-compliance .
For additional information on creating and managing assessments within Microsoft’s security and compliance solutions, you can refer to the following resources:
- Microsoft Defender for Cloud - Protect your data centers and get advanced threat protection for your Azure and non-Azure workloads.
- Microsoft Purview compliance portal - Manage your compliance needs across Microsoft 365 services using integrated solutions for information governance, classification, case management, and more.
- Azure Information Protection - Configure and manage the Azure Information Protection client and scanner to automatically classify and protect your organization’s email and documents.
By following these guidelines and utilizing the provided resources, you can effectively create and manage assessments to ensure your organization’s compliance with relevant standards and regulations.
Monitor and investigate data and activities by using Microsoft Purview (15–20%)
Plan and manage regulatory requirements by using Microsoft Purview Compliance Manager
Create and Modify Custom Templates
Custom templates are essential tools within Microsoft 365 services that allow organizations to streamline their compliance and risk management processes. These templates can be tailored to meet specific organizational needs and can be modified as requirements evolve.
Creating Custom Templates
To create custom templates, you typically start by accessing the relevant Microsoft Purview compliance portal. For instance, insider risk management notice templates are a type of custom template that can be used to communicate with employees when their activities trigger a policy match and alert https://learn.microsoft.com/en-us/training/modules/m365-compliance-insider-manage-insider-risk/actions .
Access the Notices Templates Dashboard: This dashboard displays a list of all configured notice templates. It is the starting point for creating new templates https://learn.microsoft.com/en-us/training/modules/m365-compliance-insider-manage-insider-risk/actions .
Define Template Details: When creating a new template, you will need to specify various details such as the template name, the conditions under which it will be used, and the content of the notices that will be sent out.
Use HTML for Rich Content: If a simple text-based email is not sufficient, HTML can be used in the message body field to create a more detailed and formatted message https://learn.microsoft.com/en-us/training/modules/m365-compliance-insider-manage-insider-risk/actions .
Save and Test the Template: After configuring the template, it is important to save it and test to ensure that it functions as expected.
Modifying Custom Templates
Custom templates may need to be modified over time to adapt to new compliance requirements or to improve their effectiveness.
Navigate to the Template: Use the Notices Templates Dashboard to find the template you wish to modify. Templates are listed in reverse date order, with the most recent at the top https://learn.microsoft.com/en-us/training/modules/m365-compliance-insider-manage-insider-risk/actions .
Edit the Template: Select the template and make the necessary changes. This could involve updating the conditions, editing the message content, or changing the formatting.
Review Changes: It’s crucial to review any modifications to ensure they meet the intended purpose and comply with organizational policies.
Update and Re-test: After making changes, update the template and conduct tests to confirm that it operates as required.
For additional information on creating, updating, and deleting notice templates, you can refer to the following resources:
- Using HTML in the message body field of a notice template https://learn.microsoft.com/en-us/training/modules/m365-compliance-insider-manage-insider-risk/actions .
- Learn more about creating, updating, and deleting notice templates https://learn.microsoft.com/en-us/training/modules/m365-compliance-insider-manage-insider-risk/actions .
By following these steps and utilizing the provided resources, you can effectively create and modify custom templates to enhance your organization’s compliance and risk management strategies.
Monitor and investigate data and activities by using Microsoft Purview (15–20%)
Plan and manage regulatory requirements by using Microsoft Purview Compliance Manager
Interpret and Manage Improvement Actions
Improvement actions are essentially security recommendations that are designed to enhance the security posture of an organization. These actions are identified through various security assessments and are aimed at addressing potential vulnerabilities or attack surfaces within an organization’s IT infrastructure.
Understanding Improvement Actions
Improvement actions are categorized based on their status:
- To Address: Actions that have been identified but not yet acted upon.
- Planned: Actions that are scheduled for implementation.
- Risk Accepted: Actions that have been acknowledged but the organization has chosen to accept the associated risk.
- Resolved through Third Party: Actions that have been addressed by solutions outside of Microsoft’s offerings.
- Resolved through Alternate Mitigation: Actions that have been mitigated through means other than the recommended action.
- Completed: Actions that have been fully implemented and are no longer considered a threat https://learn.microsoft.com/en-us/training/modules/mitigate-incidents-microsoft-365-defender/10-understand-microsoft-secure-score .
Managing Improvement Actions
To effectively manage improvement actions, one can utilize tools such as Microsoft Secure Score. This tool measures an organization’s security posture, with a higher score indicating a more robust security stance. The Secure Score can be accessed through the Microsoft 365 Defender portal, which provides a centralized dashboard for monitoring and improving the security of Microsoft 365 identities, apps, and devices https://learn.microsoft.com/en-us/training/modules/mitigate-incidents-microsoft-365-defender/10-understand-microsoft-secure-score .
The Microsoft 365 Defender portal offers:
- Robust Visualizations: Graphical representations of metrics and trends over time.
- Integration with Microsoft Products: Seamless connection with other Microsoft security solutions.
- Score Comparison: Ability to compare scores with similar organizations.
- Actionable Recommendations: Specific guidance on how to improve the security score https://learn.microsoft.com/en-us/training/modules/mitigate-incidents-microsoft-365-defender/10-understand-microsoft-secure-score .
Improvement actions can cover a range of Microsoft products, including but not limited to:
- Microsoft 365 (including Exchange Online)
- Microsoft Entra ID
- Microsoft Defender for Endpoint
- Microsoft Defender for Identity
- Defender for Cloud Apps
- Microsoft Teams https://learn.microsoft.com/en-us/training/modules/mitigate-incidents-microsoft-365-defender/10-understand-microsoft-secure-score .
Organizations have the flexibility to mark improvement actions as covered by third-party solutions or alternate mitigations, which can also be reflected in the Secure Score https://learn.microsoft.com/en-us/training/modules/mitigate-incidents-microsoft-365-defender/10-understand-microsoft-secure-score .
Additional Resources
For more information on managing improvement actions and utilizing Microsoft Secure Score, you can visit the following URLs:
- Microsoft Secure Score in the Microsoft 365 Defender portal
- Improvement actions in Microsoft Secure Score
Please note that the URLs provided are for additional information and are not meant to be included in the study guide as per the instructions.
Monitor and investigate data and activities by using Microsoft Purview (15–20%)
Plan and manage regulatory requirements by using Microsoft Purview Compliance Manager
Create and Manage Alert Policies for Assessments
When managing cloud environments, it’s crucial to have a robust system for creating and managing alert policies. These policies help you stay informed about the operational health and security posture of your resources. Here’s a detailed explanation of how to create and manage alert policies for assessments:
Navigate to the Appropriate Service: Begin by accessing the service that you want to monitor. For instance, if you’re using Azure, you would go to the Azure portal.
Select the Monitoring Tool: Choose the monitoring tool that aligns with the resources you wish to assess. Azure offers several tools, such as Azure Monitor and Microsoft Defender for Cloud, which provide comprehensive monitoring capabilities.
Define Alert Conditions: Determine the metrics or logs that will trigger an alert. This could be based on performance thresholds, security events, or compliance with regulatory standards https://learn.microsoft.com/en-us/training/modules/manage-cloud-security-posture-management/4-measure-enforce-regulatory-compliance .
Configure Alert Settings: Set the parameters for the alert, such as the threshold values and the evaluation frequency. For example, you might set up an alert to notify you when 75% of average compute unit (CU) usage is reached on an Application Gateway https://learn.microsoft.com/en-us/azure/application-gateway/high-traffic-support .
Automate Responses: Optionally, you can automate responses to certain alerts. This could involve scaling resources, initiating a failover, or triggering a script to address the issue.
Manage Alert Policies: Group related alerts into policies for easier management. This allows you to apply consistent settings across multiple alerts and resources.
Review and Update Policies: Regularly review your alert policies to ensure they remain effective and aligned with your operational requirements. Adjust them as necessary to reflect changes in your environment or operational practices.
Integrate with Compliance Standards: If you’re using Microsoft Defender for Cloud, you can integrate alert policies with regulatory compliance standards. This ensures that you’re alerted to any compliance deviations, which is essential for maintaining adherence to industry and regulatory requirements https://learn.microsoft.com/en-us/training/modules/manage-cloud-security-posture-management/4-measure-enforce-regulatory-compliance .
Utilize Built-in Integrations: Take advantage of built-in integrations with services like Microsoft Defender for Endpoint to enhance your alerting capabilities. This integration can provide additional insights and automated recommendations without the need for manual configuration https://learn.microsoft.com/en-us/training/modules/what-is-azure-defender/3-understand-azure-secure-center .
Monitor Across Environments: If you’re operating in a multi-cloud environment, ensure that your alert policies cover all relevant platforms. For example, onboarding your AWS account into Microsoft Defender for Cloud allows you to monitor AWS resources alongside Azure resources https://learn.microsoft.com/en-us/training/modules/connect-non-azure-machines-to-azure-defender/4-connect-aws-accounts .
Access and Download Reports: Use the dashboard provided by your monitoring tool to access and download summary reports for your alert policies. This can help you analyze trends and improve your alert management process https://learn.microsoft.com/en-us/training/modules/manage-cloud-security-posture-management/4-measure-enforce-regulatory-compliance .
For additional information on creating and managing policies, you can refer to the following resources: - Tutorial: Create and manage policies to enforce compliance https://learn.microsoft.com/security/benchmark/azure/baselines/azure-firewall-manager-security-baseline .
Remember to tailor your alert policies to the specific needs of your organization and the resources you are monitoring. Regularly reviewing and updating your alert policies will help ensure that they remain effective and relevant.
Monitor and investigate data and activities by using Microsoft Purview (15–20%)
Plan and manage eDiscovery and Content search
Choosing Between eDiscovery (Standard) and eDiscovery (Premium)
When determining the appropriate eDiscovery solution for an organization, it is crucial to understand the capabilities and functionalities of both eDiscovery (Standard) and eDiscovery (Premium) offered by Microsoft Purview. Here is a detailed comparison to guide the decision-making process:
eDiscovery (Standard)
- Basic Case Management: Allows organizations to create eDiscovery cases and assign eDiscovery managers to specific cases. Managers have access only to the cases they are members of https://learn.microsoft.com/en-us/training/modules/investigate-threats-with-content-search-in-microsoft-purview/2-explore-ediscovery-solutions .
- Search and Export: Builds upon the Content search tool by enabling search and export of content across Microsoft 365 data sources, and associating these actions with a case https://learn.microsoft.com/en-us/training/modules/investigate-threats-with-content-search-in-microsoft-purview/2-explore-ediscovery-solutions .
- eDiscovery Holds: Enables organizations to place holds on content locations relevant to cases, preserving content that may be pertinent to legal matters https://learn.microsoft.com/en-us/training/modules/investigate-threats-with-content-search-in-microsoft-purview/2-explore-ediscovery-solutions .
eDiscovery (Premium)
- Advanced Case Management: Provides an end-to-end workflow for identifying, preserving, collecting, reviewing, analyzing, and exporting content responsive to an organization’s investigations https://learn.microsoft.com/en-us/training/modules/investigate-threats-with-content-search-in-microsoft-purview/2-explore-ediscovery-solutions .
- Custodian Management: Allows legal teams to manage custodians and the legal hold notification workflow, which is essential for communicating with individuals involved in a case https://learn.microsoft.com/en-us/training/modules/investigate-threats-with-content-search-in-microsoft-purview/2-explore-ediscovery-solutions .
- Review Sets: Enables organizations to collect and copy data into review sets for further filtering, searching, and tagging to cull non-relevant content and focus on what is most pertinent https://learn.microsoft.com/en-us/training/modules/investigate-threats-with-content-search-in-microsoft-purview/2-explore-ediscovery-solutions .
- Analytics and Machine Learning: Offers analytics and predictive coding models based on machine learning to narrow the scope of investigations to the most relevant content https://learn.microsoft.com/en-us/training/modules/investigate-threats-with-content-search-in-microsoft-purview/2-explore-ediscovery-solutions .
Considerations for Choosing the Right Solution
- Organizational Needs: If the organization requires basic search capabilities and case management, eDiscovery (Standard) may suffice. However, for more complex legal cases requiring advanced management of custodians, review sets, and analytics, eDiscovery (Premium) would be the better choice https://learn.microsoft.com/en-us/training/modules/investigate-threats-with-content-search-in-microsoft-purview/2-explore-ediscovery-solutions .
- Legal Team Involvement: Organizations with dedicated legal teams that need to manage custodians and legal hold notifications should opt for eDiscovery (Premium) for its comprehensive workflow https://learn.microsoft.com/en-us/training/modules/investigate-threats-with-content-search-in-microsoft-purview/2-explore-ediscovery-solutions .
- Volume and Complexity of Data: For organizations dealing with large volumes of data or complex cases, eDiscovery (Premium) provides more robust tools for data analysis and review https://learn.microsoft.com/en-us/training/modules/investigate-threats-with-content-search-in-microsoft-purview/2-explore-ediscovery-solutions .
- Compliance Requirements: Depending on the regulatory environment and compliance requirements, eDiscovery (Premium) may offer necessary features that are not available in eDiscovery (Standard) https://learn.microsoft.com/en-us/training/modules/investigate-threats-with-content-search-in-microsoft-purview/2-explore-ediscovery-solutions .
For additional information on the differences between eDiscovery (Standard) and eDiscovery (Premium), and to understand the tier comparison, you can refer to the following resources:
- Tier comparison for Azure Front Door https://learn.microsoft.com/en-us/azure/frontdoor/tier-upgrade-powershell .
- Investigate threats with Content Search in Microsoft Purview https://learn.microsoft.com/en-us/training/modules/investigate-threats-with-content-search-in-microsoft-purview/2-explore-ediscovery-solutions .
- Set up compliance boundaries for eDiscovery investigations https://learn.microsoft.com/en-us/training/modules/investigate-threats-with-content-search-in-microsoft-purview/6-configure-search-permissions-filters .
By carefully evaluating the organization’s specific needs and the functionalities offered by each eDiscovery solution, the appropriate choice can be made to effectively manage the eDiscovery process within the organization.
Monitor and investigate data and activities by using Microsoft Purview (15–20%)
Plan and manage eDiscovery and Content search
Plan and Implement eDiscovery
eDiscovery, or electronic discovery, refers to the process by which electronic data is sought, located, secured, and searched with the intent of using it as evidence in a civil or criminal legal case. In the context of Microsoft Purview, there are three eDiscovery solutions that cater to different organizational needs:
Content Search: This is the most basic form of eDiscovery, which allows for the searching of content across Microsoft 365 data sources. It enables the export of search results to a local computer for further analysis https://learn.microsoft.com/en-us/training/modules/investigate-threats-with-content-search-in-microsoft-purview/2-explore-ediscovery-solutions .
eDiscovery (Standard): Building upon Content Search, eDiscovery (Standard) allows organizations to create eDiscovery cases and assign managers to those cases. It provides the ability to associate searches and exports with a case and to place holds on content locations that are relevant to the cases https://learn.microsoft.com/en-us/training/modules/investigate-threats-with-content-search-in-microsoft-purview/2-explore-ediscovery-solutions .
eDiscovery (Premium): This is the most advanced eDiscovery tool offered by Microsoft Purview. It includes all the capabilities of eDiscovery (Standard) and adds an end-to-end workflow for identifying, preserving, collecting, reviewing, analyzing, and exporting content. eDiscovery (Premium) is particularly useful for legal teams as it allows them to manage custodians and the legal hold notification workflow. It also provides analytics and machine learning-based predictive coding models to help narrow down the scope of an investigation to the most relevant content https://learn.microsoft.com/en-us/training/modules/investigate-threats-with-content-search-in-microsoft-purview/2-explore-ediscovery-solutions .
When planning and implementing eDiscovery, the following steps should be considered:
Identify the Scope: Determine what data is relevant to the legal case and where it resides within the organization’s data sources.
Preserve Data: Ensure that data relevant to the case is preserved in a way that prevents alteration or deletion. This can be done by placing legal holds on the data.
Collect Data: Gather the data that has been identified and preserved. This may involve copying data from live services into review sets.
Review and Analyze Data: Examine the collected data to filter out non-relevant content and focus on the information that is pertinent to the case.
Export Data: Once the relevant data has been identified, it should be exported in a format that can be used for legal proceedings.
Manage Legal Holds and Custodians: Keep track of legal holds and communicate with custodians who are involved in the case to ensure compliance and proper handling of data.
For additional information on eDiscovery and how to implement it within Microsoft Purview, you can refer to the following resources:
- Investigate threats with Content Search in Microsoft Purview
- eDiscovery solutions in Microsoft Purview
- Security warning section for persisting execution plans
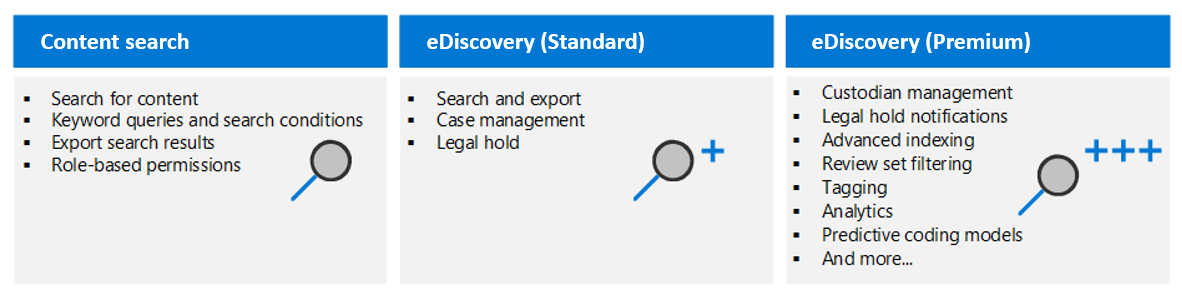
It is important to note that the implementation of eDiscovery should be done in compliance with legal and regulatory requirements, and it may involve collaboration between IT professionals, legal teams, and compliance officers.
Monitor and investigate data and activities by using Microsoft Purview (15–20%)
Plan and manage eDiscovery and Content search
Delegate Permissions to Use eDiscovery and Content Search
Electronic discovery, or eDiscovery, is a critical process in legal cases where electronic information is identified and delivered as evidence. Microsoft Purview provides tools that allow organizations to perform eDiscovery and Content searches across various services such as Exchange Online, SharePoint Online, Microsoft Teams, and others https://learn.microsoft.com/en-us/training/modules/investigate-threats-with-content-search-in-microsoft-purview/2-explore-ediscovery-solutions .
Assigning eDiscovery Permissions
To delegate permissions for eDiscovery and Content search, an organization must assign the appropriate roles to users in the Microsoft Purview compliance portal. The roles that are relevant to eDiscovery include:
eDiscovery Manager: Members of this role group can perform searches of mailboxes, SharePoint Online sites, and OneDrive for Business locations. They can also manage eDiscovery cases by adding and removing members, creating and editing content searches and holds, and exporting search results https://learn.microsoft.com/en-us/training/modules/investigate-threats-with-content-search-in-microsoft-purview/2-explore-ediscovery-solutions .
Compliance Search: This role allows users to perform searches and preview search results. It is assigned by default to the eDiscovery Manager and Organization Management role groups https://learn.microsoft.com/en-us/training/modules/investigate-threats-with-content-search-in-microsoft-purview/5-export-search-results .
To assign eDiscovery permissions, an administrator can follow these steps:
- Navigate to the Microsoft Purview compliance portal.
- Access the permissions page and choose the eDiscovery Manager role group.
- Add the users who need to perform eDiscovery searches to this role group.
For detailed instructions on assigning eDiscovery permissions, refer to the following URL: Assign eDiscovery permissions https://learn.microsoft.com/en-us/training/modules/investigate-threats-with-content-search-in-microsoft-purview/7-search-delete-email-messages https://learn.microsoft.com/en-us/training/modules/investigate-threats-with-content-search-in-microsoft-purview/5-export-search-results .
Using Search Permissions Filters
Search permissions filtering is a feature that allows an organization to control which parts of their environment can be searched by specific eDiscovery managers. This can be done by creating filters that limit searches to certain mailboxes, SharePoint sites, or content that meets specific criteria. For example, an eDiscovery manager can be restricted to search only the mailboxes of users in a particular department or location https://learn.microsoft.com/en-us/training/modules/investigate-threats-with-content-search-in-microsoft-purview/6-configure-search-permissions-filters .
To set up search permissions filters, the following cmdlets in the Security and Compliance PowerShell module are used:
New-ComplianceSecurityFilter: Creates a new search permissions filter.Get-ComplianceSecurityFilters: Returns a list of search permissions filters.Set-ComplianceSecurityFilter: Modifies an existing search permissions filter.Remove-ComplianceSecurityFilter: Deletes a search filter.
For more information on setting up compliance boundaries using search permissions filters, visit: Set up compliance boundaries for eDiscovery investigations https://learn.microsoft.com/en-us/training/modules/investigate-threats-with-content-search-in-microsoft-purview/6-configure-search-permissions-filters .
Limitations and Considerations
When delegating permissions for eDiscovery and Content search, it is important to be aware of certain limitations and considerations:
- The search and purge workflow does not delete content from Microsoft Teams. To delete Teams chat messages, a different procedure must be followed https://learn.microsoft.com/en-us/training/modules/investigate-threats-with-content-search-in-microsoft-purview/7-search-delete-email-messages .
- There is a limit of 10 items per mailbox that can be removed at one time, and a maximum of 50,000 mailboxes can be included in a content search for deletion purposes https://learn.microsoft.com/en-us/training/modules/investigate-threats-with-content-search-in-microsoft-purview/7-search-delete-email-messages .
- The procedures described are applicable only to Exchange Online mailboxes and public folders, not to SharePoint or OneDrive for Business sites https://learn.microsoft.com/en-us/training/modules/investigate-threats-with-content-search-in-microsoft-purview/7-search-delete-email-messages .
By understanding and properly delegating permissions for eDiscovery and Content search, organizations can ensure that the right individuals have the necessary access to perform these critical tasks while maintaining compliance and respecting privacy and legal boundaries.
Monitor and investigate data and activities by using Microsoft Purview (15–20%)
Plan and manage eDiscovery and Content search
Perform Searches and Respond to Results from eDiscovery
Electronic discovery, or eDiscovery, is a critical process in the realm of legal cases, where organizations identify and deliver electronic information that can be used as evidence. Microsoft Purview offers eDiscovery tools that enable organizations to search for content across various services such as Exchange Online, OneDrive for Business, SharePoint Online, Microsoft Teams, Microsoft 365 Groups, and Yammer teams https://learn.microsoft.com/en-us/training/modules/investigate-threats-with-content-search-in-microsoft-purview/2-explore-ediscovery-solutions .
Search Permissions Filtering
To perform searches, organizations can use search permissions filtering in the Microsoft Purview compliance portal. This feature allows eDiscovery managers to search only a subset of mailboxes and sites, or content that meets specific criteria. For instance:
- Limiting searches to mailboxes of users in a particular location or department using recipient filters https://learn.microsoft.com/en-us/training/modules/investigate-threats-with-content-search-in-microsoft-purview/6-configure-search-permissions-filters .
- Creating filters based on searchable message properties to specify what mailbox content can be searched https://learn.microsoft.com/en-us/training/modules/investigate-threats-with-content-search-in-microsoft-purview/6-configure-search-permissions-filters .
- Restricting searches to specific SharePoint sites by creating filters that limit which sites can be searched https://learn.microsoft.com/en-us/training/modules/investigate-threats-with-content-search-in-microsoft-purview/6-configure-search-permissions-filters .
- Specifying site content that can be searched using searchable site properties https://learn.microsoft.com/en-us/training/modules/investigate-threats-with-content-search-in-microsoft-purview/6-configure-search-permissions-filters .
Search permissions filters are applied when using any of the search features in the Microsoft Purview compliance portal, including Content search, Microsoft Purview eDiscovery (Standard), and Microsoft Purview eDiscovery (Premium) https://learn.microsoft.com/en-us/training/modules/investigate-threats-with-content-search-in-microsoft-purview/6-configure-search-permissions-filters .
Compliance Boundaries
Organizations can also use search permissions filtering to create compliance boundaries within an organization. These boundaries control which user content locations eDiscovery managers can search. For more information on setting up compliance boundaries, refer to the guide on Set up compliance boundaries for eDiscovery investigations https://learn.microsoft.com/en-us/training/modules/investigate-threats-with-content-search-in-microsoft-purview/6-configure-search-permissions-filters .
Managing Search Permissions Filters
The Security and Compliance PowerShell module provides cmdlets to configure and manage search permissions filters:
New-ComplianceSecurityFilter: Creates a new search permissions filter https://learn.microsoft.com/en-us/training/modules/investigate-threats-with-content-search-in-microsoft-purview/6-configure-search-permissions-filters .Get-ComplianceSecurityFilters: Returns a list of search permissions filters https://learn.microsoft.com/en-us/training/modules/investigate-threats-with-content-search-in-microsoft-purview/6-configure-search-permissions-filters .Set-ComplianceSecurityFilter: Modifies an existing search permissions filter https://learn.microsoft.com/en-us/training/modules/investigate-threats-with-content-search-in-microsoft-purview/6-configure-search-permissions-filters .Remove-ComplianceSecurityFilter: Deletes a search filter https://learn.microsoft.com/en-us/training/modules/investigate-threats-with-content-search-in-microsoft-purview/6-configure-search-permissions-filters .
Exporting Search Results
After creating and running a Content search or a search associated with a Microsoft Purview eDiscovery (Standard) case, organizations can export the search results. The process involves:
- Selecting Content search in the Microsoft Purview compliance portal and navigating to the Exports tab https://learn.microsoft.com/en-us/training/modules/investigate-threats-with-content-search-in-microsoft-purview/5-export-search-results https://learn.microsoft.com/en-us/training/modules/investigate-threats-with-content-search-in-microsoft-purview/5-export-search-results .
- Selecting the export job and copying the export key, which is used to download the search results https://learn.microsoft.com/en-us/training/modules/investigate-threats-with-content-search-in-microsoft-purview/5-export-search-results https://learn.microsoft.com/en-us/training/modules/investigate-threats-with-content-search-in-microsoft-purview/5-export-search-results .
- Downloading the search results using the eDiscovery Export Tool, ensuring to follow best practices such as disabling anti-virus scanning for the download folder and not downloading to a UNC path, mapped network drive, external USB drive, or synched OneDrive for Business account https://learn.microsoft.com/en-us/training/modules/investigate-threats-with-content-search-in-microsoft-purview/5-export-search-results .
It is important to note that the exported search report must be downloaded within 14 days after generation https://learn.microsoft.com/en-us/training/modules/investigate-threats-with-content-search-in-microsoft-purview/5-export-search-results . Additionally, precautions should be taken to protect the export key, as it can be used by anyone with access to download the search report https://learn.microsoft.com/en-us/training/modules/investigate-threats-with-content-search-in-microsoft-purview/5-export-search-results https://learn.microsoft.com/en-us/training/modules/investigate-threats-with-content-search-in-microsoft-purview/5-export-search-results .
Viewing Search Statistics
Organizations can view statistics about the estimated search results, which include various metrics and data points. However, the specific statistics provided are not detailed in the provided documents.
By understanding and utilizing these eDiscovery features within Microsoft Purview, organizations can effectively manage their legal investigations and respond to legal requests with the necessary electronic evidence.
Monitor and investigate data and activities by using Microsoft Purview (15–20%)
Plan and manage eDiscovery and Content search
Manage eDiscovery Cases
When managing eDiscovery cases, it is essential to understand the various tools and processes involved in handling investigations within an organization. Microsoft Purview offers a suite of eDiscovery solutions that cater to different needs, from simple content searches to comprehensive legal reviews and case management https://learn.microsoft.com/en-us/training/modules/investigate-threats-with-content-search-in-microsoft-purview/2-explore-ediscovery-solutions .
Overview of eDiscovery Solutions in Microsoft Purview
Content Search: This tool allows you to search for content across Microsoft 365 data sources and export the results to a local computer https://learn.microsoft.com/en-us/training/modules/investigate-threats-with-content-search-in-microsoft-purview/2-explore-ediscovery-solutions .
eDiscovery (Standard): Building upon Content Search, eDiscovery (Standard) enables organizations to create eDiscovery cases, assign managers, and place holds on content locations relevant to cases. It also associates searches and exports with a specific case https://learn.microsoft.com/en-us/training/modules/investigate-threats-with-content-search-in-microsoft-purview/2-explore-ediscovery-solutions .
eDiscovery (Premium): This advanced tool provides an end-to-end workflow for identifying, preserving, collecting, reviewing, analyzing, and exporting content responsive to an organization’s investigations. It allows legal teams to manage custodians and legal hold notifications, and it supports analytics and machine learning-based predictive coding to focus on the most relevant content https://learn.microsoft.com/en-us/training/modules/investigate-threats-with-content-search-in-microsoft-purview/2-explore-ediscovery-solutions .
Managing eDiscovery Cases
Assigning Alerts to Cases: Alerts can be assigned to cases for detailed investigations within the insider risk management console. Investigators can review signals, affected content, add notes, and collaborate with others to resolve the case https://learn.microsoft.com/en-us/training/modules/m365-compliance-insider-manage-insider-risk/actions .
Case Investigation and Resolution: Investigations may conclude with a notice to the employee or the creation of an eDiscovery case to determine the scope of the threat. After taking necessary actions, cases can be resolved as benign or confirmed policy violations https://learn.microsoft.com/en-us/training/modules/m365-compliance-insider-manage-insider-risk/actions .
Escalation and Legal Review: In situations requiring additional legal review, cases can be escalated, creating a new eDiscovery (Premium) case. This allows for comprehensive legal hold management and content preservation https://learn.microsoft.com/en-us/training/modules/m365-compliance-insider-manage-insider-risk/actions https://learn.microsoft.com/en-us/training/modules/m365-compliance-insider-manage-insider-risk/actions .
Integration with Insider Risk Management: Insider risk management is integrated with eDiscovery (Premium) for end-to-end resolution management, allowing risk analysts to take appropriate actions based on the severity and history of the case https://learn.microsoft.com/en-us/training/modules/m365-compliance-insider-manage-insider-risk/actions .
Permissions and Limitations
Permissions: To create and run a Content Search, you must be part of the eDiscovery Manager role group or have the Compliance Search role. For deleting messages, you need to be in the Organization Management role group or have the Search And Purge role https://learn.microsoft.com/en-us/training/modules/investigate-threats-with-content-search-in-microsoft-purview/7-search-delete-email-messages .
Limitations: There are limits on the number of items that can be removed at one time and the number of mailboxes that can be included in a search and purge action. Additionally, the search and purge workflow does not delete content from Microsoft Teams or SharePoint and OneDrive for Business sites https://learn.microsoft.com/en-us/training/modules/investigate-threats-with-content-search-in-microsoft-purview/7-search-delete-email-messages .
Additional Resources
For more information on managing eDiscovery cases and the various tools available, you can refer to the following resources:
- Overview of eDiscovery (Premium) in Microsoft Purview https://learn.microsoft.com/en-us/training/modules/m365-compliance-insider-manage-insider-risk/actions .
- Search and purge chat messages in Teams https://learn.microsoft.com/en-us/training/modules/investigate-threats-with-content-search-in-microsoft-purview/7-search-delete-email-messages .
- Assign eDiscovery permissions https://learn.microsoft.com/en-us/training/modules/investigate-threats-with-content-search-in-microsoft-purview/7-search-delete-email-messages .
- Close or delete an eDiscovery (Premium) case https://learn.microsoft.com/en-us/training/modules/investigate-threats-with-content-search-in-microsoft-purview/7-search-delete-email-messages .
By understanding and utilizing these tools and processes, organizations can effectively manage eDiscovery cases and ensure compliance with legal and regulatory requirements.
Monitor and investigate data and activities by using Microsoft Purview (15–20%)
Plan and manage eDiscovery and Content search
Perform Searches by Using Content Search
Content search is a tool within Microsoft Purview that allows organizations to search for in-place content across various Microsoft 365 services. This tool is essential for compliance, legal, and eDiscovery purposes as it enables the identification and delivery of electronic information that can be used as evidence.
Key Features of Content Search:
Broad Range of Data Sources: Content search can be used to look for information in Exchange Online, OneDrive for Business, SharePoint Online, Microsoft Teams, Microsoft 365 Groups, and Yammer teams https://learn.microsoft.com/en-us/training/modules/investigate-threats-with-content-search-in-microsoft-purview/2-explore-ediscovery-solutions .
Search Results and Export: After performing a search, organizations can view an estimated number of results and the number of content locations. These results can be previewed or exported to a local computer for further analysis https://learn.microsoft.com/en-us/training/modules/investigate-threats-with-content-search-in-microsoft-purview/3-create-content-search .
Access Control: Typically, access to Content search is limited to roles such as administrators, compliance officers, or eDiscovery managers. These individuals must be part of the eDiscovery Manager role group within the Microsoft Purview compliance portal https://learn.microsoft.com/en-us/training/modules/investigate-threats-with-content-search-in-microsoft-purview/3-create-content-search .
Search Customization: When preparing to create a content search, organizations should consider who will create and run the search, the type of content search (e.g., New search, Guided search, Search by ID list), the keywords and conditions to be used, and whether to search all locations or only specific ones https://learn.microsoft.com/en-us/training/modules/investigate-threats-with-content-search-in-microsoft-purview/3-create-content-search .
Steps to Perform a Content Search:
Access Control: Ensure that the individual conducting the search has the necessary permissions by being a member of the eDiscovery Manager role group. Permissions are assigned by members of the Organization Management role group https://learn.microsoft.com/en-us/training/modules/investigate-threats-with-content-search-in-microsoft-purview/3-create-content-search .
Initiate Search: Navigate to the Microsoft Purview compliance portal and select the Content search option. Choose the type of search you wish to perform https://learn.microsoft.com/en-us/training/modules/investigate-threats-with-content-search-in-microsoft-purview/3-create-content-search .
Define Search Parameters: Input the keywords, specify conditions (such as data type, sender, date range, and subject), and select the locations to be searched (e.g., specific user mailboxes, SharePoint sites, or Teams channels) https://learn.microsoft.com/en-us/training/modules/investigate-threats-with-content-search-in-microsoft-purview/3-create-content-search .
Review and Export Results: Once the search is complete, review the summary of results, preview the items, and export the data as needed for further examination or legal proceedings.
Compliance and Legal Considerations: It’s important to note that in an Exchange hybrid deployment, Content search cannot be used to search emails in on-premises mailboxes; it is limited to cloud-based mailboxes https://learn.microsoft.com/en-us/training/modules/investigate-threats-with-content-search-in-microsoft-purview/2-explore-ediscovery-solutions .
Additional Resources:
For more detailed guidance on using Content search, you can refer to the following resources:
- Investigate threats with Content search in Microsoft Purview
- eDiscovery solutions in Microsoft Purview
By understanding and utilizing Content search effectively, organizations can ensure they are prepared to meet legal requirements and manage compliance risks efficiently.
Monitor and investigate data and activities by using Microsoft Purview (15–20%)
Manage and analyze audit logs and reports in Microsoft Purview
Choosing Between Audit (Standard) and Audit (Premium)
When determining the appropriate auditing solution for an organization within Microsoft Purview, it is essential to understand the differences between Audit (Standard) and Audit (Premium) to align with the organization’s requirements. Below is a detailed comparison of the capabilities of both solutions:
Audit (Standard)
Audit (Standard) is the default auditing solution that provides a foundational set of features for organizations to track and investigate activities across Microsoft 365 services:
- Enabled by Default: Both Audit (Standard) and Audit (Premium) are enabled by default https://learn.microsoft.com/en-us/training/modules/investigate-threats-using-audit-in-microsoft-365-defender-microsoft-purview-standard/2-explore-microsoft-purview-audit-solutions .
- Searchable Audit Events: Thousands of searchable audit events are available https://learn.microsoft.com/en-us/training/modules/investigate-threats-using-audit-in-microsoft-365-defender-microsoft-purview-standard/2-explore-microsoft-purview-audit-solutions .
- Audit Search Tools: The audit search tool in the
Microsoft Purview compliance portal and the
Search-UnifiedAuditLogcmdlet in Exchange Online PowerShell are available for searching audited activities https://learn.microsoft.com/en-us/training/modules/investigate-threats-using-audit-in-microsoft-365-defender-microsoft-purview-standard/2-explore-microsoft-purview-audit-solutions https://learn.microsoft.com/en-us/training/modules/investigate-threats-using-audit-in-microsoft-365-defender-microsoft-purview-standard/9-summary-resources . - Export to CSV: Audit records can be exported to a CSV file for further analysis https://learn.microsoft.com/en-us/training/modules/investigate-threats-using-audit-in-microsoft-365-defender-microsoft-purview-standard/2-explore-microsoft-purview-audit-solutions https://learn.microsoft.com/en-us/training/modules/investigate-threats-using-audit-in-microsoft-365-defender-microsoft-purview-standard/9-summary-resources .
- API Access: Access to audit logs via Office 365 Management Activity API is provided https://learn.microsoft.com/en-us/training/modules/investigate-threats-using-audit-in-microsoft-365-defender-microsoft-purview-standard/2-explore-microsoft-purview-audit-solutions .
- 90-Day Retention: Audit logs are retained for 90 days https://learn.microsoft.com/en-us/training/modules/investigate-threats-using-audit-in-microsoft-365-defender-microsoft-purview-standard/2-explore-microsoft-purview-audit-solutions .
Audit (Premium)
Audit (Premium) builds upon the capabilities of Audit (Standard) and offers advanced features designed for organizations with more complex auditing and compliance needs:
- Extended Retention: Audit (Premium) offers one-year audit log retention by default, with the option to retain logs for up to 10 years for users with the required add-on license https://learn.microsoft.com/en-us/training/modules/investigate-threats-using-audit-in-microsoft-365-defender-microsoft-purview-standard/2-explore-microsoft-purview-audit-solutions https://learn.microsoft.com/en-us/training/modules/investigate-threats-using-audit-in-microsoft-365-defender-microsoft-purview-standard/2-explore-microsoft-purview-audit-solutions .
- Retention Policies: Organizations can create customized audit log retention policies based on the service, specific activities, or the user who performed an activity https://learn.microsoft.com/en-us/training/modules/investigate-threats-using-audit-in-microsoft-365-defender-microsoft-purview-standard/2-explore-microsoft-purview-audit-solutions .
- High-Value Events: Audit (Premium) provides records for crucial events that are vital for forensic and compliance investigations, such as access to mail items, search activities in Exchange Online and SharePoint Online, and more https://learn.microsoft.com/en-us/training/modules/investigate-threats-using-audit-in-microsoft-365-defender-microsoft-purview-standard/2-explore-microsoft-purview-audit-solutions .
- Increased API Bandwidth: Organizations with Audit (Premium) receive approximately twice the bandwidth for accessing audit logs through the Office 365 Management Activity API compared to Audit (Standard) https://learn.microsoft.com/en-us/training/modules/investigate-threats-using-audit-in-microsoft-365-defender-microsoft-purview-standard/2-explore-microsoft-purview-audit-solutions .
Considerations for Choosing the Right Solution
When choosing between Audit (Standard) and Audit (Premium), consider the following organizational requirements:
- Compliance and Legal Investigations: If the organization frequently conducts in-depth compliance and legal investigations, Audit (Premium) may be necessary due to its extended retention periods and access to high-value events https://learn.microsoft.com/en-us/training/modules/investigate-threats-using-audit-in-microsoft-365-defender-microsoft-purview-standard/2-explore-microsoft-purview-audit-solutions https://learn.microsoft.com/en-us/training/modules/investigate-threats-using-audit-in-microsoft-365-defender-microsoft-purview-premium/2-explore-microsoft-purview-audit-premium .
- Forensic Investigations: For organizations that need to conduct forensic investigations and determine the scope of compromise, Audit (Premium) provides crucial event logging that can be pivotal in these scenarios https://learn.microsoft.com/en-us/training/modules/investigate-threats-using-audit-in-microsoft-365-defender-microsoft-purview-standard/2-explore-microsoft-purview-audit-solutions .
- Custom Retention Policies: If there is a need for customized retention policies based on specific criteria, Audit (Premium) offers this flexibility https://learn.microsoft.com/en-us/training/modules/investigate-threats-using-audit-in-microsoft-365-defender-microsoft-purview-standard/2-explore-microsoft-purview-audit-solutions .
- API Access Needs: Organizations that require higher bandwidth for API access to audit logs will benefit from the increased limits provided by Audit (Premium) https://learn.microsoft.com/en-us/training/modules/investigate-threats-using-audit-in-microsoft-365-defender-microsoft-purview-standard/2-explore-microsoft-purview-audit-solutions .
In summary, while Audit (Standard) offers a robust set of features for general auditing purposes, Audit (Premium) provides enhanced capabilities for organizations with more demanding auditing, compliance, and investigation needs.
For additional information on Microsoft Purview’s auditing solutions, you can refer to the following resources: - Investigate threats using Audit in Microsoft 365 Defender - Audit (Premium) in Microsoft Purview
Please note that the URLs provided are for reference purposes and should be accessed for more detailed information on the respective auditing solutions.
Monitor and investigate data and activities by using Microsoft Purview (15–20%)
Manage and analyze audit logs and reports in Microsoft Purview
Plan for and Configure Auditing
When planning for and configuring auditing, it is essential to understand the steps and requirements involved in setting up and managing audit logs within an organization. Here is a detailed explanation of the process:
1. Enable Audit Logging
Audit logs are crucial for gaining insights into user activities and policy modifications. To enable audit logging, follow the step-by-step instructions provided by Microsoft:
- Turn on Auditing: Audit logging may not be enabled by default, and it is necessary to turn it on to start capturing user activities. The process can take up to 60 minutes to take effect, and it may take several hours before the audit log search returns results https://learn.microsoft.com/en-us/training/modules/m365-compliance-insider-manage-insider-risk/policies .
2. Understand Audit Log Retention Policy Requirements
Before creating an audit log retention policy, ensure that your organization meets the following prerequisites:
Assign Roles: Individuals responsible for creating and modifying audit log retention policies must have the Organization Configuration role in the Microsoft Purview compliance portal https://learn.microsoft.com/en-us/training/modules/investigate-threats-using-audit-in-microsoft-365-defender-microsoft-purview-premium/4-manage-audit-log-retention-policies .
Policy Limit: An organization is limited to a maximum of 50 audit log retention policies https://learn.microsoft.com/en-us/training/modules/investigate-threats-using-audit-in-microsoft-365-defender-microsoft-purview-premium/4-manage-audit-log-retention-policies .
Licensing Requirements: To retain audit logs beyond 90 days (up to one year), users must have an Office 365 E5 or Microsoft 365 E5 license, or a Microsoft 365 E5 Compliance or E5 eDiscovery and Audit add-on license. For a 10-year retention period, a 10-year audit log retention add-on license is also required https://learn.microsoft.com/en-us/training/modules/investigate-threats-using-audit-in-microsoft-365-defender-microsoft-purview-premium/4-manage-audit-log-retention-policies .
Custom Policies Take Precedence: Any custom audit log retention policies created will override the default retention policy https://learn.microsoft.com/en-us/training/modules/investigate-threats-using-audit-in-microsoft-365-defender-microsoft-purview-premium/4-manage-audit-log-retention-policies .
3. Set Up Audit (Standard)
Microsoft Purview Audit (Standard) is typically enabled by default for most organizations. The setup steps include:
Verify Subscriptions and Licensing: Ensure that the organization has the necessary subscriptions and user licensing to generate and preserve audit records https://learn.microsoft.com/en-us/training/modules/investigate-threats-using-audit-in-microsoft-365-defender-microsoft-purview-standard/3-implement-microsoft-purview-audit .
Assign Permissions: Permissions must be assigned to team members across security operations, IT, compliance, and legal teams https://learn.microsoft.com/en-us/training/modules/investigate-threats-using-audit-in-microsoft-365-defender-microsoft-purview-standard/3-implement-microsoft-purview-audit .
4. Understand Audit (Premium) Functionality
For more advanced auditing needs, Audit (Premium) provides additional functionalities:
- MailItemsAccessed Action: This action is part of Audit (Premium) and is enabled by default for users with an Office 365 or Microsoft 365 E5 license, or organizations with a Microsoft 365 E5 Compliance add-on subscription. It covers all mail protocols and types of mail access https://learn.microsoft.com/en-us/training/modules/investigate-threats-using-audit-in-microsoft-365-defender-microsoft-purview-premium/5-investigate-compromised-email-accounts .
5. Utilize Auditing Solutions
Microsoft Purview offers two auditing solutions: Audit (Standard) and Audit (Premium). The following points highlight the capabilities and tools available:
Unified Audit Log: Captures thousands of user and admin operations across Microsoft 365 services, providing visibility into organizational activities https://learn.microsoft.com/en-us/training/modules/investigate-threats-using-audit-in-microsoft-365-defender-microsoft-purview-standard/9-summary-resources .
Search Tools: Use the audit search tool in the Microsoft Purview compliance portal or the Search-UnifiedAuditLog cmdlet in Exchange Online PowerShell to search for audited activities https://learn.microsoft.com/en-us/training/modules/investigate-threats-using-audit-in-microsoft-365-defender-microsoft-purview-standard/9-summary-resources .
Export and Analyze Results: Export search results to a CSV file for analysis in Microsoft Excel, and use the Power Query Editor to format the audit log data https://learn.microsoft.com/en-us/training/modules/investigate-threats-using-audit-in-microsoft-365-defender-microsoft-purview-standard/9-summary-resources .
Investigate Support Issues: Use audit log searching to investigate common support issues and configure search queries to troubleshoot scenarios https://learn.microsoft.com/en-us/training/modules/investigate-threats-using-audit-in-microsoft-365-defender-microsoft-purview-standard/9-summary-resources .
For additional information and step-by-step guidance, refer to the following resources:
- Turn Office 365 audit log search on or off https://learn.microsoft.com/en-us/training/modules/m365-compliance-insider-manage-insider-risk/policies .
- Microsoft Purview compliance portal https://learn.microsoft.com/en-us/training/modules/investigate-threats-using-audit-in-microsoft-365-defender-microsoft-purview-premium/4-manage-audit-log-retention-policies https://learn.microsoft.com/en-us/training/modules/investigate-threats-using-audit-in-microsoft-365-defender-microsoft-purview-standard/3-implement-microsoft-purview-audit https://learn.microsoft.com/en-us/training/modules/investigate-threats-using-audit-in-microsoft-365-defender-microsoft-purview-premium/5-investigate-compromised-email-accounts https://learn.microsoft.com/en-us/training/modules/investigate-threats-using-audit-in-microsoft-365-defender-microsoft-purview-standard/9-summary-resources .
By following these steps and understanding the requirements, you can effectively plan for and configure auditing within your organization to maintain compliance and monitor user activities.
Monitor and investigate data and activities by using Microsoft Purview (15–20%)
Manage and analyze audit logs and reports in Microsoft Purview
Investigate Activities Using the Unified Audit Log
The Unified Audit Log (UAL) is a critical component within Microsoft Purview that allows organizations to log, search, and investigate activities across various Microsoft 365 services. It serves as a centralized repository for capturing a wide array of user and admin operations, which is essential for forensic, compliance, legal, and IT investigations.
Overview of Unified Audit Log
The UAL captures thousands of events from numerous Microsoft 365 services, providing visibility into the activities performed within an organization. Security operations teams, IT administrators, insider risk teams, and compliance and legal investigators can search these audit records to monitor and investigate actions taken in the Microsoft 365 environment https://learn.microsoft.com/en-us/training/modules/investigate-threats-using-audit-in-microsoft-365-defender-microsoft-purview-standard/9-summary-resources .
Searching the Unified Audit Log
To investigate activities using the UAL, follow these steps:
Access the Audit Log Search Tool: Navigate to the Microsoft Purview compliance portal to utilize the audit log search tool. This tool allows you to view user and administrator activity, such as when a user accessed a specific document or purged an item from their mailbox https://learn.microsoft.com/en-us/training/modules/investigate-threats-using-audit-in-microsoft-365-defender-microsoft-purview-standard/5-search-audit-log .
Use PowerShell Cmdlets: For more advanced searches or to automate the process, you can use the
Search-UnifiedAuditLogcmdlet in Exchange Online PowerShell. This cmdlet is the underlying command for the audit search tool in the compliance portal https://learn.microsoft.com/en-us/training/modules/investigate-threats-using-audit-in-microsoft-365-defender-microsoft-purview-standard/9-summary-resources .Understand License Limitations: Be aware that mailbox audit events are only returned for users with E5 licenses when using the compliance portal, the
Search-UnifiedAuditLogcmdlet, or the Office 365 Management Activity API. For non-E5 users, you may need to manually enable mailbox auditing on individual mailboxes using theSet-Mailbox -Identity <MailboxIdentity> -AuditEnabled $truecommand in Exchange Online PowerShell https://learn.microsoft.com/en-us/training/modules/investigate-threats-using-audit-in-microsoft-365-defender-microsoft-purview-standard/7-use-audit-log-searches-to-investigate-common-support-issues .Export and Analyze Search Results: After conducting a search, you can export the results to a CSV file for further analysis. This file can be searched, sorted, and filtered using tools like Microsoft Excel. Additionally, you can format the exported audit log using the Power Query Editor in Excel for a more detailed examination https://learn.microsoft.com/en-us/training/modules/investigate-threats-using-audit-in-microsoft-365-defender-microsoft-purview-standard/9-summary-resources .
Investigate Common Support Issues: The audit log search tool can also be used to troubleshoot common support issues. By configuring specific audit log search queries, you can identify the root cause of reported issues and examine detailed information in the audit records that match your search criteria https://learn.microsoft.com/en-us/training/modules/investigate-threats-using-audit-in-microsoft-365-defender-microsoft-purview-standard/9-summary-resources .
Advanced Features with Audit (Premium)
For organizations that require more sophisticated forensic and compliance investigation capabilities, Microsoft Purview Audit (Premium) offers advanced features such as:
- Customized retention policies for audit logs.
- Increased audit log retention periods.
- Access to high-value events crucial for determining the scope of a compromise.
- Higher bandwidth access for faster retrieval of audit log data via the Office 365 Management Activity API https://learn.microsoft.com/en-us/training/modules/investigate-threats-using-audit-in-microsoft-365-defender-microsoft-purview-premium/2-explore-microsoft-purview-audit-premium .
Additional Resources
For more detailed guidance on using the Unified Audit Log, you can refer to the following resources:
By leveraging the Unified Audit Log, organizations can effectively monitor, search, and investigate activities to ensure compliance and security within their Microsoft 365 environment.
Monitor and investigate data and activities by using Microsoft Purview (15–20%)
Manage and analyze audit logs and reports in Microsoft Purview
Review and Interpret Compliance Reports and Dashboards
Compliance reports and dashboards are critical tools for monitoring and ensuring that an organization adheres to legal, regulatory, and policy requirements. Understanding how to review and interpret these reports and dashboards is essential for maintaining compliance within an organization.
Compliance Reports
When conducting a Content search in the Microsoft Purview compliance portal or within a Microsoft Purview eDiscovery (Standard) case, organizations have the option to export a full set of search results. Alternatively, they can export reports that are generated alongside the actual search results. These reports provide valuable insights and are downloaded to a local computer in a folder named after the Content Search with “_ReportsOnly” appended. For instance, a search named “ContosoCase0815” would have its report downloaded to a folder named “ContosoCase0815_ReportsOnly”. The contents of these reports include a variety of documents that detail the search results and can be found at the provided URL What’s included in the report https://learn.microsoft.com/en-us/training/modules/investigate-threats-with-content-search-in-microsoft-purview/5-export-search-results .
Compliance Dashboards
Threat Analytics Dashboard
The threat analytics dashboard is a feature that highlights reports relevant to an organization’s security posture. It summarizes threats in sections such as Latest threats, High-impact threats, and Highest exposure. The dashboard allows users to select a threat to view a detailed report, which includes sections like Overview, Analyst report, Related incidents, Impacted assets, Prevented email attempts, and Exposure & mitigations. This dashboard is instrumental in understanding the current threat landscape and the organization’s exposure to these threats https://learn.microsoft.com/en-us/training/modules/mitigate-incidents-microsoft-365-defender/11-analyze-threat-analytics .
Regulatory Compliance Dashboard
The regulatory compliance dashboard in Defender for Cloud represents industry standards, regulatory standards, and benchmarks. Each standard is defined in Azure Policy and can be added to a management group or subscription from the Security policy page. Once a standard is assigned, it appears in the regulatory compliance dashboard with all compliance data mapped as assessments. Users can download summary reports for any of the standards that have been assigned. Microsoft tracks and automatically updates the regulatory standards, ensuring that new content for the initiative appears in the dashboard https://learn.microsoft.com/en-us/training/modules/manage-cloud-security-posture-management/4-measure-enforce-regulatory-compliance .
Alerts Dashboard
For alerts generated by policies, the Alerts dashboard includes a Forensic evidence tab where users can review forensic evidence captures related to the alerts. If captures are available, a notification link is also provided in the activity that generates an alert header section. The Forensic evidence tab gives access to all captures associated with the alert, which is crucial for investigating potentially risky activities https://learn.microsoft.com/en-us/training/modules/m365-compliance-insider-manage-insider-risk/forensic-evidence .
Additional Resources
- To learn more about enabling or disabling auditing, which is a prerequisite for generating certain compliance reports, visit Turn auditing on or off https://learn.microsoft.com/en-us/training/modules/investigate-threats-using-audit-in-microsoft-365-defender-microsoft-purview-standard/4-exercise-start-recording-audit-log .
By familiarizing oneself with these compliance reports and dashboards, individuals can effectively monitor compliance status, identify potential issues, and take corrective actions to ensure that the organization remains within the bounds of its compliance requirements.
Monitor and investigate data and activities by using Microsoft Purview (15–20%)
Manage and analyze audit logs and reports in Microsoft Purview
Configure Alert Policies
Alert policies in Microsoft 365 are essential for monitoring a variety of activities and events that could indicate potential security issues or compliance risks. When configuring alert policies, it is important to understand the different types of alerts and how they can be tailored to meet the specific needs of an organization.
Types of Alert Policies
- Threat Protection Alerts: These alerts are triggered by activities that could pose a threat to Microsoft Teams, SharePoint Online, and OneDrive. They are essential for early detection of potential security breaches https://learn.microsoft.com/en-us/credentials/certifications/resources/study-guides/sc-200 .
- Data Loss Prevention (DLP) Alerts: DLP policies help prevent the loss of sensitive information. Alerts are generated when there is an activity that goes against the rules defined in the DLP policies, such as sharing a large number of credit card numbers https://learn.microsoft.com/en-us/credentials/certifications/resources/study-guides/sc-200 https://learn.microsoft.com/en-us/training/modules/m365-compliance-insider-manage-insider-risk/policies .
- Insider Risk Alerts: These alerts are generated by insider risk policies and are designed to detect and respond to activities that could indicate insider threats, such as data leaks or policy violations https://learn.microsoft.com/en-us/credentials/certifications/resources/study-guides/sc-200 .
Configuring Alert Policies
- Identify the Scope: Determine what you need to monitor, such as sensitive information types, user activities, or security threats.
- Select the Policy Template: Choose a template that matches your requirements. For example, the Data leaks template for insider risk management can be used to identify potential data exposure https://learn.microsoft.com/en-us/training/modules/m365-compliance-insider-manage-insider-risk/policies .
- Define the Thresholds: Set thresholds to reduce noise. For instance, a DLP alert might only fire if a policy detects a high volume of sensitive information being shared https://learn.microsoft.com/en-us/training/modules/m365-compliance-insider-manage-insider-risk/policies .
- Assign Policies: Assign specific DLP policies to drive alert indicators for sensitive information within insider risk management policies https://learn.microsoft.com/en-us/training/modules/m365-compliance-insider-manage-insider-risk/policies .
- Configure Endpoints: For alerts that contain clip capturing, ensure that devices are onboarded and have the Microsoft Purview client installed https://learn.microsoft.com/en-us/training/modules/m365-compliance-insider-manage-insider-risk/forensic-evidence .
- Integrate with Defender for Endpoint: Configure the Security policy violation indicators to forward endpoint security alerts to the Microsoft Purview compliance portal. This enhances insider risk management policies with alerts and helps remediate internal risks https://learn.microsoft.com/en-us/training/modules/deploy-microsoft-defender-for-endpoints-environment/8-configure-environment-advanced-features .
- Review Impacted Assets: Regularly check the Impacted assets tab to identify and address unresolved alerts related to devices and mailboxes https://learn.microsoft.com/en-us/training/modules/mitigate-incidents-microsoft-365-defender/11-analyze-threat-analytics .
Additional Resources
- To learn more about configuring DLP policies and testing them, visit the Test a DLP policy page.
- For a comprehensive understanding of insider risk management workflows, including differences for forensic evidence, refer to the Insider Risk Management documentation.
By carefully configuring alert policies, organizations can enhance their security posture and compliance capabilities, ensuring that they are better equipped to detect and respond to potential risks in a timely manner.
Monitor and investigate data and activities by using Microsoft Purview (15–20%)
Manage and analyze audit logs and reports in Microsoft Purview
Configure Audit Retention Policies
Audit retention policies are a critical component of data governance in Microsoft 365 environments. They allow organizations to specify the duration for which audit logs should be retained to meet regulatory, legal, and organizational information governance requirements. Here’s a detailed explanation of how to configure audit retention policies:
Viewing and Managing Audit Retention Policies
- Audit log retention policies can be accessed through the Audit retention policies tab, often referred to as the dashboard. This is where you can view, edit, and delete existing audit retention policies https://learn.microsoft.com/en-us/training/modules/investigate-threats-using-audit-in-microsoft-365-defender-microsoft-purview-premium/4-manage-audit-log-retention-policies .
Prerequisites for Creating Audit Retention Policies
- Users responsible for creating and modifying audit retention policies must be assigned the Organization Configuration role in the Microsoft Purview compliance portal https://learn.microsoft.com/en-us/training/modules/investigate-threats-using-audit-in-microsoft-365-defender-microsoft-purview-premium/4-manage-audit-log-retention-policies .
- An organization is limited to a maximum of 50 audit log retention policies https://learn.microsoft.com/en-us/training/modules/investigate-threats-using-audit-in-microsoft-365-defender-microsoft-purview-premium/4-manage-audit-log-retention-policies .
- To retain audit logs for more than 90 days (up to one year), the user who generates the audit log must have an Office 365 E5 or Microsoft 365 E5 license, or a Microsoft 365 E5 Compliance or E5 eDiscovery and Audit add-on license https://learn.microsoft.com/en-us/training/modules/investigate-threats-using-audit-in-microsoft-365-defender-microsoft-purview-premium/4-manage-audit-log-retention-policies .
- For retaining audit logs for 10 years, the user must also have a 10-year audit log retention add-on license in addition to an E5 license https://learn.microsoft.com/en-us/training/modules/investigate-threats-using-audit-in-microsoft-365-defender-microsoft-purview-premium/4-manage-audit-log-retention-policies .
- Custom audit log retention policies created by an organization will override the default retention policy https://learn.microsoft.com/en-us/training/modules/investigate-threats-using-audit-in-microsoft-365-defender-microsoft-purview-premium/4-manage-audit-log-retention-policies .
Creating and Managing Policies
- Organizations can create and manage audit log retention policies in the Microsoft Purview compliance portal, which is part of the Microsoft Purview Audit (Premium) solution https://learn.microsoft.com/en-us/training/modules/investigate-threats-using-audit-in-microsoft-365-defender-microsoft-purview-premium/4-manage-audit-log-retention-policies .
- Policies can be set based on various criteria, such as all activities in one or more Microsoft 365 services, specific activities by all or certain users, and a priority level to determine which policy prevails when there are multiple policies https://learn.microsoft.com/en-us/training/modules/investigate-threats-using-audit-in-microsoft-365-defender-microsoft-purview-premium/4-manage-audit-log-retention-policies .
Using PowerShell to View Policies
- The Get-UnifiedAuditLogRetentionPolicy cmdlet in the Security and Compliance PowerShell module can be used to view audit log retention policies. This cmdlet allows you to sort policies by priority but does not return the default audit log retention policy https://learn.microsoft.com/en-us/training/modules/investigate-threats-using-audit-in-microsoft-365-defender-microsoft-purview-premium/4-manage-audit-log-retention-policies .
Audit (Standard) vs. Audit (Premium)
- Audit (Premium) offers additional capabilities over Audit (Standard), including one-year and 10-year audit log retention options, as well as the ability to create audit log retention policies https://learn.microsoft.com/en-us/training/modules/investigate-threats-using-audit-in-microsoft-365-defender-microsoft-purview-standard/2-explore-microsoft-purview-audit-solutions .
For more information on configuring audit retention policies, you can refer to the official Microsoft documentation:
Please note that the URLs provided are for additional information and should be accessed for more detailed guidance on the configuration and management of audit retention policies.
Manage insider and privacy risk in Microsoft 365 (15–20%)
Implement and manage Microsoft Purview Communication Compliance
Plan for Communication Compliance
When planning for communication compliance within an organization, it is essential to consider the following key aspects:
Understand the Scope of Communication Compliance: Communication compliance is part of the Microsoft Purview suite, designed to help organizations minimize communication risks by capturing, reviewing, and taking remediation actions for inappropriate messages across various Microsoft 365 services.
Identify Regulatory Requirements: Determine the specific regulatory requirements that apply to your organization. This may include regulations related to data protection, privacy, and the monitoring of employee communications.
Define Policies and Procedures: Develop clear policies and procedures for communication compliance. This should include the types of content that are monitored, the process for reviewing flagged communications, and the steps for remediation.
Configure Communication Compliance Features: Utilize the communication compliance features available in Microsoft 365 to implement your policies. This includes setting up policies that define what to capture, specifying conditions and filters, and determining the actions to be taken when a message matches a policy.
Assign Roles and Permissions: Assign appropriate roles to team members who will be responsible for managing communication compliance. Ensure that they have the necessary permissions to access the compliance data and tools.
Train Reviewers and Users: Provide training for the individuals who will be reviewing communication compliance alerts. Additionally, educate all users about the communication compliance policies to promote awareness and adherence.
Monitor and Review Communications: Regularly monitor communications for compliance with established policies. Review flagged content promptly and take necessary actions, such as notifying users, removing content, or escalating issues.
Audit and Report: Keep detailed records of compliance monitoring activities and actions taken. Use the auditing and reporting features in Microsoft 365 to track compliance and generate reports for internal or external audits.
Stay Updated with Compliance Updates: Keep abreast of updates to Microsoft 365 compliance features and regulatory changes that may affect your communication compliance plans.
For additional information on planning and configuring communication compliance in Microsoft 365, you can refer to the following resources:
- Communication Compliance in Microsoft 365
- Manage Communication Compliance
- Communication Compliance Reports
By following these steps and utilizing the resources provided, organizations can effectively plan for communication compliance and ensure that their communication practices align with regulatory requirements and organizational policies.
Manage insider and privacy risk in Microsoft 365 (15–20%)
Implement and manage Microsoft Purview Communication Compliance
Create and Manage Communication Compliance Policies
Communication compliance policies are essential for monitoring and regulating communications within an organization to ensure they comply with regulatory standards and internal policies. Here is a detailed explanation of how to create and manage these policies:
Access the Compliance Center: Begin by navigating to the Microsoft Purview compliance portal. This is the centralized platform where you can manage various compliance-related tasks.
Navigate to Communication Compliance: Within the compliance portal, locate and select the ‘Communication compliance’ option to start working with communication compliance policies.
Create a New Policy: To create a new policy, select ‘Create’ and then choose a policy template that best fits your organization’s needs. Policy templates are pre-configured with common regulatory requirements and can be customized as needed.
Define Policy Settings: Customize the policy by defining specific settings such as:
- Users or Groups: Specify which users or groups the policy will apply to.
- Communication Types: Choose the types of communication to monitor, such as email, Microsoft Teams chats, or other platforms.
- Keywords and Conditions: Set up conditions for what to monitor, including keywords, sensitive information types, or communication patterns that may indicate non-compliance.
Review and Confirm: Before finalizing the policy, review all settings to ensure they align with your organization’s compliance requirements.
Policy Activation: Activate the policy so that it starts monitoring communications as per the defined settings.
Manage Alerts: Once the policy is active, it will generate alerts for potential violations. These alerts can be reviewed and investigated to determine if a breach has occurred.
Reporting and Auditing: Use the reporting features in the compliance portal to generate reports on communication compliance. This helps in auditing and ensuring that the organization adheres to compliance standards.
Update Policy as Needed: Over time, as regulatory requirements or organizational policies change, update the communication compliance policies accordingly to maintain compliance.
For additional information on creating and managing communication compliance policies, you can refer to the following resources:
- Create a communication compliance policy
- Manage communication compliance alerts
- Communication compliance in Microsoft 365
By following these steps and utilizing the provided resources, you can effectively create and manage communication compliance policies to help ensure that your organization’s communications are in line with legal and regulatory standards.
Manage insider and privacy risk in Microsoft 365 (15–20%)
Implement and manage Microsoft Purview Communication Compliance
Investigate and Remediate Communication Compliance Alerts and Reports
Communication compliance in Microsoft 365 helps organizations to detect, capture, and take remediation actions for inappropriate messages in the workplace. When alerts are triggered, it is crucial to investigate and address them promptly to maintain compliance and address potential risks.
Investigation Process
Alert Detection: Communication compliance policies can trigger alerts when they detect activities that match policy conditions. These alerts are surfaced in the Microsoft Purview compliance portal.
Accessing Alerts: To begin an investigation, navigate to the Microsoft Purview compliance portal and select the communication compliance option to view the alerts dashboard.
Reviewing Alerts: Examine the details of the alert, including the content that triggered the alert and the context around it. This may involve reviewing message snippets or entire conversations.
User and Device Considerations: Ensure that users subject to capturing have explicit capturing requests and approvals, and that their devices are onboarded with the Microsoft Purview client installed https://learn.microsoft.com/en-us/training/modules/m365-compliance-insider-manage-insider-risk/forensic-evidence .
Remediation Actions
Taking Action: Depending on the severity and nature of the alert, actions may include notifying the user, escalating to a manager or compliance officer, or even legal action.
Resolving Alerts: After taking appropriate action, resolve the alert in the compliance portal to indicate that it has been addressed.
Documentation and Reporting: Document the investigation and remediation actions taken for each alert. This documentation is crucial for compliance audits and future reference.
Reporting
Exporting Reports: Prepare and export detailed reports of the investigation and remediation actions. This can be done through the Microsoft Purview compliance portal by selecting the relevant content search and exporting the report https://learn.microsoft.com/en-us/training/modules/investigate-threats-with-content-search-in-microsoft-purview/5-export-search-results .
Report Contents: The exported report can include all items, indexed or unindexed, and can be configured to include de-duplication information for Exchange content https://learn.microsoft.com/en-us/training/modules/investigate-threats-with-content-search-in-microsoft-purview/5-export-search-results .
Downloading Reports: Once the report is generated, it is uploaded to an Azure Storage location in the Microsoft cloud, from where it can be downloaded for further analysis or record-keeping https://learn.microsoft.com/en-us/training/modules/investigate-threats-with-content-search-in-microsoft-purview/5-export-search-results .
Additional Resources
For more information on the investigation and remediation process, as well as detailed instructions on exporting reports, you can refer to the following resources:
- Insider Risk Management Workflow
- Export a Content Search Report
- De-duplication in eDiscovery Search Results
By following these steps and utilizing the resources provided, you can effectively investigate and remediate communication compliance alerts and reports within your organization.
Manage insider and privacy risk in Microsoft 365 (15–20%)
Implement and manage Microsoft Purview Insider Risk Management
Plan for Insider Risk Management
When planning for insider risk management, it is essential to consider the following key points:
Role Group Management: Establish a role group to manage insider risk management within your organization. This group should include all designated administrators, analysts, and investigators. By centralizing insider risk management permissions in a single group, you can streamline the process of configuring and managing insider risk policies https://learn.microsoft.com/en-us/training/modules/m365-compliance-insider-manage-insider-risk/policies .
Content Explorer Access: Utilize the Content Explorer to monitor and investigate insider risks. There are two levels of access within the Content Explorer:
- Content Explorer List Viewer: This role allows users to view items and their locations in a list format. It is pre-assigned with the data classification list viewer role https://learn.microsoft.com/en-us/training/modules/m365-compliance-insider-manage-insider-risk/actions .
- Content Explorer Content Viewer: This role enables users to view the contents of each item in the list, which is crucial when reviewing files and email messages associated with risk alerts. The data classification content viewer role is pre-assigned to this role group https://learn.microsoft.com/en-us/training/modules/m365-compliance-insider-manage-insider-risk/actions .
The Content Explorer is a robust tool that provides a snapshot of items with sensitivity labels, retention labels, or classified as sensitive information types. It features advanced search and filtering capabilities https://learn.microsoft.com/en-us/training/modules/m365-compliance-insider-manage-insider-risk/actions .
For additional information on using the Content Explorer, refer to the Insider Risk Management Content Explorer documentation https://learn.microsoft.com/en-us/training/modules/m365-compliance-insider-manage-insider-risk/actions .
Case Contributors: In the Contributors tab of an insider risk management case, risk analysts and investigators can add other reviewers. By default, users with the Insider Risk Management Analysts and Insider Risk Management Investigators roles are listed as contributors for each case. It is crucial to manage cases with proper access controls to ensure the confidentiality and integrity of the investigation https://learn.microsoft.com/en-us/training/modules/m365-compliance-insider-manage-insider-risk/actions .
Integration with Endpoint Security: Leverage integrations with security solutions like Microsoft Defender for Endpoint to forward security alerts and their triage status to the Microsoft Purview compliance portal. This integration allows for the enhancement of insider risk management policies with alerts and helps in remediating internal risks https://learn.microsoft.com/en-us/training/modules/deploy-microsoft-defender-for-endpoints-environment/8-configure-environment-advanced-features .
Policy Templates and Activity Signaling: Use policy templates with predefined conditions and comprehensive activity signaling across Microsoft 365 services. These templates provide actionable insights to identify and resolve risky behavior swiftly. The workflow for identifying and resolving internal risk activities and compliance issues is a critical component of Microsoft Purview Insider Risk Management https://learn.microsoft.com/en-us/training/modules/m365-compliance-insider-manage-insider-risk/overview .
By carefully planning and implementing these components, organizations can create a robust insider risk management framework that helps protect against internal threats and ensures compliance with relevant regulations and policies.
Manage insider and privacy risk in Microsoft 365 (15–20%)
Implement and manage Microsoft Purview Insider Risk Management
Create and Manage Insider Risk Management Policies
Insider risk management policies are crucial for identifying and mitigating potential risks within an organization. These policies help in monitoring and managing activities that could lead to data breaches or other security incidents. Here’s a detailed explanation of how to create and manage insider risk management policies:
Policy Creation
To establish an insider risk management policy, you must use the policy wizard in the Insider risk management solution within the Microsoft Purview compliance portal. The creation process involves several steps:
Select a Policy Template: Choose a pre-defined template that best fits the type of risks you want to manage.
Define Users or Groups: Specify which users or groups the policy will apply to. Optionally, you can assign higher risk scores to activities based on the location of the related content, the presence of sensitive information, and the application of sensitivity labels https://learn.microsoft.com/en-us/training/modules/m365-compliance-insider-manage-insider-risk/policies .
Enable and Select Alert Indicators: Alert indicators must be enabled under Policy Settings. These indicators will define what types of activities will trigger alerts https://learn.microsoft.com/en-us/training/modules/m365-compliance-insider-manage-insider-risk/policies .
Set the Monitoring Duration: Determine the time frame for which the policy will monitor user activities https://learn.microsoft.com/en-us/training/modules/m365-compliance-insider-manage-insider-risk/policies .
For additional guidance on creating an insider risk management policy, you can refer to the following URL: Create an insider risk management policy.
Policy Management
Managing insider risk management policies involves configuring notice templates, integrating security alerts, and utilizing policy templates for actionable insights.
Configure Notice Templates: Notice templates are used to send email notifications to employees when their activities match a policy and generate an alert. These notices can include reminders, training links, or policy information. The Notices templates dashboard allows you to view and create new notice templates https://learn.microsoft.com/en-us/training/modules/m365-compliance-insider-manage-insider-risk/actions . For more complex notifications, HTML can be used in the message body field of a notice template https://learn.microsoft.com/en-us/training/modules/m365-compliance-insider-manage-insider-risk/actions . Learn more about notice templates here: Insider risk management notices.
Integrate Security Alerts: By configuring security policy violation indicators, alerts from Defender for Endpoint can be forwarded to the insider risk management solution. This enhances the policies with additional security alerts and helps in remediating internal risks https://learn.microsoft.com/en-us/training/modules/deploy-microsoft-defender-for-endpoints-environment/8-configure-environment-advanced-features .
Utilize Policy Templates: Policy templates come with pre-defined conditions and signals for various activities across Microsoft 365 services. These templates provide actionable insights to identify and address risky behavior https://learn.microsoft.com/en-us/training/modules/m365-compliance-insider-manage-insider-risk/overview .
Additional Considerations
- Clip Capturing: Some policies may involve capturing user activities for forensic evidence. This requires explicit capturing requests and approvals, and devices must be onboarded with the Microsoft Purview client installed https://learn.microsoft.com/en-us/training/modules/m365-compliance-insider-manage-insider-risk/forensic-evidence .
By following these steps and considerations, organizations can effectively create and manage insider risk management policies to protect against internal threats. It’s important to regularly review and update these policies to adapt to new risks and compliance requirements.
Manage insider and privacy risk in Microsoft 365 (15–20%)
Implement and manage Microsoft Purview Insider Risk Management
Investigate and Remediate Insider Risk Activities, Alerts, and Reports
When addressing insider risk activities, alerts, and reports, it is crucial to have a structured approach to investigate and remediate potential threats. Here’s a detailed explanation of the process:
Investigation of Insider Risk Activities
Alerts Generation: Insider risk management policies trigger alerts when there is a potential risk activity. For instance, if an employee downloads a large number of files to a USB device, this could generate an alert https://learn.microsoft.com/en-us/credentials/certifications/resources/study-guides/sc-200 .
Alerts Review: Review the alerts generated by insider risk policies and data loss prevention (DLP) policies. This step involves assessing the severity, the employee’s risk history, and the organization’s risk guidelines https://learn.microsoft.com/en-us/training/modules/m365-compliance-insider-manage-insider-risk/actions .
Content Exploration: Utilize the Content Explorer to review the items associated with risk alerts. This tool allows authorized users to view the contents of each item, providing a snapshot of items with sensitivity labels, retention labels, or classified as sensitive information https://learn.microsoft.com/en-us/training/modules/m365-compliance-insider-manage-insider-risk/actions .
Case Escalation: Depending on the case’s severity, you may need to escalate it for a deeper investigation, potentially involving collaboration with other organizational areas https://learn.microsoft.com/en-us/training/modules/m365-compliance-insider-manage-insider-risk/actions .
Remediation of Insider Risk Activities
Policy Adjustment: Adjust insider risk management policies based on the insights gained from the investigation. This could involve modifying the criteria for alerts or the response actions https://learn.microsoft.com/en-us/credentials/certifications/resources/study-guides/sc-200 .
Endpoint Security Integration: Integrate endpoint security alerts with insider risk management policies. Microsoft Defender for Endpoint can forward alerts to the Microsoft Purview compliance portal for enhanced risk management https://learn.microsoft.com/en-us/training/modules/deploy-microsoft-defender-for-endpoints-environment/8-configure-environment-advanced-features .
DLP Policy Utilization: Use DLP policies to identify and respond to the exposure of sensitive information. Configure these policies to drive alert indicators and ensure full risk management coverage https://learn.microsoft.com/en-us/training/modules/m365-compliance-insider-manage-insider-risk/policies .
Risk Resolution: Take appropriate actions to resolve the risk, which may include notifying the involved parties, securing exposed data, or implementing additional security measures.
Additional Resources
- For more information on managing insider risk activities and using the Content Explorer, visit the Insider risk management content explorer https://learn.microsoft.com/en-us/training/modules/m365-compliance-insider-manage-insider-risk/actions .
- To understand how to configure DLP policies and test them in your organization, refer to the Test a DLP policy guide https://learn.microsoft.com/en-us/training/modules/m365-compliance-insider-manage-insider-risk/policies .
By following these steps, organizations can effectively investigate and remediate insider risk activities, ensuring that alerts and reports are addressed in a timely and efficient manner.
Manage insider and privacy risk in Microsoft 365 (15–20%)
Implement and manage Microsoft Purview Insider Risk Management
Manage Insider Risk Cases
Managing insider risk cases involves a comprehensive approach to identify, investigate, and mitigate potential risks within an organization. Microsoft Purview Insider Risk Management provides a set of tools and workflows to effectively handle such cases. Here’s a detailed explanation of the process:
Identification and Resolution Workflow
The process begins with the use of policy templates that come with pre-defined conditions, allowing for the monitoring of activities across Microsoft 365 services. These templates provide actionable insights to quickly identify risky behavior. The workflow for identifying and resolving internal risk activities includes the following steps https://learn.microsoft.com/en-us/training/modules/m365-compliance-insider-manage-insider-risk/overview :
- Create Policies: Utilize pre-configured or custom policy templates to define what constitutes risky behavior within your organization.
- Detect Risks: The system monitors for activities that match the conditions set in the policies and generates alerts.
- Investigate Alerts: Alerts are reviewed to determine if they represent actual insider risks.
- Resolve Cases: Once a risk is confirmed, appropriate actions are taken to mitigate the risk, which may include user notifications, data recovery, or legal action.
Content Explorer
The Content Explorer is a key feature in managing insider risk cases. It provides two levels of access https://learn.microsoft.com/en-us/training/modules/m365-compliance-insider-manage-insider-risk/actions :
- Content Explorer List Viewer: Allows users to see items and their locations in a list view. This role is pre-assigned to the data classification list viewer role group.
- Content Explorer Content Viewer: Allows users to view the contents of each item in the list. This role is pre-assigned to the data classification content viewer role group.
Content Explorer is instrumental in reviewing files and email messages associated with risk alerts, offering advanced search and filtering features to manage sensitive information effectively.
For more information on using the Content Explorer, refer to the Insider risk management content explorer https://learn.microsoft.com/en-us/training/modules/m365-compliance-insider-manage-insider-risk/actions .
User Activity Tab
The User Activity tab is a powerful tool for analyzing and investigating internal risks. It provides a comprehensive view of a user’s activities, including https://learn.microsoft.com/en-us/training/modules/m365-compliance-insider-manage-insider-risk/actions :
- A historical timeline of all alerts associated with the user.
- Details of each alert.
- The current risk score for the user.
- Controls to take action on the risks identified.
Escalation and Legal Review
In certain cases, additional legal review may be necessary. Insider risk management cases can be escalated to create a new eDiscovery (Premium) case for a thorough legal investigation. eDiscovery (Premium) offers an end-to-end workflow for managing legal holds, collecting and reviewing content, and managing communication with custodians involved in a case https://learn.microsoft.com/en-us/training/modules/m365-compliance-insider-manage-insider-risk/actions .
Real-World Example
A real-world example of insider risk is a case where a large auto manufacturer filed a lawsuit against former employees and a competitor for corporate espionage. This underscores the importance of having robust systems in place to manage insider risks https://learn.microsoft.com/en-us/training/modules/m365-compliance-insider-manage-insider-risk/overview .
Financial Impact and Solution
Insider threats can have significant financial impacts, with costs averaging over USD 307,000 for incidents arising from negligence and over USD 750,000 for malicious actions. Microsoft Purview Insider Risk Management leverages the Microsoft Graph and integrates with HR systems to provide real-time insights, using machine learning to identify risks that traditional methods might miss. The solution offers configurable policy templates and privacy-by-design architecture to balance employee privacy with organizational risk https://learn.microsoft.com/en-us/training/modules/m365-compliance-insider-manage-insider-risk/overview .
For further details on how insider risk management can help organizations, watch the video provided in the documentation https://learn.microsoft.com/en-us/training/modules/m365-compliance-insider-manage-insider-risk/overview .
Licensing
To utilize the insider risk management features, organizations need to have the appropriate Microsoft 365 licensing. Please review the Microsoft 365 licensing guidance for security & compliance to determine the required licenses for your organization https://learn.microsoft.com/en-us/training/modules/m365-compliance-insider-manage-insider-risk/overview .
Manage insider and privacy risk in Microsoft 365 (15–20%)
Implement and manage Microsoft Purview Insider Risk Management
Manage Forensic Evidence Settings
Managing forensic evidence settings is a critical aspect of insider risk management within Microsoft Purview. Here’s a detailed explanation of how to manage these settings:
1. Confirm Subscription and Configure Data Storage Access
Ensure that you have an active insider risk management subscription and add the domain compliancedrive.microsoft.com to your firewall allowlist to facilitate data storage access https://learn.microsoft.com/en-us/training/modules/m365-compliance-insider-manage-insider-risk/forensic-evidence .
2. Configure Supported Devices
Onboard user devices to the Microsoft Purview compliance portal. This involves installing the Microsoft Purview Client on eligible devices to enable them to capture forensic evidence https://learn.microsoft.com/en-us/training/modules/m365-compliance-insider-manage-insider-risk/forensic-evidence .
3. Configure Settings
In the Microsoft Purview compliance portal, enable forensic evidence capturing and configure the capturing parameters. This includes setting bandwidth limits and options for offline capturing to ensure that evidence is captured even when devices are not connected to the internet https://learn.microsoft.com/en-us/training/modules/m365-compliance-insider-manage-insider-risk/forensic-evidence .
4. Create a Policy
Develop forensic evidence policies that define the scope of security-related user activity to be captured. You can choose to capture either specific activities or all activities depending on the requirements of your organization https://learn.microsoft.com/en-us/training/modules/m365-compliance-insider-manage-insider-risk/forensic-evidence .
5. Define and Approve Users for Capturing
Visual capturing for specific users must be defined and approved through a dual authorization process. This ensures that capturing is conducted in a controlled manner and with proper authorization https://learn.microsoft.com/en-us/training/modules/m365-compliance-insider-manage-insider-risk/forensic-evidence .
Deletion of Forensic Evidence
Investigators with the Insider Risk Management Investigators role can delete individual clips from the captured clips list. Administrators can perform bulk deletions through the settings in the Microsoft Purview compliance portal. It is important to note that forensic evidence clips are automatically deleted 120 days after capture, but they can be exported or transferred before deletion https://learn.microsoft.com/en-us/training/modules/m365-compliance-insider-manage-insider-risk/forensic-evidence .
Workflow Differences for Forensic Evidence
The workflow for detecting, investigating, and remediating alerts that contain clip capturing follows the same basic steps as other insider risk management policies, with some differences. Explicit capturing requests and approvals are required, and devices must be onboarded with the Microsoft Purview client installed https://learn.microsoft.com/en-us/training/modules/m365-compliance-insider-manage-insider-risk/forensic-evidence .
Features of Forensic Evidence
Forensic evidence in Microsoft Purview offers features such as visual capturing of security-related user activities, customizable triggers, user-centric policy targeting, strong role-based access controls, and deep integration with insider risk management features. It also provides a trial capacity for captured clips and ensures user privacy through multiple levels of approval https://learn.microsoft.com/en-us/training/modules/m365-compliance-insider-manage-insider-risk/forensic-evidence .
Device Health Report
The Device Health Report in Microsoft Purview allows monitoring of the health and status of devices configured for forensic evidence. It provides details such as device name, status, last sync time, user name, Windows version, and client version, helping identify potential issues with devices and the Microsoft Purview Client https://learn.microsoft.com/en-us/training/modules/m365-compliance-insider-manage-insider-risk/forensic-evidence .
For additional information on managing forensic evidence settings and device health, you can visit the following URLs: - Configure forensic evidence settings - Device health report (preview)
Manage insider and privacy risk in Microsoft 365 (15–20%)
Implement and manage Microsoft Purview Insider Risk Management
Manage Notice Templates
Managing notice templates is an essential aspect of insider risk management within an organization. Notice templates are used to communicate with employees when their activities trigger a policy match and an alert is generated. These communications can range from simple reminders to more detailed messages that may include links to refresher training or corporate policy resources. Effectively managing these templates is crucial for maintaining compliance and creating a documented audit trail for employees who engage in risky activities.
Creating Notice Templates
To create a new insider risk management notice template, follow these steps:
- Navigate to the Insider risk management solution in the Microsoft Purview compliance portal.
- Select the Notice templates tab.
- Click on Create notice template to open the notice creation tool.
- Fill in the necessary information for the new notice template:
- Template name: Assign a friendly name to the notice.
- Send from: Enter the sender’s email address that will appear in the From field.
- Cc and Bcc: Optionally add users or groups to be notified.
- Subject: Write the subject line for the message.
- Message body: Compose the content of the message, which can include text or HTML.
- Select Create to save the new notice template or Cancel to exit without saving https://learn.microsoft.com/en-us/training/modules/m365-compliance-insider-manage-insider-risk/notice-templates .
Updating Notice Templates
To update an existing notice template:
- In the Microsoft Purview compliance portal, go to Insider risk management and select the Notice templates tab.
- Choose the notice template you wish to modify.
- On the notice details page, click Edit.
- Make the necessary changes to the template fields, such as the template name, sender’s email address, Cc and Bcc fields, subject line, and message body.
- Click Save to apply the updates or Cancel to exit without saving the changes https://learn.microsoft.com/en-us/training/modules/m365-compliance-insider-manage-insider-risk/notice-templates .
Deleting Notice Templates
To remove an insider risk management notice template:
- In the Microsoft Purview compliance portal, navigate to Insider risk management.
- Select the Notice templates tab.
- Choose the notice template you want to delete.
- Click the Delete icon on the toolbar.
- Confirm the deletion by selecting Yes or cancel the action by selecting Cancel https://learn.microsoft.com/en-us/training/modules/m365-compliance-insider-manage-insider-risk/notice-templates .
Notice Templates Dashboard
The Notices templates dashboard provides a centralized view of all configured notice templates. Templates are listed in reverse chronological order, with the most recent ones appearing first. This dashboard is a valuable tool for managing and reviewing the notice templates that have been created within your organization https://learn.microsoft.com/en-us/training/modules/m365-compliance-insider-manage-insider-risk/actions https://learn.microsoft.com/en-us/training/modules/m365-compliance-insider-manage-insider-risk/notice-templates .
For additional information and detailed guidance on managing notice templates, you can refer to the following resources:
- Creating, updating, and deleting notice templates
- Using HTML in the message body field of a notice template
By effectively managing notice templates, organizations can ensure that their internal compliance training programs are supported and that they maintain a clear audit trail of employee activities related to insider risks.
Manage insider and privacy risk in Microsoft 365 (15–20%)
Implement and manage Microsoft Purview Information Barriers (IBs)
Plan for Information Barriers (IBs)
Information Barriers (IBs) are policies that can be configured within Microsoft 365 to prevent communication or collaboration between certain groups of users to avoid conflicts of interest, protect sensitive information, or comply with regulatory standards. When planning for Information Barriers in your organization, consider the following steps:
Identify Regulatory Requirements and Organizational Policies: Determine the regulations and internal policies that necessitate the use of Information Barriers. This could include financial regulations, ethical walls, or internal data protection policies.
Define Segments: Segments are groups of users who share a common attribute, such as department or project team. Define segments based on the communication restrictions required by your organization’s policies.
Create Information Barrier Policies: Develop policies that define what types of interactions are allowed or blocked between segments. These policies can control sharing, communication, and collaboration activities across Microsoft 365 services.
Implement Policies in Microsoft 365: Use the Microsoft 365 compliance center to implement your Information Barrier policies. This involves configuring the policies and applying them to the appropriate segments.
Monitor and Report: Regularly monitor the effectiveness of Information Barrier policies and generate reports to ensure compliance. Adjust policies as necessary to reflect changes in organizational structure or regulatory requirements.
Educate Users: Inform users about Information Barrier policies and their impact on communication and collaboration within the organization. Provide guidance on how to work within the constraints of these policies.
Review and Update: Periodically review Information Barrier policies to ensure they remain relevant and effective. Update policies to adapt to organizational changes or evolving regulatory requirements.
For additional information on planning and configuring Information Barriers in Microsoft 365, you can refer to the following resources:
- Information barriers in Microsoft 365
- Define information barrier policies
- Information barriers in Microsoft Teams
By following these steps and utilizing the provided resources, you can effectively plan for and implement Information Barriers within your organization to ensure compliance and protect sensitive information.
Manage insider and privacy risk in Microsoft 365 (15–20%)
Implement and manage Microsoft Purview Information Barriers (IBs)
Create and Manage Information Barriers (IB) Segments and Policies
Information Barriers (IB) are restrictions that an organization can configure to prevent certain segments of users from communicating with each other. This is particularly useful in scenarios where there are regulatory or ethical walls that need to be enforced within the organization. To create and manage IB segments and policies, follow these steps:
Identify Segments: Determine the groups of users that should be restricted from communicating with each other. These groups are referred to as segments.
Define Policies: Create policies that define which segments are blocked or allowed to communicate. Each policy includes two segments: one that defines who the policy applies to (the “from” segment) and the other that defines who they are restricted from or allowed to communicate with (the “to” segment).
Apply Policies: Assign the policies to the appropriate user segments within your organization. Once applied, the policies will enforce the communication restrictions across Microsoft 365 services.
Review and Modify Policies: Regularly review the IB policies to ensure they are up to date with the organization’s requirements. Modify the policies as necessary to adapt to any changes within the organization.
For additional information on creating and managing Information Barriers in Microsoft 365, you can visit the following URLs:
To understand the basics of Information Barriers and how they work, visit the Information Barriers in Microsoft 365 documentation.
For guidance on how to define policies for Information Barriers, refer to the Define policies for Information Barriers page.
To learn about segmenting your users for Information Barriers, check out the Segment users for Information Barriers documentation.
By following these steps and utilizing the resources provided, you can effectively create and manage Information Barriers within your organization to comply with internal or regulatory requirements.
Manage insider and privacy risk in Microsoft 365 (15–20%)
Implement and manage Microsoft Purview Information Barriers (IBs)
Explanation of Configuring Teams, SharePoint, and OneDrive to Enforce Information Barriers (IBs)
Information Barriers (IBs) are policies that can be applied within an organization to restrict communication and collaboration between certain groups of users to avoid conflicts of interest, protect sensitive information, or comply with regulations. When setting up IBs for Microsoft Teams, SharePoint, and OneDrive, it is important to understand how to configure these services to enforce the barriers effectively.
Microsoft Teams
To enforce IBs in Microsoft Teams, you need to define policies that control which individuals or groups can communicate and collaborate with each other. These policies can prevent users from discovering, calling, chatting, or setting up meetings with users who are not authorized to communicate with them based on the IB policy.
- Define Information Barrier Policies: Use the Microsoft 365 compliance center to create policies that define allowed and blocked segments within your organization.
- Apply Policies to Teams: Assign the policies to users, which will automatically enforce the barriers within Microsoft Teams.
- Barrier Modes: Choose between one-way or two-way barriers. One-way barriers allow one group to communicate with another while preventing the reverse. Two-way barriers block communication in both directions.
SharePoint and OneDrive
For SharePoint Online and OneDrive for Business, IBs help control access to sites and documents by restricting which users can share and access content.
- Define Access Permissions: Set up access permissions on SharePoint sites and OneDrive accounts to align with your IB policies.
- Apply Sensitivity Labels: Use sensitivity labels to classify content and enforce protection settings based on the label.
- Barrier Modes: Configure SharePoint sites and OneDrive libraries to respect the IB policies by ensuring that only authorized users can access or share the content.
Additional Steps
- Monitor and Audit: Regularly monitor and audit the effectiveness of your IB policies to ensure they are being enforced as expected.
- Review and Update: Periodically review and update IB policies to reflect any changes in organizational structure or compliance requirements.
Additional Resources
For more detailed guidance on setting up and managing Information Barriers in Microsoft 365, you can refer to the following resources:
- Information Barriers in Microsoft Teams
- Configure Information Barriers policies
- Information Barriers in SharePoint Online
- Use sensitivity labels to protect content in Microsoft Teams, Microsoft 365 groups, and SharePoint sites
By following these steps and utilizing the provided resources, you can configure Microsoft Teams, SharePoint, and OneDrive to enforce Information Barriers effectively within your organization.
Manage insider and privacy risk in Microsoft 365 (15–20%)
Implement and manage Microsoft Purview Information Barriers (IBs)
Investigating Issues with Information Barrier (IB) Policies
When investigating issues with Information Barrier (IB) policies, it is essential to understand the tools and processes involved in managing and responding to alerts that may arise from these policies. Information Barrier policies are designed to prevent communication and collaboration between groups or individuals to avoid conflicts of interest or to protect sensitive information.
Utilizing the Insider Risk Alert Dashboard
The insider risk Alert dashboard is a critical tool for viewing and taking action on alerts generated by insider risk policies, which include Information Barrier policies. The dashboard provides a snapshot of the following:
- Alerts to Review: Displays the total number of alerts that need review and triage, including a breakdown by alert severity.
- Open Alerts Over the Past 30 Days: Shows the total number of alerts created by policy matches over the last 30 days, sorted by high, medium, and low alert severity levels.
- Average Time to Resolve Alerts: Provides statistics on the average time taken to resolve alerts of different severities, listed in hours, days, or months https://learn.microsoft.com/en-us/training/modules/m365-compliance-insider-manage-insider-risk/alerts .
Insider Risk Management Throttling
It is important to note that insider risk management uses built-in alert throttling to protect the risk investigation and review experience. This throttling helps prevent an overload of policy alerts, which could be caused by misconfigured data connectors or DLP policies. As a result, there might be a delay in displaying new alerts for a user https://learn.microsoft.com/en-us/training/modules/m365-compliance-insider-manage-insider-risk/alerts .
Investigating and Responding to Alerts
To investigate and respond to alerts generated by IB policies, you can:
- Investigate Threats: Use tools like Microsoft Defender for Office 365 to investigate threats to email, Microsoft Teams, SharePoint Online, and OneDrive https://learn.microsoft.com/en-us/credentials/certifications/resources/study-guides/sc-200 .
- Audit Log Search: Utilize the audit log search tool in the Microsoft Purview compliance portal to investigate common support issues that may be related to IB policy violations https://learn.microsoft.com/en-us/training/modules/investigate-threats-using-audit-in-microsoft-365-defender-microsoft-purview-standard/7-use-audit-log-searches-to-investigate-common-support-issues .
- Reviewing Policies: Regularly review your organization’s policies in the Microsoft 365 Defender portal to ensure they are up-to-date and effectively mitigating threats https://learn.microsoft.com/en-us/training/modules/m365-threat-remediate/configure-protect-detect .
Additional Resources
For more detailed information on managing insider risk and investigating alerts, you can refer to the following URLs:
- Insider Risk Management: Insider Risk Management in Microsoft 365
- Microsoft Defender for Office 365: Microsoft Defender for Office 365
- Audit Log Search Tool: Using the Audit Log Search Tool
- Microsoft Sentinel Incident Management: Incident Management in Microsoft Sentinel
By leveraging these tools and resources, you can effectively investigate and resolve issues related to Information Barrier policies, ensuring compliance and protecting sensitive information within your organization.
Manage insider and privacy risk in Microsoft 365 (15–20%)
Implement and manage privacy requirements by using Microsoft Priva
Configure and Maintain Privacy Risk Management
Privacy risk management is a critical aspect of protecting sensitive information within an organization. It involves the implementation of policies, controls, and technologies to mitigate the risk of unauthorized access or exposure of private data. Here’s a detailed explanation of how to configure and maintain privacy risk management:
Visual Capturing of Security-Related User Activities: Implement systems that can visually capture user activities related to security. This can help in understanding the context of user actions and identifying potential privacy risks https://learn.microsoft.com/en-us/training/modules/m365-compliance-insider-manage-insider-risk/forensic-evidence .
Customizable Triggers and Capturing Options: Set up customizable event triggers that initiate the capturing of forensic evidence. This allows organizations to tailor the capturing process to specific activities that are considered high risk for privacy https://learn.microsoft.com/en-us/training/modules/m365-compliance-insider-manage-insider-risk/forensic-evidence https://learn.microsoft.com/en-us/training/modules/m365-compliance-insider-manage-insider-risk/forensic-evidence .
User-Centric Policy Targeting: Develop policies that are centered around the user, ensuring that privacy risk management is tailored to the activities and data access patterns of individual users or user groups https://learn.microsoft.com/en-us/training/modules/m365-compliance-insider-manage-insider-risk/forensic-evidence https://learn.microsoft.com/en-us/training/modules/m365-compliance-insider-manage-insider-risk/forensic-evidence .
Strong Role-Based Access Controls (RBAC): Establish strong RBAC to ensure that only authorized personnel have access to sensitive information. This minimizes the risk of data breaches and unauthorized data exposure https://learn.microsoft.com/en-us/training/modules/m365-compliance-insider-manage-insider-risk/forensic-evidence .
Deep Integration with Insider Risk Management Features: Integrate privacy risk management with insider risk management features to provide a comprehensive approach to risk mitigation. This integration ensures that privacy risks are managed alongside other insider risks https://learn.microsoft.com/en-us/training/modules/m365-compliance-insider-manage-insider-risk/forensic-evidence https://learn.microsoft.com/en-us/training/modules/m365-compliance-insider-manage-insider-risk/forensic-evidence .
Trial Capacity for Captured Clips: Utilize the trial capacity feature to test the effectiveness of the visual capturing system. This allows organizations to evaluate the system’s performance before fully implementing it https://learn.microsoft.com/en-us/training/modules/m365-compliance-insider-manage-insider-risk/forensic-evidence .
Forensic Evidence and User Privacy: Ensure that forensic evidence collection respects user privacy by requiring multiple levels of approval before activating the capturing feature. This helps maintain user trust while protecting their privacy https://learn.microsoft.com/en-us/training/modules/m365-compliance-insider-manage-insider-risk/forensic-evidence .
Data Loss Prevention (DLP) Policies: Use DLP policies to identify and prevent the exposure of sensitive information. Configure insider risk management policies with DLP templates to drive alert indicators for sensitive information exposure https://learn.microsoft.com/en-us/training/modules/m365-compliance-insider-manage-insider-risk/policies .
Access Control for Case Management: Maintain strict access controls for case management to ensure the confidentiality and integrity of investigations. Assign users to specific roles, such as Insider Risk Management Analysts and Insider Risk Management Investigators, to control access to cases https://learn.microsoft.com/en-us/training/modules/m365-compliance-insider-manage-insider-risk/actions .
For additional information on device and configuration requirements, please refer to the device and configuration requirements section.
To learn more about configuring DLP policies for your organization, visit the Test a DLP policy topic.
By following these steps, organizations can configure and maintain a robust privacy risk management system that protects sensitive information and complies with regulatory requirements.
Manage insider and privacy risk in Microsoft 365 (15–20%)
Implement and manage privacy requirements by using Microsoft Priva
Create and Manage Privacy Risk Management Policies
Privacy Risk Management policies are essential for organizations to protect sensitive data and manage internal risks effectively. These policies are designed to monitor and respond to potential data risks within an organization. Here’s a detailed explanation of how to create and manage these policies:
Step 1: Understand the Policy Framework
Before creating Privacy Risk Management policies, it’s important to understand the framework that supports these policies. Insider risk management policies help determine which employees are in-scope and which types of risk indicators are configured for alerts https://learn.microsoft.com/en-us/training/modules/m365-compliance-insider-manage-insider-risk/overview . These policies are crucial for detecting activities that could pose a risk to the organization’s data security.
Step 2: Configure Policy Triggers and Evidence Collection
Policies can be customized with specific triggers that, when activated, collect forensic evidence to provide visual context during investigations https://learn.microsoft.com/en-us/training/modules/m365-compliance-insider-manage-insider-risk/forensic-evidence . This evidence is crucial for security teams to understand the nature of the risk and respond accordingly. The forensic evidence feature includes:
- Visual capturing of security-related user activities https://learn.microsoft.com/en-us/training/modules/m365-compliance-insider-manage-insider-risk/forensic-evidence .
- Customizable triggers and capturing options https://learn.microsoft.com/en-us/training/modules/m365-compliance-insider-manage-insider-risk/forensic-evidence .
- User-centric policy targeting https://learn.microsoft.com/en-us/training/modules/m365-compliance-insider-manage-insider-risk/forensic-evidence .
- Strong role-based access controls https://learn.microsoft.com/en-us/training/modules/m365-compliance-insider-manage-insider-risk/forensic-evidence .
Step 3: Integrate with Insider Risk Management Features
The forensic evidence feature integrates with existing insider risk management features, enhancing the overall capability to manage privacy risks https://learn.microsoft.com/en-us/training/modules/m365-compliance-insider-manage-insider-risk/forensic-evidence . This deep integration ensures that the policies work seamlessly within the broader risk management framework.
Step 4: Ensure User Privacy and Compliance
Privacy Risk Management policies include built-in user privacy protection controls. For instance, forensic evidence requires dual authorization for policy creation, ensuring that user privacy is respected and maintained https://learn.microsoft.com/en-us/training/modules/m365-compliance-insider-manage-insider-risk/forensic-evidence . Additionally, multiple levels of approval are required for activating the capturing feature, which further protects user privacy https://learn.microsoft.com/en-us/training/modules/m365-compliance-insider-manage-insider-risk/forensic-evidence .
Step 5: Create a New Policy
To create a new policy, use the policy wizard in the Insider risk management solution in the Microsoft Purview compliance portal. The policy wizard guides you through the necessary steps to configure:
- Policy template https://learn.microsoft.com/en-us/training/modules/m365-compliance-insider-manage-insider-risk/policies .
- Users or groups the policy will apply to https://learn.microsoft.com/en-us/training/modules/m365-compliance-insider-manage-insider-risk/policies .
- Alert indicators that need to be enabled under Policy Settings https://learn.microsoft.com/en-us/training/modules/m365-compliance-insider-manage-insider-risk/policies .
- Duration for monitoring https://learn.microsoft.com/en-us/training/modules/m365-compliance-insider-manage-insider-risk/policies .
For more information on creating an insider risk management policy, refer to the following resource: Create an insider risk policy https://learn.microsoft.com/en-us/training/modules/m365-compliance-insider-manage-insider-risk/policies .
Step 6: Monitor and Respond to Alerts
Once the policy is in place, it’s important to continuously monitor alerts and respond to them promptly. This proactive approach helps in preventing, detecting, and containing internal risks effectively.
Step 7: Review and Update Policies Regularly
Regularly review and update Privacy Risk Management policies to adapt to the evolving data security landscape and organizational changes. This ensures that the policies remain effective and relevant.
By following these steps, organizations can create and manage robust Privacy Risk Management policies that safeguard sensitive information and mitigate privacy risks.
Manage insider and privacy risk in Microsoft 365 (15–20%)
Implement and manage privacy requirements by using Microsoft Priva
Identify and Monitor Potential Risks Involving Personal Data
When it comes to managing and protecting personal data within an organization, identifying and monitoring potential risks is a critical component of data governance and compliance. Personal data, often referred to as sensitive information, can include financial details, social security numbers, health records, and other personally identifiable information (PII). The inadvertent or unauthorized disclosure of such data can lead to significant legal, financial, and reputational damage for an organization.
Data Loss Prevention (DLP)
Data Loss Prevention (DLP) policies are essential tools for identifying sensitive information across various locations, such as Exchange Online, SharePoint Online, OneDrive, and Microsoft Teams https://learn.microsoft.com/en-us/training/modules/respond-to-data-loss-prevention-alerts-microsoft-365/2-understand-data-loss-prevention-alerts . DLP policies help prevent the accidental sharing of sensitive information by:
- Identifying sensitive information within documents and emails, and monitoring their movement and sharing within and outside the organization.
- Automatically blocking access to documents or preventing emails containing sensitive information from being sent if they violate policy rules.
- Providing continuous monitoring of content shared through Office desktop programs like Excel, PowerPoint, and Word https://learn.microsoft.com/en-us/training/modules/respond-to-data-loss-prevention-alerts-microsoft-365/2-understand-data-loss-prevention-alerts .
Insider Risk Policies
Insider risk policies are designed to detect and respond to activities that pose a risk to the organization, especially those involving insiders such as employees or contractors https://learn.microsoft.com/en-us/credentials/certifications/resources/study-guides/sc-200 . These policies can help in:
- Investigating and responding to alerts generated by insider risk policies, which may indicate unauthorized access to or sharing of personal data.
- Discovering and managing apps that may pose a risk to personal data by using Microsoft Defender for Cloud Apps https://learn.microsoft.com/en-us/credentials/certifications/resources/study-guides/sc-200 .
Microsoft Defender for Cloud Apps
Microsoft Defender for Cloud Apps is a tool that helps identify, investigate, and remediate security risks associated with cloud applications https://learn.microsoft.com/en-us/credentials/certifications/resources/study-guides/sc-200 . It can be used to:
- Monitor and control data travel across all cloud services.
- Detect unusual behavior across cloud apps to identify ransomware, compromised users, or rogue applications.
- Assess the compliance of cloud apps and prevent data leaks to non-compliant apps https://learn.microsoft.com/en-us/credentials/certifications/resources/study-guides/sc-200 .
Insider Risk Management in Microsoft Purview
The insider risk management solution in Microsoft Purview leverages the Microsoft Graph and other security services to obtain real-time signals such as file activity, communications sentiment, and abnormal user behaviors https://learn.microsoft.com/en-us/training/modules/m365-compliance-insider-manage-insider-risk/overview . This solution helps in:
- Correlating various signals to identify hidden patterns and risks that traditional methods might miss.
- Using configurable policy templates tailored for risks such as digital IP theft and confidentiality breaches.
- Balancing employee privacy with organizational risk through a privacy-by-design architecture https://learn.microsoft.com/en-us/training/modules/m365-compliance-insider-manage-insider-risk/overview .
Additional Resources
For more information on how to implement and manage these security measures, you can refer to the following resources:
- Data Loss Prevention (DLP) in Microsoft 365
- Insider Risk Management in Microsoft Purview
- Microsoft Defender for Cloud Apps
By utilizing these tools and policies, organizations can effectively identify and monitor potential risks involving personal data, ensuring compliance with business standards and industry regulations while protecting sensitive information from unauthorized access and disclosure.
Manage insider and privacy risk in Microsoft 365 (15–20%)
Implement and manage privacy requirements by using Microsoft Priva
Evaluate and Remediate Alerts and Issues
When evaluating and remediating alerts and issues, it is crucial to have a systematic approach to manage and investigate security incidents and alerts across protected resources. Microsoft Defender for Cloud provides a purpose-driven user interface that facilitates this process. Here’s a detailed explanation of how to evaluate and remediate alerts and issues:
Investigate and Respond to Threats
- Investigate Threats:
- Begin by investigating threats to various Microsoft services such as Microsoft Teams, SharePoint Online, and OneDrive, as well as email threats using Microsoft Defender for Office 365 https://learn.microsoft.com/en-us/credentials/certifications/resources/study-guides/sc-200 .
- Alerts may be generated by data loss prevention (DLP) policies or insider risk policies, which require attention and response https://learn.microsoft.com/en-us/credentials/certifications/resources/study-guides/sc-200 .
- For example, an alert might be triggered by a legitimate user accessing a SQL Server from a compromised computer that has communicated with a crypto-mining command and control server https://learn.microsoft.com/en-us/training/modules/understand-azure-defender-cloud-workload-protection/5-understand-azure-defender-for-sql .
- Alert Details:
- Alerts include details of the incident that triggered them and recommendations on how to investigate and remediate threats https://learn.microsoft.com/en-us/training/modules/understand-azure-defender-cloud-workload-protection/5-understand-azure-defender-for-sql .
- In Defender for Cloud, you can select an alert to open a side pane that shows a description of the alert and all the affected resources https://learn.microsoft.com/en-us/training/modules/remediate-azure-defender-security-alerts/3-remediate-alerts .
- Remediate Threats:
- Take action based on the alert’s details, which may include IP addresses, files, processes, and more https://learn.microsoft.com/en-us/training/modules/remediate-azure-defender-security-alerts/3-remediate-alerts .
- Manual remediation steps are provided to mitigate the threat, alongside recommendations to prevent future attacks https://learn.microsoft.com/en-us/training/modules/remediate-azure-defender-security-alerts/3-remediate-alerts .
Automate and Manage Responses
- Automate Responses:
- Automate responses in Microsoft Defender for Cloud to streamline the remediation process https://learn.microsoft.com/en-us/training/modules/remediate-azure-defender-security-alerts/8-summary-resources .
- Trigger automated responses, such as a logic app, as a response to a security alert https://learn.microsoft.com/en-us/training/modules/remediate-azure-defender-security-alerts/3-remediate-alerts .
- Manage Alerts:
- Set up email notifications to stay informed about security alerts https://learn.microsoft.com/en-us/credentials/certifications/resources/study-guides/sc-200 .
- Create and manage alert suppression rules to filter out irrelevant alerts https://learn.microsoft.com/en-us/credentials/certifications/resources/study-guides/sc-200 .
- Design and configure workflow automation to ensure a consistent and efficient response to alerts https://learn.microsoft.com/en-us/credentials/certifications/resources/study-guides/sc-200 .
- Utilize Threat Intelligence:
- Analyze Microsoft Defender for Cloud threat intelligence reports to gain insights into potential threats and vulnerabilities https://learn.microsoft.com/en-us/credentials/certifications/resources/study-guides/sc-200 .
- Use Defender for Cloud Apps:
- Discover and manage apps using Microsoft Defender for Cloud Apps to identify and remediate security risks https://learn.microsoft.com/en-us/credentials/certifications/resources/study-guides/sc-200 .
Additional Resources
For further information on managing and remediating alerts in Microsoft Defender for Cloud, you can refer to the following resources:
- Microsoft Defender for Cloud Alerts
- Security Alert Details and Remediation Steps
- Automated Response and Alert Suppression
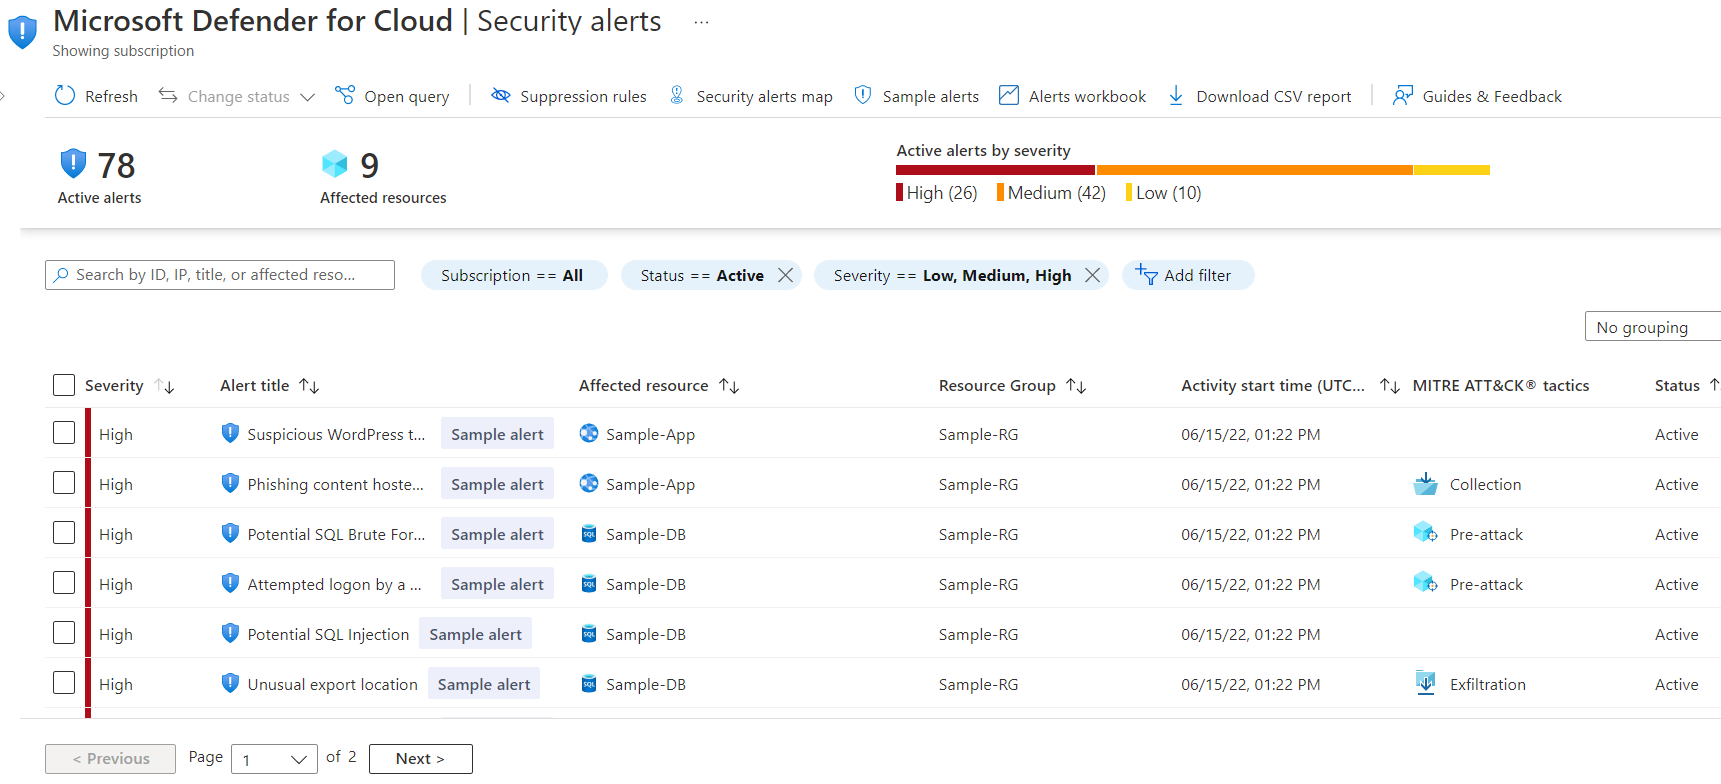
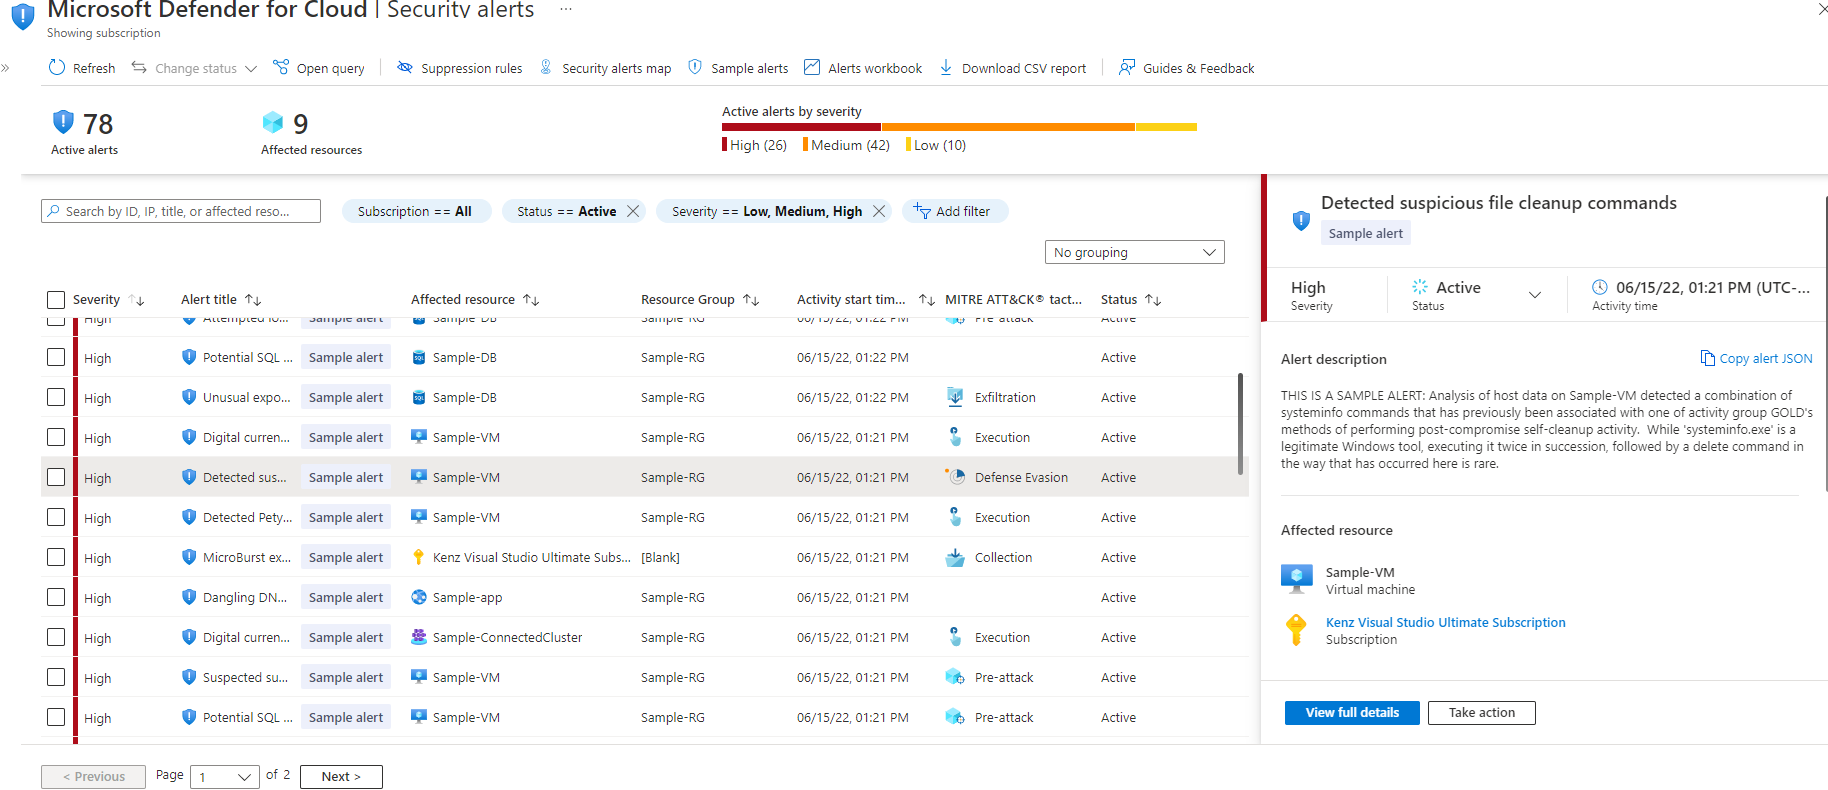
By following these steps and utilizing the available resources, you can effectively evaluate and remediate alerts and issues, ensuring the security and compliance of your organization’s resources.
Manage insider and privacy risk in Microsoft 365 (15–20%)
Implement and manage privacy requirements by using Microsoft Priva
Implement and Manage Subject Rights Requests
Subject rights requests (SRRs) are a critical component of data privacy and protection, particularly under regulations such as the General Data Protection Regulation (GDPR). Implementing and managing SRRs involves several steps to ensure that individuals can exercise their rights regarding their personal data. Here is a detailed explanation of how to handle SRRs:
Identification of Subject Rights: First, it is essential to understand the rights of individuals concerning their data. These rights typically include the right to access, correct, delete, or transfer their personal data.
Request Receipt and Verification: When a subject rights request is received, the organization must have a process in place to promptly acknowledge the request. Additionally, the identity of the requester must be verified to prevent unauthorized access to personal data.
Data Search and Retrieval: Upon verification, the organization should search for and retrieve all data related to the individual making the request. This process may involve querying databases, archives, and other data repositories.
Evaluation of Data: Evaluate the data to determine if any exemptions or legal reasons prevent fulfilling the request. For example, certain data may need to be retained for legal or regulatory reasons.
Fulfillment of Request: Depending on the request type, the organization must take appropriate action, such as providing a copy of the data, correcting inaccuracies, or deleting the data.
Documentation and Audit Trail: Maintain detailed records of the request and the actions taken in response. This documentation serves as an audit trail for compliance purposes.
Communication with the Requester: Communicate the outcome of the request to the individual, including any actions taken or reasons for denial if applicable.
Review and Update Policies: Regularly review and update policies and procedures related to SRRs to ensure ongoing compliance with data protection laws.
For additional information on subject rights requests and data protection, you can refer to the following resources:
- Azure confidential ledger https://learn.microsoft.com/en-us/azure/confidential-ledger/faq : Provides an overview of Azure’s confidential ledger, which can be used to manage and secure the ledger that may contain subject rights requests and other sensitive data.
Remember, it is crucial to stay updated with the latest data protection regulations and to implement robust systems and processes to manage subject rights requests effectively.
Manage insider and privacy risk in Microsoft 365 (15–20%)
Implement and manage privacy requirements by using Microsoft Priva
Implement and Manage Subject Rights Requests
Subject rights requests are a critical component of data privacy and protection, particularly under regulations such as the General Data Protection Regulation (GDPR). These requests allow individuals to exercise their rights over the personal data that an organization holds about them. Implementing and managing these requests effectively is essential for compliance and maintaining trust with customers.
Key Steps for Implementation:
- Identification of Data Subject Requests (DSRs):
- Establish a clear process for identifying and categorizing different types of DSRs, such as requests for access, rectification, erasure, or data portability.
- Verification of Identity:
- Implement robust methods to verify the identity of the individual making the request to prevent unauthorized access to personal data.
- Search and Retrieval of Data:
- Develop a system to search for and retrieve all relevant data associated with the individual across various data repositories.
- Fulfillment of Requests:
- Ensure that the organization can fulfill the request within the legal time frame, which is typically within one month of receipt of the request.
- Documentation and Audit Trail:
- Keep detailed records of all DSRs, including the request, actions taken, and the final outcome to maintain an audit trail for compliance purposes.
- Communication with Data Subject:
- Maintain clear and open communication with the data subject throughout the process, including confirmation of receipt of the request and notification upon completion of the request.
Tools and Resources:
- Azure Information Protection (AIP):
- Utilize AIP to classify, label, and protect documents and emails, making it easier to manage and respond to DSRs.
- Microsoft 365 Compliance Center:
- Leverage the Microsoft 365 Compliance Center to handle DSRs, including the ability to search for and export data related to an individual.
- Automated Workflows:
- Implement automated workflows to streamline the process of responding to DSRs, reducing manual effort and the potential for errors.
Additional Information:
For more detailed guidance on implementing and managing subject rights requests, the following resources may be helpful:
By following these steps and utilizing the appropriate tools, organizations can effectively manage subject rights requests, ensuring compliance with data protection regulations and reinforcing customer trust.